Install Dashboards Component
This page describes the installation process for the Oracle Utilities Analytics Warehouse (OUAW) Dashboards component on the application server.
On this page:
Prerequisites
Before you begin installing the OUAW Dashboards component, verify the following:
-
Ensure the same OS user installs the required software.
-
Ensure that all the prerequisite software (such as Java, Oracle Database Client, Oracle Fusion Middleware, Oracle Analytics Server) is installed.
-
Ensure that the Oracle Analytics Server (OAS) domain is installed and configured, and that the domain paths are available.
-
Verify that the OUAW Dashboards Component installer is available in the <TEMPDIR>/application directory on the application server.
See Perform Pre-Installation Steps for OUAW for more information.
Set Up the Dashboard Environment
-
Log in to application server.
-
Navigate to the temporary directory where the OUAW installer is downloaded. Example: <TEMPDIR/application>.
-
Set the JAVA_HOME. Example:
Copyexport JAVA_HOME=<JAVA HOME> -
Set the path to JAVA_HOME/bin. Example:
Copyexport PATH=$JAVA_HOME/bin:$PATH -
Launch the OUAW installer by running the following command:
Copyjava -jar OUA_2.8.0.0.0_generic.jar -logLevel finest
Oracle Utilities Analytics Warehouse Dashboards Installation Wizard
-
Run the Oracle Utilities Analytics Warehouse Installer. The Welcome page appears.
-
Review the available information before you begin the installation, and click Next to continue.
Note: If you are installing Oracle software on the server for the first time, provide central inventory details such as the inventory directory location and operating system group.
-
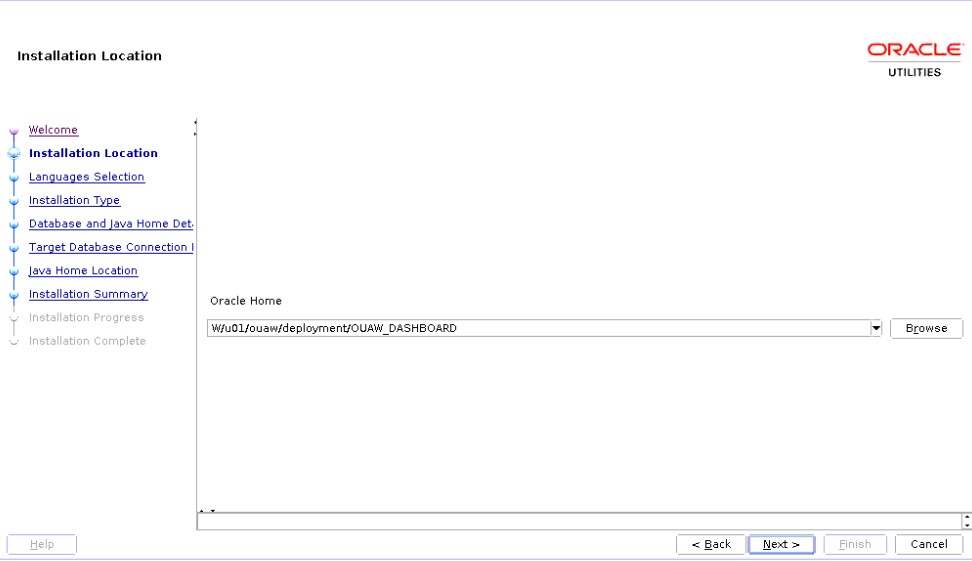
On the Installation Location page, select the installation location from the Oracle Home drop-down menu and click Next. Note: The specified Oracle home directory must be an empty directory.
Field Name and Description
Value
Oracle Home: The directory where the Oracle Utilities Analytics Warehouse Dashboards component is going to be installed.
Note: In the documentation, this directory location is referred to as Dashboards Home. Keep note of it because it will be used during some deployment steps.
Example: <Dashboards Home>
</u01/ouaw/deployment/OUAW_DASHBOARD>
-
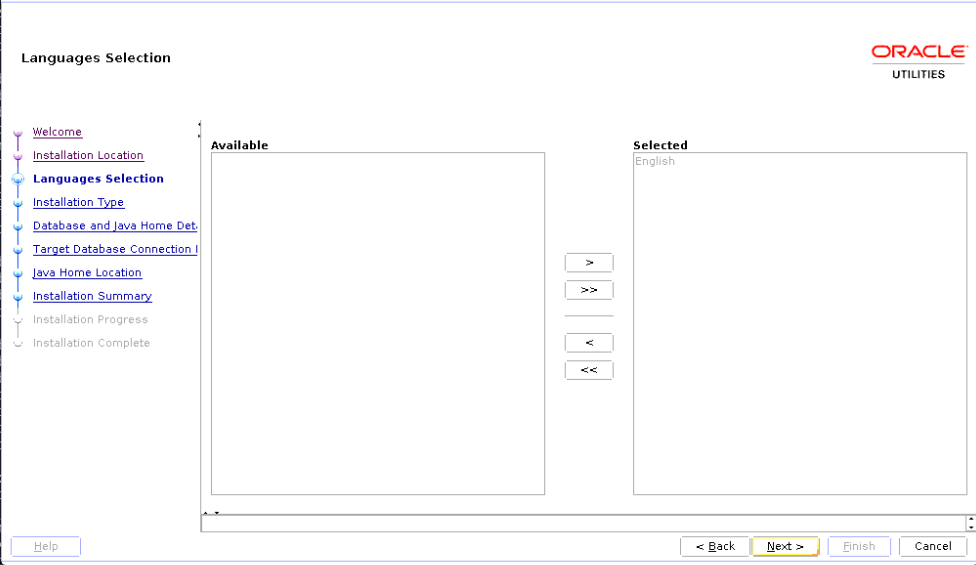
On the Language Selection page, select English and click Next.
Field Name and Description
Value
Language Selection: The language for the installation process.
English
-
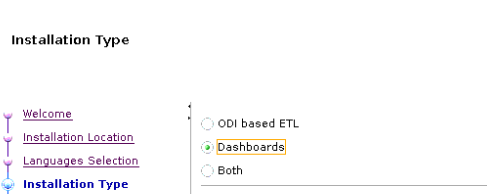
On the Installation Type page, select the Dashboards option. Based on the selected installation type, the options on the left navigation panel will change. You will need to define Database and Java Home Details, Target Database Connection Details, and OAS Home Details.
-
Click Next.
-
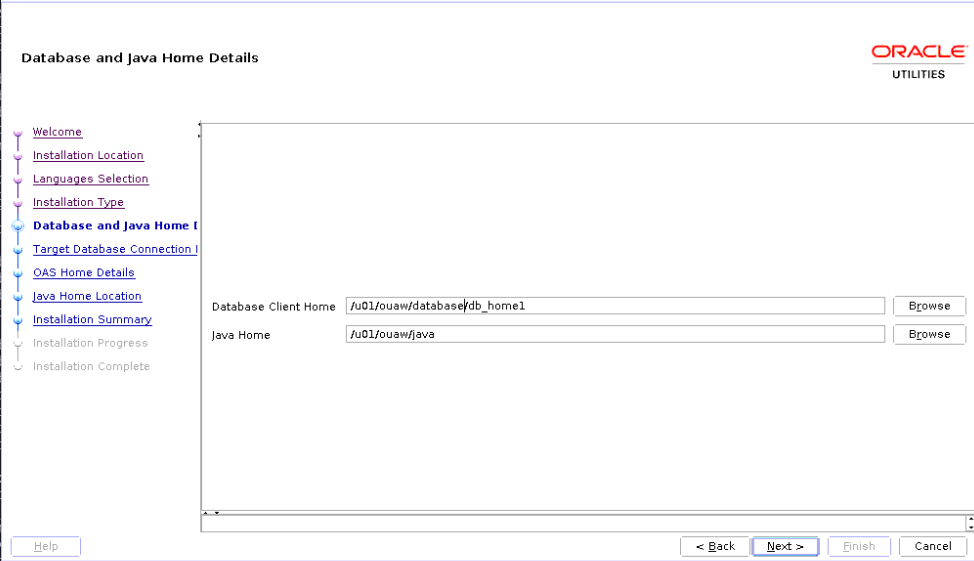
On the Database and Java Home Details page, enter the following details in the respective fields and click Next.
Field Name and Description
Value
Database Client Home: The directory where the Oracle Database Client is installed. If you are installing the Dashboard component on the same machine as the Database component, then you can use Database Home.
Example: <Database Client> or <ORACLE HOME>
</u01/ouaw/dbclient> or </u01/ouaw/database>
Java Home: The directory where Java is installed.
Example: <JAVA HOME>
</u01/ouaw/java>
-
On the Target Database Connection Details page, enter the following values in the respective fields. Verify that "tnsping Target-SERVICENAME" gives you confirmed Database Connection details, and click Next.
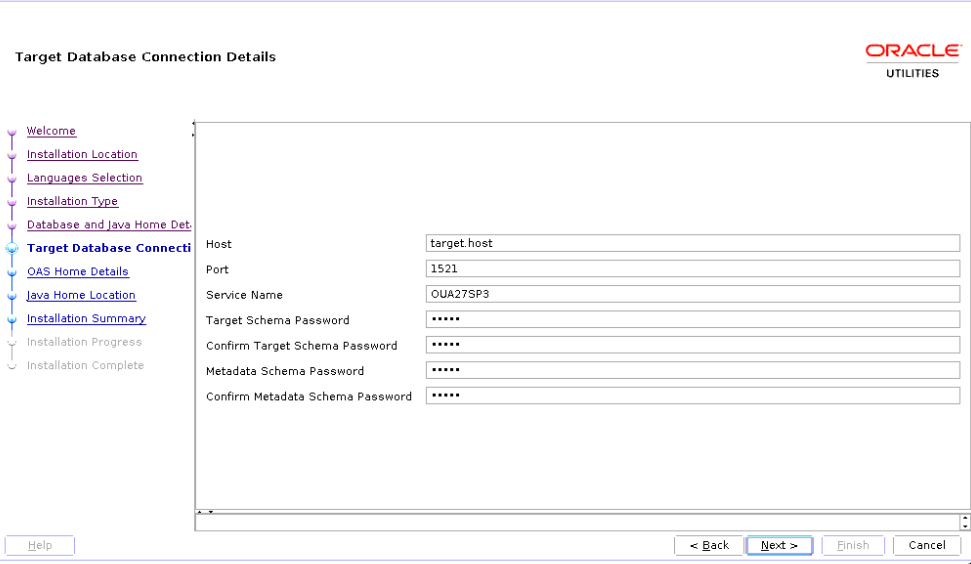
Field Name and Description
Value
Host: The target database hostname where the database resides
Target Database Server host name
Example: <dbserver.hostname>
Port: The target database port number on the database server used for connecting
Target Database port. Example: <1521>
Service Name: The target database service name
<Target Database service name>
Target Schema Password: The password for the target schema (DWADM)
<DWADM user password>
Confirm Target Schema Password: Same as the Target Schema Password
<DWADM user password>
Metadata Schema Password: The password for the metadata schema (MDADM)
<MDADM user password>
Confirm Metadata Schema Password: The same password given for metadata schema
<MDADM user password>
-
On the OAS Home Details page, enter the following details in the respective fields and click Next.
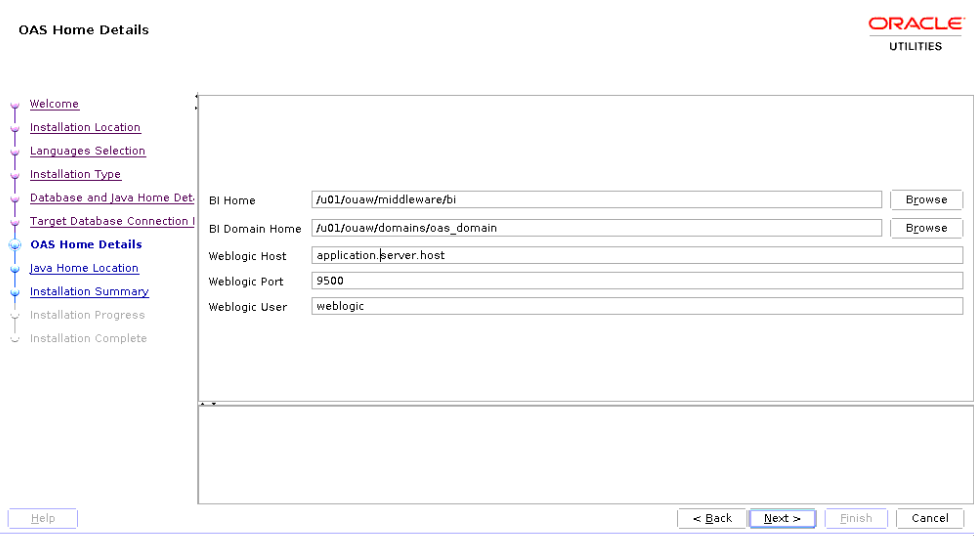
Field Name and Description
Value
BI Home: The location of the bi folder where OAS is installed on the application server.
<FMW Home>/bi
Example: </u01/ouaw/middleware/bi>
BI Domain Home: The OAS domain home location.
<OAS Domain>
Example: </u01/ouaw/domains/oas_domain>
WebLogic Host: The Application server hostname where the WebLogic server is running.
<appserver.hostname>
WebLogic Port Number: A unique port number within the system that is assigned to the HTTP port. This port number is used as part of the client URL request to connect to the host. It is the OAS WebLogic console admin port number.
<OAS weblogic Admin server port>
Example: <9500>
WebLogic User: WebLogic domain console login user name.
Example: <weblogic>
-
On the Java Home Location page, enter the proper file path and click Next.
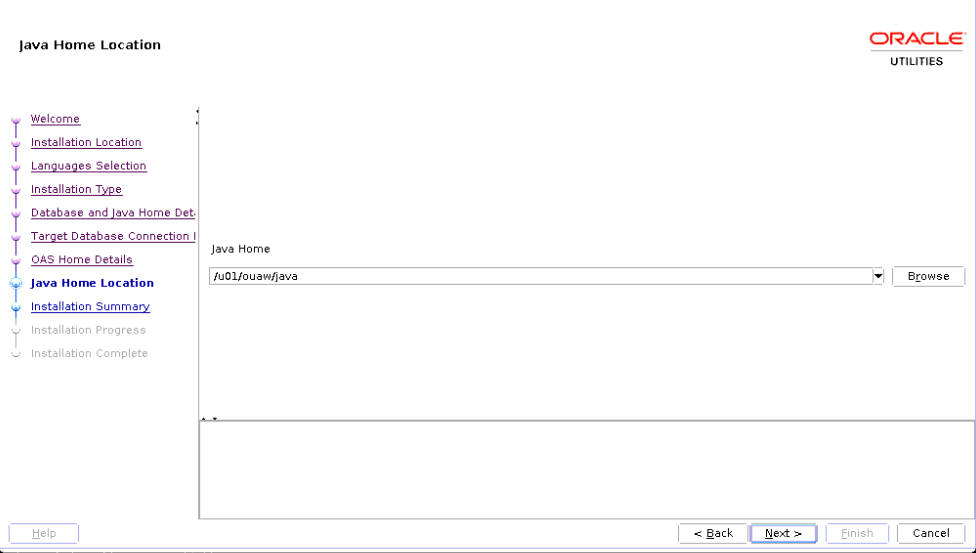
Field Name and Description
Value
Java Home: Enter the Java installed location.
Example: <JAVA HOME>
</u01/ouaw/java>
-
On the Installation Summary page, verify the installation options and click Install. For any changes to the configuration before starting the installation, use the navigation pane and select the topic to edit.
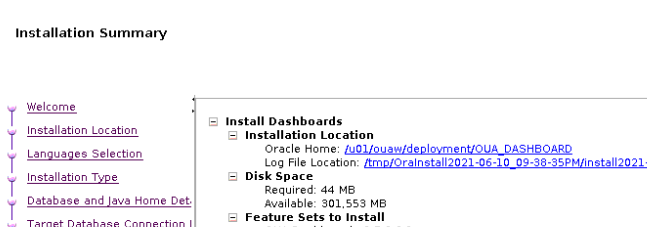
An Installation Progress page appears to track the installation. Detailed logs of the installation are available in the logs/system directory under the installation location.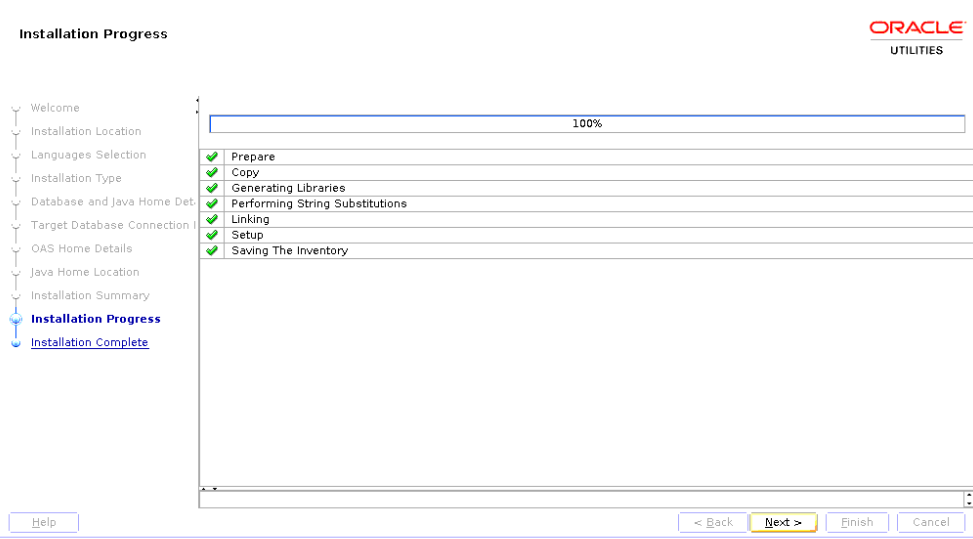
-
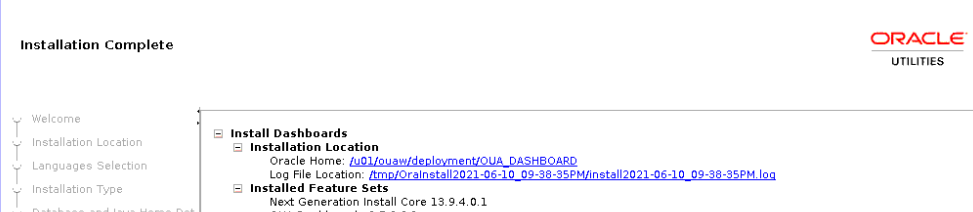
On the Installation Complete page, click Finish to close the installer.
Verify the Dashboards Installation
Review the contents of the installation log files to verify that the installer did not encounter any problems. The OUAW installer logs location will be shown in the launched terminal. Enter the following commands:
cd <Dashboards Home>;
ls
This will confirm that the Dashboards component installation was successful.
Deploy the Web Catalog
On the Oracle Analytics Server, you can deploy the latest catalogs into the environment using online mode.
-
Navigate to <OAS DOMAIN>/bitools/bin.
-
Create a new credentials file called boot.txt and add the following contents to it:
Copylogin=<OAS Weblogc admin user>
pwd=<OAS Weblogic admin password> -
For each catalog present under <Dashboards Home>/Catalog directory, run the following command from the <OAS DOMAIN HOME>/bitools/bin location. Replace all parameters enclosed in <> with actual values. Note: The inputFile parameter must be in double quotes, and the catalog filename includes spaces.
Copy./runcat.sh -cmd unarchive -folder "/shared" -online http://<OAS SERVER Host>:<OAS Managed SERVER PORT>/analytics-ws/saw.dll -credentials boot.txt -inputFile "<Dashboards Home>/Catalog/<Catalog Name>" -overwrite all
-
Deploy the 'Spatial Metadata Catalog' on the System folder. Replease all parameters enclosed in <> with actual values. Note: The inputFile parameter must be in double quotes, and the catalog filename includes spaces.
Copy./runcat.sh -cmd unarchive -folder "/system" -online http://<OAS SERVER Host>:<OAS Managed SERVER PORT>/analytics-ws/saw.dll -credentials boot.txt -inputFile "<Dashboards Home>/Catalog/Spatial Metadata.Catalog" -overwrite all
Deploy the Repository (RPD) File
-
Take the Utilities Business Analytics RPD file (UtilitiesBusinessAnalytics.rpd) backup from the OUAW Dashboards component installed location. Example: <Dashboards Home>/Reports/rpd/UtilitiesBusinessAnalytics.rpd.
-
Copy the file to the Windows machine where Oracle Analytics Client Tools 5.9.0 is installed.
-
Make sure you download Oracle Analytics Client Tools 5.9.0 from OTN and install it on the Windows machine before proceeding to the next step.
-
Click Start > Programs > Oracle Analytics Client Tools > Model Administration Tool.
-
Click File > Open > Offline... to open the RPD in offline mode.
-
Provide the RPD password. The default password is “oracle123”.
-
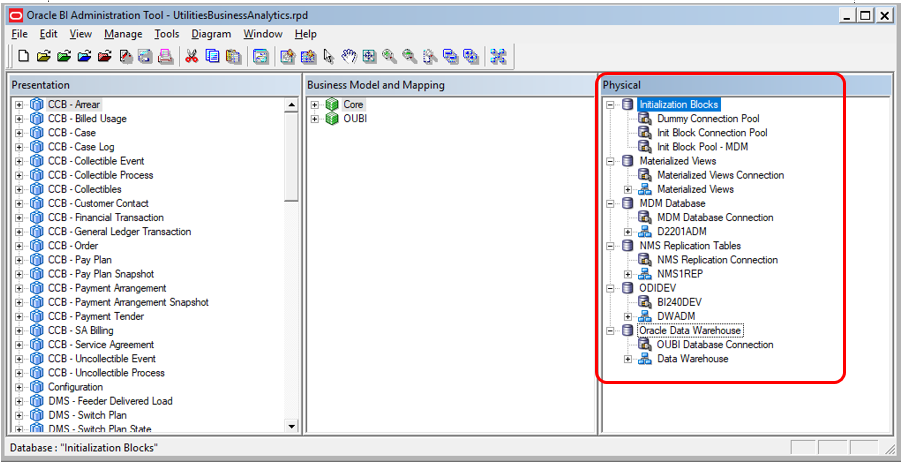
In the Oracle BI Administration tool, go to the Physical pane and expand the tree.
-
Double-click Init Block Connection Pool and enter the following:
-
Datasource name: BI Database name
-
User name: DWREAD
-
Password: DWREAD User password
-
-
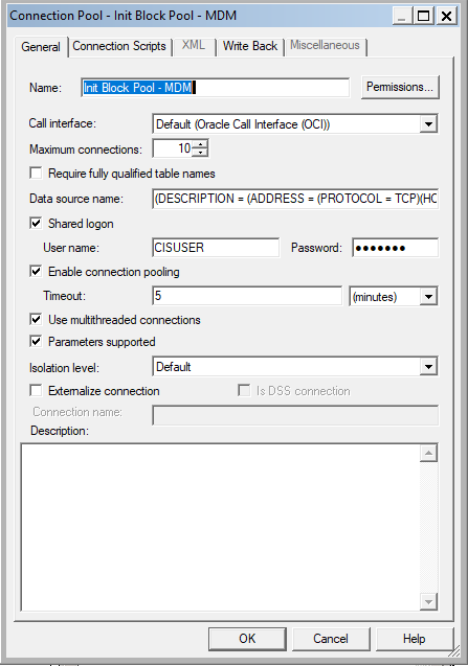
Double-click Init Block Pool - MDM and enter the following (only for Oracle Utilities Meter Data Management):
-
Datasource name: MDM database name
-
User name: CISUSER
-
Password: CISUSER User password
-
-
Double-click Materialized Views Connection and enter the following:
-
Datasource name: BI Database name
-
User name: DWREAD
-
Password: DWREAD User password
-
-
Double-click MDM Database Connection and enter the following (only for Oracle Utilities Meter Data Management):
-
Datasource name: MDM database name
-
User name: CISUSER
-
Password: CISUSER User password
-
-
Double-click NMS Replication Tables and enter the following (only for Oracle Utilities Network Management System):
-
Datasource name: BI database name
-
User name: DWREAD
-
Password: DWREAD User password

Note: The default schema name is <NMS1REP>. If the replication schema name is different, then rename it to the actual value.
-
-
Double-click ODIDEV Connection and enter the following:
-
Datasource name: BI database name
-
User name: DWUSER
-
Password: DWUSER User password
-
-
Double-click Oracle Data Warehouse OUBI Database Connection and enter the following:
-
Datasource name: BI database name
-
User name: DWREAD
-
Password: DWREAD User password
-
-
Click File and then click Save the changes. Click Yes when you see the prompt "Do you wish to check global consistency?" Ignore any warnings that appear after the consistency check is complete.
-
Copy the modified RPD back to the path: <Dashboards Home>/Reports/rpd/UtilitiesBusinessAnalytics.rpd
-
On the application server where the Oracle Analytics Server (OAS) Domain exists, navigate to <OAS DOMAIN HOME>/bitools/bin and run the following command to deploy the RPD:
-
In Unix if SSL is enabled:
Copy./datamodel.sh uploadrpd -I <Dashboards Home>/Reports/rpd/UtilitiesBusinessAnalytics.rpd -W <rpd password, default password is oracle123> -U <WebLogic user name of OAS domain> -P <WebLogic password of OAS domain> -SI ssi -SSL-TS <keystore> -TSP <keystore_password> -
In Unix if SSL is disabled:
Copy./datamodel.sh uploadrpd -I <Dashboards Home>/Reports/rpd/UtilitiesBusinessAnalytics.rpd -W <rpd password, default password is oracle123> -U <WebLogic user name of OASdomain> -P <WebLogic password of OAS domain> -SI ssi
-
-
Run the following commands from <OAS DOMAIN HOME>/bitools/bin directory to stop and start the OAS domain services respectively.
Copy./stop.sh
./start.sh
Deploy Writeback Templates
-
Log in to the application server and run the following commands to deploy writeback templates:
Copymkdir -p <FMW Home>/bi/bifoundation/web/msgdb/l_en/custommessages
cp <Dashboards Home>/writeback/wbtemplates/* <FMW Home>/bi/bifoundation/web/msgdb/l_en/custommessages/ -
Restart the Oracle Analytics Server services after deploying these writeback templates in the specified path.
Copycd <OAS DOMAIN>/bitools/bin
./stop.sh
./start.sh
Enable the Autocomplete Feature in Oracle Analytics Server
-
Log in to the Analytics application. http://<Application Server Host>:<port>/analytics
-
Click User profile icon in the top right section of the page.
-
From the drop-down menu, select My Account.
-
On the Preferences tab, set Prompt AutoComplete to ON.
-
Click OK.
Configure the MapViewer
Configuring and deploying the MapViewer on the application server involves two tasks: configuring the data source for the MapViewer, and modifying the instanceconfig.xml file.
Configure the Data Source for the MapViewer
-
Log in to the WebLogic admin console.
-
To create the 'MAP_DS' data source, click Lock and edit on the change center.
-
Navigate to Services > Data Sources.
-
Click New > Generic Data Source.
-
Enter the following details and click Next.
-
Name: MAP_DS
-
JNDI Name: MAP_DS
-
Database Type: Oracle
-
-
Select the following and click Next.
-
Database Driver: *Oracle’s Driver (Thin) for Service connections; Versions:Any
-
-
On the next page, do not change any values. Click Next.
-
Enter the following connection properties and click Next.
-
Database Name: BI Database Name
-
Host Name: Database host
-
Port: Database port
-
Database User Name: dwadm
-
Password: dwadm user password
-
-
On the next page, click Test Configuration. After a successful test, click Next.
-
On the Select Target page, select AdminServer under Servers, and bi_cluster under Clusters. Click Finish to save the configuration.
-
Click Activate Changes on the change center.
Configure MapViewer for OUAW
To work with OUAW Analytics, there are a few changes that need to be made in the mapViewerConfig file. The file is located in <OAS DOMAIN>/config/fmwconfig/mapviewer/conf. Ensure you take a backup before updating it.
Note: Skip this task on AIX platforms. The Mapviewer URL is not supported in AIX environments.
To update the MapViewer configuration from the MapViewer Admin Console:
-
Log in to MapViewer http://<Server>:<port>/mapviewer
-
Navigate to MapViewer > Administration > Configuration. This section enables you to edit mapViewerConfig.xml file. If the customer environment runs behind the proxy, then on the application server, insert the list of host names for all the third-party service providers in the security_config node.
Copy<proxy_enabled_hosts>elocation.oracle.com</proxy_enabled_hosts> -
Add the following ns_data_provider node:
Copy<ns_data_provider id="obieeNsdp" class="com.oracle.utilities.birdseye.BirdseyeNSDP" /> -
Add the current map_tile_server with the following map_tile_server node:
Copy<map_tile_server><tile_storage default_root_path="/mytilecache/"/></map_tile_server> -
Add the below map data source code in the mapViewerConfig.xml with the appropriate values as Database server details:
Copy<map_data_source name="mapconn"
jdbc_host="<DB server name>"
jdbc_sid="//<DB Service name>"
jdbc_port="1521"
jdbc_user="DWADM"
jdbc_password="!<DWADM user password>"
jdbc_mode="thin"
number_of_mappers="32"
allow_jdbc_theme_based_foi="true"/>
Modify Instanceconfig.xml
Ensure you take a backup before updating the instanceconfig.xml file.
Perform the following changes to the instanceconfig.xml file for Oracle Analytics Server 5.9:
-
Run the proper command in UNIX to go to the directory containing the instanceconfig.xml file. The path will have a pattern similar to <OAS DOMAIN>/config/fmwconfig/biconfig/OBIPS. Example:
Copycd </u01/ouaw/domains/oas_domain/config/fmwconfig/biconfig/OBIPS> -
Make the following changes to the instanceconfig.xml file:
-
Update the security node with the following values. If the security node is not present, add the following XML stanzas before the </Serverinstance> ending tag:
Copy<Security>
<ClientSessionExpireMinutes>210</ClientSessionExpireMinutes>
<HttpOnlyCookies>false</HttpOnlyCookies>
<CookieDomain />
<CookiePath>/</CookiePath>
</Security> -
Update the following <ServerInstance> element:
Copy<LightWriteback>true</LightWriteback> -
Add the following code between the <ServerInstance></ServerInstance> tags.
Copy<Prompts>
<MaxDropDownValues>256</MaxDropDownValues>
<AutoApplyDashboardPromptValues>true</AutoApplyDashboardPromptValues>
<AutoSearchPromptDialogBox>true</AutoSearchPromptDialogBox>
<AutoCompletePromptDropDowns>
<SupportAutoComplete>true</SupportAutoComplete>
<CaseInsensitive>true</CaseInsensitive>
<MatchingLevel>MatchAll</MatchingLevel>
<ResultsLimit>50</ResultsLimit>
</AutoCompletePromptDropDowns>
</Prompts>
<SpatialMaps>
<MapViewerAPIV2Enabled>false</MapViewerAPIV2Enabled>
</SpatialMaps>
-
Perform the following changes to the instanceconfig.xml file for Oracle Analytics Server 6.4:
Remove <ServerInstance/> tag from the instanceconfig.xml file, and add the following XML stanzas before </WebConfig>:
<ServerInstance>
<LightWriteback>true</LightWriteback>
<Security>
<HttpOnlyCookies>false</HttpOnlyCookies>
<CookieDomain/>
<CookiePath>/</CookiePath>
</Security>
<Prompts>
  <MaxDropDownValues>256</MaxDropDownValues>
  <AutoApplyDashboardPromptValues>true</AutoApplyDashboardPromptValues>
  <AutoSearchPromptDialogBox>true</AutoSearchPromptDialogBox>
  <AutoCompletePromptDropDowns>
    <SupportAutoComplete>true</SupportAutoComplete>
    <CaseInsensitive>true</CaseInsensitive>
    <MatchingLevel>MatchAll</MatchingLevel>
    <ResultsLimit>50</ResultsLimit>
  </AutoCompletePromptDropDowns>
 </Prompts>
<SpatialMaps>
 <MapViewerAPIV2Enabled>false</MapViewerAPIV2Enabled>
</SpatialMaps>
</ServerInstance>For example, after updating the above configuration, the instanceconfig.xml file should look like below:
<WebConfig xmlns="oracle.bi.presentation.services/config/v1.1">
<ServerInstance>
 <LightWriteback>true</LightWriteback>
 <Security>
  <HttpOnlyCookies>false</HttpOnlyCookies>
  <CookieDomain/>
  <CookiePath>/</CookiePath>
 </Security>
 <Prompts>
  <MaxDropDownValues>256</MaxDropDownValues>
  <AutoApplyDashboardPromptValues>true</AutoApplyDashboardPromptValues>
  <AutoSearchPromptDialogBox>true</AutoSearchPromptDialogBox>
  <AutoCompletePromptDropDowns>
   <SupportAutoComplete>true</SupportAutoComplete>
   <CaseInsensitive>true</CaseInsensitive>
   <MatchingLevel>MatchAll</MatchingLevel>
   <ResultsLimit>50</ResultsLimit>
  </AutoCompletePromptDropDowns>
 </Prompts>
 <SpatialMaps>
  <MapViewerAPIV2Enabled>false</MapViewerAPIV2Enabled>
 </SpatialMaps>
</ServerInstance>
</WebConfig>Enable WriteBack
-
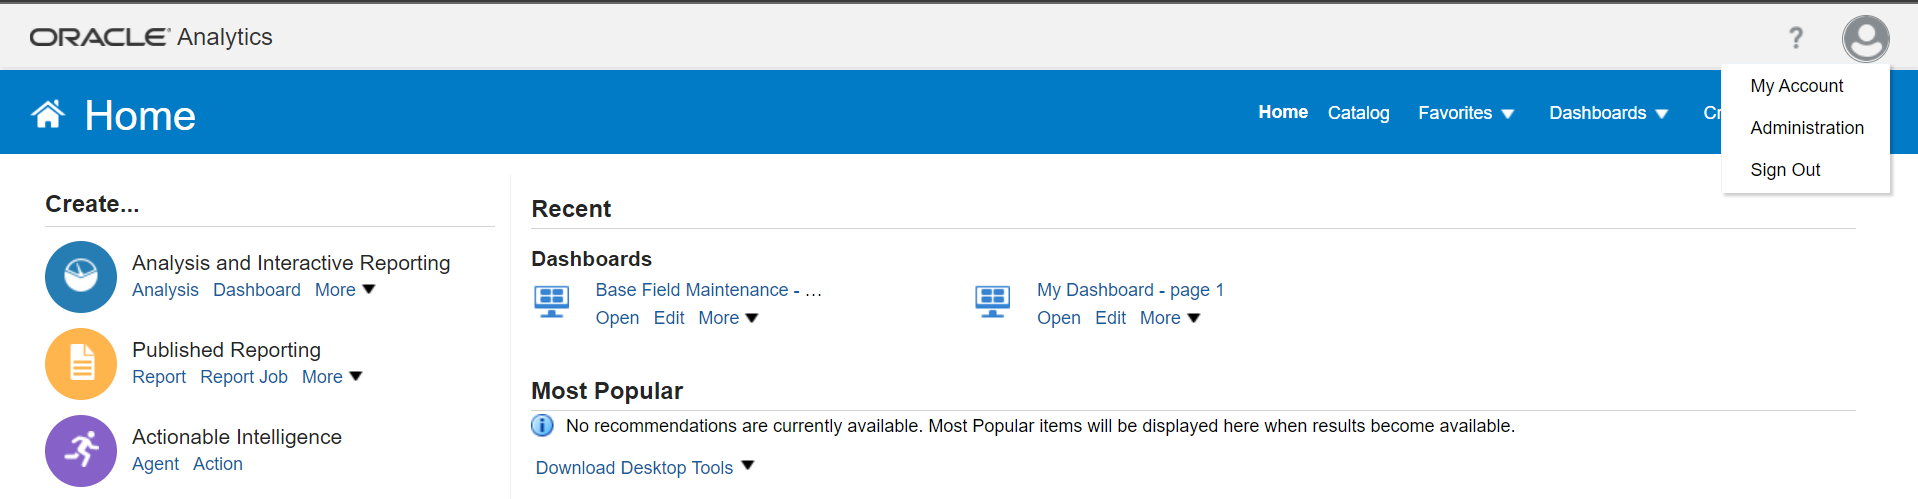
Log in to the Analytics application: http://<applicationserver.host>:<port>/analytics.
-
Click the profile icon in the top right corner of the screen, and click Administration.
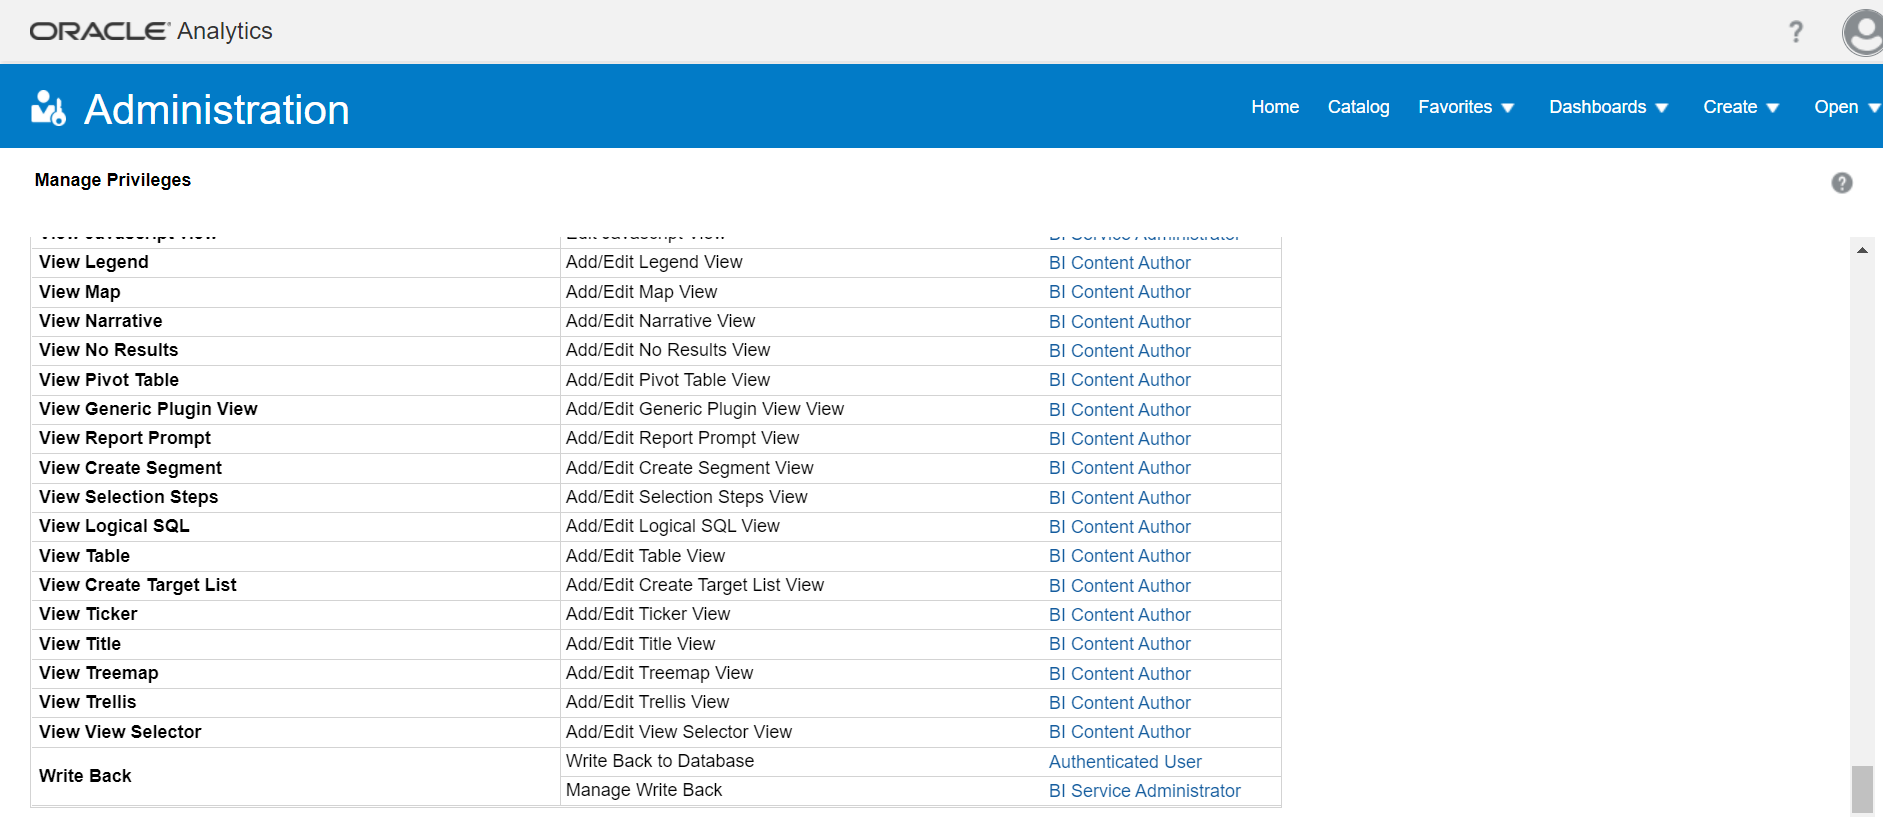
-
In the Administration screen, under the Security area, click Manage Privileges.

-
In the Manage Privileges area, in the Write Back > Write Back to Database row, click Authenticated User.
-
In the dialog box that displays, click the menu in the Permissions column and select Granted.
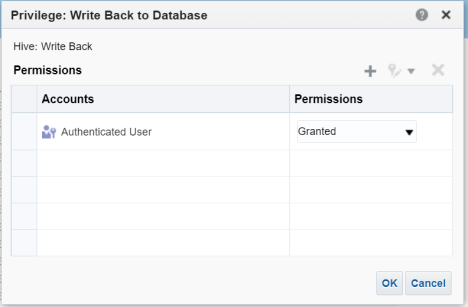
-
Click OK.