Upgrade OUAW Components
This page details how to upgrade the database, ETL, admin tool, and dashboard components for Oracle Utilities Analytics Warehouse v2.8.0.0.
On this page:
Upgrade the Database Component
This section details the steps to upgrade the Oracle Utilities Analytics Warehouse database component.
Copy and Decompress the Install Media
-
Download Oracle Utilities Analytics v2.8.0.0 Oracle Database part file (Oracle Utilities Analytics v2.8.0.0 Oracle Database Multiplatform.zip) from Oracle Software Delivery Cloud onto the target database server.
-
Create a temporary directory (example: </OUA/temp> for a Linux machine). This directory (referred to as <TEMPDIR> below) must be located outside any current working Oracle Utilities application environment. All files that are placed in this directory as a part of the installation can be deleted after completing a successful installation.
-
Unzip Oracle Utilities Analytics v2.8.0.0 Oracle Database Multiplatform.zip to <TEMPDIR> using any zip utility.
-
Execute the SQL below before installing the RELADM, MDADM, and DWADM Schemas. This provides the required permissions to the users created.
Copy
Usersgrants.sql in <TEMPDIR>/BI2800/Scripts/Usersgrants.sql
Install the RELADM Schema
-
Log in to the target database server.
-
Navigate to the temporary directory into which the Oracle Utilities Analytics Warehouse v2.8.0.0 Oracle Database Multiplatform zip file was extracted.
Copy
cd database/BI2800/RELADM/Install-Upgrade - Review Storage.xml to ensure the RELADM user has quota on the mentioned tablespace in file. If not, edit the file with correct tablespace name.
- Add JAVA_HOME/bin to the PATH variable.
-
Set CLASSPATH pointing to the location where OraDBI.jar and all dependency jars exist.
Copy
export CLASSPATH=<TEMPDIR>/BI2800/RELADM/Jarfiles/* -
Execute the command below. Once complete, the utility creates the RELADM schema and system data definitions.
Copy
java com.oracle.ouaf.oem.install.OraDBI -d jdbc:oracle:thin:@<DATABASE SERVER>:<DATABASE PORT>/<ORACLE SERVICENAME>,RELADM,<Password of RELADM User>,,,,,RELADM -l 1,2 -o -q trueNote: If an error occurs while executing a SQL or another utility, it logs and displays the error message and allows you to re-execute the current step.
-
To generate database statistics after connecting to sys user, run the statement below:
Copy
exec DBMS_STATS.GATHER_SCHEMA_STATS('RELADM')
Install the MDADM Schema
-
Log in to the target database server.
-
Navigate to the temporary directory into which the Oracle Utilities Analytics Warehouse v2.8.0.0 Oracle Database Multiplatform zip file was extracted.
Copy
cd database/BI2800/MDADM/Install-Upgrade - Review Storage.xml to ensure the MDAM user has quota on the mentioned tablespace in file. If not, edit the file with correct tablespace name.
-
Add JAVA_HOME/bin to the PATH variable.
-
Set CLASSPATH pointing to the location where OraDBI.jar and all dependency jars exist.
Copy
export CLASSPATH=<TEMPDIR>/BI2800/MDADM/Jarfiles/* -
Execute the command below. When completed, the utility creates the MDADM schema and system data definitions.
Copy
java com.oracle.ouaf.oem.install.OraDBI -d jdbc:oracle:thin:@<DATABASE SERVER>:<DATABASE PORT>/<ORACLE SERVICENAME>,MDADM,<Password of MDADM User>,,,,,MDADM -l 1,2 -o -q true -
To generate database statistics after connecting to sys user, run the statement below:
Copy
exec DBMS_STATS.GATHER_SCHEMA_STATS('MDADM');
Note: If an error occurs while executing a SQL or another utility, it logs and displays the error message and allows you to re-execute the current step.
Install the DWADM Schema
-
Log in to the target database server.
- Navigate to the temporary directory into which the Oracle Utilities Analytics Warehouse v2.8.0.0 Oracle Database Multiplatform.zip file was extracted.
Copy
cd database/BI2800/DWADM/Install-Upgrade -
Review Storage.xml to ensure the DWADM user has quota on mentioned tablespace in file. If not, edit the file with correct tablespace name.
-
Add JAVA_HOME/bin to the PATH variable.
-
Set CLASSPATH pointing to the location where OraDBI.jar and all dependency jars exist.
Copyexport CLASSPATH=<TEMPDIR>/BI2800/DWADM/Jarfiles/* -
Execute the command below. When completed, the utility creates the DWADM schema and system data definitions.
Copy
java com.oracle.ouaf.oem.install.OraDBI -d jdbc:oracle:thin:@<DATABASE SERVER>:<DATABASE PORT>/<ORACLE SERVICENAME>,DWADM,<Password of DWADM User>,DWUSER,DWREAD,DW_USER,DW_READ,DWADM -p <Password of DWUSER>,<Password of DWREAD> -l 1,2 -o -q trueNote: If an error occurs while executing a SQL or another utility, it logs and displays the error message, allowing you to re-execute the current step.
-
To generate database statistics after connecting to sys user, run the statement below:
Copy
exec DBMS_STATS.GATHER_SCHEMA_STATS('DWADM');
Upgrade the ETL Component
Prerequisites
Before installing the OUAW ETL component, verify the following:
-
Ensure latest Java version (Example: 1.8.291) is installed on the application server.
-
Ensure Oracle Fusion Middleware Infrastructure 12.2.1.4 installation and patch no# 30657796 is applied on the target application server.
-
Ensure Oracle Data Integrator (ODI) 12.2.1.4 and patch no# 31510501 are applied on the target application server.
-
Ensure ODI domain admin and managed servers are in stopped state.
-
Purge all the ODI operator logs.
Install the OUAW ETL Component
-
Log in to the application server.
-
Navigate to the temporary directory where OUAW installer is downloaded.
Example: <TEMPDIR/application>.
-
Set the JAVA HOME and add PATH.
Copy
export JAVA_HOME=<JAVA HOME>
export PATH=$JAVA_HOME/bin:$PATH -
Launch the OUAW installer by running the command below. The OUAW installer Welcomepage appears.
Copyjava -jar OUA_2.8.0.0.0_generic.jar -logLevel finest -
Review the information before you begin the installation. Click Next to continue.
-
On the Installation Location page, define the installation location in the Oracle Home field and click Next.
Note: The specified Oracle home directory must be an empty directory.

Field Name and Description
Value
Oracle Home: The directory where the Oracle Utilities Analytics Warehouse ETL is going to be installed.
Note: This directory location is called the ETL Home. Keep track of it, as it will be used during some deployment steps.
Example: <ETL Home>
</u01/ouaw/deployment/OUA_ETL>
-
On the Languages Selection page, select English and click Next.

Field Name and Description
Value
Language Selection: The language for the installation process.
English
-
On the Installation Type page, select ODI basedETL and click Next.
Note: Based on the selected installation type, the options on the left navigation panel change.

Field Name and Description
Value
Installation Type: Select ODI based ETL.
ODI based ETL
-
On the Database and Java Home Details page, enter the following and click Next.

Field Name and Description
Value
Database Client Home: Enter the Oracle Database Client installed location.
Note: In case the same server is being used for both the application and the database, enter the Database Home location.
Example: <Database Client> or <ORACLE_HOME>
</u01/ouaw/dbclient> or </u01/ouaw/database>
Java Home: Enter the location used for the Java install.
Example: <JAVA HOME>
</u01/ouaw/java>
-
On the Target Database Connection Details page, populate the fields as detailed in the table below, and click Next.

Field Name and Description
Value
Host: The target database server where database resides.
Target Database server host name.
<dbserver.hostname>
Port: The target database server port number.
Target Database port.
Example: <1521>
Service Name: The target database service name.
<Database service name>
Target Schema Password: Password for the target schema (DWADM).
<DWADM user password>
Confirm Target Schema Password: Confirm password for the target schema (DWADM).
<DWADM user password>
Target Schema Password: Password for the metadata schema (MDADM).
<MDADM user password>
Confirm Target Schema Password: Confirm password for the metadata (MDADM) schema.
<MDADM user password>
-
On the ODI Home and Schema Details page, populate the fields as detailed in the table below, and click Next.

Field Name and Description
Value
ODI Home: The directory where Oracle Data Integrator (ODI) is installed.
Location of new FMW Home
Example: </u01/ouaw/middleware>
Supervisor User: Name of the Oracle Data Integrator Supervisor.
SUPERVISOR
Supervisor Password: Enter the Supervisor Password and store it for future reference.
<Supervisor user password >
Confirm Supervisor Password: Enter same as Supervisor Password.
<Supervisor user password >
Master Repository Schema Name: Oracle Data Integrator master repository schema name.
OUA_MASTER
Master Repository Schema Password: Master Repository schema password.
<OUA_MASTER user password>
Confirm Master Repository Schema Password: Confirm password of the Oracle Data Integrator master repository schema.
<OUA_MASTER user password>
Work Repository Schema Name: Oracle Data Integrator work repository schema name.
OUA_WORK
Work Repository Schema Password: Work Repository schema password.
<OUA_WORK user password>
Confirm Work Repository Schema Password: Confirm password of Oracle Data Integrator work repository schema.
<OUA_WORK user password>
-
On the Oracle Data Integrator Agent and Repository Details page, populate the fields as detailed in the table below, and click Next.

Field Name and Description
Value
ODI Agent Host: The application server hostname where the ODI application server is installed.
Example:
<appserver.hostname>
ODI Agent Port: Enter the port which is the Oracle Data Integrator WebLogic Managed Server port. Make sure that you use the same port while creating Oracle Data Integrator managed server.
Example: <11002>
-
On the Target GoldenGate Details page, populate the fields as detailed in the table below, and click Next.

Field Name and Description
Value
GoldenGate Host: Enter the Target database hostname where GoldenGate is installed.
Target database server host name
Example: <dbserver.hostname>
GoldenGate Home: Enter the GoldenGate installed location.
Example: <GoldenGate Home.>
Target Database Home: Enter the target database installed location.
Example: <ORACLE HOME>
GoldenGate Manager Port: The Oracle GoldenGate Manager port which is running on the database server host.
<The default value is 7830>
GoldenGate Algorithm: The algorithm configured in Oracle GoldenGate on the target database server
The default value is "BLOWFISH".
GoldenGate Encryptkey: The Encrypt Key configured in Oracle GoldenGate on the target database server.
The default value is “DEFAULT”
GoldenGate Shared Secret: Shared secret key configured in Oracle GoldenGate on the target database server.
Go to the Oracle GoldenGate prompt and run the command:
encrypt password <password of MDADM user>, encryptkey DEFAULT
Provide the result of the above command as the value.
-
On the Target JAgent Details page, populate the fields as detailed in the table below and click Next.

Field Name and Description
Value
JAgent Host: Enter the Target database hostname where GoldenGate JAgent is configured.
The target database server host name
Example: <dbserver.hostname>
JAgent GoldenGate Home: Enter the target database server GoldenGate Home installed location.
Example: <GoldenGate Home>
JAgent Port: Use the JAgent RMI port defined in the config properties file.
Example: <5557>
JAgent User: Enter the OS user that installed the JAgent.
Example: <oracle>
JAgent Wallet Password: Enter the JAgent Wallet password which was generated in the above steps.
<JAGENT Wallet password>
Confirm JAgent Wallet Password: Enter the same password as above.
<JAGENT Wallet password>
-
On the Java Home Location page, populate the fields as detailed in the table below and click Next.

Field Name and Description
Value
Java Home: Enter the Java installed location (on the Application server).
Example: </u01/ouaw/java>
-
On the Installation Summary page, a summary is displayed. Click the Installbutton to proceed.

An Installation Progress page displays to track the installation.

- On the Installation Complete page, note the displayed details and click Finish to close the installer wizard. The ETL is now installed.
Upgrade the Administration Tool Component
Prerequisites
To remove the previously created Apex workspace from the database:
-
Connect to the target database as SYSTEM user.
Copy
export ORACLE_HOME=<ORACLE_HOME>
export ORACLE_SID=<DATABASE SERVICE NAME>
export PATH=$ORACLE_HOME/bin:$PATH
sqlplus system/<system user password>@<DATABASE SERVICE NAME>
-
Run the following PL/SQL procedure.
Copy
BEGIN
APEX_INSTANCE_ADMIN.REMOVE_WORKSPACE('OBIU_ADM');
END;
/
-
Make sure no workspace with “OBIU” exists in the database.
Copy
select WORKSPACE from APEX_WORKSPACES where WORKSPACE like '%OBIU%';Note: No rows should be returned from this query.
-
Remove ords.war and i.war apps from APEX WebLogic console.
- Log in to APEX WebLogic console.
- Navigate to Deployments > Control.
- Click Stop and select Force Stop Now.
- Click Yes.
- On the Configuration tab, click Lock and Edit.
- Under Deployments, select both i and ords.
- Click Delete.
- Confirm the deletion and click Activate Changes.
-
Uninstall the existing ords.war from the database by navigating to ords unzip location on the application server and executing the commands below.
Copy
cd </u01>/<ords>
export JAVA_HOME=<JAVA HOME>
export PATH=$JAVA_HOME/bin:$PATH
java -jar ords.war uninstall
Note: Provide the necessary inputs for this command, and use JDK1.8 to run it.
-
Download Apex 21.1 from Oracle and place it under a temporary directory in both the OUAW database and application servers.
Example: </u01/temp> -
Download ORDS 21.1.3 from Oracle and place it under a temporary directory in the application server.
Example: </u01/temp> -
Download the Admin tool (Oracle Utilities Analytics v2.8.0.0.0 Multiplatform.zip) file from the edelivery and place it under a temporary directory in the OUAW database server.
Example: </u01/temp>
Admin Tool Installation Steps
-
Log in to the target database server and navigate to the Apex extracted directory.
Example: cd </u01/ouaw/apex> -
Connect to the Oracle Utilities Analytics Warehouse Database with sys user and execute the following commands in order:
Copy
export ORACLE_HOME=<ORACLE_HOME>
export ORACLE_SID=<DATABASE SERVICE NAME>
export PATH=$ORACLE_HOME/bin:$PATH
sqlplus sys/<sys user password>@<database service name> as sysdba
@apxrtins.sql <Tablespace name> <Tablespace name> <Temp Tablespace name> /i/
Example:
@apxrtins.sql <CISTS_01> <CISTS_01> <TEMP> /i/
Copy@apxchpwd.sql -
Run the following to install Apex for the first time:
Copy
EXEC DBMS_XDB.SETHTTPPORT(0);
SELECT DBMS_XDB.GETHTTPPORT FROM DUAL;
Note: This query should result in zero (0).
-
Run the following SQL:
Copy
ALTER USER APEX_PUBLIC_USER ACCOUNT UNLOCK;
ALTER USER APEX_PUBLIC_USER IDENTIFIED BY APEX_PUBLIC_USER;
@apex_rest_config.sqlNote: Make sure to note the password for these two users: APEX_LISTENER user and APEX_REST_PUBLIC_USER.
Configure APEX Workspace for OUAW
To import the Admin tool to configure Oracle Data Integrator:
-
Download and unzip the Oracle Utilities Analytics v2.8.0.0.0 Multiplatform.zip file, which includes the AdminTool folder.
-
Copy the Multiplatform zip file into a temp directory within the target database server.
Example: </u01/temp>
-
Navigate to the TEMP directory and connect to the database using the system user.
Copy
cd </u01/temp/AdminTool>
sqlplus system/<system user password>
Install ORDS on the Application Server
- Navigate to the ORDS extracted directory on the application server and make sure that the APEX extracted directory is available in the location where the Admin tool is set up.
Example: </u01/ouaw/ords>
- Create a directory on the application server to configure Apex.
Example: mkdir -p </u01/ouaw/apex_configuration>
- Navigate back to the ords directory where Oracle REST Data source (ORDS) was extracted.
Example: cd </u01/ouaw/ords>
-
To perform an advanced installation, execute the following commands:
Copy
export JAVA_HOME=</u01/ouaw/java>
export PATH=$JAVA_HOME/bin:$PATH
java -jar ords.war install advancedNote: Use JDK1.8 or a later version to run this command.
See below an example of the command prompt, in which default options will appear enclosed in square brackets []. Use these options, or provide the necessary inputs for your requirements.
Enter the location to store configuration data: </scratch/ouacicd/apex_configuration>
Specify the database connection type to use.
Enter number for [1] Basic [2] TNS [3] Custom URL [1]:
Enter the name of the database server [localhost]:<dbserver.hostname>
Enter the database listen port [1521]:<dbserver.port>
Enter 1 to specify the database service name, or 2 to specify the database SID [1]:
Enter the database service name:<database service name>
Enter 1 if you want to verify/install Oracle REST Data Services schema or 2 to skip this step [1]:
Enter the database password for ORDS_PUBLIC_USER:
Confirm password:
Requires to login with administrator privileges to verify Oracle REST Data Services schema.Enter the administrator username:sys
Enter the database password for SYS AS SYSDBA:
Confirm password:
Connecting to database user: SYS AS SYSDBA url: jdbc:oracle:thin:@//<dbserver.hostname>:1521/<database service name>Retrieving information.
Enter the default tablespace for ORDS_METADATA [SYSAUX]:
Enter the temporary tablespace for ORDS_METADATA [TEMP]:
Enter the default tablespace for ORDS_PUBLIC_USER [SYSAUX]:
Enter the temporary tablespace for ORDS_PUBLIC_USER [TEMP]:
Enter 1 if you want to use PL/SQL Gateway or 2 to skip this step.
If using Oracle Application Express or migrating from mod_plsql then you must enter 1 [1]:
Enter the PL/SQL Gateway database user name [APEX_PUBLIC_USER]:
Enter the database password for APEX_PUBLIC_USER:
Confirm password:
Enter 1 to specify passwords for Application Express RESTful Services database users (APEX_LISTENER, APEX_REST_PUBLIC_USER) or 2 to skip this step [1]:
Enter the database password for APEX_LISTENER:
Confirm password:
Enter the database password for APEX_REST_PUBLIC_USER:
Confirm password:
Enter a number to select a feature to enable:
[1] SQL Developer Web (Enables all features)
[2] REST Enabled SQL
[3] Database API
[4] REST Enabled SQL and Database API
[5] None
Choose [1]:
2021-12-08T16:43:47.300Z INFO reloaded pools: []
Installing Oracle REST Data Services version 21.1.3.r1531102
... Log file written to /scratch/gbuora/ords_install_core_2021-12-08_164347_00407.log
... Verified database prerequisites
... Created Oracle REST Data Services proxy user
... Created Oracle REST Data Services schema
... Granted privileges to Oracle REST Data Services
... Created Oracle REST Data Services database objects
... Log file written to /scratch/gbuora/ords_install_datamodel_2021-12-08_164359_00711.log
... Log file written to /scratch/gbuora/ords_install_apex_2021-12-08_164401_00030.log
Completed installation for Oracle REST Data Services version 21.1.3.r1531102. Elapsed time: 00:00:15.52Enter 1 if you wish to start in standalone mode or 2 to exit [1]:2
-
Navigate to the ORDS directory.
Example: cd </u01/ouaw/ords>
-
Run the following command after setting JAVA HOME:
Copyjava -jar ords.war static </u01/ouaw/apex>/apex/imagesNote: The command above will create an i.war file in the ords folder.
Install the ords.war and i.war files
- Log in to <apex domain> WebLogic administration console and click the Lock & Edit button located in the Change Center.
-
On the Domain Structure panel, select Deployments, then click Install.

- Enter the appropriate path and then select the
ords.warfile. Click Next.Example: </u01/ouaw/ords>
-
Select the deployment target as <apex_server1>.

-
On the application assistant, populate the fields as detailed in the table below.

Field Name and Description
Value
Name: Enter the deployment name.
ords
Security: Select the security model to be used.
Select the Custom Roles option.
Source accessibility: Select the source accessibility option.
Select the Use the defaults defined by the deployment's targetsoption.
-
The location of ords.war file and target will appear on the Summary section. Click Finish.

- After saving the ords.war deployment, click the Activate Changes button located in the Change Center.
-
Repeat the steps above to deploy the i.war file.
-
On the WebLogic administration console, navigate to Deployment and then Control.
-
Select i and ords.
-
Click Start and then Servicing All Requests.
-
Restart the administration and managed servers.
Access the AdminTool
Use this URL to access the administration tool:
http://<hostname>:<apex_server1_port>/ords/f?p=104
-
Provide the following credentials to access the Admintool:
Username: Admin
Password: Admin_123
Note: After logging in to the application for the first time, you will be requested to change the password.
-
After logging in, you can access the ETL Configuration and ETL Job Execution through the respective tabs.

Change the Default Password of Admin User
This section describes the APEX API used to change the admin user's password.
The script below should be run after connecting to the database as user SYSTEM.
Note: Replace the string 'New password' with the new password for the admin account before running the script.
begin
wwv_flow_api.set_security_group_id(p_security_group_id=>nvl(wwv_flow_application_install.get_workspace_id,2090606133849294));
end;
/
begin
apex_util.edit_user(
p_user_id => '1467765078687596',
p_user_name => 'ADMIN',
p_web_password => 'New password',
p_new_password => 'New password'
);
end;
/
commit;
/
Note: It is strongly recommended to change the default password after logging in.
Upgrade the Dashboards Component
Prerequisites
Before you begin installing the OUAW Dashboards component, note the following:
-
A single OS user must install all required software.
-
All required software (such as Java, Oracle Database Client, Oracle Fusion Middleware, Oracle Analytics Server) must be installed.
-
The Oracle Analytics Server (OAS) domain must be installed and configured, and all domain paths must be available.
-
OUAW Dashboards Component installer must be available in the <TEMPDIR>/application directory located on the application server.
Set Up the Dashboard Environment
- Log in to the application server.
- Navigate to the temporary directory where the OUAW installer was downloaded.
Example: <TEMPDIR/application>
- Set the JAVA_HOME.
Example: export JAVA_HOME=<JAVA HOME>
- Set the path to JAVA_HOME/bin.
Example: export PATH=$JAVA_HOME/bin:$PATH
-
Launch the OUAW installer by running the following command:
Copy
java -jar OUA_2.8.0.0.0_generic.jar -logLevel finest
Oracle Utilities Analytics Warehouse Dashboards Installation Wizard
- Run the Oracle Utilities Analytics Warehouse Installer. The Welcome page appears.
- Review the available information before you begin the installation. Click Next to continue.
-
On the Installation Location page, select the installation location from the Oracle Home drop-down menu and click Next.
Note: The specified Oracle home directory must be an empty directory.

Field Name and Description
Value
Oracle Home: The directory where the Oracle Utilities Analytics Warehouse Dashboards component is going to be installed.
Note: In the documentation, this directory location is referred to as Dashboards Home. Keep note of it because it will be used during some deployment steps.
Example: <Dashboards Home>
</u01/ouaw/deployment/OUAW_DASHBOARD>
-
On the Language Selection page, select English, then click Next.

Field Name and Description
Value
Language Selection: The language for the installation process.
English
-
On the Installation Type page, select the Dashboards option. The left navigation panel will change based on the installation type that was selected. You will need to enter details for the following: Database and Java Home Details, Target Database Connection Details, and OAS Home Details.

-
Click Next.
-
On the Database and Java Home Details page, populate the fields as detailed in the table below, then click Next.

Field Name and Description
Value
Database Client Home: The directory where the Oracle Database Client is installed. If you are installing the Dashboard component on the same machine as the Database component, then you can use Database Home.
Example: <Database Client> or <ORACLE HOME>
</u01/ouaw/dbclient> or </u01/ouaw/database>
Java Home: The directory where Java is installed.
Example: <JAVA HOME>
</u01/ouaw/java>
-
On the Target Database Connection Details page, populate the fields as detailed in the table below. Verify that "tnsping Target-SERVICENAME" gives you confirmed Database Connection details. Click Next.

Field Name and Description
Value
Host: The target database host name where the database resides
Target Database Server host name
Example: <dbserver.hostname>
Port: The target database port number on the database server used for connecting
Target Database port. Example: <1521>
Service Name: The target database service name
<Target Database service name>
Target Schema Password: The password for the target schema (DWADM)
<DWADM user password>
Confirm Target Schema Password: Same as the Target Schema Password
<DWADM user password>
Metadata Schema Password: The password for the metadata schema (MDADM)
<MDADM user password>
Confirm Metadata Schema Password: The same password given for metadata schema
<MDADM user password>
-
On the OAS Home Details page, enter the following details in the respective fields and click Next.
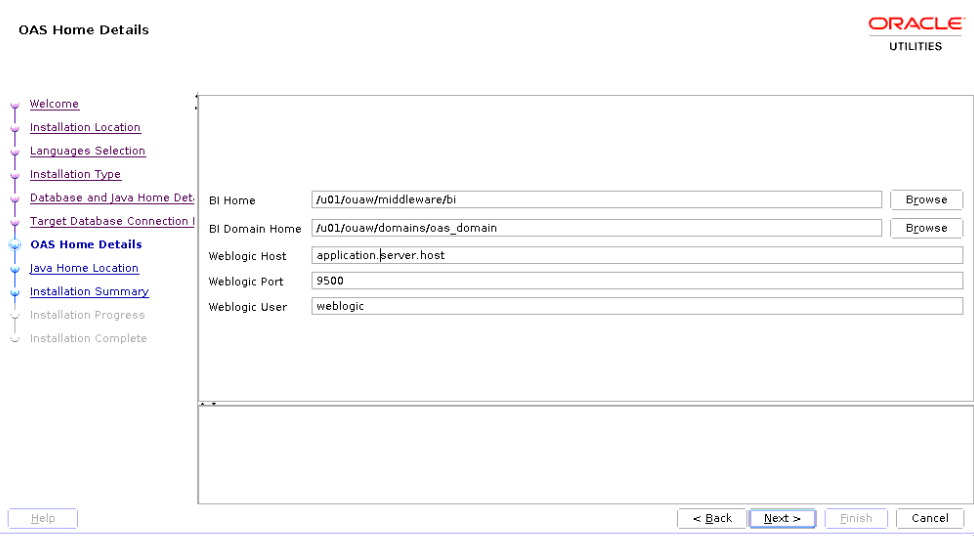
Field Name and Description
Value
BI Home: The location of the bi folder where OAS is installed on the application server.
<FMW Home>/bi
Example: </u01/ouaw/middleware/bi>
BI Domain Home: The OAS domain home location.
<OAS Domain>
Example: </u01/ouaw/domains/oas_domain>
WebLogic Host: The Application server hostname where the WebLogic server is running.
<appserver.hostname>
WebLogic Port Number: A unique port number within the system that is assigned to the HTTP port. This port number is used as part of the client URL request to connect to the host. It is the OAS WebLogic console admin port number.
<OAS weblogic Admin server port>
Example: <9500>
WebLogic User: WebLogic domain console login user name.
Example: <weblogic>
-
On the Java Home Location page, enter the proper file path and click Next.

Field Name and Description
Value
Java Home: Enter the Java installed location.
Example: <JAVA HOME>
</u01/ouaw/java>
-
On the Installation Summary page, verify the installation options and click Install. To make changes to the configuration before starting the installation, use the navigation pane and select the topic to edit.

An Installation Progress page appears to track the installation. Detailed logs of the installation are available in the logs/system directory under the installation location.

-
On the Installation Complete page, click Finish to close the installer.

Deploy the Web Catalog
On the Oracle Analytics Server, you can deploy the latest catalogs into the environment using the online mode.
- Navigate to <DOMAIN DOMAIN>/<OAS_DOMAIN>/bitools/bin.
-
Create a new credentials file called boot.txt and add the following contents to it:
Copy
login=<OAS Weblogc admin user>
pwd=<OAS Weblogic admin password>
For each catalog present under
<Dashboards Home>/Catalogdirectory, run the following command from the<OAS DOMAIN HOME>/bitools/binlocation. Replace all parameters enclosed in <> with the appropriate values.Copy./runcat.sh -cmd unarchive -folder "/shared" -online http://<OAS SERVER Host>:<OAS Managed SERVER PORT>/analytics-ws/saw.dll -credentials boot.txt -inputFile "<Dashboards Home>/Catalog/<Catalog Name>" -overwrite allNote: The inputFile parameter must be in double quotes, and the catalog file name must include spaces.
-
Deploy the 'Spatial Metadata Catalog' on the System folder. Replace all parameters enclosed in <> with the appropriate values.
Copy
./runcat.sh -cmd unarchive -folder "/system" -online http://<OAS SERVER Host>:<OAS Managed SERVER PORT>/analytics-ws/saw.dll -credentials boot.txt -inputFile "<Dashboards Home>/Catalog/Spatial Metadata.Catalog" -overwrite allNote: The inputFile parameter must be in double quotes, and the catalog filename must include spaces.
Deploy the Merged RPD File
To merge the 270013 RPD file with the 28000 RPD, which contains the database changes required:
- Copy both 270013 and 28000 RPD files to the Windows machine where Oracle Analytics Client Tool 5.9 is installed, then merge it.
Note: RPD file merge steps can be found here: Merging Repositories
-
Once the RPD file merge is complete, copy the modified RPD back to the
<install dir>/Reports/rpd/UtilitiesBusinessAnalytics.rpd, where<install_dir>is the Oracle Utilities Analytics Dashboard Component installation directory.
Upload the RPD File
-
Log in to the target application server where OAS is installed.
-
Navigate to <DOMAIN HOME>/<OAS DOMAIN>/bitools/bin.
-
Run the following command to deploy the RPD:
Copy./datamodel.sh uploadrpd -I <Dashboards Home>/Reports/rpd/UtilitiesBusinessAnalytics.rpd -W <rpd password, defaultpassword is oracle123> -U <Weblogic user name of OAS domain> -P <Weblogic password of OAS domain> -SI ssi -
Run the following commands from the <OAS_DOMAIN>/bitools/bin directory to stop and start the OAS domain services respectively.
Copy
./stop.sh
 ./start.sh
Deploy Writeback Templates
-
Log in to the application server and run the following commands to deploy writeback templates:
Copy
mkdir -p <FMW Home>/bi/bifoundation/web/msgdb/l_en/custommessages
cp <Dashboards Home>/writeback/wbtemplates/* <FMW Home>/bi/bifoundation/web/msgdb/l_en/custommessages/ -
Restart the Oracle Analytics Server services after deploying these writeback templates in the specified path.
Copy
cd <OAS DOMAIN>/bitools/bin
./stop.sh
./start.sh
Configure MapViewer for OUAW
To work with OUAW Analytics, there are a few changes that need to be made in the mapViewerConfig file. The file is located in <OAS DOMAIN>/config/fmwconfig/mapviewer/conf. Ensure you take a backup before updating it.
Note: Skip this task on AIX platforms. The Mapviewer URL is not supported in AIX environments.
Update the MapViewer configuration from the MapViewer Admin Console
- Log in to MapViewer (http://<Server>:<port>/mapviewer)
-
Navigate to MapViewer > Administration > Configuration to edit the
mapViewerConfig.xmlfile. If the customer environment runs behind the proxy, then insert the list of host names for all the third-party service providers in the security_config node.Example:
<proxy_enabled_hosts>
elocation.oracle.com
</proxy_enabled_hosts> -
Add the following ns_data_provider node:
Copy
<ns_data_provider id="obieeNsdp" class="com.oracle.utilities.birdseye.BirdseyeNSDP" /> -
Add the current map_tile_server with the following map_tile_server node:
Copy
                <map_tile_server>
                <tile_storage default_root_path="/mytilecache/"/>
                </map_tile_server>
-
Add the following map data source code in the mapViewerConfig.xml with the appropriate values as database server details:
Copy
<map_data_source name="mapconn"
jdbc_host="<DB server name>"
jdbc_sid="//<DB Service name>"
jdbc_port="1521"
jdbc_user="DWADM"
jdbc_password="!<DWADM user password>"
jdbc_mode="thin"
number_of_mappers="32"
allow_jdbc_theme_based_foi="true"
/>
-
Click Save and Restart.
Configure Spatial Data
-
Log in to the target database server.
-
Navigate to the temporary directory where the Oracle Utilities Analytics Warehouse v2.8.0.0 Oracle Database Multiplatform.zip file was extracted.
Copy
cd database/BI2800/Spatial-Metadata -
Set the following environment variables.
Copy
export ORACLE_SID=<DATABASE SERVICE NAME>
export ORACLE_HOME=<ORACLE HOME>
export PATH=$ORACLE_HOME/bin:$PATH
-
Create the database directory in the database after connecting to sys user.
Copy
sqlplus sys/<sys user password>@<DATABASE SERVICE NAME>Example: Create the directory <dump_dir> as '</u01/dumps>'.
-
Copy the user_sdo.dmp dumpfile from the temporary directory <TEMPDIR>/database/BI2800/Spatial-Metadata to the database directory <dump_dir> location.
Example: </u01/dumps>
-
Execute the impdp command to import the USER_SDO* tables data.
Copy
impdp directory=dump_dir dumpfile=user_sdo.dmp logfile=impdp_user_sdo.log schemas=DWADM remap_tablespace=cists_01:<tablespace_name> -
Provide DWADM user name password when prompted.
Note: Ensure to change the tablespace_name to the name on which DWADM has the quota. If DWADM user have quota on cists_01 tablespace, then exclude the whole remap_tablespace clause from the command.
- Review the impdp_user_sdo.log file to ensure the tables are imported successfully.
-
After importing the tables, run the following SQL scripts from the <TEMPDIR>/BI2800/Spatial-Metadata directory.
Copy
sqlplus dwadm/<dwadm user password>@<database service name>
@copy_spatial_metadata.sql
@clean_sdo_release_tbls.sql
-
Review the log files.
Post-Upgrade Steps
Run Post-Upgrade Steps
- Run the source configuration in Register Mode.
Note: For more details on source configuration refer to Configure ETL Source for OUAW. If you created the GolgenGate user earlier, then you can skip step 5 under the 'Set Up Oracle GoldenGate on Source Database Server' section.
-
Start the source application.
-
Execute the following scenarios manually from ODI Designer > Load Plan and Scenarios section > Framework > Data Correction folder in GLOBAL context. Follow the order specified below and ensure that every scenario completes successfully.
- B1_MDFIX_27011
- B1_MDFIX_27012
- B1_DATAFIX_27012
- B1_MDFIX_27020
- B1_DATAFIX_27020
- B1_MDFIX_28000
-
Start B1_RUN_ALL from ODI studio.
Backfill the Storm Key Column in NMS Star Schema
Note: This step is only necessary if NMS source is configured.
As a part of 2.7.0.2.0 release, the Storm dimension CD_STORM has been modified to have the Control Zone as a part of the natural key. As a result, there have been changes made to the ETL mappings of the dimension and 12 facts which are dependent on this dimension. While these ETL component changes will take care of the incremental data changes after the upgrade, the modification to existing data will be taken care of ODI procedures B1_NMS_FACT_STORM_KEY_UPD_2702.
The execution of the procedure B1_NMS_FACT_STORM_KEY_UPD_2702 will be optional and will have to be done only if the customer decides to refresh STORM_KEY value for existing rows as per new logic. If more than one context is configured, this scenario will need to be triggered for each configured context.
Perform the following steps to execute the procedure B1_NMS_FACT_STORM_KEY_UPD_2702.
-
Check that storm dimension must be loaded till the checkpoint timestamp. Enter the appropriate context below:
Copy
select entity_name, status_flg, max(slice_end_dttm) -1/ (24*60*60) from mdadm.b1_jobs_vw where entity_name ='CD_STORM' and context_cd ='<context code>' group by entity_name,status_flg;The value for max (slice_end_dttm) should be the same as the LAST_UPDATE_TS column value in the B1_CHECKPOINT table fetched below:
Copyselect max (last_update_ts) from mdadm.b1_checkpoint where group_name like '<context code>%'; - Ensure that B1_RUN_ALL is not running. Use ODI Studio to stop B1_RUN_ALL.
- Disable all NMS facts from the admin tool and ensure that all running fact jobs are completed.
- Navigate to ODI Designer > Load Plan and Scenarios > Accelerators - Data Correction.
- Right-click on B1_NMS_FACT_STORM_KEY_UPD_2702 Version 001 and click Run. Select the appropriate context.
- Enable all NMS facts from the admin tool after execution of the above procedure is completed.
- Start B1_RUN_ALL from ODI Studio.