Working with Tags
You can annotate add, edit, and remove device tags on the Map.
For more information about tagging devices, see Tagging Devices.
To add a Hot Line Warning tag, select the device in the Map and choose Add HLW Tag... from the Selection Panel Tag/Note menu. Instruct or complete the action as appropriate. To remove an HLW tag, select its symbol and use Remove Condition. A device with an HLW tag can be opened or closed only when the operation is associated with a Planned or Emergency switching sheet; recording only in the Miscellaneous Log is not permitted.
To add a tag:
1. In the Map, click to select a device or conductor, then from the Selection Panel select Add Tag from the  Tag/Note menu.
2. Choose the tag type, if prompted, enter tag text, if applicable, and then click Instruct or Complete. The tag is added.
Editing a Tag
1. In the Map, select the tag symbol, then from the Selection Panel Tag panel, select  Edit Condition from the Tag/Note menu.
2. Edit the text, then click OK.
Removing a Tag
In the Map, click to select the tag symbol, then from the Selection Panel Tag panel, select  Remove Condition from the Tag/Note menu.
Operating Devices
The Operate Device dialog box is displayed when instructing or completing device operations; it allows you to verify important information before instructing or completing the device operation. It can be displayed from the Map or from a switching sheet.
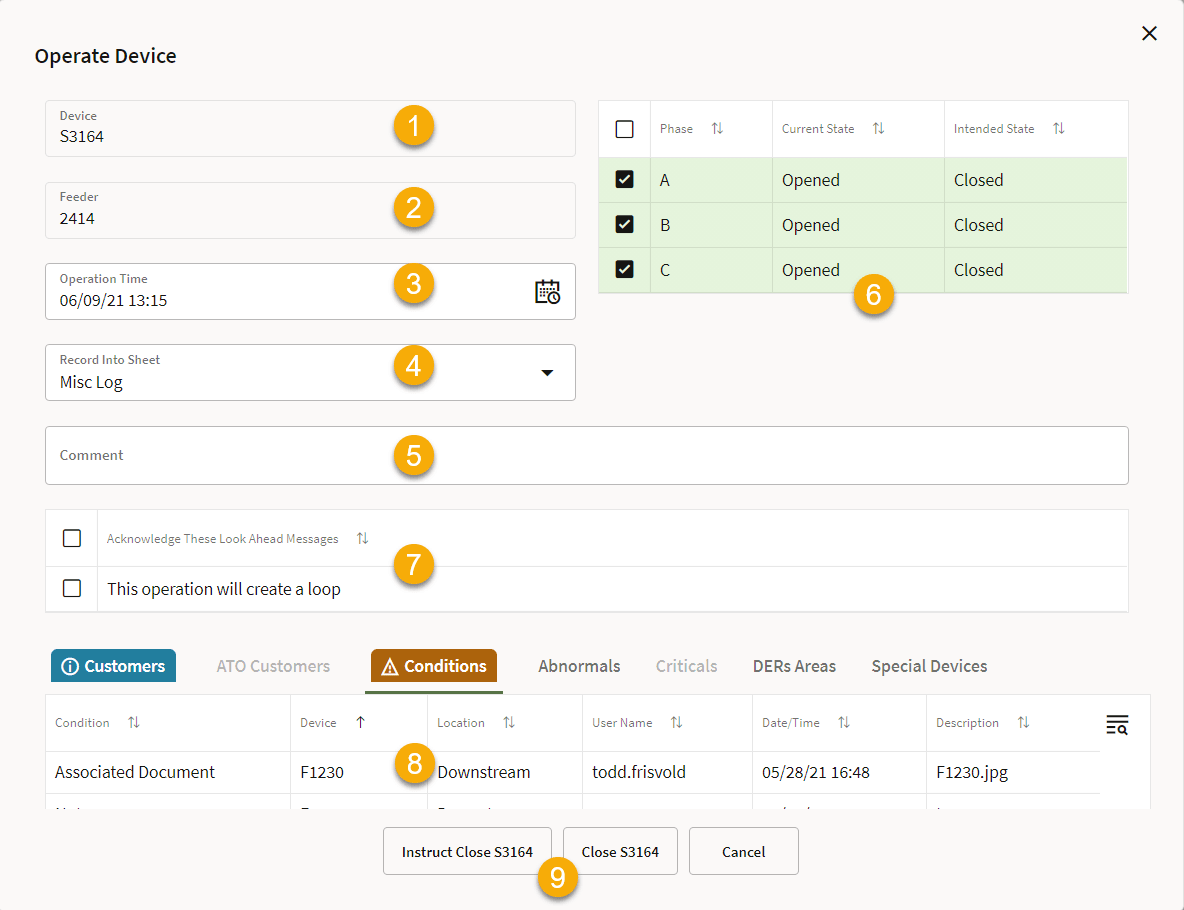
As illustrated in the screen capture above, the Operate Device dialog box has the following fields and buttons.
1. The Device to be operated.
2. The Feeder for the device to be operated.
3. The Operation Time recorded. Default to the current time, but can be backdated if required, to allow for more accurate recording of time off / time restored.
4. The Record Into Sheet field allows you to choose where the device operation will be recorded. If you are recording into a switch sheet, you can still choose to record the operation into the Miscellaneous Log, if required.
5. The Comment field allows you to add a comment to the device operation. This will be seen in the Comment field in the switching step for the device operation in the switching sheet or Miscellaneous Log.
6. The Phases table allows you to select the phase(s) to be operated. All available phases are selected by default, but can be deselected by clicking the check‑boxes. Clicking anywhere else on a phase row selects that row and deselects other rows.
7. The Look Ahead Messages section displays safety or electrical information messages. For example, warns you that you are going to make or break a loop, or energize a grounded section. These messages must be acknowledged/checked before the command buttons (for example, Instruct Close [Device]) become enabled.
8. The tabbed Look Ahead section provides information relevant to the impending device operation. Some information can be configured such that it must be viewed before operating the device. In cases like this, the tab with the information will oscillate until selected; once the tab has been selected and the page viewed, the command buttons become enabled.
9. Command buttons allow you to instruct or complete the device operation. These buttons will only become enabled once any electrical look ahead messages and conditions have been acknowledged.
You can operate devices as described below.
1. From the Map, select the device, then from the Selection Panel, select Open or Close, as applicable, from the Operate menu.
Note: The Operate Device dialog box will be displayed when executing switching sheet steps.
2. In the Operate Device dialog box, enter information as desired in the top panel. Things you may edit include the phases to be operated, where to record the action to (Miscellaneous Log or a switching sheet), and comments.
3. In the lower part of the Operate Device dialog box, view Look Ahead information. If the action results in conditions that need to be acknowledged, the Conditions tab will jiggle. Select the Conditions tab and view the results of the operation.
Note: For more information see Understanding the Look Ahead Dialog Box.
4. Once you have reviewed the information, click the Open or Close button, as applicable, to complete the operation.
In the Map, the device and network update to reflect the change in state.