Understanding Load Shed and Restoration in Flex Operations
Introduction
Load Shed & Restoration helps operators prepare and manage planned load shed activities. It displays the load blocks in the operator's subscribed zones, supports Fixed and Rotational planning, and creates Load Shed switching sheets for approved selections.
Notes:
• The tool is available only in real-time mode. Users require both Full Operations and Switching privileges and must subscribe to the zones containing the required load blocks.
• The Web Workspace (Java client) Load Shed & Restoration tool is retained for limited legacy operations. It lets an operator view preconfigured load groups, select groups, view impacted customers, create a Load Shed switching plan, open the associated switching sheet, and use the related Java switching actions. Use Flex Operations for Basic and Advanced modes, Rotational planning, save cases, load-block maintenance, and the expanded selected-load and search workflow.
• Load Block and Load Group are synonymous. The Java tool uses Load Group (see Load Shed & Restoration for details), while Flex Operations uses Load Block. Both names identify the same configured collection of feeders and switches used for Load Shed planning.
Using the Load Shed & Restoration Tool
In Flex Operations, open Load Shed & Restoration from the Tools menu. The tool opens on the Fixed tab and displays only the blocks in the operator's subscribed zones.
File Menu
Menu Option | Description |
|---|---|
New Window | Opens another Load Shed and Restoration tool instance. |
Export Load Blocks | Exports active blocks using the Load Shed import CSV column order. |
Exit | Closes the tool. |
Actions Menu
Menu Option | Description |
|---|---|
Refresh | Refreshes the data. |
View | Opens the Map to the selected load block. |
Get Impacted Customers | Shows customers affected by the Fixed selection. |
Create Manual Switch Plan | Creates a Load Shed sheet for the Fixed selection or generated Rotational plan. |
Open Switching Sheet | Opens the sheet associated with the selected block or applied plan. |
Save Case | Saves a Fixed selection or a generated Rotational plan without creating an event or sheet. |
Open Save Case | Opens a retained Fixed or Rotational save case. |
Search Criteria | Opens criteria for the active tab. |
Working with Fixed Load Shed
Basic and Advanced Modes
Basic is the default Fixed mode. It displays active SCADA blocks and uses retained SCADA load; it does not refresh Power Flow or model data and does not display Power Flow-dependent columns. Advanced refreshes block data, applies Power Flow-aware searching, and displays Power Flow-derived columns when Power Flow is licensed.
Note: In Basic mode, SCADA Only is selected and cannot be cleared. DER criteria are hidden. Feeder status, feeder nominal state, and critical customer values remain available in both modes.
Selecting Blocks and Feeders
The Load Blocks table is a parent/child tree. A parent row is a block and a child row is an associated feeder or switch. Select a parent to select all children; clear a parent to clear all children. Selecting all child rows selects the parent, while clearing one child leaves the parent partially selected. The header has a select-all checkbox.
The Selected Load area lists the selected blocks and feeders and summarizes configured load, SCADA load, net Power Flow load, and Power Flow generation where available.
Note: Search does not select a feeder with negative active search load. If an operator manually selects one, the tool warns that the feeder has backfeed generation and requires confirmation.
Searching for Load
Open Search Criteria, enter the required criteria, and select Search.
• The Net Load to Shed field is the requested amount. Basic compares the request with eligible SCADA load; Advanced compares it with eligible net Power Flow load.
• Priority is the default selection method. It selects eligible feeders that most closely match the requested MW, using lower Priority as the preference tie-breaker.
• Initial Priority uses the imported initial priority as the preference tie-breaker.
• MW selects eligible child feeders as closely as possible to the requested MW and can select part of a block.
• Allow critical customers and Feeders in nominal state only are available in both modes.
• In Advanced mode with Power Flow licensed, Consider DERs enables DER Output less than (MW).
Select Clear to remove Fixed selections and reset the Selected Load summary.
Understanding the Load Blocks Table
Parent rows show block-level values. Child rows show feeder or device-level values. Use the column chooser to show or hide optional columns, including Initial Priority, and drag a column to change its order.
Column | Description |
|---|---|
Select | Selects or clears a block or feeder for the Load Shed plan. |
Load Block | The configured block name. It is shown on the parent row. |
Type | Indicates whether the block is SCADA or Manual. |
Percent Load | The configured positive percentage for the block. Rotational planning uses this value for eligibility and schedule selection. |
Priority | The dynamic shed preference. Lower values are preferred. After a block is operated, active priorities are compacted and the operated block moves to the highest Priority. |
Initial Priority | The imported initial priority. It is hidden by default and does not change after import. |
Feeder | The feeder associated with the child row. |
Switch | The switch operated for Load Shed or restoration on the feeder. |
Configured Load (MW) | The configured load for the feeder. The parent value is the total for energized feeders in the block. |
SCADA Load (MW) | The refreshed retained SCADA load for the feeder. The parent value is the corresponding block total. |
PF Load (MW) | The Power Flow-calculated load. It is displayed in Advanced mode when Power Flow is licensed. |
PF Gen (MW) | The Power Flow-calculated DER output. It is displayed in Advanced mode when Power Flow is licensed. |
# DERs | The number of DERs connected to the feeder. The parent value is the block total. |
# Critical Customers | The number of configured critical customers associated with the feeder. The parent value is the block total. |
Feeder Nominal | Shows whether the feeder is in nominal state. |
Feeder Status | Shows whether the feeder is energized or de-energized. |
Plan # | The Load Shed switching sheet number associated with the block. |
Plan Status | The current status of the Load Shed sheet associated with the block. |
Last Shed Time | The most recent time that the block was shed. |
Last Restore Time | The most recent time that the block was restored. |
Managing Load Blocks
Use the Fixed-tab controls to add or delete a block, or to add or delete a switch from a block. A block associated with a switching sheet is not editable.
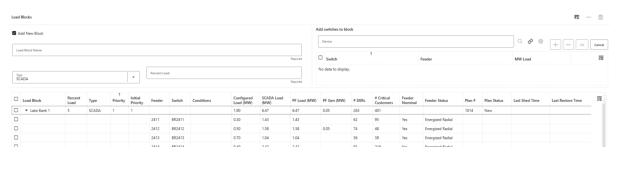
Adding a Load Block
Select Add Load Block.
Enter a unique block name, choose SCADA or Manual, and enter a positive Percent Load value.
Use Add Devices to Block to record an operable map device or search for a switch. Enter a positive MW Load for every staged device.
Review the staged devices and select OK to save.
Note: Only SCADA switches can be added to a SCADA block. Refine an ambiguous switch search before saving.
Creating a Fixed Load Shed Plan
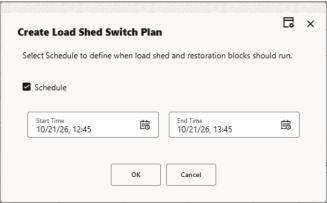
1. Select eligible blocks or feeder rows on the Fixed tab. A block already associated with a switching sheet cannot be included in a new plan.
2. Review the Selected Load summary and select Create Manual Switch Plan.
3. Leave Schedule clear for an unscheduled plan, or select Schedule and enter start and end times.
4. Confirm the creation and select Open Switch Sheet to review the generated sheet.
An unscheduled Fixed plan contains Load Shed steps only. A scheduled Fixed plan stores start and finish dates, schedules shed blocks at the start time, and schedules restoration blocks at the end time.
Note: Use Action > Generate Steps > Restoration to generate restoration steps on an unscheduled sheet. Mirror Restoration is also available for Load Shed sheets when mirrored restoration steps are appropriate for the operating plan.
Scheduled-Plan Validation
If the first scheduled start time is at or before the current time, NMS displays a Continue/Cancel warning. Select Cancel to return to the creation dialog and revise the schedule; the dialog remains open and retains Schedule, Start Time, and End Time. Select Continue only when the displayed schedule is intended.
A scheduled sheet cannot be executed after the scheduled time of its first block has passed. No steps are executed. Delete the expired sheet and create a new Load Shed sheet with the required time window.
Working with Rotational Load Shed
Rotational planning is limited to SCADA blocks. The Rotational tab displays the load blocks, Plan Summary, Plan Details, and Detailed Schedule. Available blocks are not already associated with a switching sheet and have eligible feeder switches.
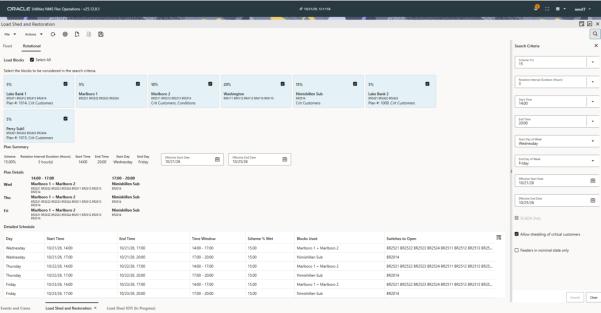
Generating a Rotational Plan
1. Select the Rotational tab and open Search criteria.
2. Select a Scheme and enter duration, start and end times, start and end days, and Effective End Date as required.
3. Optionally apply critical-customer and nominal-feeder criteria. SCADA Only is selected and cannot be changed.
4. Select Search after selecting a Scheme and Effective End Date, then review the plan details.
For each interval, NMS selects one or more eligible SCADA blocks whose Percent Load totals up to the selected scheme. It prefers unused or least-used blocks and uses lower Priority as a tie-breaker. A plan can be generated even when the selected blocks do not total the scheme exactly.
Creating a Rotational Plan
Select Create Manual Switch Plan to create a Rotational plan. The sheet schedules each shed block at the interval start and each restoration block at the interval end.
Scheduled‑Plan Validation
When the first scheduled start time is at or before the current time, NMS displays a Continue/Cancel warning. Select Cancel to stop creation or Continue to retain the selected schedule. The first-block expiration rule also applies before execution.
Saving and Opening Save Cases
On the Fixed tab, select the required blocks or feeders and review the Selected Load summary. On the Rotational tab, generate and review the plan. Select Save Case, enter a name, and confirm. Saving retains the selection, criteria, or generated plan without creating an event or switching sheet.
To open a save case, select Open Save Case from the File menu and choose the required case. NMS opens the corresponding Fixed or Rotational tab and restores the selection or generated plan. Applying a modified case creates a new save case and does not overwrite the prior case.
Understanding Load Shed Events
A Load Shed event records the operational impact of a Load Shed switching plan. When a device is operated from a Load Shed switching sheet, NMS creates the associated outage event. The event is identified as Out-LoadShed in the Clues field and shows the Load Shed plan number in the Plan # field.
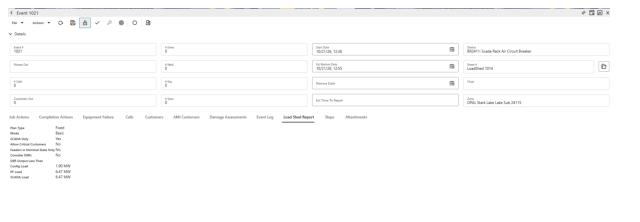
Viewing Impacted Customers and the Load Shed Report
On the Fixed tab, select Impacted Customers to view customers affected by the current selection. For a Load Shed event, open Event Details and select Load Shed Report. The read-only report summarizes the retained save case. For Rotational cases, it includes the sheet number, scheme, duration, start and end times, start and end days, and effective end date. Select Open next to the sheet number to open the associated sheet.
Executing and Aborting Load Shed Execution
Executing SCADA Steps
In web workspace, open a Load Shed sheet and select Execute All SCADA Load Shed Steps from the Steps tab. The action is available when the sheet is locked, is not read-only or complete, and contains executable SCADA Load Shed or restoration blocks.
Scheduled sheets can execute both SCADA shed and restoration blocks. Multiple device blocks in the same shed or restoration phase can start at the same time; steps within each device block execute in sequence.
Aborting Load Shed Execution
In the web workspace, select one Load Shed event in Work Agenda or in the Switching event popup menu, then select Abort Load Shed Execution. The action is available only when the event status is Plan created, Plan Scheduled, or Execution in progress.
1. Select the applicable single Load Shed event.
2. Select Abort Load Shed Execution and confirm the action.
Note: Abort Load Shed Execution cancels Load Shed processing. Review the switching sheet and operating state before planning further switching work.
Deleting an Unexecuted Load Shed Sheet
Delete an eligible unexecuted Load Shed sheet from Switching Tracking/Logs. Deletion is available only when the sheet's forced event belongs to that sheet, no steps have been instructed or executed, and normal permissions and sheet-editing conditions are met. The action requires edit mode, the sheet lock, and a deletion reason.
1. Open the unexecuted Load Shed sheet and select Tracking/Logs.
2. Lock the sheet, enter the deletion reason, and select Delete.
3. Confirm the deletion. NMS cancels the associated Load Shed event.
After deletion, the affected blocks are available for a new Load Shed sheet. Sheets with instructed or executed steps, or an unrelated forced event association, cannot be deleted using this workflow.
Plan Status
Work Agenda displays Plan created for a new unscheduled plan, Plan Scheduled for a scheduled plan, Execution in progress during execution, Execution failed when execution ends with a failed result, Load Shed Plan Aborted after execution is aborted, and Executed when all steps succeed.