Note:
- This tutorial is available in an Oracle-provided free lab environment.
- It uses example values for Oracle Cloud Infrastructure credentials, tenancy, and compartments. When completing your lab, substitute these values with ones specific to your cloud environment.
Accelerate Applications in Oracle Cloud with GraalVM Enterprise
Introduction
GraalVM Enterprise is a high performance JDK distribution, built on trusted and secure Oracle Java SE, that provides significant improvements in application execution and efficiency.
GraalVM Enterprise is included in the Oracle Java SE Subscription and available at no cost on Oracle Cloud Infrastructure (OCI)
GraalVM Enterprise offers two ways to run Java applications: on the HotSpot JVM or as an ahead-of-time compiled native exectuable. When running on the HotSpot JVM, GraalVM Enterprise employs the Graal compiler as the top-tier JIT compiler. The compiler performs advanced optimization and applies aggressive inlining techniques to accelerate performance of any application, without any code changes. Running as a native exectuable GraalVM Enterprise uses Native Image to transform a Java appication into a self-contained native executable that does not require a JVM to run, starts up instantly, and delivers peak performance with no warm up time.
In this lab you will run demo projects on a JVM and as native exectuables to compare performance and see how GraalVM Enterprise can accelerate applications on OCI. Faster applications with lower resource requirements translates into fewer or smaller servers, which reduces cloud costs.
Lab Contents
In this lab you will:
- Connect to a VM instance in Oracle Cloud where you will perform the lab with GraalVM Enterprise already available
- Run a JMH performance benchmark
- Generate a native executable for a Micronaut application and run it
- Configure the host firewall to allow traffic to your VM instance (optional)
Estimated lab time: 30 minutes
NOTE: Whenever you see the laptop icon you will need to perform an action such as entering a command or editing a file.
![]()
# The box under the icon will tell you what to do.
To copy a command, hover over the field and then click the copy to clipboard icon.
To paste a copied command in a terminal window, right click and select the Paste option from the context menu. If you prefer keyboard shortcuts instead, use CTRL+SHIFT+V.
Task 1: Connect to a VM instance in Oracle Cloud
When you start the lab, the necessary resources are provisioned in the background: Virtual Cloud Network (VCN), Compute Instance with the Oracle Linux 8 pre-built image. Resources provisioning also includes installing and configuring the GraalVM Enterprise runtime environment with Native Image to keep this lab concise and save your time. It can take ~5 minutes to complete provisioning. You can tell when the resources are fully provisioned and ready by consulting the Resources tab on the Luna Lab webpage (see step 1, below).
-
Double-click the Luna Lab icon on the desktop to open the browser.

Wait until the animated gear besides Resources turns into a checkmark. It means all the required compute and network resources are provisioned, and you can proceed.

-
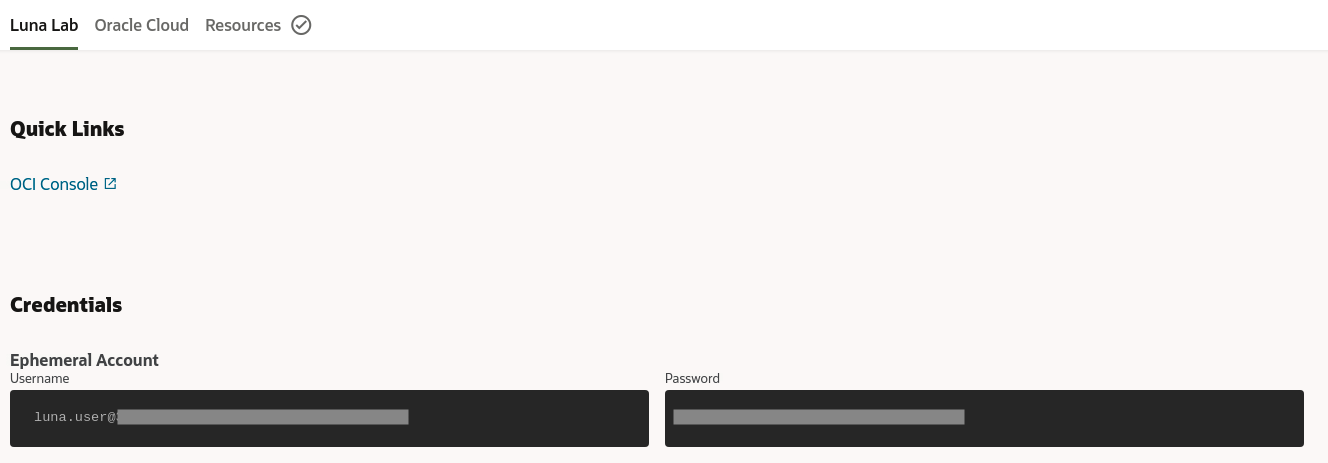
Click the Resources tab in the Luna Lab page. The Resources page shows the name and the public IP address of a VM instance provisioned for you.
-
Copy the Public IP address from the SERVER_IP box. You many need to click on
View Details. To copy hover over the field and then click the Copy to clipboard icon.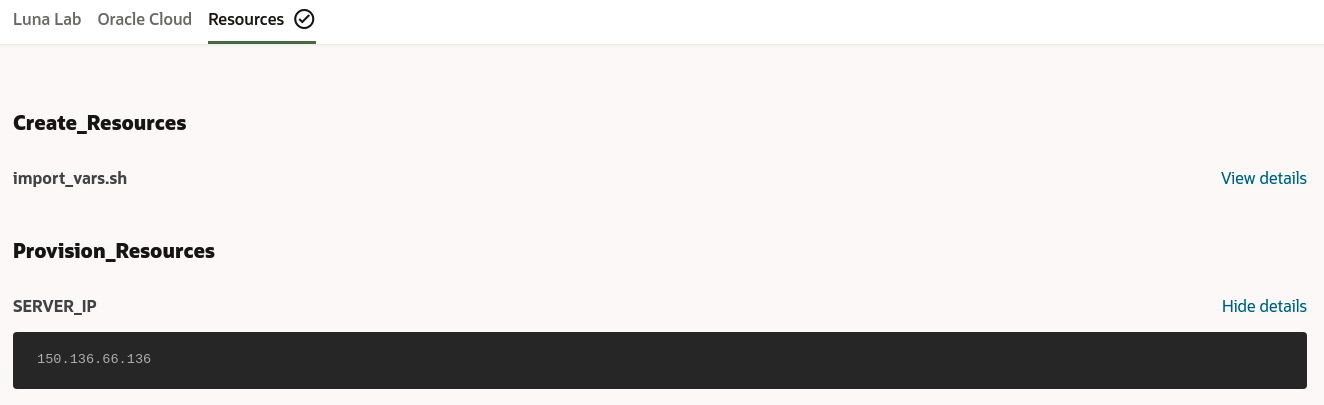
-
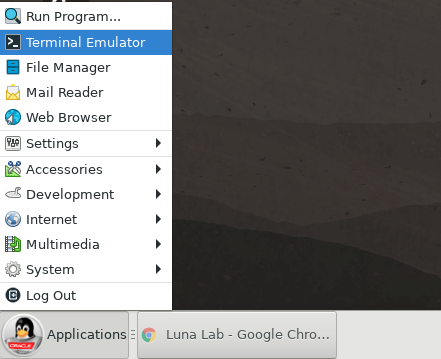
Minimize the browser window so you can see the Luna Desktop. Click the Applications menu and open a Terminal Emulator.
-
Enter SSH connection command where
is your VM instance public IP address: 
ssh opc@<SERVER_IP>Accept the ECDSA key fingerprint by typing
yesat the prompt.
You are now connected to a VM instance in Oracle Cloud. Your VM instance is already preconfigured with GraalVM Enterprise and the Native Image tooling required for this lab. You can easily check that by running these commands:
![]()
java -version
![]()
native-image --version
If you wish to learn how to install GraalVM Enterprise and its features on Oracle Linux yourself, run the Get Started with GraalVM on Oracle Linux lab upon this lab completion.
You can proceed to the next task.
Task 2: Run Demos: Java Microbenchmark Harness (JMH)
In this part you will run a Java benchmark to compare the performance of the GraalVM Enterprise JIT compiler vs. the C2 JIT compiler. The Graal compiler, enabled in GraalVM Enterprise by default, provides optimized performance for programs running on the JVM through unique approaches to code analysis, advanced optimizations, and performs a very aggressive inlining algorithm for deep and wide class hierarchies.
The benchmark you are going to run is written with Java Microbenchmark Harness (JMH) and uses Java Stream API. It illustrates inlining and partial escape analysis the compiler performs in conjunction, which explains significant performance gains at run time.
The demo source code is available in the java-simple-stream-benchmark directory.
The microbenchmark creates a stream from array elements and maps each number using several mapping functions:
public class JavaSimpleStreamBenchmark {

  static int[] values = new int[]{1, 2, 3, 4, 5, 6, 7, 8, 9, 10};

  @Benchmark
  public int testMethod() {
    return Arrays.stream(values)
      .map(x -> x + 1)
      .map(x -> x * 2)
      .map(x -> x + 2)
      .reduce(0, Integer::sum);
  }
}
The JavaSimpleStreamBenchmark.testMethod is executed with 3 iterations to allow the JIT compiler to warmup before it samples the performance. The benchmark results are printed to the console, and are in nanoseconds per operation, which means lower numbers are better.
-
In the terminal window connected to your VM instance, go to the demo directory:
cd java-simple-stream-benchmark -
The benchmark project is built with Maven, but it does not come with a Maven Wrapper (
.mvnw) and Oracle Linux does not include Maven by default. Install Maven withyum:sudo yum install maven -
Build the project:
mvn package -
Run the benchmark with the GraalVM Enterprise JIT compiler:
java -jar target/benchmarks.jarBy invoking the
javacommand, you use the optimized Graal JIT compiler enabled in GraalVM Enterprise by default. -
Run the benchmark on the same JVM (GraalVM Enterprise), but use the C2 compiler instead of the Graal compiler by applying the
-XX:-UseJVMCICompileroption:java -XX:-UseJVMCICompiler -jar target/benchmarks.jar
Compare the benchmark results after completing steps 4-5. The results, of course, will depend on the number of processors and memory of your VM instance. Below are the numbers taken on a compute instance with the VM.Standard.2-2 shape and 30GB of memory:
Graal JIT Compiler:
[opc@demo-instance java-simple-stream-benchmark]$ java -jar target/benchmarks.jar
...
Benchmark                             Mode  Cnt   Score    Error  Units
JavaSimpleStreamBenchmark.testMethod  avgt    3  53.474 ? 1236.199  ns/op
C2 JIT Compiler:
[opc@demo-instance java-simple-stream-benchmark]$ java -XX:-UseJVMCICompiler -jar target/benchmarks.jar
...
Benchmark                             Mode  Cnt    Score    Error  Units
JavaSimpleStreamBenchmark.testMethod  avgt    3  361.844 ? 37.120  ns/op
The Graal JIT compiler average result is over 5x faster than C2’s on the same benchmark!
You can proceed to the next task.
Task 3: Run Demos: Micronaut Native Linux Executable
This task will focus on comparing the startup times when running a Java microservice on a JVM and as a native executable. In both cases the microservice will run on GraalVM Enterprise, but will be executed in different modes: just-in-time or ahead-of-time compiled, to demonstrate the startup boost.
This microservice is written with Micronaut, a full-stack Java framework suited for building microservices and serverless applications. It is a simple server-side rendering application, where the service, ConferenceService.java, contains a list of conferences and returns a random conference. The controller is defined with the @Controller annotation and mapped to the path /conferences to obtain a random conference name. Micronaut converts it automatically to JSON in the response.
-
Return to the home directory:
cd -
Create a Micronaut application specifying Maven or Gradle build tools, download the application sources, unzip the archive, and navigate to it.
mkdir micronaut-demo && cd micronaut-demoMaven:
curl https://guides.micronaut.io/latest/micronaut-creating-first-graal-app-maven-java.zip -o micronaut-creating-first-graal-app.zipGradle:
curl https://guides.micronaut.io/latest/micronaut-creating-first-graal-app-gradle-java.zip -o micronaut-creating-first-graal-app.zipIt will download the Micronaut 3.0.x version.
unzip micronaut-creating-first-graal-app.zip -
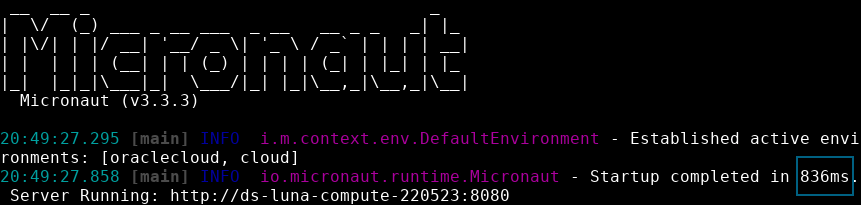
Build and run the application with Gradle or Maven Wrapper on the JVM (GraalVM Enterprise).
Maven:
./mvnw mn:runGradle:
./gradlew runThe application is started on port 8080. Note the time taken to start this simple Micronaut microservice.
-
Terminate the application by typing
CTRL+C. -
Generate a standalone native Linux executable with Native Image. You can build a native executable using Gradle or Maven.
Maven by specifying the
native-imagepackaging format:./mvnw package -Dpackaging=native-imageGradle by running the Micronaut project’s
nativeImagetask:./gradlew nativeImageIf you used Maven, the executable called
micronautguidewill be written to the project target/ directory by default, or to the build/native-image/ directory calledapplicationif you used Gradle.Note: The time to build an executable depends on application size and complexity and may take some time on low powered VMs.
-
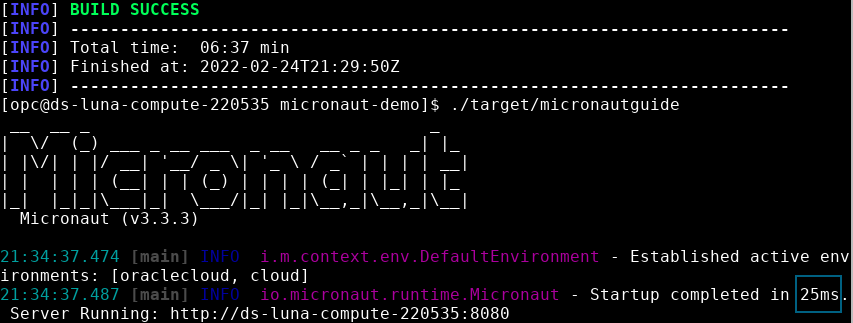
Invoke the executable.
Built with Maven:
./target/micronautguideBuilt with Gradle:
./build/native-image/applicationOnce again, note the time taken to start this microservice as a native executable. It starts much faster because the executable is a self-contained binary and does not require a JDK to run, making it an easy way to distribute applications. The filesize is also quite small.
-
Terminate the application by typing
CTRL+C.
GraalVM Native Image creates a native executable with the application classes, dependent library classes, dependent JDK classes, and a snapshot of the application heap with classes initialized at build time. Running a Java application as a native executable provides instantaneous startup, lower CPU and memory consumption, making the GraalVM Enterprise runtime environment a good candidate for cloud deployments.
You already saw the difference in startup times and can already end this lab. However, you can continue and test this server-side application running in a browser which requires configuring the host firewall to allow traffic to your VM instance. Proceed to Task 4.
Task 4: Configure the Host Firewall Allows Traffic to a VM instance (Optional)
To test the above server-side application in a browser, you need to ensure that the host firewall allows traffic to your virtual machine.
-
Login to OCI Console. Open the Luna Lab page and click the OCI Console quick link. Enter username and password provided under Credentials for this lab ephemeral account.
-
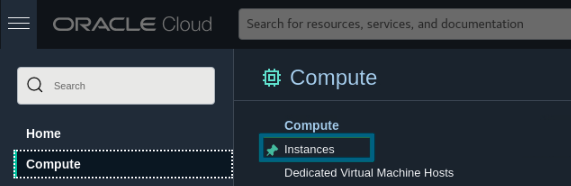
When you are logged into the OCI Console, navigate to Compute and click Instances.
-
Select a necessary compartment in the Compartment dropdown on the left. To find your compartment name, return to the Luna Lab page, then click Oracle Cloud, and see the Compartment Name field.

-
Find your VM instance in the main view and open it.
-
In the Primary VNIC section, click on Subnet your instance is attached to.
-
On the subnet page, click on the security list (name starting with ds-luna-seclist-).
-
Press Add Ingress Rule and fill in the following data:
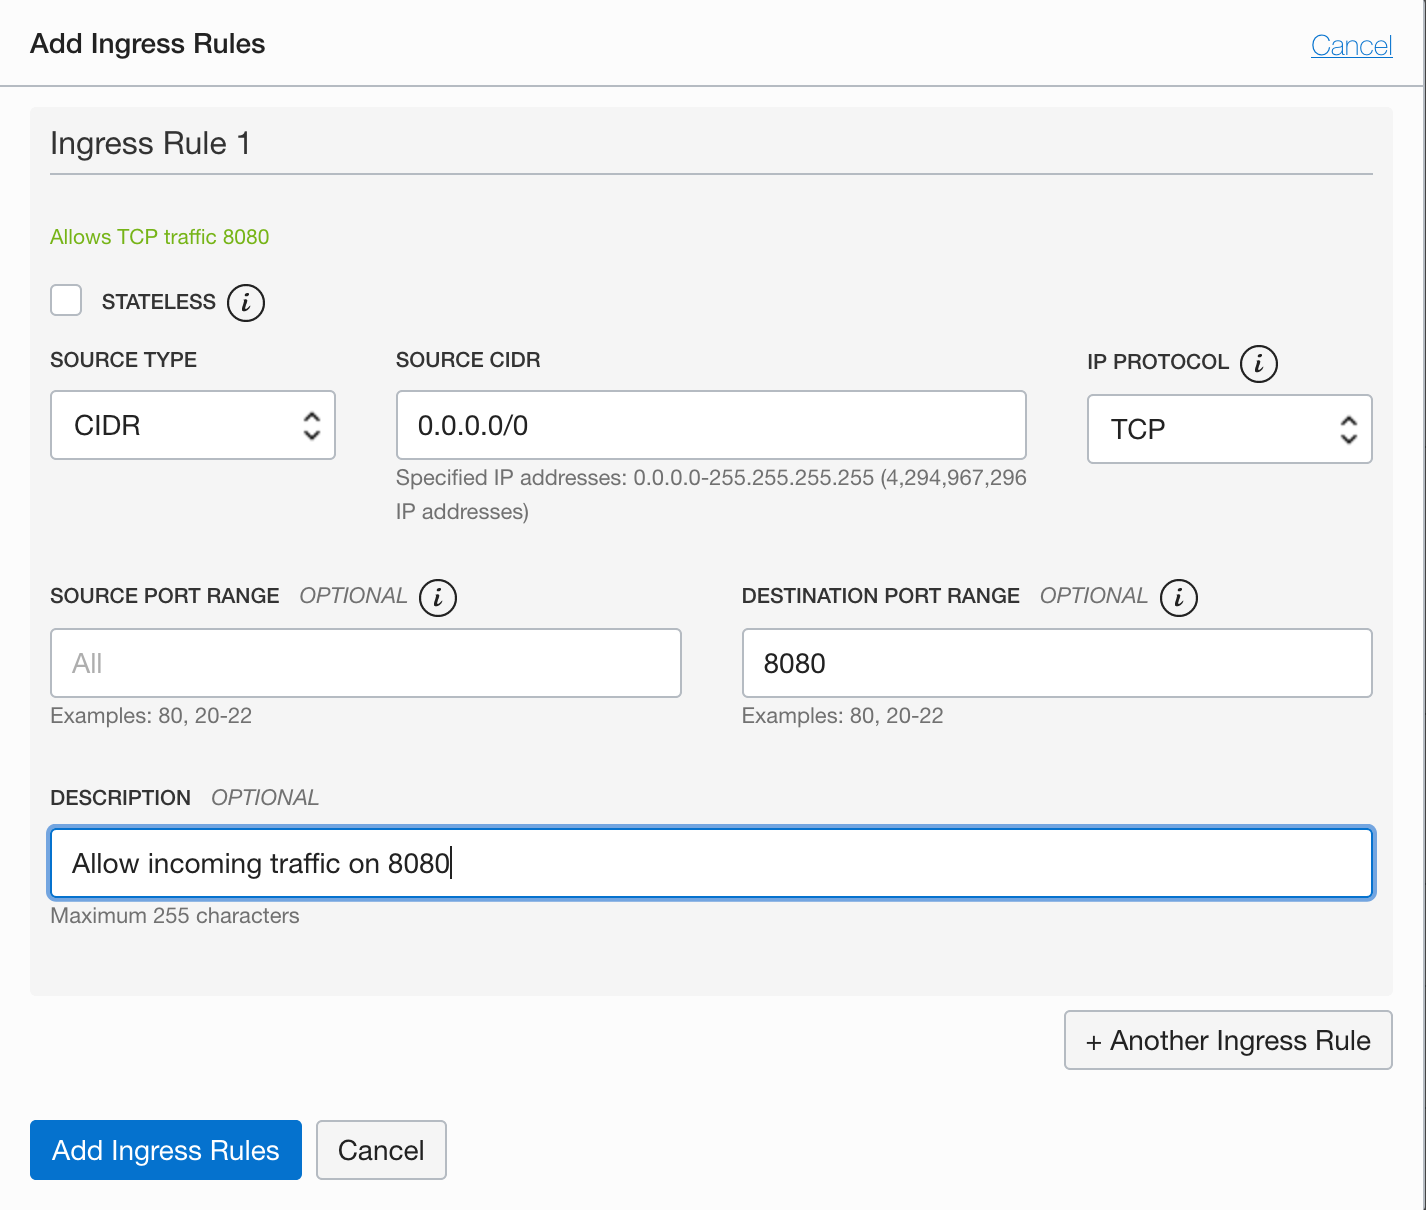
The rule allows traffic from all sources to use port 8080, so that the application can be reached from anywhere.
-
Return to the terminal window and run the following commands to restart the firewall in your running VM instance.
sudo firewall-cmd --permanent --add-port=8080/tcpsudo systemctl reload firewalld -
Restart the application:
Built with Maven:
./target/micronautguideBuilt with Gradle:
./build/native-image/application -
Open the application in a browser,
http://<SERVER_IP>:8080/conferences/random, where the<SERVER_IP>is your instance public IP address. Because the Micronaut@Controllerannotation is mapped to the/conferencespath, you have to append/conferences/randompath to the URL.http://<SERVER_IP>:8080/conferences/random -
(Optional) Open a new termianl window and send a GET request with
curl:curl http://<SERVER_IP>:8080/conferences/random
Congratulations! You have successfully completed this lab.
Learn More
- Take this lab to learn how to install GraalVM Enterprise and its features on Oracle Linux yourself.
- Get hands-on lab experience using GraalVM Native Image and start building cloud native Java applications by running the GraalVM Native Image Quick Start lab.
- Check the GraalVM Enterprise documentation
- Visit the product page at oracle.com
To end this session, click the End Session button in the toolbar.
More Learning Resources
Explore other labs on docs.oracle.com/learn or access more free learning content on the Oracle Learning YouTube channel. Additionally, visit education.oracle.com/learning-explorer to become an Oracle Learning Explorer.
For product documentation, visit Oracle Help Center.
Accelerate Applications in OCI with GraalVM Enterprise
F44879-03
March 2022
Copyright © 2022, Oracle and/or its affiliates.