Note:
- This tutorial is available in an Oracle-provided free lab environment.
- It uses example values for Oracle Cloud Infrastructure credentials, tenancy, and compartments. When completing your lab, substitute these values with ones specific to your cloud environment.
TASK 3: Create a Micronaut Application in VS Code
In this lab you are going to create a Micronaut application and configure your application to communicate with Oracle Autonomous Database.
The The GraalVM Tools for Micronaut Extension is pre-installed in VS Code as part of the provisioning process to save time. The Micronaut support also includes the Micronaut Launch application that allows you to create Micronaut projects through the interface inside VS Code. In combination with the GraalVM Tools for Java Extension, which is pre-installed as a dependency, you can run Micronaut projects on GraalVM Enterprise, and debug them directly from VS Code.
Estimated Time: 15 minutes
Task Contents
In this task you will:
- Create a new Micronaut application
- Configure the Micronaut application to connect to the Oracle Autonomous Database instance
- Configure Oracle Autonomous Database JDBC Drivers
- Configure Flyway to Create the Schema
- Define the SQL Migration Script
Step 1: Create a New Micronaut Application
-
In VS Code window, connected to a remote host, go to View, then Command Palette (Command Palette can be also opened by pressing F1, or the Ctrl+Shift+P hot keys combination for Linux), and search for “Micronaut”.
-
Select Micronaut: Create Micronaut Project to create a Micronaut project.
-
Follow the wizard prompts to configure the project:
-
Pick the latest Micronaut version available, and do not choose options with SNAPSHOT
-
Pick the application type: Micronaut Application
-
Pick the latest Java version available. At the time of creating this lab, it is GraalVM EE 22.0.0, Java 17
-
Provide the project name: ocidemo
-
Provide the base package name: com.example
-
Pick project’s language: Java
-
Add project’s features: Database: Micronaut Data JDBC and Database: Oracle Database Server. Press OK
-
Pick up Maven or Gradle as the build tool
-
Pick the test framework: JUnit
-
Choose the destination folder on your remote host machine to save the project files: type /home/opc/ and press OK to confirm.
Your newly created Micronaut project files will be opened in the current workspace in VS Code.
-
Step 2: Configure the Application to Connect to Oracle Autonomous Database Instance
Oracle Cloud Autonomous Database connection information and credentials are stored in the Oracle Wallet. With Micronaut you can automatically generate and download the Wallet and configure the data source. Complete the next steps to use automated data source configuration from the Wallet:
-
Click on your project folder name in the left panel, and open the
application.ymlfile undersrc/main/resources/. -
Replace the default file content with the following data:

micronaut: application: name: ocidemo datasources: default: ocid: ocid1.autonomousdatabase.oc1... walletPassword: WALLET_PASSWORD username: DATABASE_USERNAME password: DATABASE_PASSWORD -
Modify the default datasource connection settings.
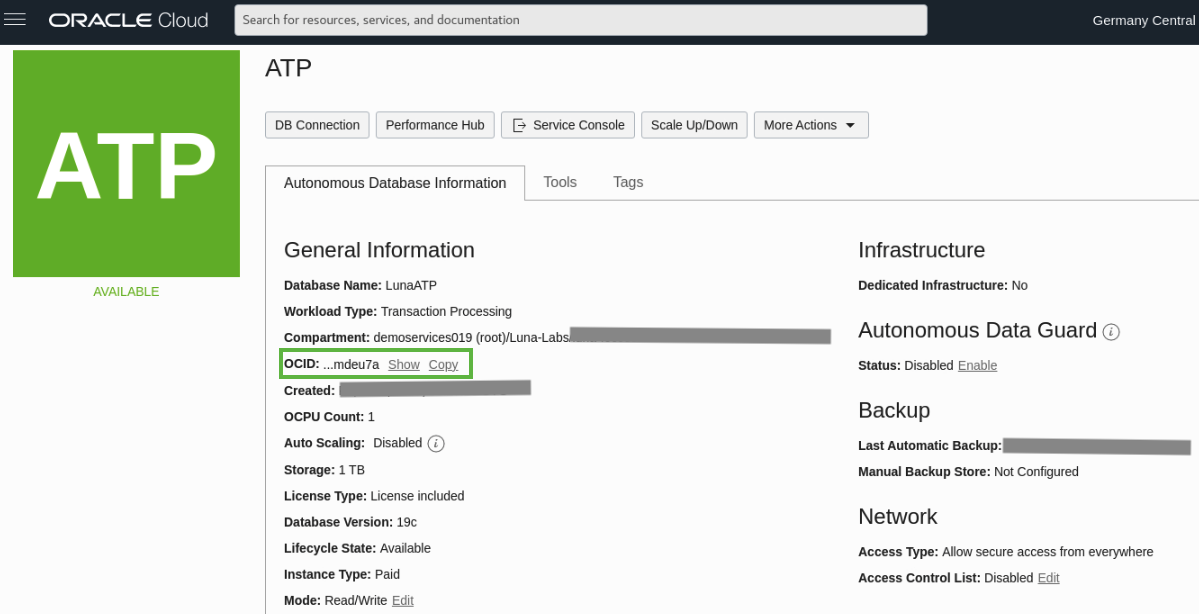
- Return the browser window, and you should see your Oracle Autonomous Database instance console. Under Autonomous Database Information > General Information, find and copy the
ocidvalue of your instance.
- Return to VS Code and, in
application.yml, OCID in theocidfield. - The
walletPasswordis to encrypt the keys inside the wallet and can be anything of your choice (must be at least eight characters long and must include at least one letter and either one numeric character or one special character). - The
usernameandpasswordvalues should be the name and the password you chose when creating a database schema user in the previous lab.
- Return the browser window, and you should see your Oracle Autonomous Database instance console. Under Autonomous Database Information > General Information, find and copy the
NOTE: In VS Code files are not saved automatically. To save your changes to a particular file, go to File, then Save, or Save All to save edits to a bunch of files. Alternatively, type
CTLR +S.
Step 3: Configure Oracle Autonomous Database JDBC Drivers
You have to specify the correct version of the Oracle Database Driver and the required modules in the pom.xml file in the root of your project.
-
Apply Oracle Database BOM 21.1.0.0 or above.
If you used Maven, open
pom.xmlin the root of your project and insert the following between therepositoriesand thedependenciessections:<dependencyManagement> <dependencies> <dependency> <groupId>com.oracle.database.jdbc</groupId> <artifactId>ojdbc-bom</artifactId> <version>21.1.0.0</version> <type>pom</type> <scope>import</scope> </dependency> </dependencies> </dependencyManagement>If you used Gradle, open
build.gradlein the root of your project and insert the following at the end of thedependenciesblock:implementation platform("com.oracle.database.jdbc:ojdbc-bom:21.1.0.0") -
Add a dependency on the
micronaut-oraclecloud-atpmodule.If you used Maven, open
pom.xmland insert the following inside thedependenciesblock:<dependency> <groupId>io.micronaut.oraclecloud</groupId> <artifactId>micronaut-oraclecloud-atp</artifactId> <version>1.2.1</version> <scope>runtime</scope> </dependency>If you used Gradle, open
build.gradleand add the following at the end of thedependenciesblock:runtimeOnly("io.micronaut.oraclecloud:micronaut-oraclecloud-atp") -
Enable OCI SDK logging.
If you used Maven, open the
pom.xmland add the following dependencies inside thedependenciesblock:<dependency> <groupId>org.apache.httpcomponents</groupId> <artifactId>httpclient</artifactId> <version>4.5.13</version> <scope>runtime</scope> <exclusions> <exclusion> <groupId>commons-logging</groupId> <artifactId>commons-logging</artifactId> </exclusion> </exclusions> </dependency> <dependency> <groupId>org.slf4j</groupId> <artifactId>jcl-over-slf4j</artifactId> <version>1.7.36</version> <scope>runtime</scope> </dependency>If you used Gradle, insert the following configuration right above the
dependenciesblock:configurations.all { resolutionStrategy.dependencySubstitution { substitute(module('commons-logging:commons-logging')) .using(module('org.slf4j:jcl-over-slf4j:1.7.36')) } }
Step 4: Configure Flyway to Create the Schema
Next you need to enable support for the Open Source Flyway database migration toolkit which lets you define SQL scripts that manage and version your database schema so you can gradually evolve the schema along with the new versions of your application.
-
Add a dependency on
micronaut-flyway.If you used Maven, open
pom.xmland insert the following inside thedependenciesblock:<dependency> <groupId>io.micronaut.flyway</groupId> <artifactId>micronaut-flyway</artifactId> <scope>runtime</scope> </dependency>If you used Gradle, open
build.gradleand add the following at the end of thedependenciesblock:runtimeOnly("io.micronaut.flyway:micronaut-flyway") -
Switch to the
src/main/resources/application.ymlfile and add the following configuration right below thedatasourcessection at line 10, to enable Flyway to run on startup:flyway: datasources: default: enabled: true -
Open the
application-test.ymlfile undersrc/test/resources/and replace the file default content with the following entry for Flyway which will contain your test configuration and set Flyway to clean the schema when the application starts, to ensure tests run with fresh data:flyway: datasources: default: clean-schema: true
NOTE: In a real world scenario you would setup a separate database to run your tests against.
Step 5: Defining the SQL Migration Script
The next step is to define the SQL migration script that will create the application’s initial schema.
-
Create
db/migrationfolder undersrc/main/resources. Right-click onsrc/main/resourcesto expand the content menu and select New Folder: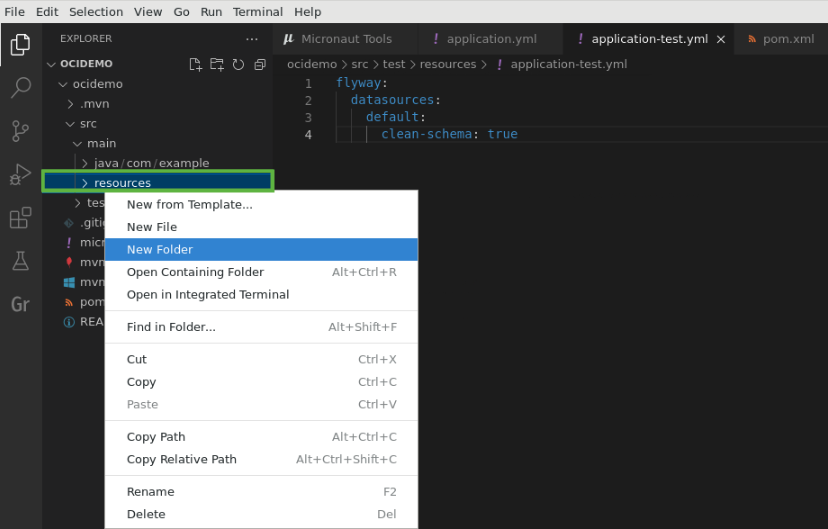
-
Create an SQL file. Right-click on
src/main/resources/db/migration/to expand the content menu and select New File. Name itV1__create-schema.sql. -
Add the following SQL code to the file:
CREATE TABLE "PET" ("ID" VARCHAR(36),"OWNER_ID" NUMBER(19) NOT NULL,"NAME" VARCHAR(255) NOT NULL,"TYPE" VARCHAR(255) NOT NULL);
CREATE TABLE "OWNER" ("ID" NUMBER(19) PRIMARY KEY NOT NULL,"AGE" NUMBER(10) NOT NULL,"NAME" VARCHAR(255) NOT NULL);
CREATE SEQUENCE "OWNER_SEQ" MINVALUE 1 START WITH 1 NOCACHE NOCYCLE;
The SQL script above will create
ownerandpettables to store data for owners and their pets in Autonomous Database.
You may now proceed to the next task.