Note:
- This tutorial is available in an Oracle-provided free lab environment.
- It uses example values for Oracle Cloud Infrastructure credentials, tenancy, and compartments. When completing your lab, substitute these values with ones specific to your cloud environment.
TASK 4: Implement Database Queries and Build a Micronaut Application
In this lab you will implement database queries and build a Micronaut application locally that connects to Oracle Autonomous Database.
Estimated Time: 30 minutes
Task Contents
In this task you will:
- Create Micronaut Data entities that map to Oracle Database tables
- Define Micronaut Data repositories to implement queries
- Expose Micronaut Controllers as REST endpoints
- Populate Data on Application Startup
- Run integration tests for the Micronaut application
Step 1: Create Micronaut Data Entities that Map to Oracle Database Tables
In the previous task you added the SQL script that would create a table called OWNER and a table called PET once executed. Next you have to define entity classes that can be used to read data from the database tables.
-
Create an entity class which will represent an
Ownerin thesrc/main/java/com/examplepackage. Right-click onsrc/main/java/com/exampleto expand the content menu, select New File, name itOwner.java, and paste the following code:
package com.example;

import io.micronaut.core.annotation.Creator;
import io.micronaut.data.annotation.GeneratedValue;
import io.micronaut.data.annotation.Id;
import io.micronaut.data.annotation.MappedEntity;

@MappedEntity
public class Owner {

  // The ID of the class uses a generated sequence value
  @Id
  @GeneratedValue
  private Long id;
  private final String name;
  private int age;

  // the constructor reads column values by the name of each constructor argument
  @Creator
  public Owner(String name) {
      this.name = name;
  }

  // each property of the class maps to a database column
  public int getAge() {
      return age;
  }

  public void setAge(int age) {
      this.age = age;
  }

  public String getName() {
      return name;
  }

  public Long getId() {
      return id;
  }

  public void setId(Long id) {
      this.id = id;
  }
}
The
@MappedEntityannotation is used to indicate that the entity is mapped to a database table. By default this will be a table using the same name as the class (in this caseowner).The columns of the table are represented by each Java property. In the above case an
idcolumn will be used to represent the primary key and@GeneratedValuewill set up the mapping to assume the use of anidentitycolumn in Autonomous Database.The
@Creatorannotation is used on the constructor that will be used to instantiate the mapped entity and is also used to express required columns. In this case thenamecolumn is required and immutable whilst theagecolumn is not required and can be set independently using thesetAgesetter. -
Create a
Pet.javafile that will represent thePetentity to model apettable undersrc/main/java/com/example:package com.example; import io.micronaut.core.annotation.Creator; import io.micronaut.core.annotation.Nullable; import io.micronaut.data.annotation.AutoPopulated; import io.micronaut.data.annotation.Id; import io.micronaut.data.annotation.MappedEntity; import io.micronaut.data.annotation.Relation; import java.util.UUID; @MappedEntity public class Pet { // This class uses an auto populated UUID for the primary key @Id @AutoPopulated private UUID id; private final String name; // A relation is defined between Pet and Owner @Relation(Relation.Kind.MANY_TO_ONE) private final Owner owner; private PetType type = PetType.DOG; // The constructor defines the columns to be read @Creator public Pet(String name, @Nullable Owner owner) { this.name = name; this.owner = owner; } public Owner getOwner() { return owner; } public String getName() { return name; } public UUID getId() { return id; } public void setId(UUID id) { this.id = id; } public PetType getType() { return type; } public void setType(PetType type) { this.type = type; } public enum PetType { DOG, CAT } }Note that the
Petclass uses an automatically populatedUUIDas the primary key to demonstrate differing approaches to ID generation.A relationship between the
Petclass and theOwnerclass is also defined using the@Relation(Relation.Kind.MANY_TO_ONE)annotation, indicating this is a many-to-one relationship.With that done it is time to move onto defining repository interfaces to implement queries.
Step 2: Define Micronaut Data Repositories to Implement Queries
Micronaut Data supports the notion of defining interfaces that automatically implement SQL queries for you at compilation time using the data repository pattern. In this section you will take advantage of this Micronaut Data feature.
-
Create a separate folder called
repositoriesundersrc/main/java/com/example. -
Define a new repository interface that extends from
CrudRepositoryand is annotated with@JdbcRepositoryusing theORACLEdialect in a file calledOwnerRepository.java:package com.example.repositories; import com.example.Owner; import io.micronaut.data.jdbc.annotation.JdbcRepository; import io.micronaut.data.model.query.builder.sql.Dialect; import io.micronaut.data.repository.CrudRepository; import java.util.List; import java.util.Optional; // The @JdbcRepository annotation indicates the database dialect @JdbcRepository(dialect = Dialect.ORACLE) public interface OwnerRepository extends CrudRepository<Owner, Long> { @Override List<Owner> findAll(); // This method will compute at compilation time a query such as // SELECT ID, NAME, AGE FROM OWNER WHERE NAME = ? Optional<Owner> findByName(String name); }The
CrudRepositoryinterface takes 2 generic argument types. The first is the type of the entity (in this caseOwner) and the second is the type of the ID (in this caseLong).The
CrudRepositoryinterface defines methods that allow you to create, read, update, and delete (CRUD) entities from the database with the appropriate SQL inserts, selects, updates and deletes computed for you at compilation time. For more information, see the Javadoc for CrudRepository.You can define methods within the interface that perform JDBC queries and automatically handle all the intricate details for you such as defining correct transaction semantics (read-only transactions for queries), executing the query and mapping the result set to the
Ownerentity class you defined earlier.The
findByNamemethod defined above will produce a query such asSELECT ID, NAME, AGE FROM OWNER WHERE NAME = ?automatically at compilation time.For more information on query methods and the types of queries you can define see the documentation for query methods in the Micronaut Data documentation.
-
With the
OwnerRepositoryin place, define another repository and this time using a data transfer object (DTO) to perform an optimized query. So first, you need to create the DTO class in a file calledNameDTO.javaundersrc/main/java/com/example/repositories:package com.example.repositories; import io.micronaut.core.annotation.Introspected; @Introspected public class NameDTO { private String name; public String getName() { return name; } public void setName(String name) { this.name = name; } }A DTO is a simple POJO that allows you to select only the columns a particular query needs, thus producing a more optimized query.
-
Define the repository called
PetRepositoryin a file calledPetRepository.javafor thePetentity that uses the DTO in the same locationsrc/main/java/com/example/repositories:package com.example.repositories; import com.example.Pet; import io.micronaut.data.annotation.Join; import io.micronaut.data.jdbc.annotation.JdbcRepository; import io.micronaut.data.model.query.builder.sql.Dialect; import io.micronaut.data.repository.PageableRepository; import java.util.List; import java.util.Optional; import java.util.UUID; @JdbcRepository(dialect = Dialect.ORACLE) public interface PetRepository extends PageableRepository<Pet, UUID> { List<NameDTO> list(); @Join("owner") Optional<Pet> findByName(String name); }Take note of the
listmethod that returns the DTO. This method will again be implemented for you at compilation time, but this time instead of retrieving all the columns of thePettable, it will only retrieve thenamecolumn and any other columns you may define.The
@Joinannotation will query and instantiate the joined object (Owner) and assign it to theOwnerfield of the queriedPet.The
findByNamemethod is also interesting as it uses another important feature of Micronaut Data which is the@Joinannotation. It allows you to specify join paths so that you retrieve exactly the data you need via database joins resulting in much more efficient queries.
With the data repositories in place, move on to exposing REST endpoints.
Step 3: Expose Micronaut Controllers as REST Endpoints
REST endpoints in Micronaut are easy to write and are defined as controllers (as per the MVC pattern).
-
Create a folder
controllersundersrc/main/java/com/example/. -
Define a new
OwnerControllerclass in a file calledOwnerController.java:package com.example.controllers; import java.util.List; import java.util.Optional; import javax.validation.constraints.NotBlank; import com.example.Owner; import com.example.repositories.OwnerRepository; import io.micronaut.http.annotation.Controller; import io.micronaut.http.annotation.Get; import io.micronaut.scheduling.TaskExecutors; import io.micronaut.scheduling.annotation.ExecuteOn; @Controller("/owners") @ExecuteOn(TaskExecutors.IO) class OwnerController { private final OwnerRepository ownerRepository; OwnerController(OwnerRepository ownerRepository) { this.ownerRepository = ownerRepository; } @Get("/") List<Owner> all() { return ownerRepository.findAll(); } @Get("/{name}") Optional<Owner> byName(@NotBlank String name) { return ownerRepository.findByName(name); } }A controller class is defined with the
@Controllerannotation which you can use to define the root URI that the controller maps to (in this case/owners).Notice the
@ExecuteOnannotation which is used to tell Micronaut that the controller performs I/O communication with a database and, therefore, operations should run on the I/O thread pool.The
OwnerControllerclass uses Micronaut dependency injection to obtain a reference to theOwnerRepositoryrepository interface you defined earlier and is used to implement two endpoints:/- The root endpoint lists all the owners/{name}- The second endpoint uses a URI template to allow looking up an owner by name. The value of the URI variable{name}is provided as a parameter to thebyNamemethod.
-
Next, define another REST endpoint called
PetControllerin a file calledPetController.javaundersrc/main/java/com/example/controllers:package com.example.controllers; import java.util.List; import java.util.Optional; import com.example.repositories.NameDTO; import com.example.Pet; import com.example.repositories.PetRepository; import io.micronaut.http.annotation.Controller; import io.micronaut.http.annotation.Get; import io.micronaut.scheduling.TaskExecutors; import io.micronaut.scheduling.annotation.ExecuteOn; @ExecuteOn(TaskExecutors.IO) @Controller("/pets") class PetController { private final PetRepository petRepository; PetController(PetRepository petRepository) { this.petRepository = petRepository; } @Get("/") List<NameDTO> all() { return petRepository.list(); } @Get("/{name}") Optional<Pet> byName(String name) { return petRepository.findByName(name); } }This time the
PetRepositoryis injected to expose a list of pets and pets by name.
Step 4: Populate Data on Application Startup
The next step is to populate some application data on startup. To do this you can use Micronaut application events.
Open the src/main/java/com/example/Application.java class and replace the initial file content with the following:
![]()
package com.example;

import com.example.repositories.OwnerRepository;
import com.example.repositories.PetRepository;
import io.micronaut.context.event.StartupEvent;
import io.micronaut.runtime.Micronaut;
import io.micronaut.runtime.event.annotation.EventListener;

import jakarta.inject.Singleton;
import javax.transaction.Transactional;
import java.util.Arrays;

@Singleton
public class Application {
    private final OwnerRepository ownerRepository;
    private final PetRepository petRepository;

    Application(OwnerRepository ownerRepository, PetRepository petRepository) {
        this.ownerRepository = ownerRepository;
        this.petRepository = petRepository;
    }

    public static void main(String[] args) {
        Micronaut.run(Application.class);
    }

    @EventListener
    @Transactional
    void init(StartupEvent event) {
        // clear out any existing data
        petRepository.deleteAll();
        ownerRepository.deleteAll();

        // create data
        Owner fred = new Owner("Fred");
        fred.setAge(45);
        Owner barney = new Owner("Barney");
        barney.setAge(40);
        ownerRepository.saveAll(Arrays.asList(fred, barney));

        Pet dino = new Pet("Dino", fred);
        Pet bp = new Pet("Baby Puss", fred);
        bp.setType(Pet.PetType.CAT);
        Pet hoppy = new Pet("Hoppy", barney);

        petRepository.saveAll(Arrays.asList(dino, bp, hoppy));
    }
}
Note that the constructor is modified to dependency inject the repository definitions so data can be persisted.
Finally the init method is annotated with @EventListener with an argument to receive a StartupEvent. This event is called once the application is up and running, and can be used to persist data when your application is ready to do so.
The rest of the example demonstrates saving a few entities using the saveAll method of the CrudRepository interface.
Notice that javax.transaction.Transactional is declared on the method which ensures that Micronaut Data wraps the execution of the init method in a JDBC transaction that is rolled back if an exception occurs during the execution of the method.
Step 5: Run Integration Tests for the Micronaut Application
The application has already been setup with a single test that checks if the application can startup successfully (and hence will test the logic of the init method defined in the previous section).
-
From the top navigation, go to Terminal, then New Terminal.
-
Run the
testgoal to execute tests:./mvnw test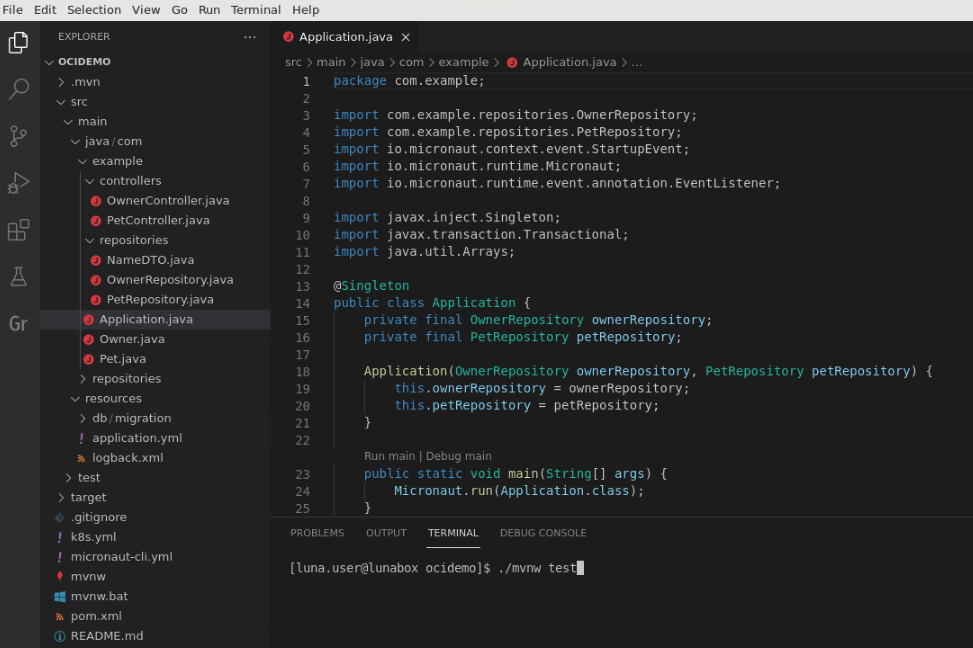
Alternatively, if you are using Gradle, run the
testtask:./gradlew testYou should see the BUILD SUCCESS message at the end of the test run.
You may now proceed to the next task.