Note:
- This tutorial is available in an Oracle-provided free lab environment.
- It uses example values for Oracle Cloud Infrastructure credentials, tenancy, and compartments. When completing your lab, substitute these values with ones specific to your cloud environment.
Configure public DNS for Oracle Cloud VMware Solution SDDC workloads on VMware NSX-T overlay
Introduction
This tutorial is a step-by-step guide for configuring public DNS resolution for workloads running on VMware NSX-T overlay networks within Oracle Cloud VMware Solution. The Oracle Cloud Infrastructure (OCI) team’s focus is to enable you, our customers, so you can perform this administrative task in your environment when necessary by following this tutorial.
Objectives
The objective is to let VMware software-defined data center (SDDC) workloads running on the VMware NSX-T overlay networks to access the public domain name system (DNS) servers out of the Oracle Cloud VMware Solution SDDC environment.
Prerequisites
- VMware SDDC within your tenancy with appropriate permissions
- VMware SDDC VCN attached to a Network Address Translation (NAT) gateway or internet gateway
- Overlay network configuration on VMware NSX-T
About VMware NSX-T DNS
IP address management in VMware NSX-T can be configured using DNS and Dynamic Host Configuration Protocol (DHCP). VMware NSX-T is not functioning as an DNS server but configured to function as a ‘forwarder’ whereby it sends DNS queries to an upstream DNS server in the environment, here we are forwarding the request to Google DNS Sever.
Some additional need to know information about DNS forwarders:
- DNS forwarders cache results from prior requests.
- The local cache is checked first when a DNS forwarder receives a DNS request.
Task 1: Deploy a Test VM
For the following configuration and example, use the well-known Google DNS server IP: 8.8.8.8.
Configure DNS forwarding on VMware NSX-T to allow SDDC virtual machines (VMs) to forward their DNS queries to Google DNS servers.
-
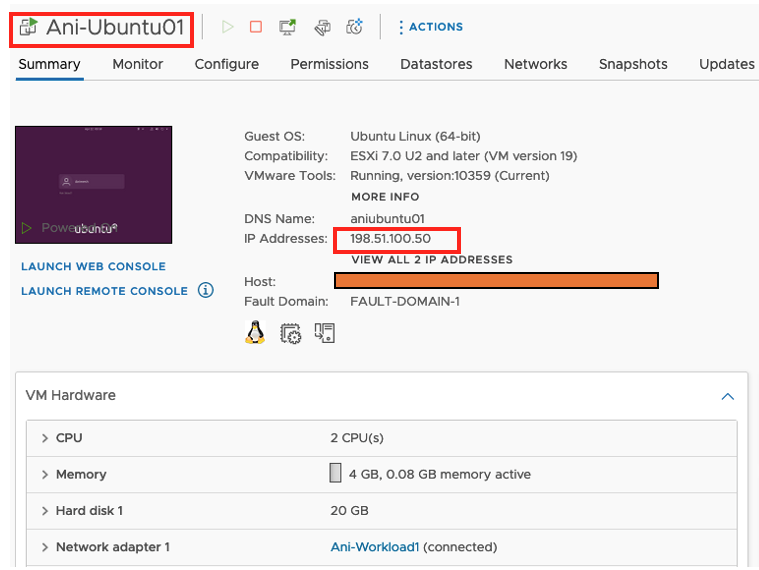
Log in to the vCenter and setup a test VM. In this example, use Ubuntu 20.04 attached to an overlay VMware NSX-T network.
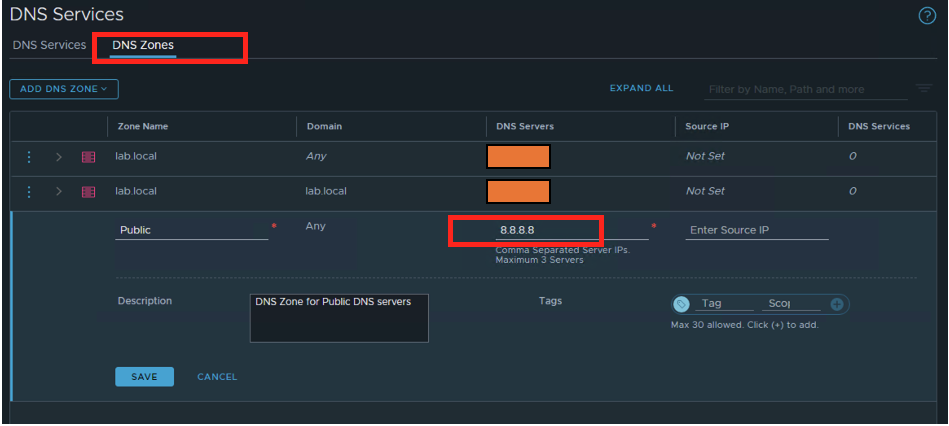
Task 2: Configure a Public DNS Zone With the Public DNS Server IP
-
Under NSX-T Networking, in DNS Zones, create a new DNS zone as Public and set the Public DNS server IP, in this case 8.8.8.8.
Note: For, this example we will use it as the default zone. When you configure a DNS zone, you can specify a source IP for a DNS forwarder to use when forwarding DNS queries to an upstream DNS server. If you do not specify a source IP, the DNS query packet’s source IP will be the DNS forwarder’s listener IP.
Specifying a source IP is needed if the listener IP is an internal address that is not reachable from the external upstream DNS server. To ensure that the DNS response packets are routed back to the forwarder, a dedicated source IP is needed. Alternatively, you can configure Source Network Address Translation (SNAT) on the logical router to translate the listener IP to a public IP. In this case, you do not need to specify a source IP, we will be using the SNAT feature on VMware NSX-T for the same.
-
Create a DNS Service. In DNS Services, add the DNS Service IP (192.0.2.254) and attach it to Tier1 Gateway. For the Default DNS Zone, use the DNS zone created in the previous step.
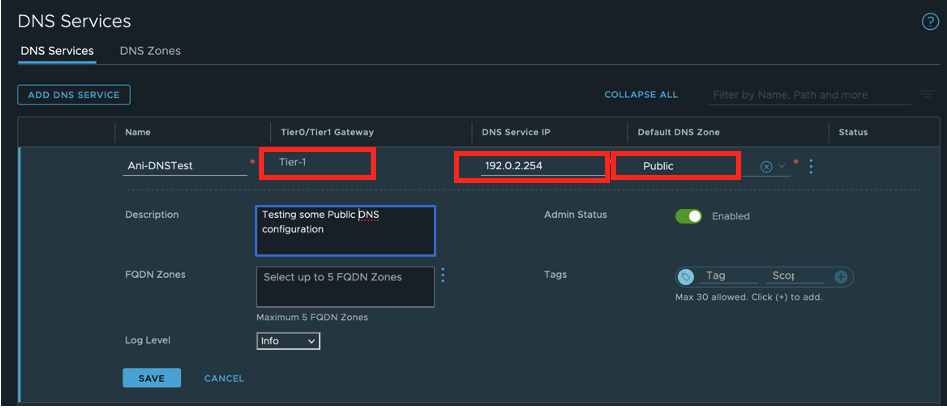
Verify that the newly created DNS Service status indicates “Success”.
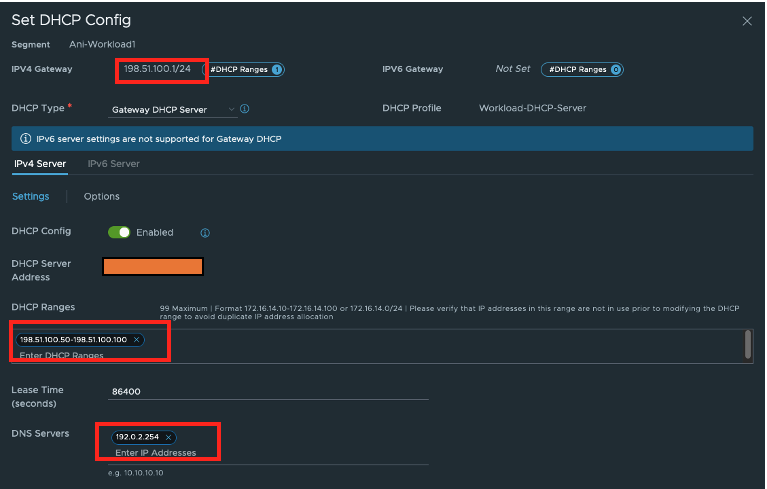
Task 3: Configure the VMware NSX-T Overlay Segment and DHCP Configuration
-
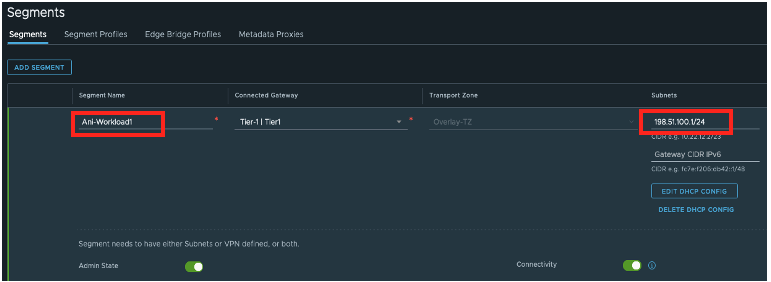
Create a new overlay segment on Vmware NSX-T and configure DNS by adding the DNS service IP. The VMs or clients attached to this segment will use the DNS service IP as the endpoint. Use Edit DHCP Config to configure it. We are using DHCP for this example.
-
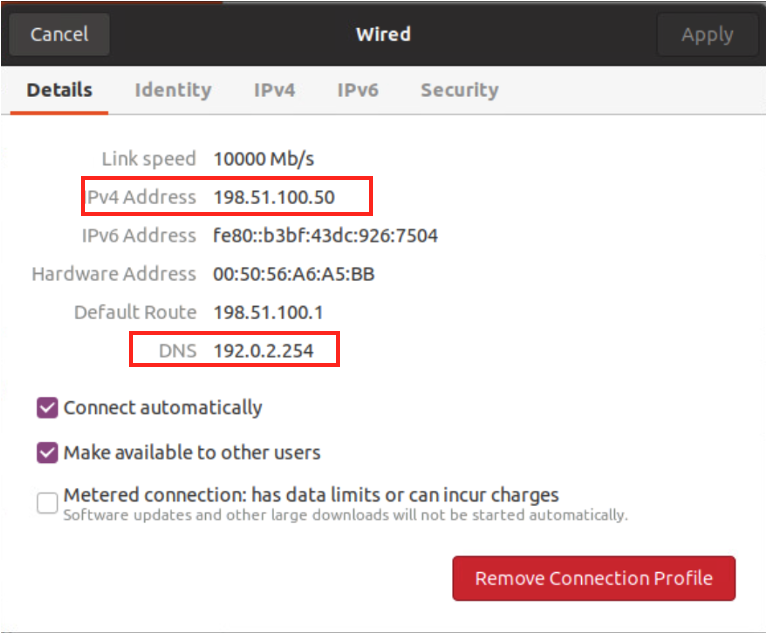
Validate that the settings have taken effect on the Ubuntu machine, as seen in this example:
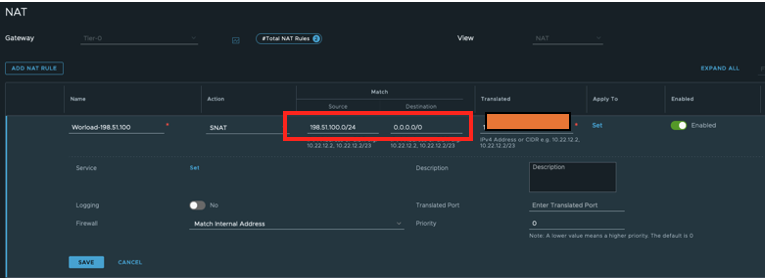
Task 4: Configure VMware NSX-T NAT Rules
-
Configure the VMware NSX-T NAT rule to allow SDDC overlay VMs to access external networks or public networks. Here, we are doing SNAT for the segment network 198.51.100.0/24 to VMware NSX-T HA VIP IP (check the HA VIP in your deployed SDDC).
-
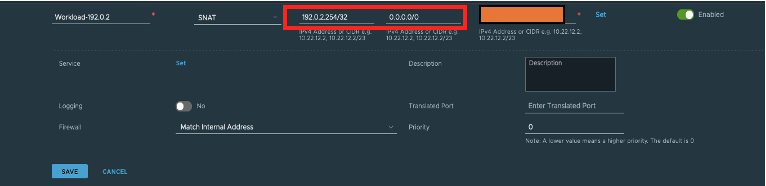
Write a SNAT rule specifically for DNS Service IP 192.0.2.254/32.
Note: Because the DNS Service IP is a different IP from the overlay segment range, a separate NAT rule must be written for the forwarded requests to reach 8.8.8.8. If you are using an IP from the overlay segment range, a separate NAT rule on VMware NSX-T is not required.
Note: Check route-advertisement on both Tier-1 gateway and Tier-0 and ensure DNS Forwarder and NAT IP are enabled.
Bonus Option to Make VMware NSX-T Segments Reachable from a VCN Configuration
Now that the configuration is complete from the VMware NSX-T end, if required for the VMware NSX-T overlay segments to be reachable from the VCN segments, a route can be added to the Oracle Cloud VMware Solution VLAN networks towards the private IP (VMware NSX-T VIP).
See the following screen shot for example route rules and appropriate ingress rules for the protocol and ports to be open on network security groups. As mentioned earlier, for this example we are using SNAT on the Tier-0 router with Tier-0 Uplink VIP IP.

After you try to ping google.com or anything else on the internet, it will be able to resolve the DNS from the VM running on the VMware NSX-T overlay.
Acknowledgements
- Author - Animesh Dixit (Principal Cloud Architect)
More Learning Resources
Explore other labs on docs.oracle.com/learn or access more free learning content on the Oracle Learning YouTube channel. Additionally, visit education.oracle.com/learning-explorer to become an Oracle Learning Explorer.
For product documentation, visit Oracle Help Center.
Configure public DNS for Oracle Cloud VMWare Solution SDDC workloads on VMware NSX-T overlay
F56452-01
April 2022
Copyright © 2022, Oracle and/or its affiliates.