Apply Exadata Live Update for VM Operating System Updates
Introduction
Exadata Live Update lets you apply eligible VM operating system fixes while the virtual machines remain online. This helps you address security requirements without temporarily reducing VM cluster capacity for a rolling reboot.
The feature is available for eligible Exadata VM clusters in Oracle Exadata Database Service on Dedicated Infrastructure and Oracle Exadata Database Service on Cloud@Customer that use a supported Exadata Image release.
When an image contains updates that cannot be installed online, it applies the eligible online fixes first and records the remaining changes as pending updates. You can apply those pending changes later through the standard rolling-reboot process.
For VM operating system updates, there are two update paths to choose from:
| Option | What it does |
|---|---|
| Full update | Applies the target image using rolling reboots. Databases remain available, but each VM is restarted in turn. |
| Online update | Applies eligible updates while the VMs remain online. Any fixes that require a reboot remain pending. |
For Online update path, you have options to select update scope:
- High CVSS only applies eligible security fixes with CVSS scores 7–10.
- All CVSS applies eligible security fixes with CVSS scores 1–10.
- All online updates applies the broadest supported set of eligible online fixes including All CVSS fixes.
CVSS (Common Vulnerability Scoring System) is an industry standard for describing the severity of a security vulnerability. Its Base Score ranges from 0.0 to 10.0, with higher scores indicating greater severity. Oracle uses CVSS Base Metrics in security advisory risk matrices; these metrics reflect characteristics intrinsic to a vulnerability, while temporal and environmental factors can change over time or depend on your environment.
Use the CVSS score to help prioritize the eligible security fixes included in an online update. For Oracle’s scoring interpretation, including CVSS version 3.1 details and metric definitions, see Use of Common Vulnerability Scoring System (CVSS) by Oracle.
Objectives
In this tutorial, you will:
- Apply VM operating system online update with High CVSS only scope.
- Apply VM operating system online update with All CVSS scope.
- Apply VM operating system online update with All online updates scope.
- Review and apply pending updates, if required.
Note: You do not need to complete these tasks sequentially. Choose and perform the update-scope (High CVSS/All CVSS/All Online) that meets your requirements; review and apply pending updates only when applicable.
Prerequisites
Before you begin, make sure you have:
- Access to the Oracle Cloud Infrastructure Console.
- An eligible Exadata VM cluster in Oracle Exadata Database Service on Dedicated Infrastructure or Exadata Database Service on Cloud@Customer.
- A supported Exadata Image release and an available target OS image update.
- IAM permissions to view and update the VM cluster and to view work requests.
Important: A precheck is strongly recommended before every update. Review the precheck results and resolve any reported issues before you apply the update.
Task 1: Apply VM operating system online update with High CVSS only scope
-
Open the navigation menu and select Oracle AI Database.
-
Select Oracle Exadata Database Service on Dedicated Infrastructure or Oracle Exadata Database Service on Cloud@Customer.
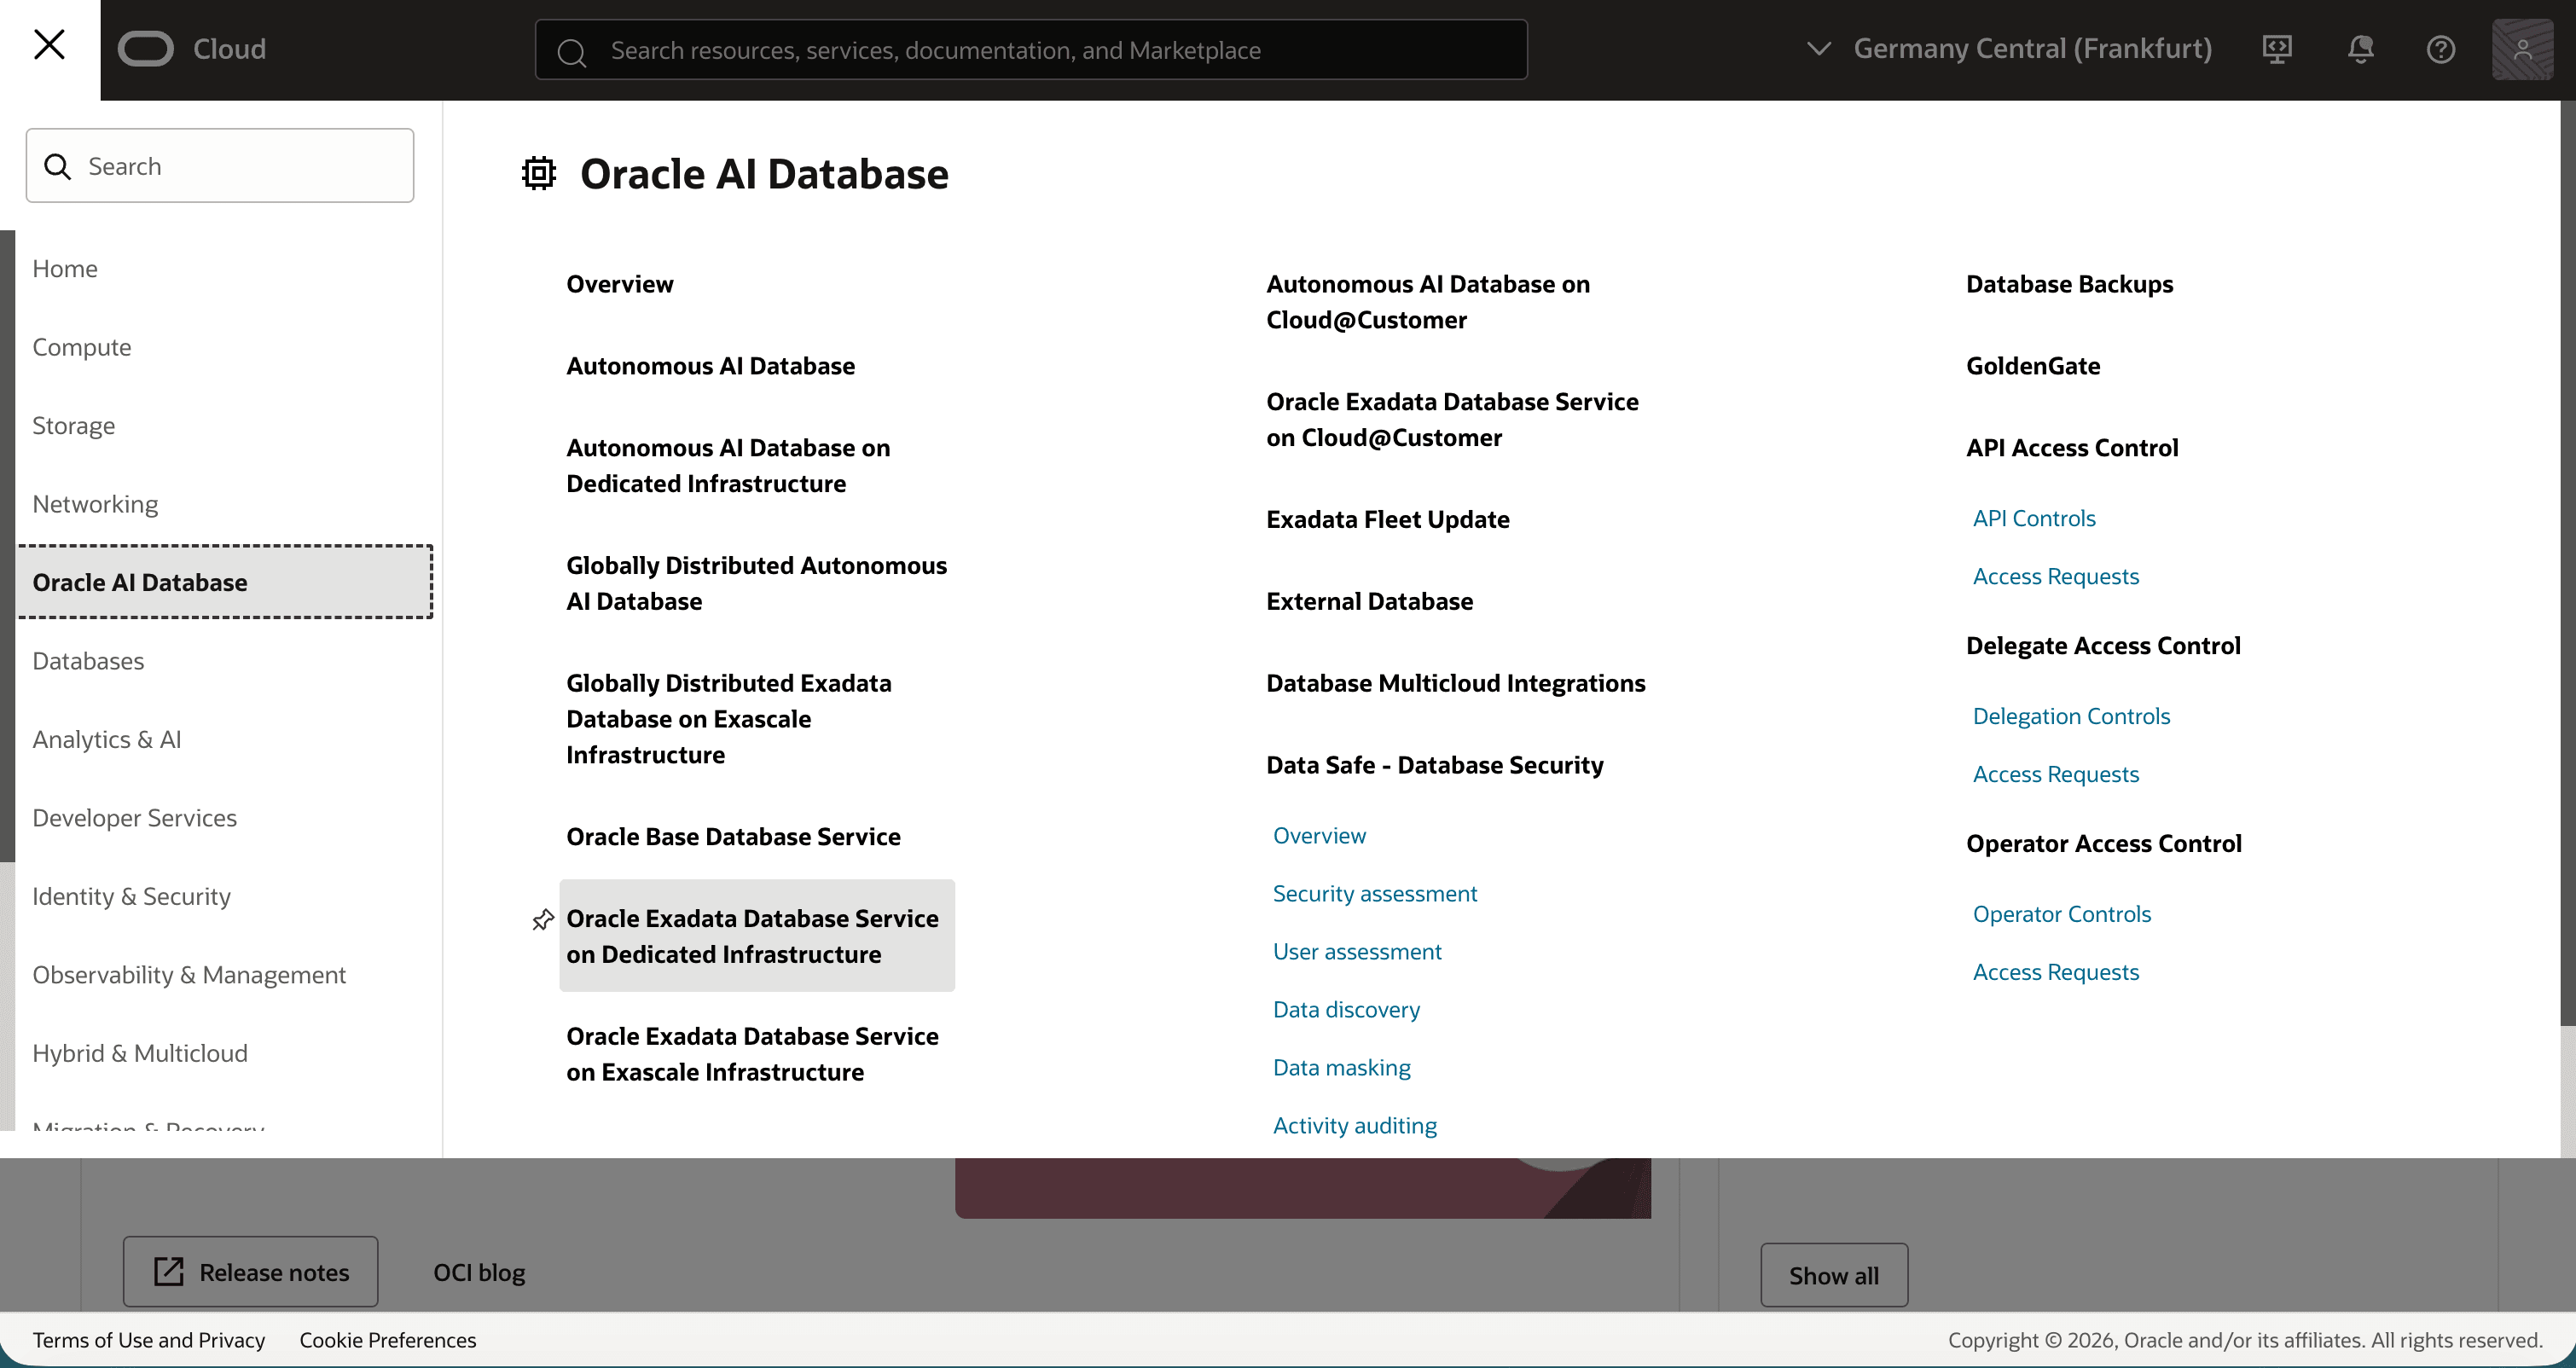
Description of the illustration live-update-console-service-navigation.png
-
Open Exadata VM Clusters, choose the correct compartment, and select the VM cluster.
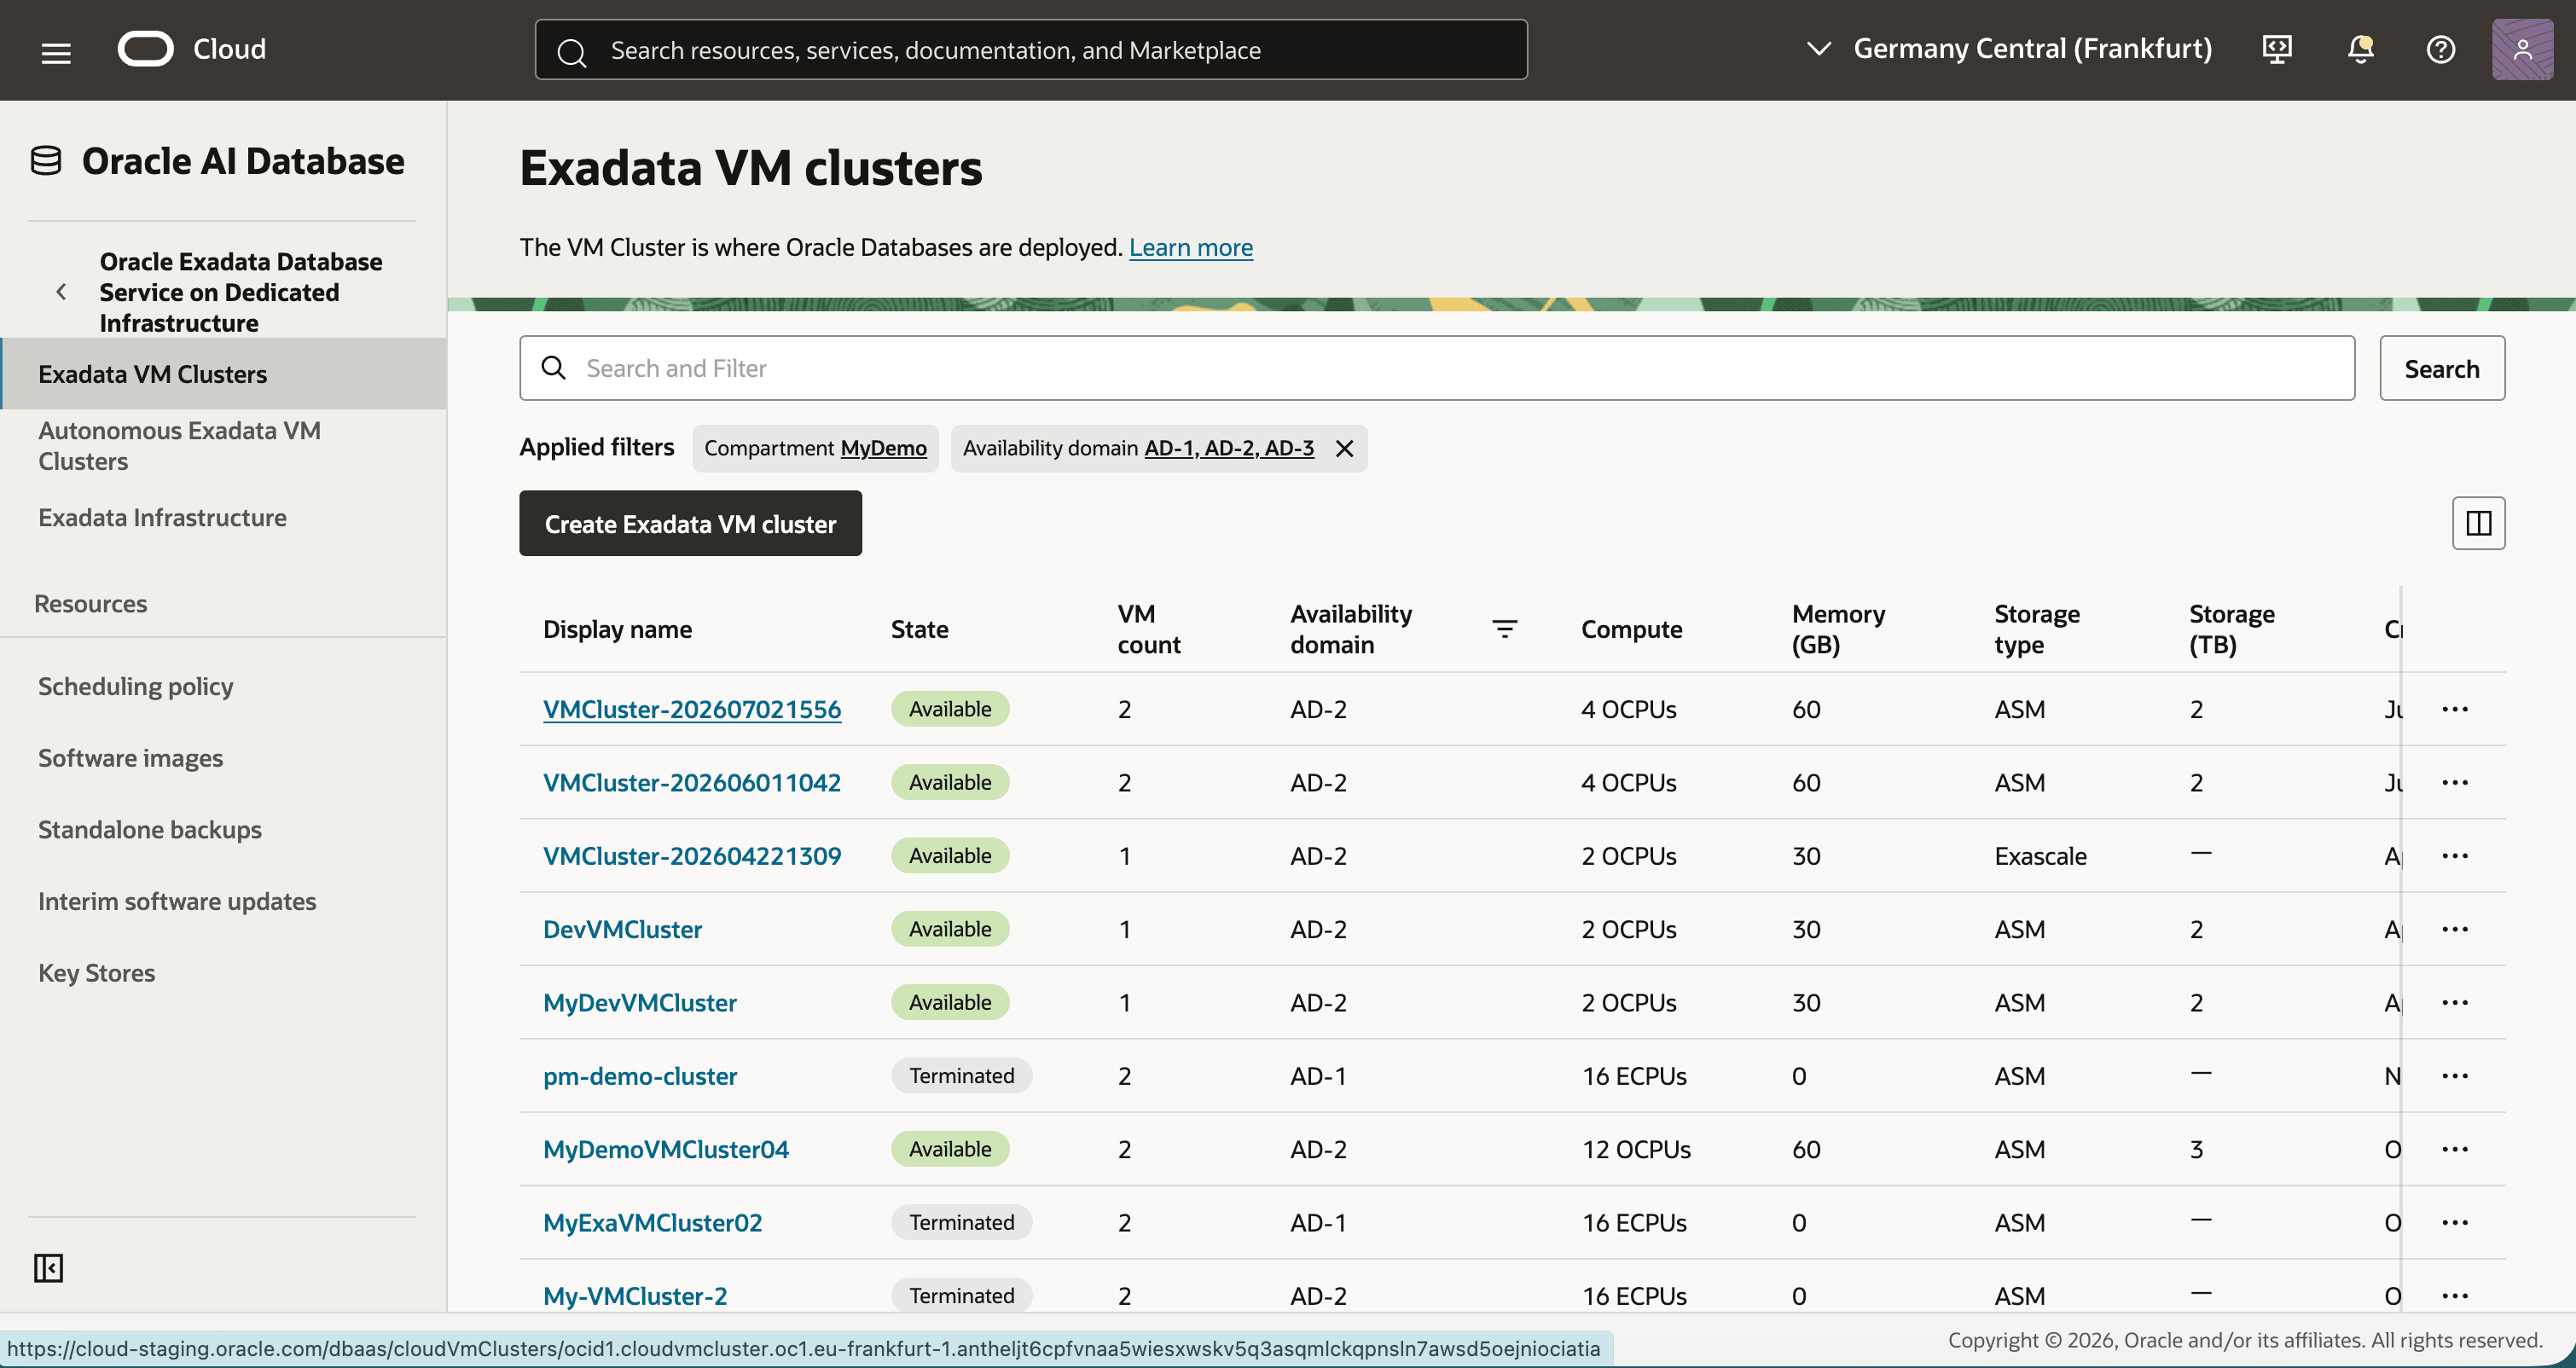
Description of the illustration live-update-vm-clusters-list.png
-
On the VM cluster details page, review the current Exadata image version. A New versions available indicator identifies an image that can be evaluated for update.
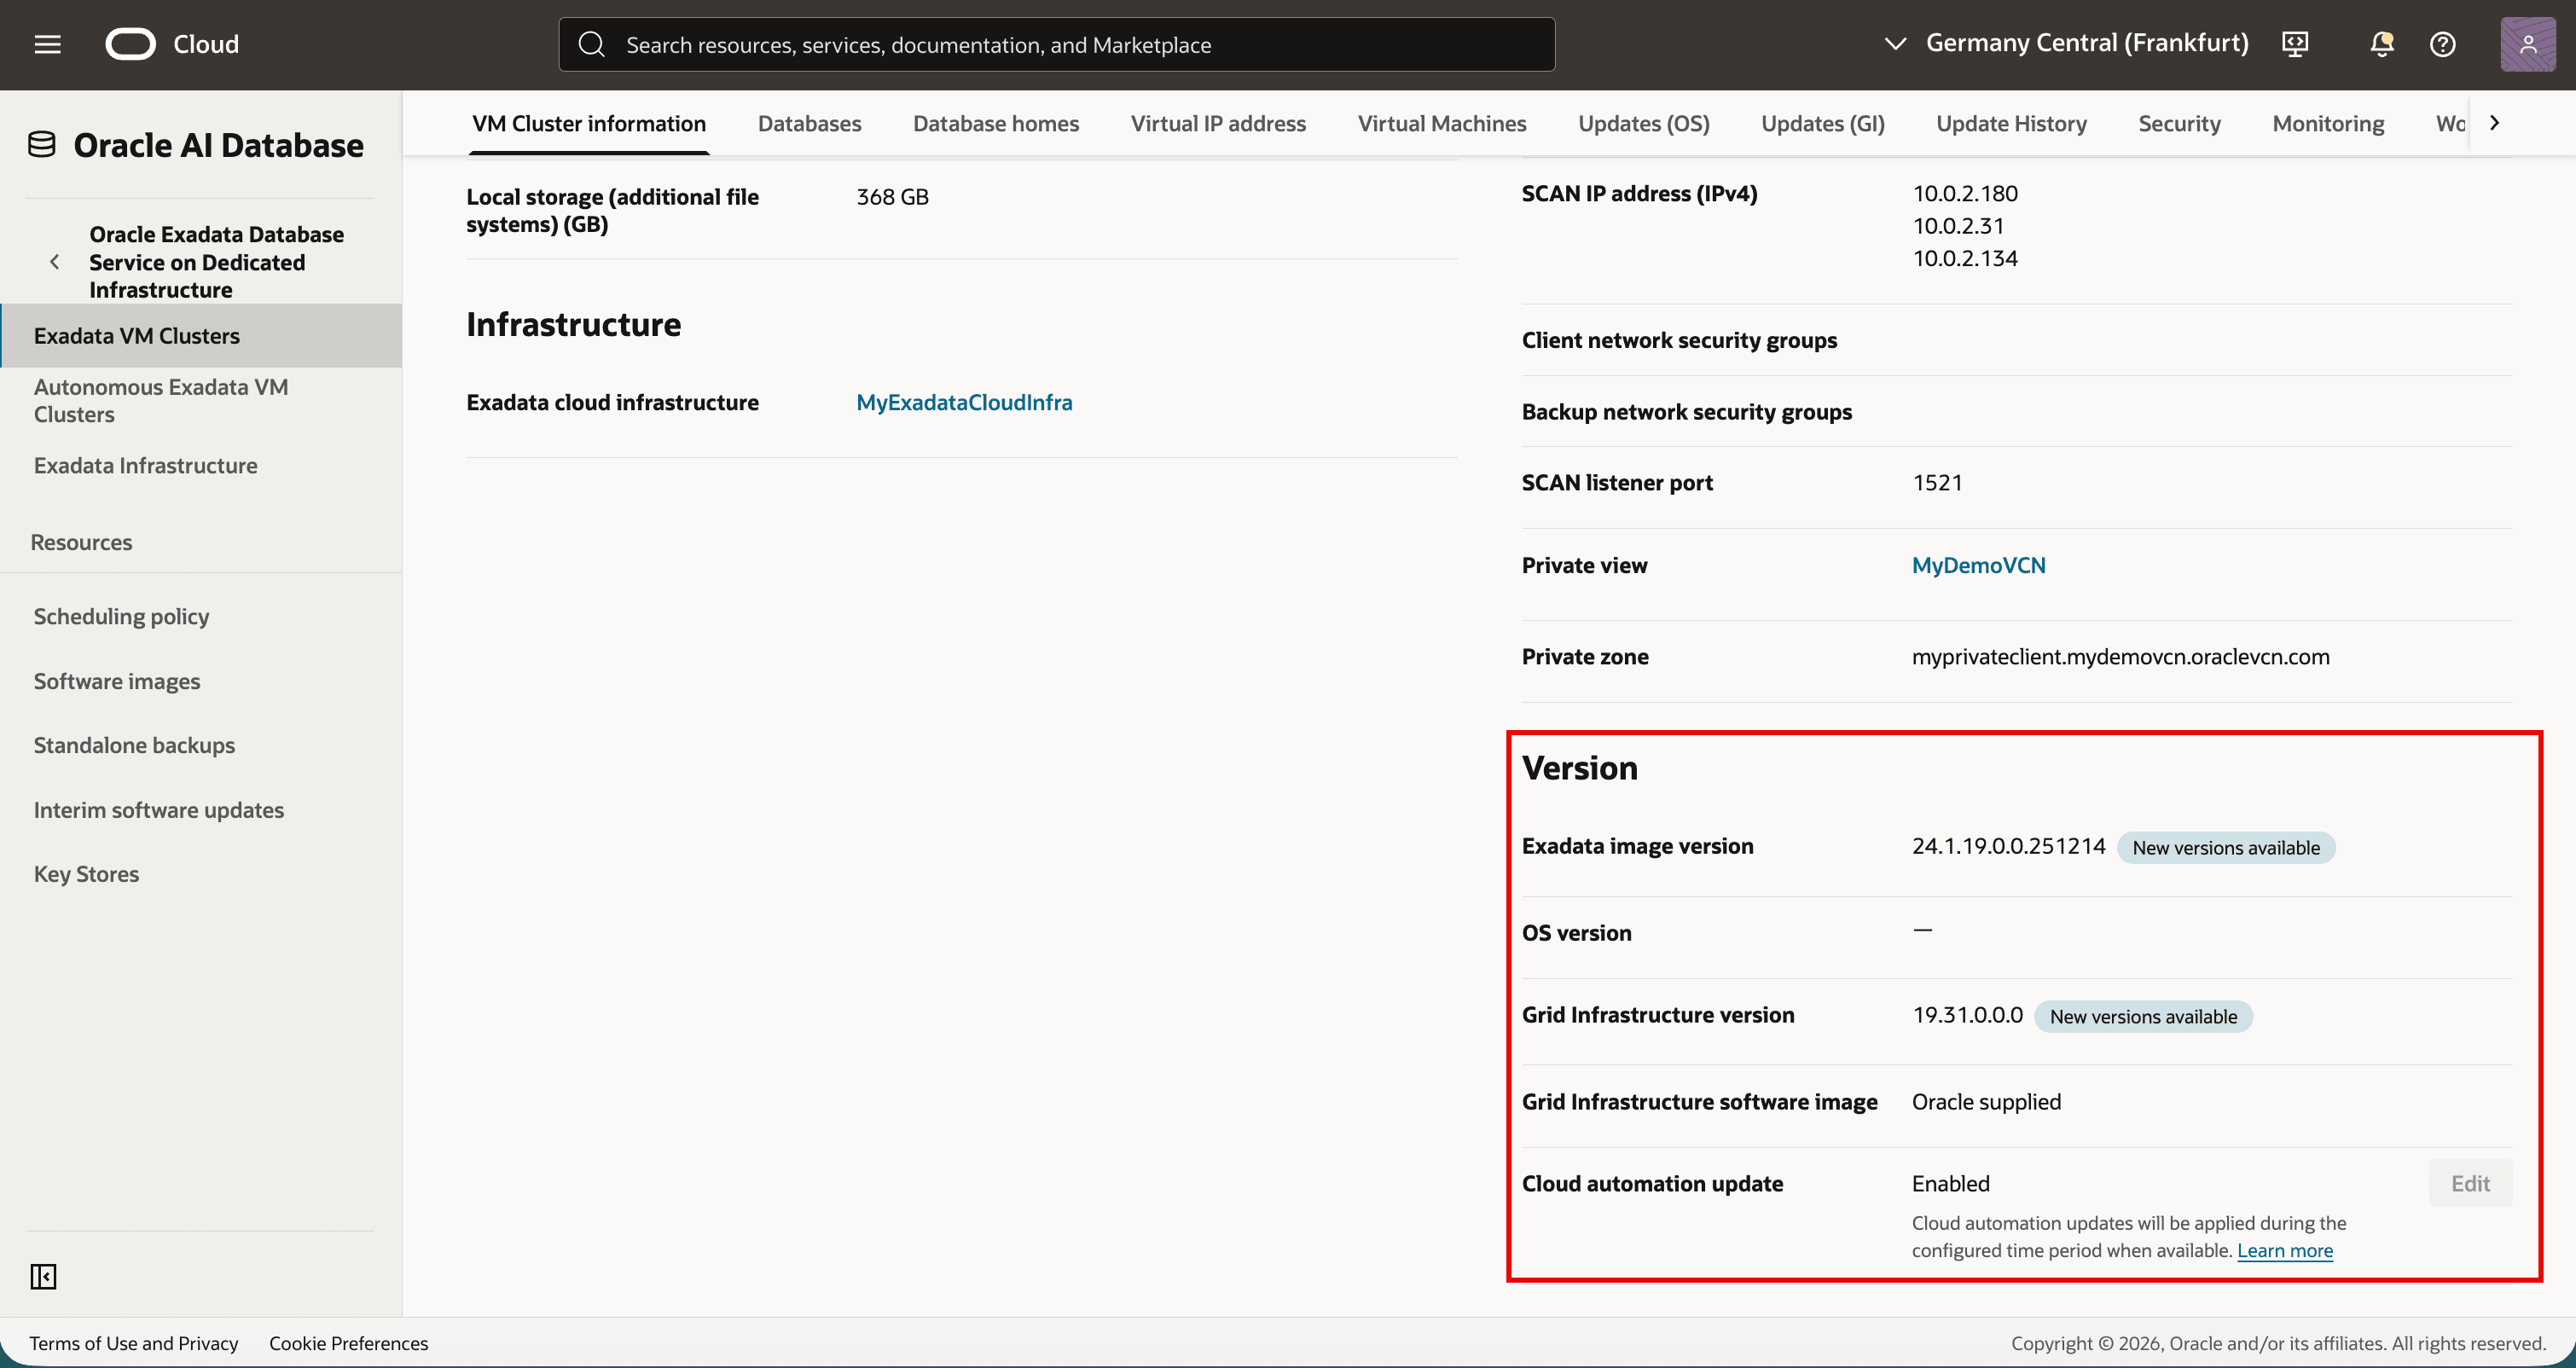
Description of the illustration live-update-vm-cluster-version-details.png
-
Select the Updates (OS) tab. For the target image, select Actions, then Apply Exadata OS Image Update.
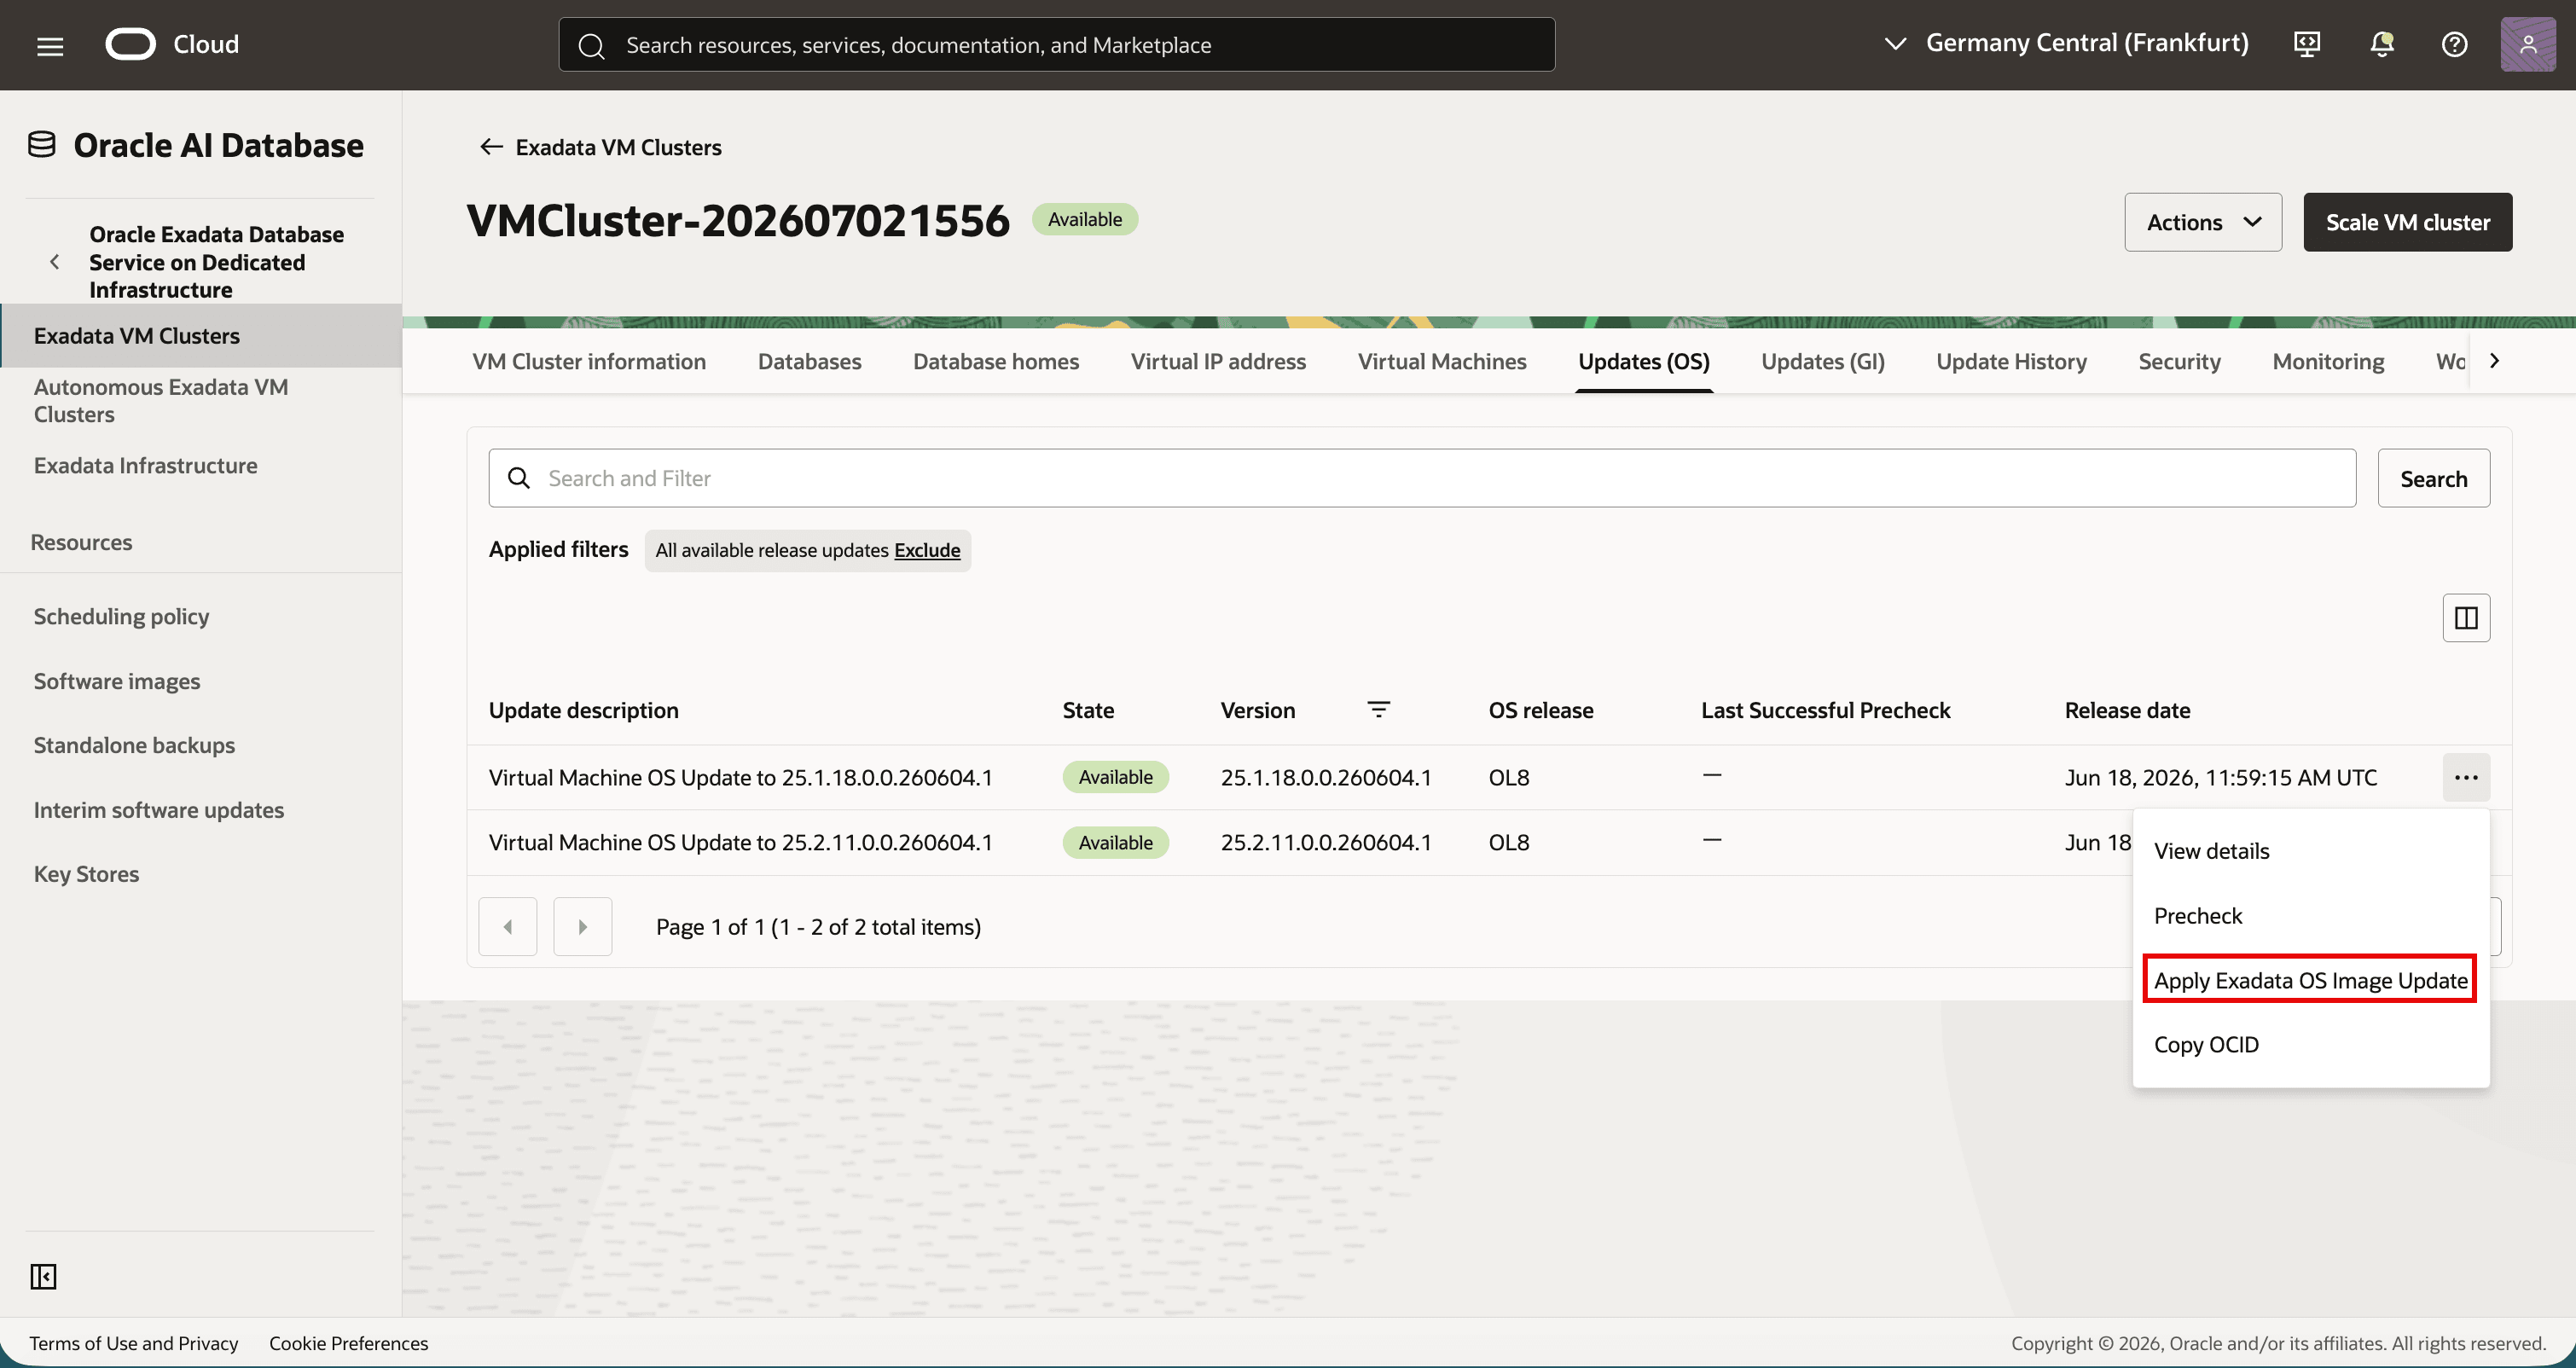
Description of the illustration live-update-os-update-actions-available.png
-
Select Online update, then select High CVSS only. Review the target image and pending-update message, then click Run Precheck. Confirm the precheck if prompted.
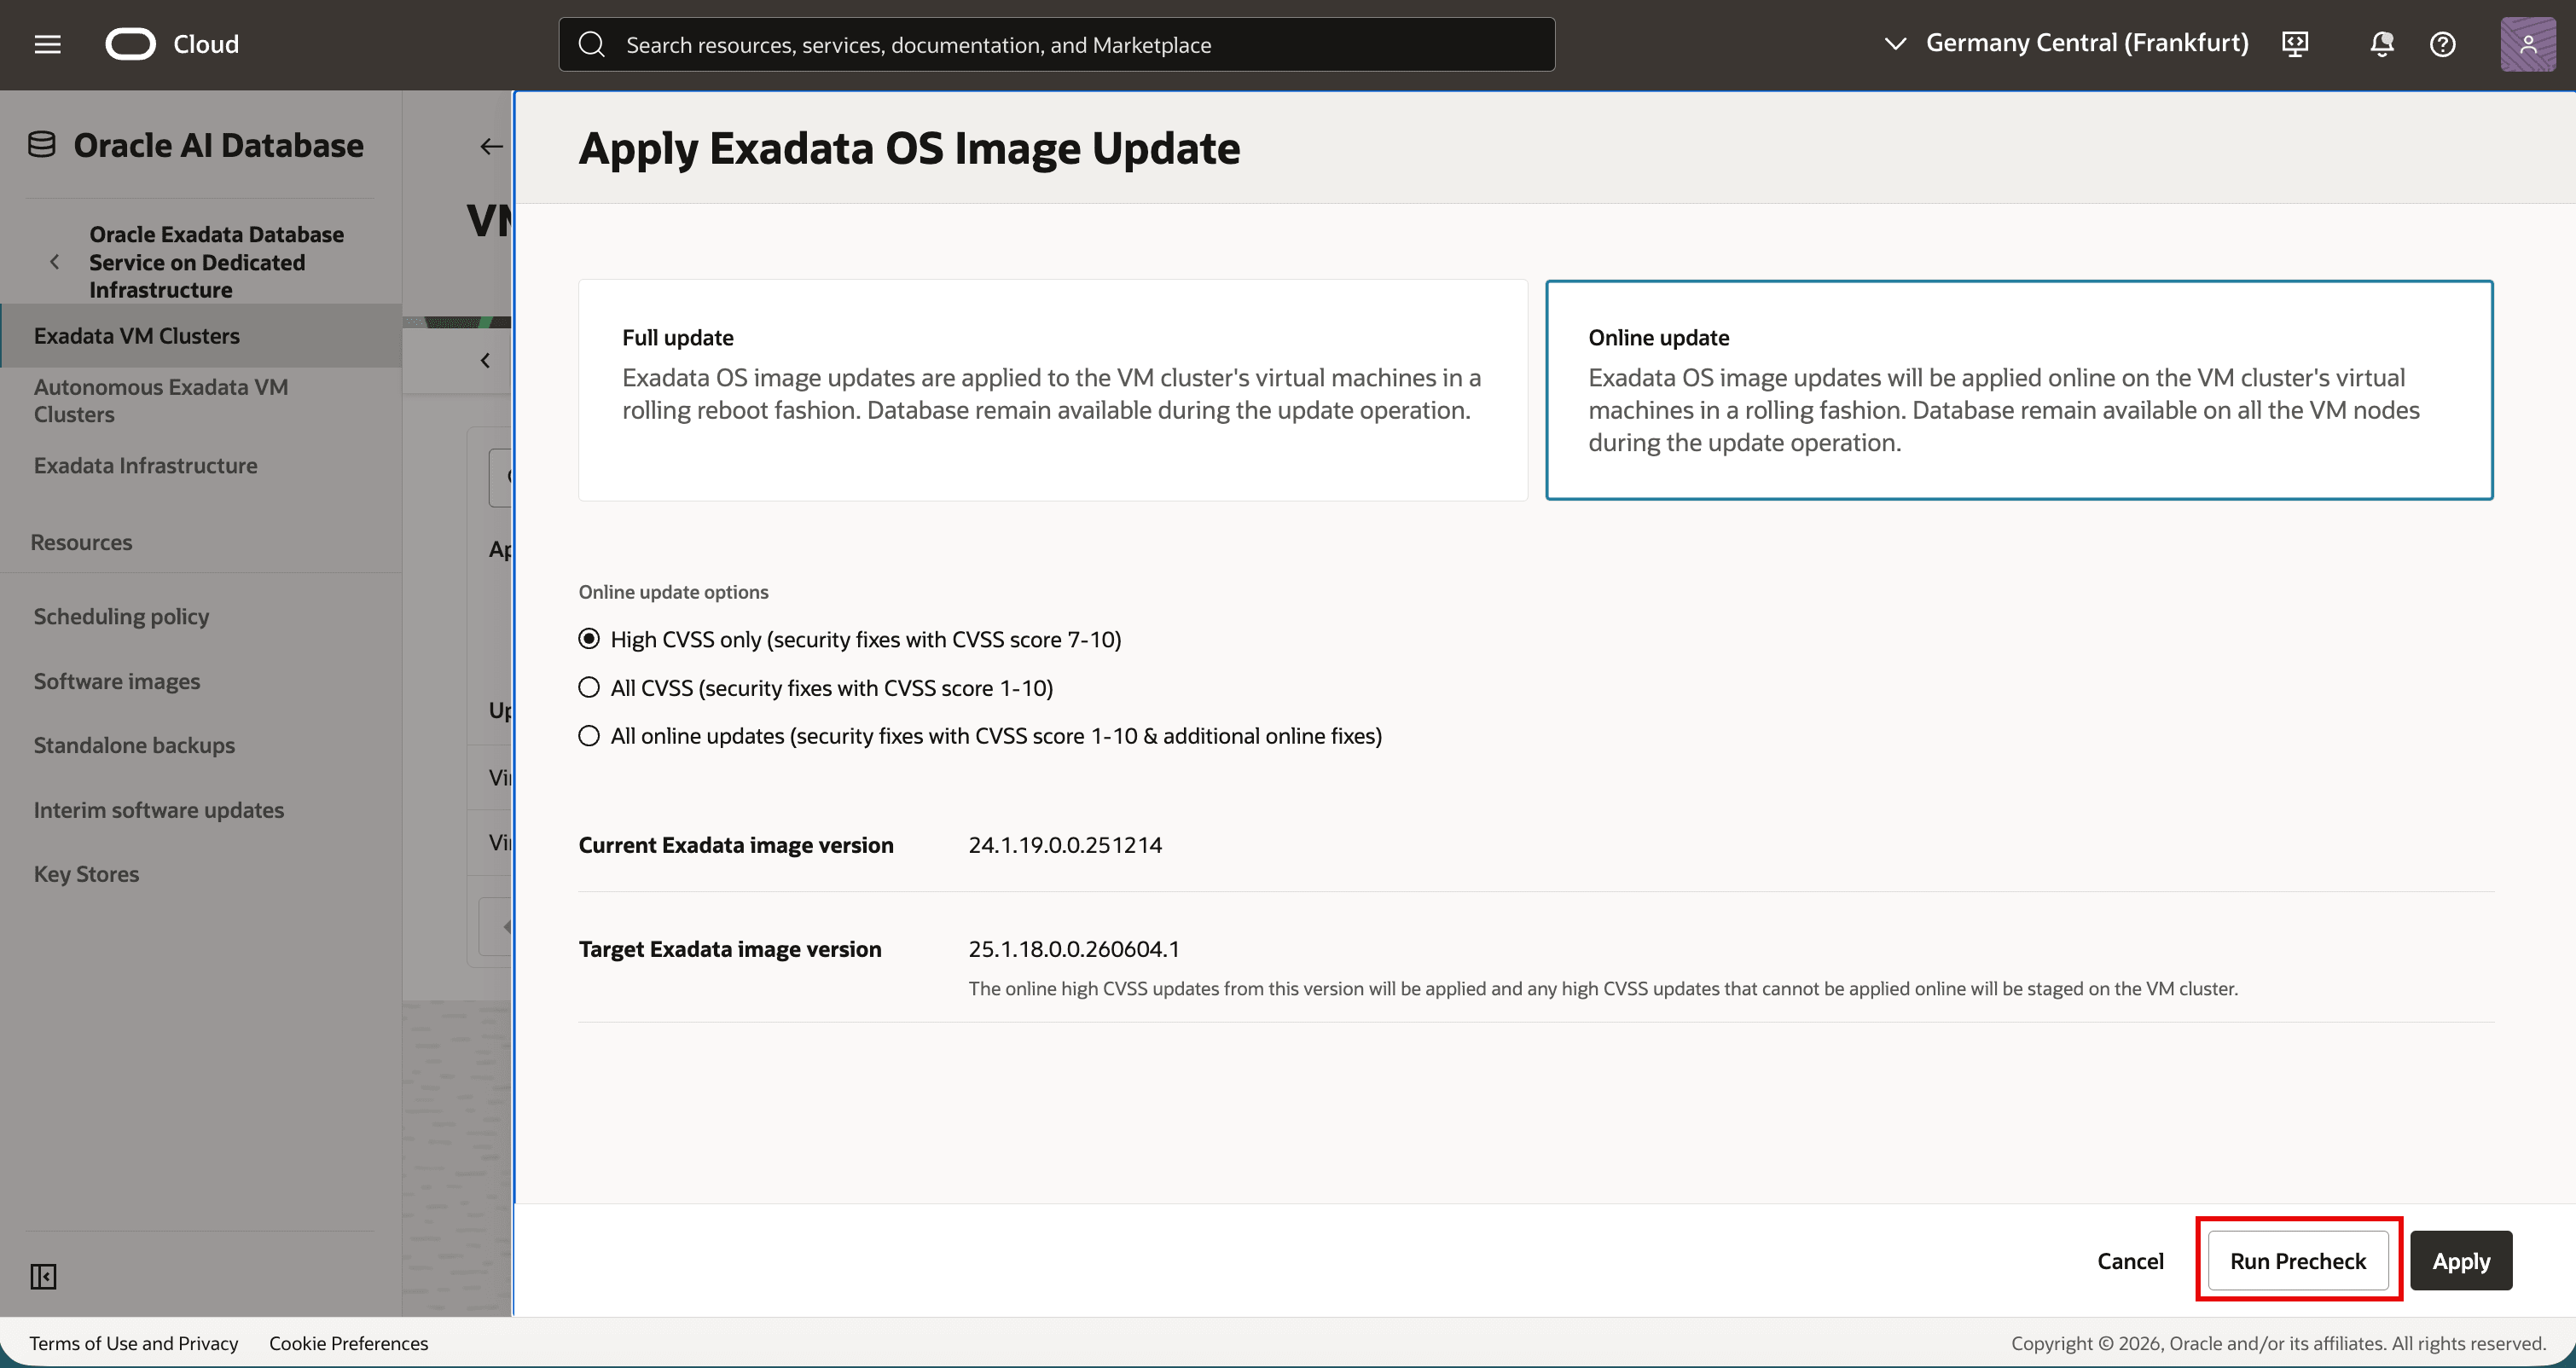
Description of the illustration live-update-select-high-cvss-scope-precheck.png
-
Wait for the precheck work request to succeed. Reopen Apply Exadata OS Image Update, select Online update and High CVSS only, then click Apply.
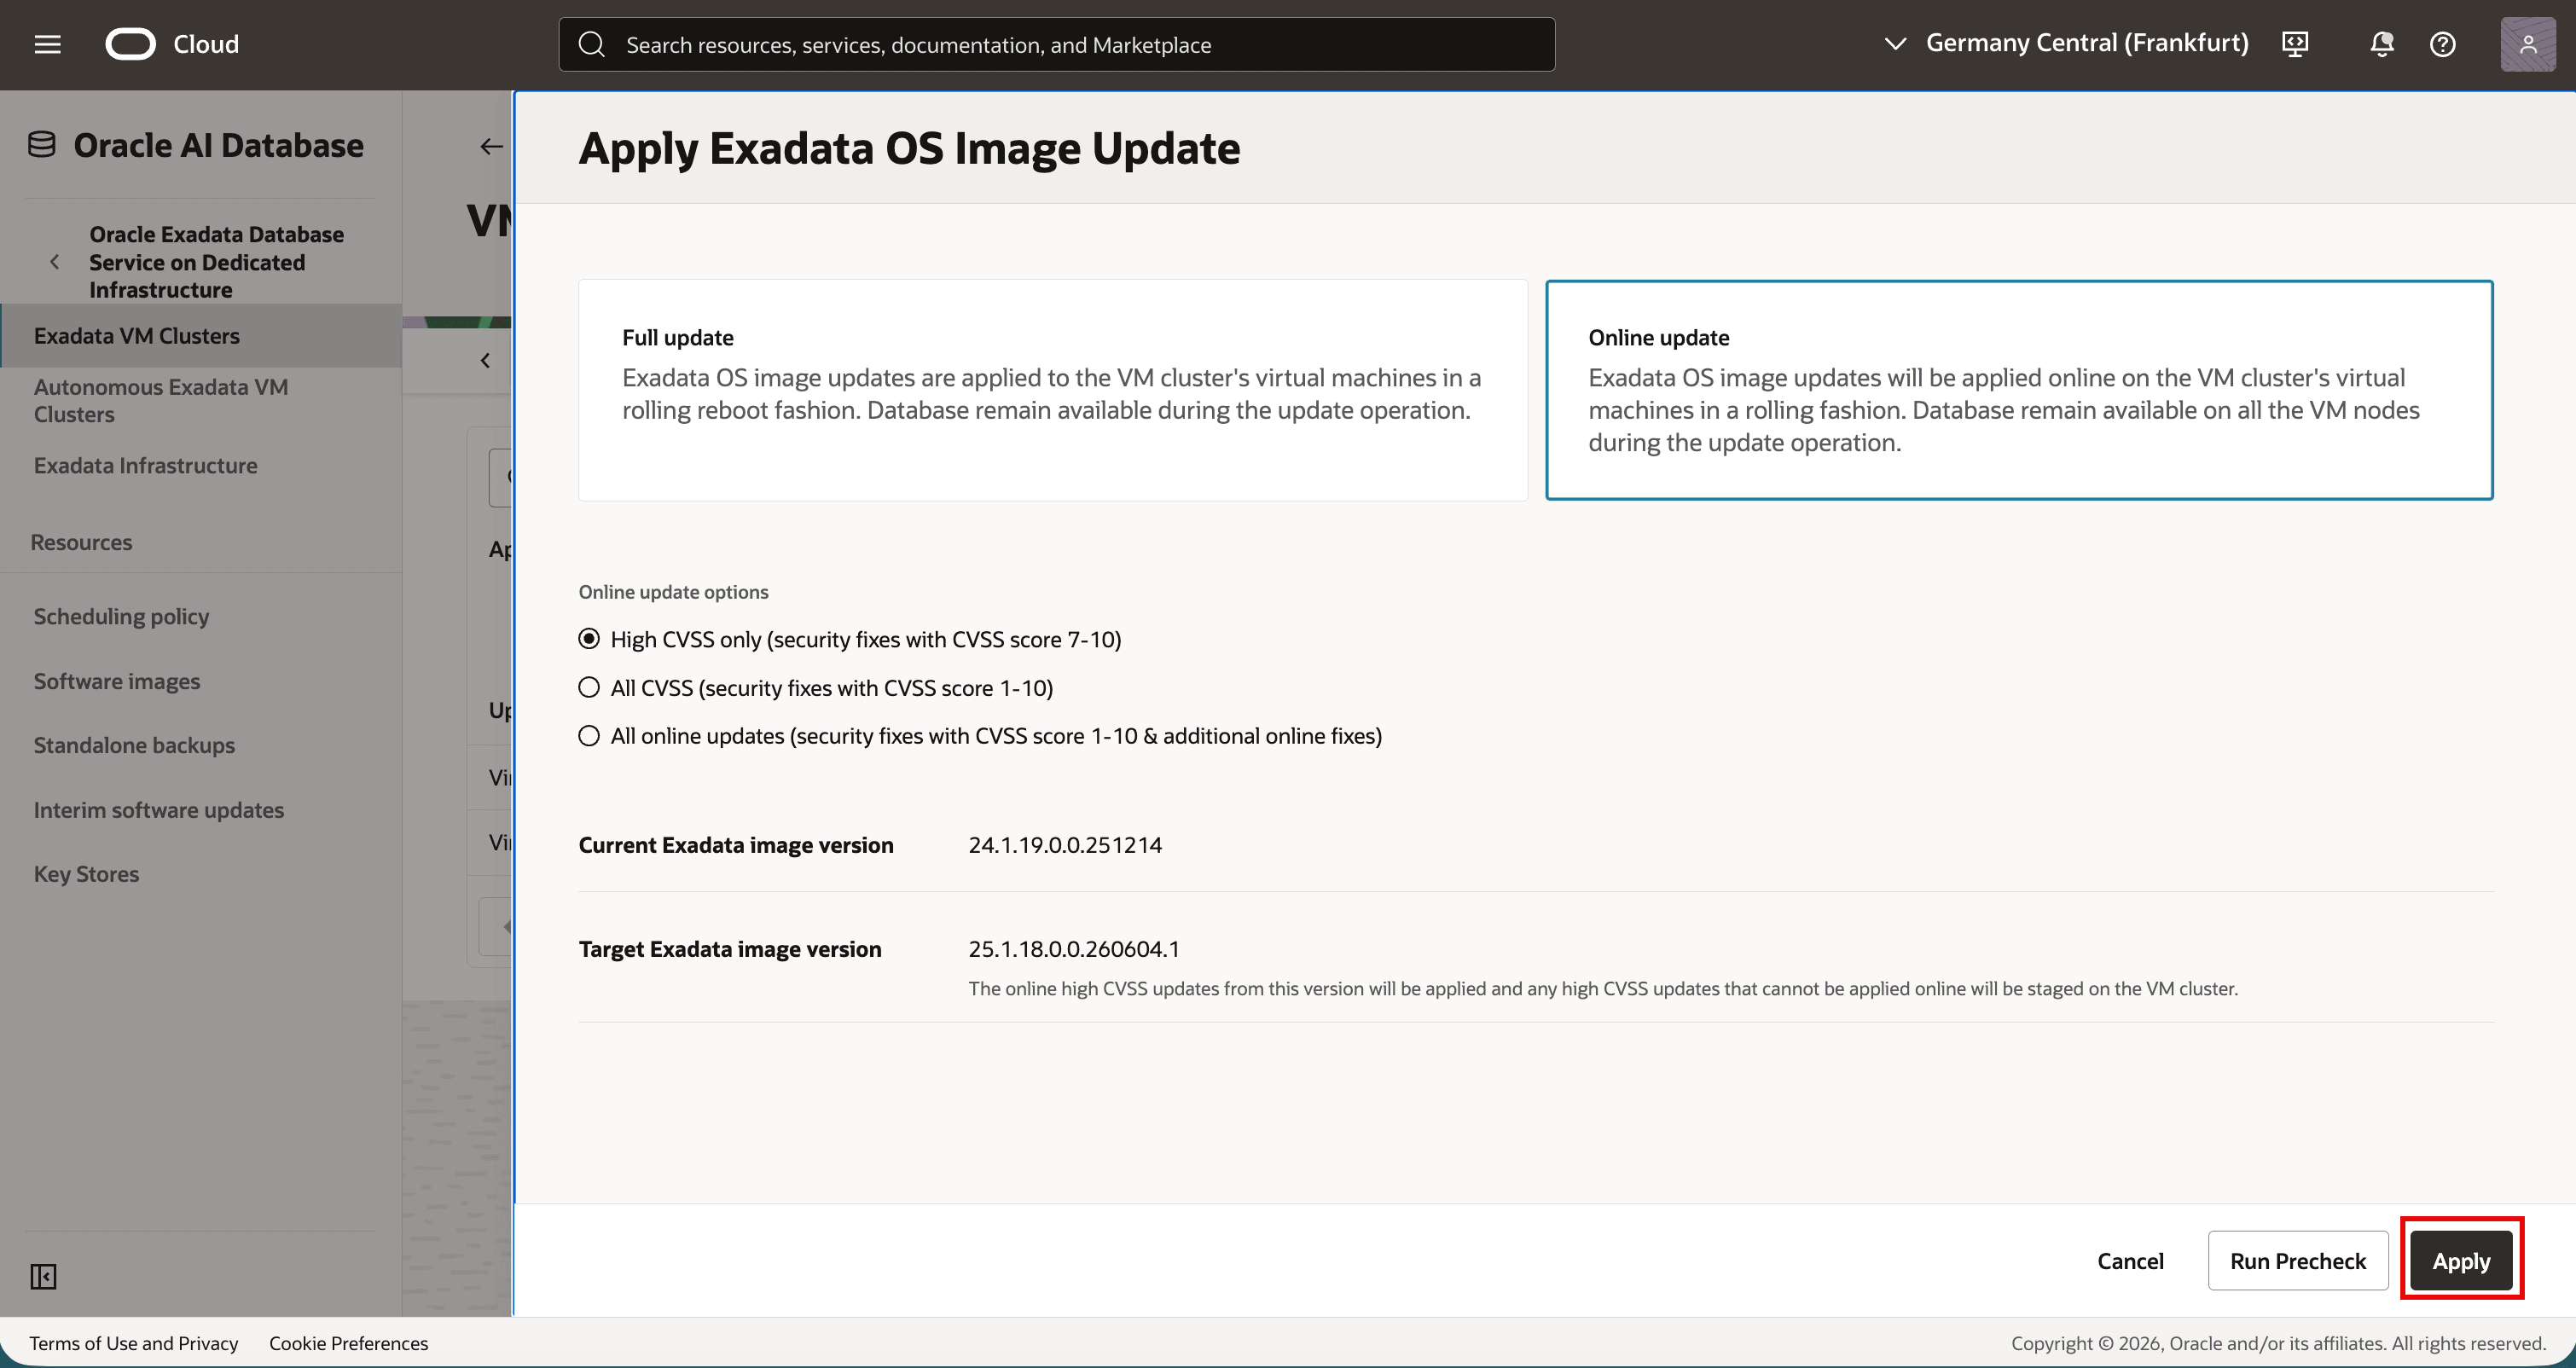
Description of the illustration live-update-select-high-cvss-scope.png
-
Monitor Work requests, Updates (OS), and Update History until the update succeeds. Verify that Update History records the High CVSS only scope.
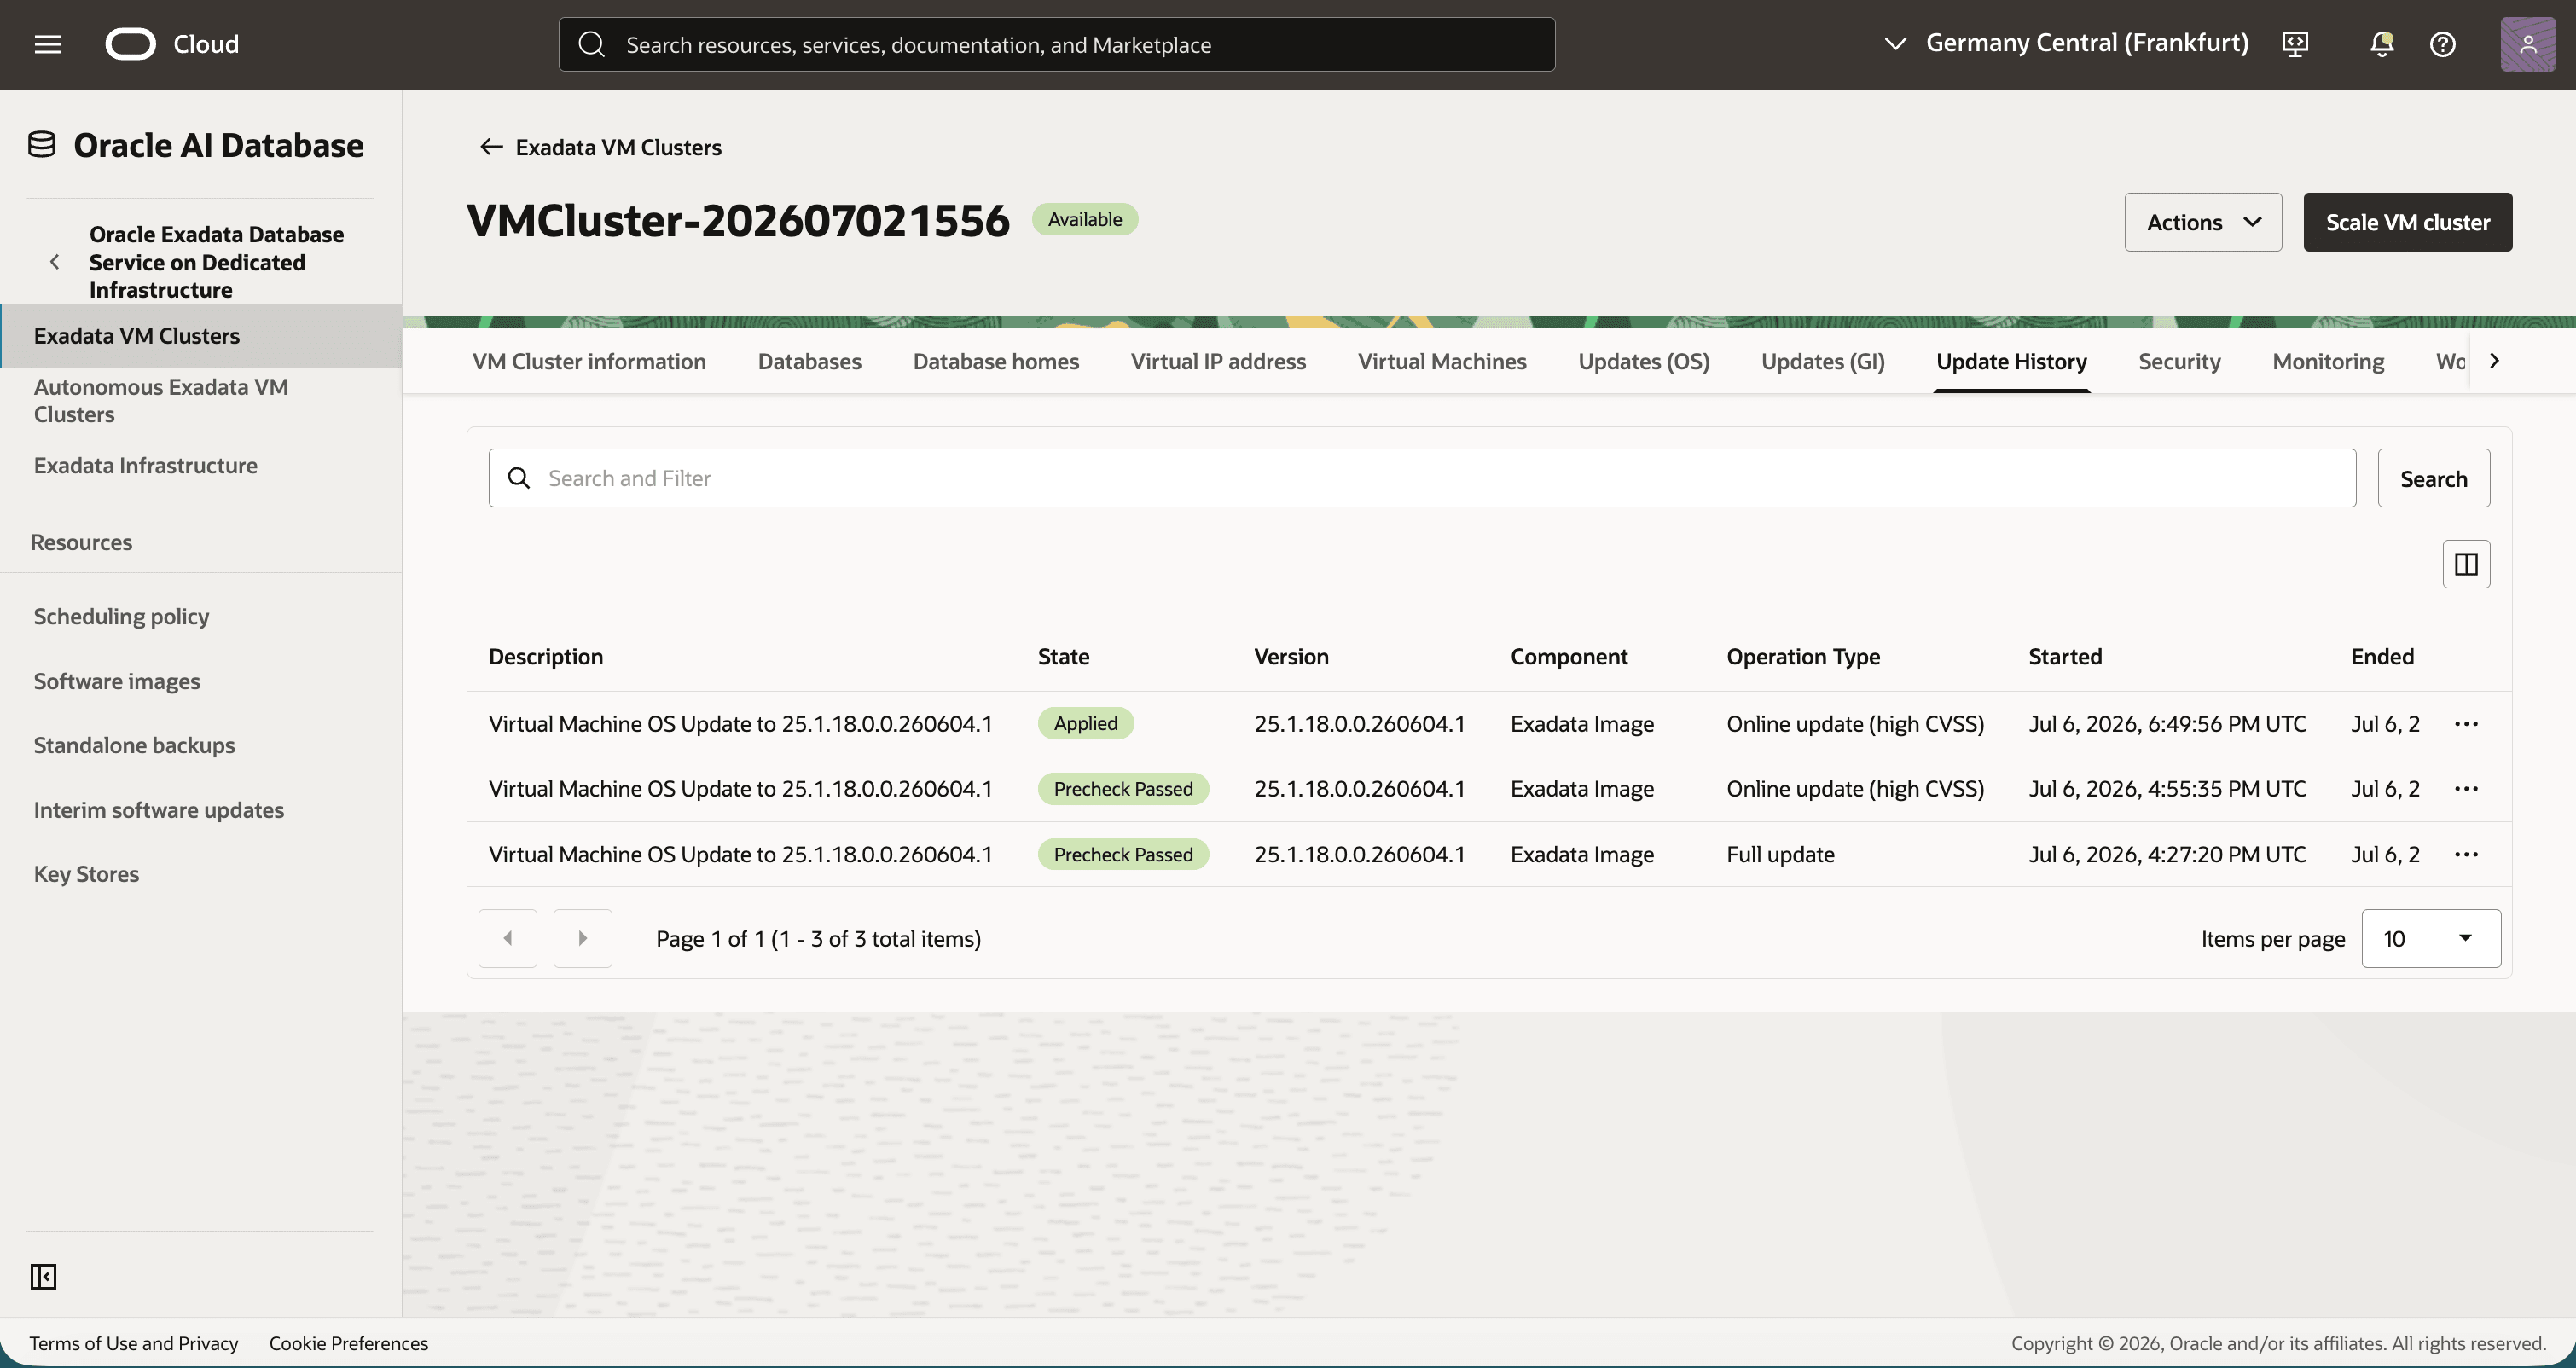
Description of the illustration live-update-history-online-update-result.png
Task 2: Apply VM operating system online update with All CVSS scope
-
Return to Updates (OS) and select the next approved available OS image. From its Actions menu, select Apply Exadata OS Image Update.
-
Select Online update, then select All CVSS. Review the target image and pending-update message, then run and confirm the precheck.
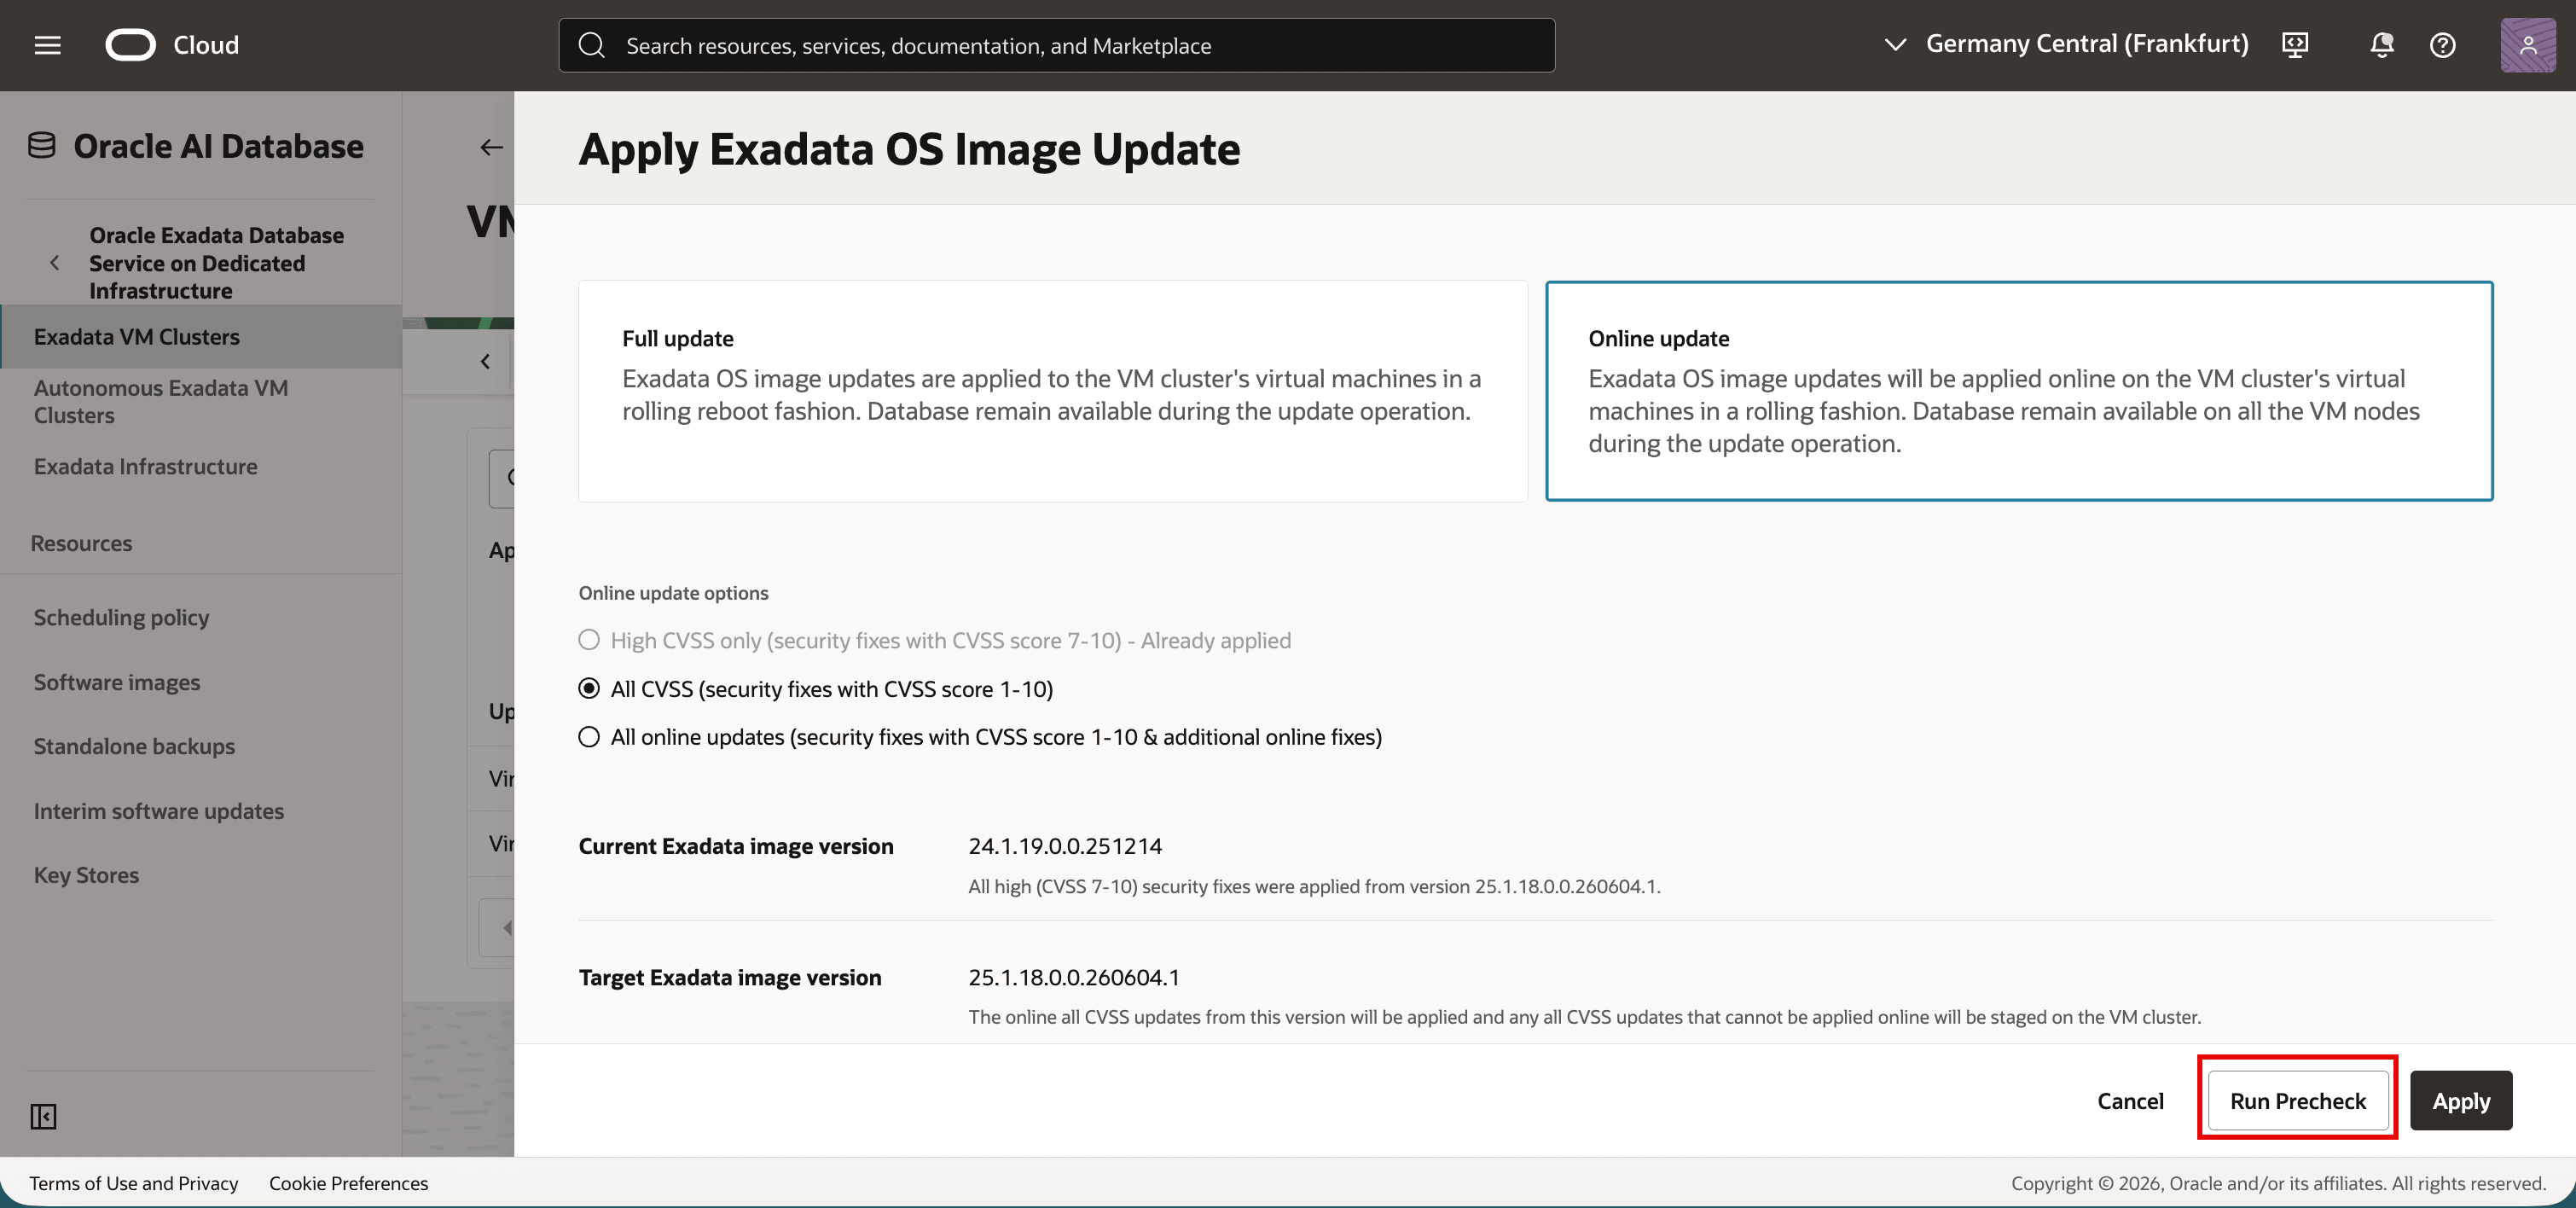
Description of the illustration live-update-select-all-cvss-updates-precheck.png
-
After the precheck succeeds, reopen Apply Exadata OS Image Update, select Online update and All CVSS, then click Apply.
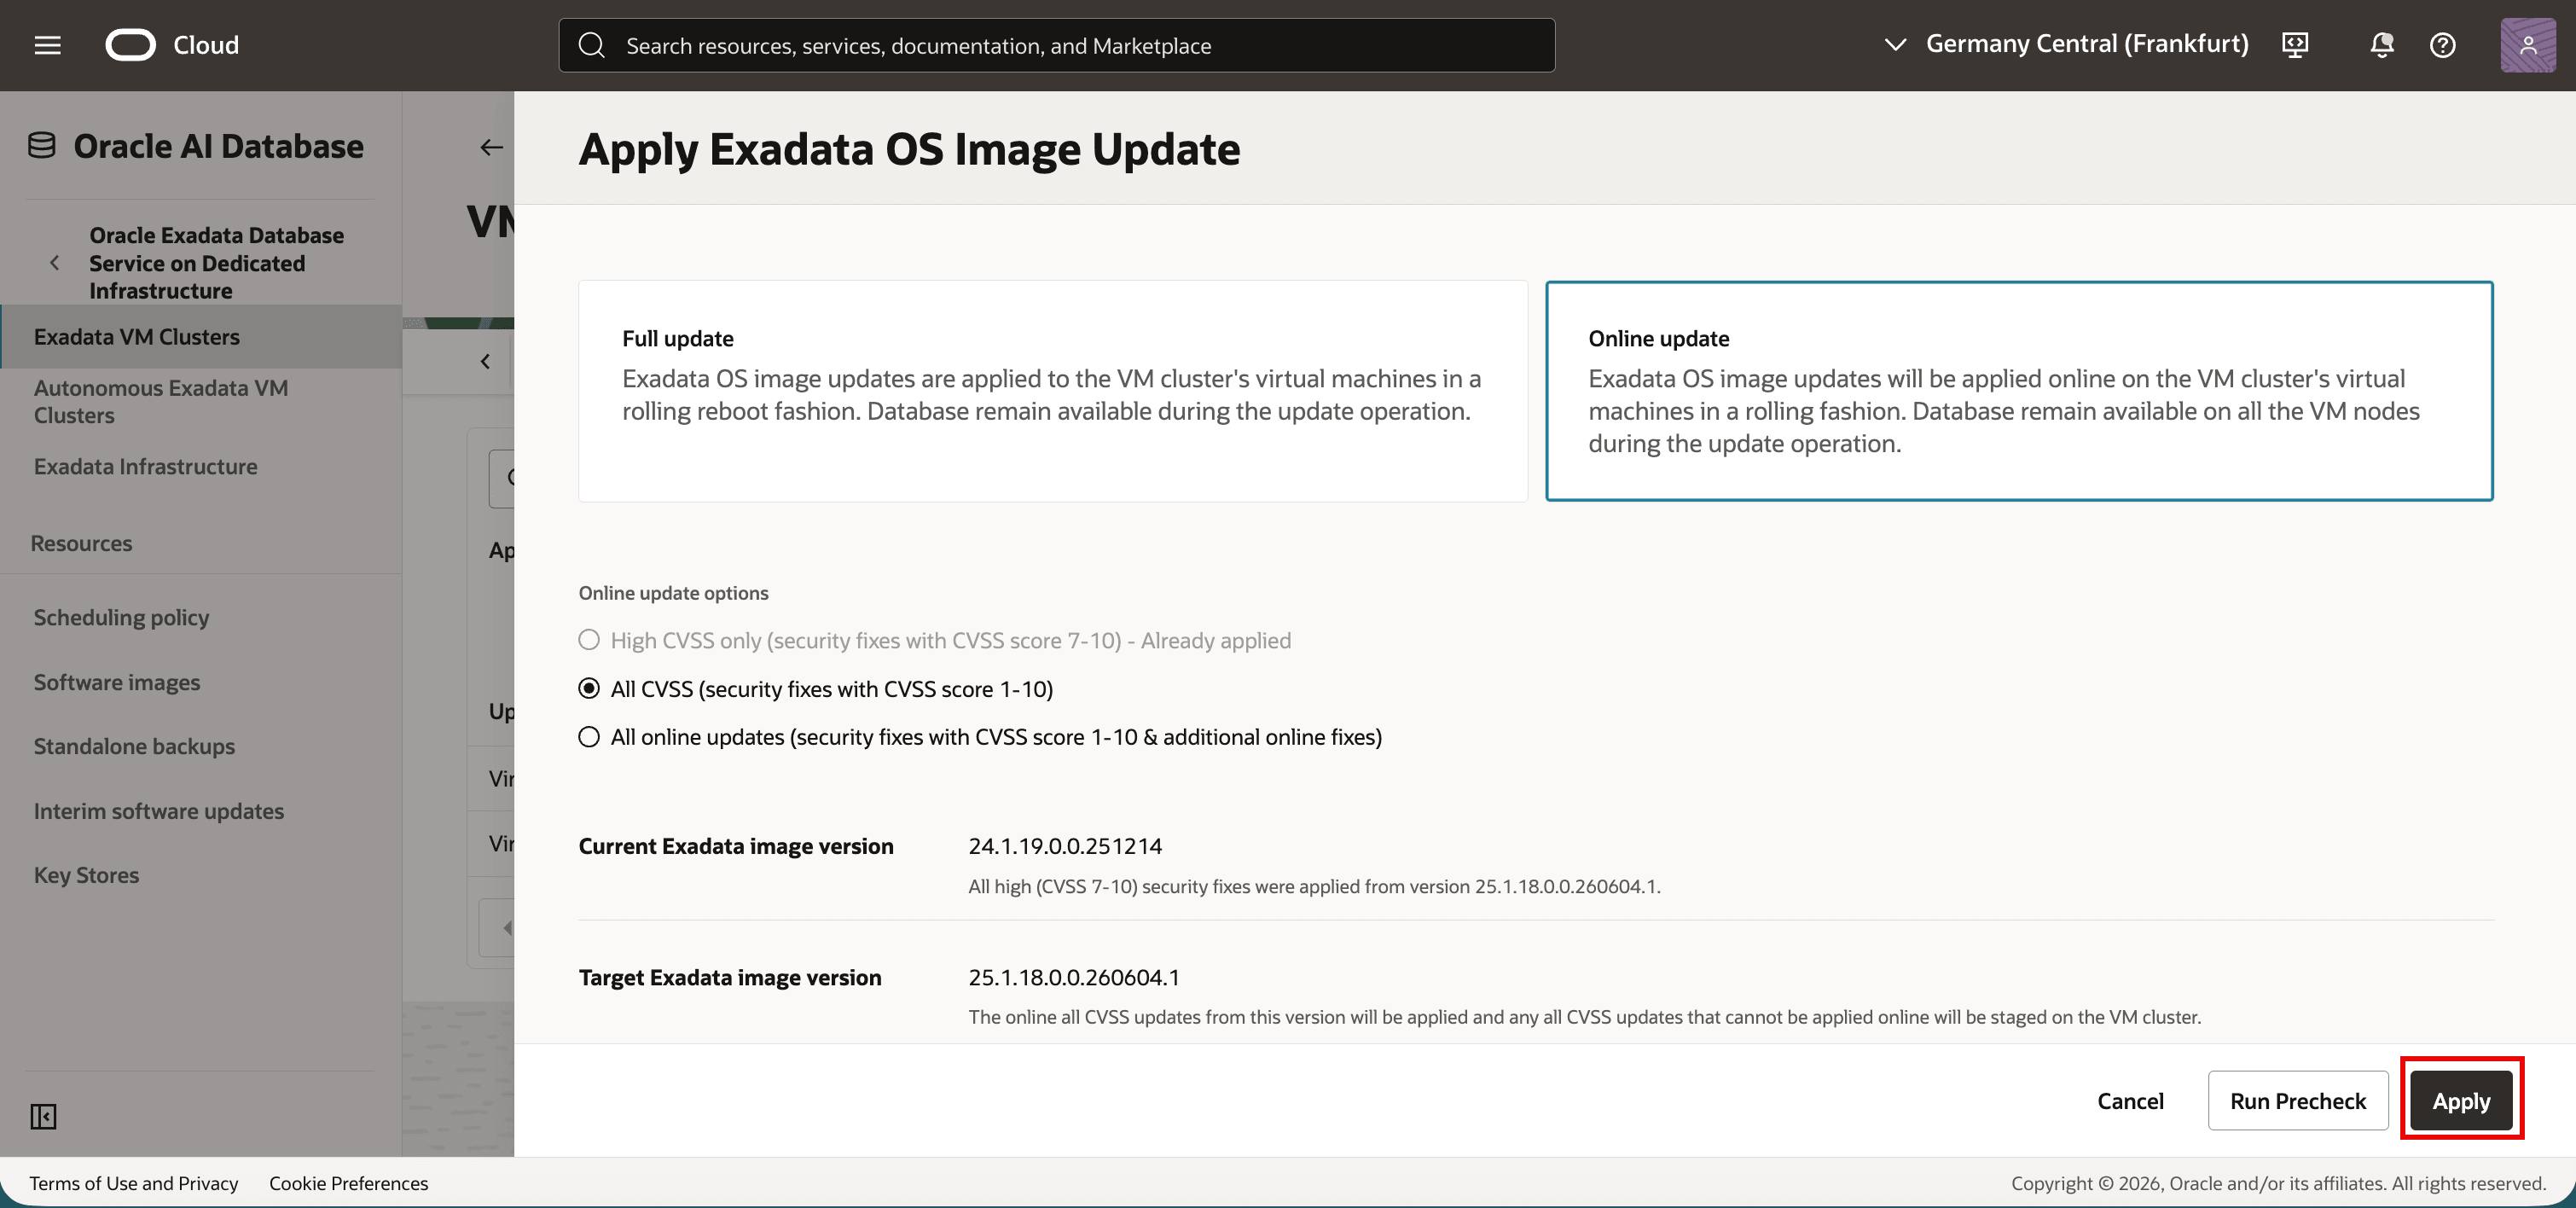
Description of the illustration live-update-select-all-cvss-updates.png
-
Monitor Work requests and Update History until the update succeeds. Verify that Update History records the All CVSS scope.
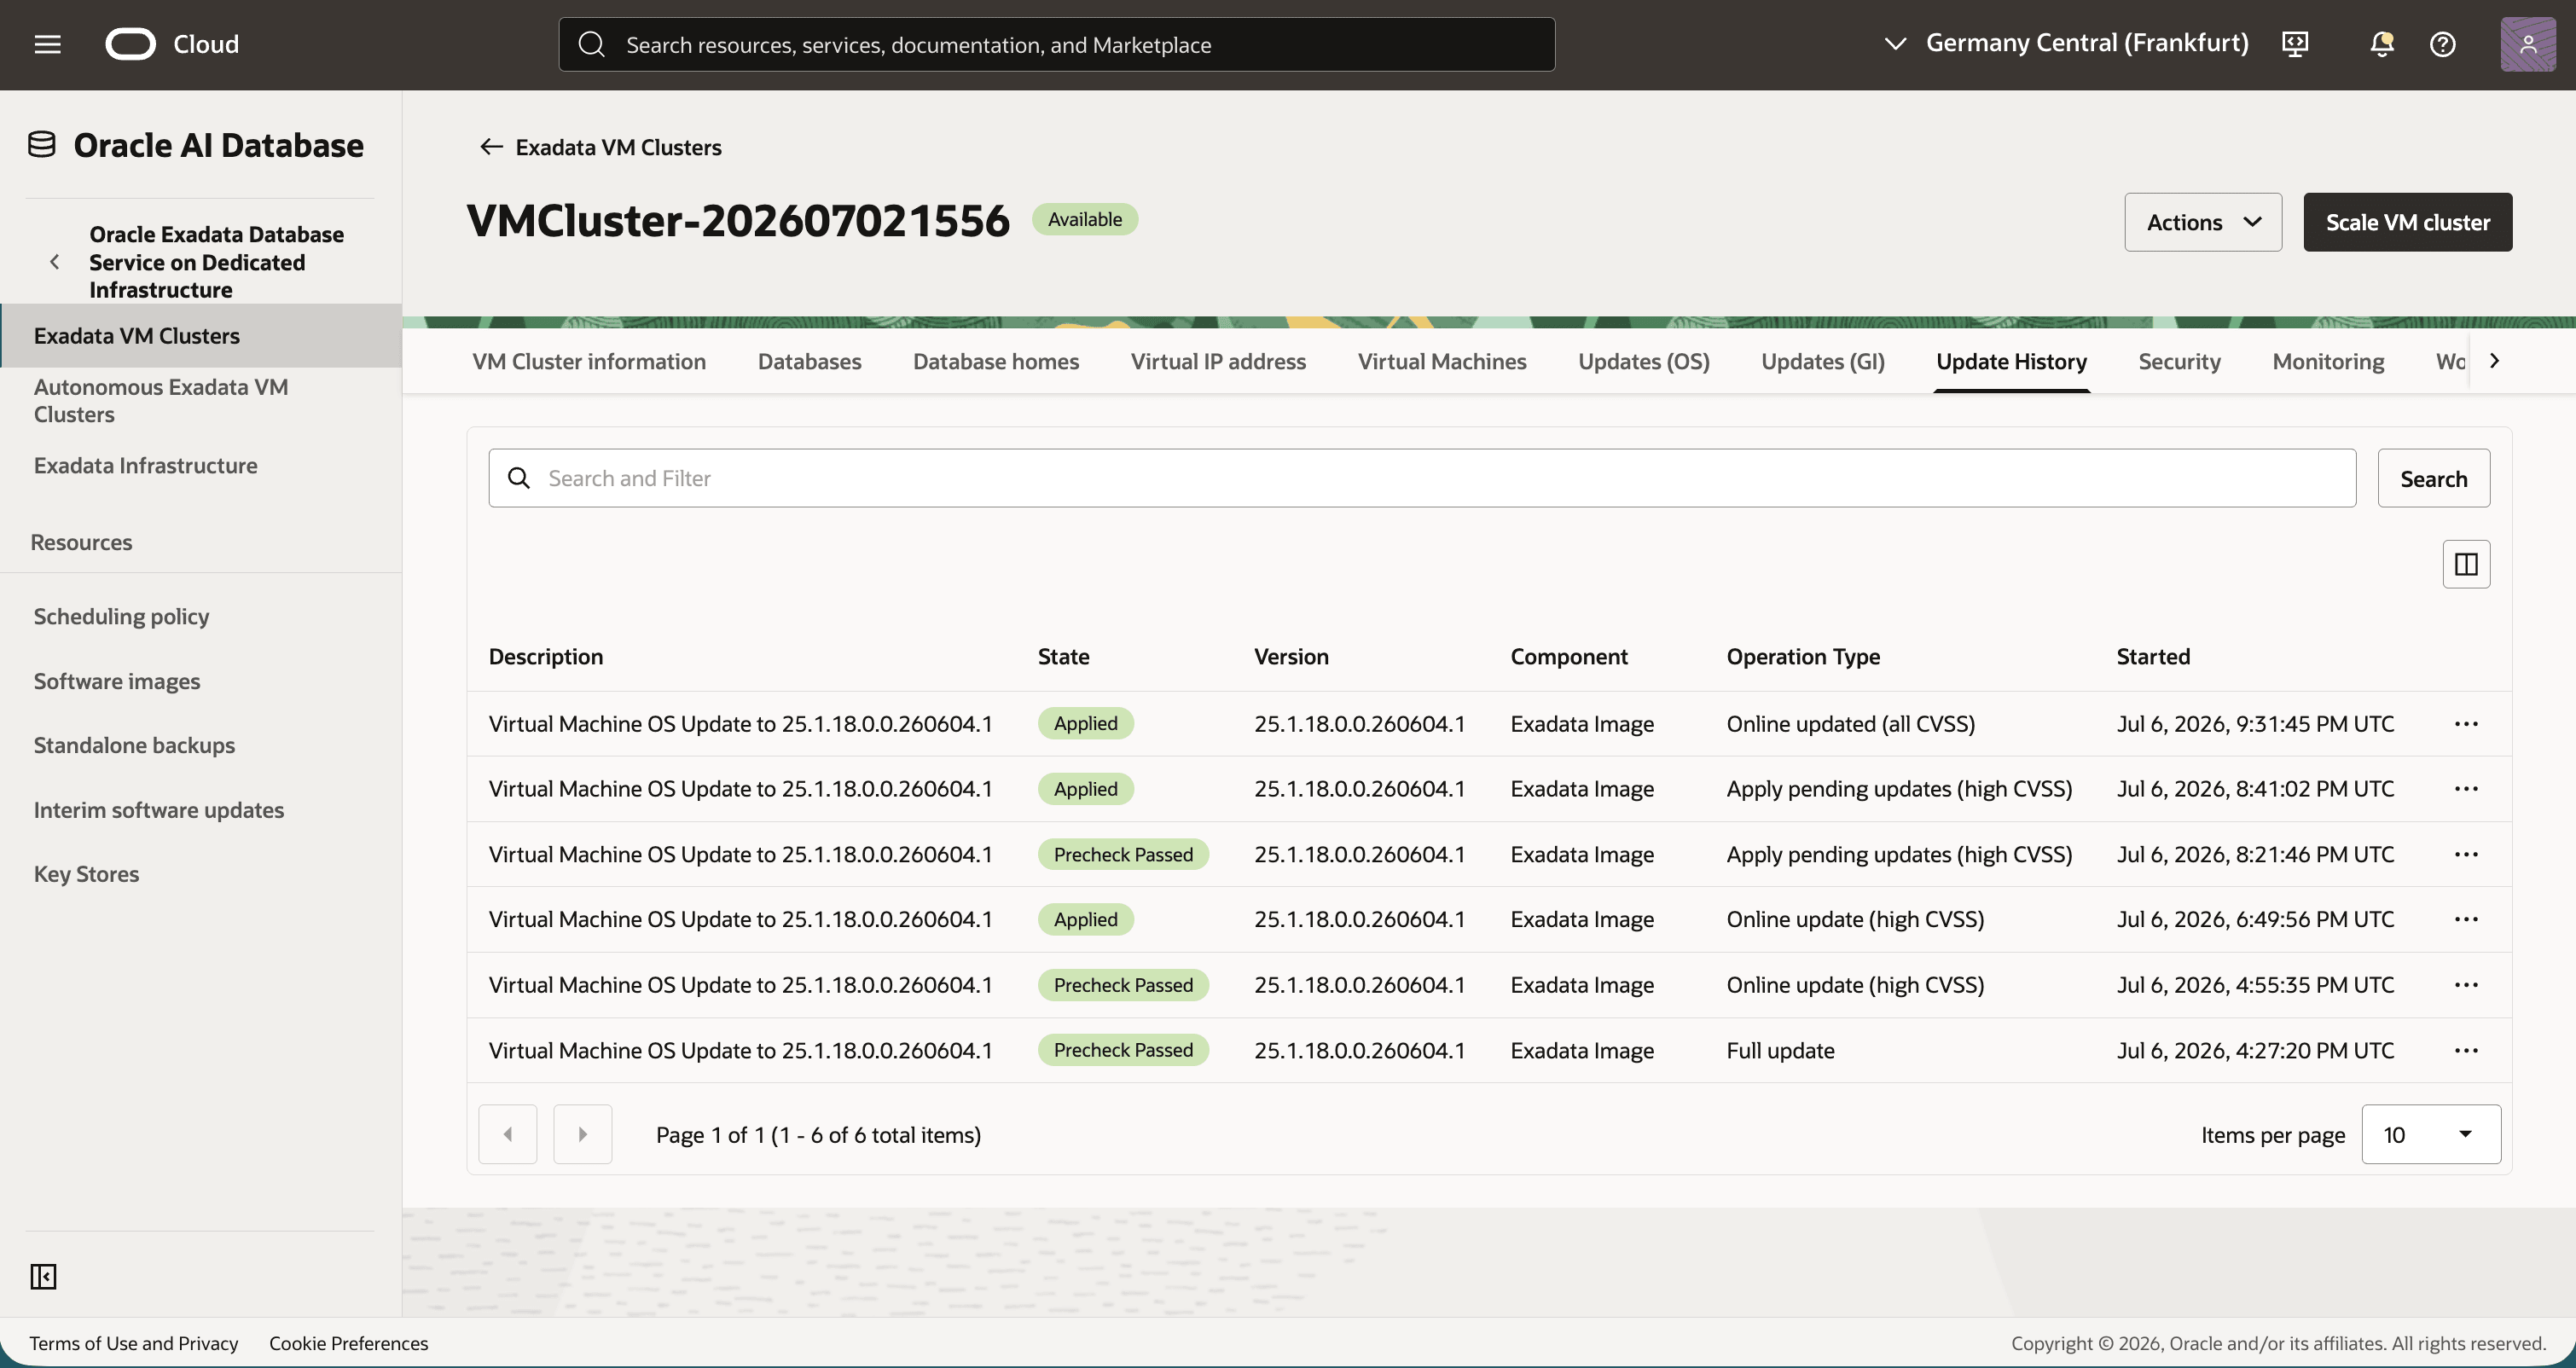
Description of the illustration live-update-history-all-cvss-applied.png
Task 3: Apply VM operating system online update with All online updates scope
-
Return to Updates (OS) and select the next approved available OS image. From its Actions menu, select Apply Exadata OS Image Update.
-
Select Online update, then select All online updates. Review the target image and pending-update message, then run and confirm the precheck.
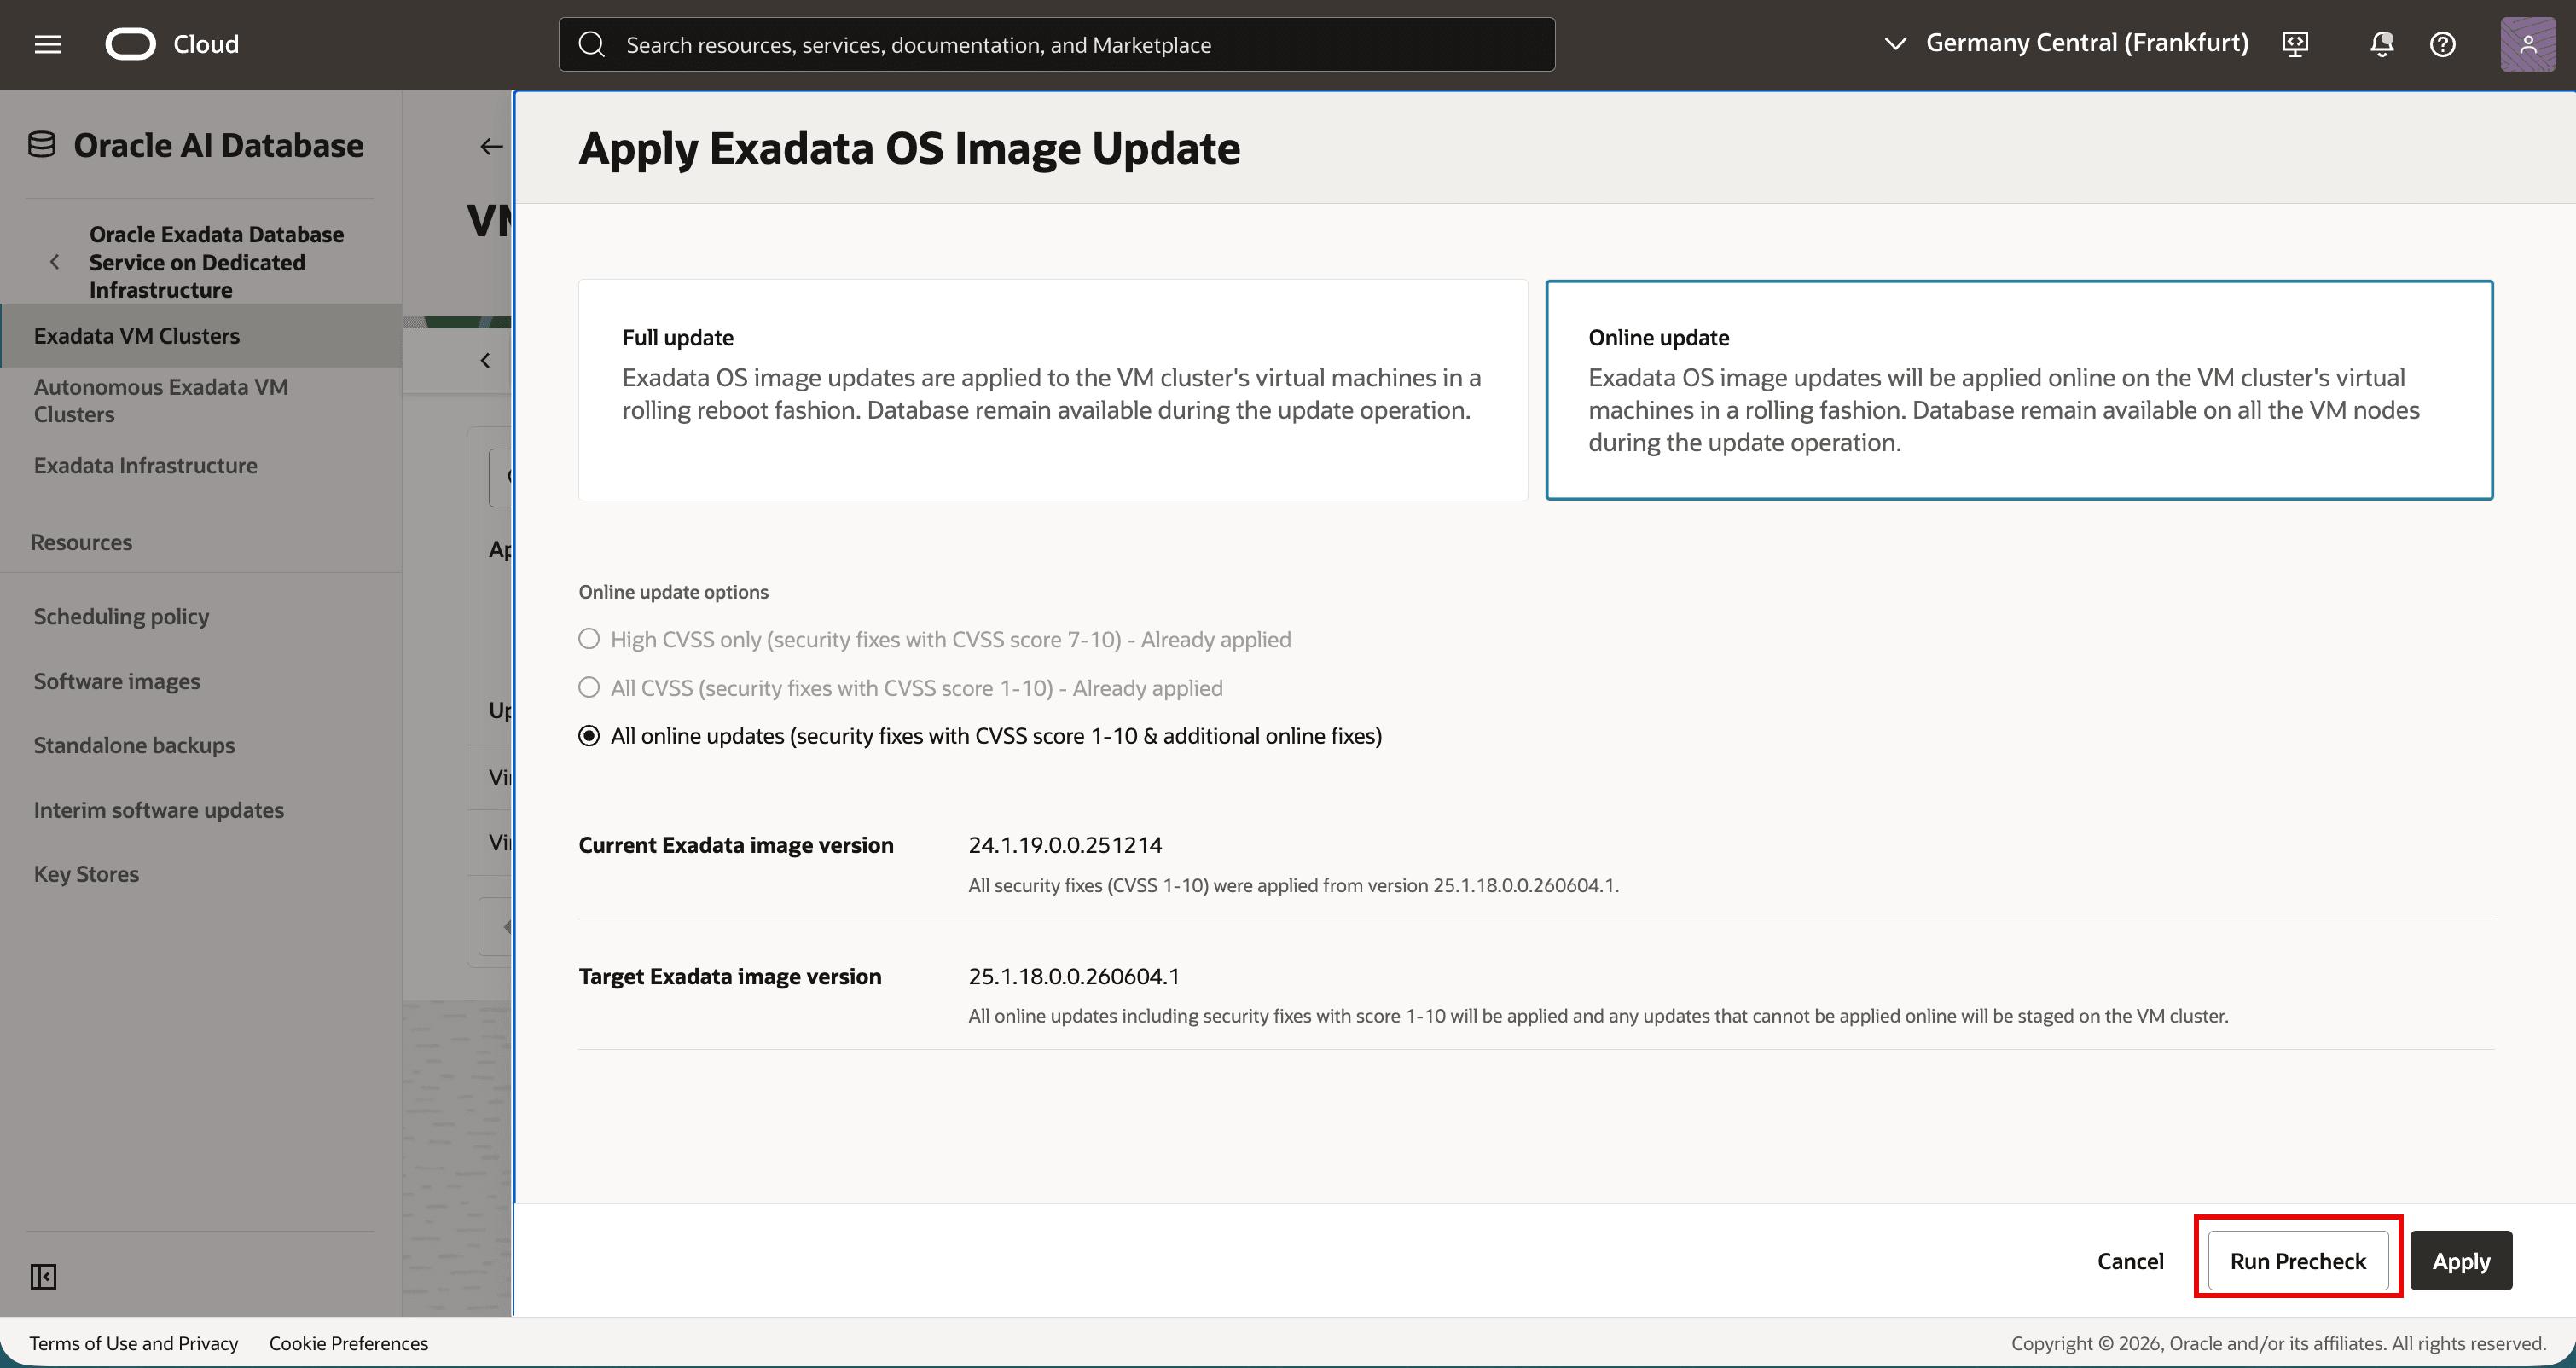
Description of the illustration live-update-select-all-online-updates-precheck.png
-
After the precheck succeeds, reopen Apply Exadata OS Image Update, select Online update and All online updates, then click Apply.
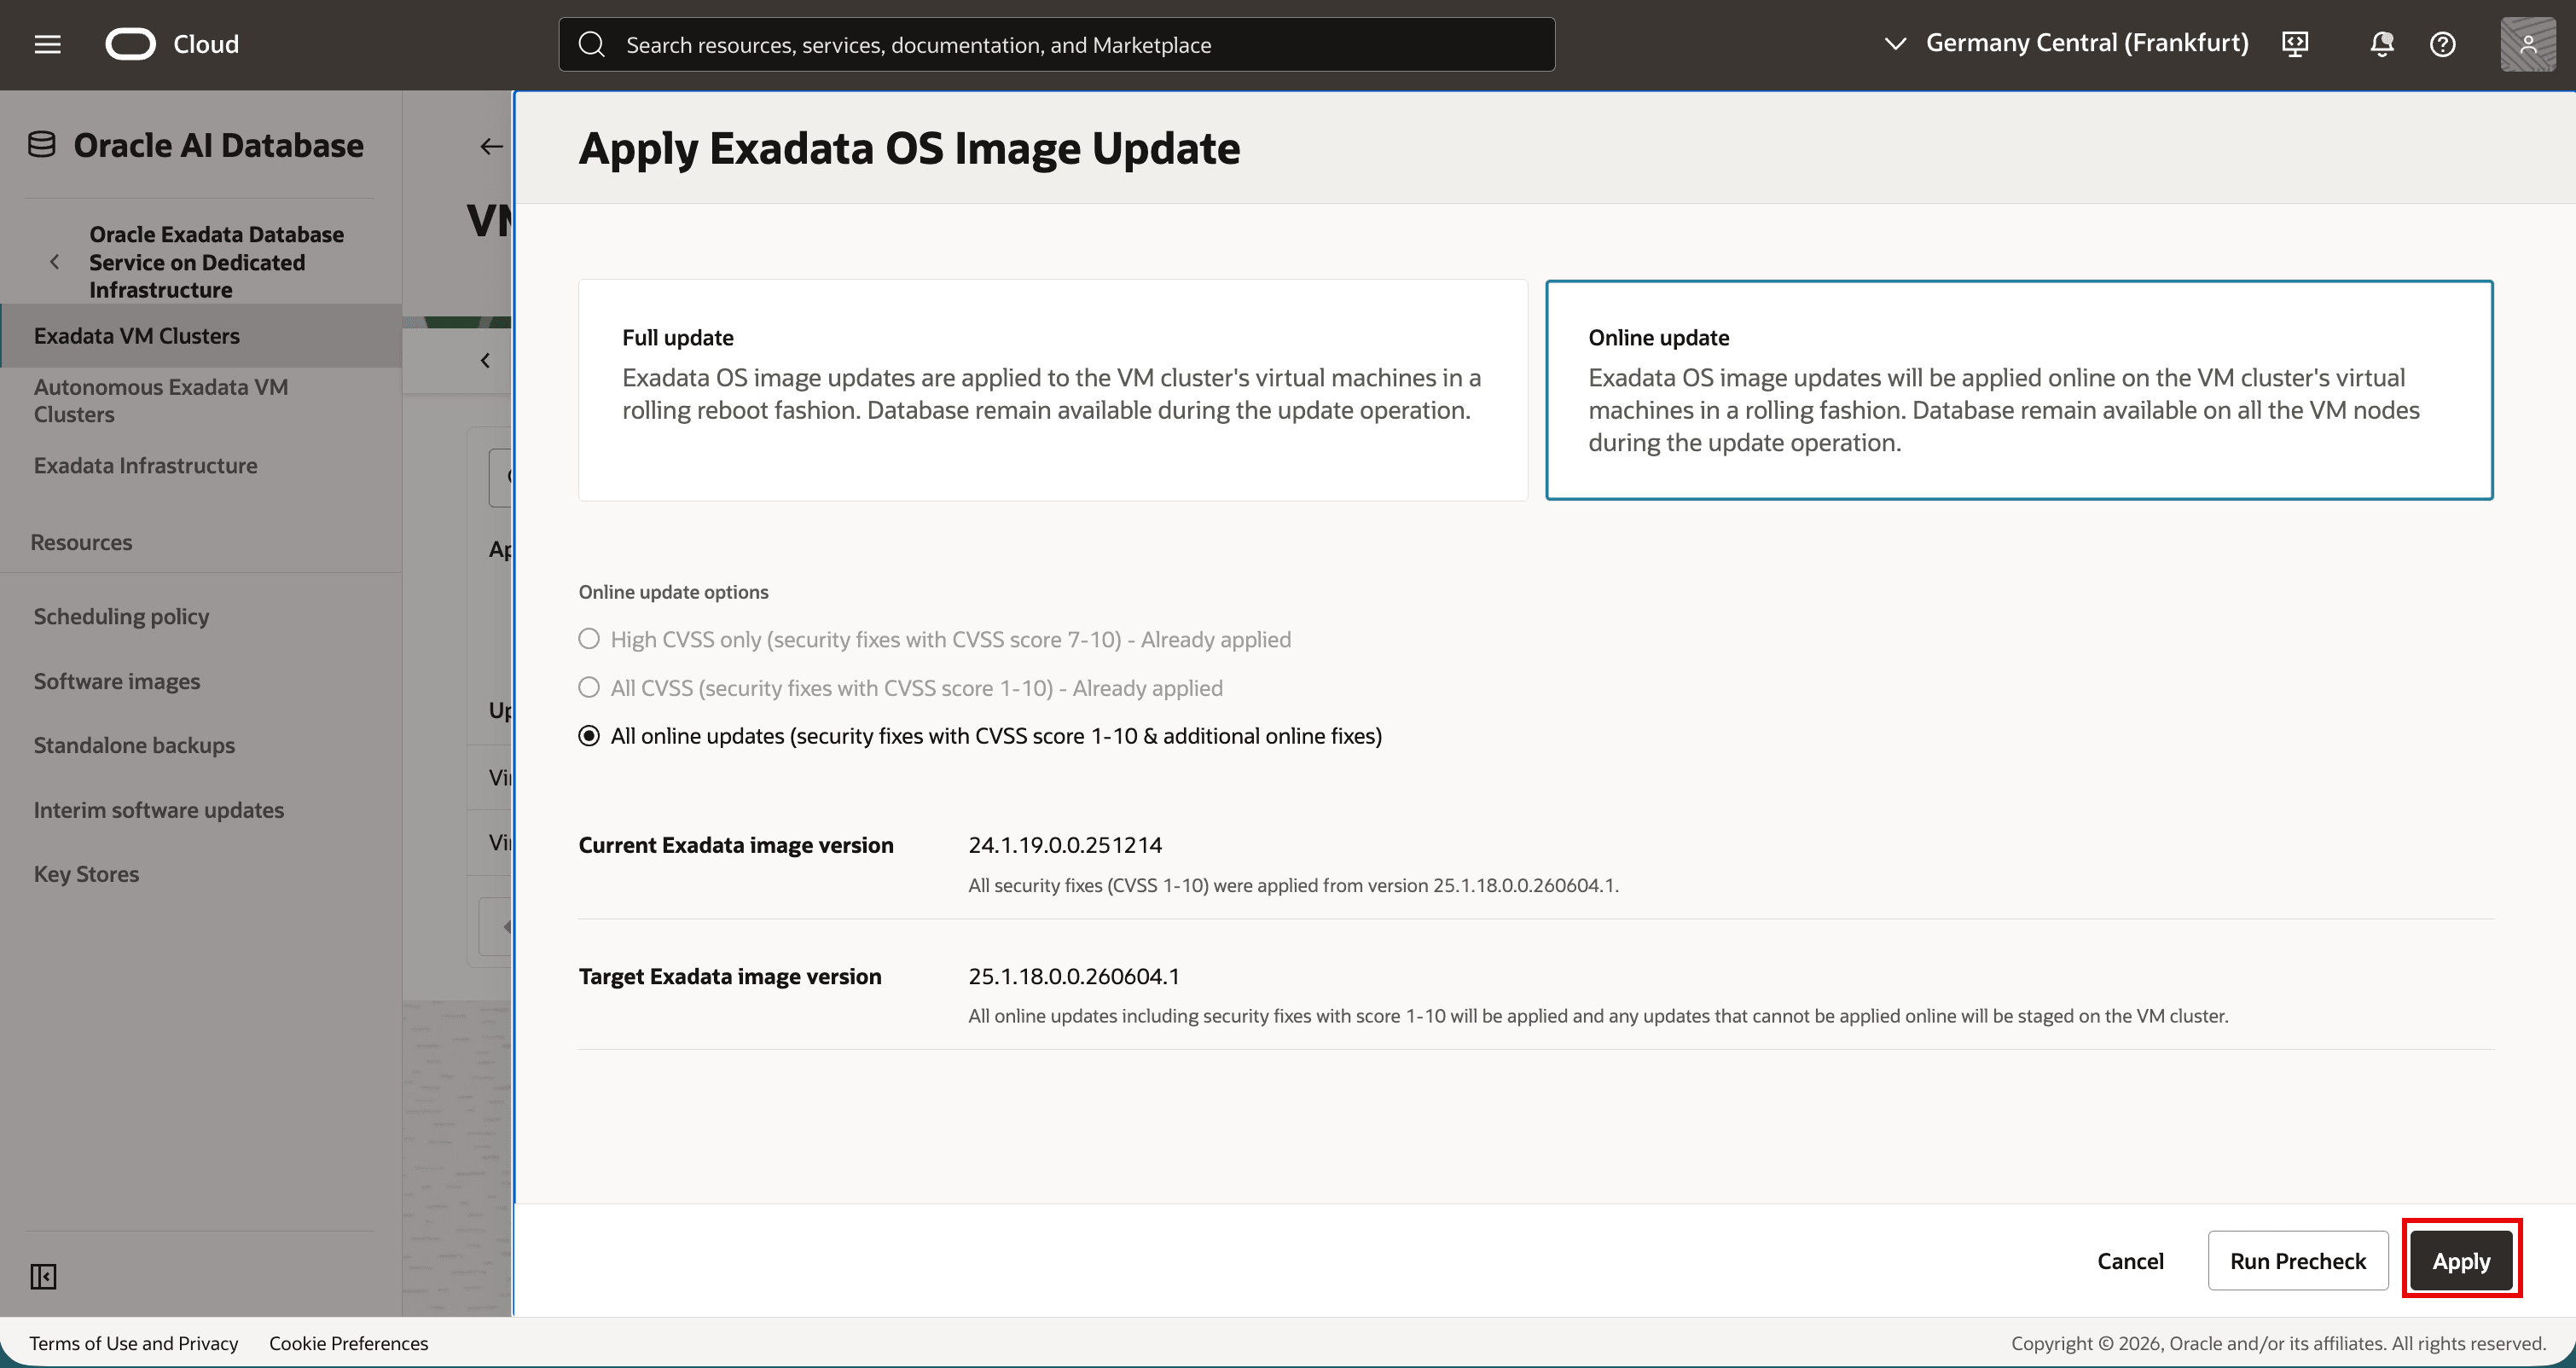
Description of the illustration live-update-select-all-online-updates.png
-
Monitor Work requests, Updates (OS), and Update History until the update succeeds. Verify that Update History records the All online updates scope.
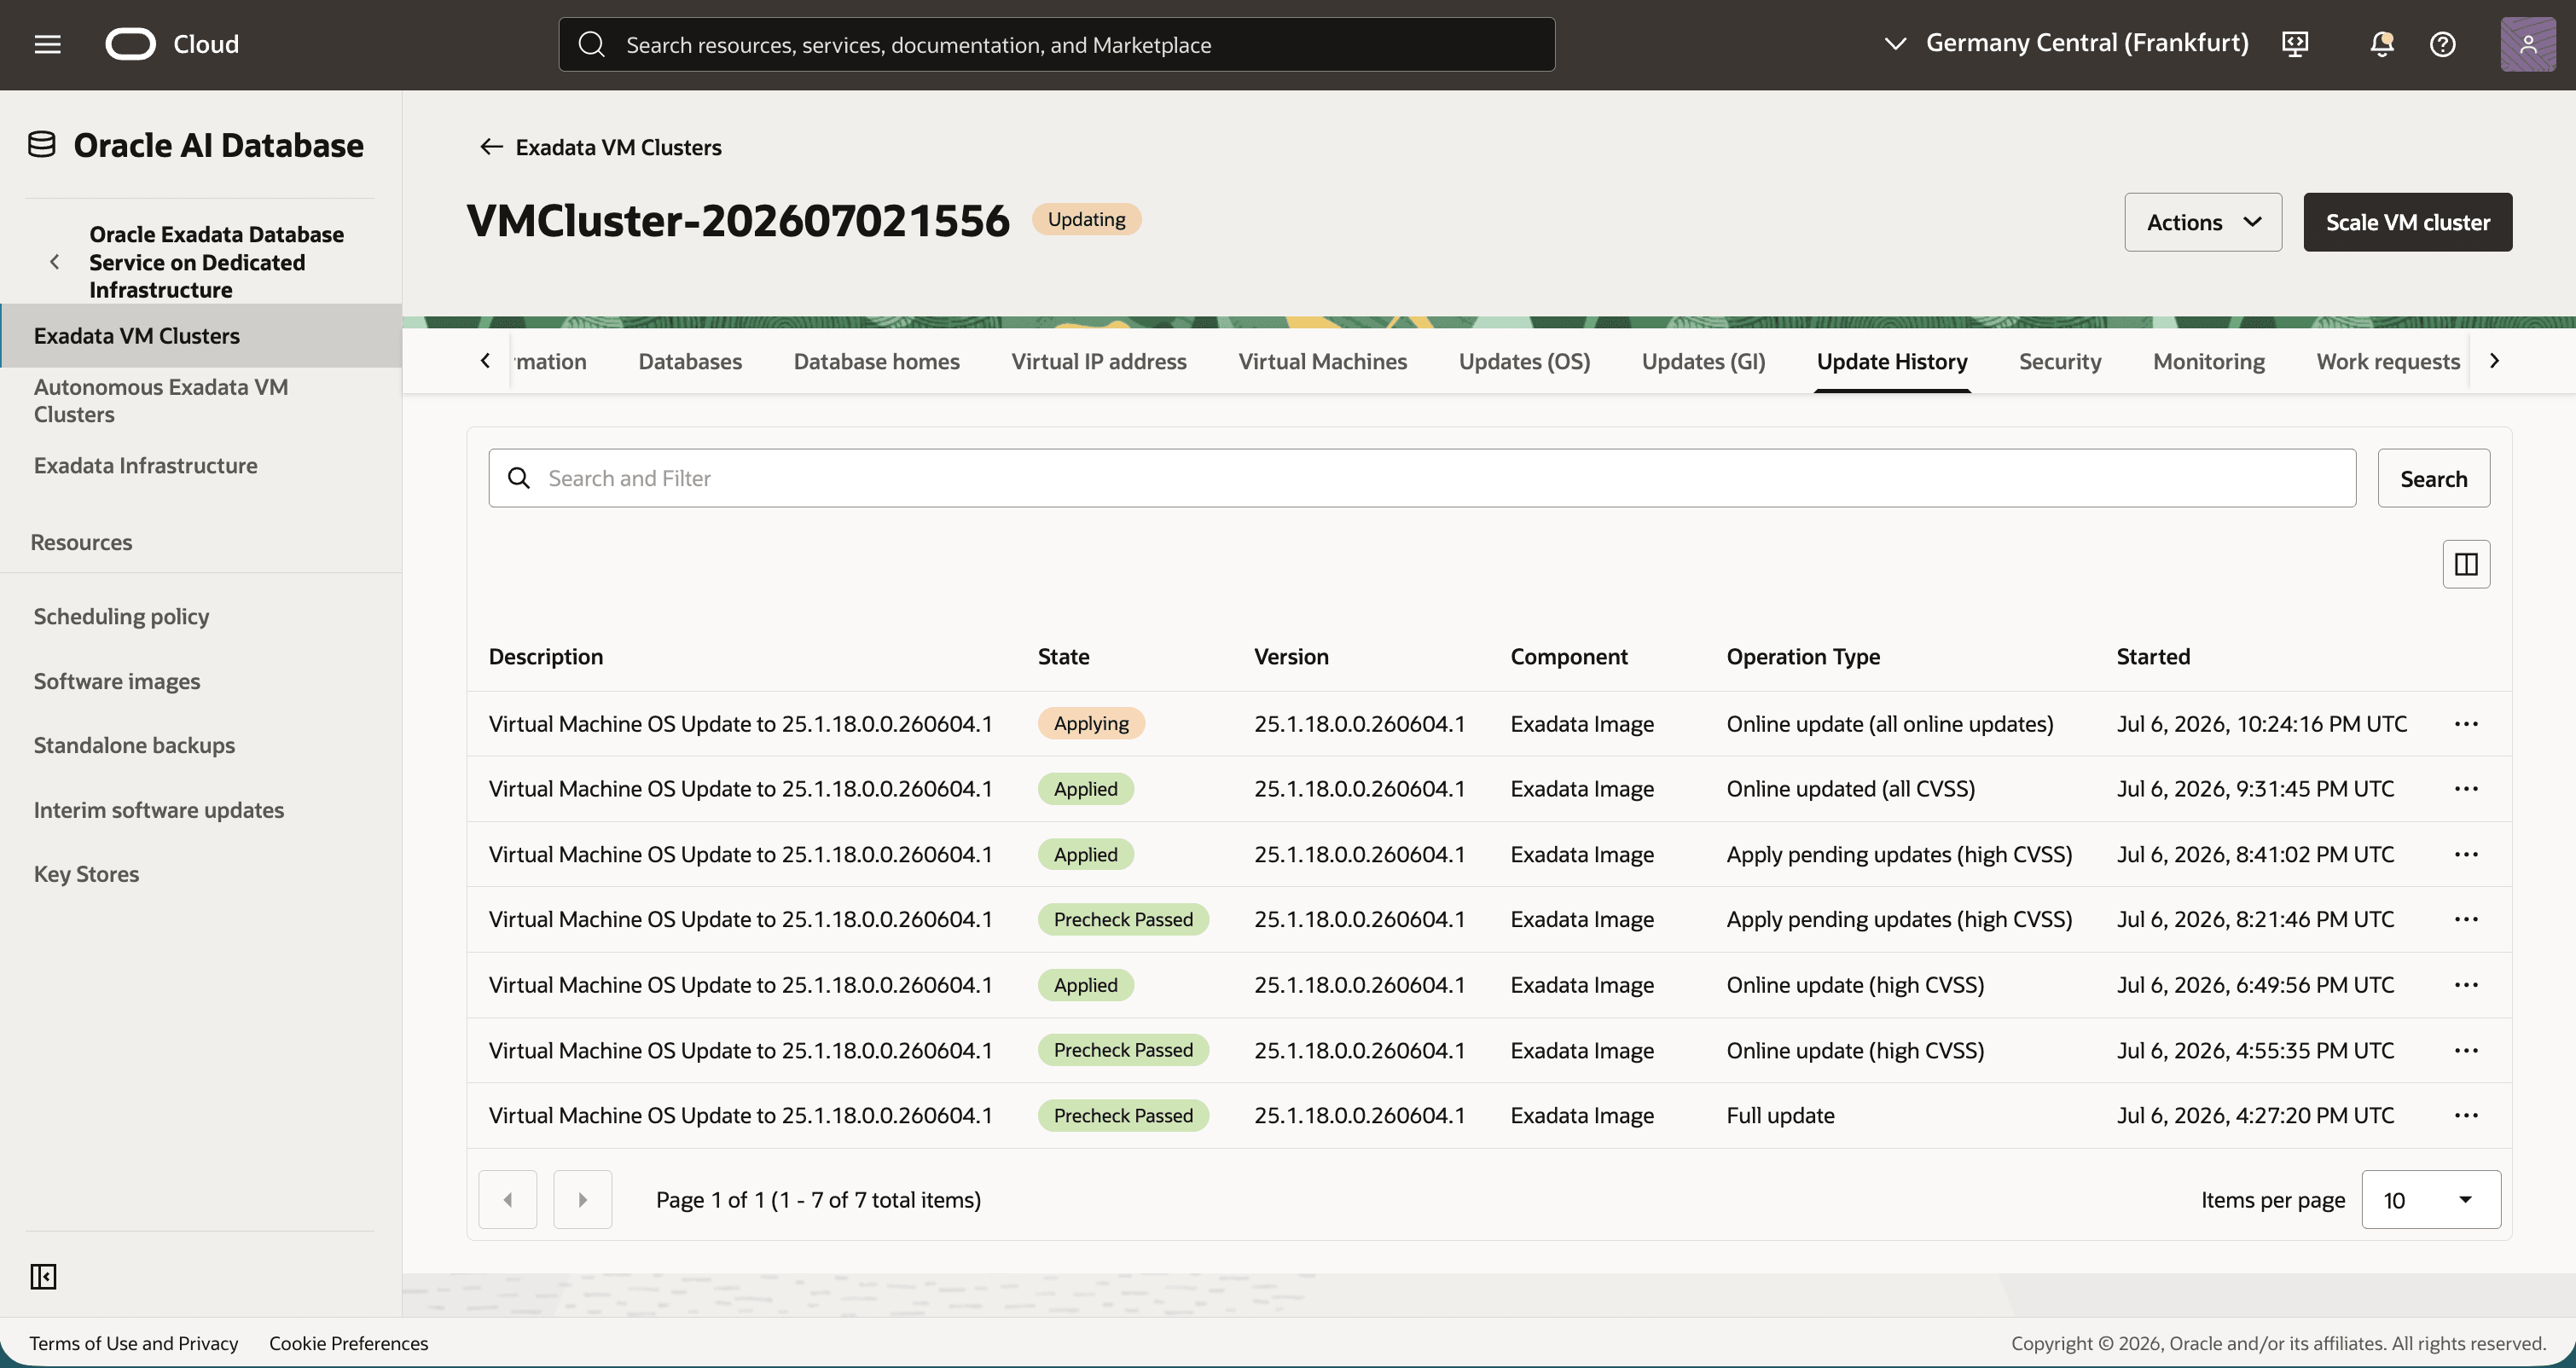
Description of the illustration live-update-history-overview.png
Task 4: Review and apply pending updates, if required
An online update can leave reboot-required fixes as pending updates. The VM cluster details page identifies this condition and provides the Apply pending updates action.
-
On the VM cluster details page, review the version section and identify any pending updates.
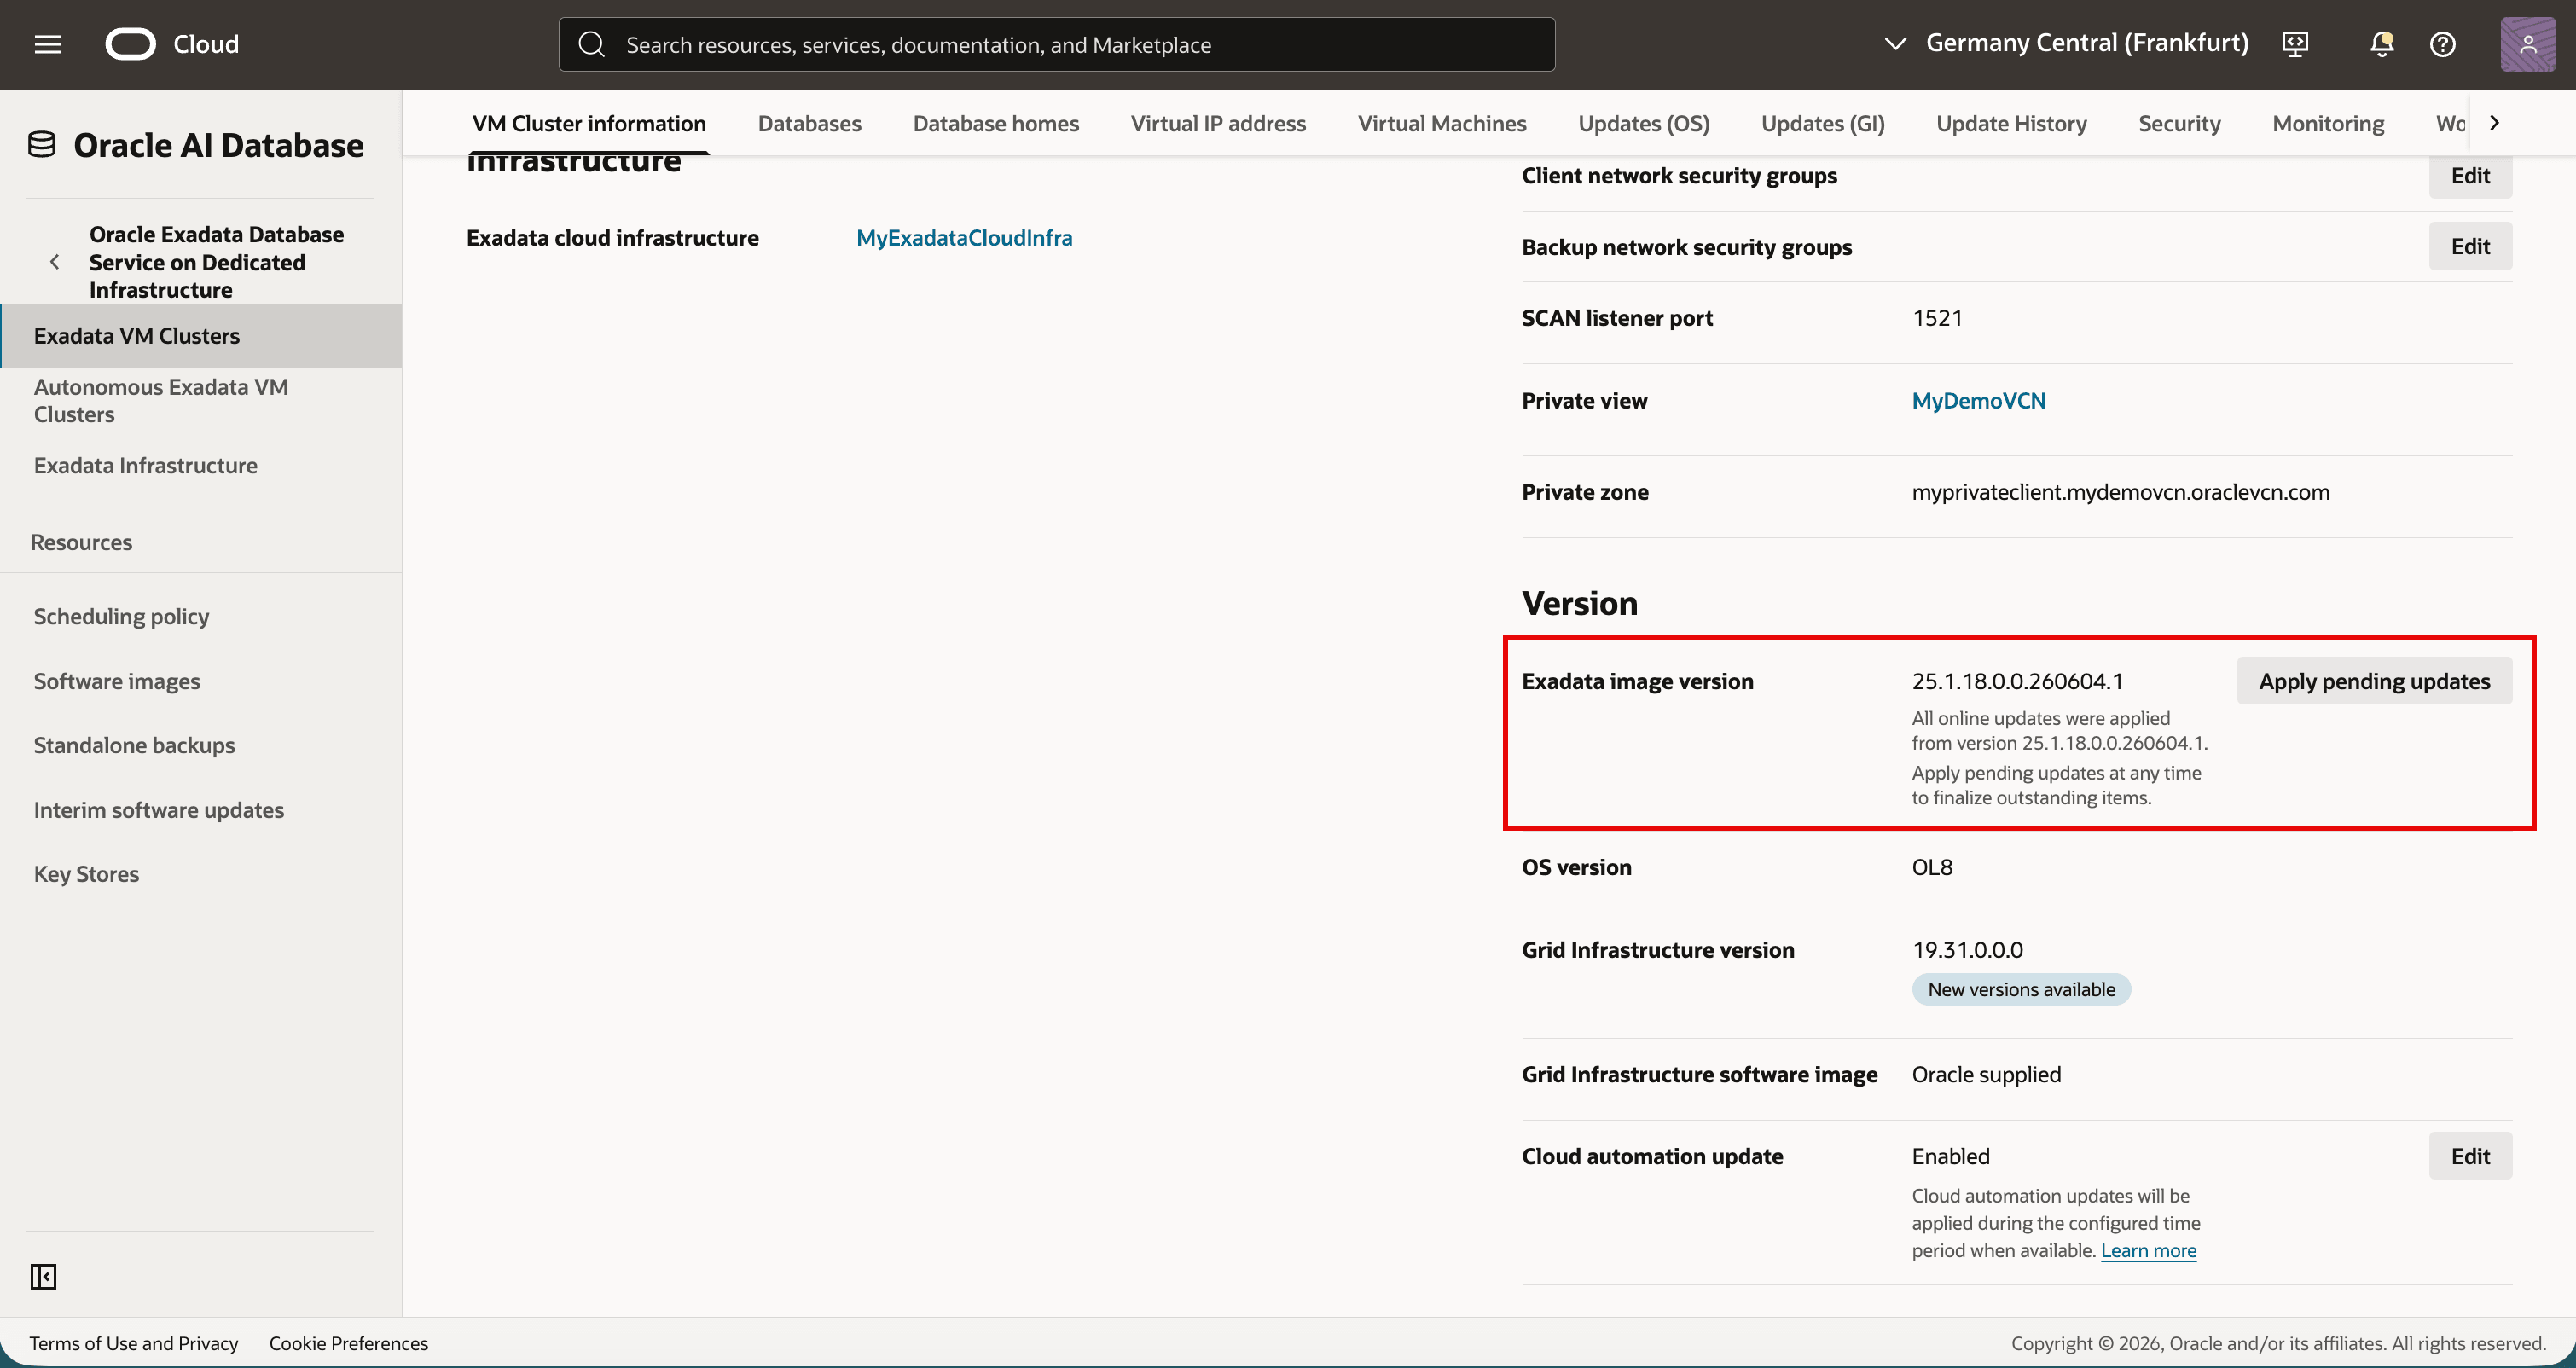
Description of the illustration live-update-pending-updates-available.png
-
Click Apply pending updates when you are ready to complete the outstanding changes in an approved rolling-reboot window.
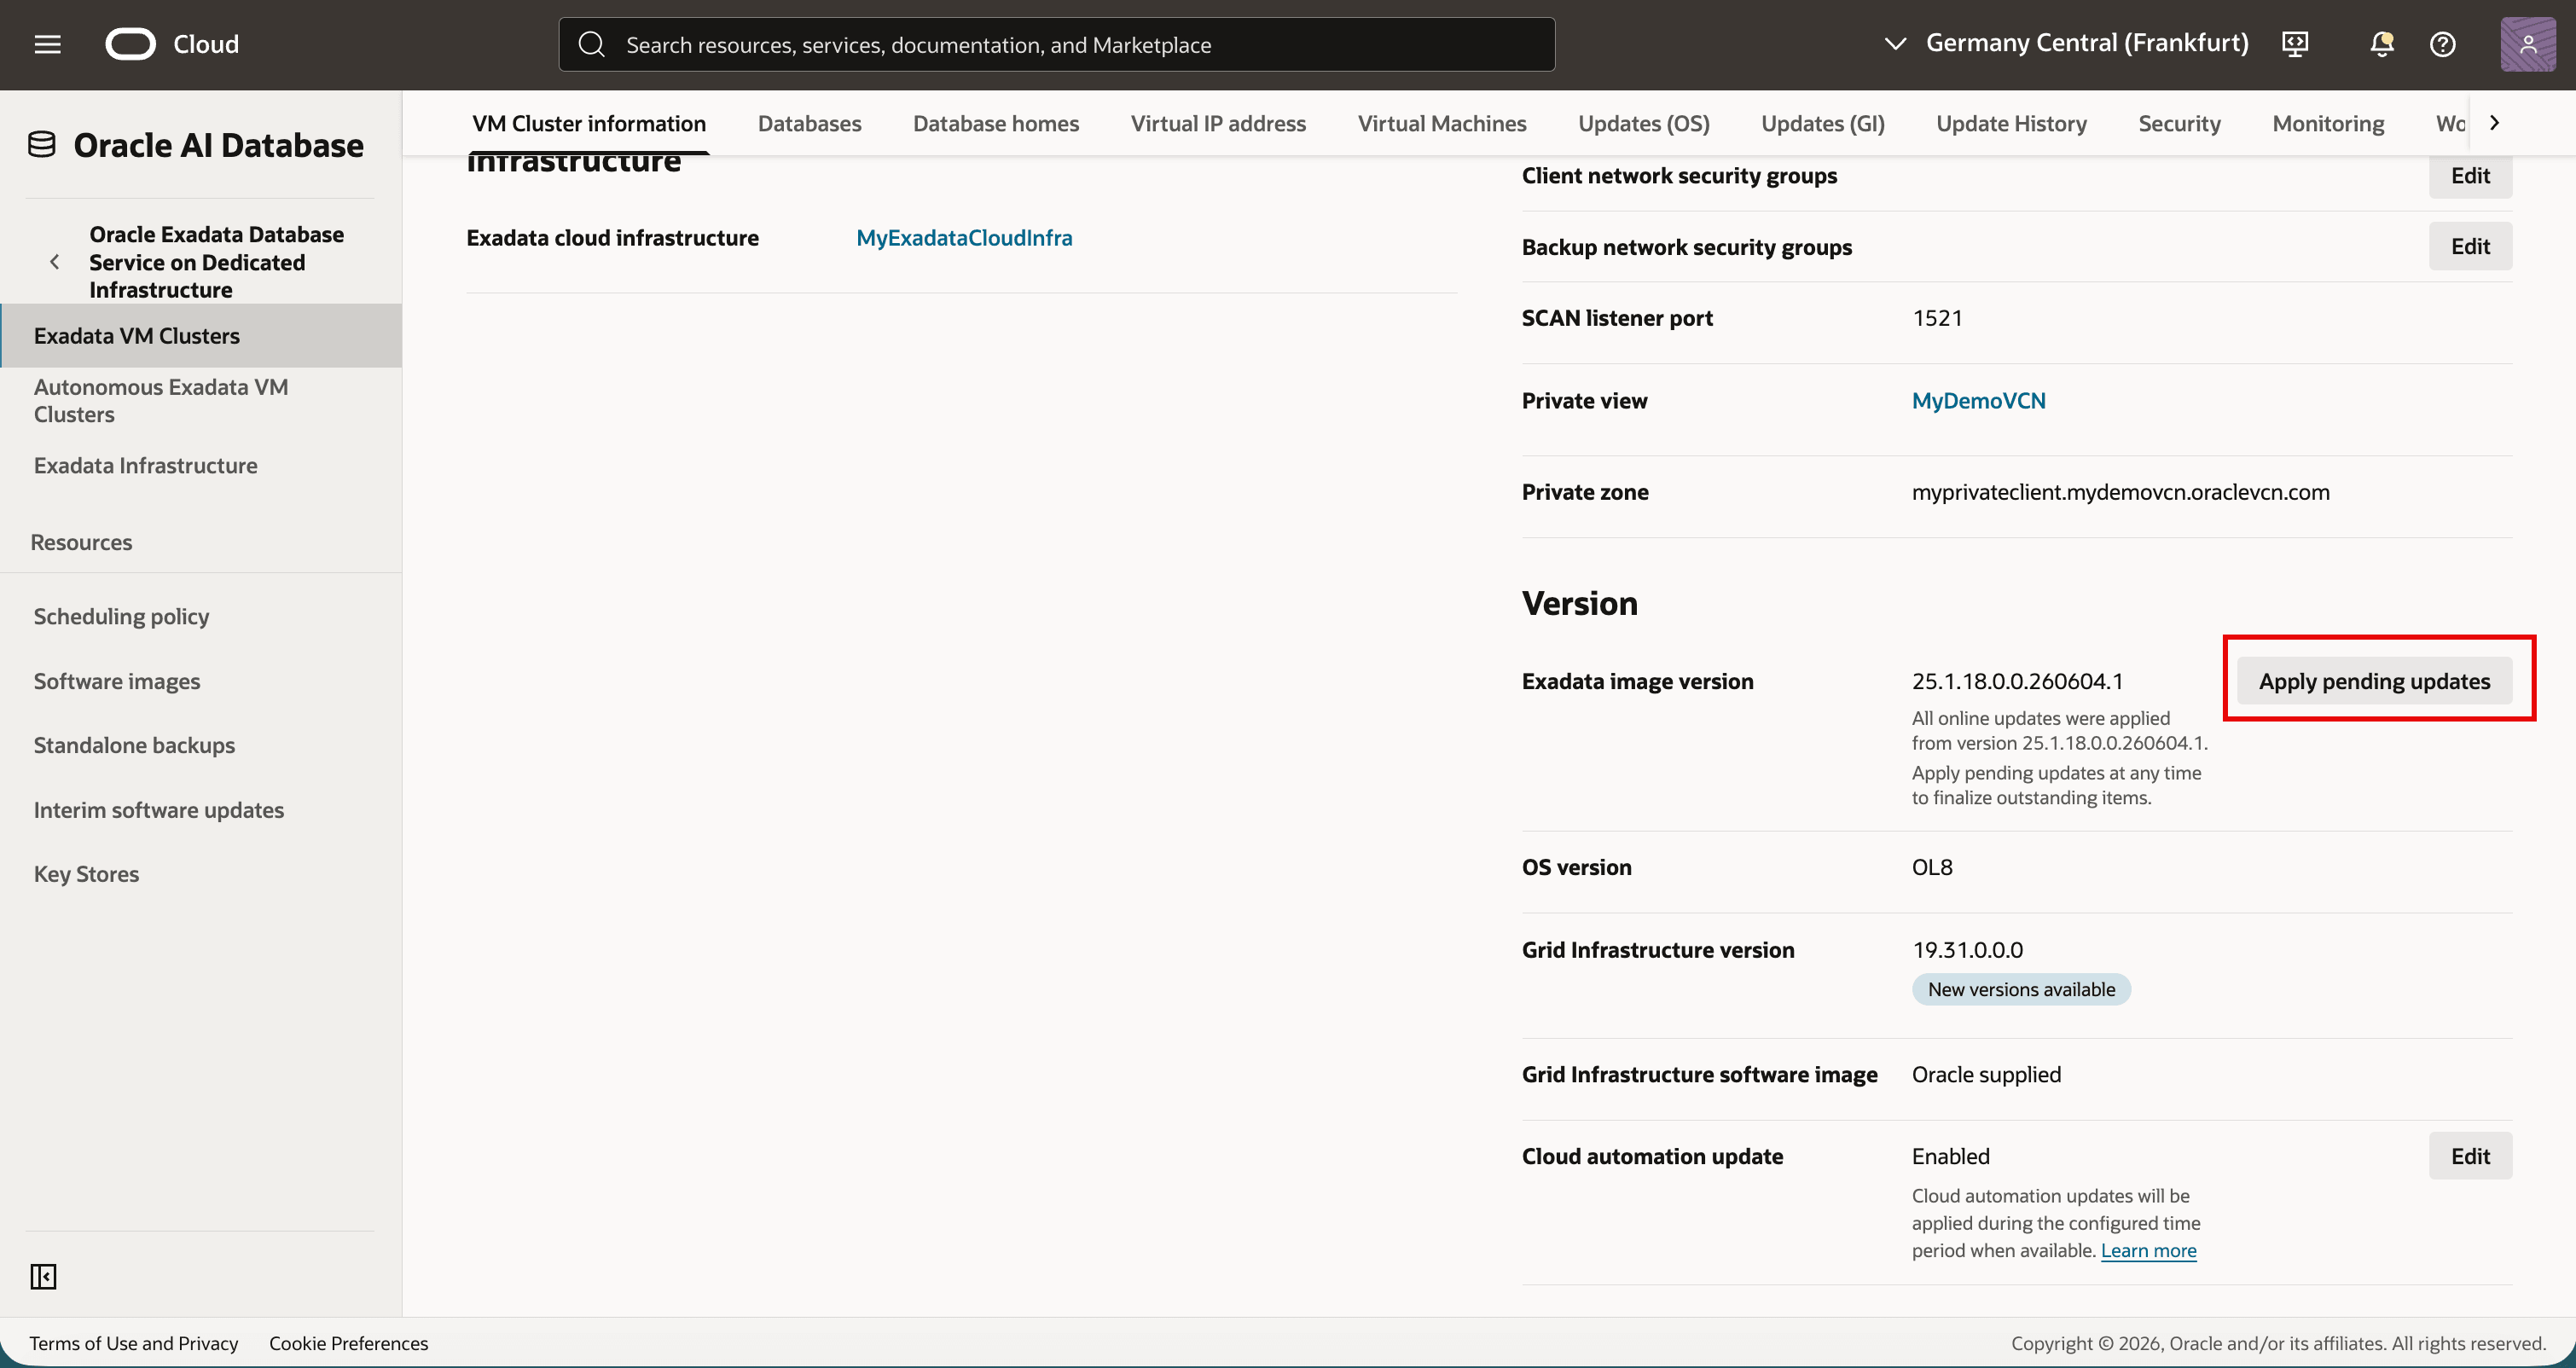
Description of the illustration live-update-pending-updates-button.png
-
Run the precheck from the pending-update dialog by clicking Run Precheck.
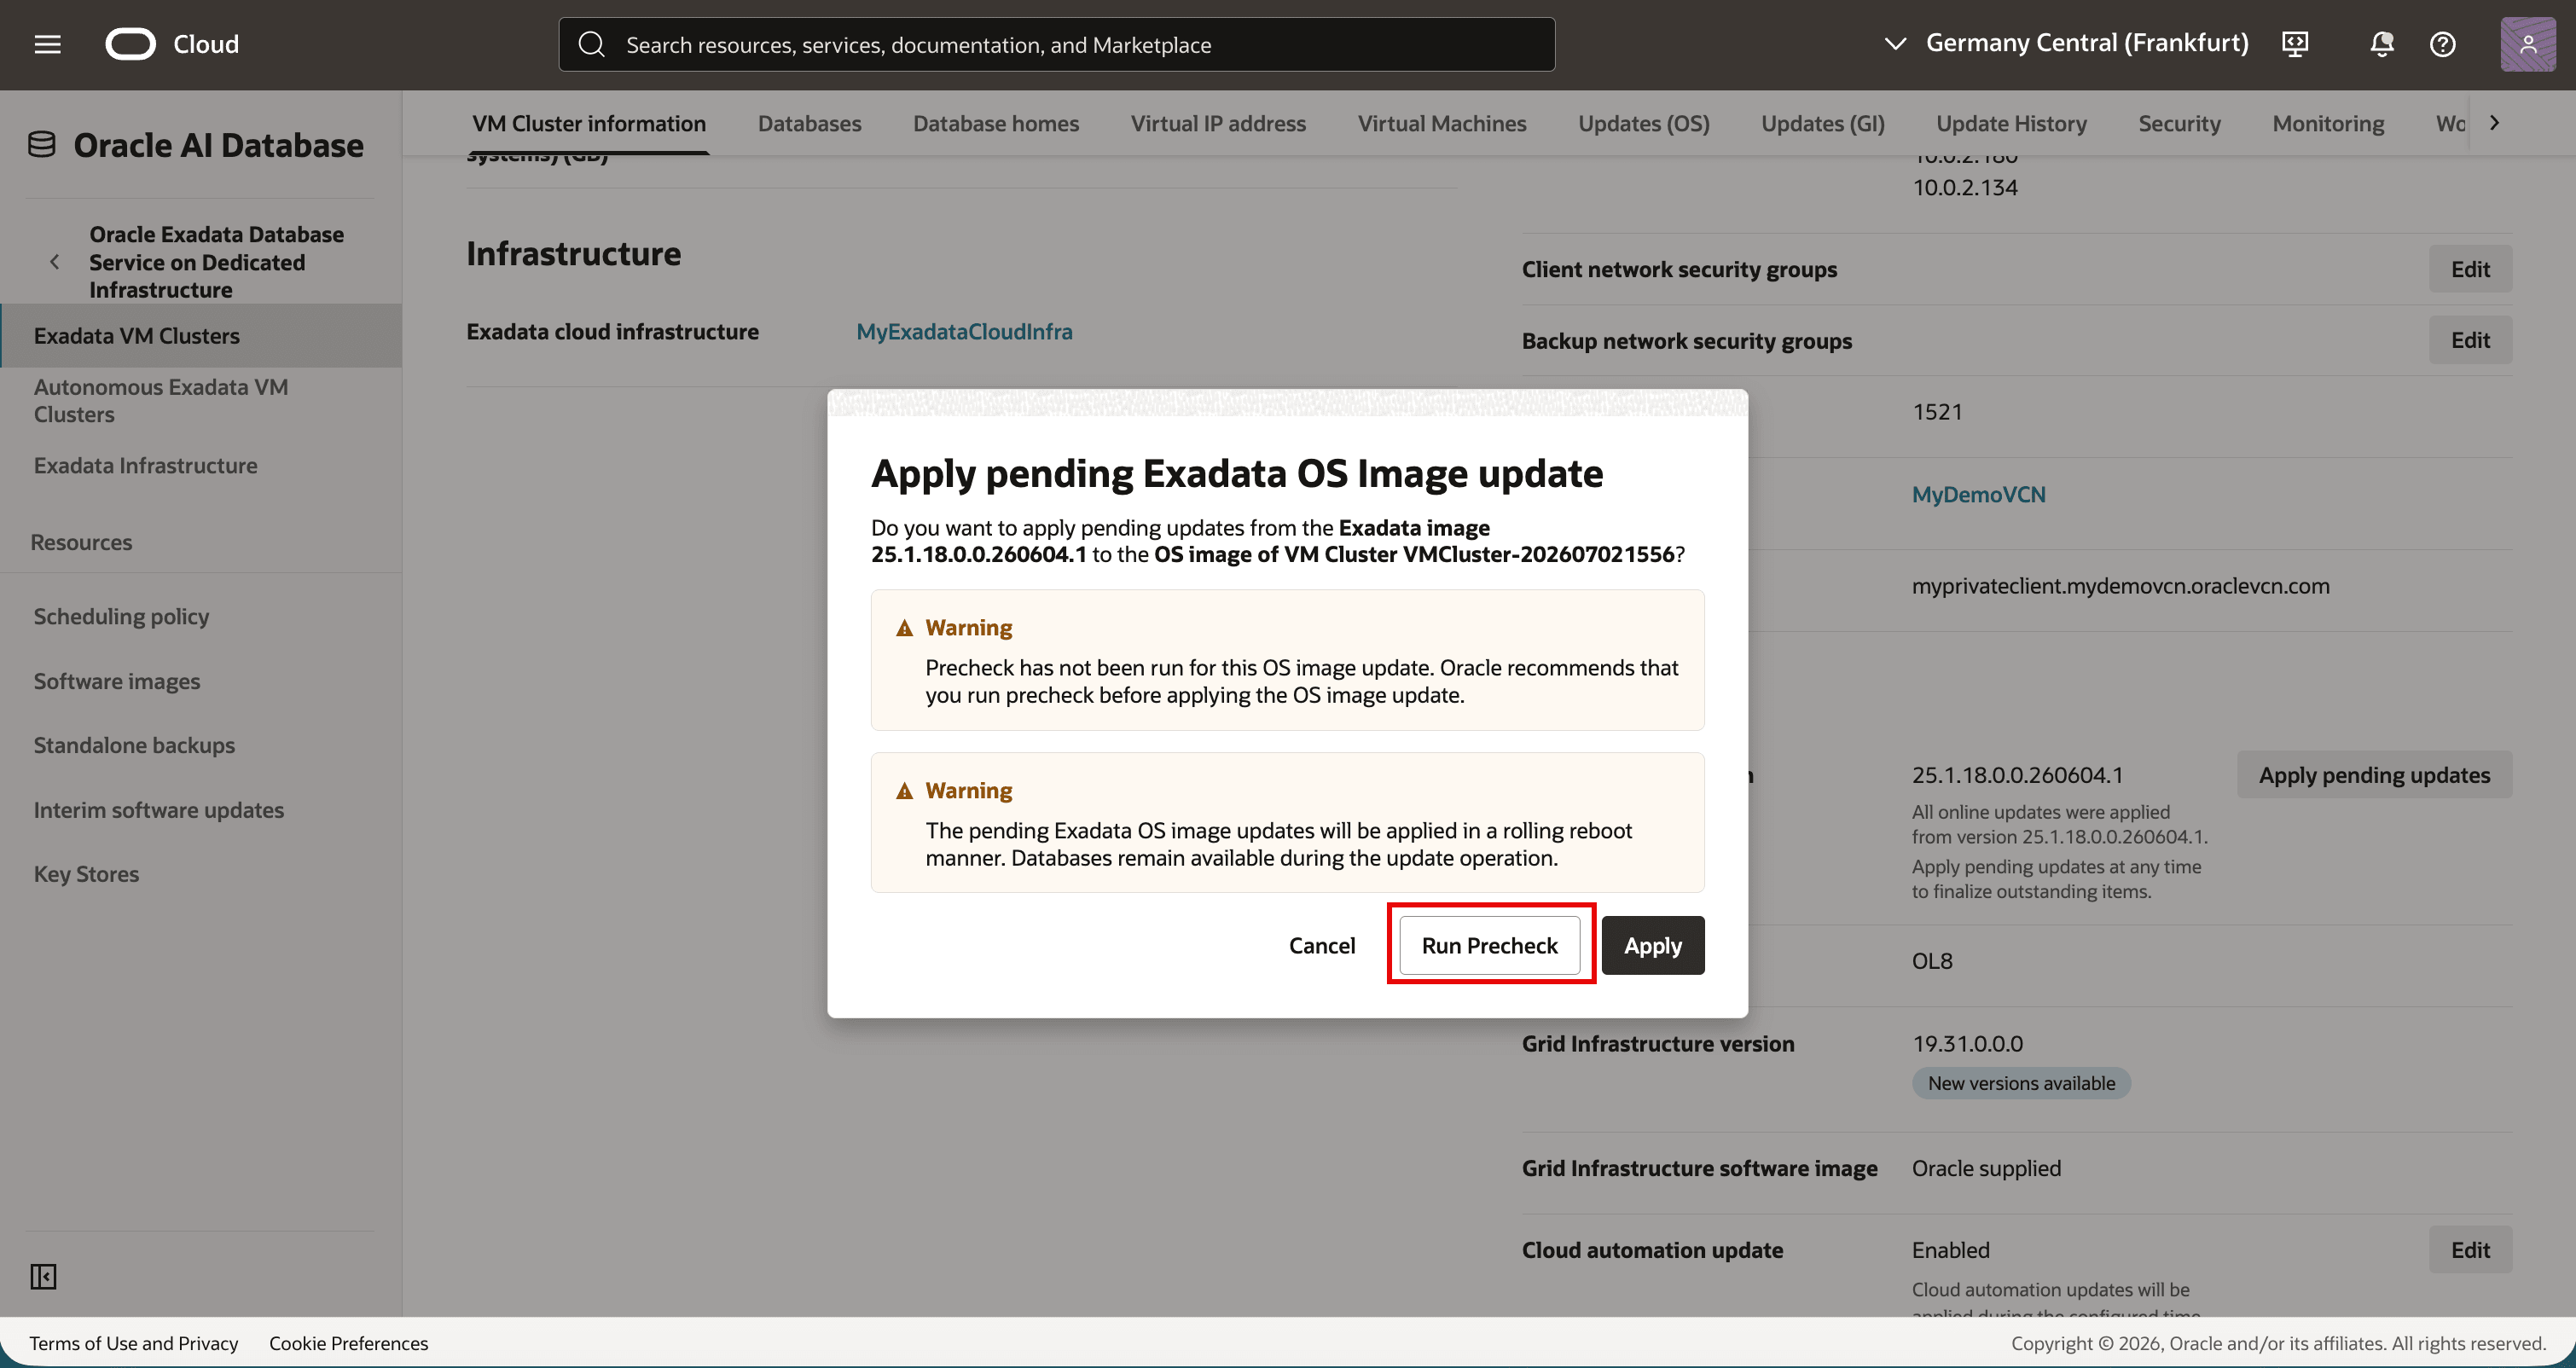
Description of the illustration live-update-pending-updates-precheck.png
-
After the precheck succeeds, reopen Apply pending updates and click Apply.
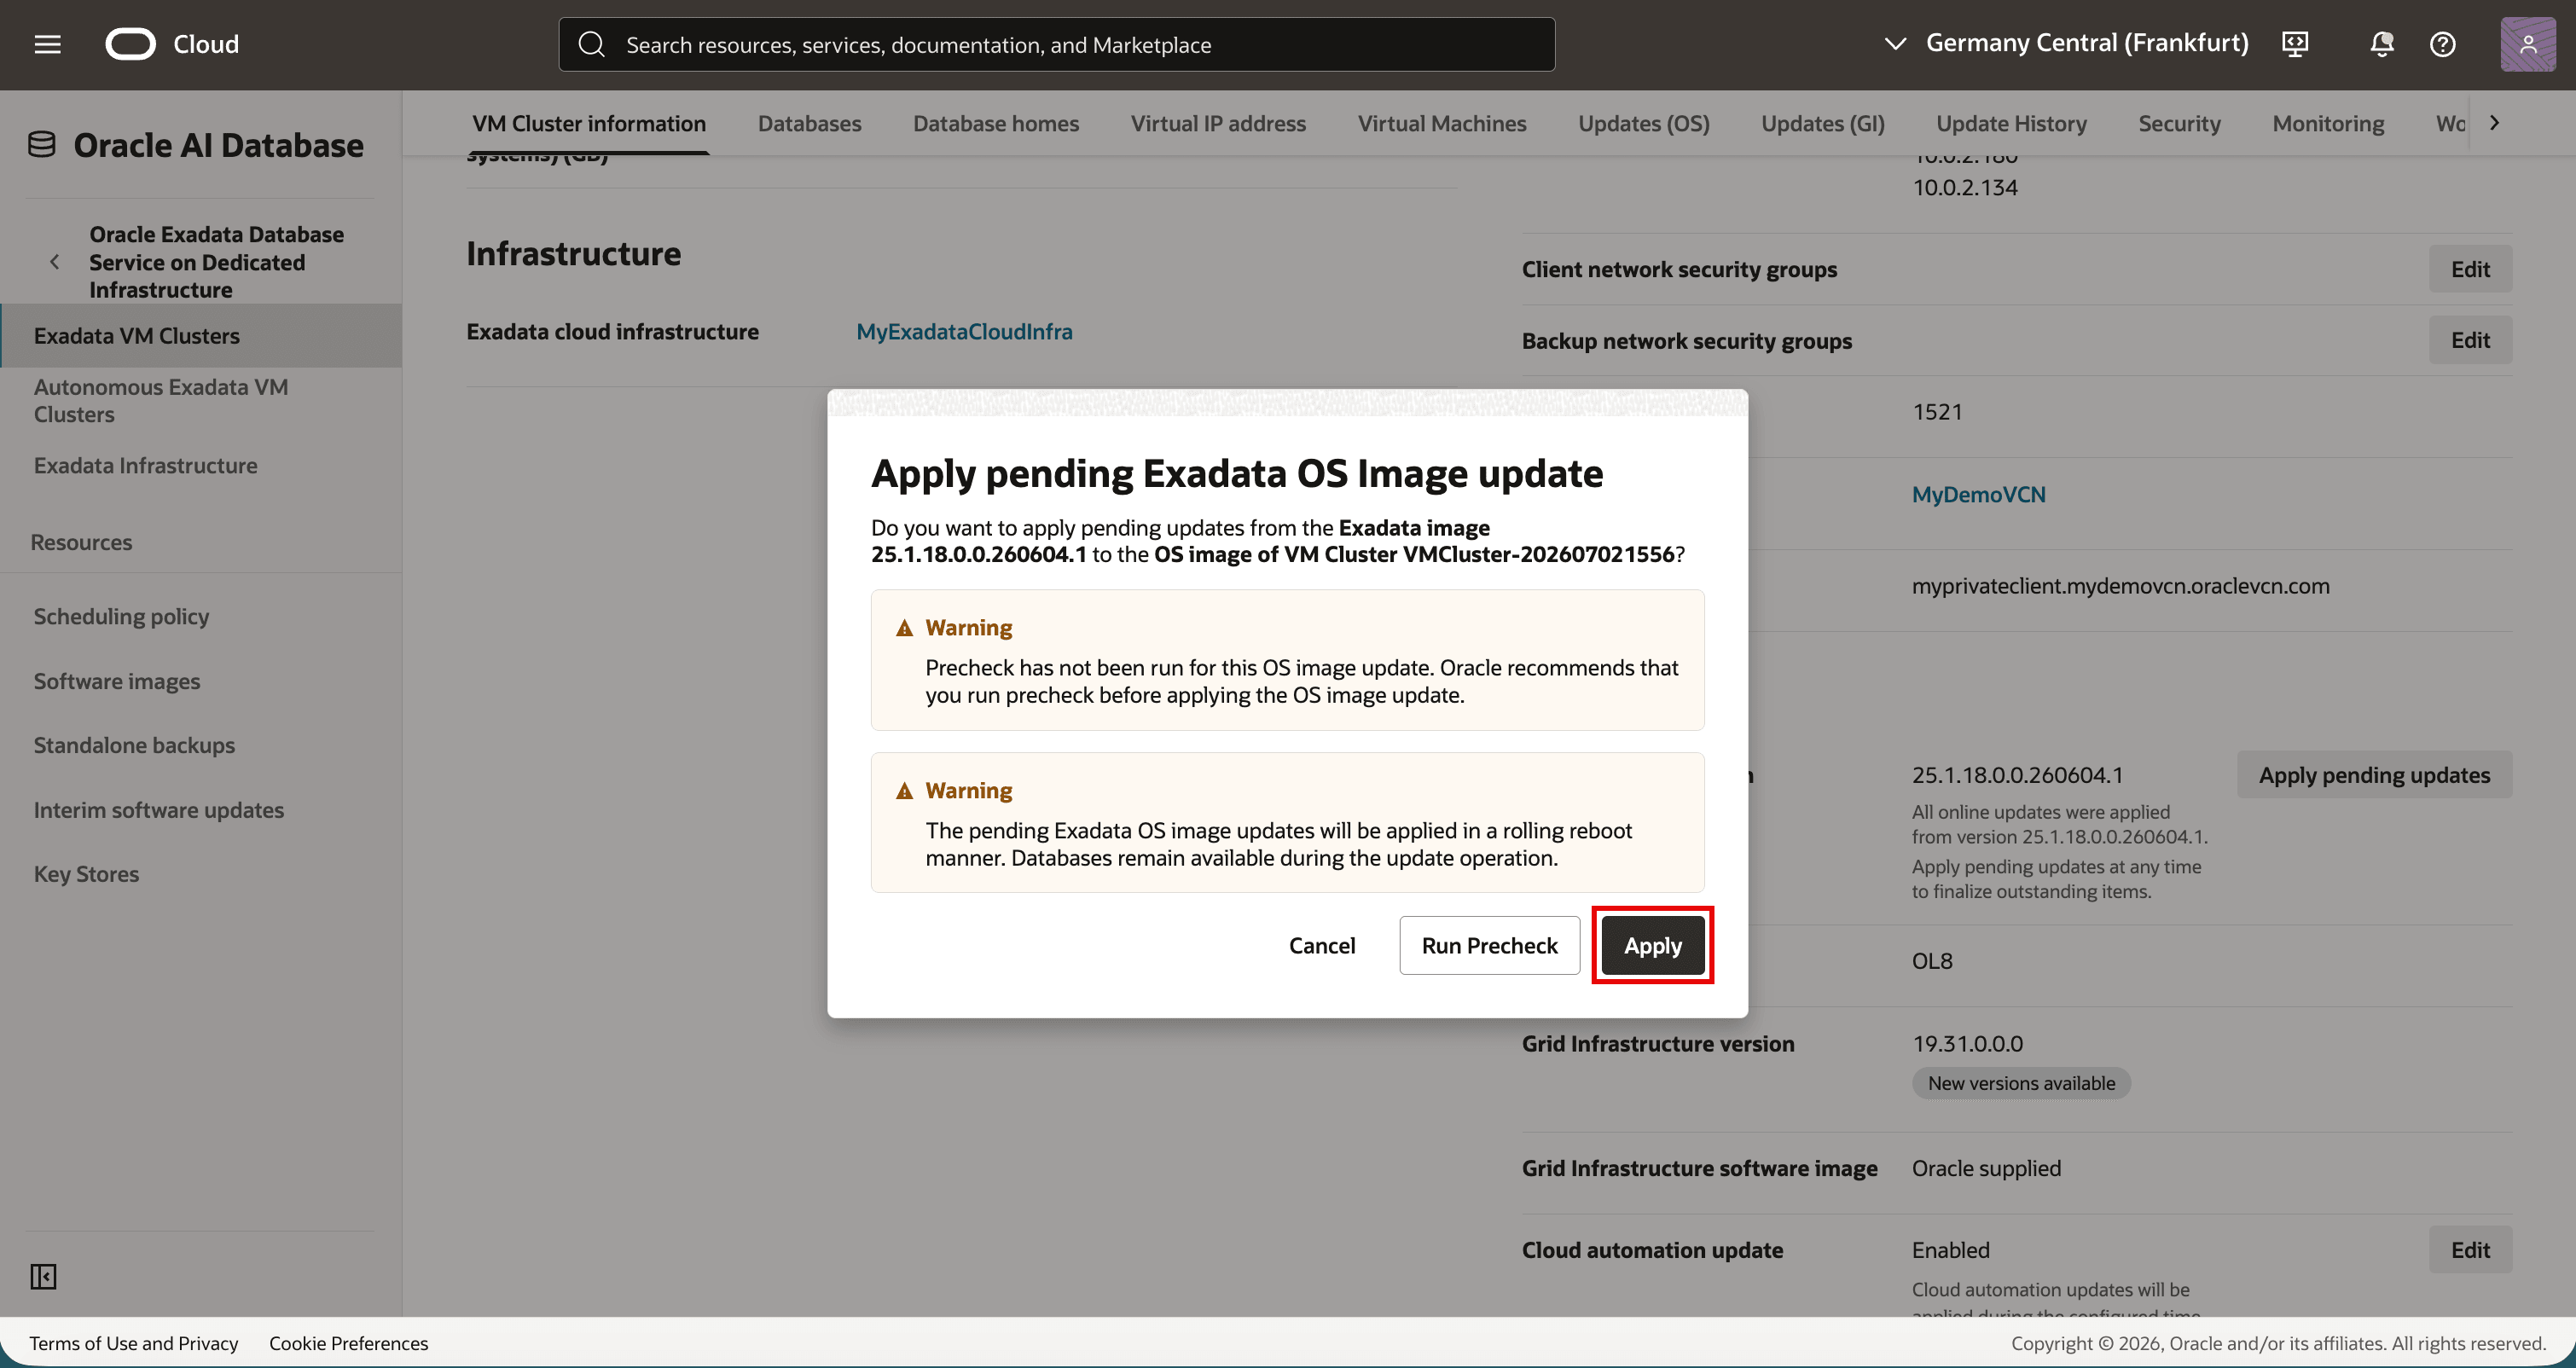
Description of the illustration live-update-pending-updates-apply.png
-
Monitor the pending-update work request and Update History entry until the operation succeeds.
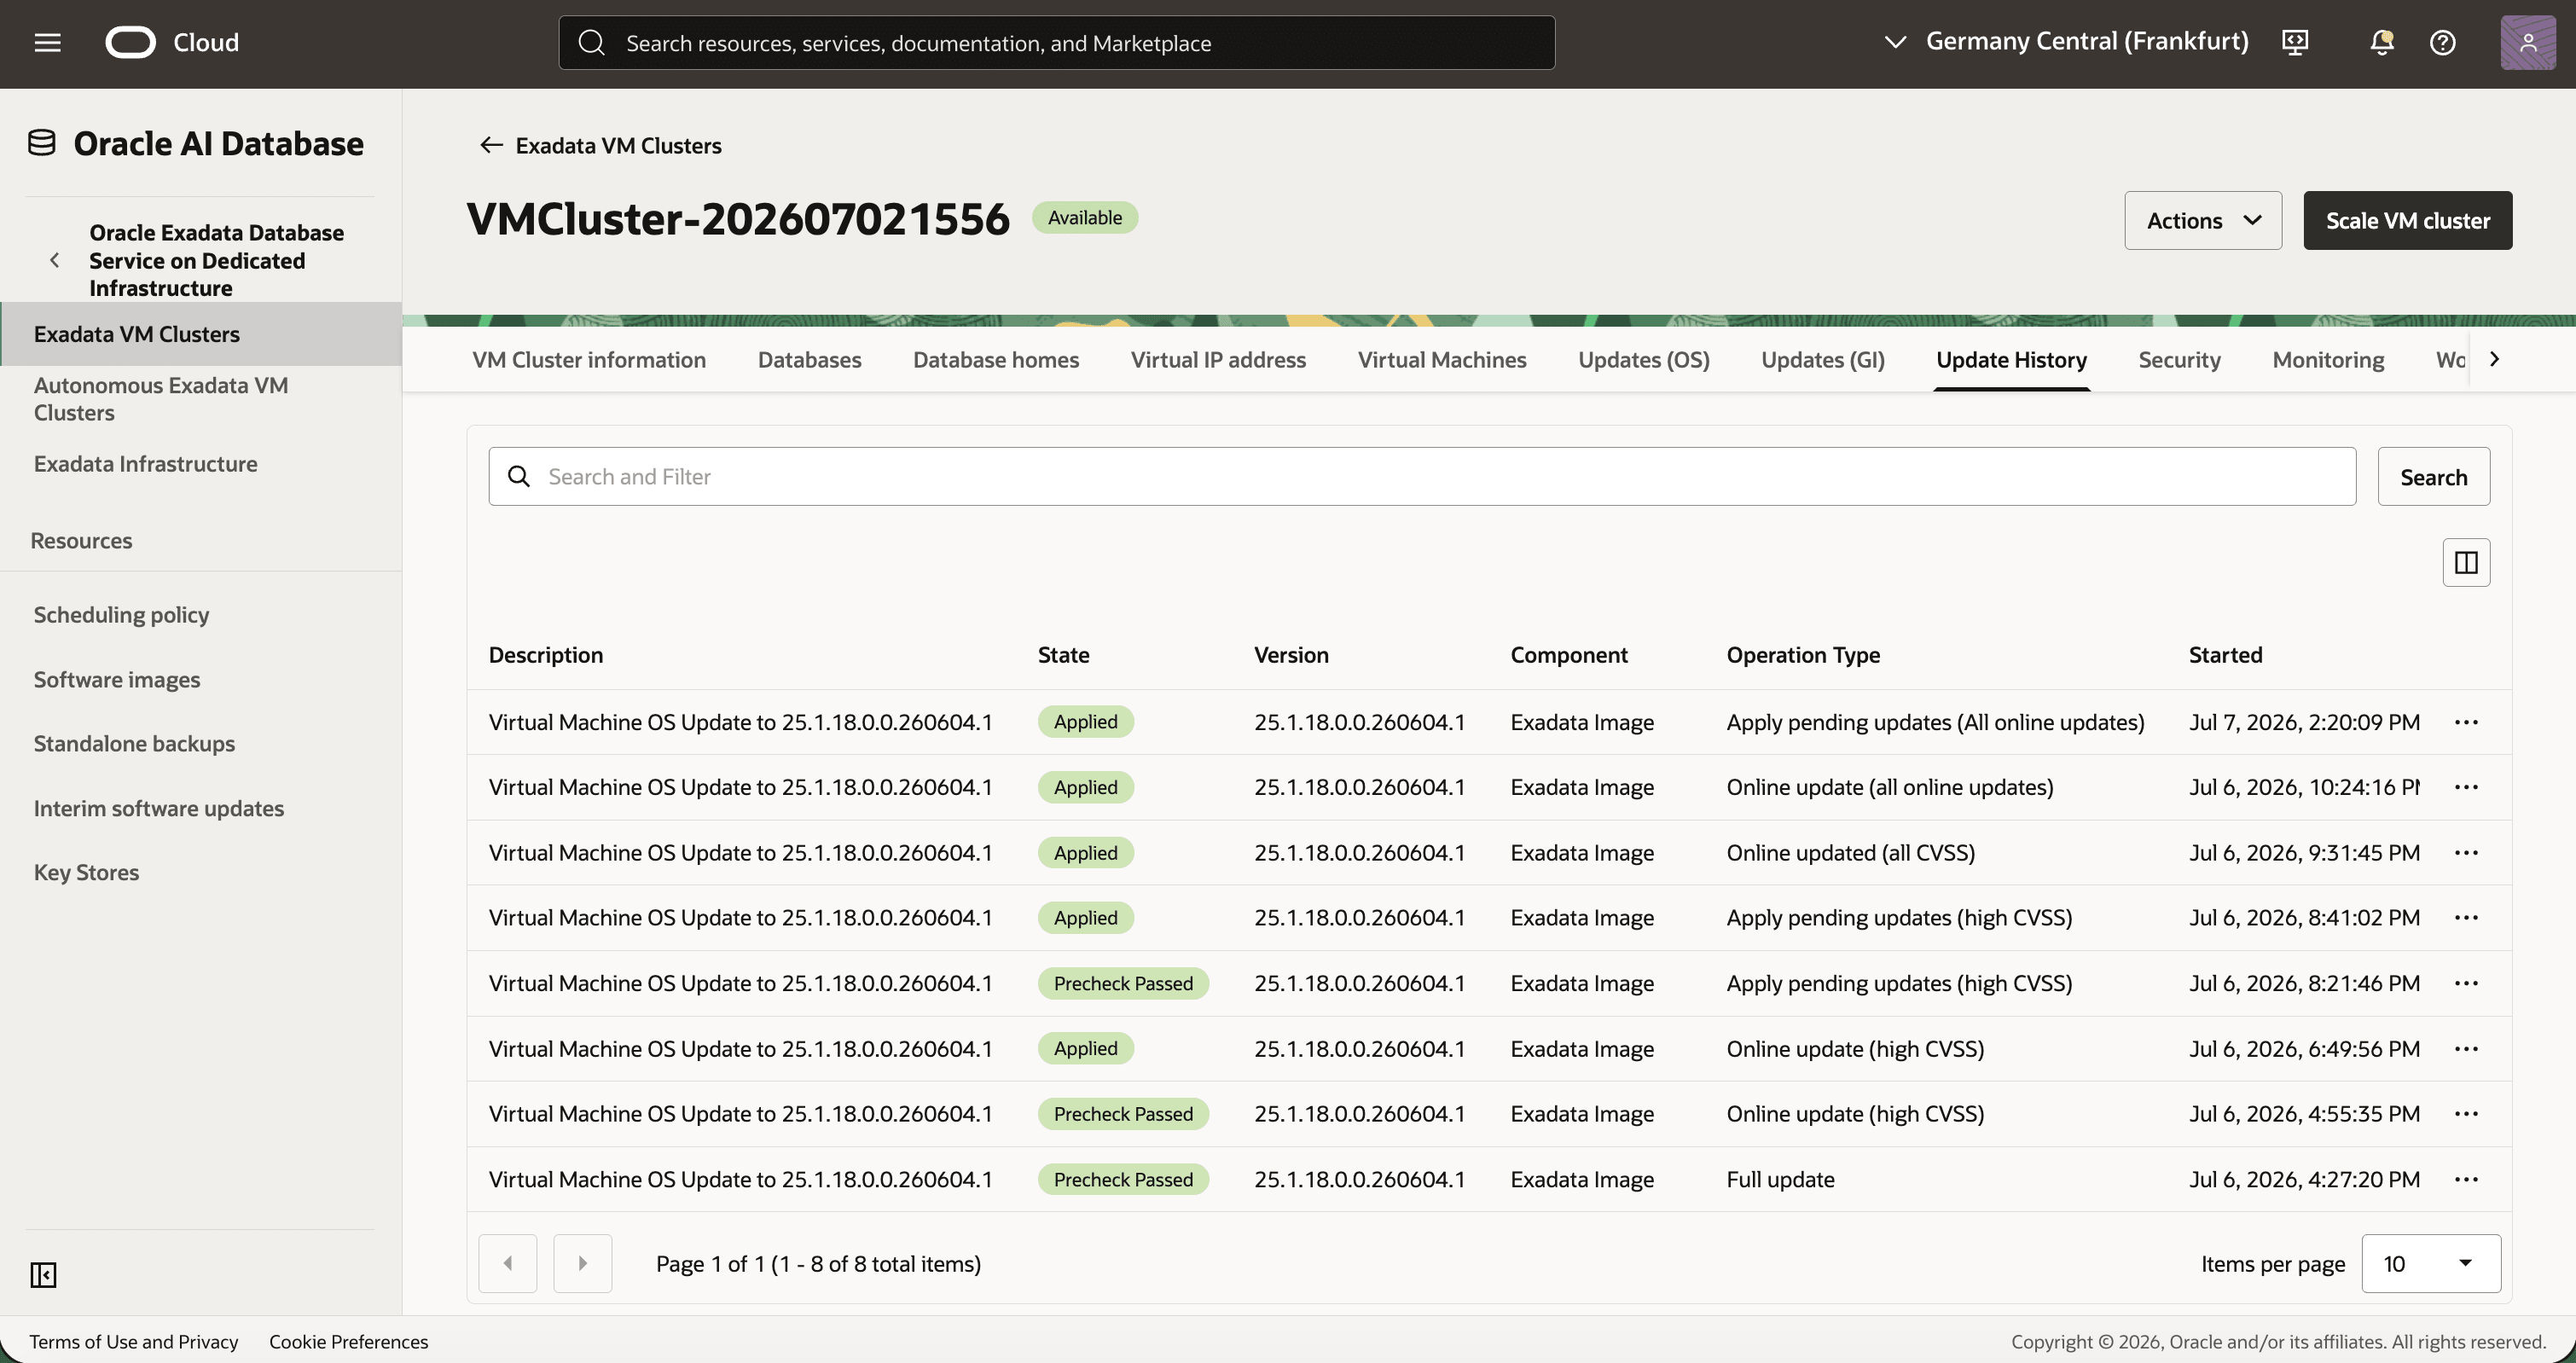
Description of the illustration live-update-history-pending-updates-completed.png
-
On the VM cluster details page, verify that the version section no longer shows pending updates or the Apply pending updates action.
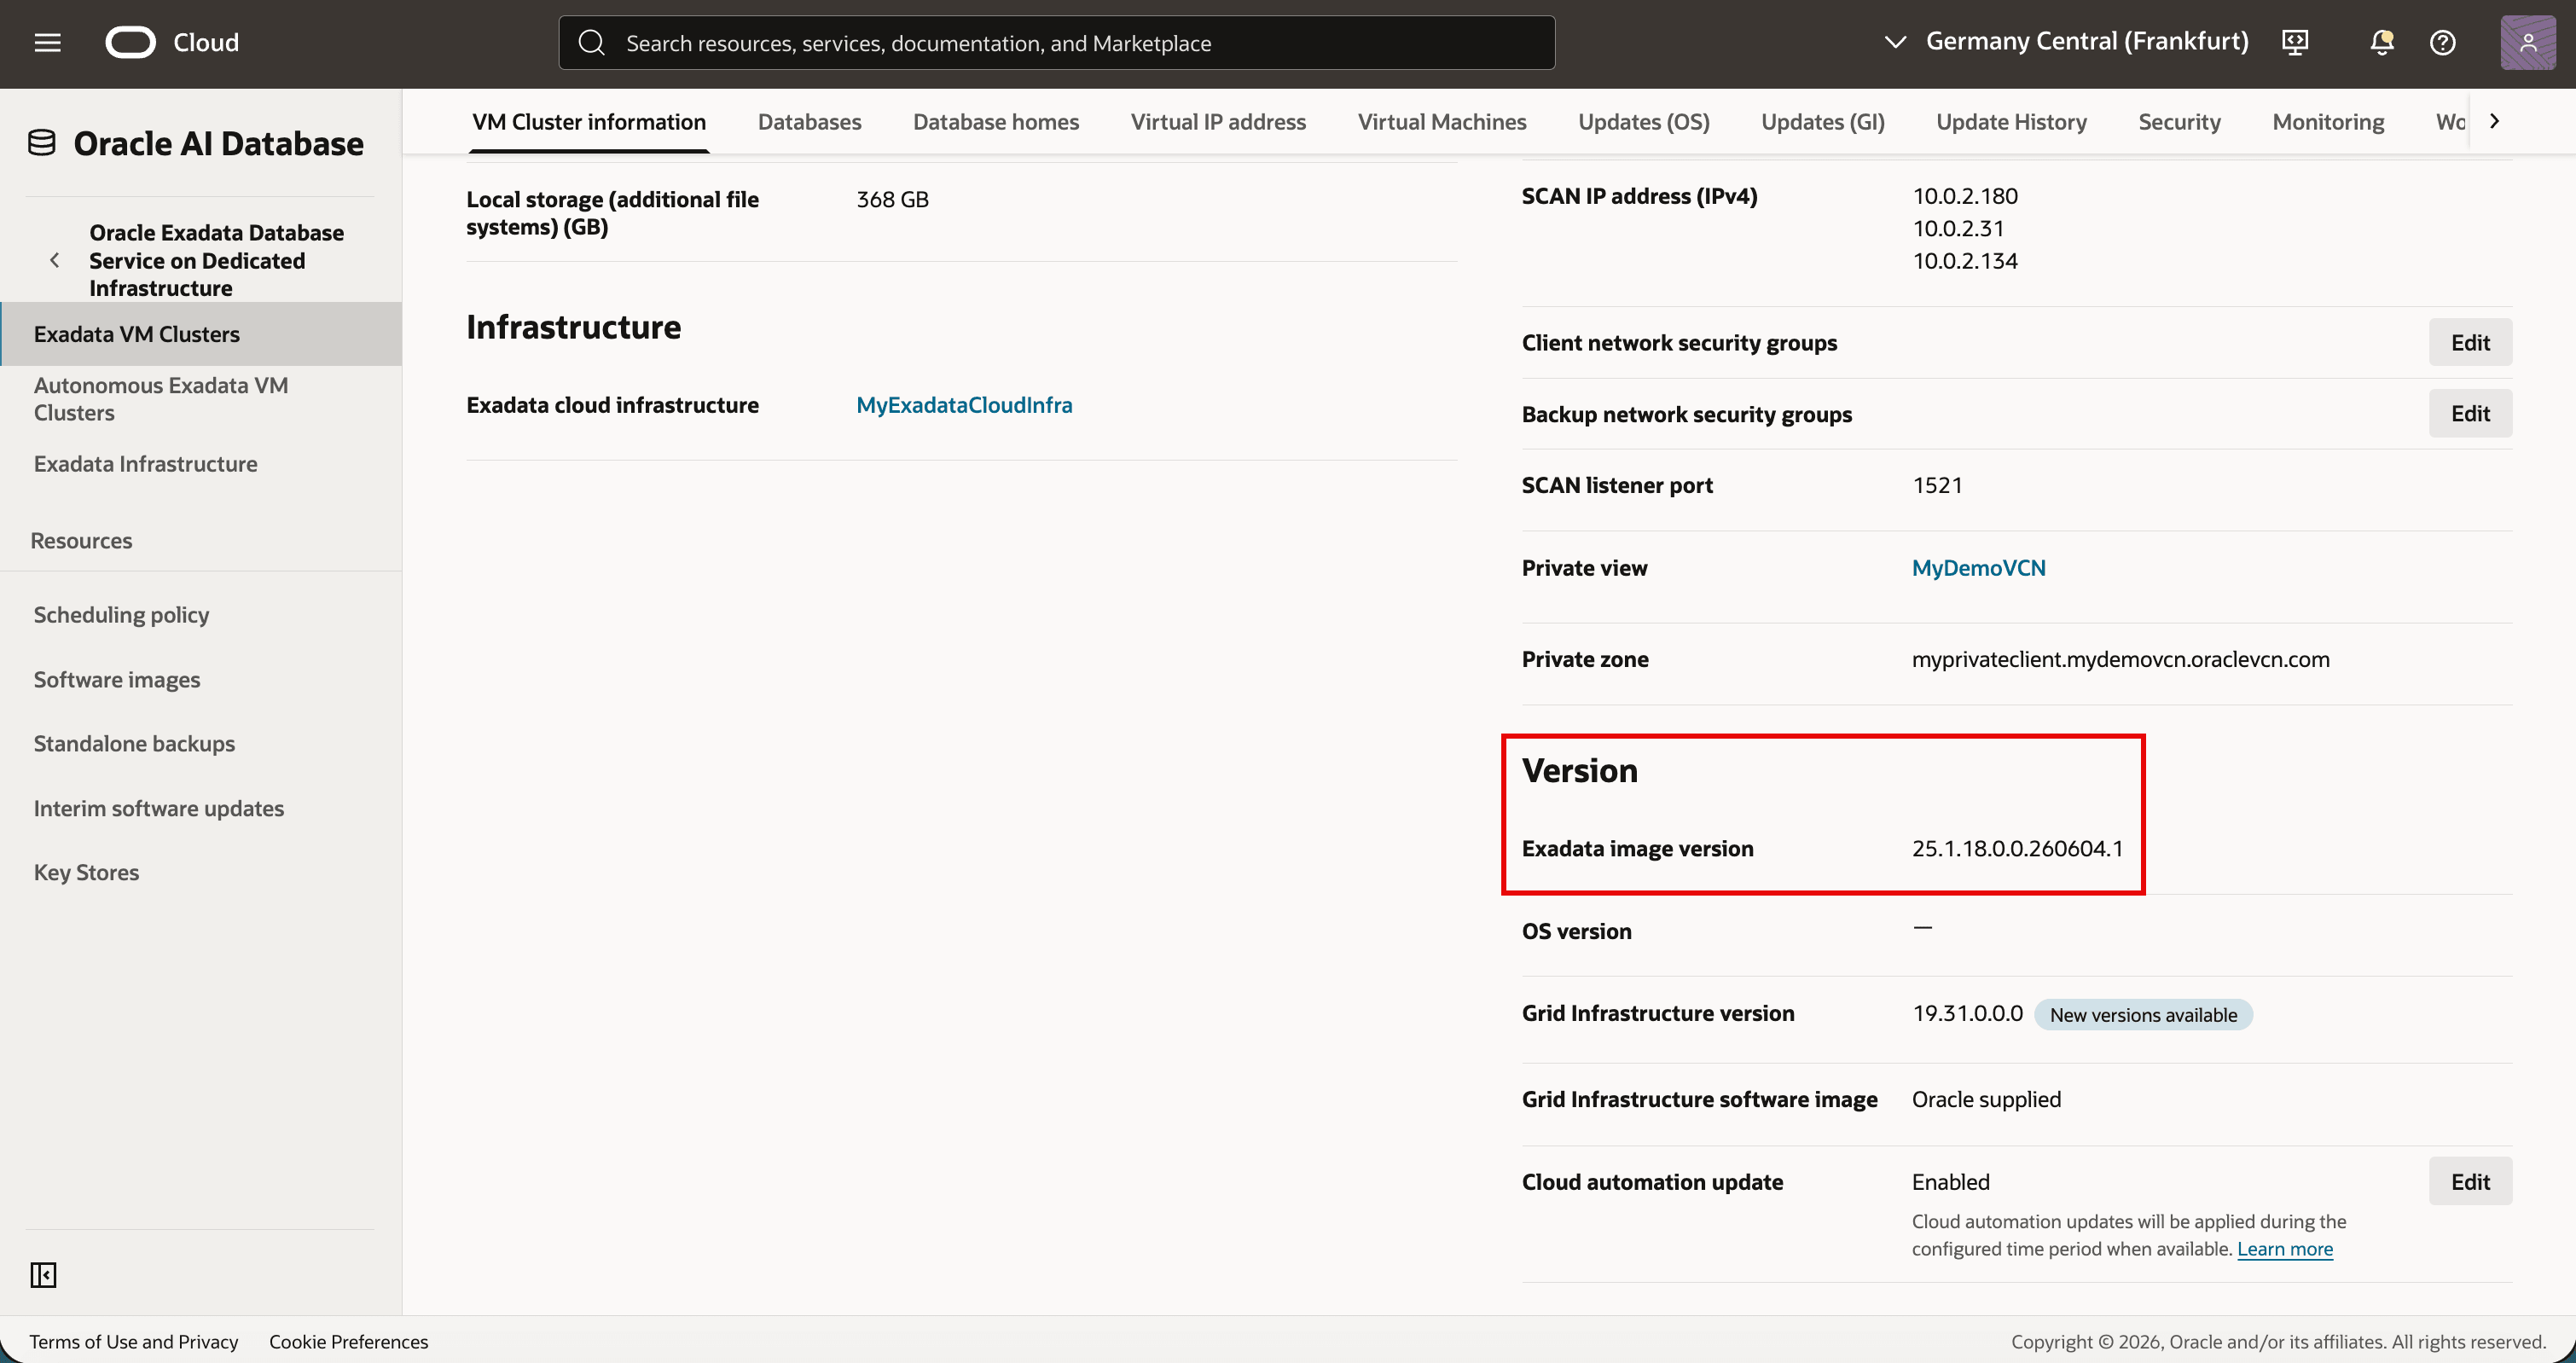
Description of the illustration live-update-pending-updates-applied.png
Related links
-
What’s New in Oracle Exadata Database Service on Dedicated Infrastructure
-
What’s New in Oracle Exadata Database Service on Cloud@Customer
Acknowledgments
- Contributors - Vishal Patil, Leo Alvarado, Pravin Jha, Tammy Bednar (Product Management)
More Learning Resources
Explore other labs on docs.oracle.com/learn or access more free learning content on the Oracle Learning YouTube channel. Additionally, visit education.oracle.com/learning-explorer to become an Oracle Learning Explorer.
For product documentation, visit Oracle Help Center.
Apply Exadata Database Service Live Update for VM Operating System Updates
G59102-01