Add containers to the Oracle JET web app
Introduction
A responsive page layout can flexibly scale to fit a wide range of screen sizes, from small phones to desktop monitors. An Oracle JavaScript Extension Toolkit (JET) flex layout has child elements that you can arrange in any direction. When the screen size changes, these elements adjust themselves and grow to fill the unused space or shrink to avoid overflowing of parent or child elements in the layout. You can use the Oracle JET layout classes oj-flex and oj-flex-item to create responsive containers to design a responsive page layout. The Oracle JET style classes oj-panel and oj-panel-bg add borders and color to the containers. You can use these style classes to aid in the visualization of the layout, and you can remove them in the final app.
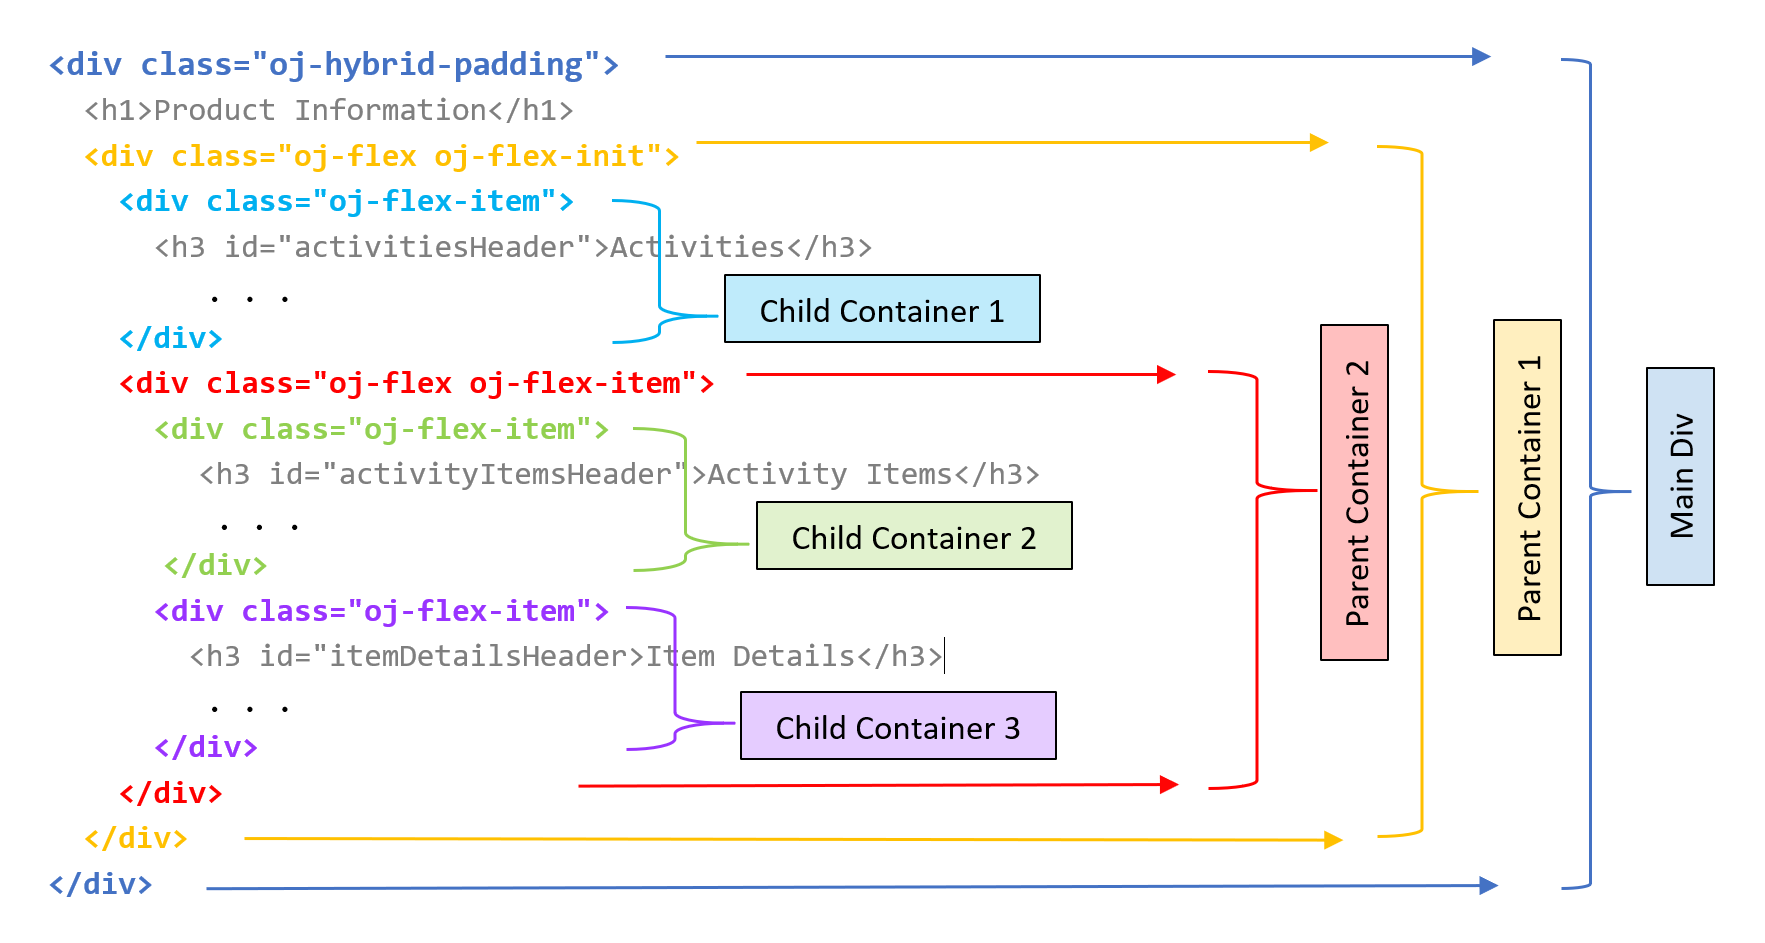
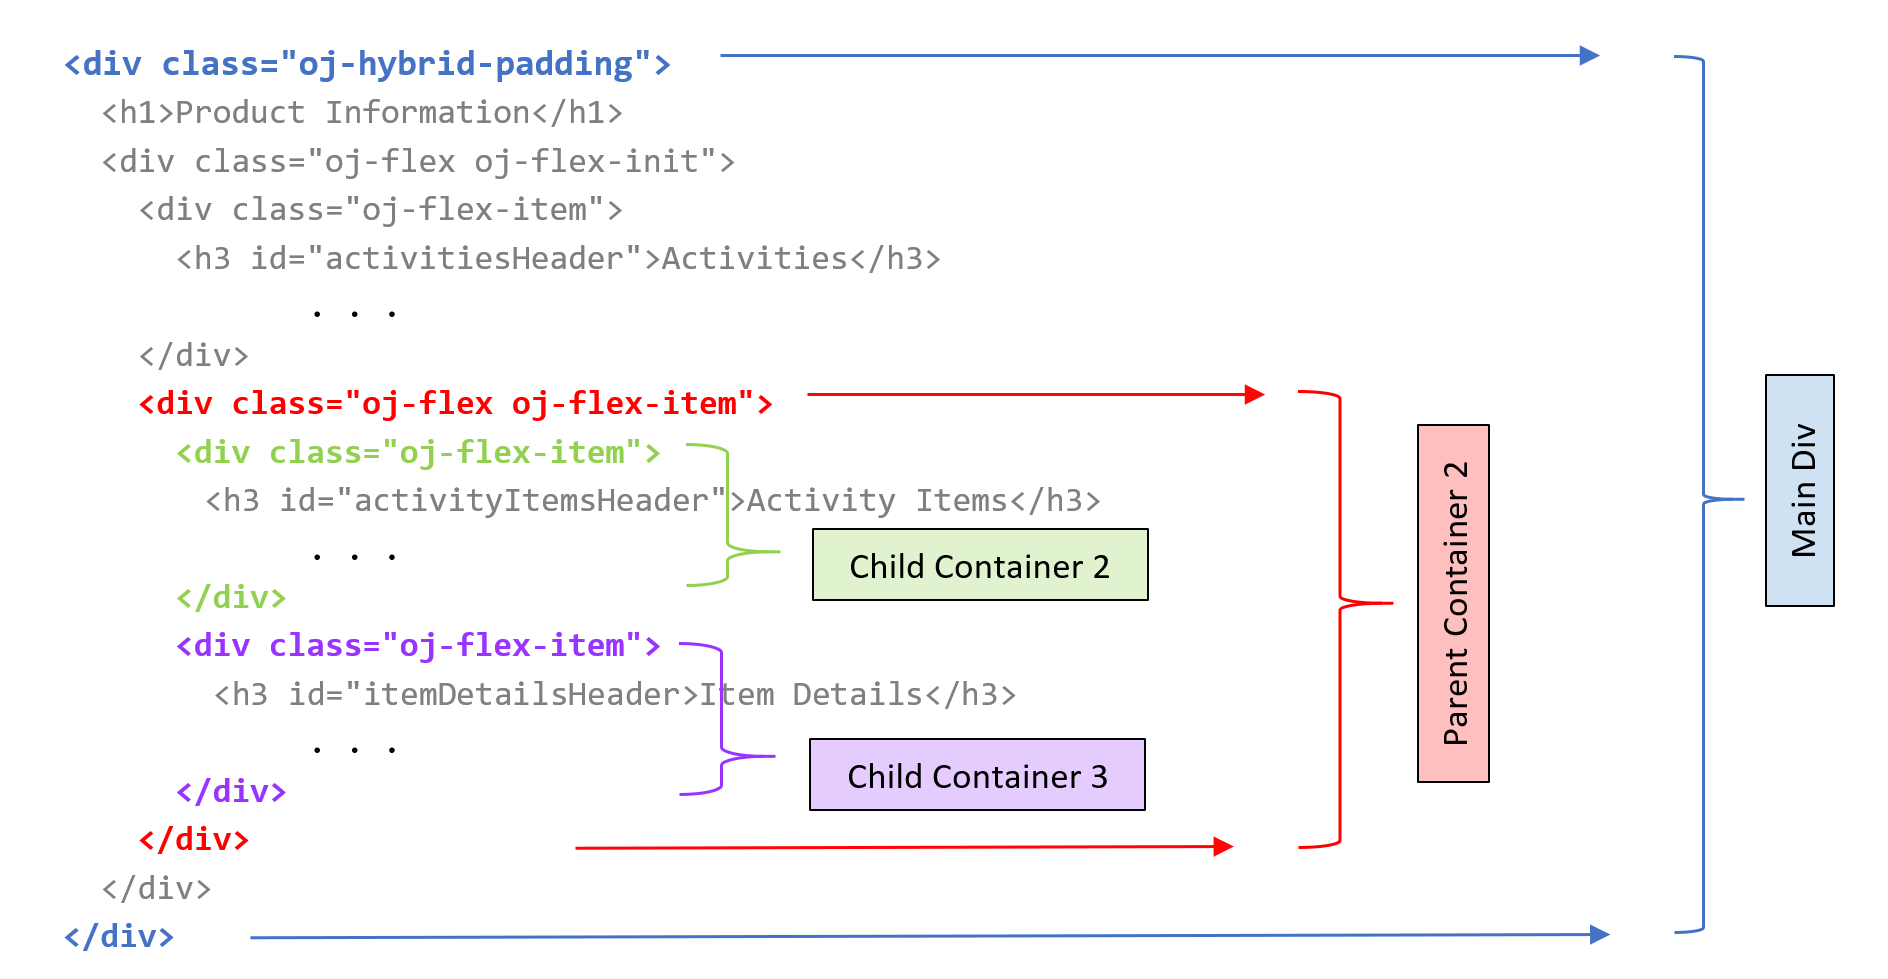
The web app that you will create in this tutorial has a page layout structure with a main parent container surrounding a second parent container and a child container, the Activities container. The second parent container holds two child containers: the Activity Items and Item Details containers.

A parent container is one that holds child containers. However, a child container can also be a parent container if it holds a child container—for example, Parent Container 2 above.
In the following illustration of the page layout you will create, a main div element contains Parent Container 1. Parent Container 1 wraps around Child Container 1 and Parent Container 2. Parent Container 2 holds two child containers, Child Container 2 and Child Container 3.

Objectives
In this tutorial, you will add containers and panels to convert a page layout to a responsive page layout in an Oracle JET web app by using Oracle JET layout and style classes.
Prerequisites
- A development environment set up to create Oracle JET web apps that includes an installation of Node.js
- Google Chrome web browser installed and set as the default web browser
- Access to the Oracle JET Developer Cookbook
-
(Option 1) Completion of the final tutorial in the previous learning path in this series: Prepare to Deploy an Oracle JET Web Application
- (Option 2) If you haven’t completed the previous learning path in this series: The jet_web_application_temp.zip downloaded
Task 1: Download the Starter App
Skip this task if you’re continuing to work in an app that you created in the previous learning path.
-
Rename
jet_web_application_temp.zipasJET_Web_Application.zip. Extract the contents to theJET_Web_Applicationfolder. -
Navigate to the
JET_Web_Applicationfolder, and restore the Oracle JET web app.npm installYour app is ready to use.
Task 2: Add Activities Containers
Modify the Oracle JET web app layout to add a flexible box layout. To create the flex layout, add an Oracle JET oj-flex class to the parent div element and an oj-flex-item class to the child div element. Parent Container 1 is the parent container that encloses all the other containers within it. Child Container 1 is the first child container and contains the Activities list.

-
Open the Oracle JET Cookbook, click Layout & Nav in the menu bar, and select the Flex Layout component. In the toolbar, click API Doc and then select flex.
-
In the Flex Layout API documentation, scroll to the table that describes the Oracle JET layout classes and read about the
oj-flexclass. -
Navigate to the
JET_Web_Application/src/ts/viewsdirectory and open thedashboard.htmlfile in an editor. -
Find the Product Information heading
h1element, and beneath it add an outerdivelement with theidattribute valueparentContainer1along with the Oracle JET container class. Thisdivelement encloses all other containers within it. Add a closing</div>tag above the last closing</div>at the end of the file.<div class="oj-hybrid-padding"> <h1>Product Information</h1> <!-- Parent Container 1 contains all the panels in the app --> <div id="parentContainer1" class="oj-flex oj-flex-init"> <div id="activitiesContainer"> <h3 id="activitiesHeader">Activities</h3> . . . </oj-chart> </div> </div> </div> -
Find the
divelement whereid="activitiesContainer", before the Activities heading, and add an Oracle JET container item class.<!-- The Activities container displays the Activities list --> <div id="activitiesContainer" class="oj-flex-item"> <h3 id="activitiesHeader">Activities</h3> </div> -
Save the
dashboard.htmlfile.Your code should look similar to parent-containers-dashboard-html.txt.
Task 3: Add Item Details Containers
Modify the Oracle JET web app responsive layout to add the Item Details containers. Parent Container 2 contains the two child containers. Child Container 2 is left empty but in the later tutorials will contain the Activity Items list in it. Child Container 3 contains the Item Details chart.

-
Find the
divelement whereid="itemDetailsContainer". Above it, add an outerdivelement with anidattribute with the valueparentContainer2, as well as an Oracle JET container class and container item class. Add a closing</div>tag above the second-to-last closing</div>in the file.<!-- Parent Container 2 surrounds the Item Details container --> <div id="parentContainer2" class="oj-flex oj-flex-item"> <div id="itemDetailsContainer"> <h3>Item Details</h3> . . . </oj-chart> </div> </div> </div> </div> -
Underneath the
divelement whereid="parentContainer2", add an emptydivelement with anidattribute with the valueactivityItemsContainer, as well as an Oracle JET container item class.<!-- Parent Container 2 surrounds the Activity Items and Item Details child containers --> <div id="parentContainer2" class="oj-flex oj-flex-item"> <div id="activityItemsContainer" class="oj-flex-item"></div> <div id="itemDetailsContainer"> <h3>Item Details</h3> . . . </div> </div> -
Finally, add an Oracle JET container item class to the
divelement whereid="itemDetailsContainer".<!-- Item Details container displays a chart upon selection --> <div id="itemDetailsContainer" class="oj-flex-item"> <h3>Item Details</h3> </div> -
Save the
dashboard.htmlfile.Your code should look similar to the containers-dashboard-html.txt.
Task 4: Add Panels and Panel Color
Apply the Oracle JET style classes to add panels and panel colors to the containers and container items in the web app to help visualize the layout.
-
Find the
divelement whereid="parentContainer1", and then add two style classes to specify a panel with a border and background color.<!-- The border and color for Parent Container 1 --> <div id="parentContainer1" class="oj-flex oj-flex-init oj-panel oj-bg-warning-20" ></div> -
Find the
divelement whereid="activitiesContainer", and then add two style classes to specify a panel with a border and background color.<!-- The border and color for the Activities container --> <div id="activitiesContainer" class="oj-flex-item oj-bg-info-30"> <h3 id="activitiesHeader">Activities</h3> </div> -
Find the
divelement whereid="parentContainer2", and then add two style classes to specify a panel with a border and background color.<!-- The border and color for Parent Container 2 --> <div id="parentContainer2" class="oj-flex oj-flex-item oj-panel oj-bg-danger-30" ></div> -
Find the
divelement whereid="itemDetailsContainer", and then add two style classes to specify the panel and panel color.<!-- The border and color for the Item Details container --> <div id="itemDetailsContainer" class="oj-flex-item oj-panel oj-bg-neutral-30" ></div> -
Save the
dashboard.htmlfile.Your code should look similar to the final-containers-dashboard-html.txt.
Task 5: Run the Web App
-
In the terminal window, change to the
JET_Web_Applicationdirectory and run the app.npx ojet serveOracle JET tooling runs your web app in a local web browser where you can view the dashboard contents.

-
Close the browser window or tab that displays your running web app.
-
In the terminal window, press Ctrl+C, and if prompted, enter
yto exit the Oracle JET tooling batch job.
Next Step
Proceed to the next tutorial in this module.
This tutorial is part of the module Responsive Design.
- Add Containers to the Oracle JET Web Application
- Format the Containers for Different Screen Sizes
- Show or Hide Content in the Oracle JET Web Application
- Test the Oracle JET Web Application on Different Screen Sizes
You can return to the learning path’s main page to access all the modules on building web apps.
More Learning Resources
Explore other labs on docs.oracle.com/learn or access more free learning content on the Oracle Learning YouTube channel. Additionally, visit education.oracle.com/learning-explorer to become an Oracle Learning Explorer.
For product documentation, visit Oracle Help Center.
Add containers to the Oracle JET web application
F11842-10