Enabling MFA for Local Users in Oracle Database 23ai using Oracle Mobile Authenticator (OMA)
Introduction
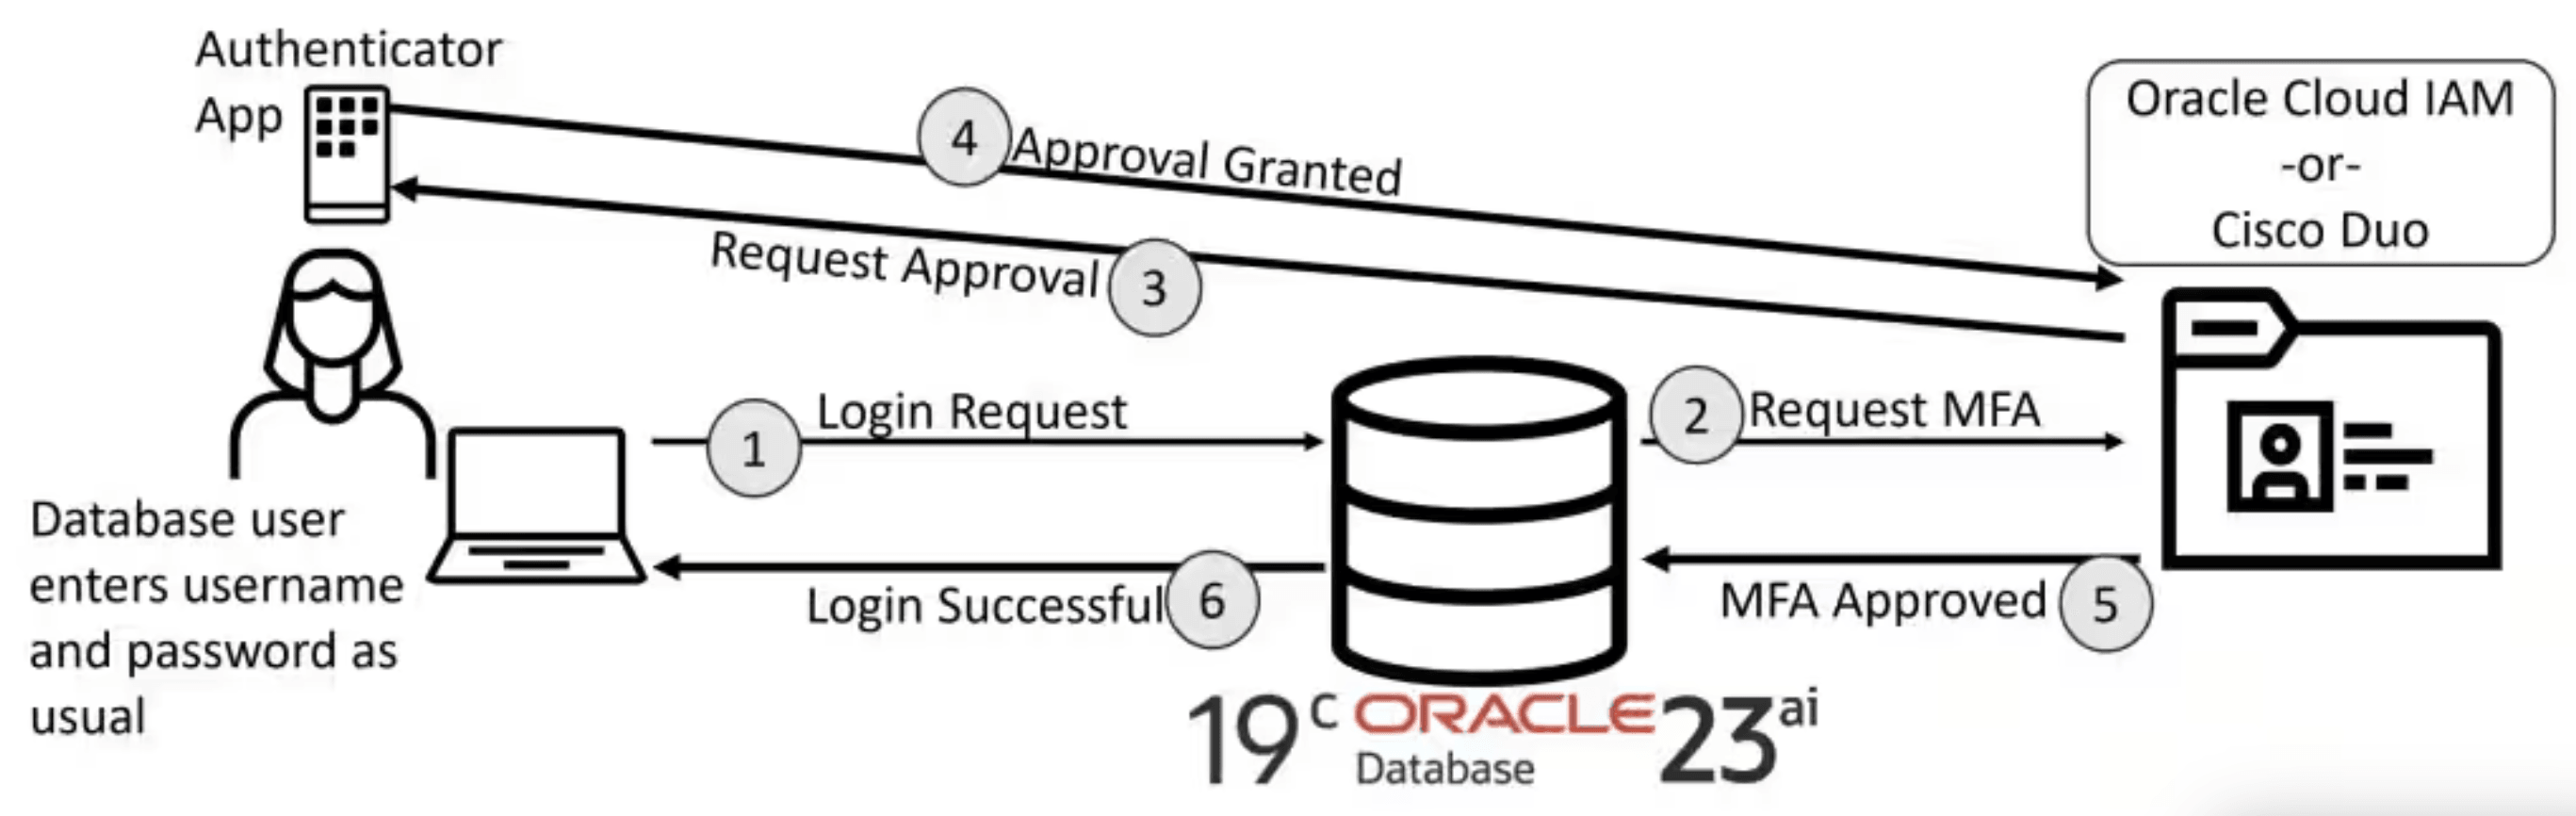
Oracle’s July 2025 Database Release Update (DBRU) introduces a crucial security enhancement: native multi-factor authentication (MFA) for on-premises and hybrid database users. This new feature, available in Oracle Database 23ai (23.9+) and backported to 19c (with the latest July 2025 Release Update), allows you to secure traditional database accounts, such as the ‘SCOTT’ account, with a second authentication factor directly from a mobile device. This eliminates the need to rely on external identity providers for MFA. This guide will walk you through the steps to implement MFA using the Oracle Mobile Authenticator (OMA) application.
Why do we need this?
Previously, implementing multi-factor authentication for Oracle Database required integration with external identity providers such as Entra ID, OCI Identity and Access Management (IAM), or RADIUS. This approach presented a significant challenge for environments without access to these MFA-enabled directories, including on-premises standalone databases, IaaS deployments, or Oracle Base Database Service systems.
With the July 2025 Database Release Update (DBRU), Oracle now enables native MFA for local database users in Oracle Database 19c and 23ai. This new capability supports push-based authentication with either the Oracle Mobile Authenticator (OMA) or Cisco Duo, offering a robust and integrated security solution.
Key Benefits
- Enhanced Security: Provides stronger protection against password-based attacks and credential theft.
- Simplified User Experience: Offers convenient push-based authentication, eliminating the need for users to manually enter one-time codes.
- Comprehensive Coverage: Extends security to critical administrative accounts (SYSDBA, SYSOPER, etc.) within both CDB root and PDBs.
- Regulatory Compliance: Helps meet strict compliance requirements, such as PCI DSS and DORA.
- Granular Control: Allows for selective MFA enablement on a per-user basis, providing a flexible rollout strategy.
- Seamless Integration: Requires no client-side changes or modifications.
Audience
This tutorial is specifically designed for:
- IAM (Identity and Access Management) Professionals
- Database Administrators (DBAs)
- Security Analysts and Auditors
Objective
The primary objective of this tutorial is to demonstrate how to enable multi-factor authentication (MFA) for local Oracle Database users. While Oracle supports integrating MFA with external providers such as OCI Identity and Access Management or Cisco Duo, this guide will focus specifically on the native push-based authentication workflow using the Oracle Mobile Authenticator (OMA) application.
Prerequisites
To complete this tutorial, the following components are required:
- Oracle Database Instance: An Oracle Database 23ai instance (23.9+) or a Database 19c instance running the July 2025 Database Release Update (DBRU). This guide uses an 23ai OCI Base Database Service instance.
- Mobile Device: An Android or iOS smartphone with the Oracle Mobile Authenticator (OMA) application installed.
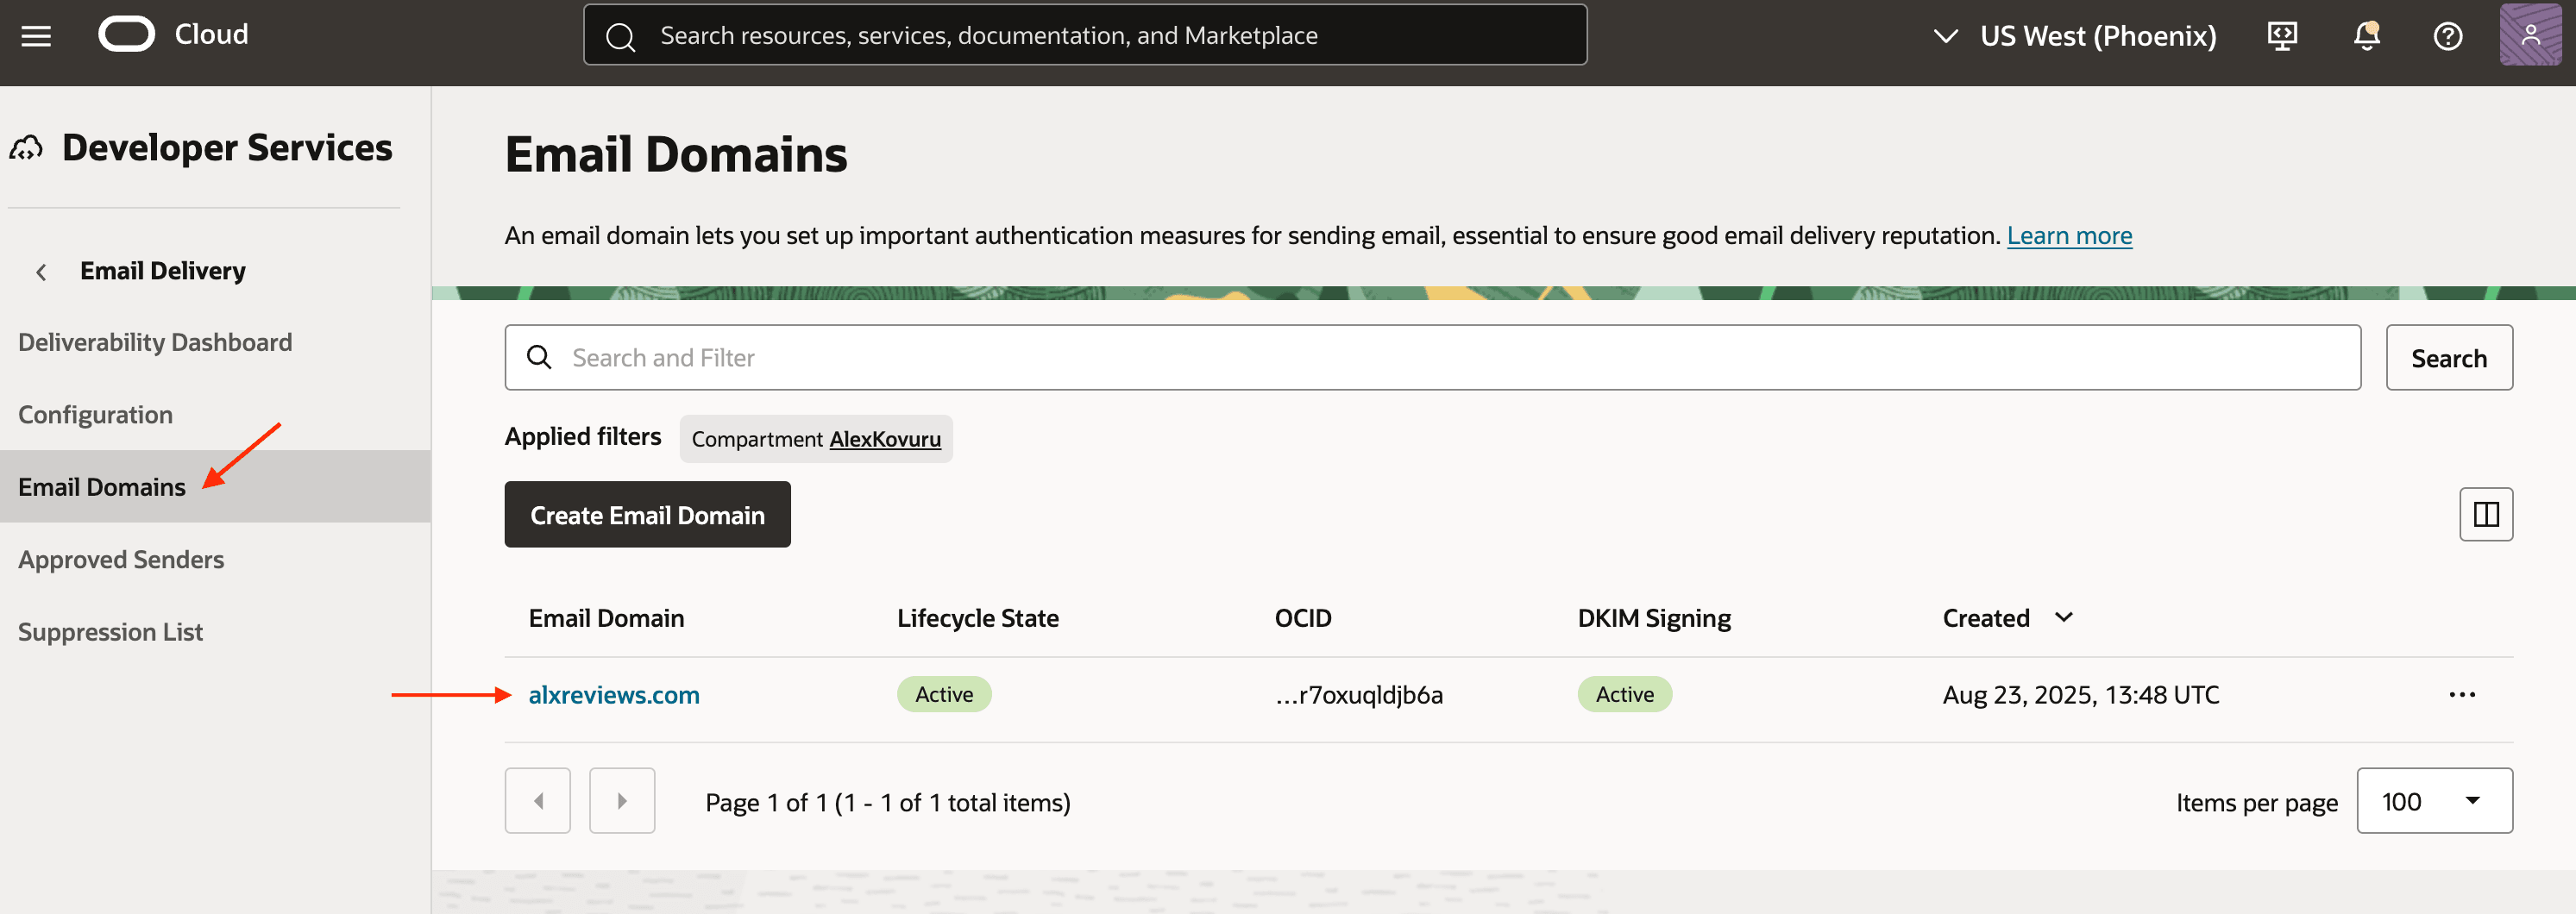
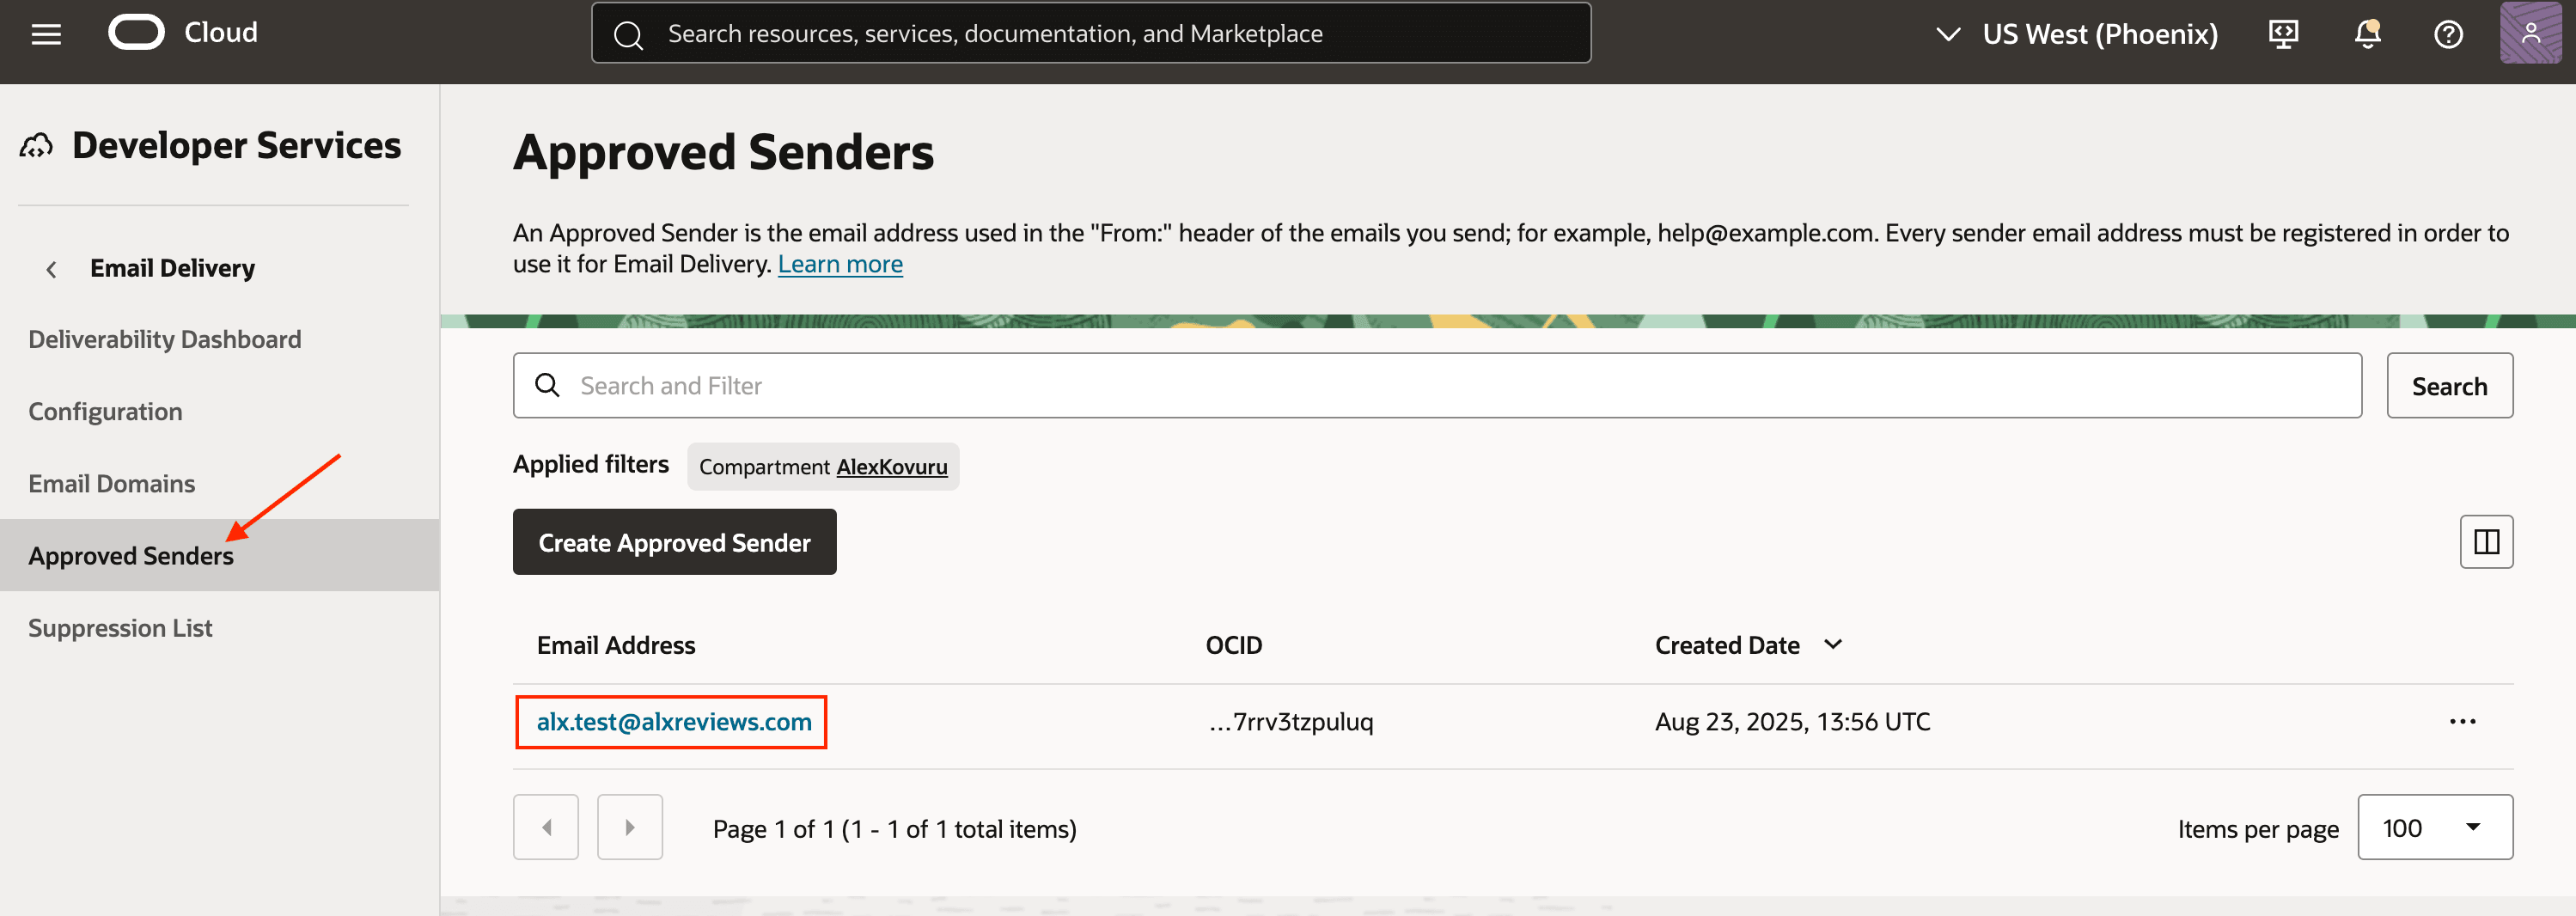
- OCI Email Delivery: OCI Email Delivery is required to send email invitations for MFA enrolment. This service requires:
- An approved sender and a verified domain
- Outbound internet access from the database host to the OCI Email Delivery endpoints.
-
For more details, refer to the OCI Email Delivery documentation
Email Domain:
Approved Sender:
Task 1: OCI Identity and Access Management Configuration
Before enabling multi-factor authentication, you must configure an OAuth application in your OCI Identity and Access Management Identity Domain. This application is essential, as the database’s MFA wallet uses its credentials to validate authentication tokens.
-
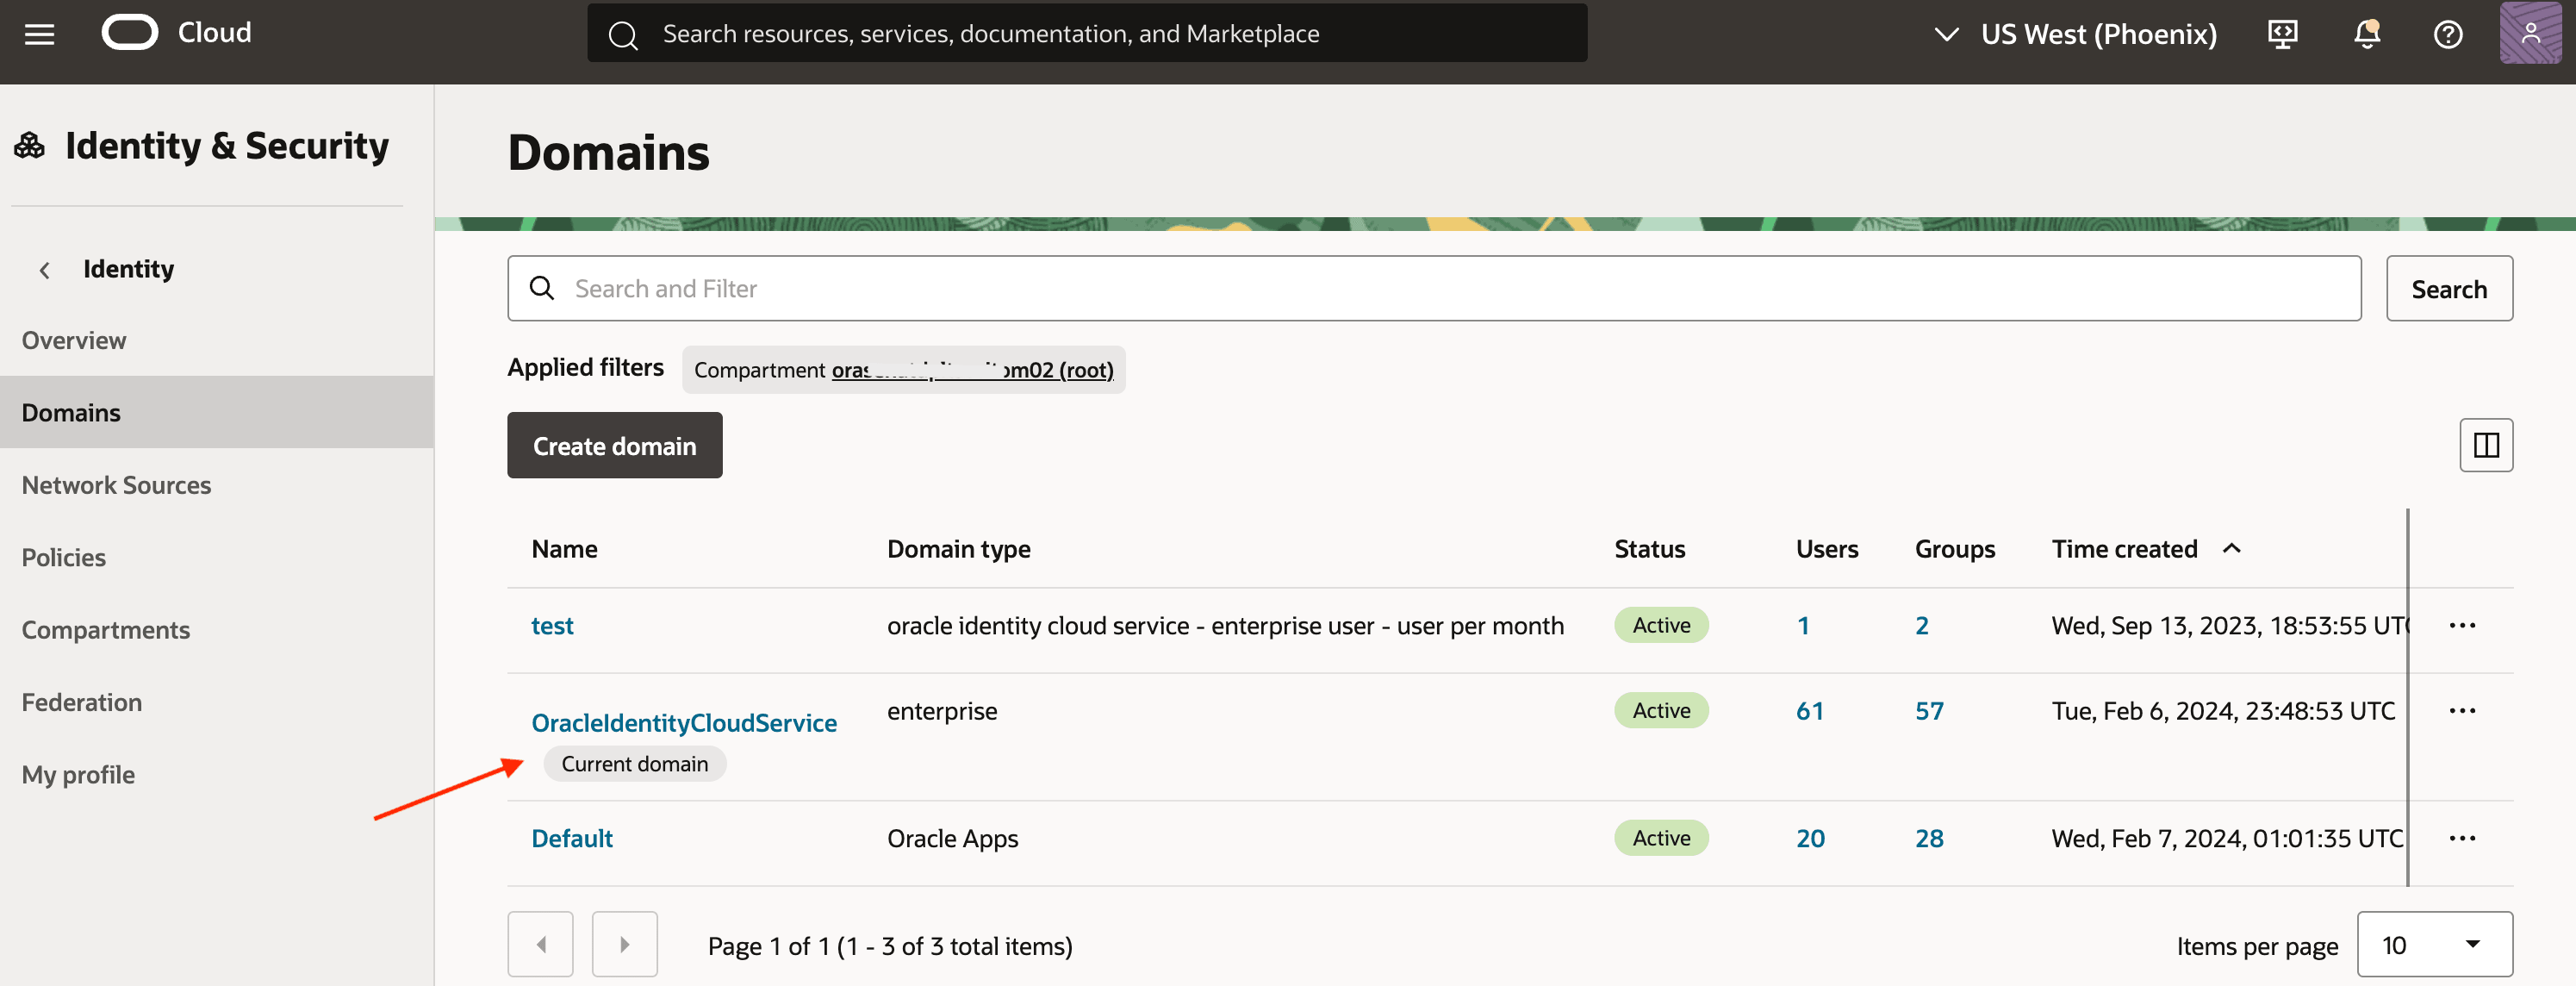
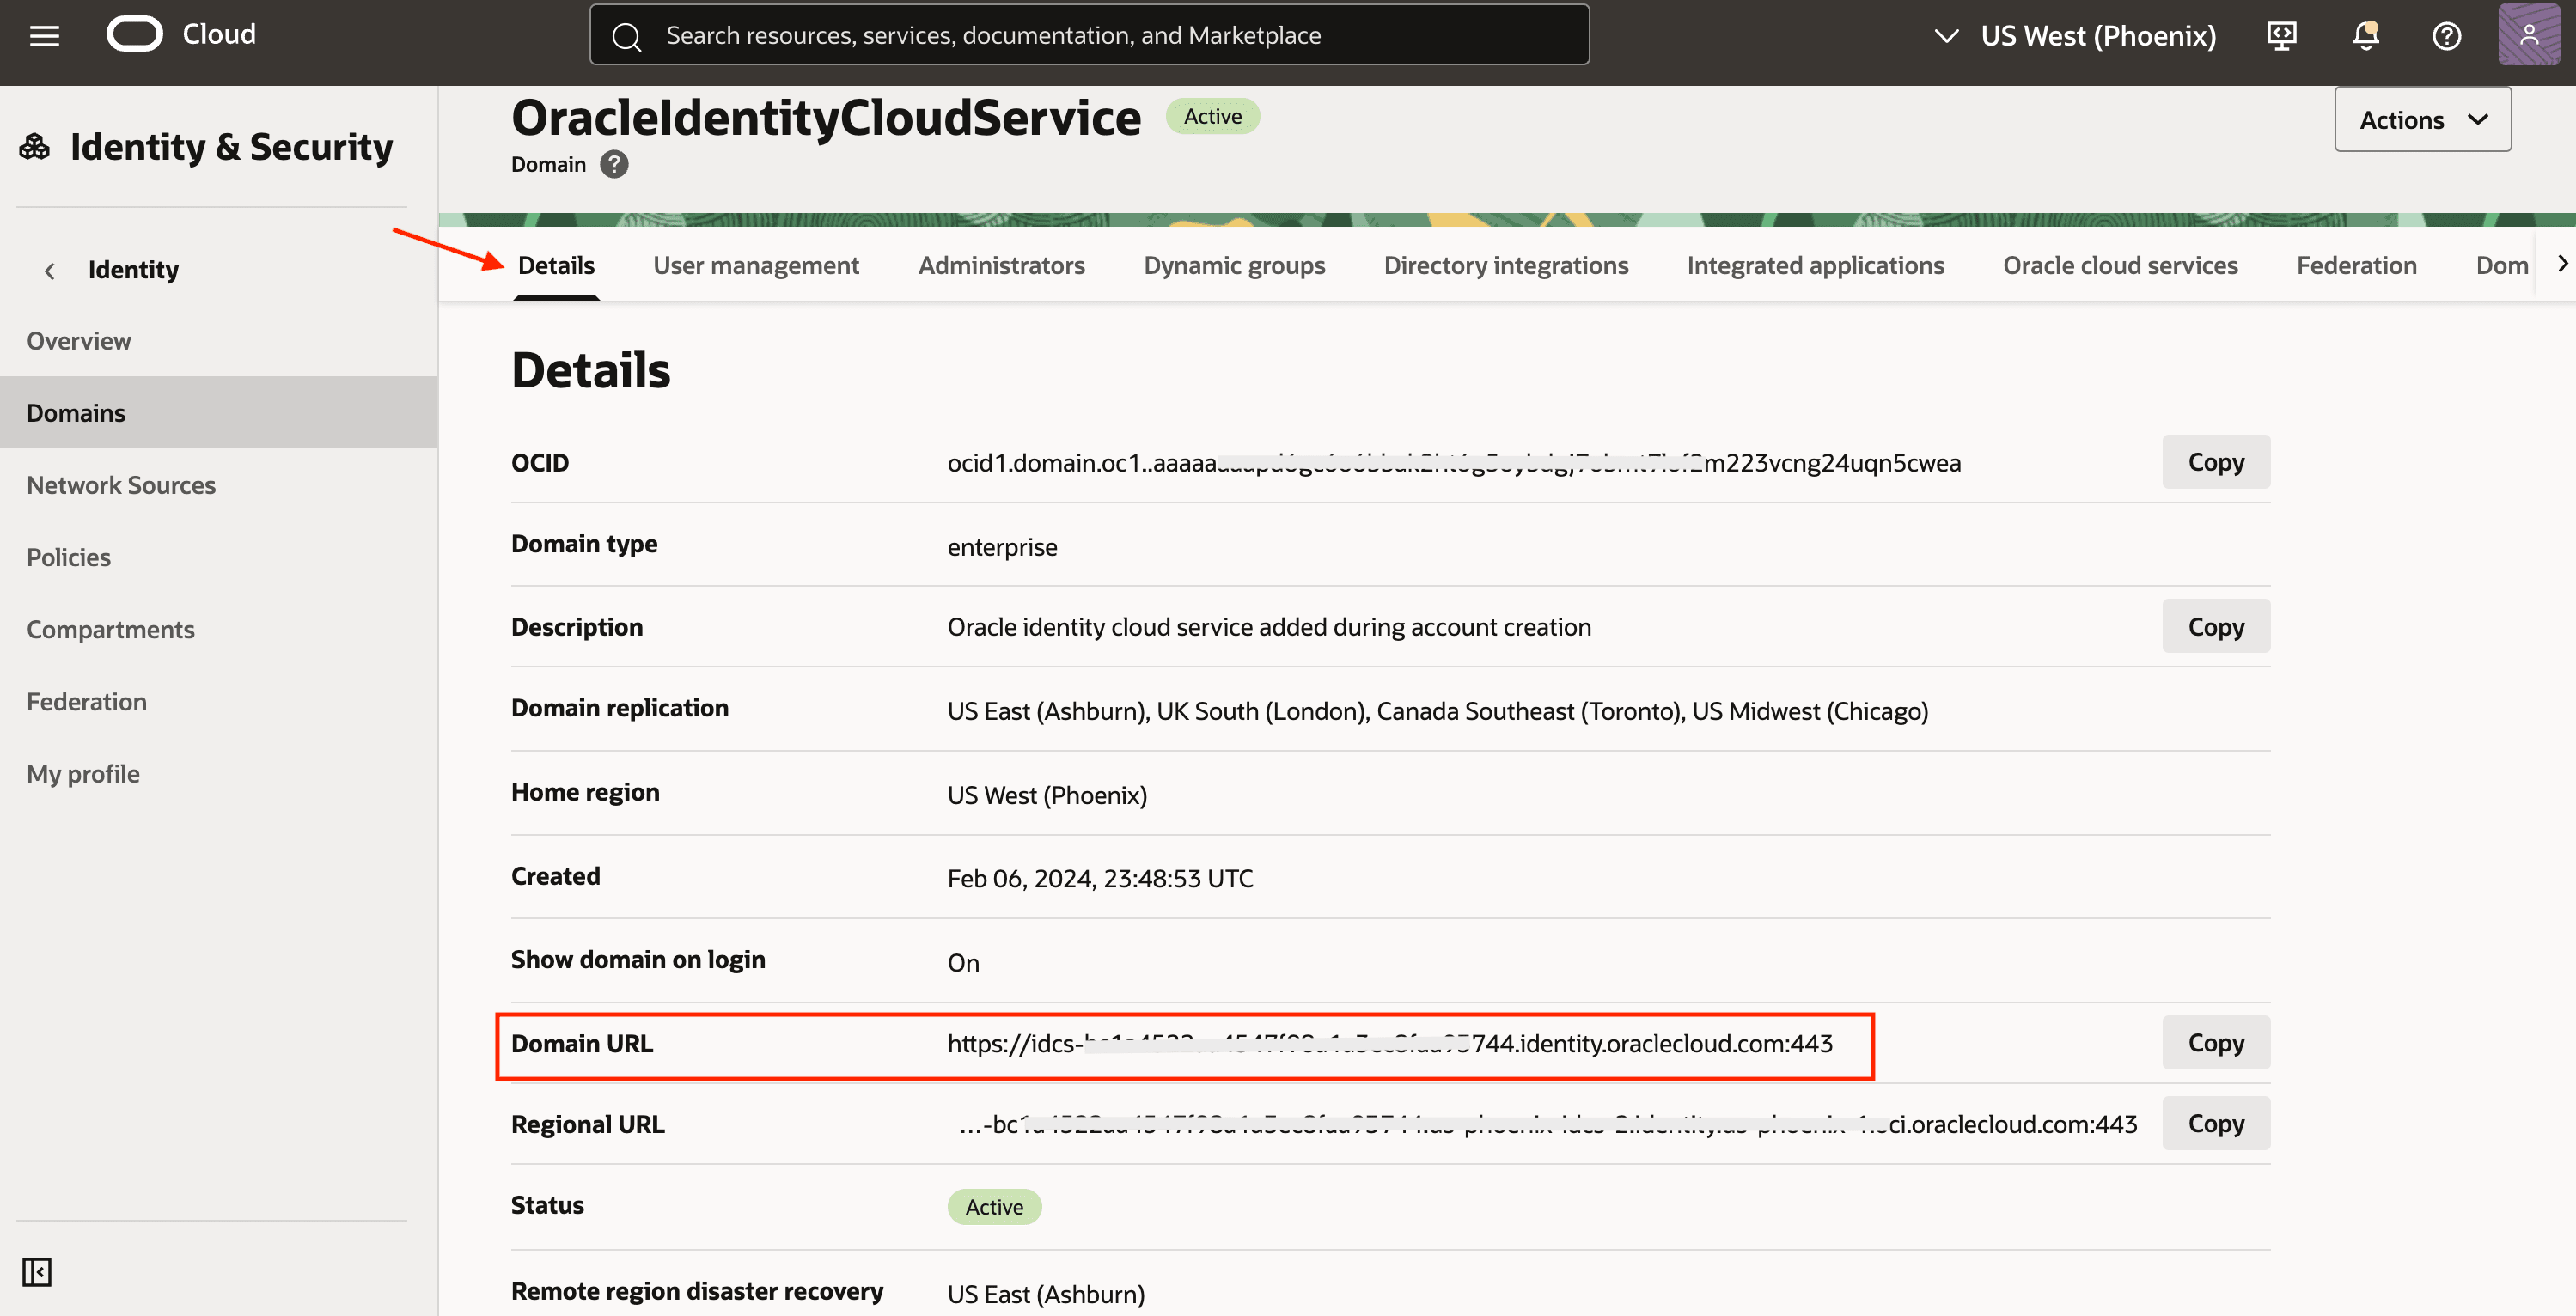
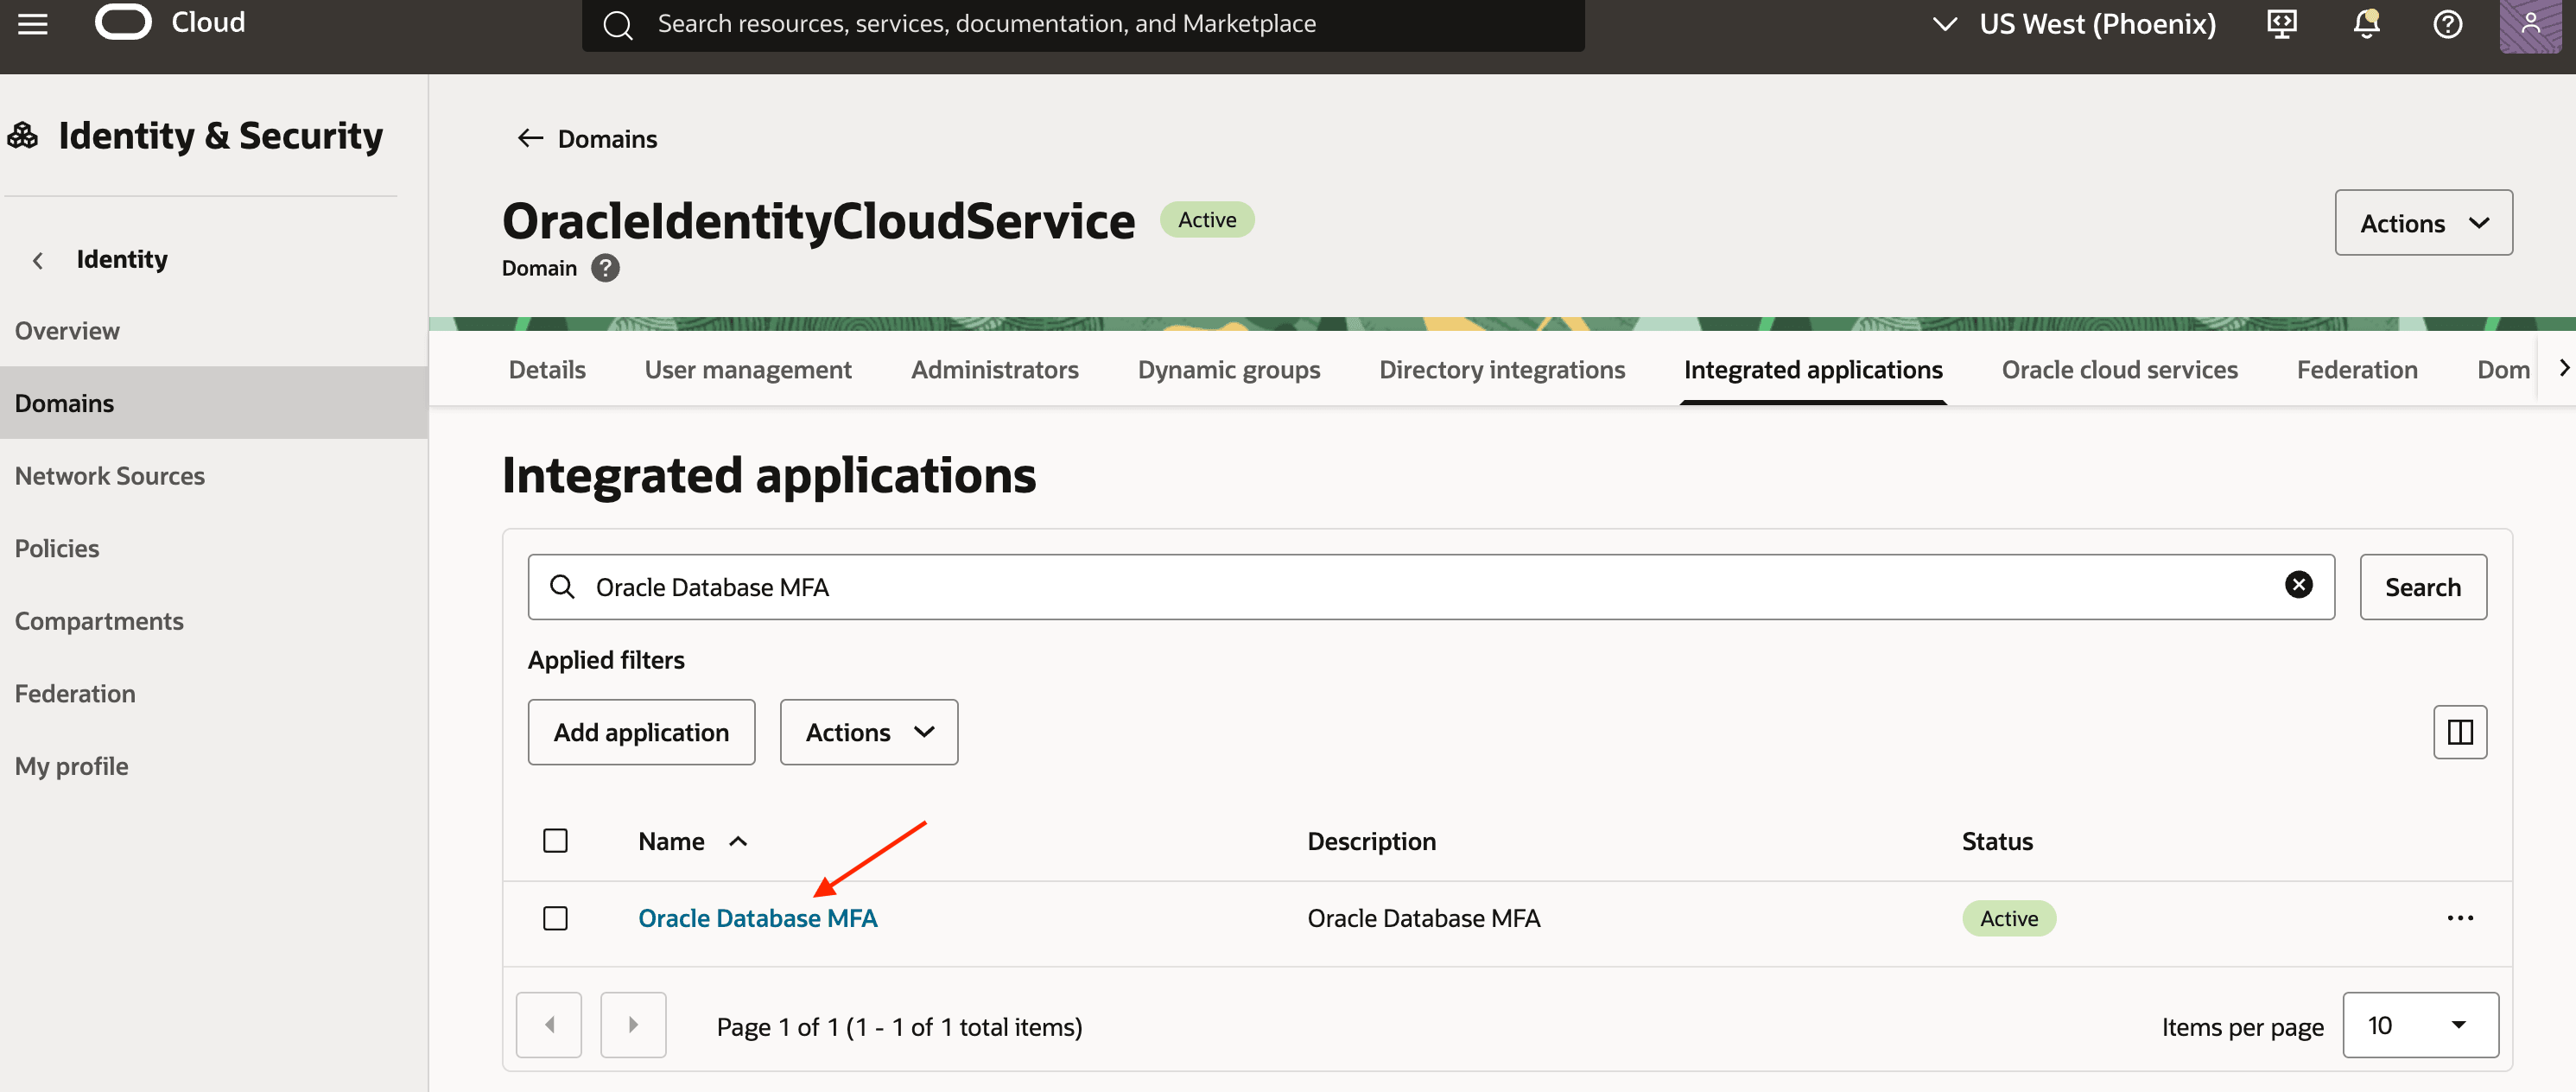
Log in to the OCI Console and navigate to Identity & Security, Domains.
-
Select your current domain and review its details. Note down the domain URL (excluding the port number).
-
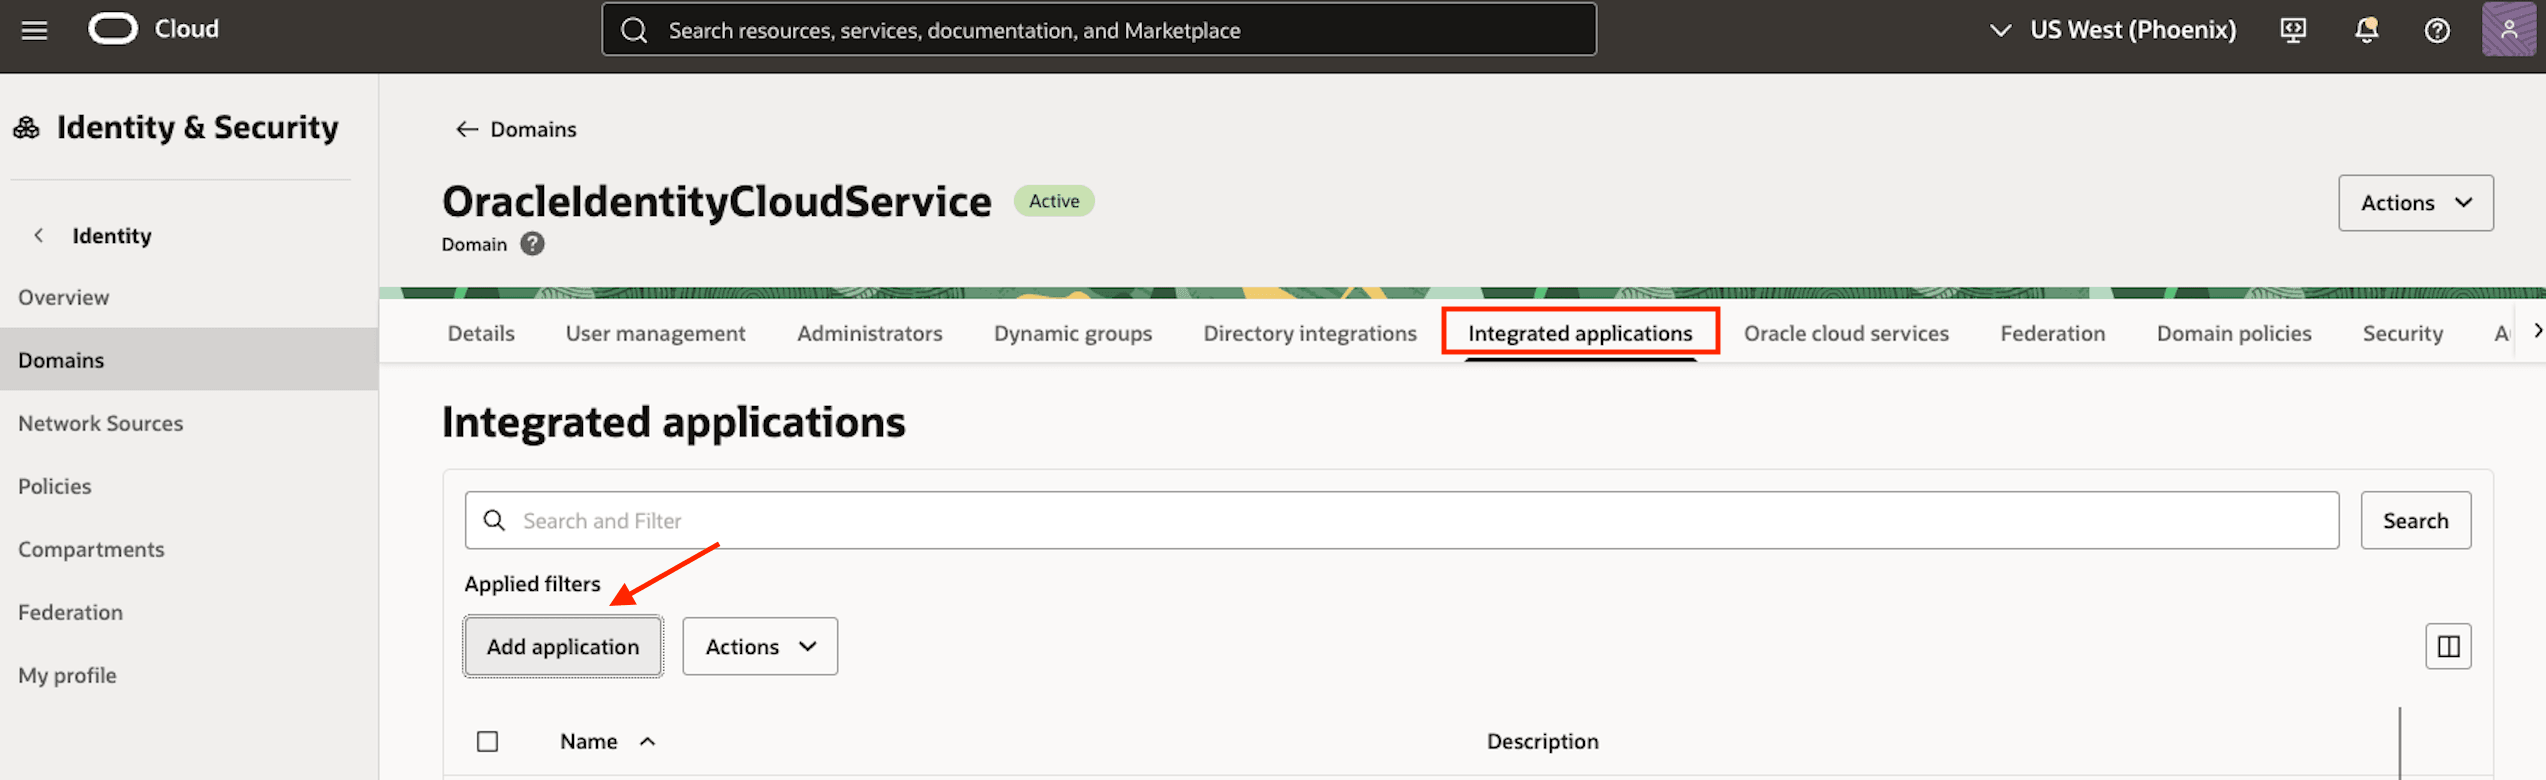
Register an OAuth client application within the Identity Domain. This is a required step for the MFA feature to function correctly. Click Integrated Applications and then click Add application.
-
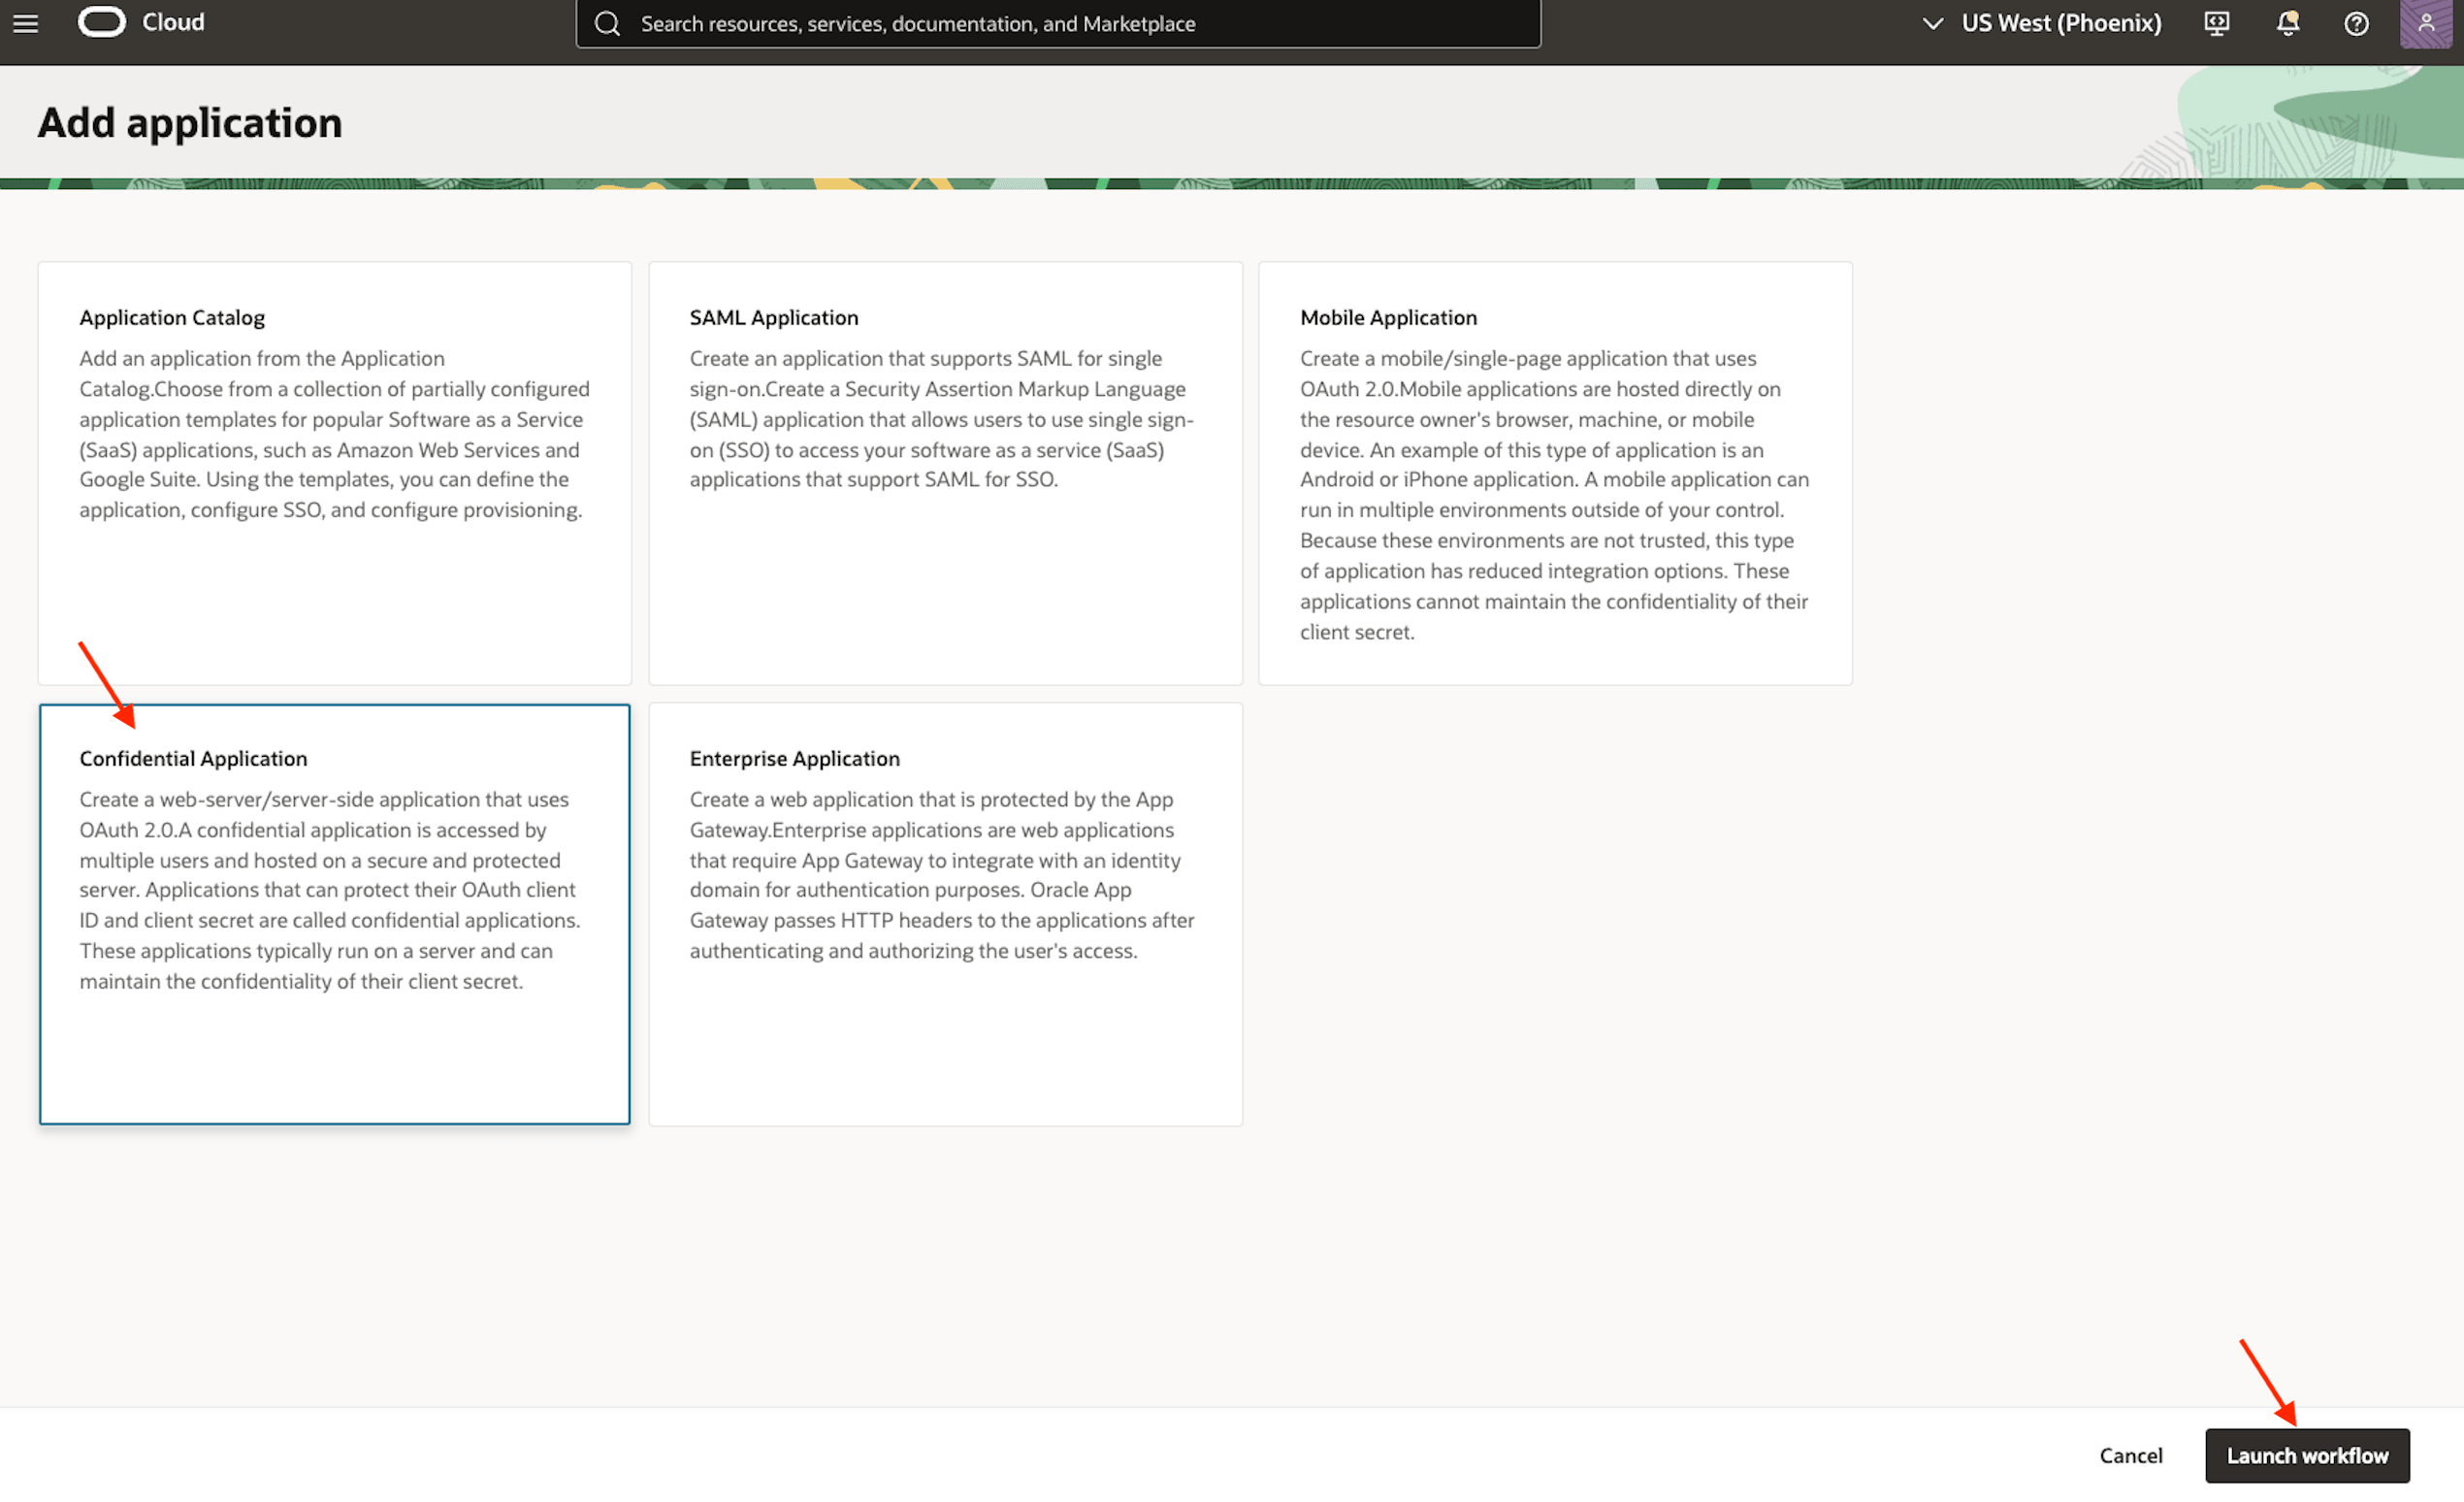
Select Confidential Application and click Launch workflow.
-
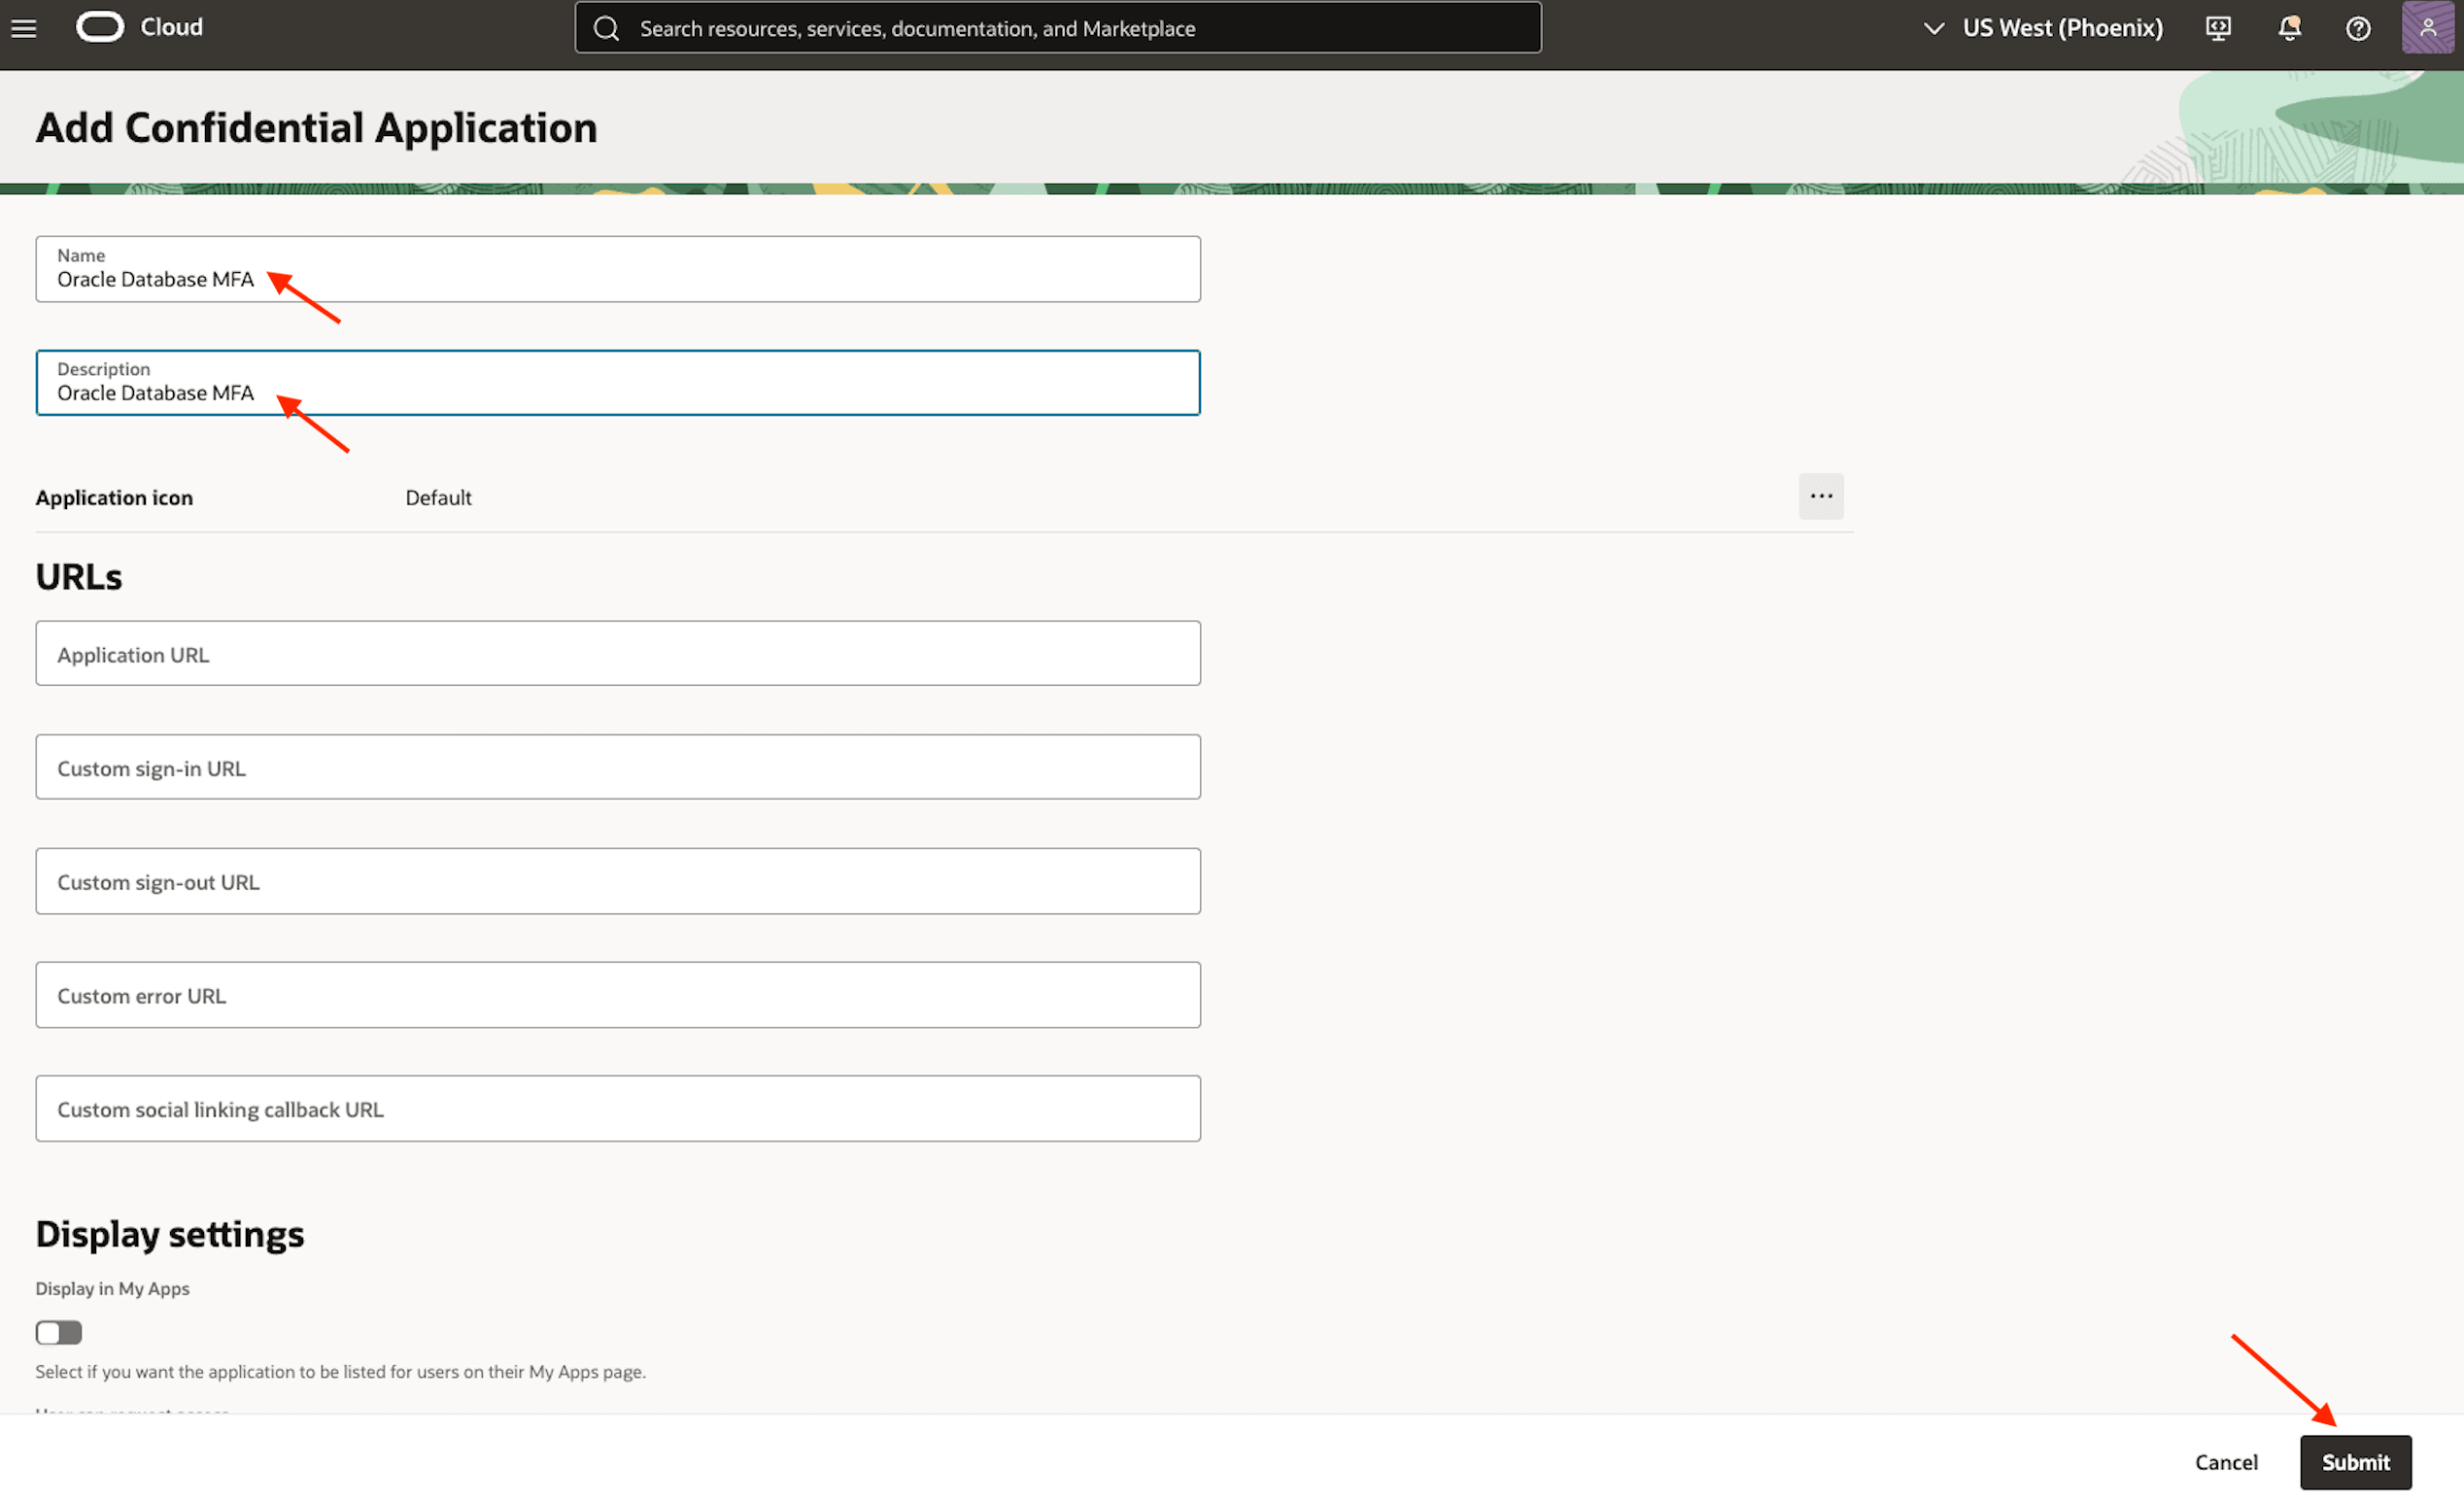
Enter the required application details, such as a name and a description, then click Submit.
-
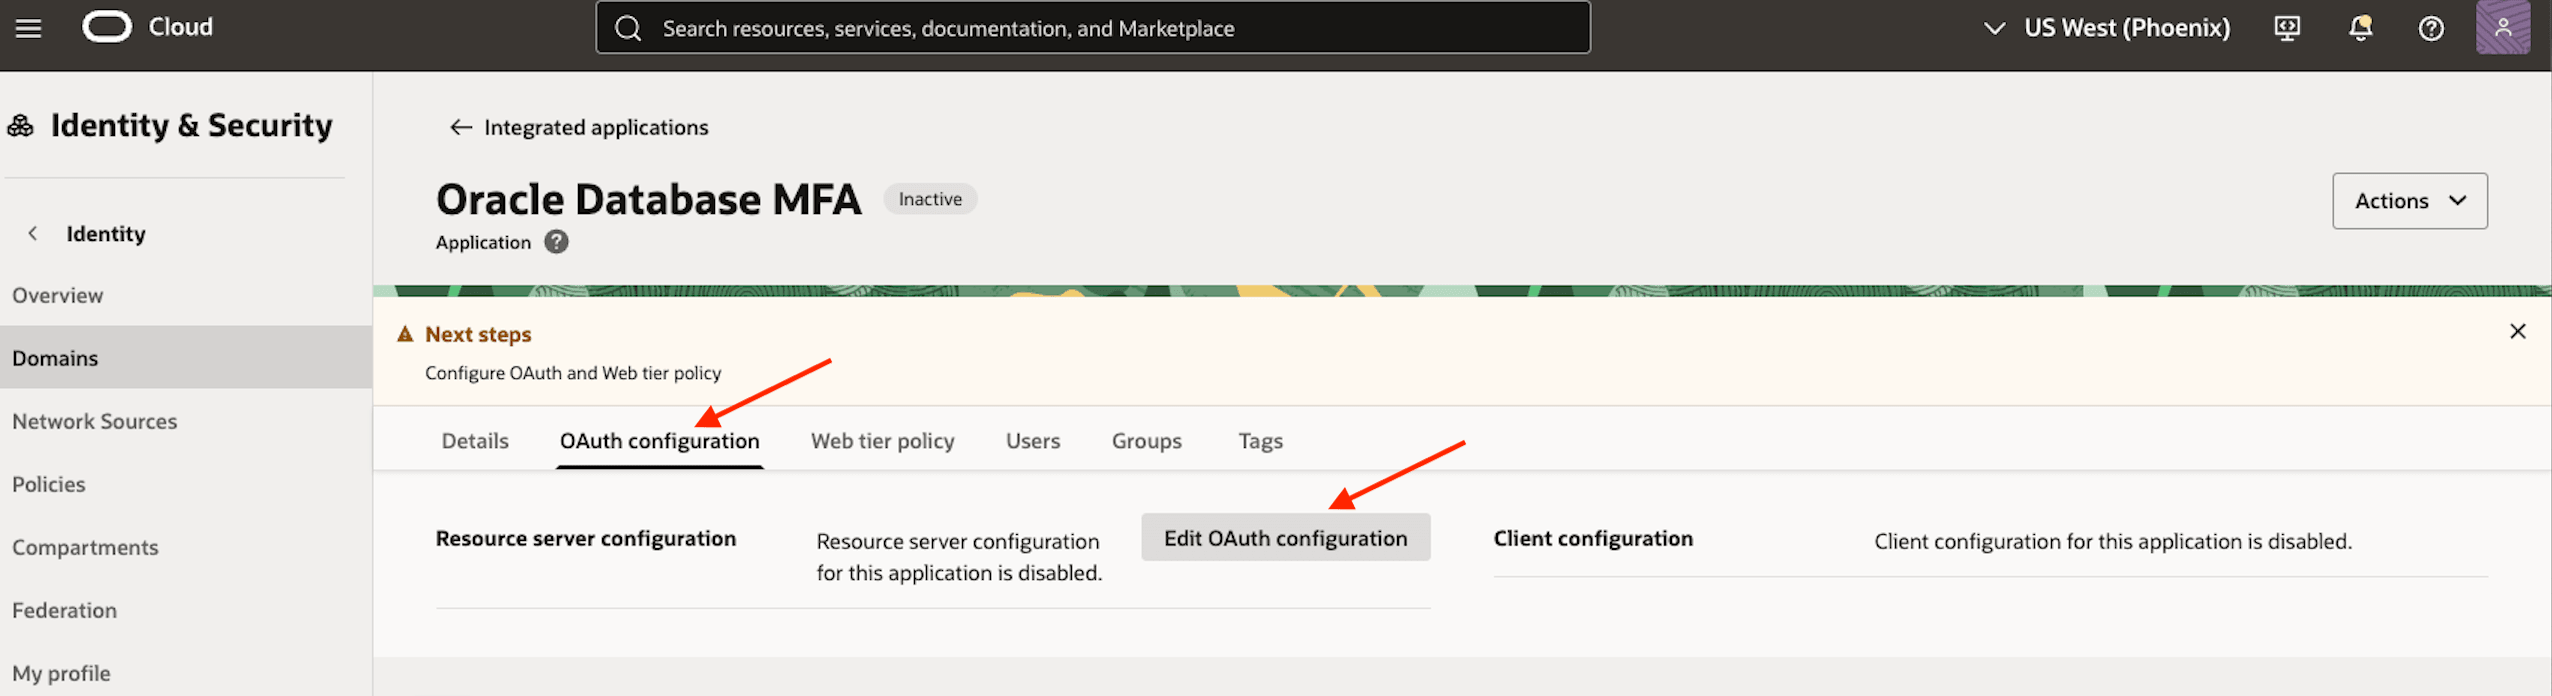
Click the application you just created to view its details.
-
Navigate to the OAuth configuration tab and click Edit OAuth configuration.
-
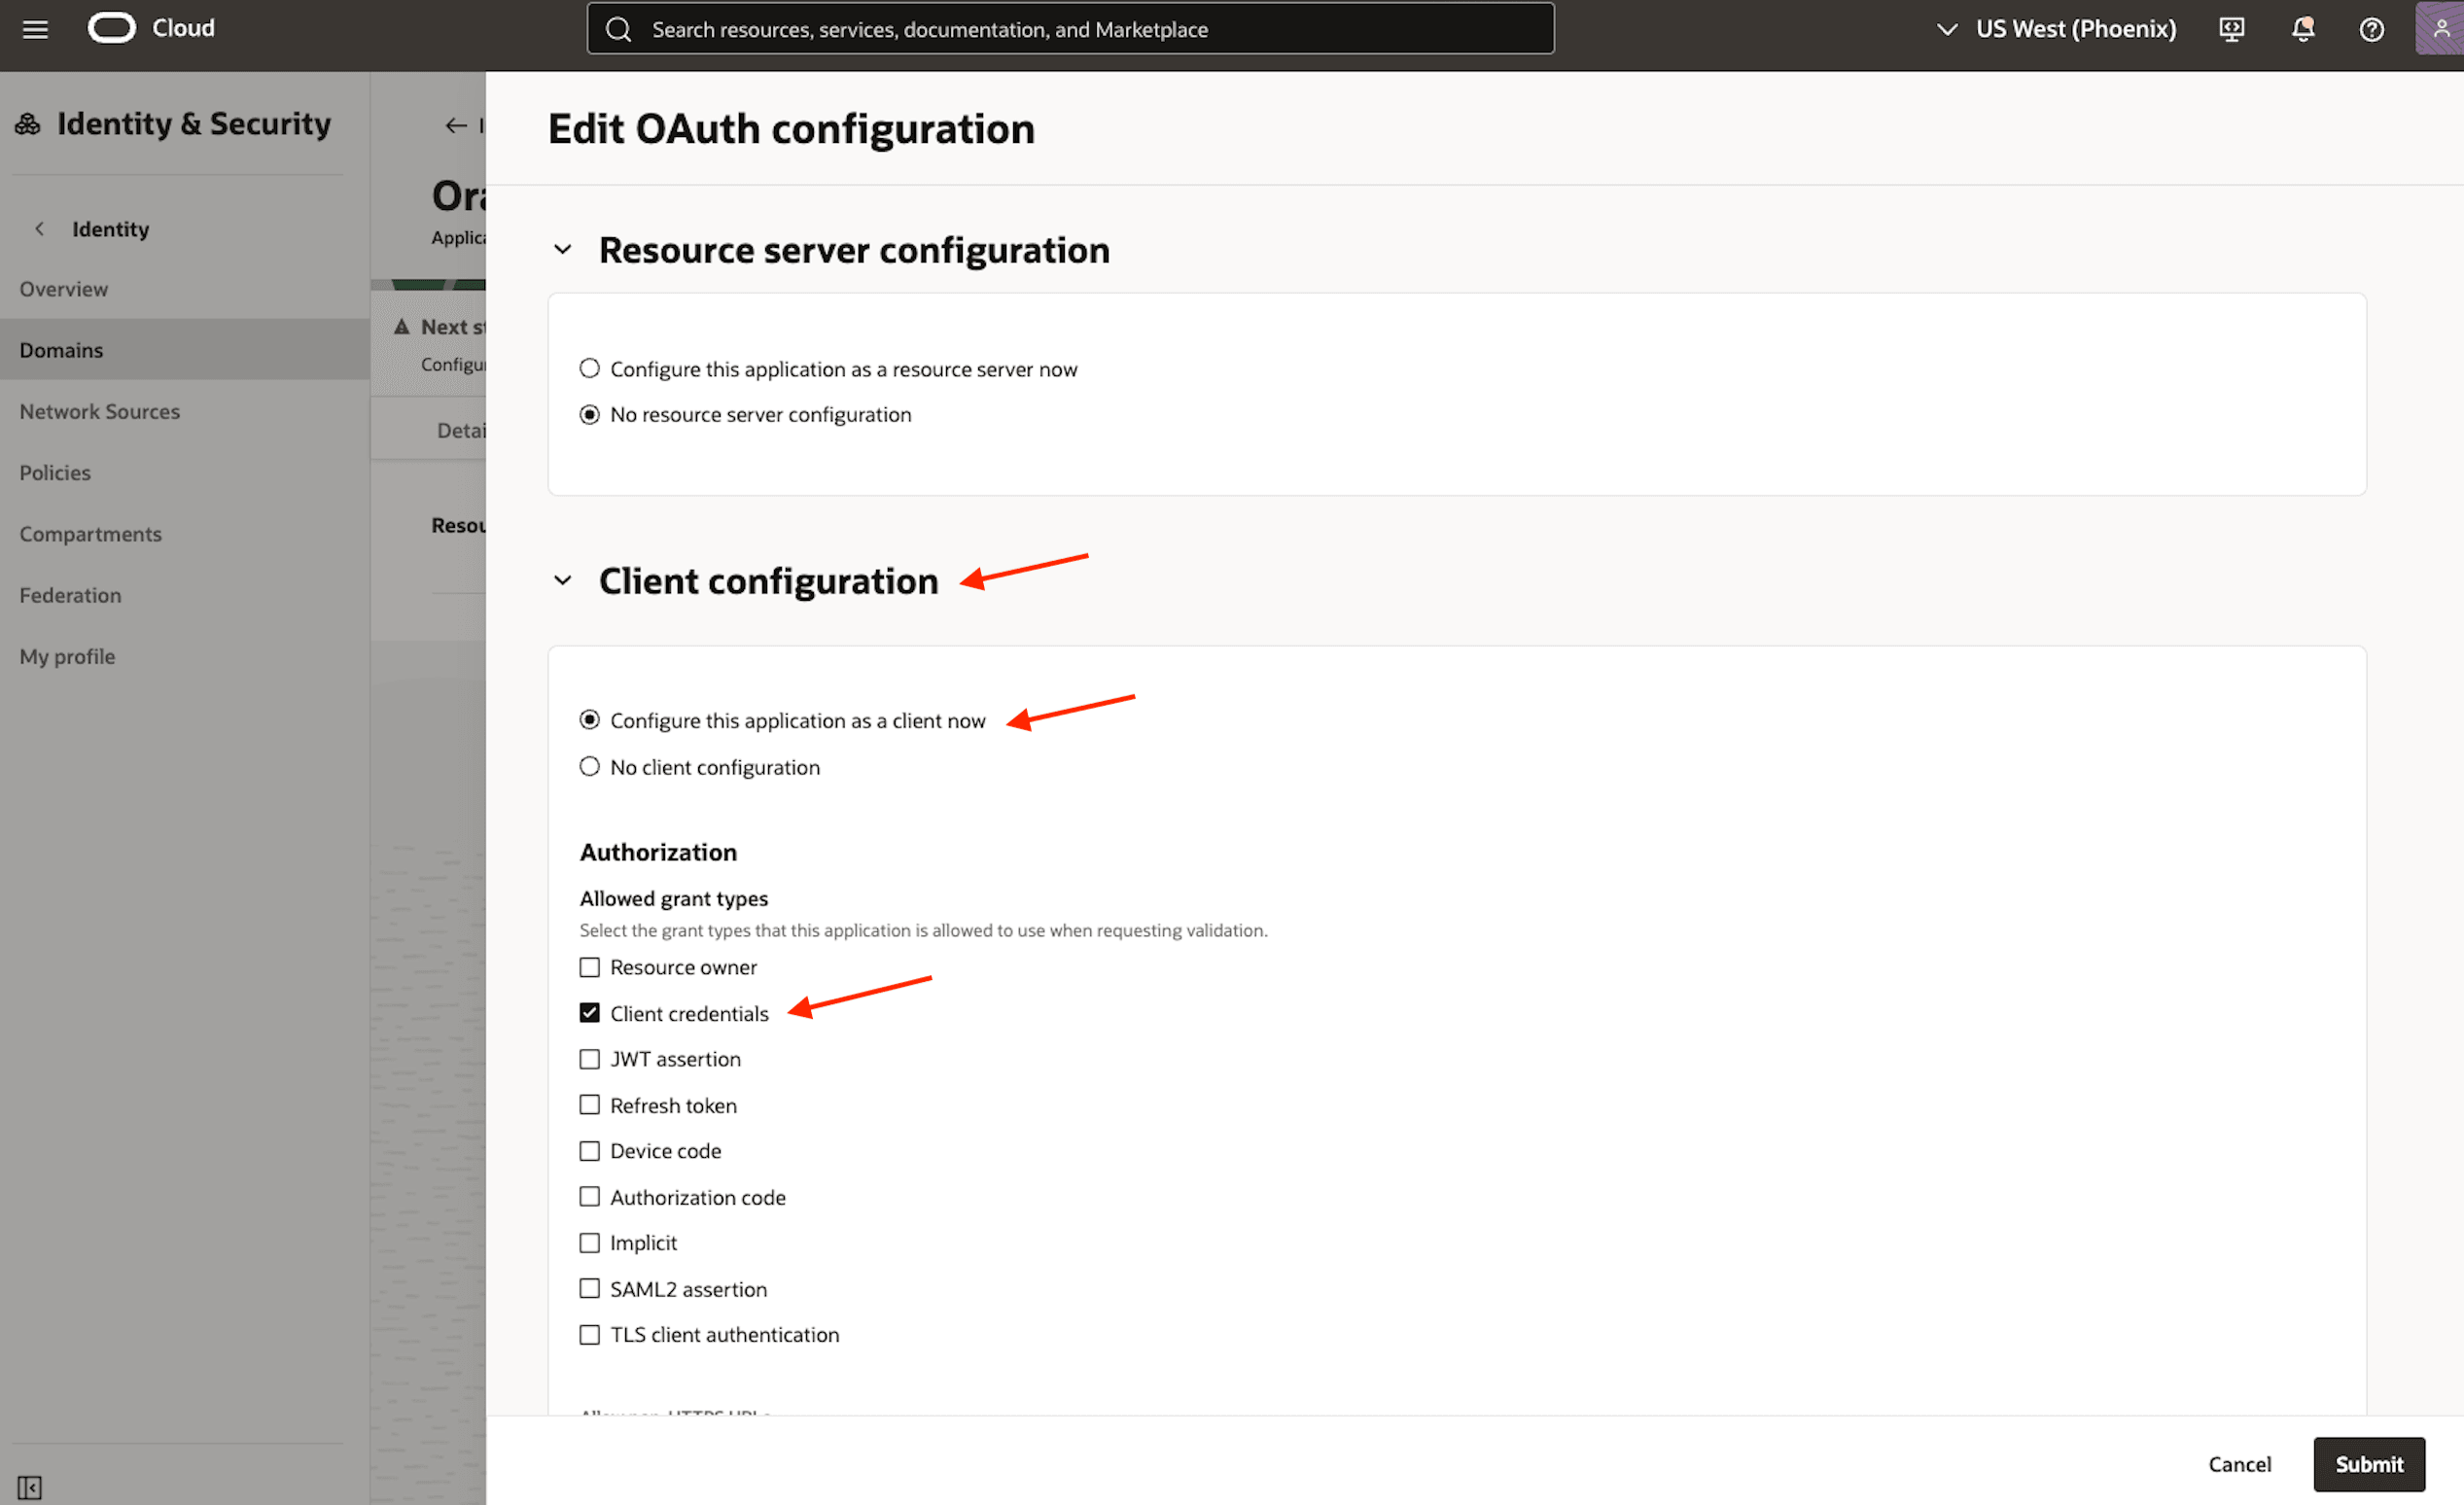
In the Client configuration section, select Configure this application as a client now.** Under Allowed grant types, ensure that Client Credentials is the only option selected. Do not click Submit yet.
-
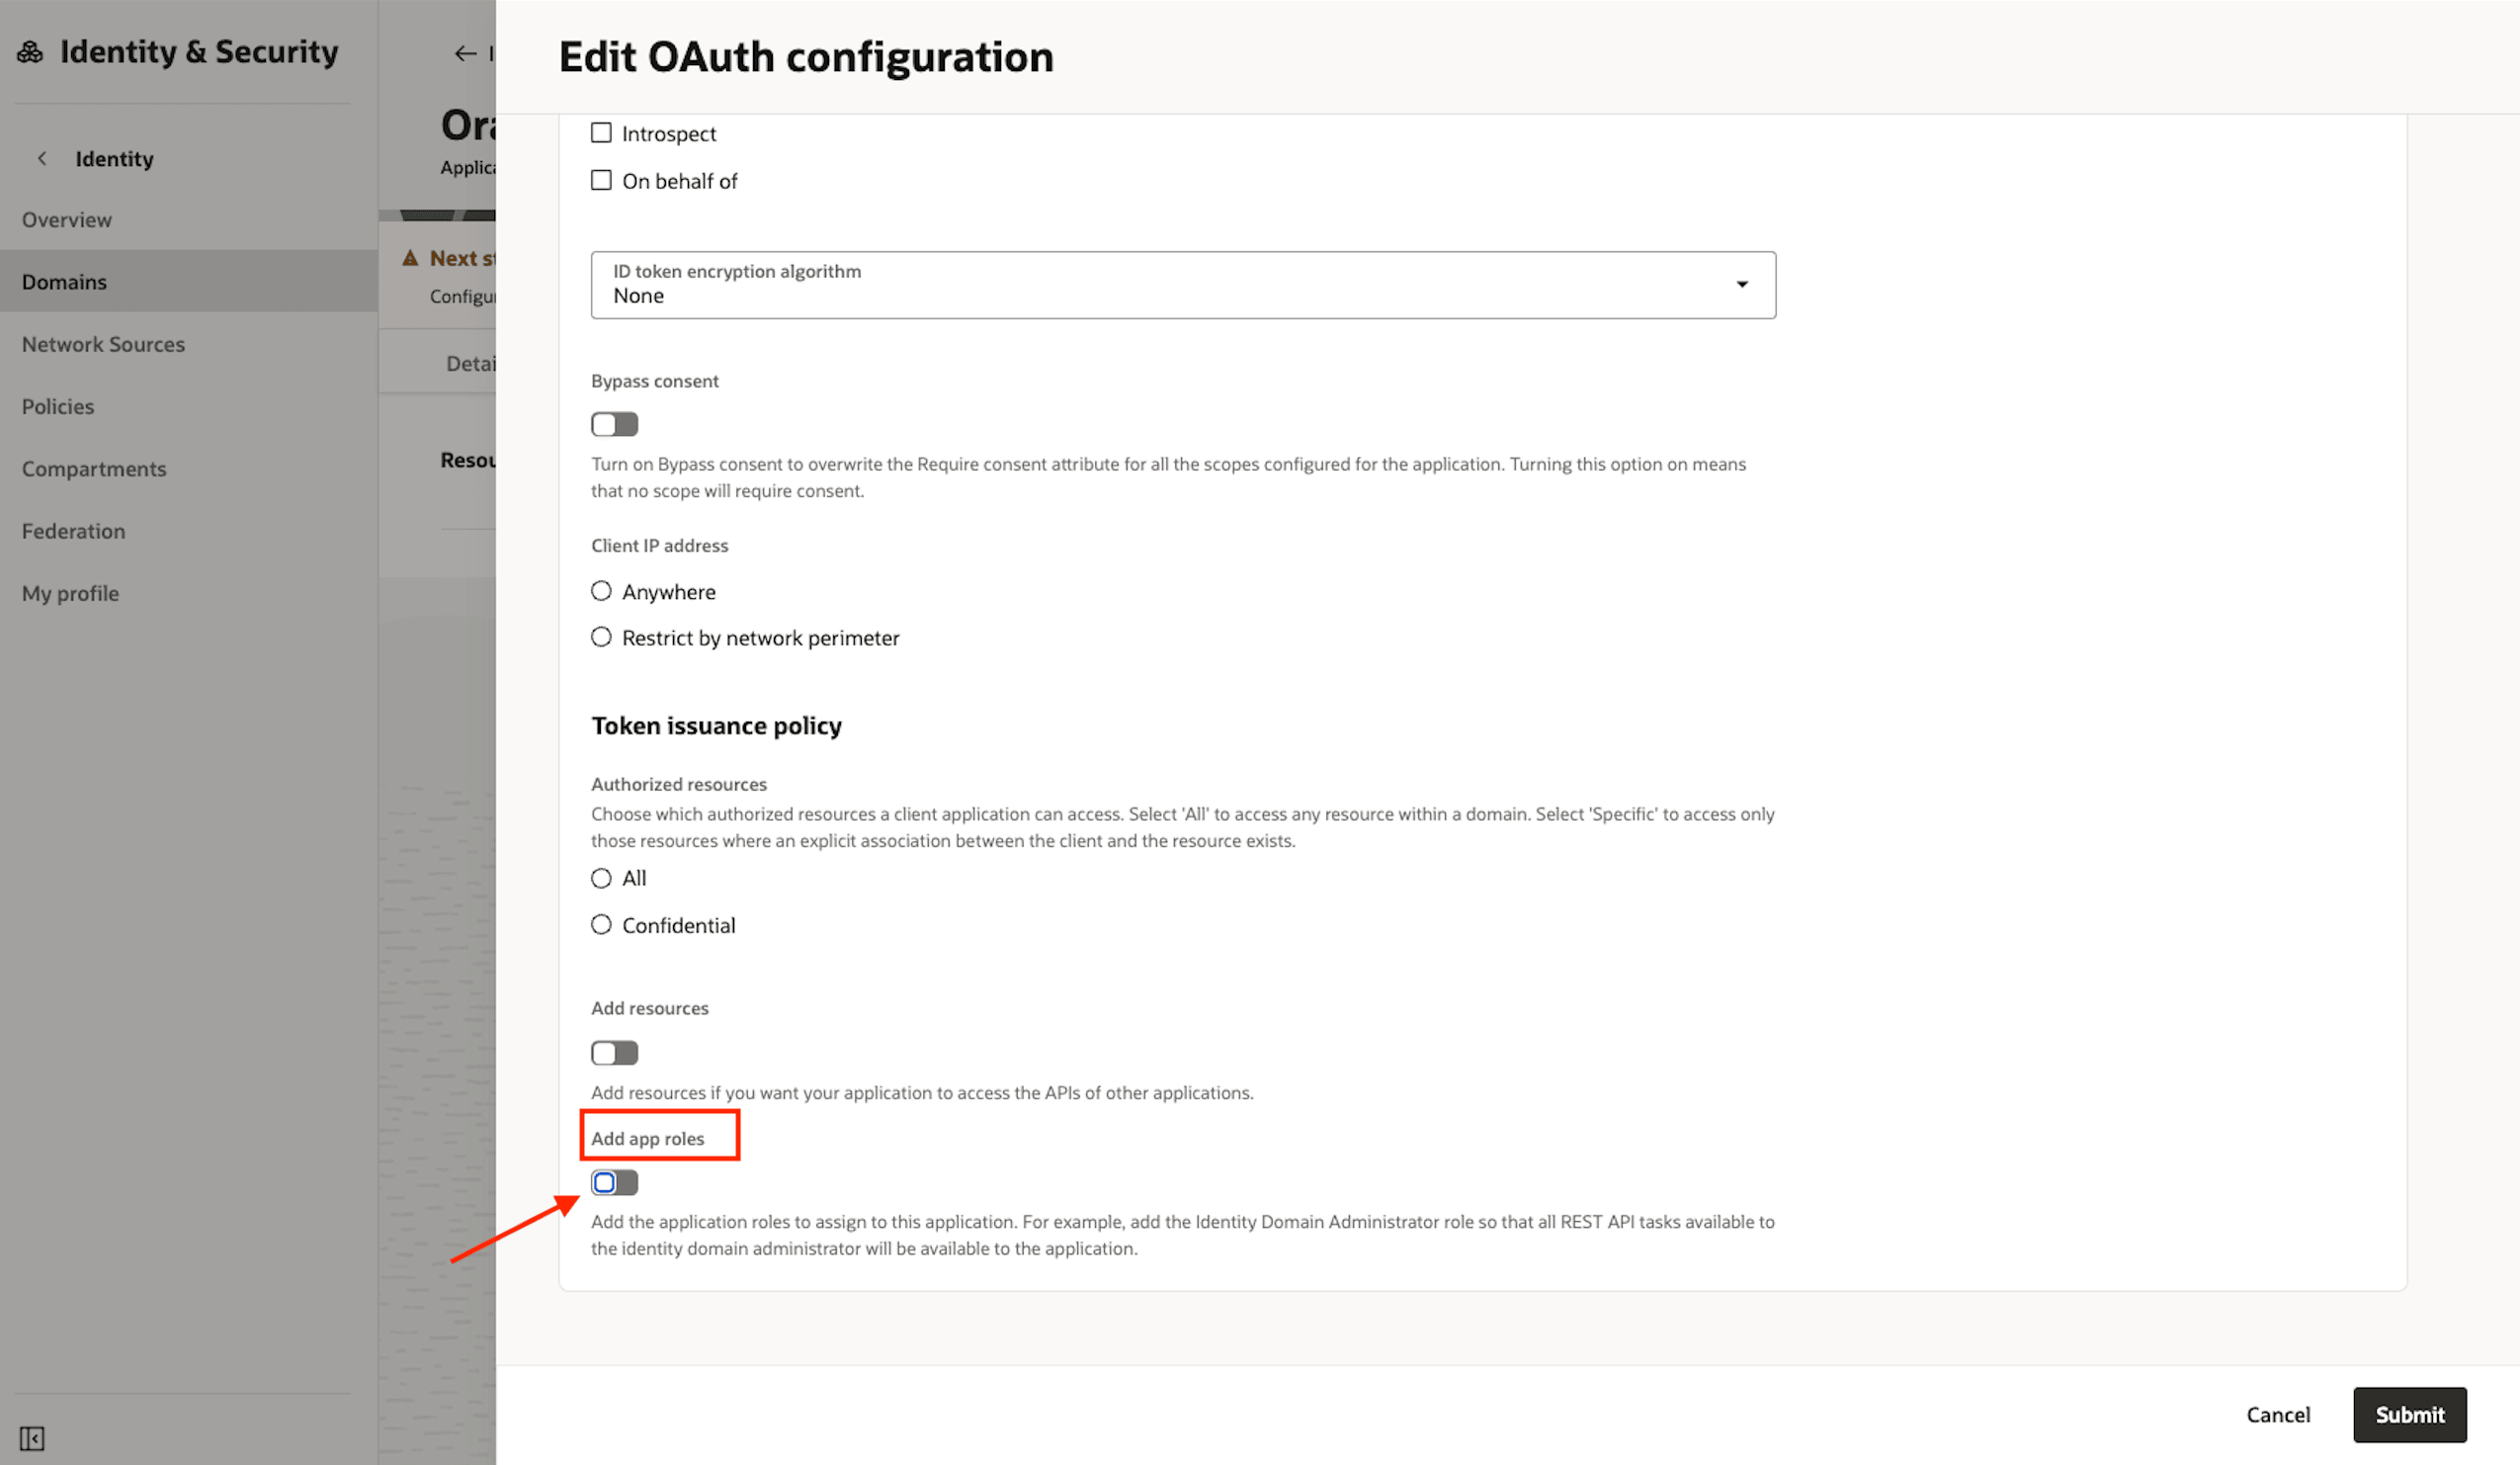
Scroll down to the App roles section and enable it.
-
Click the button Add App roles.
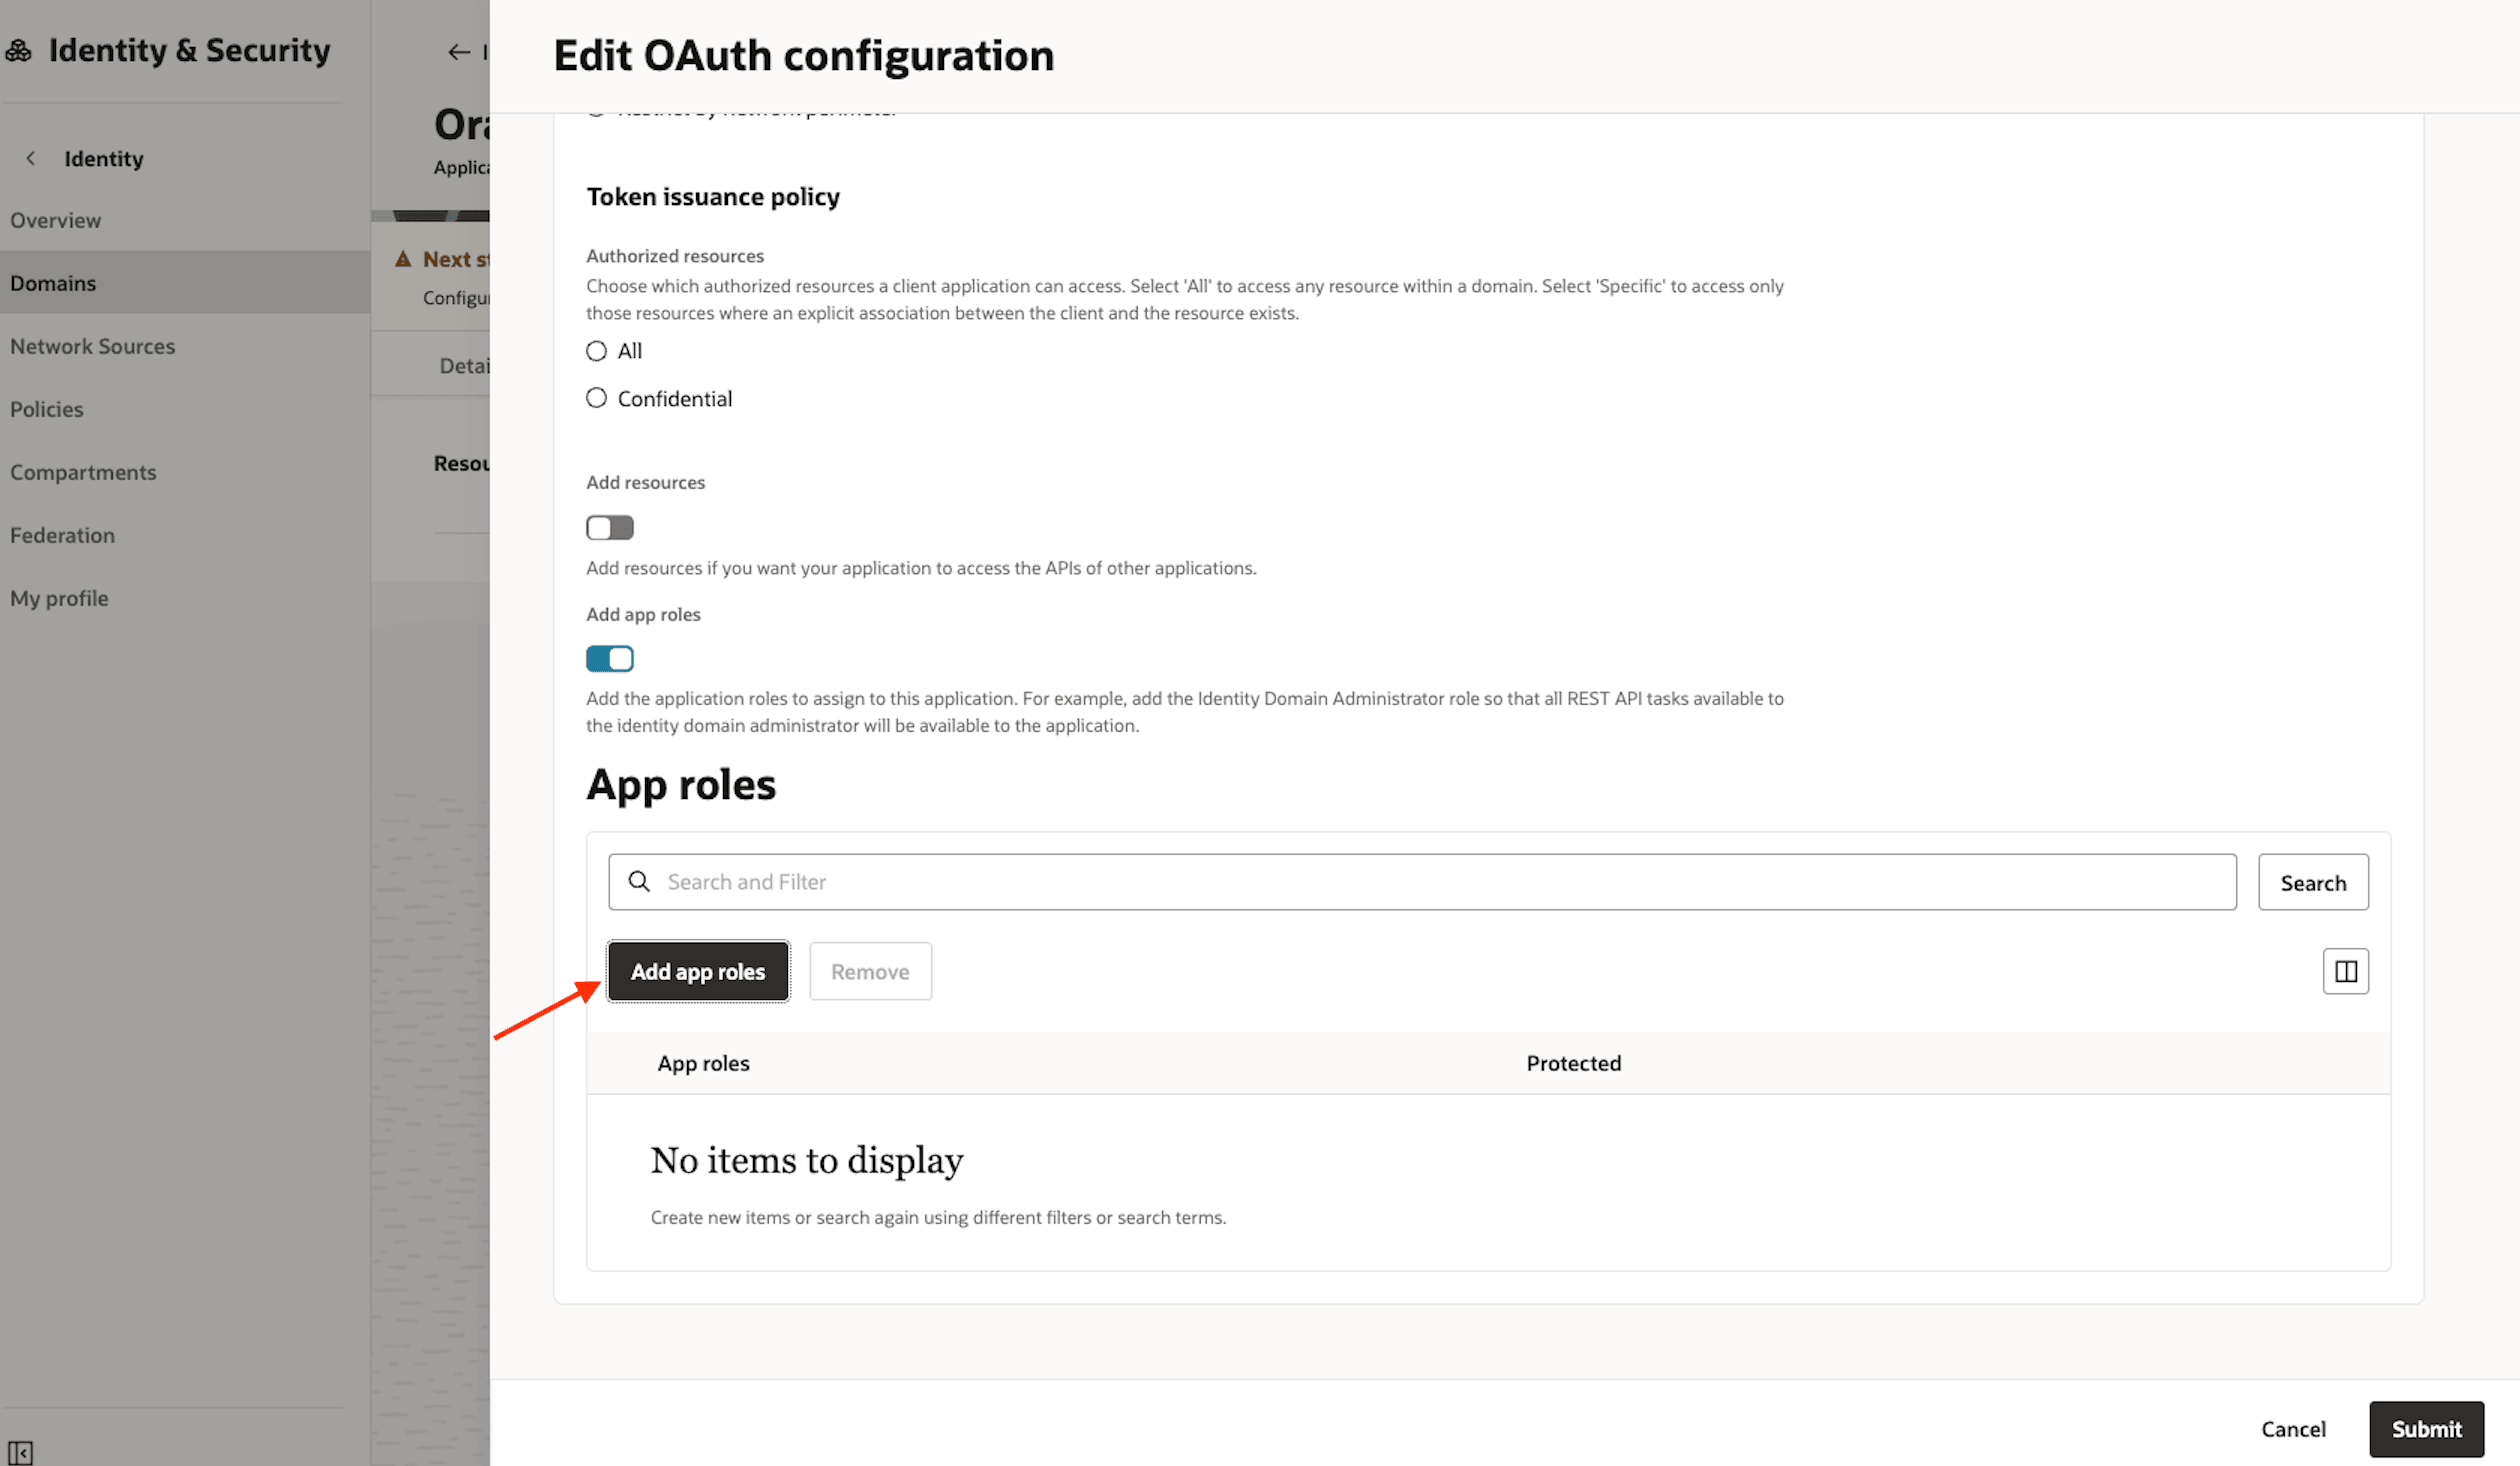
-
Add the roles User Administrator, Identity Domain Administration and MFA Client, then click the button Add.
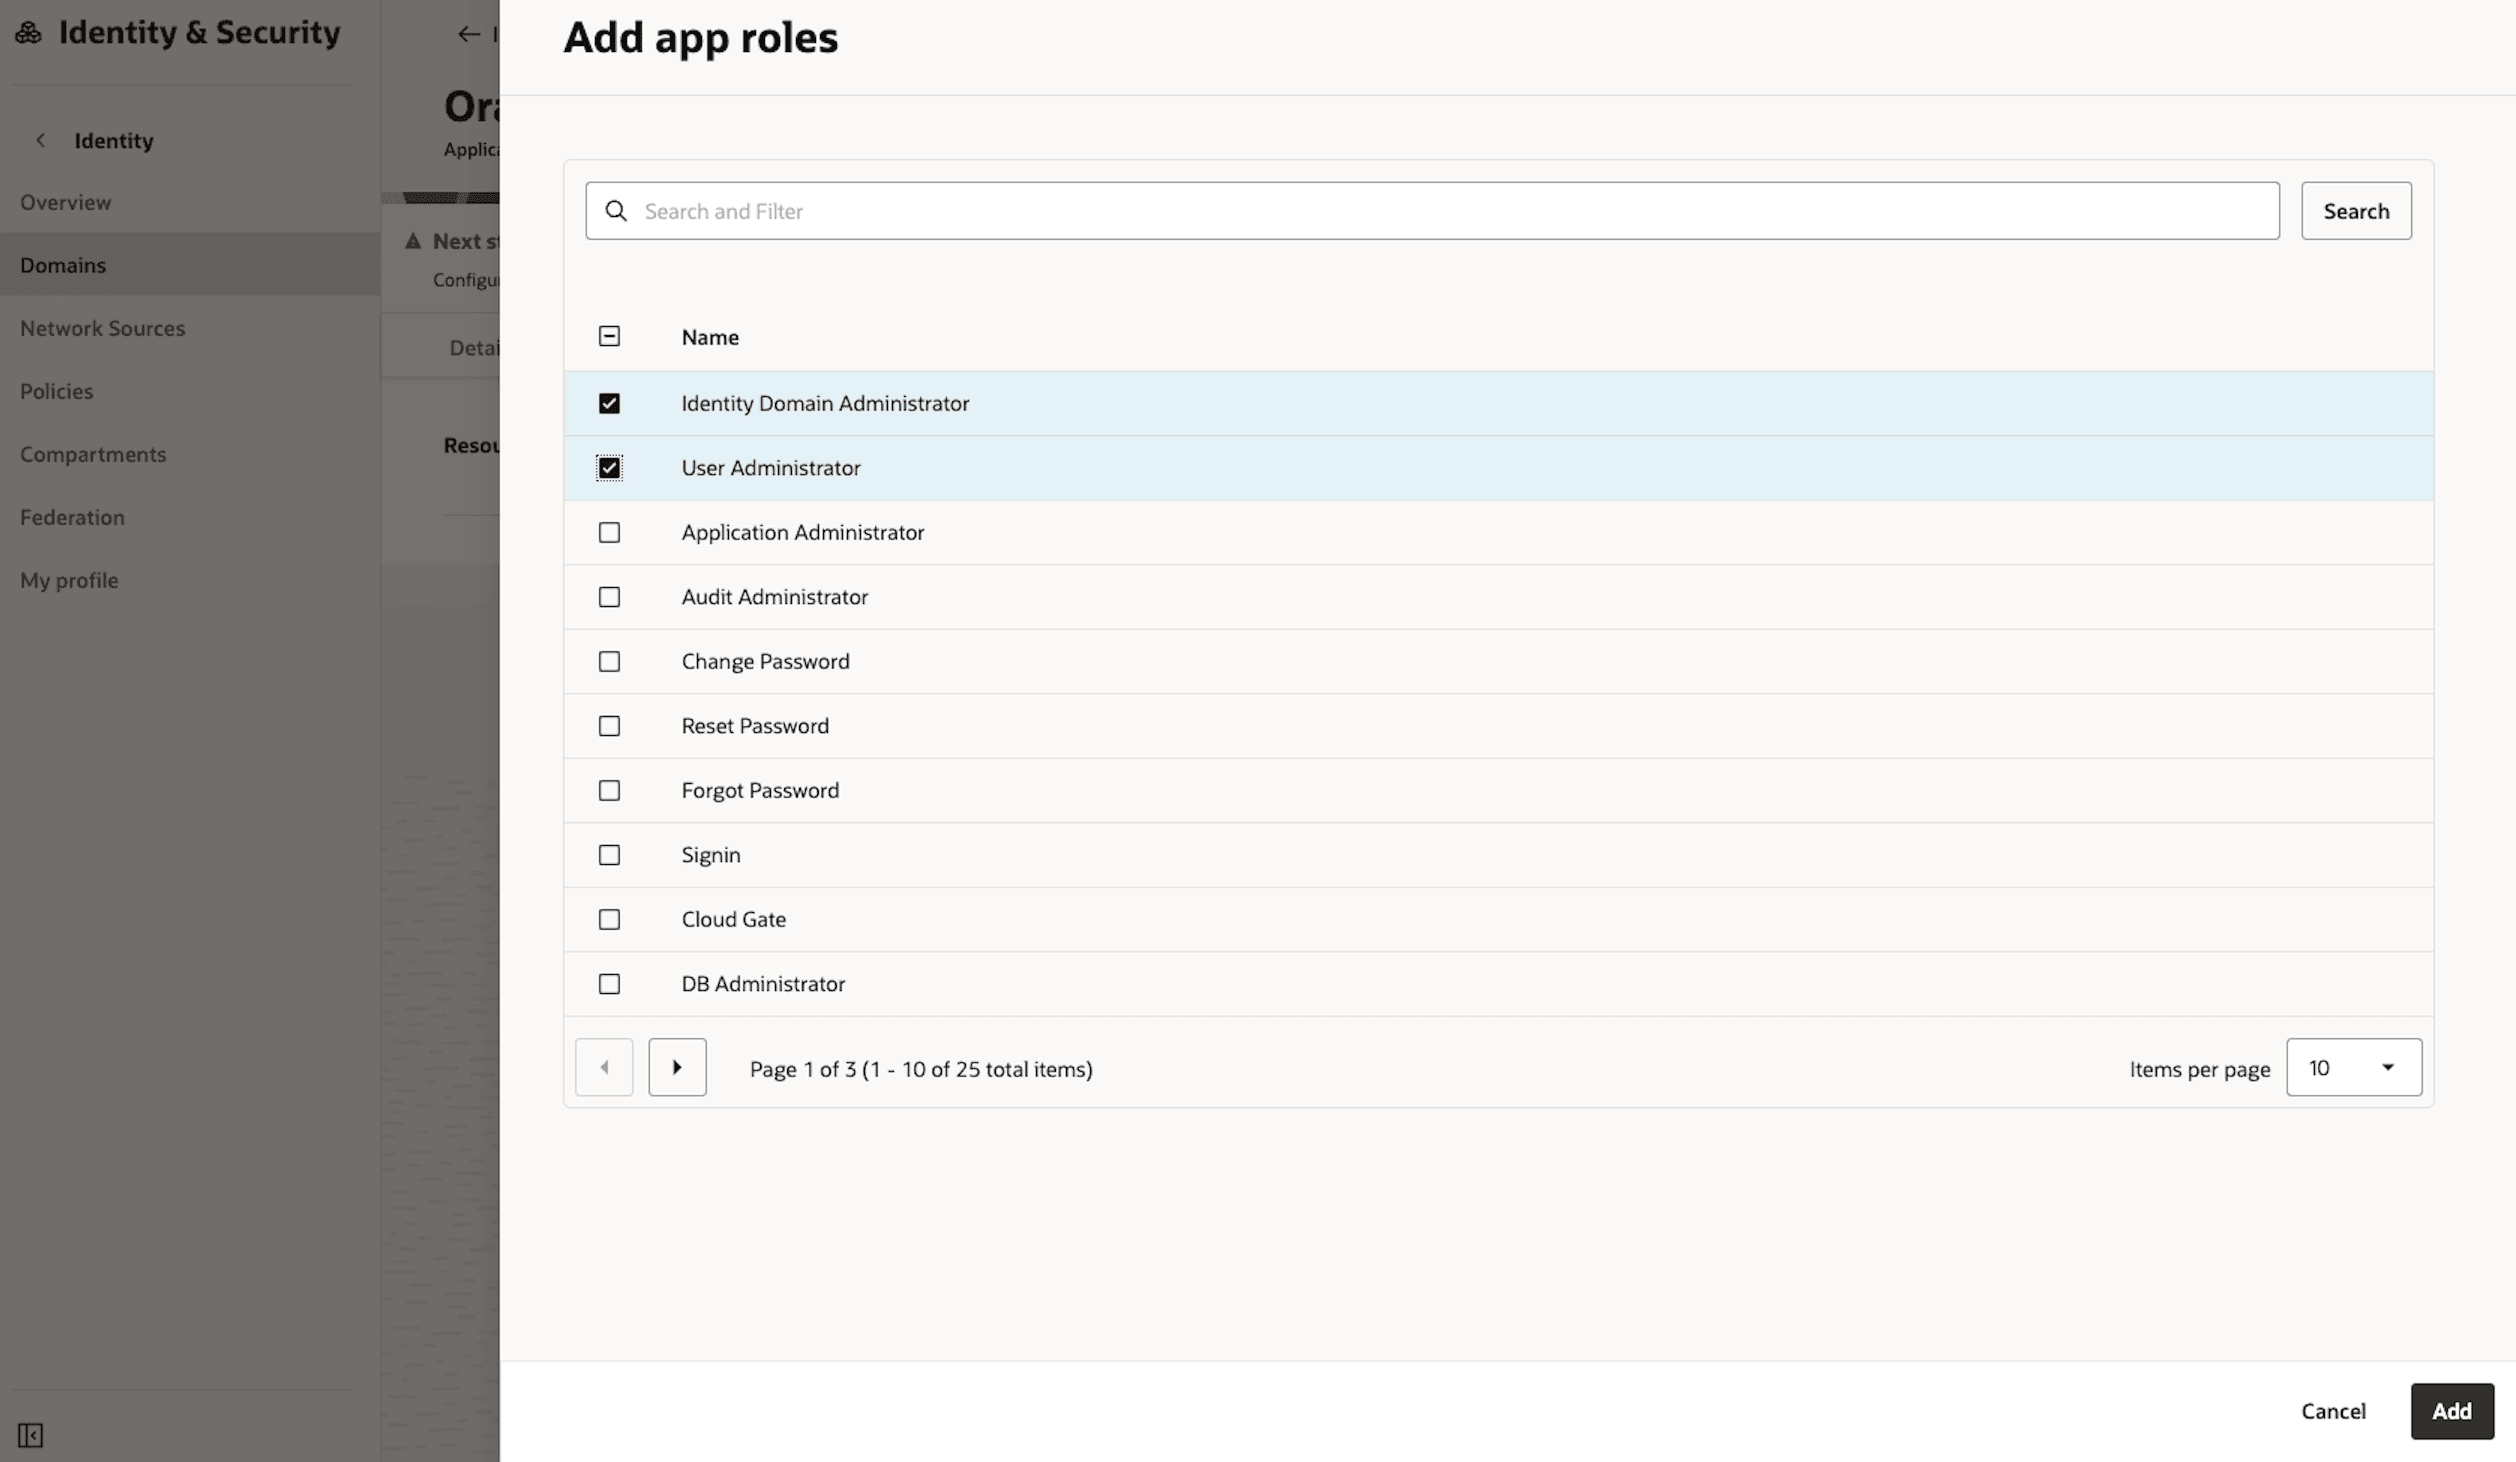
-
Verify the App roles and then click Submit.
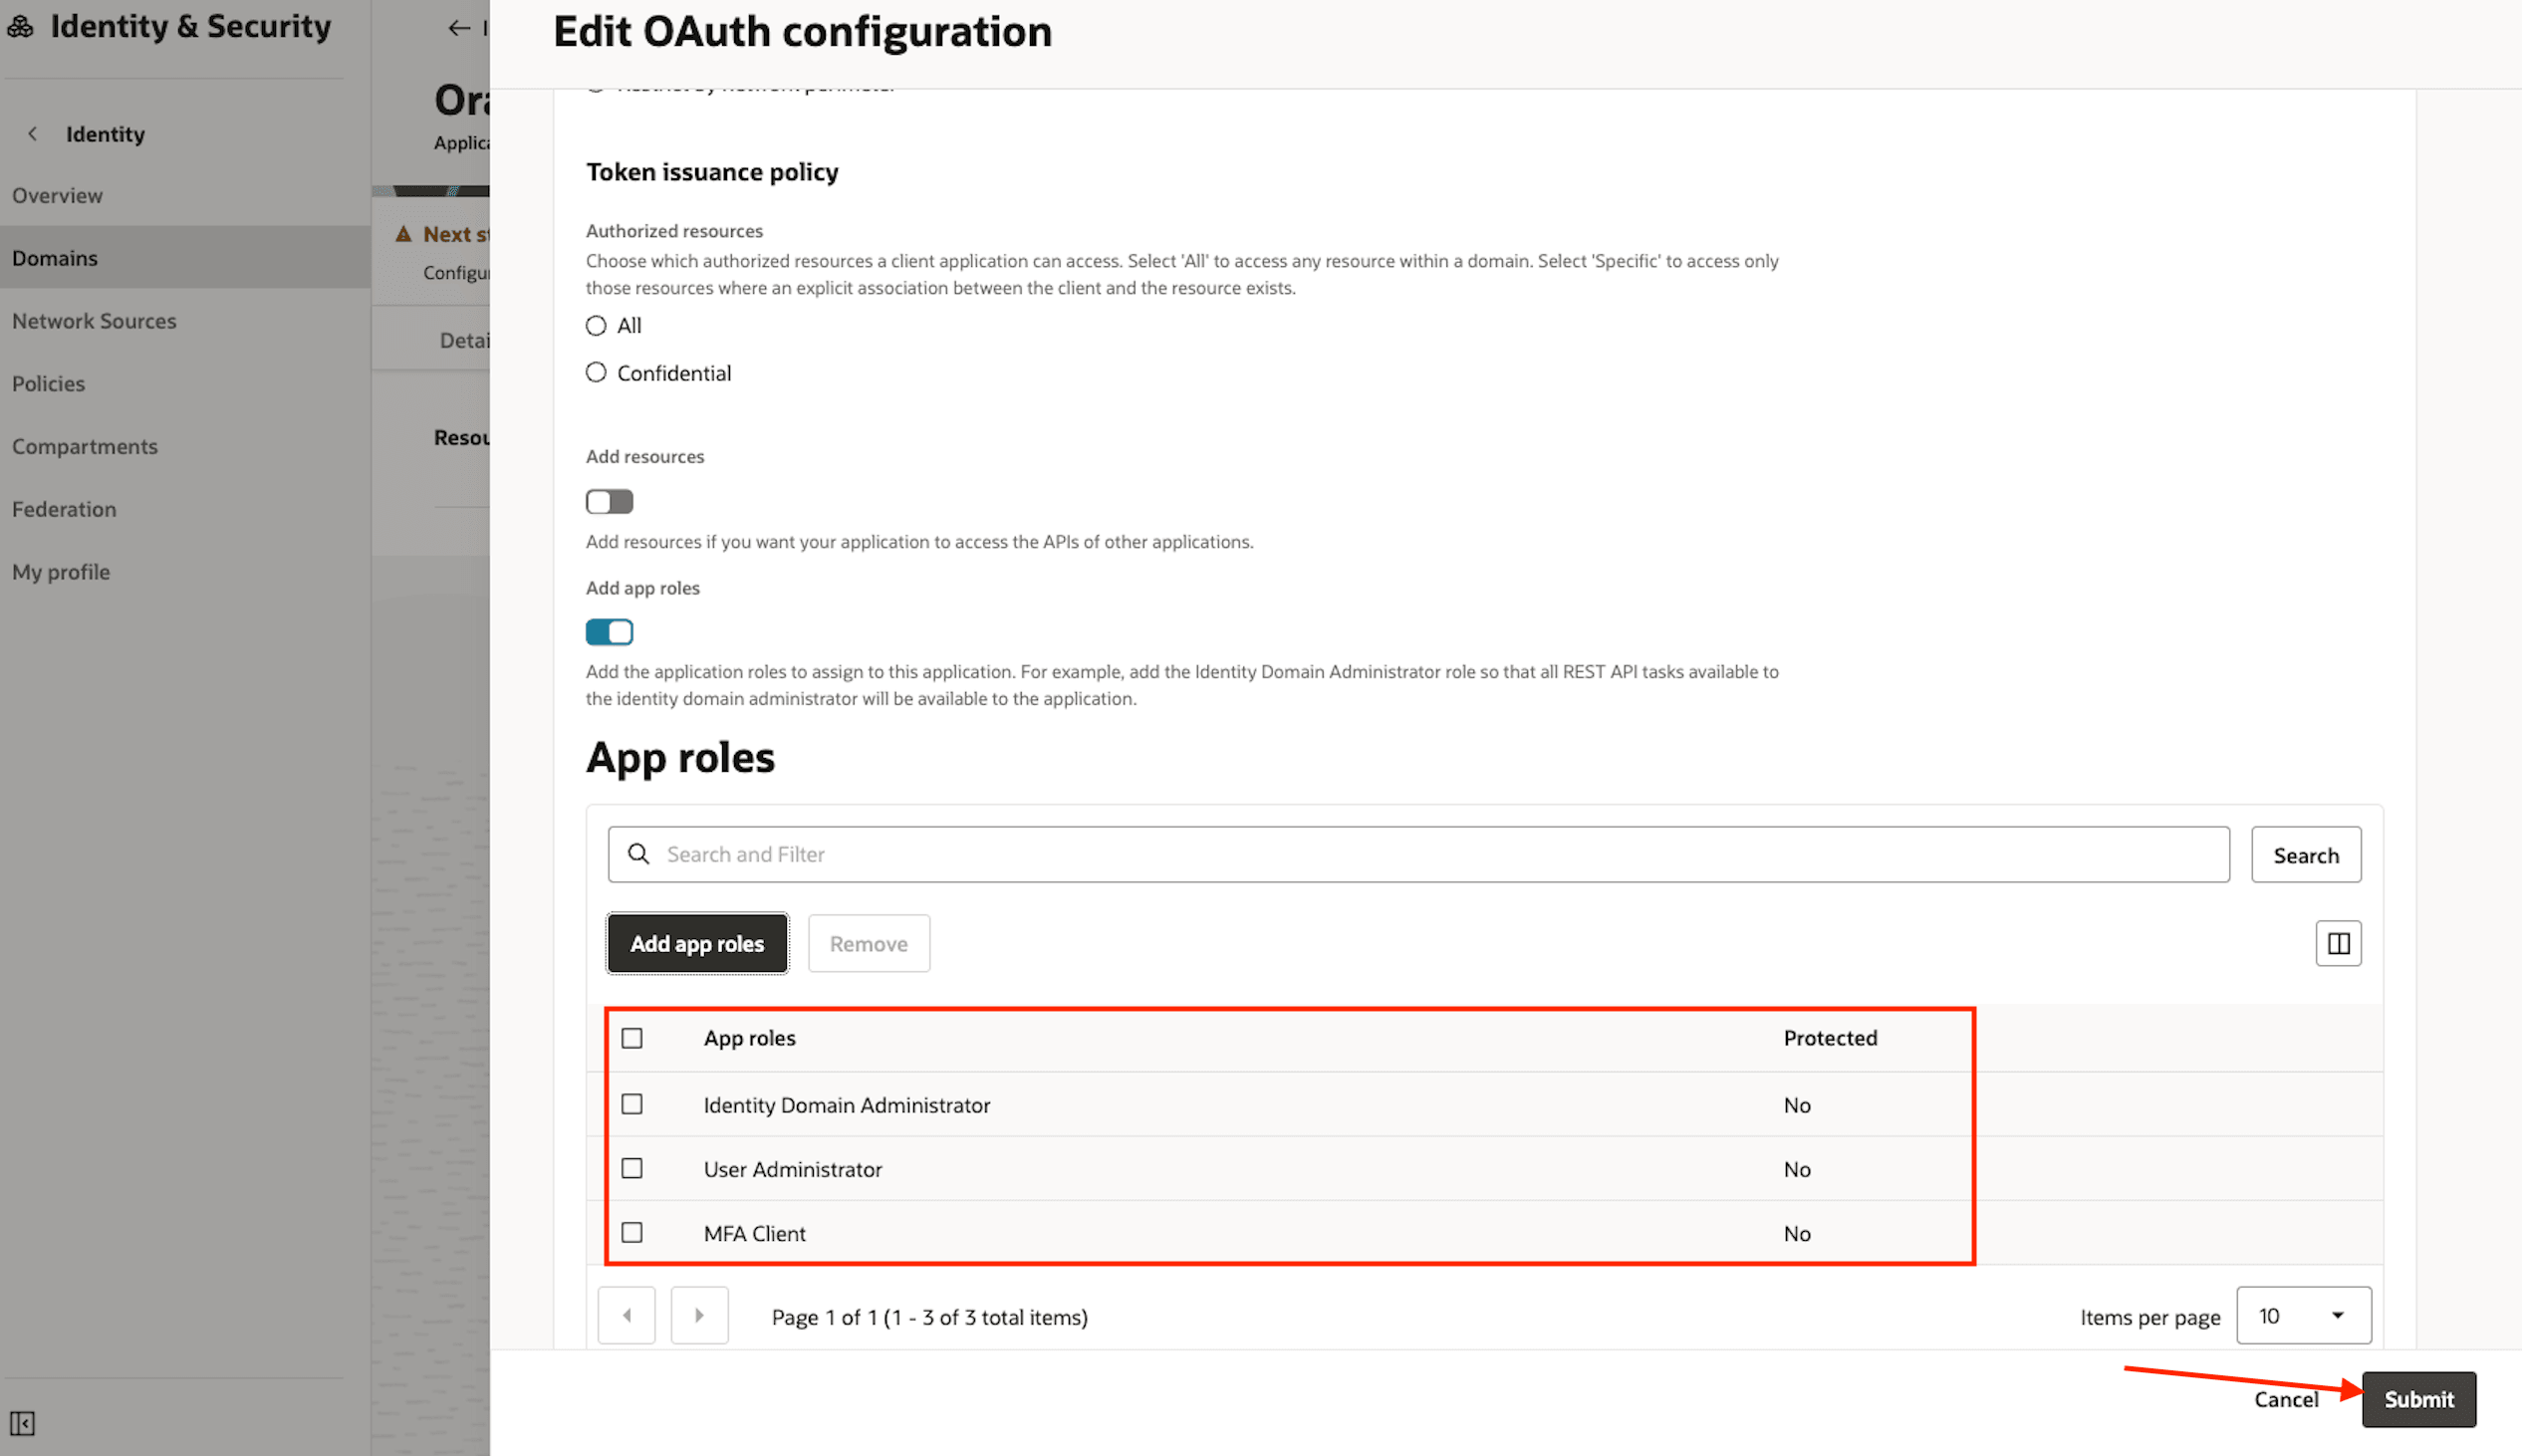
-
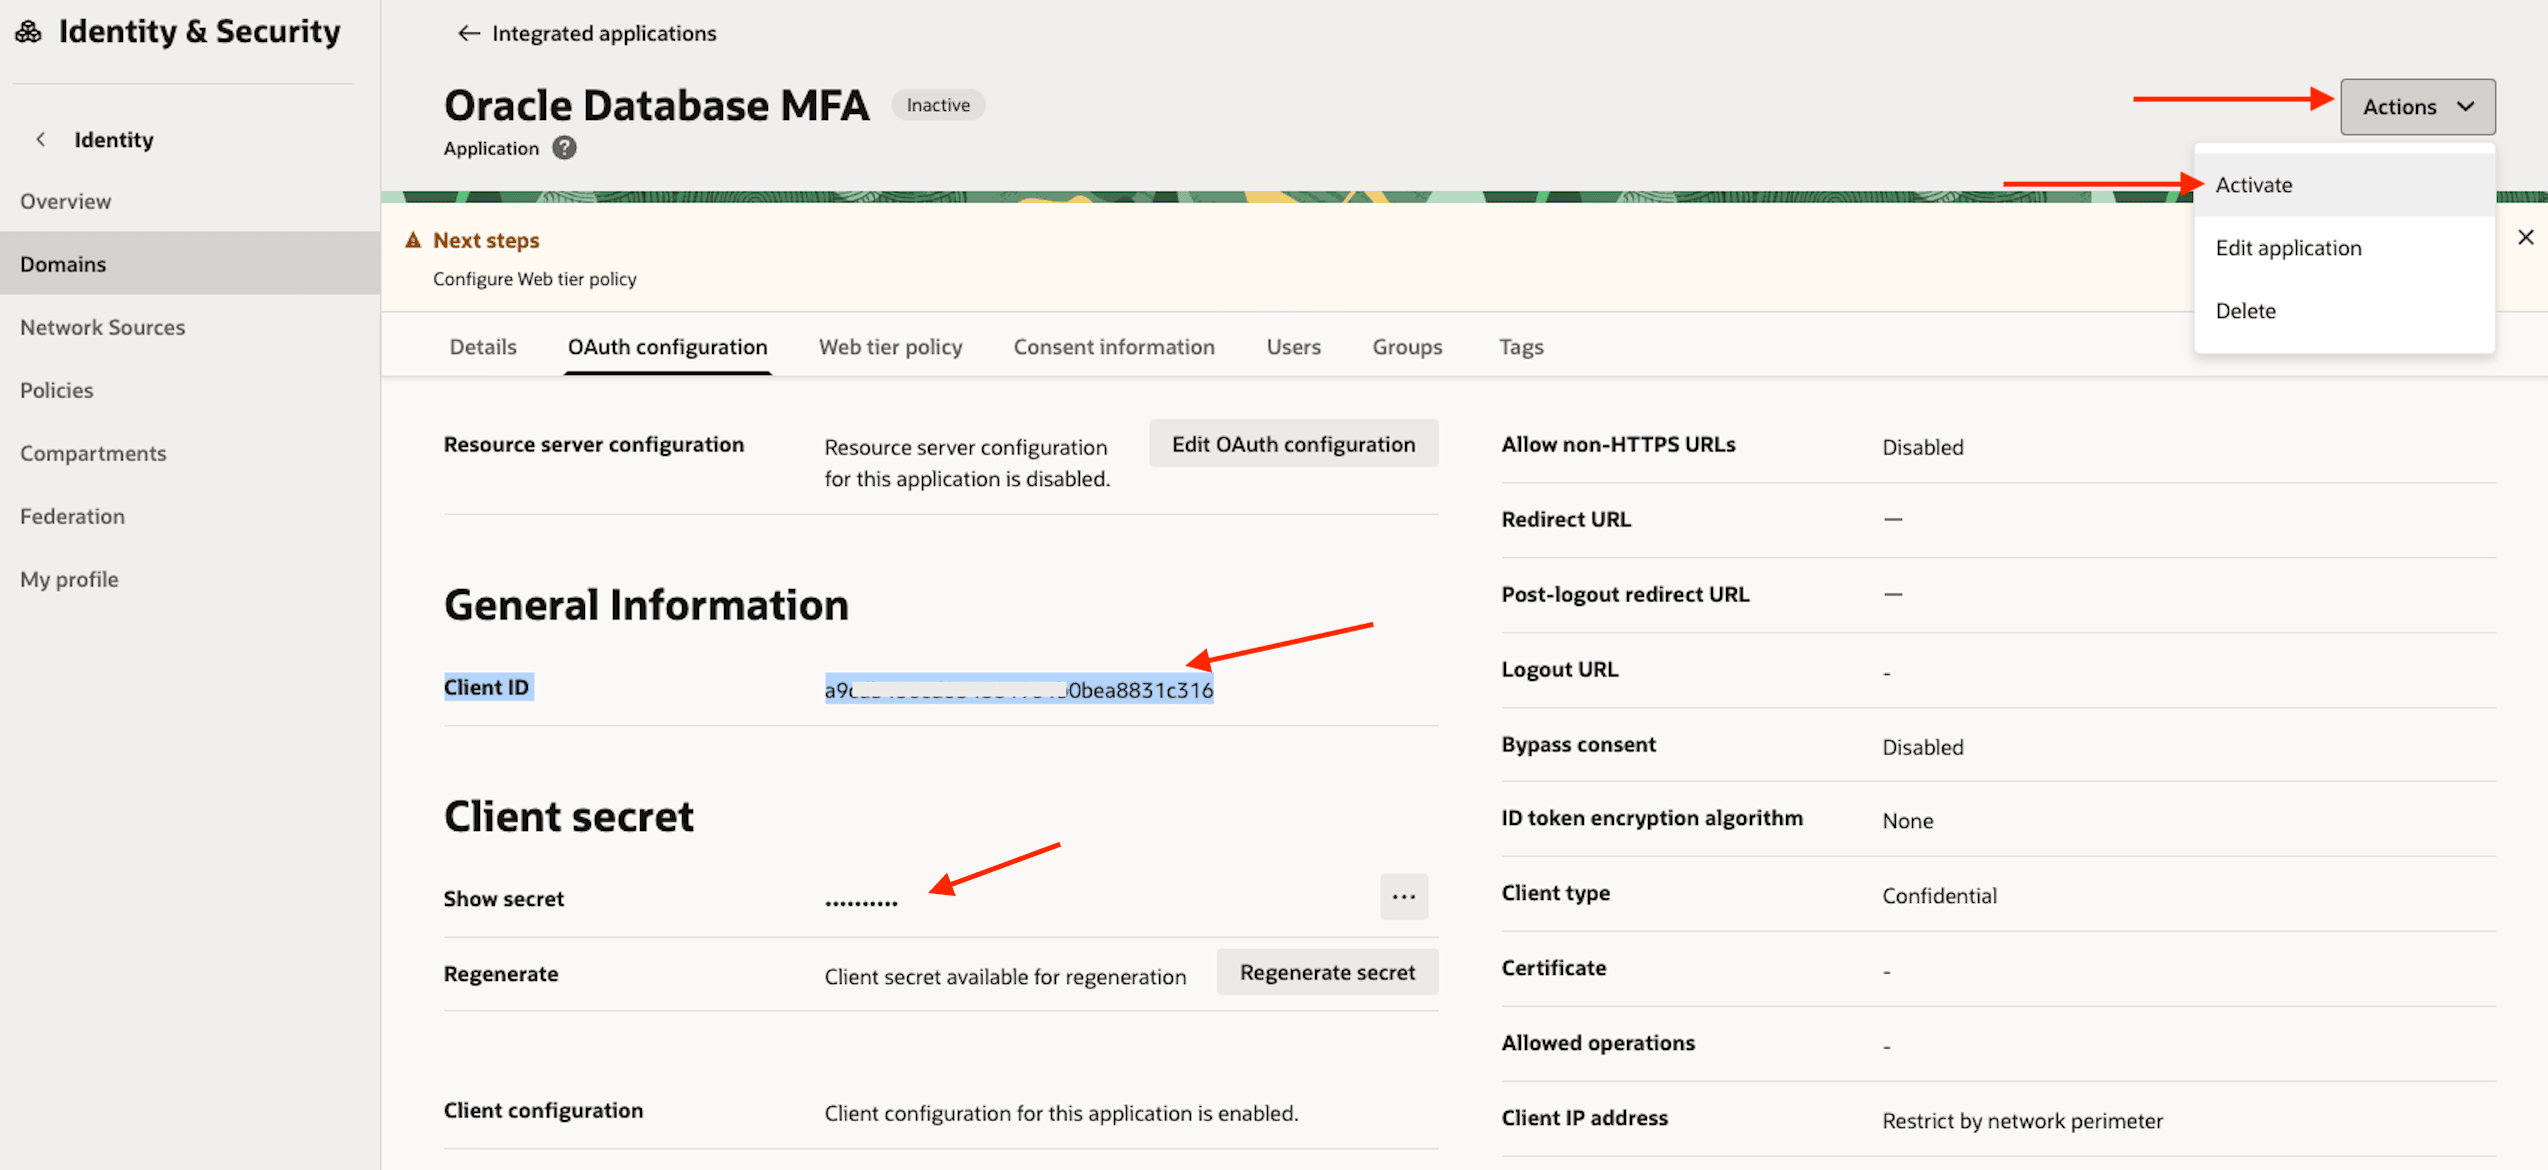
On the OAuth configuration tab, the Client ID and Client secret are now available.
- Copy and Securely Store: Copy both the Client ID and the Client secret and store them in a secure location. To reveal the secret, use the Show or Copy option from the menu next to the value.
-
Activate Application: From the Actions dropdown menu, select Activate to enable the application.
Task 2: OCI Identity and Access Management Group Configuration for Email Delivery
To utilize OCI Email Delivery for sending MFA notifications, you must first create a dedicated IAM group with the necessary permissions.
-
Log in to the OCI Console and navigate to Identity & Security, Domains. Select your current Identity Domain. Click User Management tab, scroll down to Groups, and then click Create group.
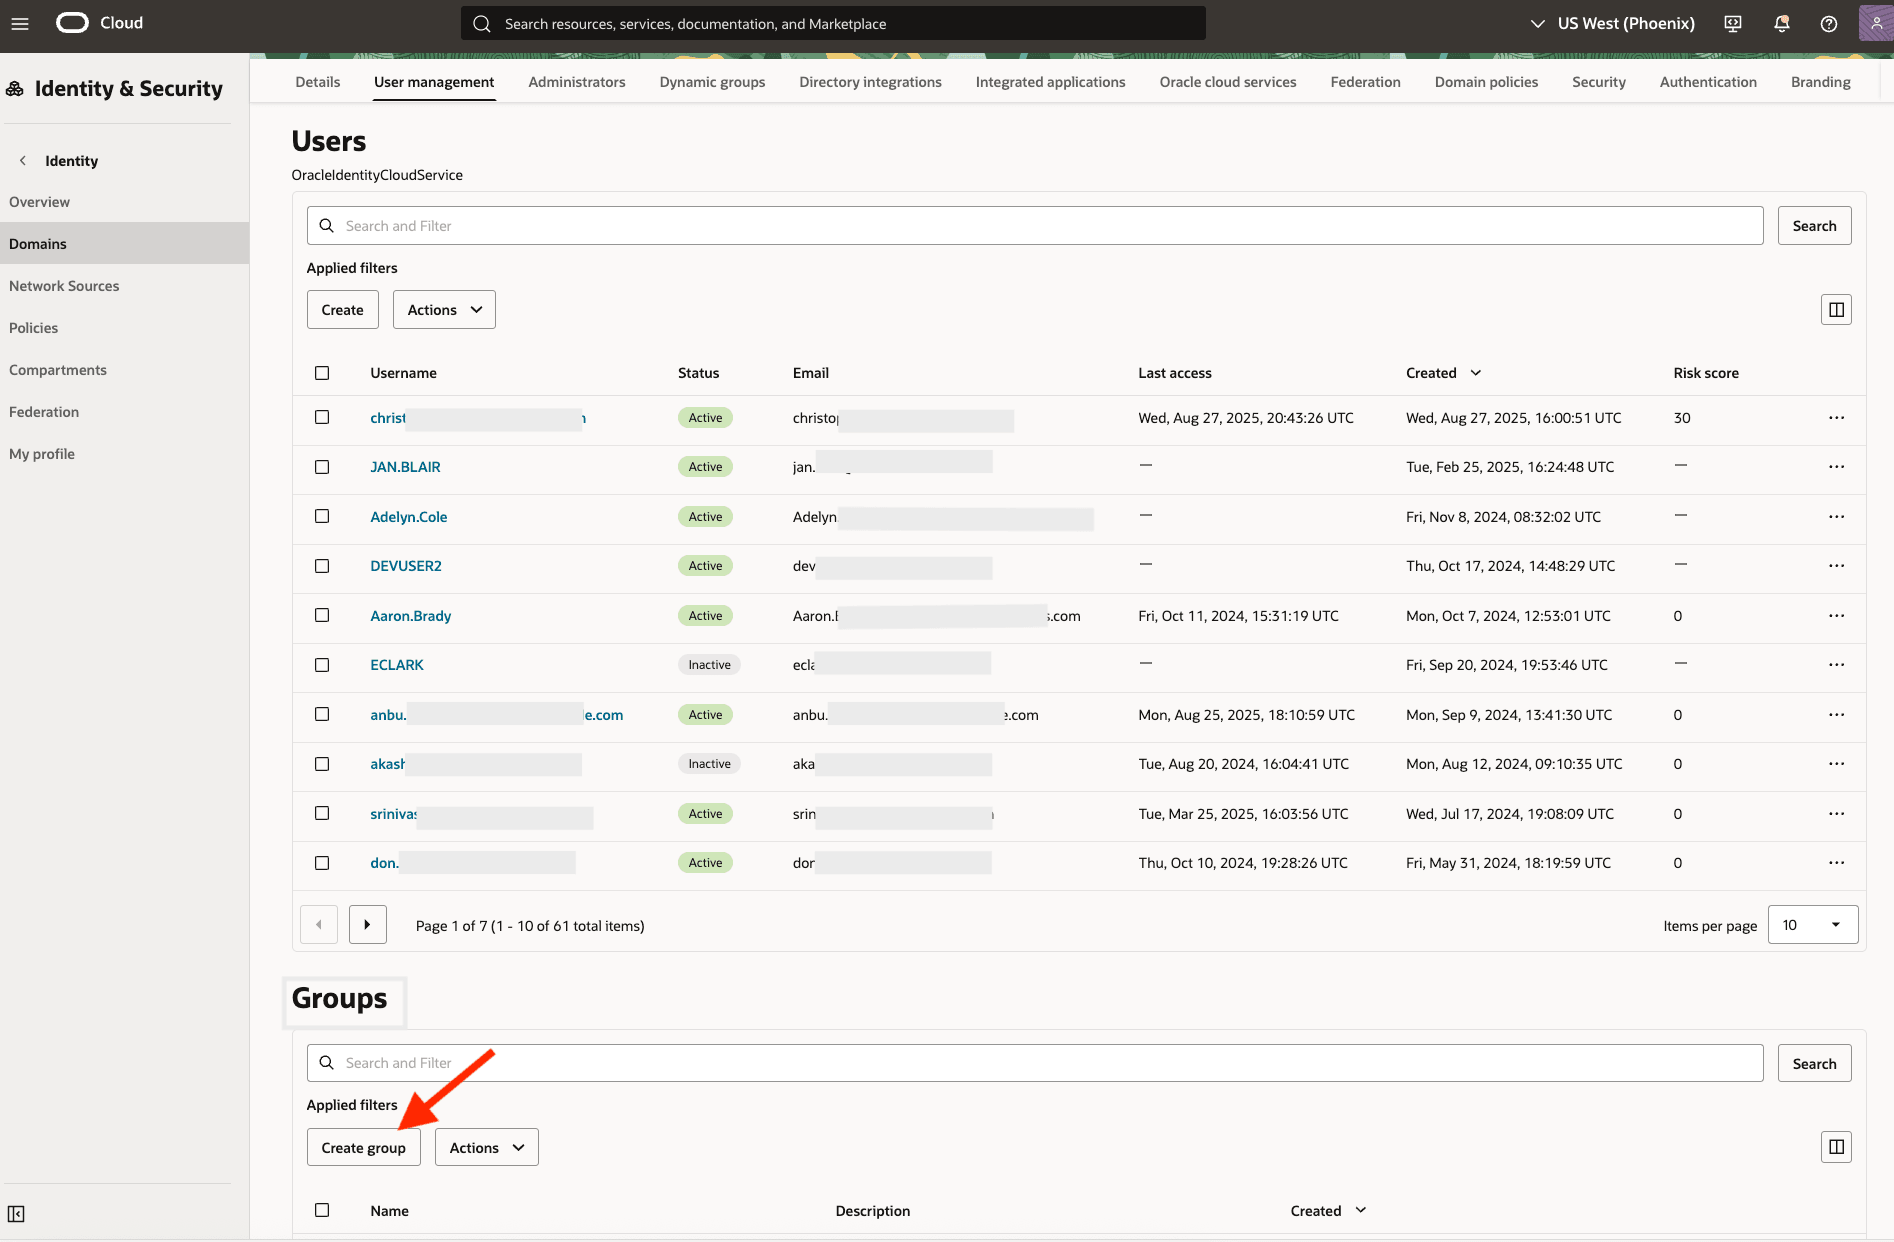
-
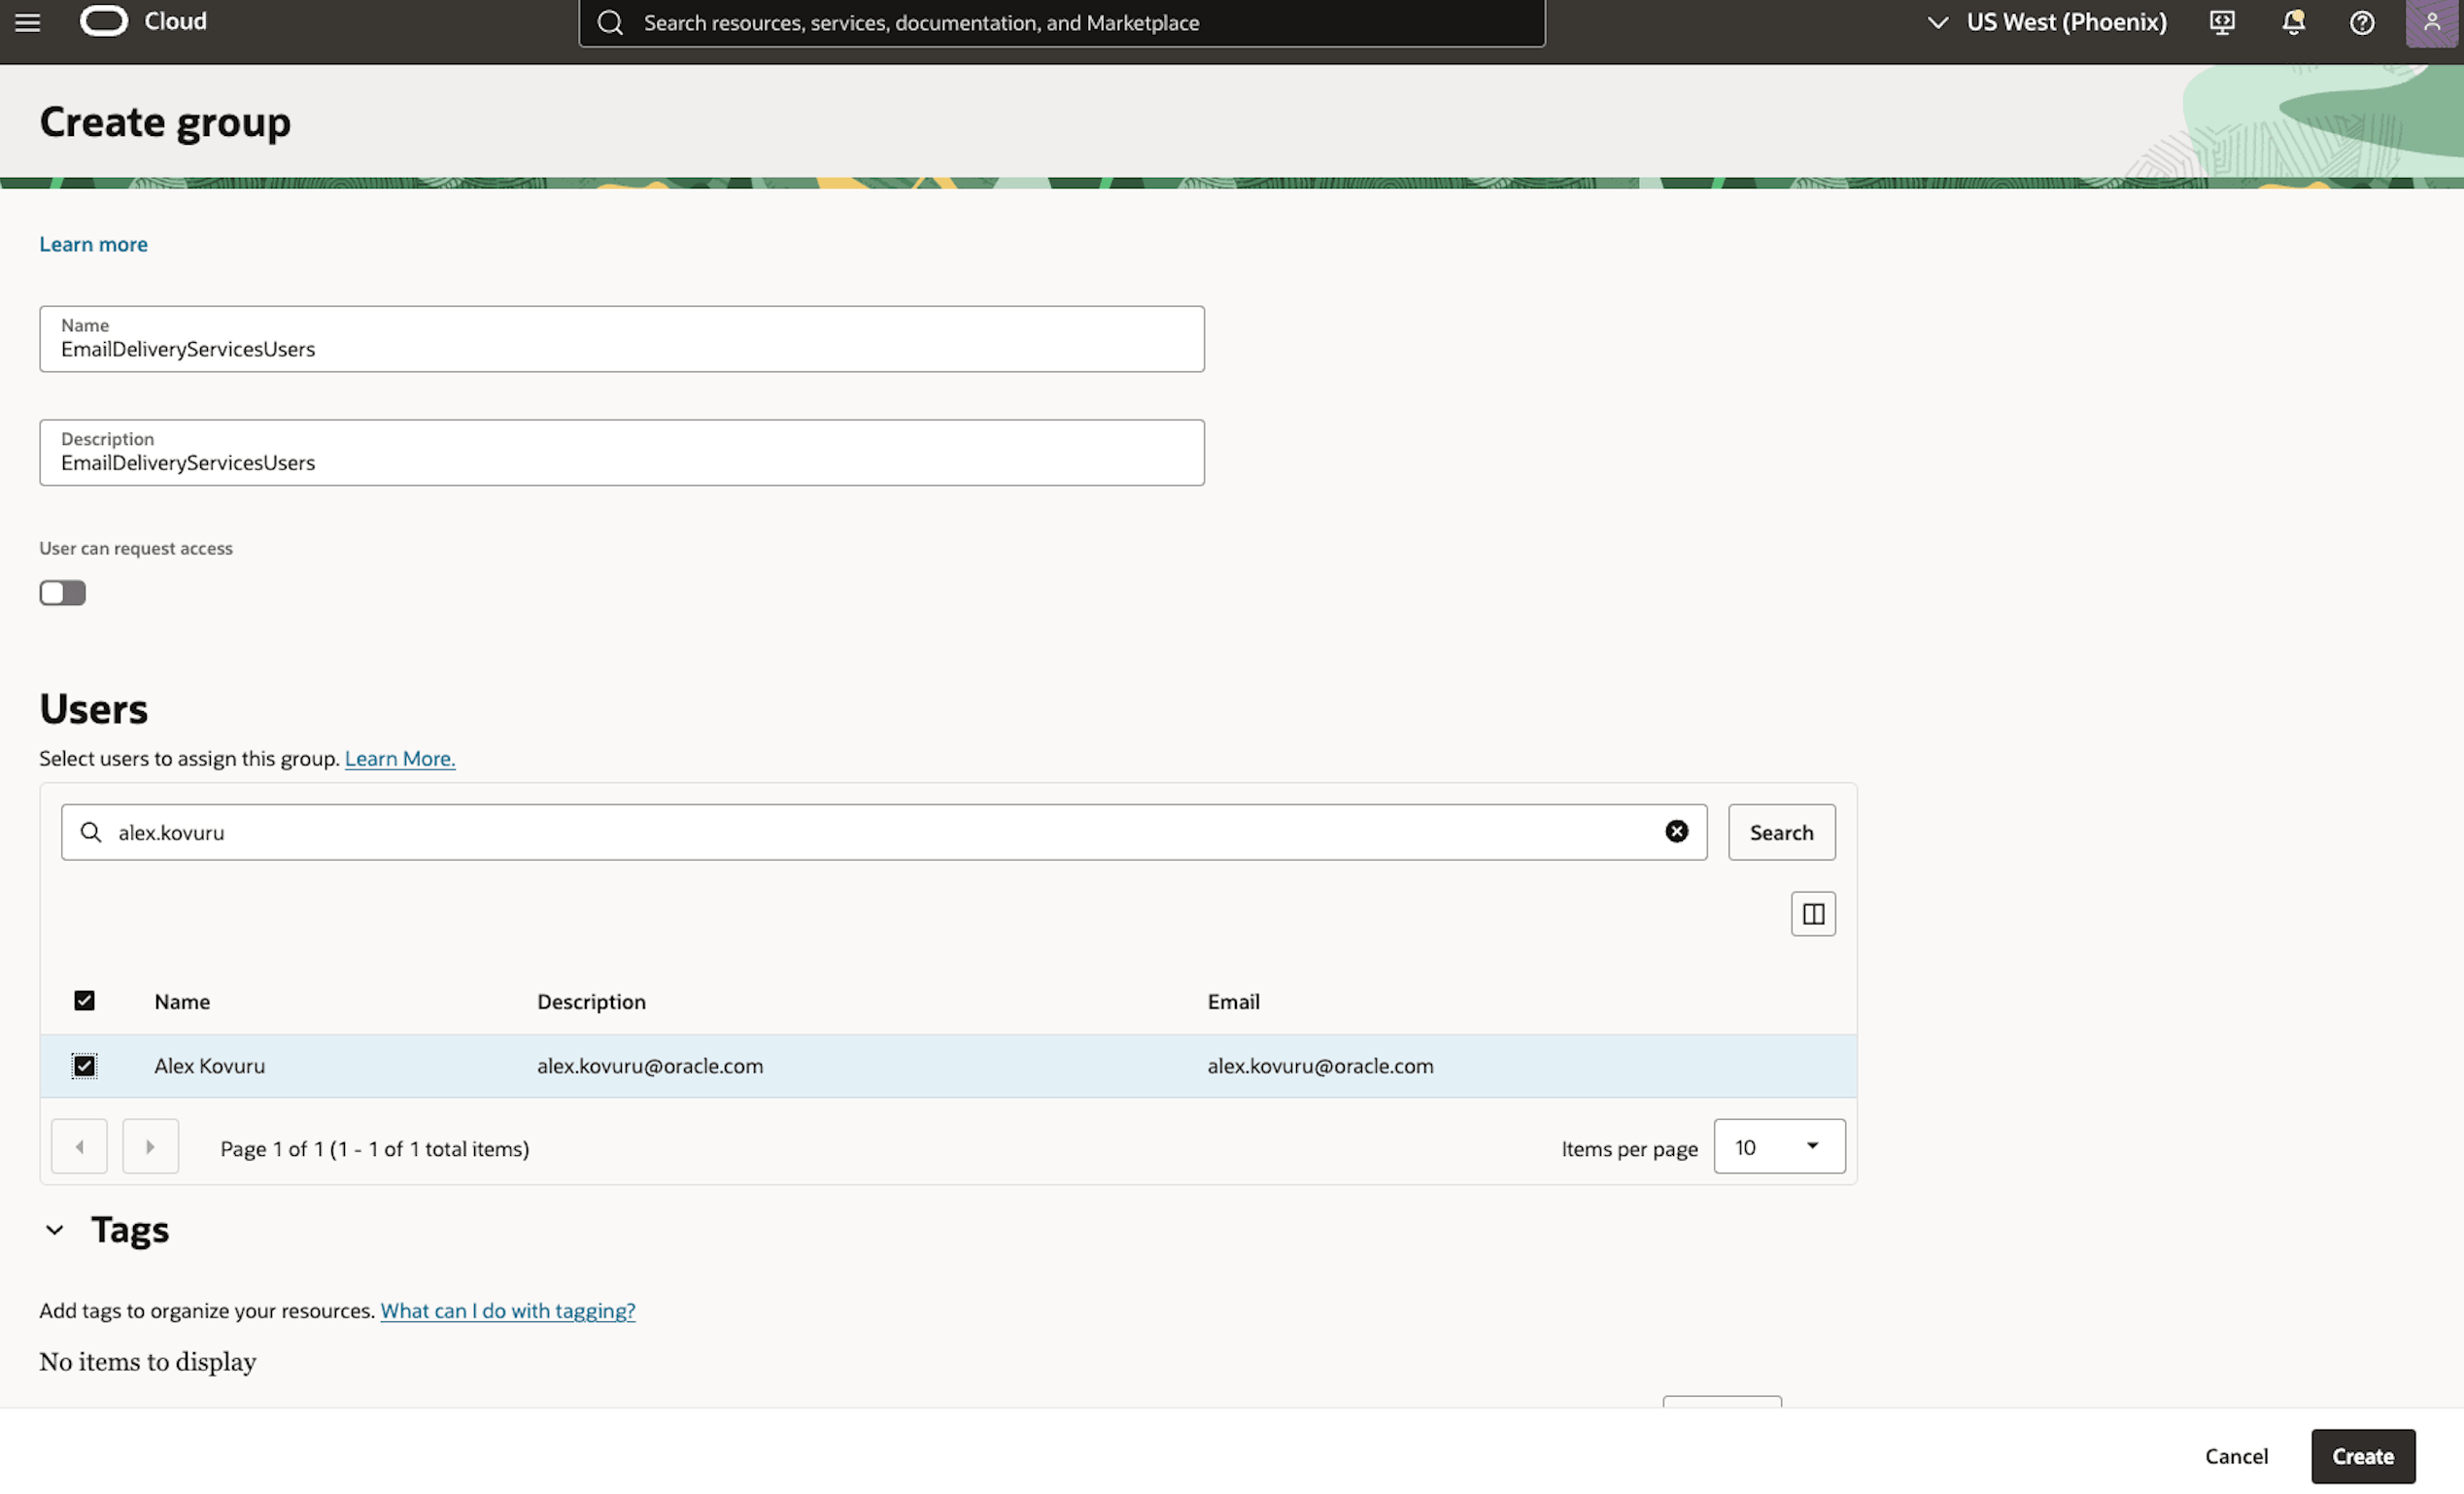
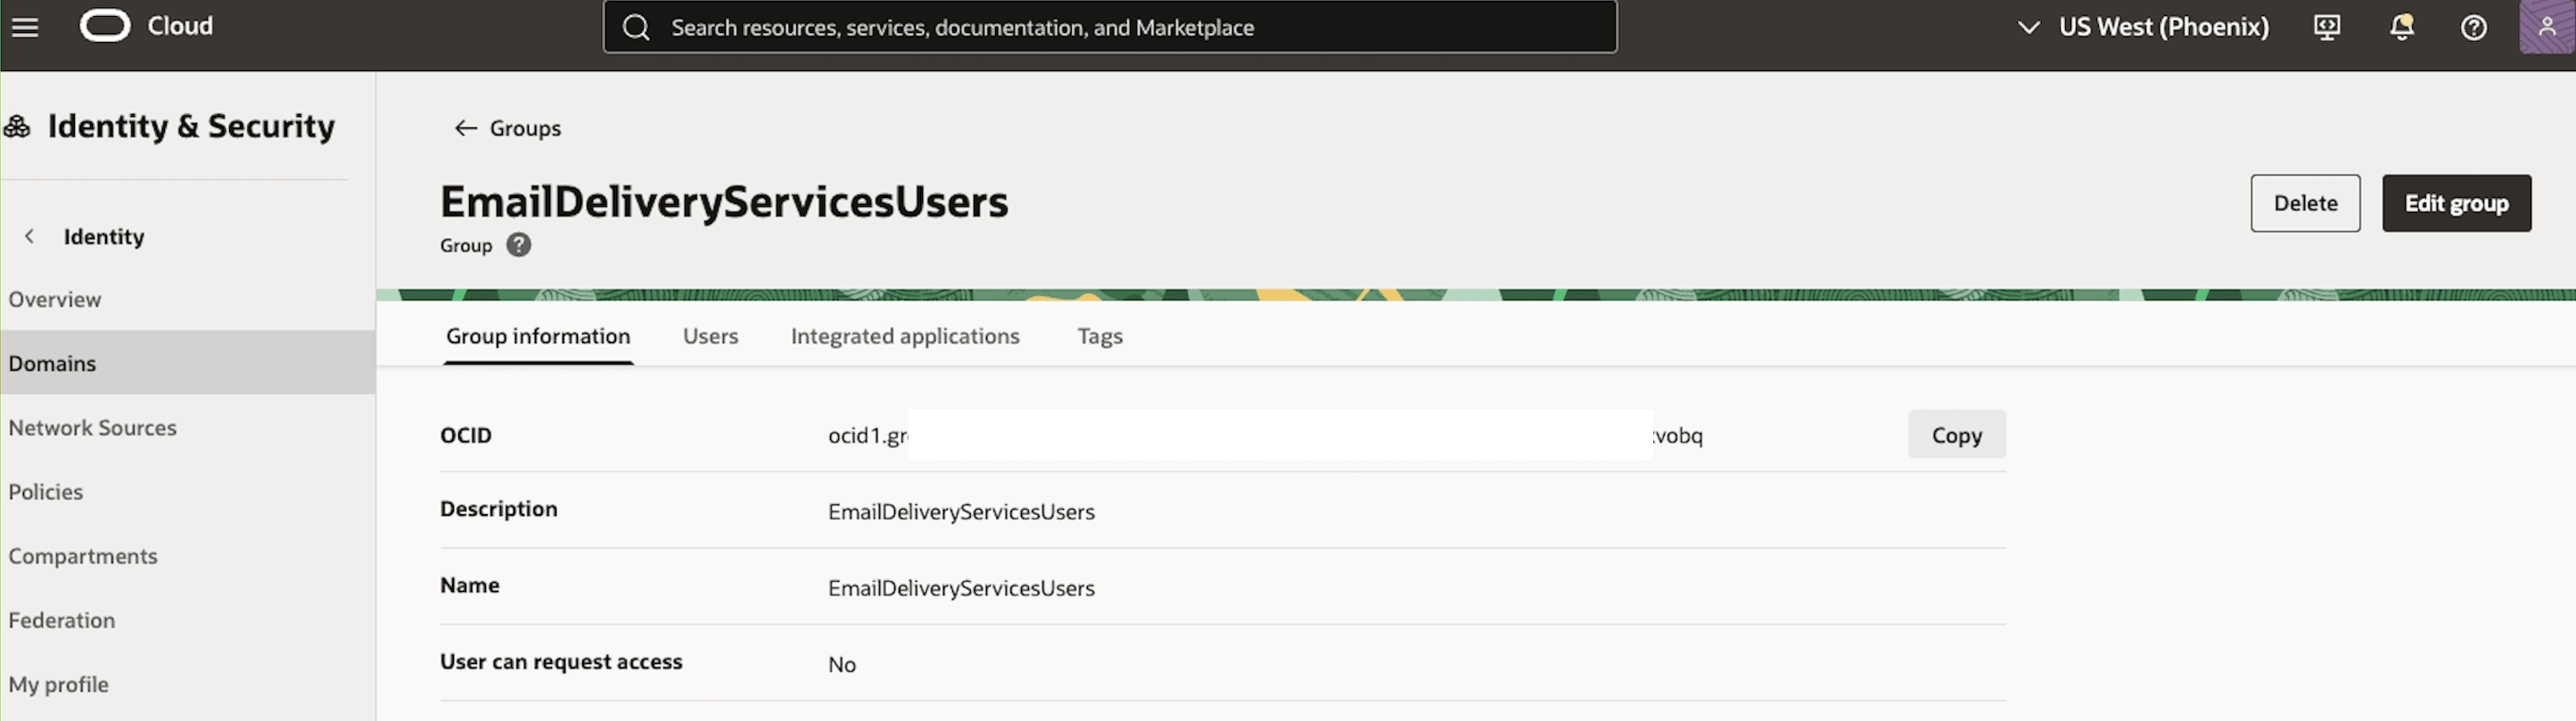
Provide a name for the new group (for example EmailDeliveryServicesUsers). Add the appropriate user(s) who will be responsible for managing the email delivery service to this group.
-
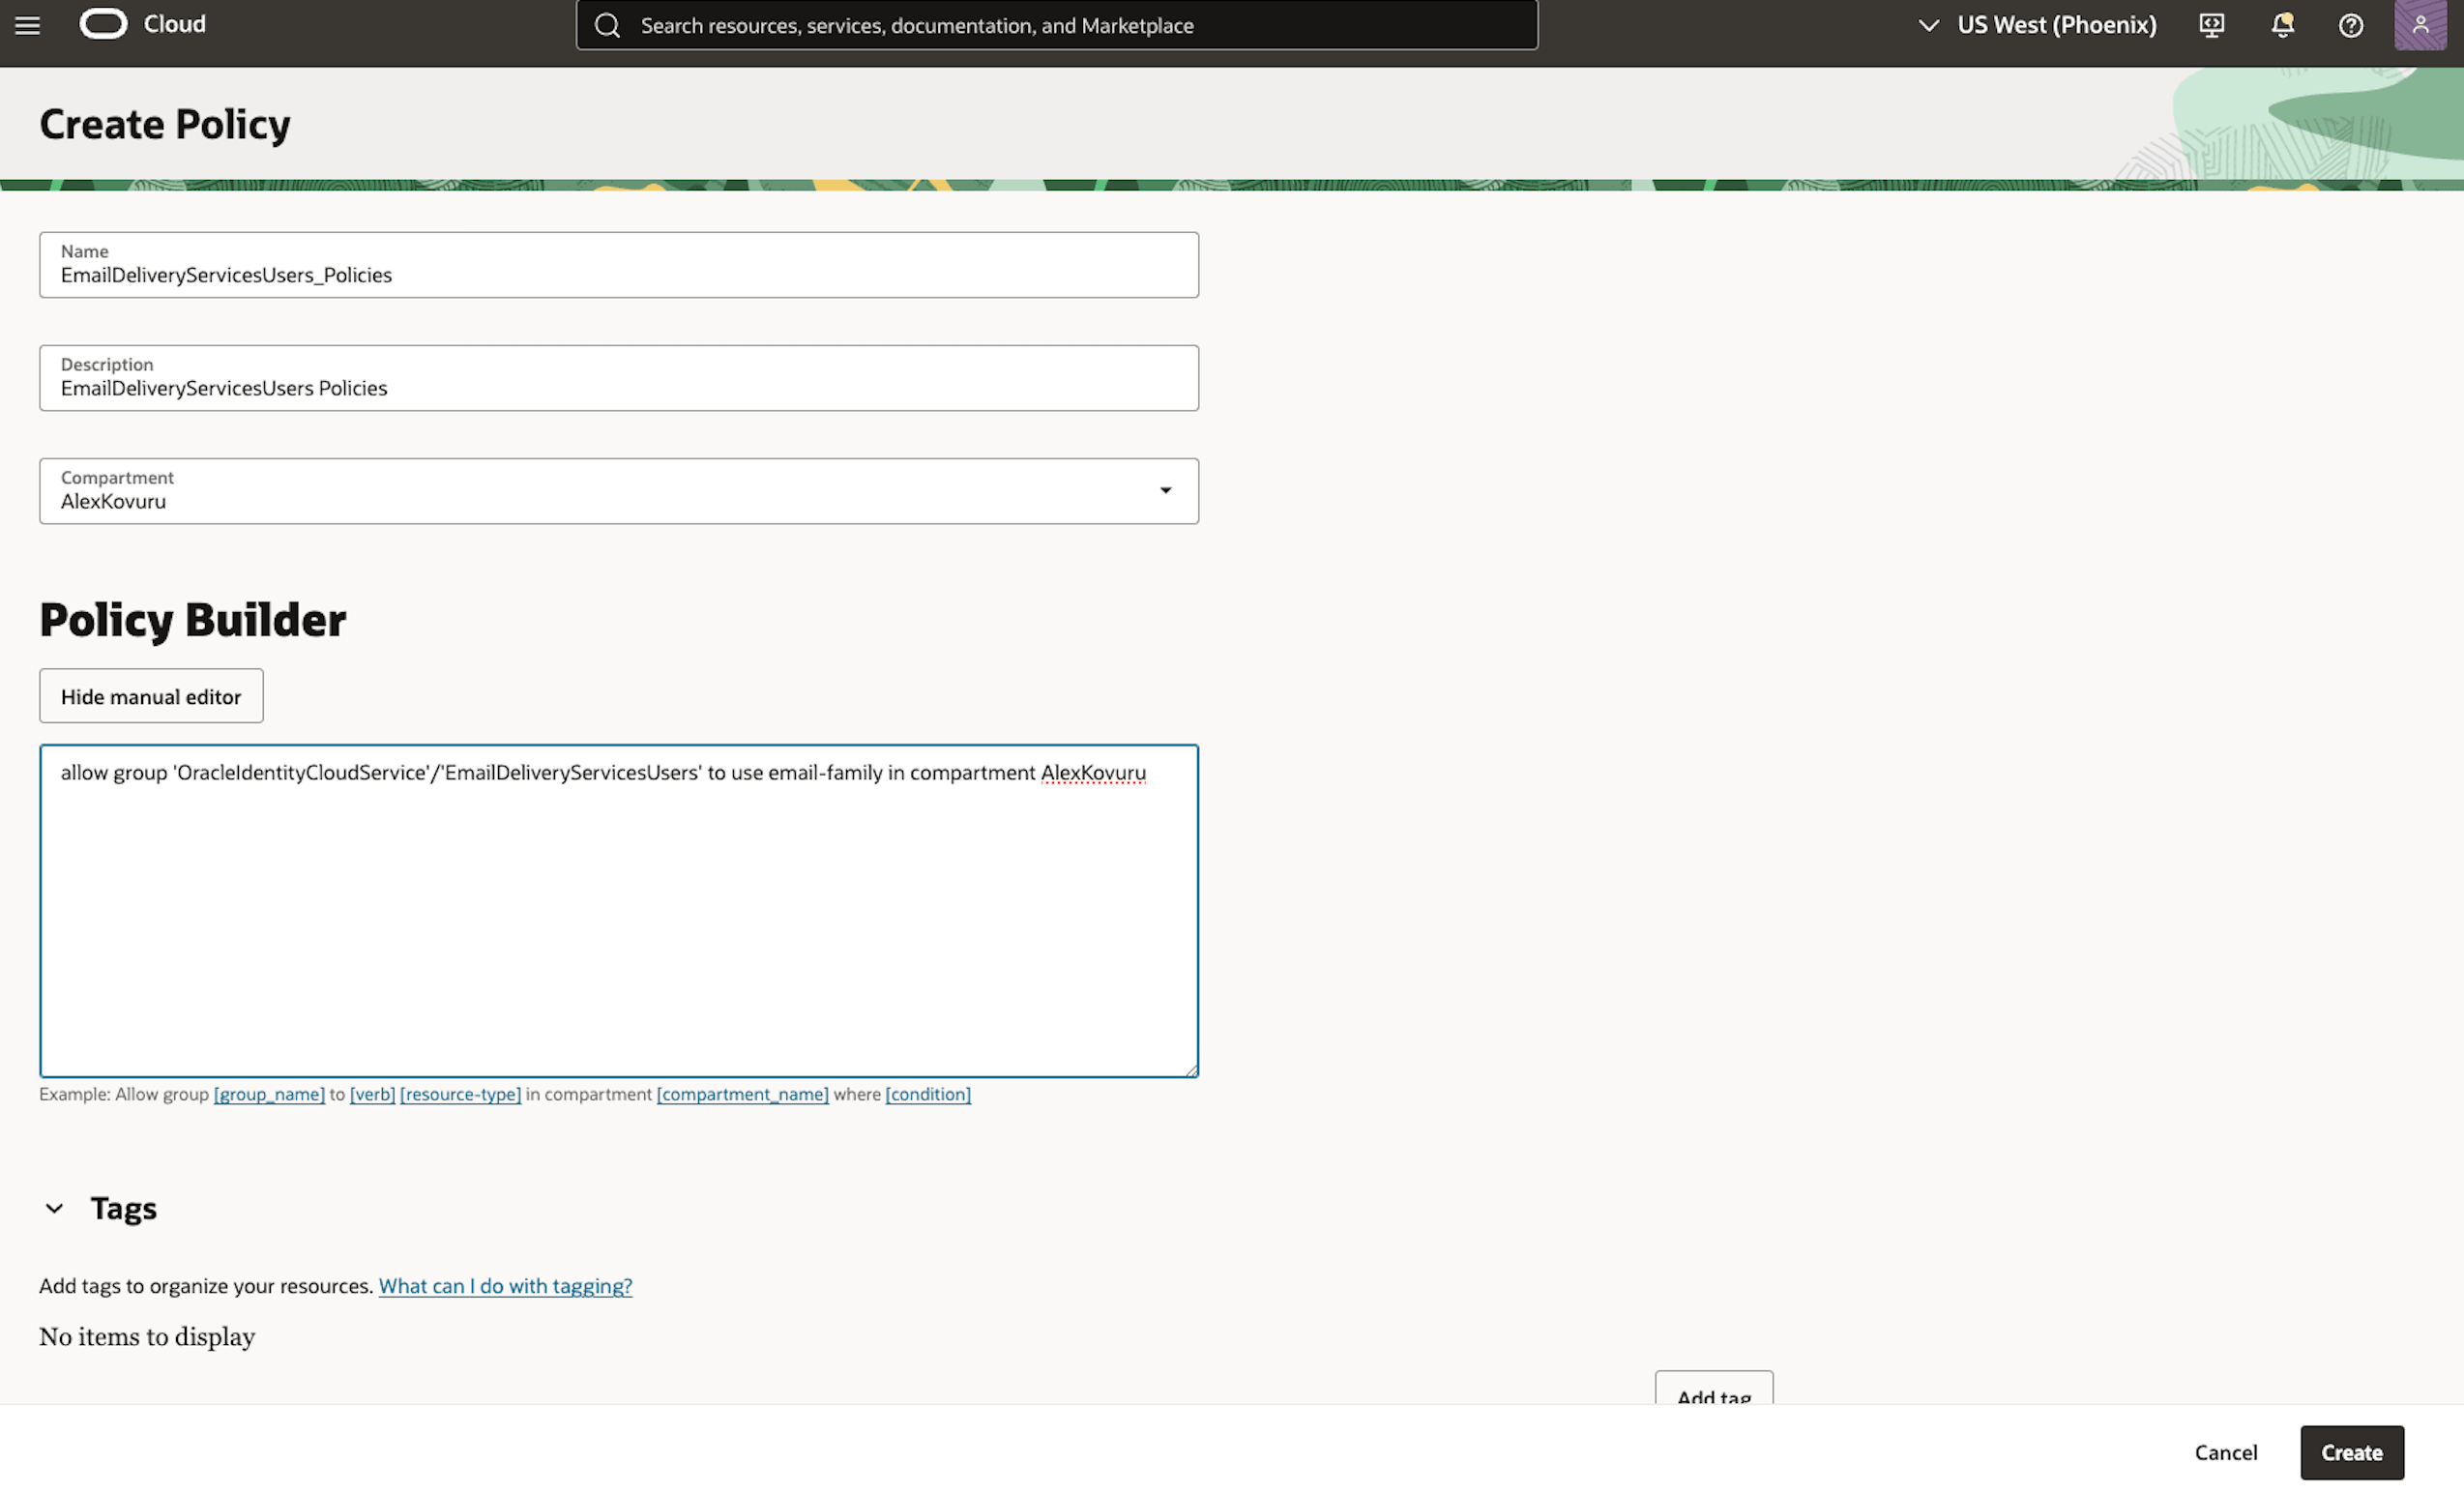
Create an IAM Policy for Email Delivery. To allow the IAM group to send email notifications, you must create a policy that grants it the necessary permissions. Log in to the OCI Console and navigate to Identity & Security, Policies, and then click Create Policy.

-
Provide a Name and Description for the policy (for example MFA_Email_Delivery_Policy). In the Policy Builder section, enter the following policy statement and then click Create.
allow group ‘OracleIdentityCloudService’/’EmailDeliveryServicesUsers’ to use email-family in compartment AlexKovuru.
-
Finally, you need to create the SMTP credentials the database will use. Log in to the OCI Console, navigate to Identity & Security, My Profile and click the Saved passwords Tab. Then go to SMTP credentials and click Generate Credentials.
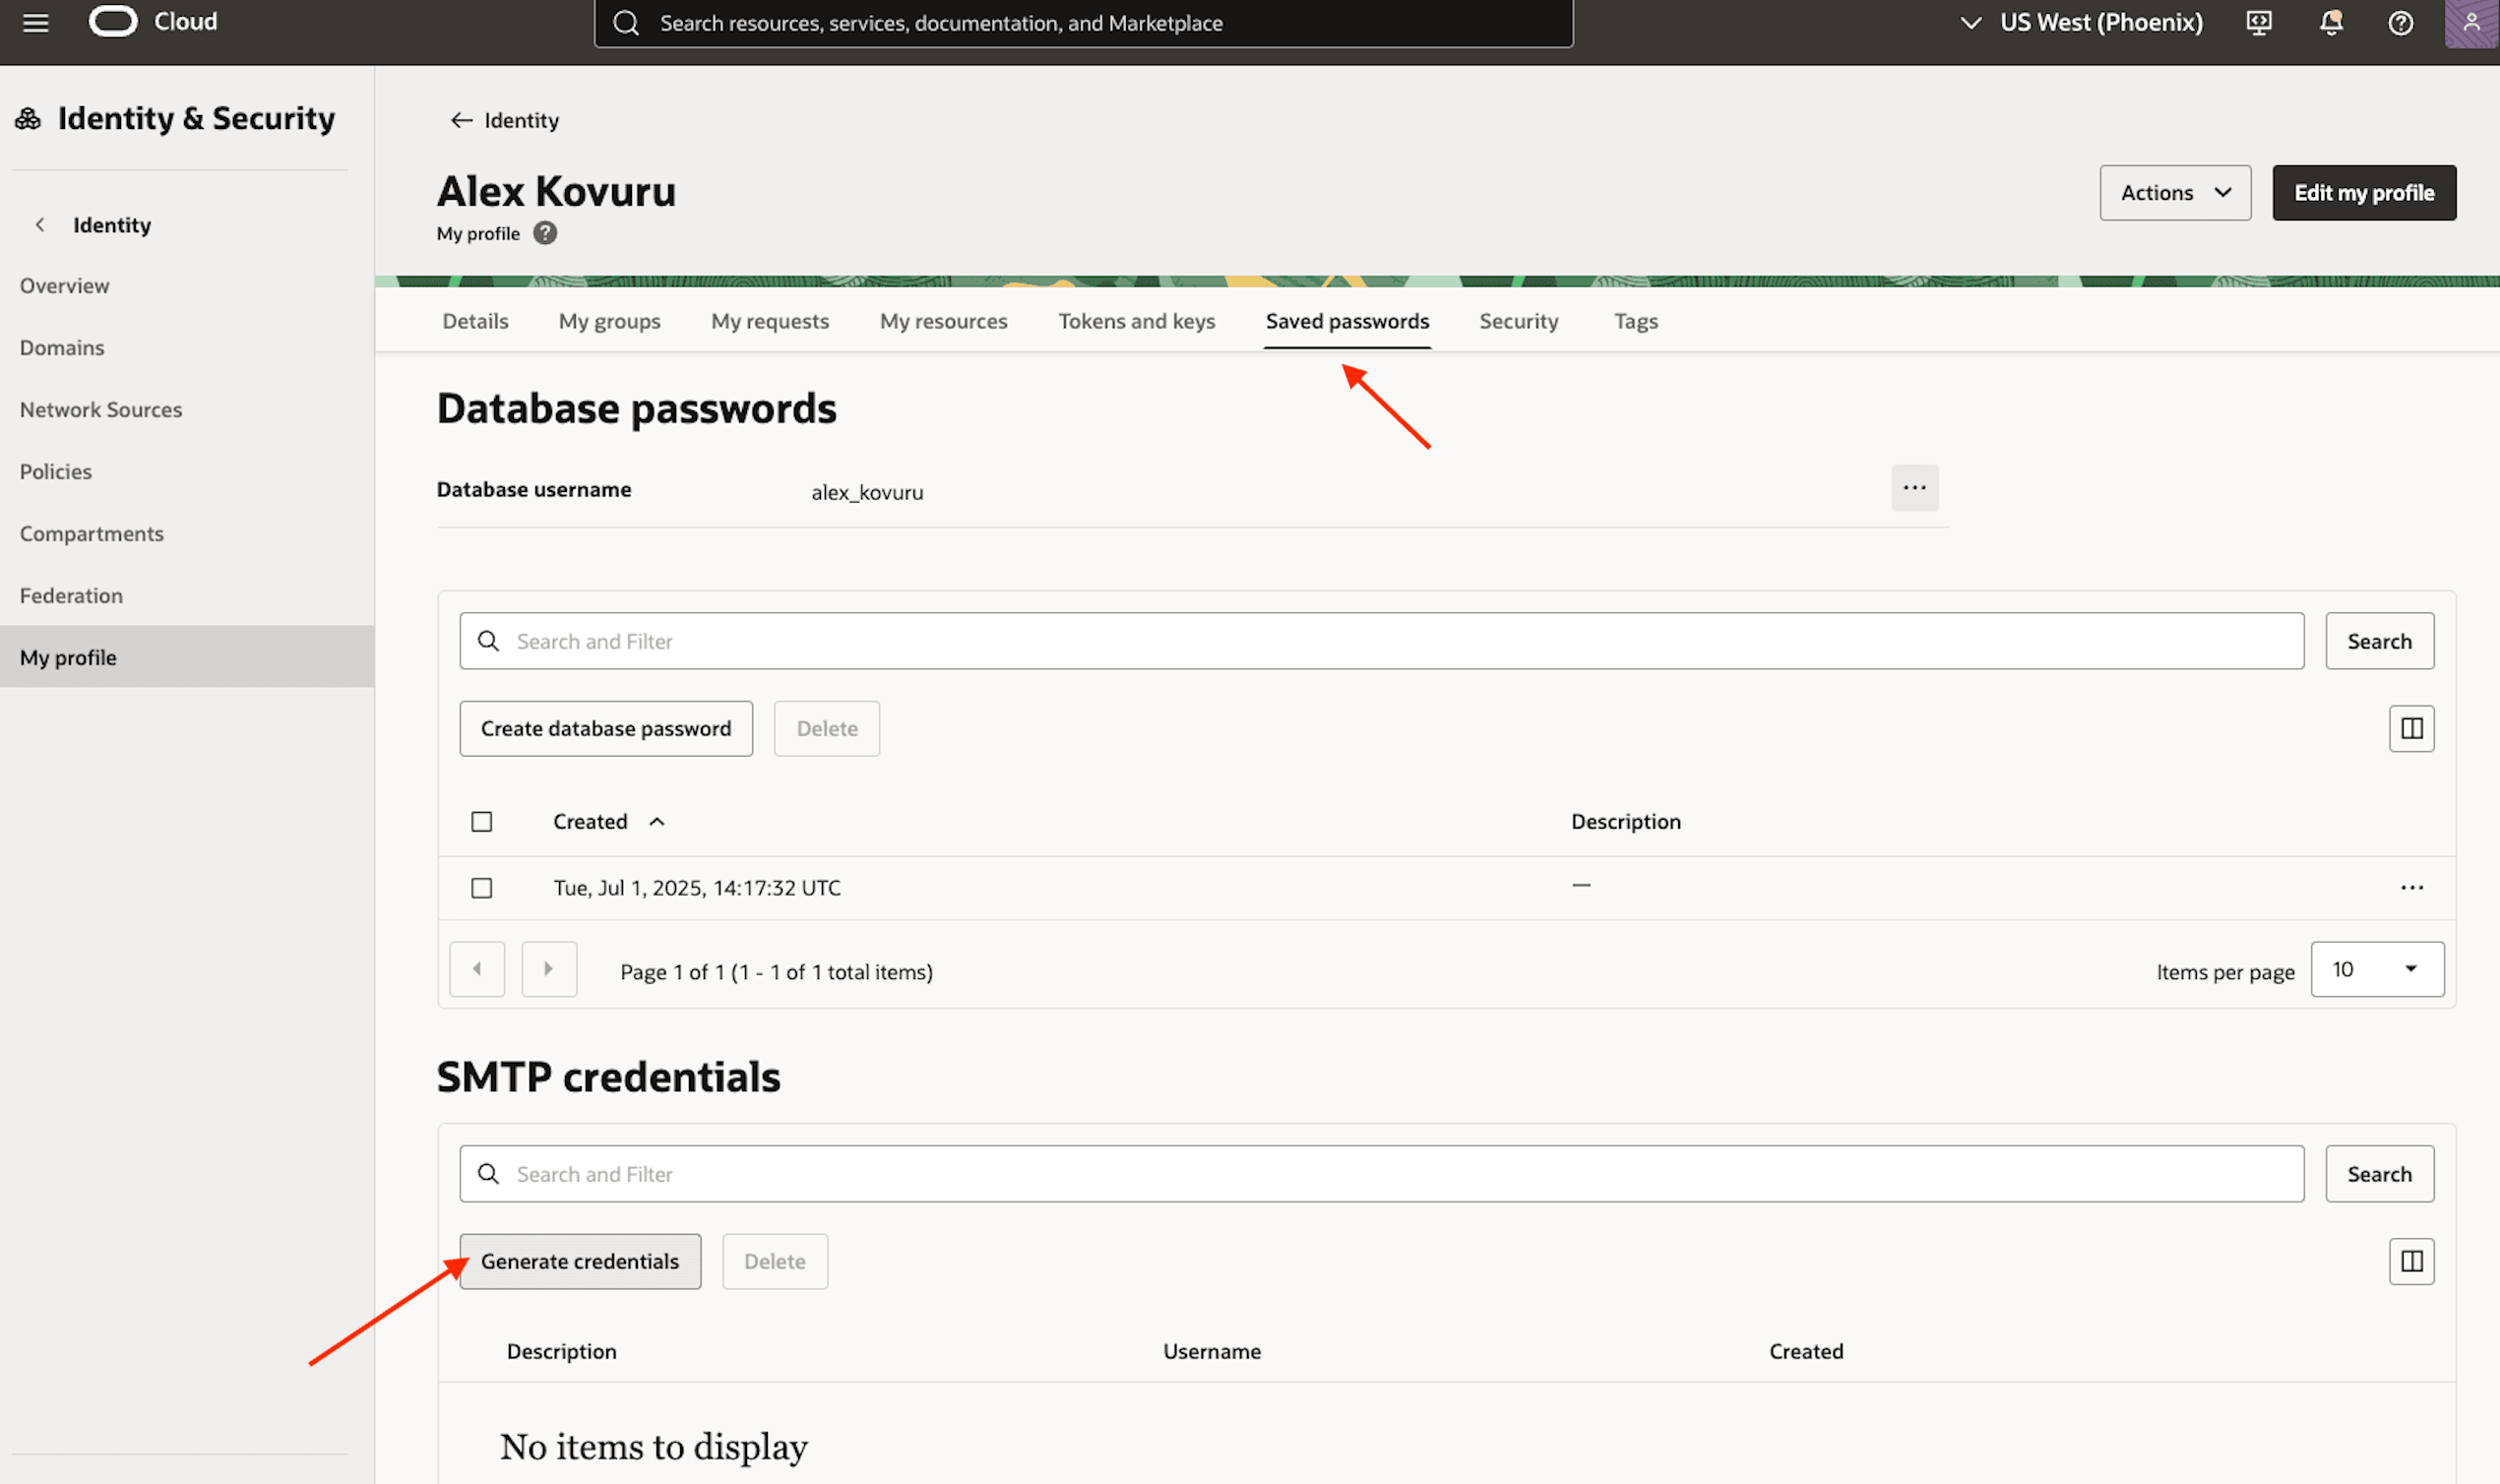
-
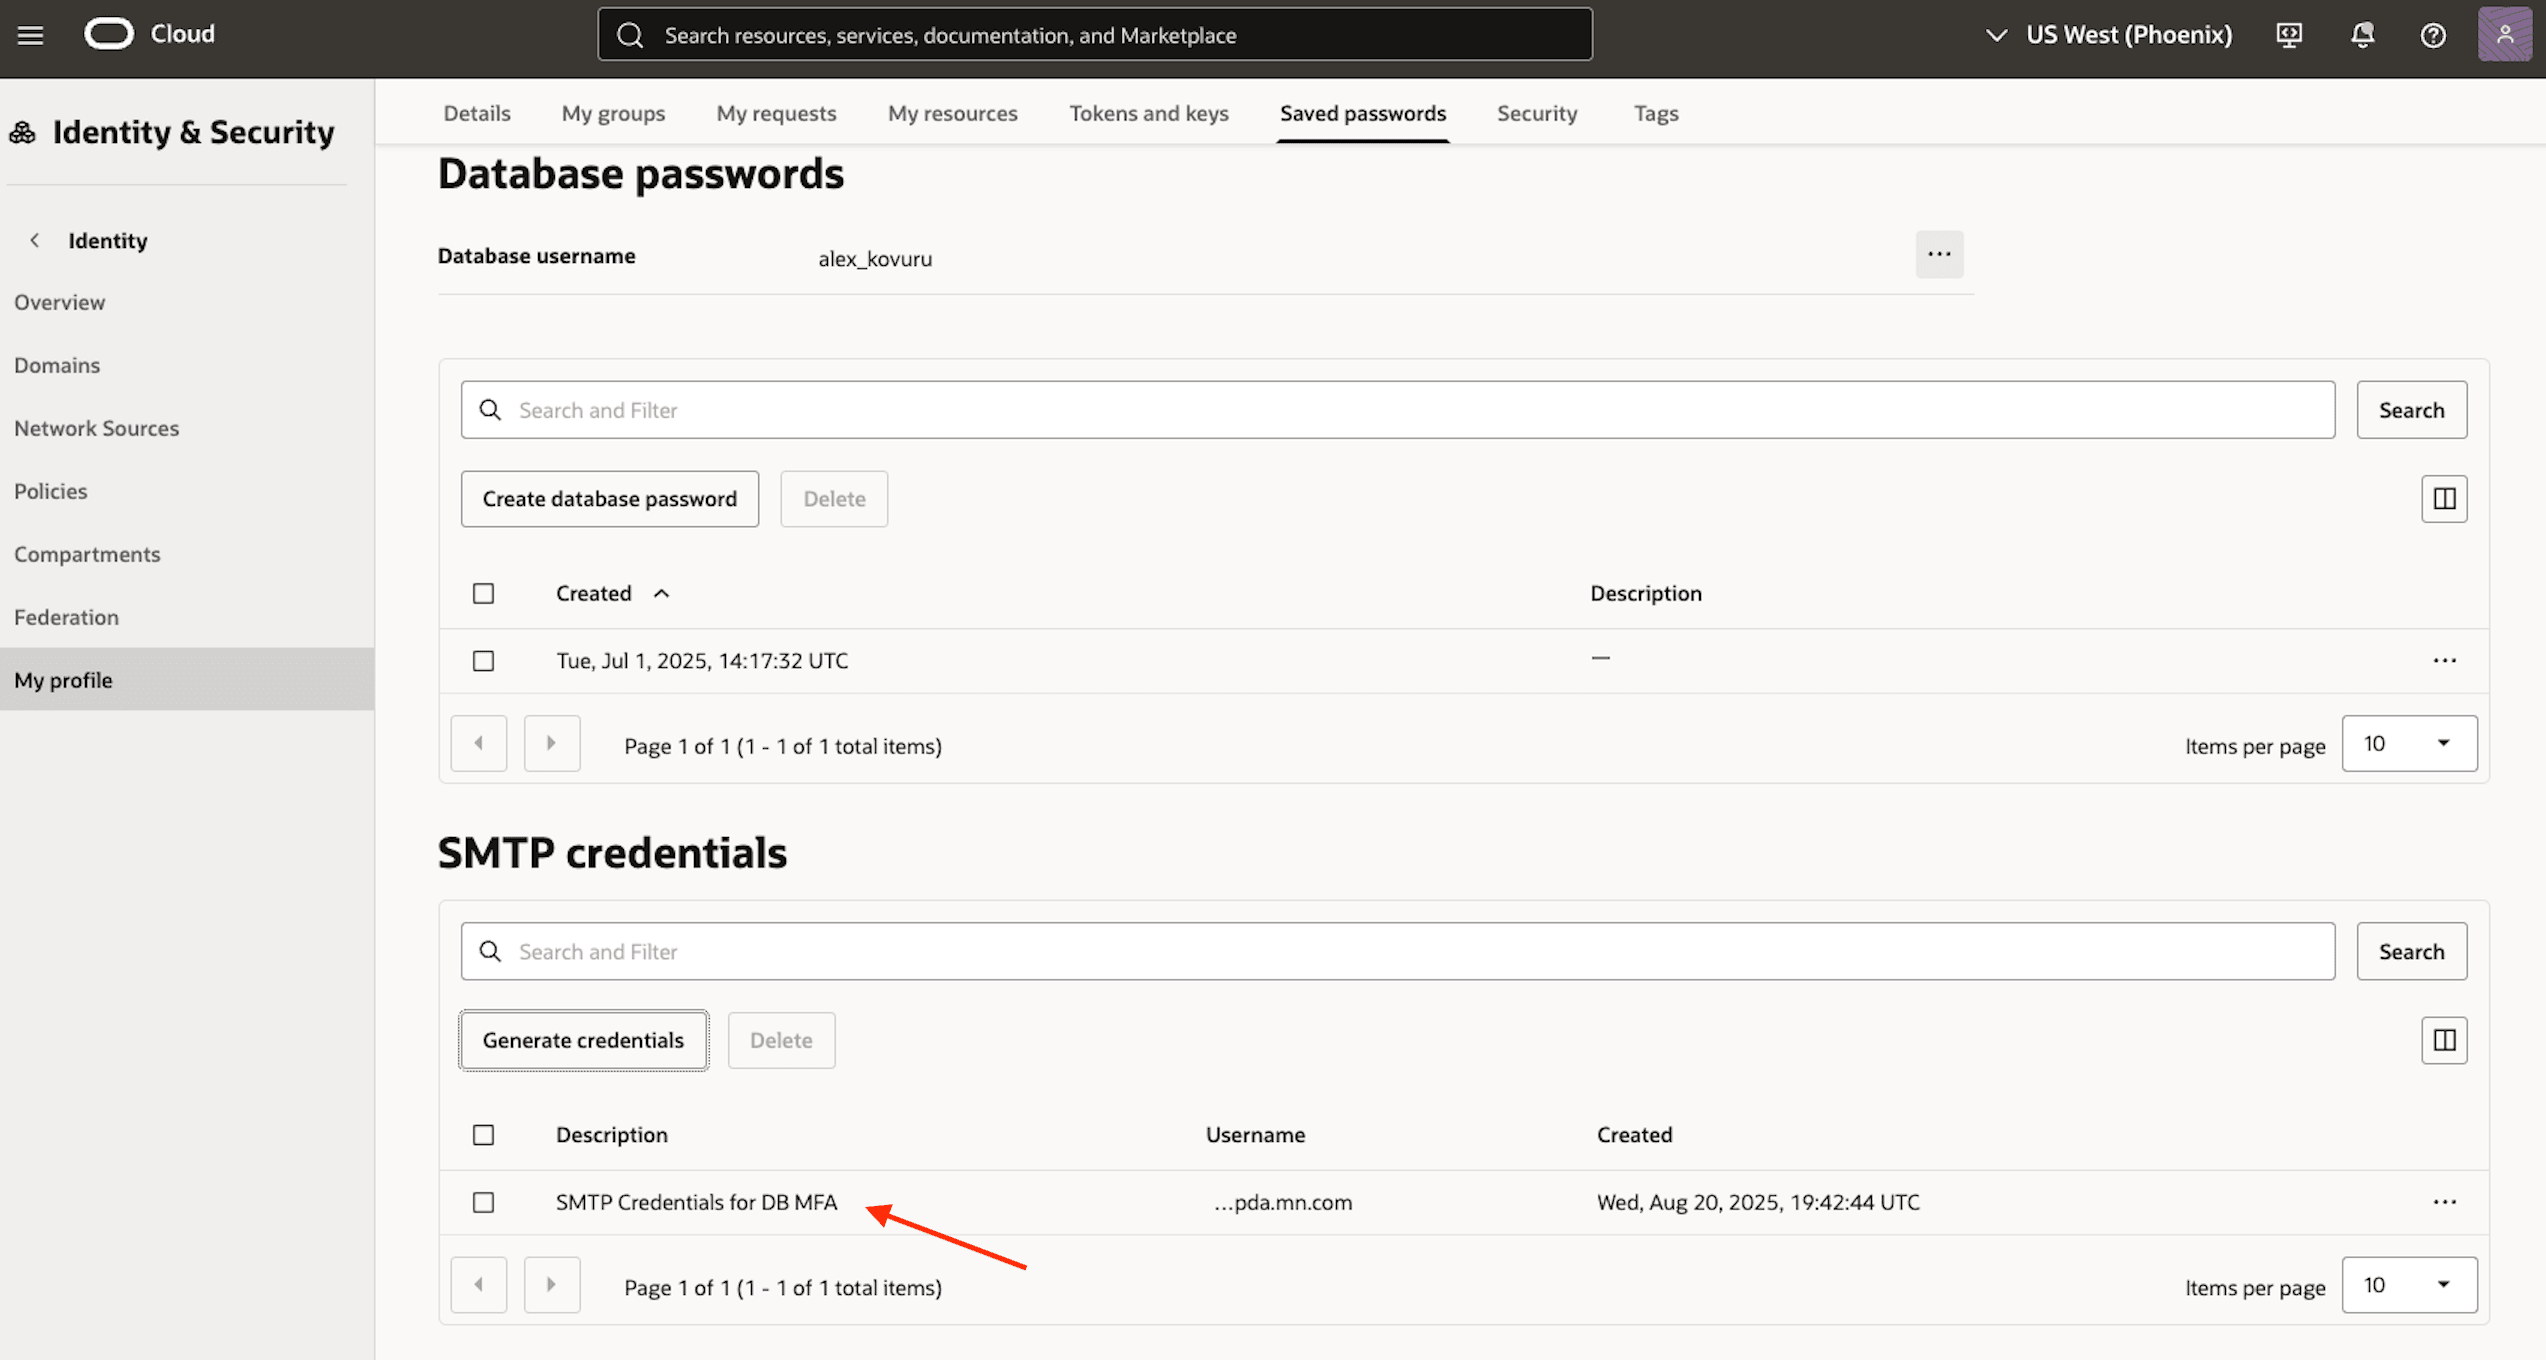
Generate the SMTP credentials and be sure to copy the SMTP username and password immediately.

Important: The password will only be displayed once, so you must save it before closing the window.

-
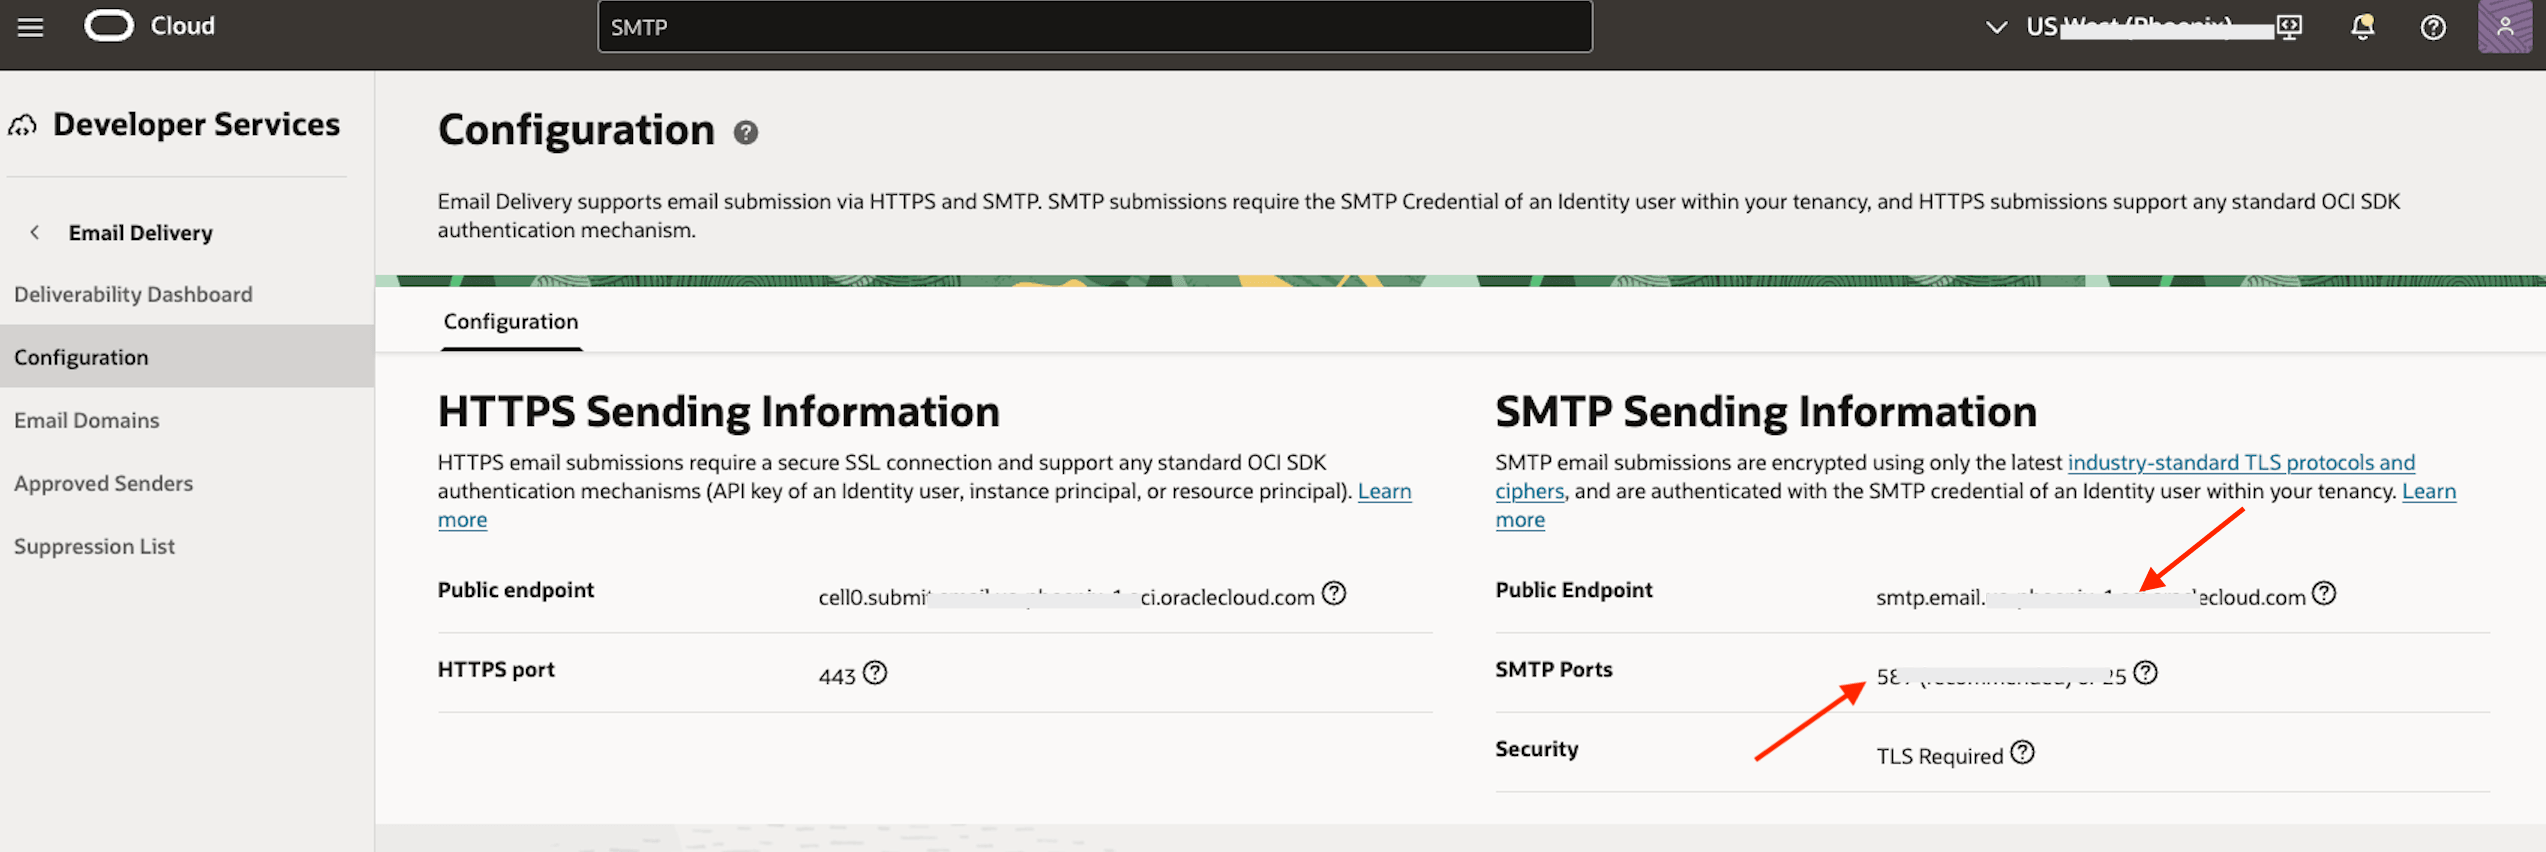
Log in to the OCI Console and navigate to Developer Services, Application Integration, Email Delivery, Configuration. Find the SMTP Sending Information assigned to your region. Note the Public Endpoint and SMTP Port values.
-
Please note that OCI Email Delivery only permits sending from approved senders and registered domains. (as outlined in Prerequisite 3).
Task 3: Configure the Database for MFA
This task configures multi-factor authentication (MFA) for an Oracle 23ai pluggable database (PDB) using Oracle Mobile Authenticator (OMA) and SMTP integration.
-
Connect to your PDB with SYSDBA privileges:
sqlplus "/as sysdba" -
Configure your Pluggable Database (PDB) for MFA, you’ll need to set the following parameters. The MFA_SENDER_EMAIL_ID parameter must be set to an approved sender you’ve already configured in OCI Email Delivery.
ALTER SYSTEM SET MFA_OMA_IAM_DOMAIN_URL ='https://idcs-bc1a4xxxxxxxxxxxxxxxx3744.identity.oraclecloud.com'; (from Task 1- step 2) ALTER SYSTEM SET MFA_SMTP_HOST ='smtp.email.us-pxxxxix-1.oci.oraclecloud.com'; (from Task 2- step 7) ALTER SYSTEM SET MFA_SMTP_PORT = 5x7; (from Task 2- step 7) ALTER SYSTEM SET MFA_SENDER_EMAIL_ID ="alx.test@alxreviews.com"; (from Prerequisites - step 3) ALTER SYSTEM SET MFA_SENDER_EMAIL_DISPLAYNAME = 'DB Admin'; -
Update sqlnet.ora: Edit the file and add the following parameter:
SQLNET.INBOUND_CONNECT_TIMEOUT=120 -
Configure Oracle Wallet: Oracle Wallet is used to store OAuth and SMTP credentials securely. Check PDB GUID and Wallet Root
show parameter wallet_root; SELECT guid FROM v$containers WHERE name = 'DB23MFAPDB'; -
Create MFA Wallet Directory:
mkdir -p /opt/oracle/dcs/commonstore/wallets/DBS23MFA_k3x_phx/3B36E010Dxxxxxxxxxxxx40A7AC6/mfa cd /opt/oracle/dcs/commonstore/wallets/DBS23MFA_k3x_phx/3B36E010Dxxxxxxxxxxxx40A7AC6/mfa -
Create Oracle Wallet
orapki wallet create -wallet ./ -pwd <user_password> -auto_login -compat_v12 -
Store your MFA credentials securely in an Oracle Wallet. The database relies on this wallet to access the OAuth client and SMTP credentials. It is important that the alias names for each credential exactly match the predefined values listed below.
Required aliases and their corresponding credentials:
- oracle.security.mfa.oma.clientid → OAuth Client ID (from Task 1 – Step 12)
- oracle.security.mfa.oma.clientsecret → OAuth Client Secret (from Task 1 – Step 12)
- oracle.security.mfa.smtp.user → SMTP username generated in your OCI user profile (from Task 2 – Step 6)
- oracle.security.mfa.smtp.password → SMTP password generated for your user (from Task 2 – Step 6)
You can use the orapki utility to create the wallet and add these credentials.
orapki secretstore create_entry -wallet ./ -pwd <user_password> -alias oracle.security.mfa.oma.clientid -secret a9cdb456cdxxxxxxxxxxxx31c316 orapki secretstore create_entry -wallet ./ -pwd <user_password> -alias oracle.security.mfa.oma.clientsecret -secret idcscs-a263de20-xxxxxxxxxxxx-207f5e56e1ad orapki secretstore create_entry -wallet ./ -pwd <user_password> -alias oracle.security.mfa.smtp.user -secret ocid1.user.oc1..aaaa...@ocid1.tenancy.oc1..aaaa.... orapki secretstore create_entry -wallet ./ -pwd <user_password> -alias oracle.security.mfa.smtp.password -secret '[4lnl0rxxxxxxxxxxxxUgobB' -
Create MFA-Enabled User: Create a user with MFA factor authentication:
 CREATE USER testmfa IDENTIFIED BY <user_password>
 AND FACTOR ‘OMA_PUSH’ AS ‘registered_emailid’;
Note: The email must be a valid account where the OMA app is registered. Otherwise, the push notification cannot be delivered.
-
Grant required roles:
GRANT CONNECT, RESOURCE TO testmfa; -
The user will receive an email with instructions to complete their OMA registration. This email will contain a QR code that they must scan using the Oracle Mobile Authenticator app to set up MFA.

Task 4: Test MFA Authentication
-
Connect as the new user:
sqlplus testmfa/<user_password> -
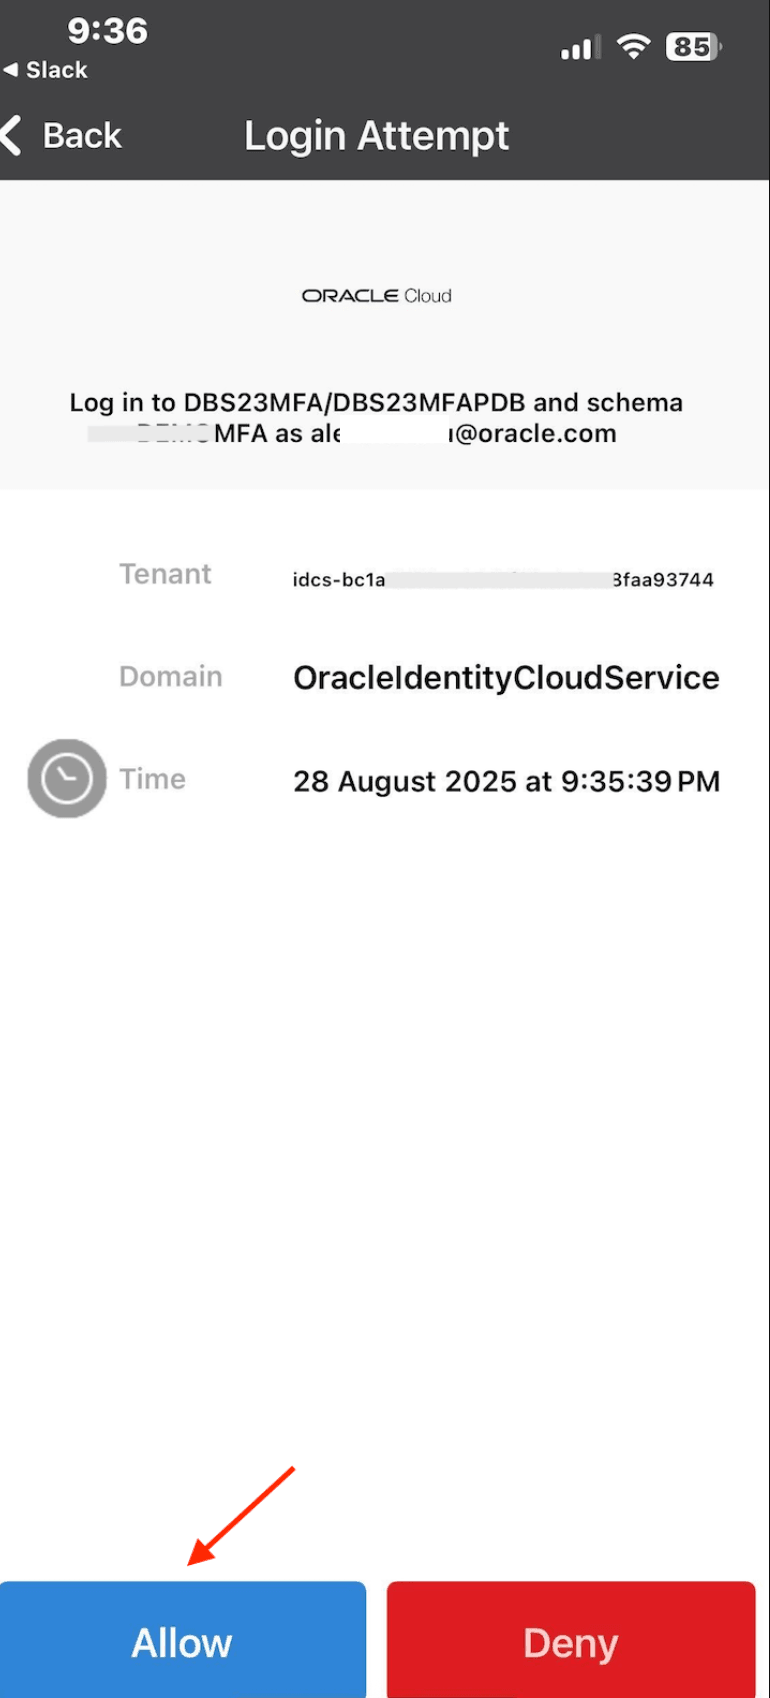
Approve the login request in the OMA app.
-
Verify the connected user:
 SHOW USER;
 SELECT * FROM SESSION_ROLES;
Related Links
- Oracle Database 23ai Docs – Configuring MFA
- Oracle Blog – MFA July 2025
- OCI Docs – Email Delivery
- CI Docs – Confidential Application & OAuth
Acknowledgments
Authors - Alex Kovuru (Principal Cloud Architect)
Contributors - Indiradarshni Balasundaram (Senior Cloud Engineer)
More Learning Resources
Explore other labs on docs.oracle.com/learn or access more free learning content on the Oracle Learning YouTube channel. Additionally, visit education.oracle.com/learning-explorer to become an Oracle Learning Explorer.
For product documentation, visit Oracle Help Center.
Enable MFA for Local Users in Oracle Database 23ai Using Oracle Mobile Authenticator (OMA)
G42527-01