Note:
- This tutorial is available in an Oracle-provided free lab environment.
- It uses example values for Oracle Cloud Infrastructure credentials, tenancy, and compartments. When completing your lab, substitute these values with ones specific to your cloud environment.
Use Oracle Cloud Cluster File System Tools on Oracle Cloud Infrastructure
Introduction
OCFS2 is a general-purpose clustered file system used in clustered environments to increase storage performance and availability. In Oracle Cloud Infrastructure, you can deploy OCFS2 clustered file systems through Read/Write - shareable block storage attached to an instance.
Note: For optimal OCFS2 file system performance, reduce the number of files with the OCFS2 filesystem. Applications such as Oracle e-Business Suite (EBS) or Oracle WebCenter Content (WCC) should leverage a separate NFS file system for directories containing large amounts of temporary files. During runtime, system administrators should actively archive, purge, remove, delete, and move any non-current files to one or more separate subdirectories or filesystems while regularly monitoring the OCFS2 filesystem file/inode usage.
This tutorial provides instructions on using ocfs2-tools to deploy and test a two node Oracle Cluster File System version 2 (OCFS2) on Oracle Cloud Infrastructure.
Objectives
- Prepare for an OCFS2 configuration
- Configure security list
- Create and attach a block volume
- Install or upgrade the software required for OCFS2
- Configure the cluster layout
- Configure and start the O2CB cluster stack service
- Create an OCFS2 volume
- Mount an OCFS2 volume
Prerequisites
Two Oracle Linux systems with the following configuration:
- a non-root user with sudo permissions
- Oracle Linux 8 or later and the latest UEK kernel
- additional block volumes for use with OCFS2
Configure a Security List Ingress Rule for the Virtual Cloud Network
Security lists control the traffic in and out of the various subnets associated with the VCN. When configuring configuring an OCFS2 cluster, you need to add an ingress rule allowing the instances access through TCP and UDP port 7777.
The required port is configured to the stateful ingress rules of the default security list for the Virtual Cloud Network (VCN).
-
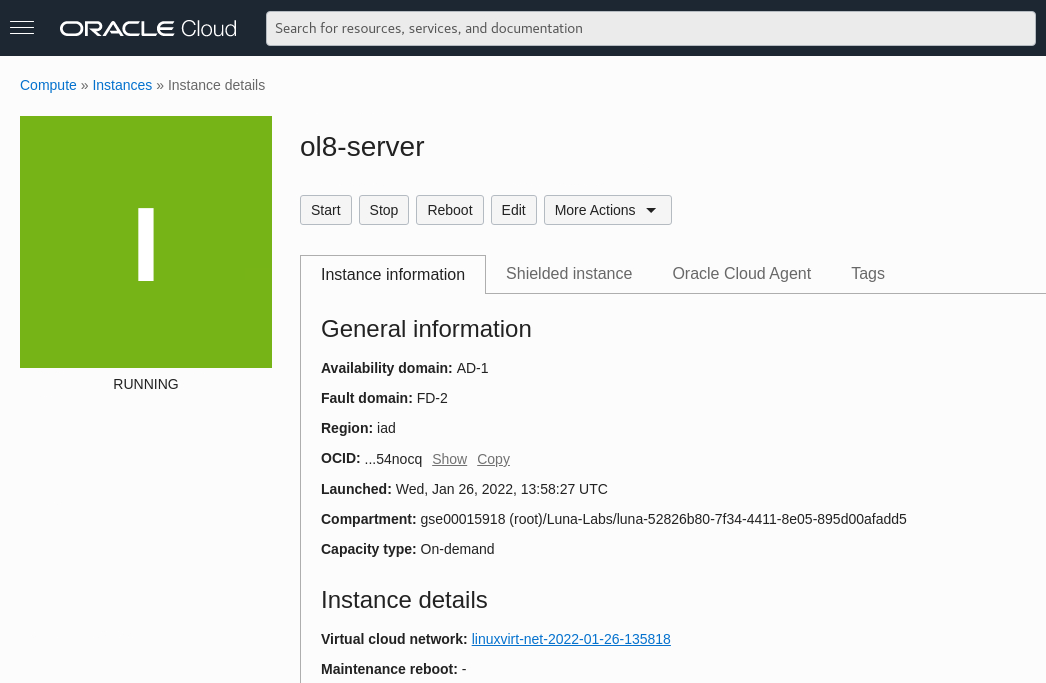
Connect to ol-server by following the instructions in Oracle Linux Lab Basics guide. The guide provides connection and usage instructions.
-
From the server’s Instance details section of the Instance Information tab, click on the link beside Virtual cloud network to view the VCN details page.
-
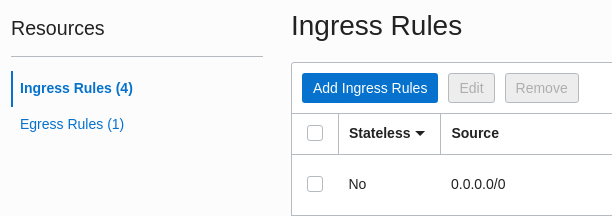
Under Resources, click on Security Lists.

-
Click on the name of the default security list in the table.
Note: Under Resources, be certain to click Ingress Rules to display the current list of ingress rules.
-
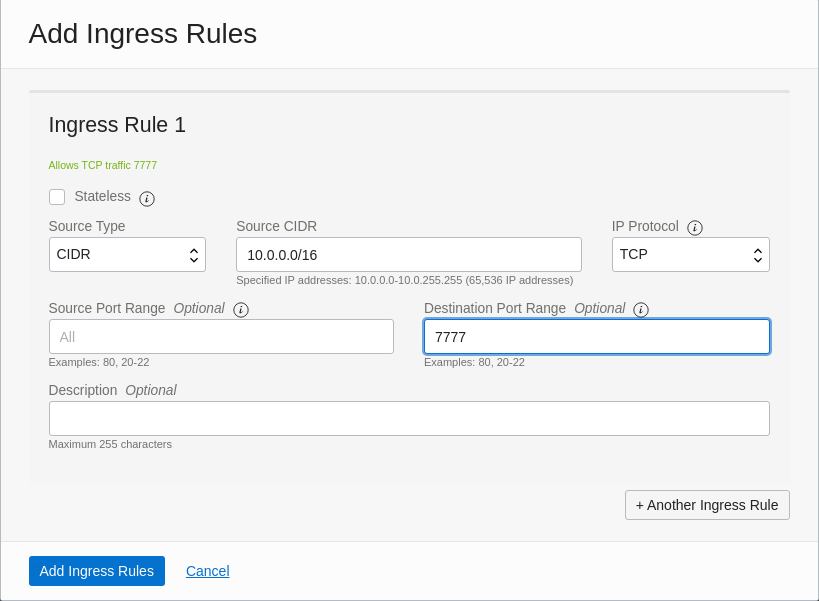
Click Add Ingress Rules button.
- Source CIDR = 10.0.0.0/16
- IP Protocol = TCP
- Destination Port Range = 7777
-
Click the + Another Ingress Rule button and add the following for UDP access:
- Leave Stateless box unchecked.
- Source Type = CIDR
- Source CIDR = 10.0.0.0/16
- IP Protocol = UDP
- Destination Port Range = 7777
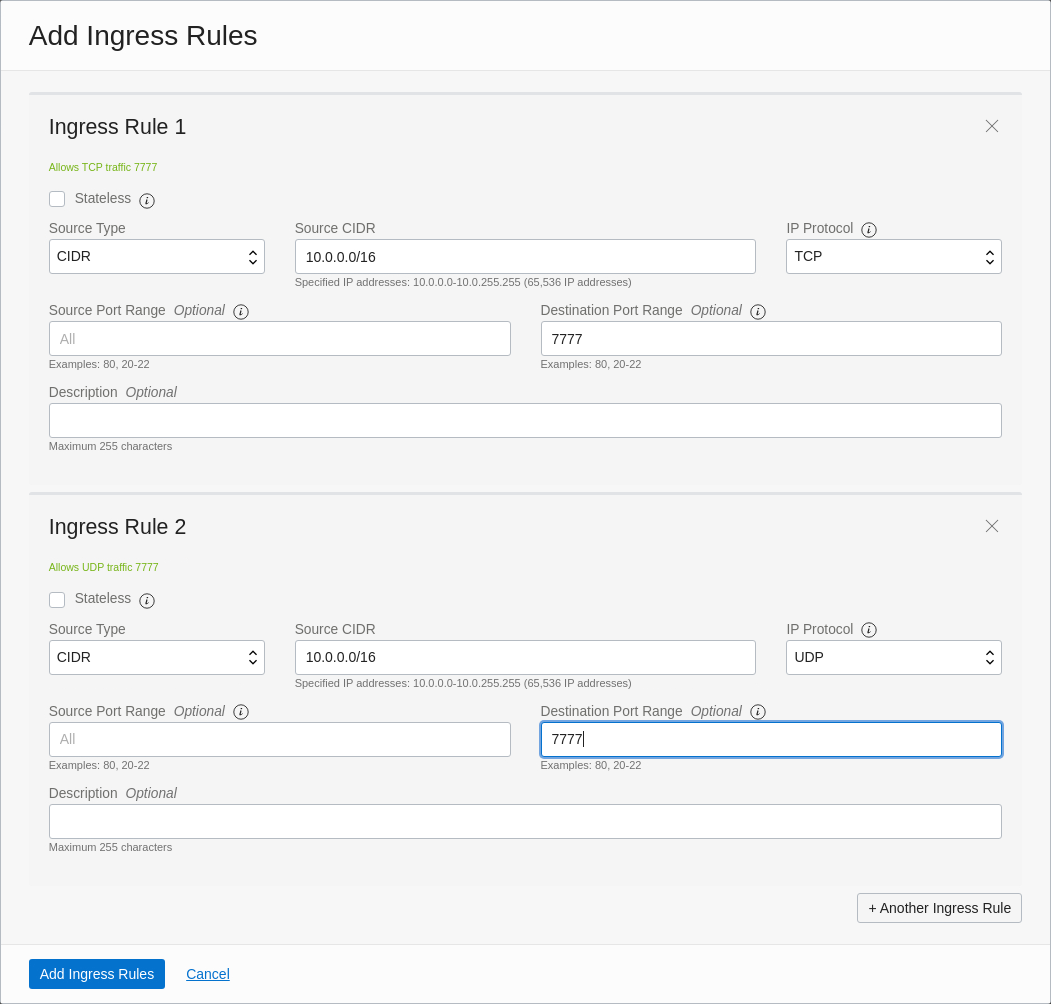
Note: Carefully review your selections, and click Add Ingress Rules.
-
Verify you see port 7777 listed in the Ingress Rules list.

Create and Attach a Block Volume
In this task, you create a block volume in the lab compartment and attach it to ol-server.
-
Create a block volume.
-
In the web console, select Storage > Block Storage.

The Block Volumes page displays.
-
Click the Create Block Volume button.

The Create block volume dialog displays.
-
In the dialog, provide the following information:

- Name: ocfs2-bv01
- Volume Size and Performance:
- Custom
- 50 for the size
Click the Create Block Volume button. The volume becomes available (green icon) shortly.
-
-
Attach the block volume to ol-server.
-
Under the Resources section of the Block Volumes page, select Attached Instances

The web console displays the available block volumes in the compartment.
-
Click the Attach to Instance button.
The Attach to instance dialog displays.
-
Select the following in the dialog:
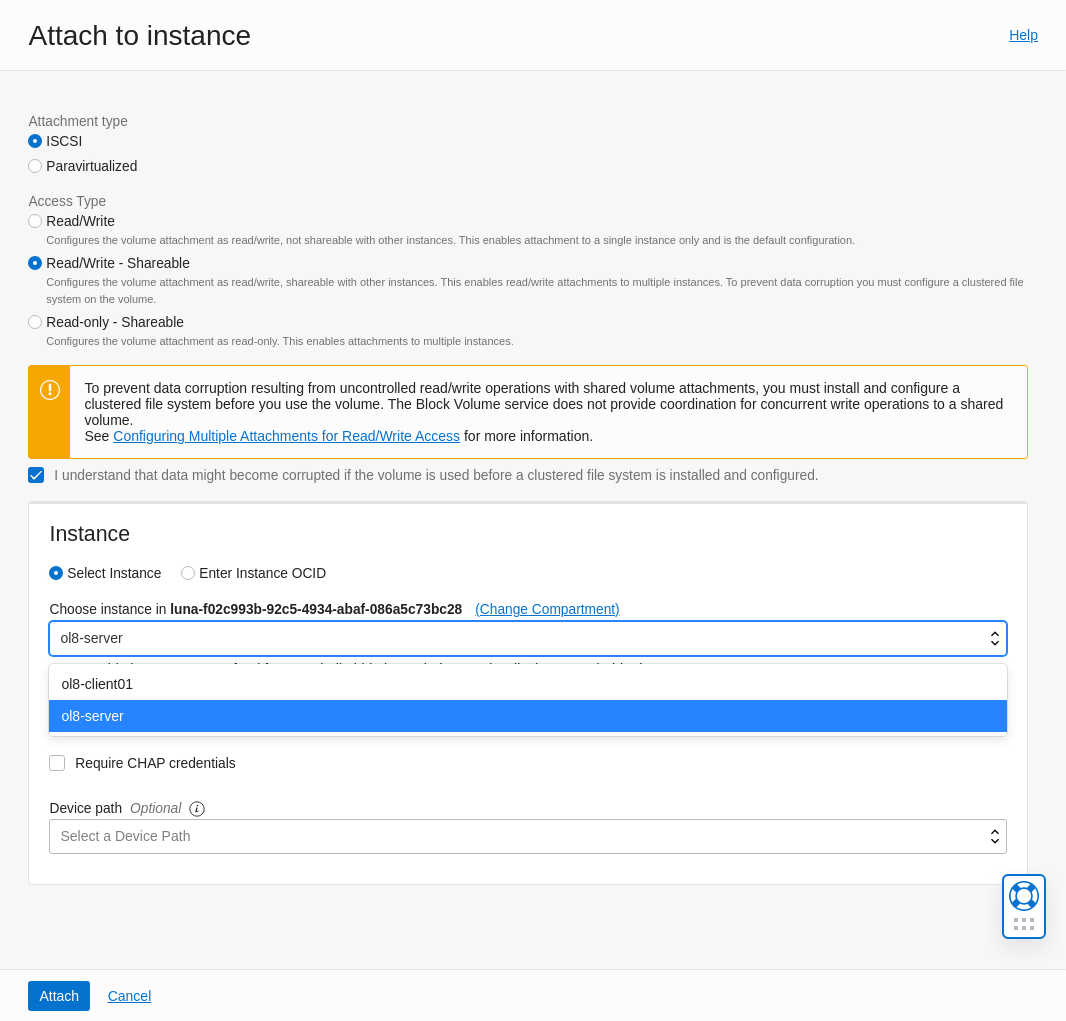
- Attachment type: iSCSI
- Access Type: Read/Write Sharable, and then select the checkbox to acknowledge the risk of data corruption without a configured clustered file system.
- Select Instance: ol-server
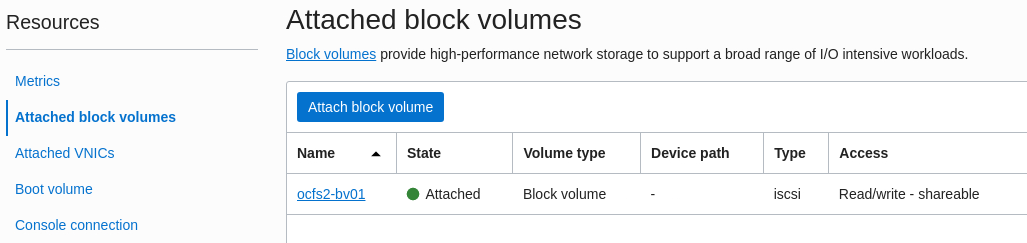
Click Attach to continue. When done, ocfs2-bv01 appears in the list of block volumes in the compartment.
-
Click the ol-server link in the table to verify that ocfs2-bv01 appears in the list of attached block volumes with read/write sharable access.
-
Install ocfs2-tools on the Cluster Members
The instructions use the following instance names for the cluster members: ol-server and ol-client01.
Substitute with your specified, cluster names, OCFS2 volume names, disk labels, instance hostnames, and private IP address when appropriate.
In this practice you:
- Install
ocfs2-toolson the cluster members - Configure the firewall to allow communication
-
Install
ocfs2-tools.-
Open terminals and connect to each cluster member.
-
In the terminal window connected to ol-server, install
ocfs2-toolsusing thednfcommand.sudo dnf install -y ocfs2-tools -
In the terminal window connected to ol-client01, install
ocfs2-toolsusing thednfcommand.sudo dnf install -y ocfs2-tools
-
-
Configure firewall rules using the
firewall-cmdcommand on the cluster members. On each cluster member, run the following commands:-
Add the firewall rules:
sudo firewall-cmd --permanent --add-port=7777/tcp --add-port=7777/udp --add-port=3260/tcp -
Reload the firewall rules:
sudo firewall-cmd --complete-reload
-
-
Use the
unamecommand on the cluster members to ensure both instances use the same kernel version.sudo uname -rAn OCFS2 cluster requires kernel compatibility by all cluster members. The output should display the same kernel version, for example:
5.4.17-2136.302.7.2.1.el8uek.x86_64. -
Disable
selinuxon the cluster nodes.sudo vi /etc/selinux/configSample text:
# This file controls the state of SELinux on the system.
# SELINUX= can take one of these three values:
#     enforcing - SELinux security policy is enforced.
#     permissive - SELinux prints warnings instead of enforcing.
#     disabled - No SELinux policy is loaded.
SELINUX=disabled
# SELINUXTYPE= can take one of these three values:
#     targeted - Targeted processes are protected,
#     minimum - Modification of targeted policy. Only selected processes are protected.
#     mls - Multi Level Security protection.
SELINUXTYPE=targeted
Configure the Cluster Layout
-
From ol-server, use the
o2cbcommand and create theociocfs2cluster.sudo o2cb add-cluster ociocfs2 -
Use the
o2cbcommand to list theociocfs2information in the cluster layout.sudo o2cb list-cluster ociocfs2Sample output:
cluster:
        node_count = 0
        heartbeat_mode = local
        name = ociocfs2
This information is written to the
/etc/ocfs2/cluster.conffile.Note: The default heartbeat mode is
local. -
Use the
o2cbcommand and add ol-server and ol-client01 toociocfs2.sudo o2cb add-node ociocfs2 ol-server --ip 10.0.0.150sudo o2cb add-node ociocfs2 ol-client01 --ip 10.0.0.151 -
Use the
o2cbcommand to list theociocfs2information.sudo o2cb list-cluster ociocfs2Sample output:
node: number = 0 name = ol-server ip_address = 10.0.0.150 ip_port = 7777 cluster = ociocfs2 node: number = 1 name = ol-client01 ip_address = 10.0.0.151 ip_port = 7777 cluster = ociocfs2 cluster: node_count = 2 heartbeat_mode = local name = ociocfs2 -
Use the
catcommand to display the contents of the/etc/ocfs2/cluster.conffile.cat /etc/ocfs2/cluster.conf -
Create a cluster configuration file on ol-client01.
-
Use the
mkdircommand to create the/etc/ocfs2directory on ol-client01.sudo mkdir /etc/ocfs2 -
Use a text editor, like
vimorvi, to create acluster.conffile.sudo vim /etc/ocfs2/cluster.conf -
Insert the contents of the
cluster.conffile on ol-server into thecluster.conffile on ol-client01. -
Save the file and exit the text editor.
-
Configure and Start the O2CB Cluster Stack on the Cluster Members
-
On ol-server, use the
/sbin/o2cb.initcommand without any arguments to display its usage.sudo /sbin/o2cb.initCommand usage output:
Usage: /sbin/o2cb.init {start|stop|restart|force-reload|enable|disable|configure|load|unload|online|offline|force-offline|status|online-status}et -
Add the
configureargument to/sbin/o2cb.initand configure the cluster stack on both cluster nodes. Provide the following responses:- Answer
yto “Load O2CB driver on boot” - Accept the default (press Enter), `“o2cb”, as the cluster stack
- Enter
ociocfs2as the cluster to start on boot - Accept the defaults (press Enter) for all other queries
sudo /sbin/o2cb.init configureCommand output:
Load O2CB driver on boot (y/n) [n]: y Cluster stack backing O2CB [o2cb]: Cluster to start on boot (Enter "none" to clear) [ocfs2]: ociocfs2 Specify heartbeat dead threshold (>=7) [31]: Specify network idle timeout in ms (>=5000) [30000]: Specify network keepalive delay in ms (>=1000) [2000]: Specify network reconnect delay in ms (>=2000) [2000]: Writing O2CB configuration: OK checking debugfs... Loading stack plugin "o2cb": OK Loading filesystem "ocfs2_dlmfs": OK Creating directory '/dlm': OK Mounting ocfs2_dlmfs filesystem at /dlm: OK Setting cluster stack "o2cb": OK. - Answer
-
Run the same command and enter the identical responses on ol-client01.
sudo /sbin/o2cb.init configure -
Check the cluster status on both members using the
/sbin/o2cb.initcommand.sudo /sbin/o2cb.init statusThe output shows that O2CB cluster,
ociocfs2, is online; however, the O2CB heartbeat is not active. The heartbeat becomes active after mounting a disk volume. -
Enable the
o2cbservice, and theocfs2service using thesystemctlcommand on the cluster members.sudo systemctl enable o2cbsudo systemctl enable ocfs2 -
Add the following kernel settings to the end of
/etc/sysctl.d/99-sysctl.confon both cluster members:kernel.panic = 30kernel.panic_on_oops = 1
sudo vim /etc/sysctl.d/99-sysctl.confSave the changes and exit the file.
-
Implement the changes immediately using the
sysctlcommand on both members.sudo sysctl -p
Create OCFS2 Volumes
-
Create different types of OCFS2 volumes on block volume
/dev/xvb. Enterywhen prompted to overwrite the existingocfs2partition.-
Use the
mkfs.ocfs2command to create a file system.sudo mkfs.ocfs2 /dev/sdbNote: Review the default values:
- Features
- Block size and cluster size
- Node slots
- Journal size
-
Use the
mkfs.ocfs2command to create a file system with the-T mailoption.- Specify this type when you intend to use the file system as a mail server.
- Mail servers perform many metadata changes to many small files, which require the use of a large journal.
sudo mkfs.ocfs2 -T mail /dev/sdb1Note: Review the output and note the larger journal size.
-
Use the
mkfs.ocfs2command to create a file system with the-T vmstoreoption.- Specify this type when you intend to store virtual machine images.
- These file types are sparsely allocated large files and require moderate metadata updates.
sudo mkfs.ocfs2 -T vmstore /dev/sdb1Note: Review the output and note the differences from the default file system:
- Cluster size
- Cluster groups
- Extent allocator size
- Journal size
-
Use the
mkfs.ocfs2command to create a file system with the-T datafilesoption.- Specify this type when you intend to use the file system for database files.
- These file types use fewer fully allocated large files, with fewer metadata changes, and do not benefit from a large journal.
sudo mkfs.ocfs2 -T datafiles /dev/sdb1Note: Review the output and note the differences in the journal size.
-
Use the
mkfs.ocfs2command to create a file system with the label,ocfs2vol.sudo mkfs.ocfs2 -L "ocfs2vol" /dev/sdb1
-
Mount and Test the OCFS2 Volume
In this practice, you mount the clustered OCFS2 volume to ol-server and ol-client01, and then create, modify, and remove files from one host to another.
-
From ol-server, mount the OCFS2 volume.
-
Use the
mdkircommand to make a mount point,/u01, for the OCFS2 volume.sudo mkdir /u01 -
Use the
mountcommand to mount the OCFS2 volume by labelocfs2volon the/u01mount point.sudo mount -L ocfs2vol /u01 -
Use the command
/sbin/o2cb.init statusto display the status of the O2CB heartbeat mode.sudo /sbin/o2cb.init statusNote: After mounting the volume, the output shows that the heartbeat mode is now active.
-
Create a test file in the
/u01directory.echo "File created on ol-server" | sudo tee /u01/shared.txt > /dev/nullThe
teecommand reads from standard input and writes the output to theshared.txtfile. -
Use the
catcommand to view the contents of/u01/shared.txt.sudo cat /u01/shared.txt
-
-
From ol-client02, mount the OCFS2 volume.
-
Use the
mdkircommand to make a mount point,/u01, for the OCFS2 volume.sudo mkdir /u01 -
Use the
mountcommand to mount the OCFS2 volume by labelocfs2volon the/u01mount point.sudo mount -L ocfs2vol /u01If the
mountcommand fails with acan’t find LABELerror message, then:-
Use the
catcommand to display the/proc/partitionsfile.sudo cat /proc/partitionsThe
/proc/partitionsfile displays a table of partitioned devices. -
If the
sdbpartition is not listed, use thepartprobecommand on/dev/sdbto inform the OS of partition table changes.sudo partprobe /dev/sdb
-
-
Rerun the command
cat /proc/partitionsto display the table.Confirm
sdbappears in the table. -
Retry mounting the volume.
sudo mount -L ocfs2vol /u01 -
Use the
lsto list the contents of the/u01directory.sudo ls /u01The outputs displays the
shared.txtfile. This verifies that the OCFS2 shares the clustered file system between both cluster members. -
Use a text editor and modify the contents of the
shared.txtfile by addingModified on ol-client01to the end of the file.
-
-
From ol-server, use the
catcommand to display the contents of theshared.txtfile.sudo cat /u01/shared.txtSeeing the updated text file contents confirms both cluster members have read/write access.
For More Information:
- Oracle Learning Library
- Oracle Linux Documentation
- Managing the Oracle Cluster File System Version 2
More Learning Resources
Explore other labs on docs.oracle.com/learn or access more free learning content on the Oracle Learning YouTube channel. Additionally, visit education.oracle.com/learning-explorer to become an Oracle Learning Explorer.
For product documentation, visit Oracle Help Center.
Use Oracle Cloud Cluster File System Tools on Oracle Cloud Infrastructure
F54500-04
August 2022
Copyright © 2022, Oracle and/or its affiliates.