Orchestrating Ansible Playbooks with OCI Fleet Application Management
Introduction
Oracle Cloud Infrastructure (OCI) provides a comprehensive cloud platform for customers to manage their infrastructure and applications. To further enhance the management capabilities, Fleet Application Management (FAM) in OCI orchestrates operational tasks at scale. As part of this orchestration, FAM allows users to orchestrate the Ansible, a popular open-source automation tool, to enable customers to automate and manage their OCI resources more efficiently.
By allowing users to orchestrate the Ansible with FAM, customers can use Ansible’s automation capabilities to manage their OCI infrastructures and application stacks.
- Configuration management
- Application deployment
- Orchestration
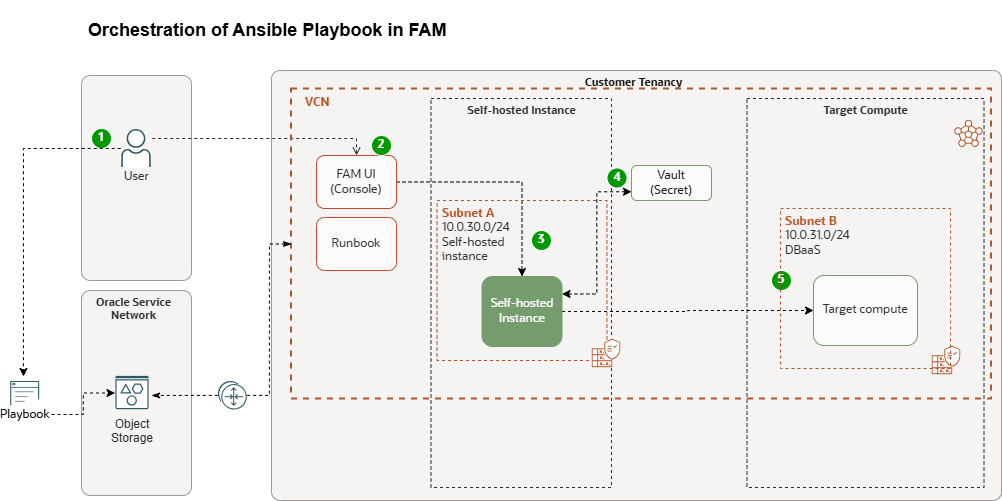
In this tutorial, we are going to show how to execute the Ansible playbook through the self-hosted instance with OCI Fleet Application Management (FAM).
Note: We are describing the process using the OCI Console, but you can also use the Oracle Cloud Infrastructure Command Line Interface (OCI CLI) or API. For information about OCI Fleet Application Management, see Fleet Application Management.
Get started - Execution of an Ansible Runbook
OCI FAM uses the runbook to trigger a script on a self-hosted instance, where an ansible playbook is executed against target compute instance. Ansible can be integrated with OCI’s native security mechanisms, such as the OCI Vault and Instance Principals, to securely manage secrets (like SSH private keys) and automate tasks across cloud instances.
- Vault stores SSH keys: SSH private keys are stored in OCI Vault, with access permissions granted only to specific instances (via Instance Principals).
- Ansible Playbook: Ansible playbook doesn’t include SSH keys directly. Instead, it has logic to retrieve the SSH key from OCI Vault at runtime using Instance Principals.
- Execution Flow: When the playbook is executed by FAM, it retrieves the SSH private key from Vault, authenticates to the target instances, and proceeds with the deployment or configuration tasks.
- Completion: Once the playbook execution is finished, the sensitive SSH key is cleaned on the compute instance, ensuring a clean and secure execution environment.
Objectives
- Execute the Ansible playbook against the remote systems with OCI FAM self-hosted instance, with dynamic retrieval of the SSH key from OCI Vault and uses it to authenticate to the remote systems during the execution of the playbook.
Task 1: Self-hosted Instance
Create compute instance
First, launch a compute instance. Choose whether to create a new instance or select an existing one, then follow the detailed steps below.
Note: For detailed, step-by-step instructions on how to create a compute instance in Oracle Cloud Infrastructure, please refer to the official Oracle documentation: Creating an Instance
Register Self-hosted instance in OCI Fleet Application Management
A self-hosted instance can act as a central hub to monitor and manage several resources. By choosing an instance as a self-hosted instance, you can perform various checks to ensure that your Compute instances are running as expected.
- Log in to the OCI Console, navigate to Observability & Management, and select Fleet Application Management.
- Click Administration.
- Under Metadata management, click Self-hosted instances and Create self-hosted instance.
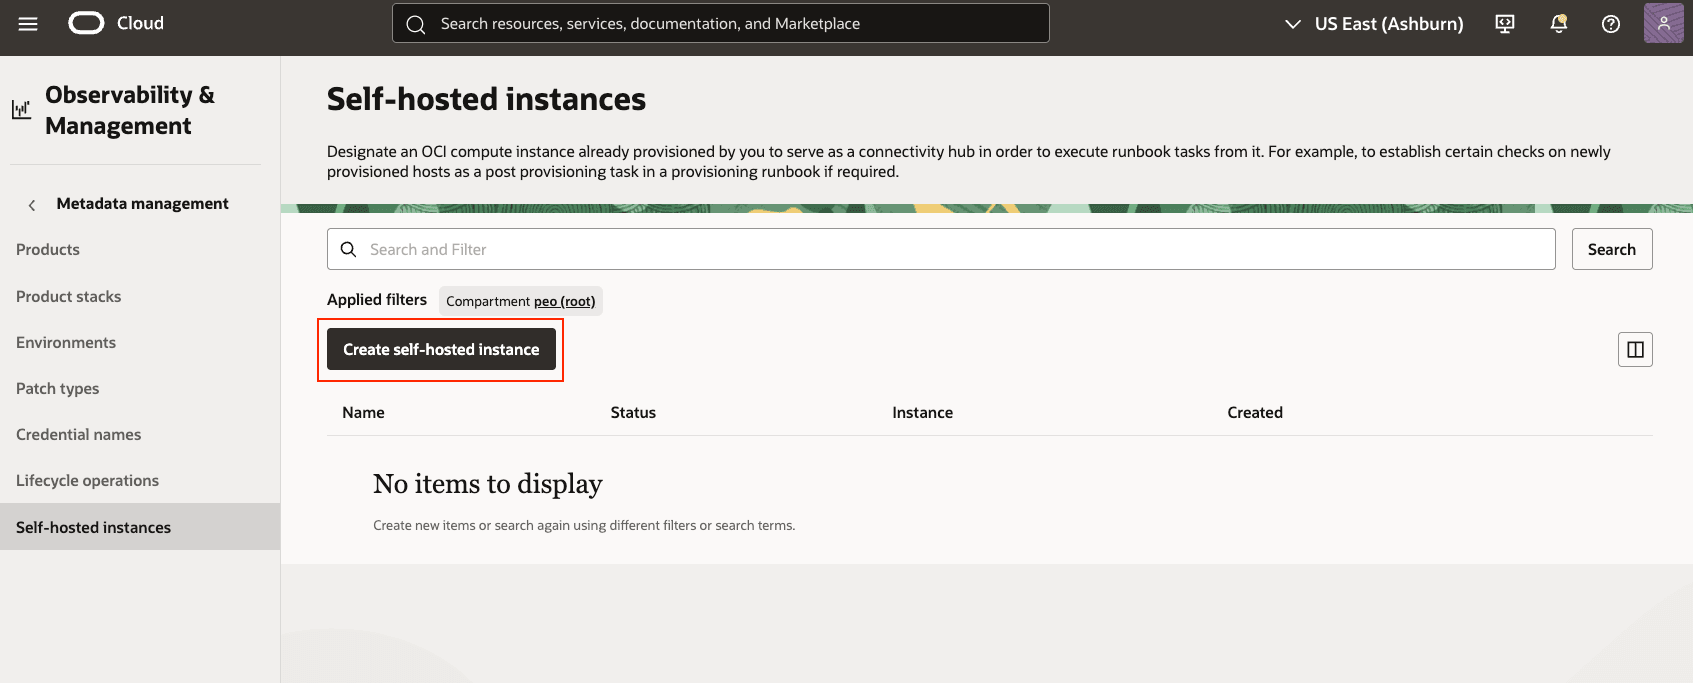
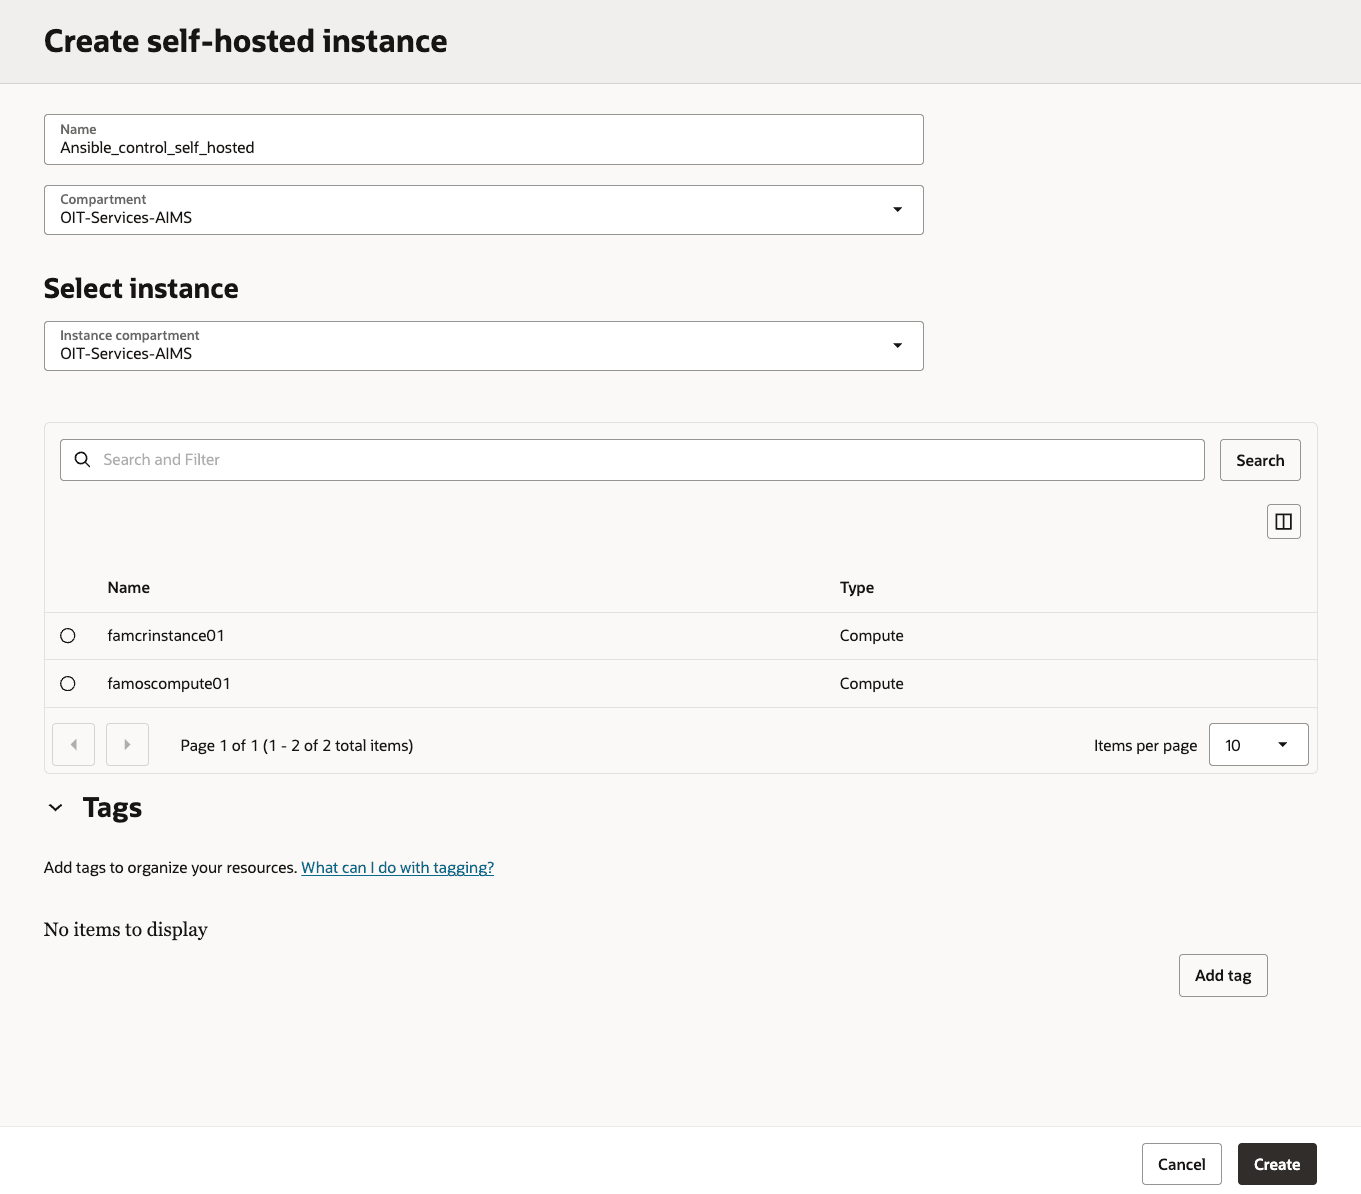
- Enter the following information for the self-hosted instances.
- Name: Enter the self-hosted instance, avoiding any confidential information such as keys, and so on.
- Compartment: Choose the compartment which contains the self-hosted instance
- Select Instance → Compartment:
- Instance: Choose the instance** in the selected compartment
Create self-hosted instance
Important : Ensure you enable the Fleet Application Management plugin on your self-hosted instance and its associated instance. This step ensures that Fleet Application Management can effectively consider these instances for lifecycle operations.
Task 2: Configure Self-hosted instance
Next, prepare your self-hosted control node by installing and validating below components:
- OCI SDK for Python
- Installing and configuring Ansible
- Ansible Collections
The Ansible collection RPM installs the OCI Ansible collection and its required dependencies. After installing the RPM, you must configure the SDK and CLI configuration file as explained in Configuring Authentication.
Installing the OCI SDK for Python
Installing the OCI SDK on a compute instance (self-hosted instance) typically involves using a package manager or a direct download and installation method, depending on the SDK language and the operating system of the compute instance(self-hosted).
- Download and install the SDK for Python by following instructions in the topic, SDK for Python. For additional guidance, see Downloading and Installing the SDK.
- After installing the SDK for Python, you must configure it using instructions in the topic Configuring the SDK.
\\# Create and activate a Python virtual environment (for pip/CLI tools)

python3 -m venv fam\\_ansible

source fam\\_ansible/bin/activate

\\# Upgrade pip inside the venv

pip install --upgrade pip

\\# Verify OCI CLI if already present in your path

oci -version

3\\.66.1

\\# If OCI CLI not installed

\$ pip install oci-cli

Collecting oci-cli`

 Downloading oci\\_cli-3.66.1-py3-none-any.whl


Successfully installed oci-2.160.1 oci-cli-3.66.1
Installing and Configuring Ansible
- To install Ansible, follow the instructions provided in the Ansible Installation Guide.
- For guidance configuring Ansible, see Configuring Ansible.
Note: This installation uses Python version 3.6 and Ansible version 2.9 or later.
Installing the OCI Ansible Collection
Install the OCI Ansible collection from Ansible Galaxy by using the following command:
\\# Install the Oracle OCI Ansible Collection

ansible-galaxy collection install oracle.oci

Starting galaxy collection install process

Process install dependency map

Starting collection install process

Downloading https://galaxy.ansible.com/oracle-oci-5.5.0.tar.gz

Installing 'oracle.oci:5.5.0' to '/root/.ansible/collections/ansible\\_collections/oracle/oci'

oracle.oci:5.5.0 was installed successfully

\\#

ansible-doc -l | grep oracle.oci

oracle.oci (collection)  5.5.0

\\#

ansible -m ping localhost -c local

localhost | SUCCESS => {

    "changed": false,

    "ping": "pong"

}

\\#

ansible-doc -l | grep oci\\_ | tail

oracle.oci.oci\\_waf\\_web\\_app\\_firewall\\_policy\\_facts

oracle.oci.oci\\_work\\_requests\\_work\\_request\\_error\\_facts

oracle.oci.oci\\_work\\_requests\\_work\\_request\\_facts

oracle.oci.oci\\_work\\_requests\\_work\\_request\\_log\\_entry\\_facts
If you’ve already installed the collection, you can update its modules to the latest version by adding the –force flag to the command. For example:
\$ ansible-galaxy collection install --force oracle.ociIf you need to install ansible core in the compute:
\\# Refresh repo metadata and install Ansible core + Git

sudo dnf makecache

sudo dnf install -y ansible-core git

\\# Verify Ansible

ansible --version

ansible [core 2.14.18]

config file = /etc/ansible/ansible.cfg

ansible python module location = /usr/lib/python3.9/site-packages/ansible

executable location = /usr/bin/ansible

python version = 3.9.21
Note: For detailed, step-by-step instructions on how to get started using Ansible in Oracle Cloud Infrastructure, please refer to the official Oracle documentation: Ansible Collection getting started.
Task 3: Configuring Instance Principal to access the Secret (IAM)
In this section, you’ll configure the required IAM permissions for:
- The self-hosted instance (using Instance Principals) to read secrets from OCI Vault
- User group permission to manage the runbook to execute the ansible playbook.
Secret Access using Instance Principal
Use Instance Principals to let your compute instance call OCI services without storing or rotating user credentials. By placing the instance in a dynamic group and granting the appropriate IAM policy, the instance can securely read secrets from OCI Vault. To use instance principals, you need to create a dynamic group and policy as given below.
Create Dynamic Group
Dynamic Groups use rules to define which instances are members of the group. The matching rule can be a simple rule where you provide the OCID of the compute instance that is used for CLI. There is a Rule Builder that you can use from the OCI console to make the rule. To create a dynamic group using OCI console, see the documentation here.
To create a dynamic group, do the following:
- Log into the OCI Console
- Select the hamburger menu on the top left corner, select Identity, select Dynamic Groups, and Click Create Dynamic Group.
- Enter its name, and a friendly description
- Enter a matching rule, so your instance is qualified for the dynamic group
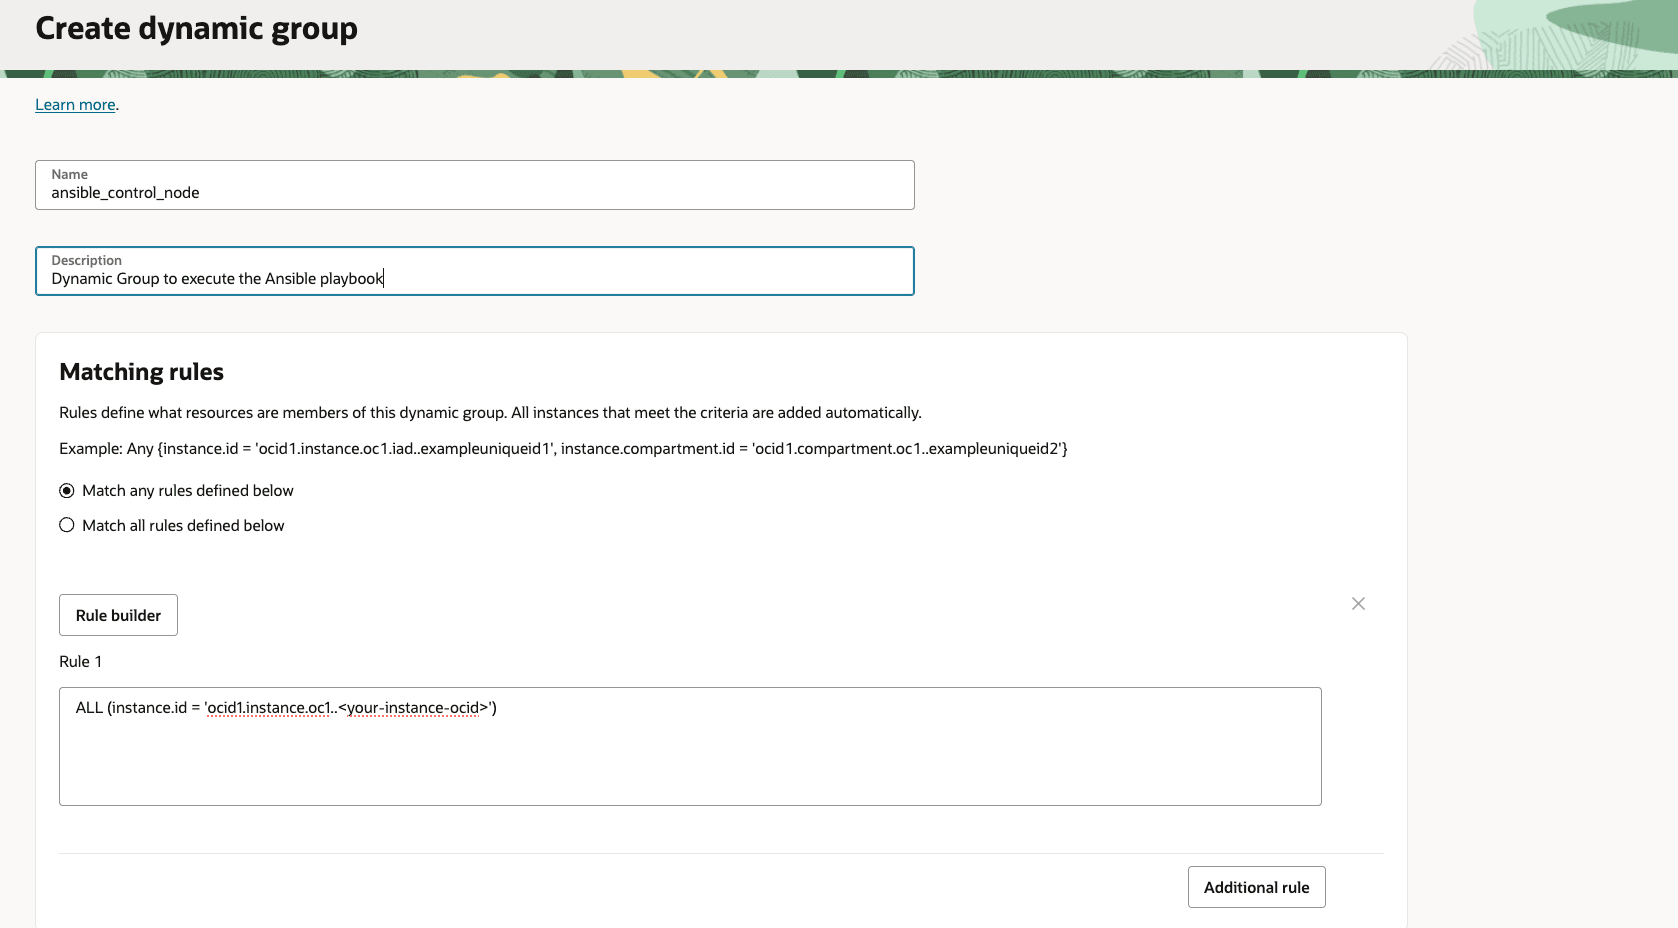
If you are not sure how to define the rule you can use the Rule Builder to help you build the rule. Click the Rule Builder button. Enter the criteria for your rule. In this tutorial, we are using a very simple rule, where we specify the OCID of the compute instance where we will run the Ansible playbook.
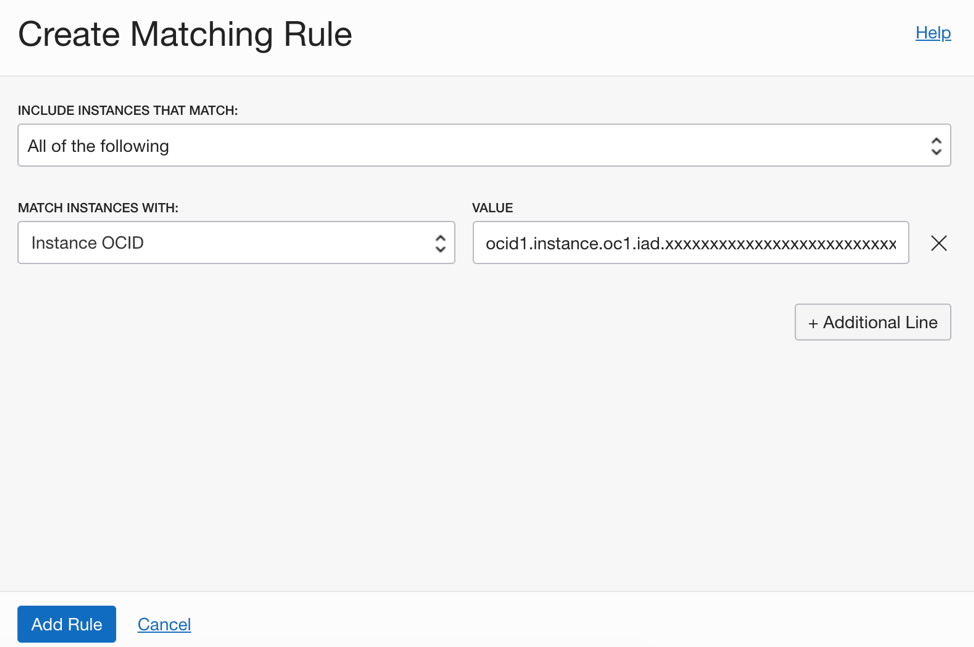
Enter the matching rule and hit Add Rule button. In the Create Dynamic Group screen click Create button.
Create Policy
Once you have created the dynamic group, you need to create a policy that gives your group the privilege to read the secrets in the vault compartment. The documentation for writing policies is given here.
To create a policy do the following:
- Log into the OCI Console
- Select the hamburger menu on the top left corner, select Identity, select Policies, and click Create Policy.
- Name: Enter a name
- Description: Add a description
- Compartment: Choose the compartment
-
Policy Statements: Add the following:
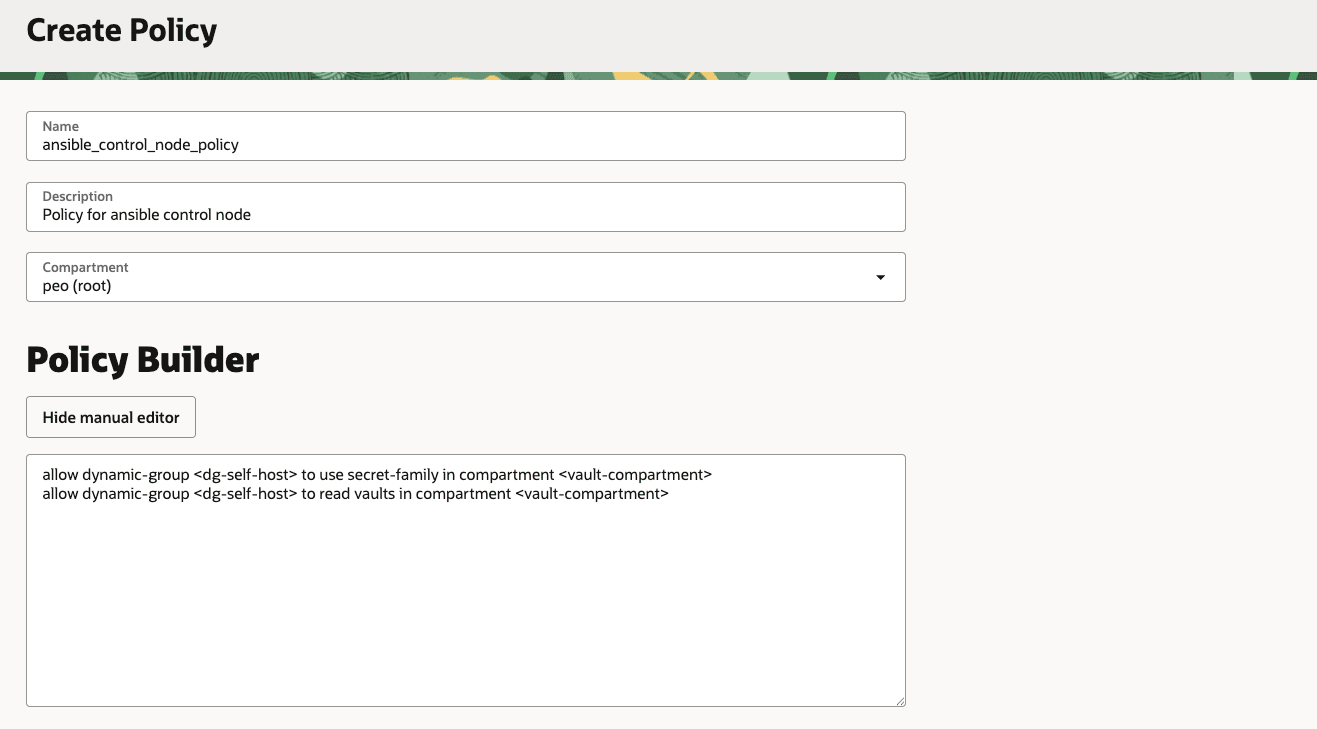
allow dynamic-group ansible\_control\_node\_dg to use secret-family in compartment <vault-compartment>allow dynamic-group ansible\_control\_node\_dg to read vaults in compartment <vault-compartment> - Click Create.
Enabling Instance Principal Authorization for OCI Secret
Once you have created the Dynamic Group, the Matching Rule, and the Policy you are ready to use Instance Principals for authorizing OCI CLI calls for OCI Vault/secret. To enable Instance Principal authorization from the CLI, you can use the authorization option (–auth) for a command. For example:
\\# From the self-host, check a simple IAM call via Instance Principals

oci iam region list --auth instance\\_principal

\\# Test a secrets call (replace with your secret OCID)

oci secrets secret-bundle get \\

--secret-id ocid1.vaultsecret.oc1..example \\

--auth instance\\_principal \\

--raw-output \\

--query 'data."secret-bundle-content".content' | base64 -d
References
- Calling Services from an Instance
- Managing Dynamic Groups
- Writing authorization policies for Dynamic Groups
Task 4: Create Runbook for executing Ansible playbook
After installation and configuration is complete, you can write a sample playbook that uses Ansible. Following is an example playbook (named run_uptime_date_commands.yml) that execute the simple command on the remote compute instance..
Create an Ansible Playbook
- Get the ssh key from the Vault with instance principal
- Dynamically adds the target host with SSH parameters
- Writes the key to a secure file
- Execute simple command on the remote system (uptime && date)
\\---

\\# Play 1: Fetch the OCI Vault secret (private key) and write to a local file

\\- name: Fetch private key from OCI Vault and save to file

hosts: localhost

connection: local

gather\\_facts: false

vars:

# Override at runtime: -e secret\\_ocid= -e output\\_path= -e target\\_host= -e ssh\\_user=

secret\\_ocid: "ocid1.vaultsecret.oc1.iad.amXXXXXXaaaal4XXXXXXXXXXXXXXXXXXXXX2d7swXXXXXzq"

output\\_path: "/secret\\_value.txt"

# SSH connection parameters to the target

target\\_host: "famosXXXXXXXXXXXXXXXXX.com"

ssh\\_user: "XXXXX"

ssh\\_port: 22

# Optional: relax host key checking for first-time connections

# For production, set to "" and manage known\\_hosts strictly

ssh\\_common\\_args: "-o StrictHostKeyChecking=no -o UserKnownHostsFile=/dev/null"

tasks:

- name: Fetch secret (base64) via OCI CLI using instance principals

ansible.builtin.command:

   argv:

         - oci

         - secrets

         - secret-bundle

         - get

         - --secret-id

         - ""

         - --auth

         - instance\\_principal

         - --raw-output

         - --query

         - "data.\\"secret-bundle-content\\".content"

      register: secret\\_b64

      changed\\_when: false

      environment:

        NO\\_PROXY: "169.254.0.0/16,127.0.0.1,localhost"

        no\\_proxy: "169.254.0.0/16,127.0.0.1,localhost"

    - name: Fail if fetch failed

      ansible.builtin.fail:

        msg: "Failed to fetch secret. stderr="

      when: secret\\_b64.rc != 0

    - name: Decode base64 to raw secret string

      ansible.builtin.set\\_fact:

        secret\\_raw: ""

    # If the secret was stored with literal "\\n", convert to real newlines (typical for PEM pasted as single line)

    - name: Normalize newlines if needed

      ansible.builtin.set\\_fact:

        secret\\_value: ""

      when: "'\\\\n' in secret\\_raw or '\\\\r\\\\n' in secret\\_raw"

    - name: Keep decoded secret as-is

      ansible.builtin.set\\_fact:

        secret\\_value: ""

      when: "'\\\\n' not in secret\\_raw and '\\\\r\\\\n' not in secret\\_raw"

    - name: Write key to file with strict permissions (0600)

      ansible.builtin.copy:

        dest: ""

        content: ""

        mode: "0600"

      no\\_log: true

    - name: Add dynamic host with SSH parameters

      ansible.builtin.add\\_host:

        name: ""

        groups: dynamic\\_targets

        ansible\\_user: ""

        ansible\\_port: ""

        ansible\\_ssh\\_private\\_key\\_file: ""

        ansible\\_ssh\\_common\\_args: ""

\\# Play 2: Connect to the target and run uptime and date

\\- name: Run health checks on target

  hosts: dynamic\\_targets

  gather\\_facts: false

  tasks:

    - name: Wait for SSH to be ready

      ansible.builtin.wait\\_for\\_connection:

        timeout: 60

        sleep: 3

    - name: Run uptime

      ansible.builtin.command: uptime

      register: uptime\\_out

      changed\\_when: false

    - name: Show uptime output

      ansible.builtin.debug:

        var: uptime\\_out.stdout

    - name: Run date

      ansible.builtin.command: date

      register: date\\_out

      changed\\_when: false

    - name: Show date output

      ansible.builtin.debug:

        var: date\\_out.stdout
Note: We recommend to keep the playbook self-contained and pass all inputs via -e so the same FAM Runbook can run different hosts/users/commands without file edits. Also we strongly recommend to store the ssh key in the vault and fetch the secret whenever required.
Create a Lifecycle Operation for Ansible Playbook Execution
Create a custom lifecycle operation in FAM for executing the DbNode OS patching script, as it does not fall under standard lifecycle categories.
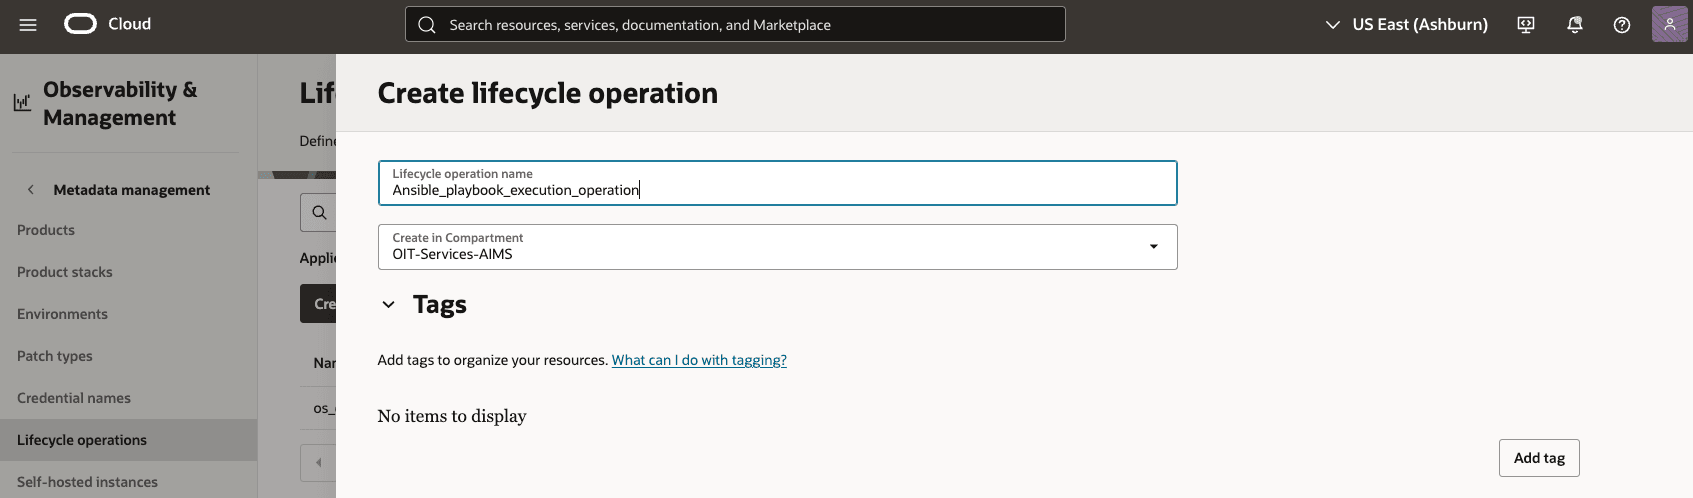
- In the OCI Console, navigate to Fleet Application Management > Metadata Management > Lifecycle Operations
- Create a new lifecycle operation named, e.g., Ansible_playbook_execution_operation.
- Specify that it uses a self-hosted instance (configured in later steps)
Create a Runbook through the OCI console
This tutorial of executing the ansible playbook with the self-hosted instance uses the OCI FAM runbook, which can define how to execute the playbook with variables. For example, in order to execute the ansible playbook, you write the command to execute the ansible playbook.
To create a runbook, follow the steps:
- Go to the OCI Console, navigate to Fleet Application Management, and click Actions and Controls.
- Click Runbooks and Create runbook.
- Enter Name, Description, Lifecycle operation, Runbook type, and select Operating System (OS) type and Estimated completion time.
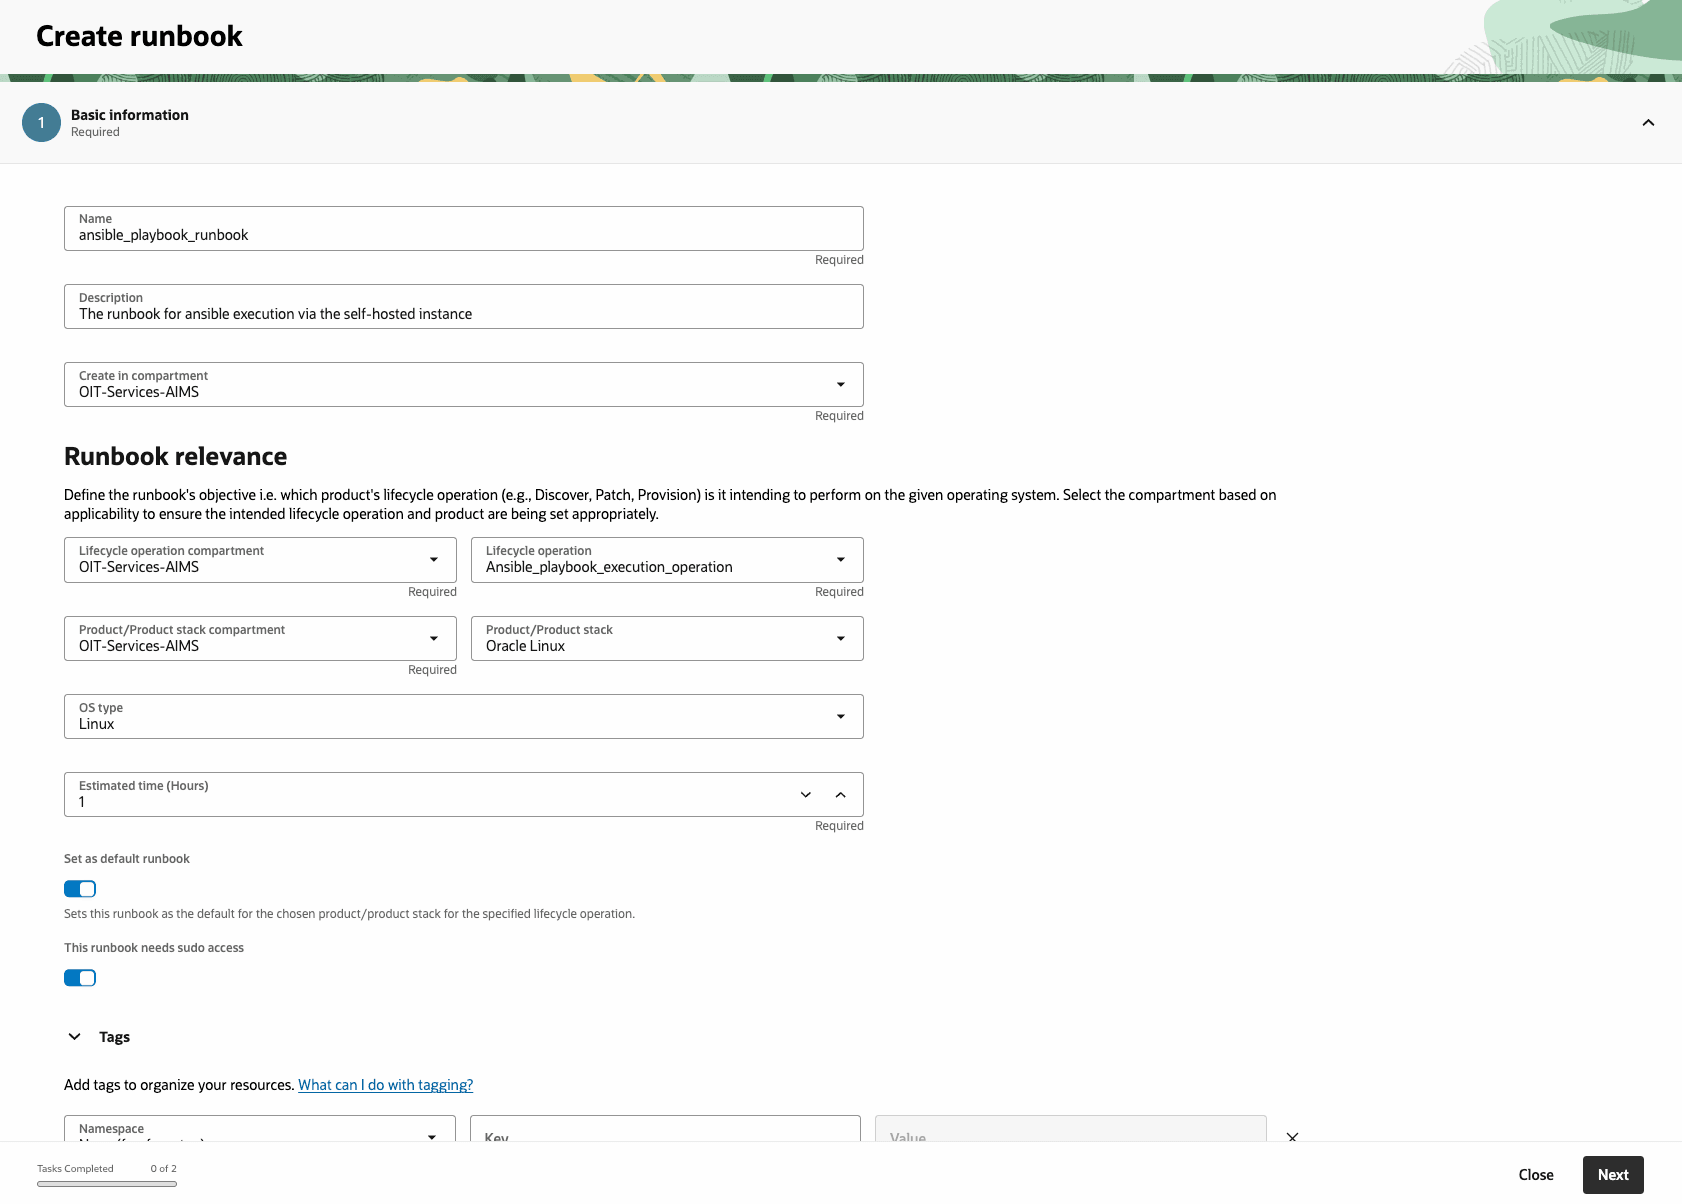
- Create your runbook by using the visual designer, upload a YAML or JSON file, or reference your existing automation script through Bash or Python script tasks within the runbook.
- . Upload file (playbook yml)
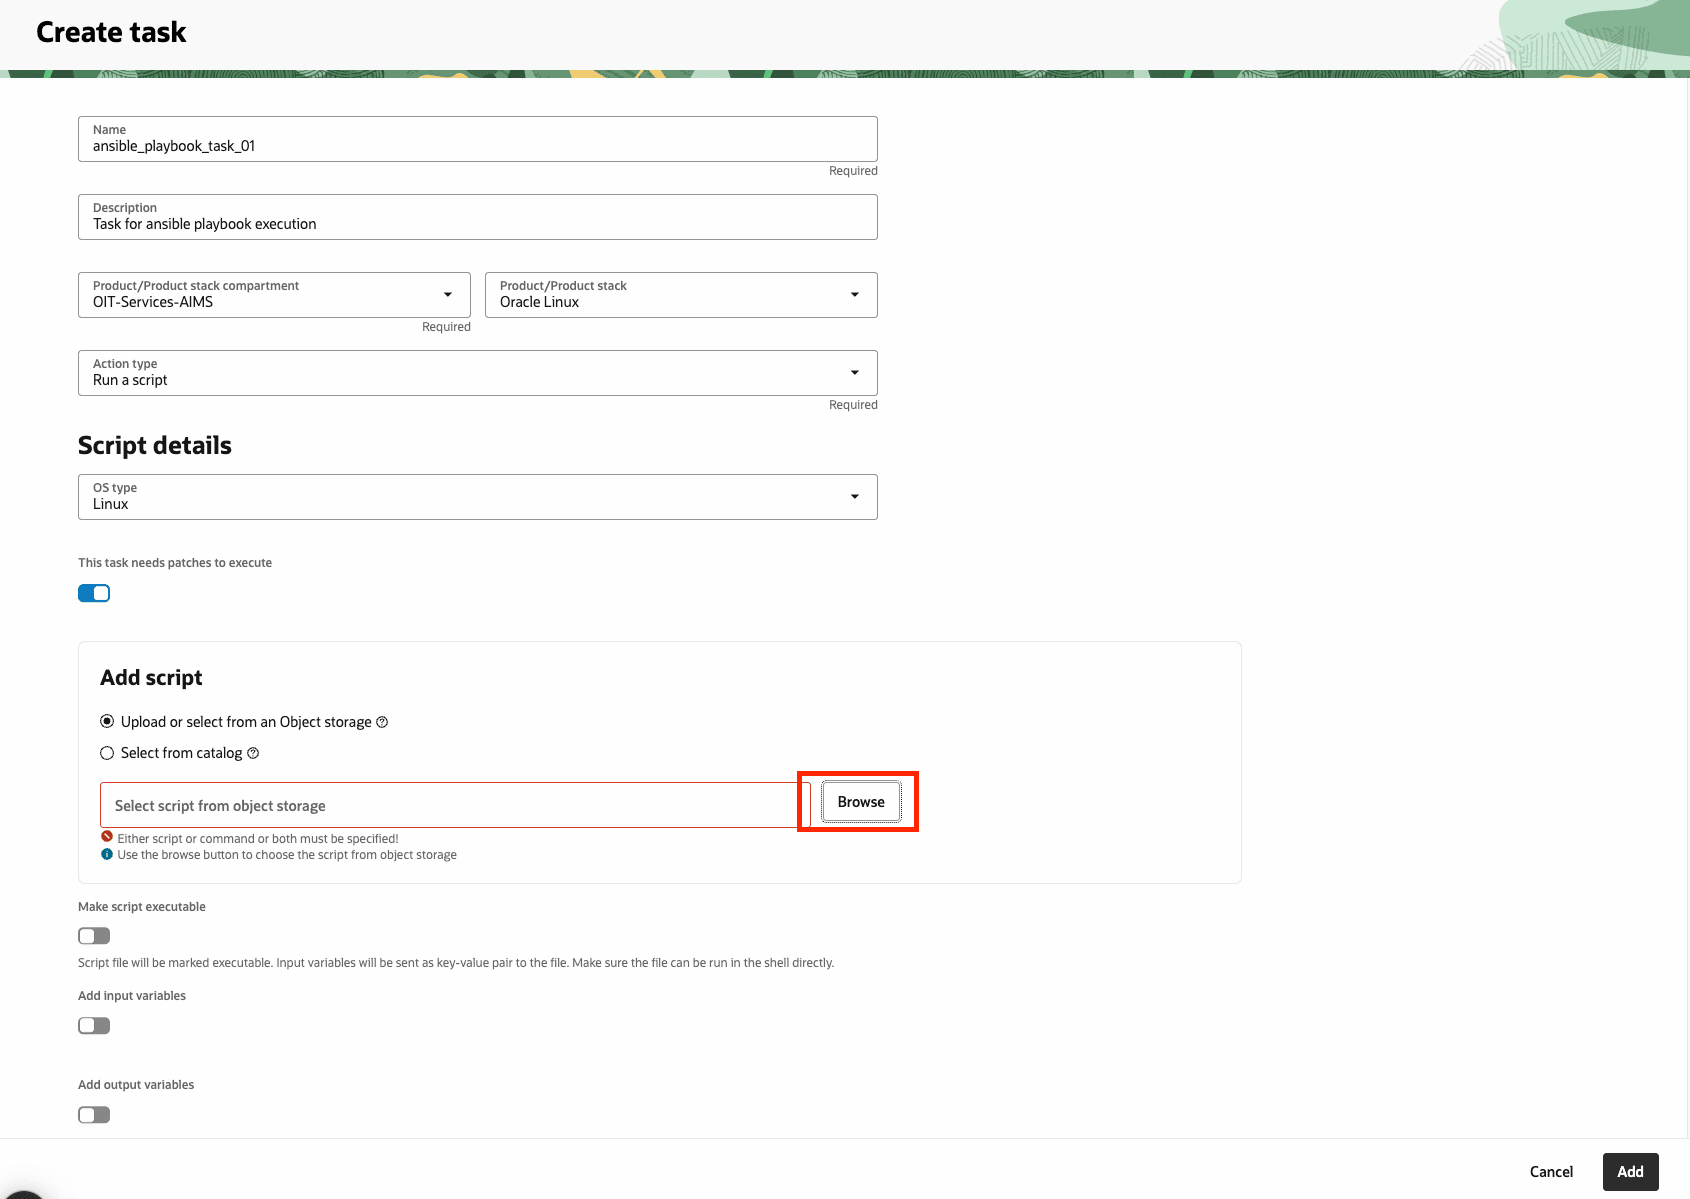

- . Upload file (playbook yml)
- Provide the command to execute the ansible playbook using with Bash or Python script tasks in the runbook.
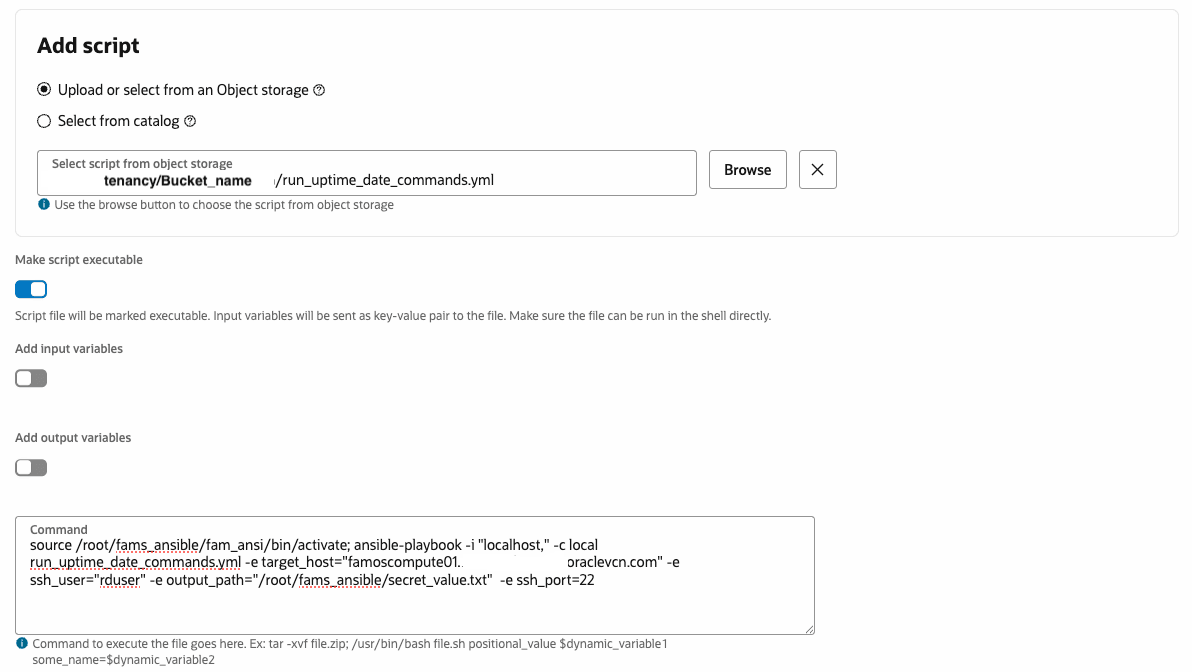
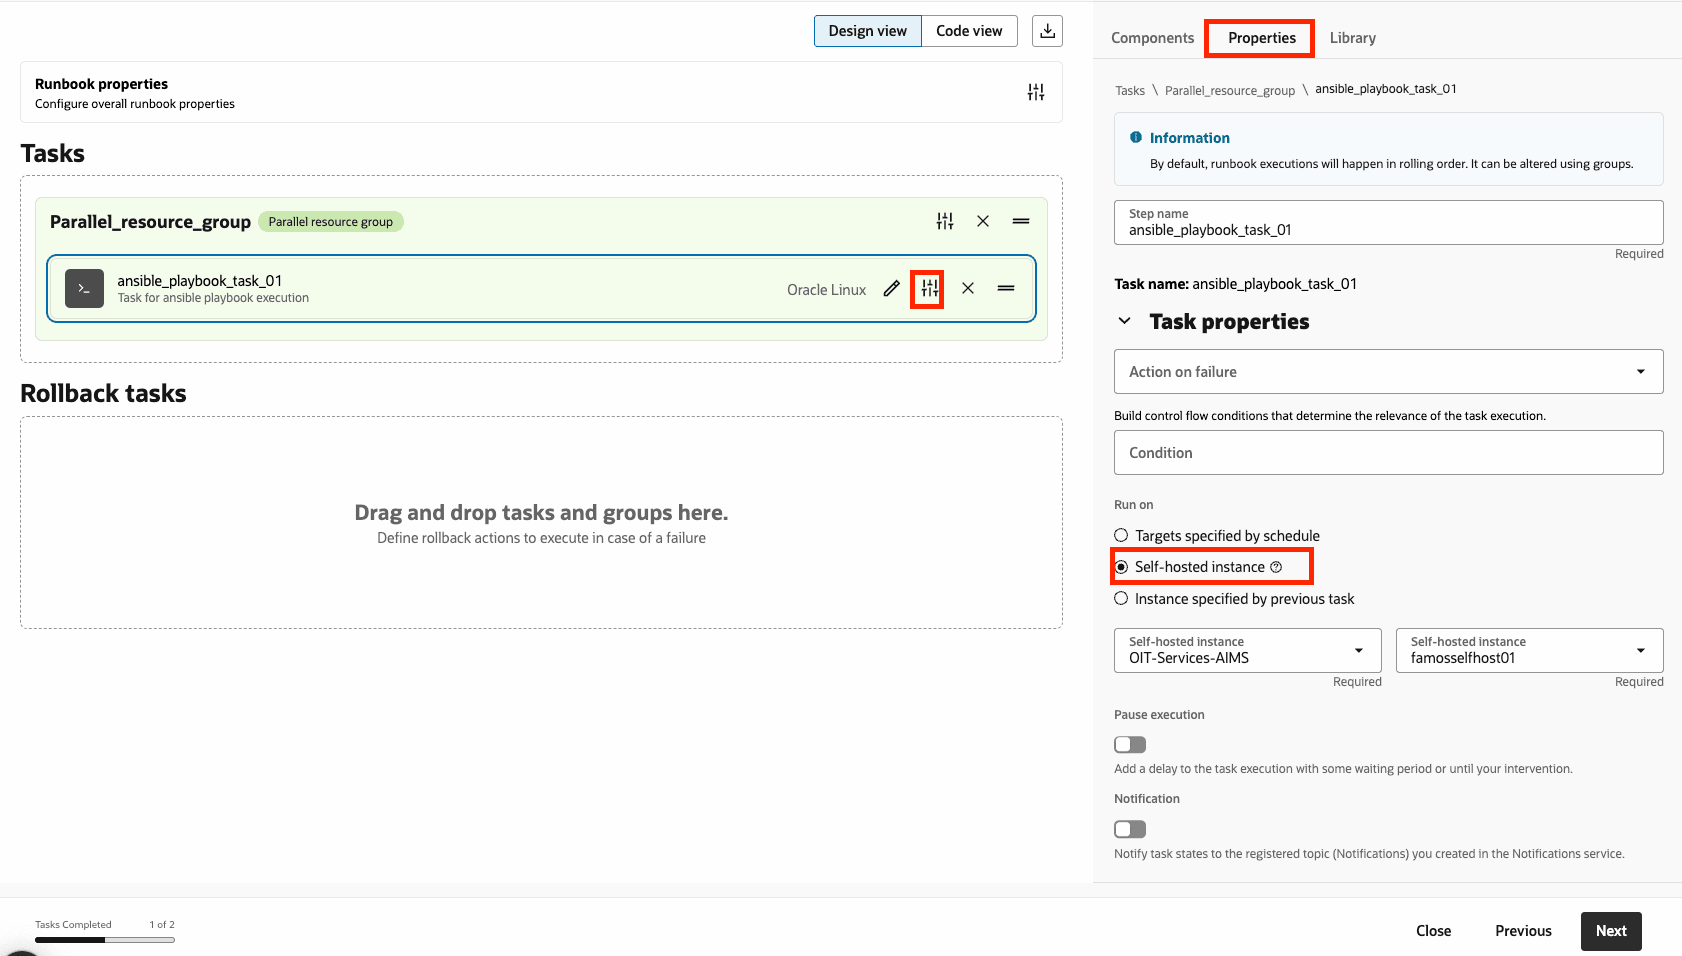
- After adding the command to execute, you have to change properties to Self-hosted instance and choose the self-hosted instance which you have created earlier task 1.
- Add more tasks to customize your runbook as needed.
Task 5: Execution Ansible Playbook
After the runbook creation, you are ready to execute the Ansible Playbook in OCI Fleet Application Management. Now you can execute the ansible playbook through the self-hosted instance. To run the runbook, create a fleet that contains the self-hosted instance.
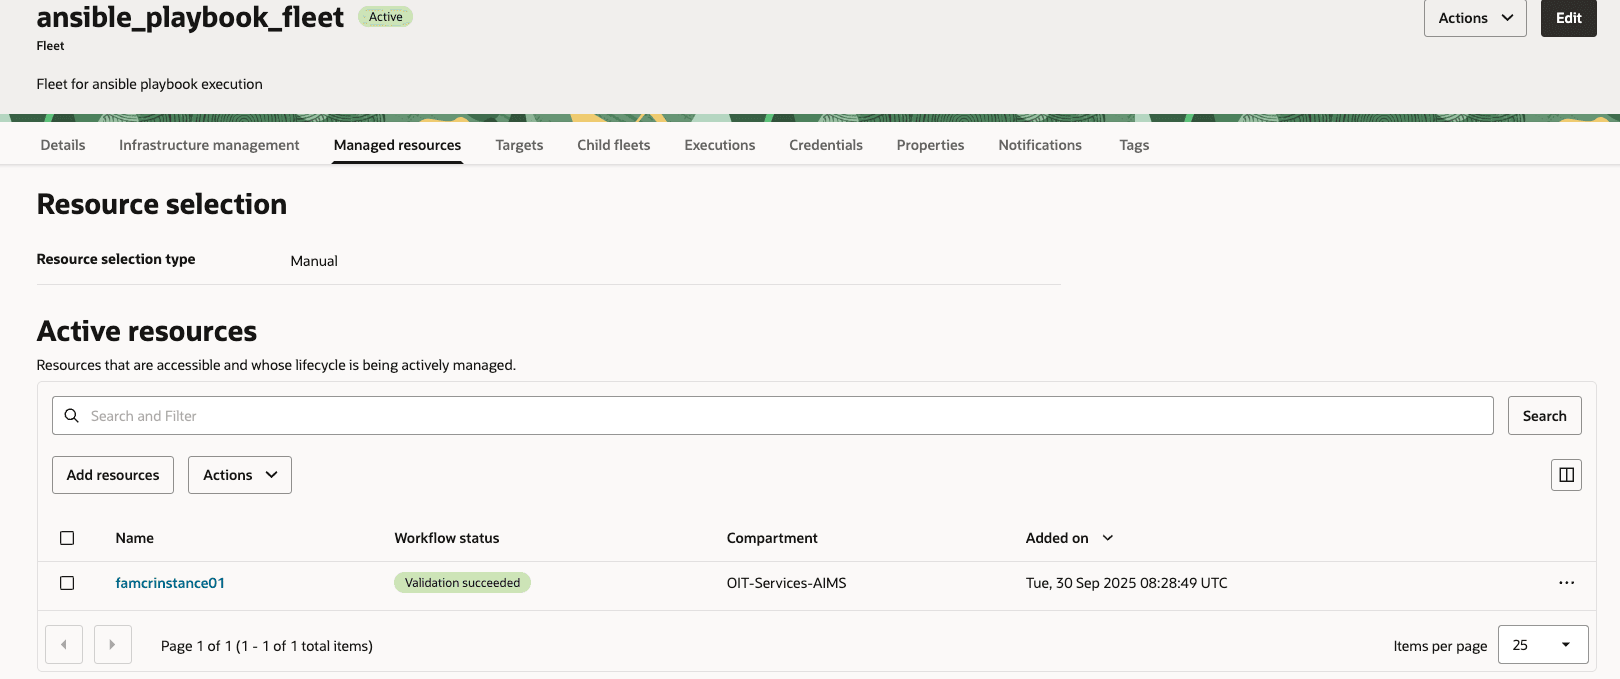
Create a Fleet for the instance
Create a fleet in FAM to manage the self-hosted instance. No products need to be added for CR execution.
- In the OCI Console, go to Fleet Application Management > Fleets.
- Create a new fleet (e.g., ansible_playbook_fleet) and add the self-hosted instance as a resource.
- Ensure the fleet is in the desired compartment and set to Production environment type if applicable.
Executing the Ansible Playbook Runbook
Trigger the runbook execution for the Ansible Playbook.
- In the OCI Console, go to Fleet Application Management > Fleets > ansible_playbook_fleet.
- Create a new job or execution, selecting the ansible_playbook_runbook and the lifecycle operation.
- Schedule the execution or run it immediately.
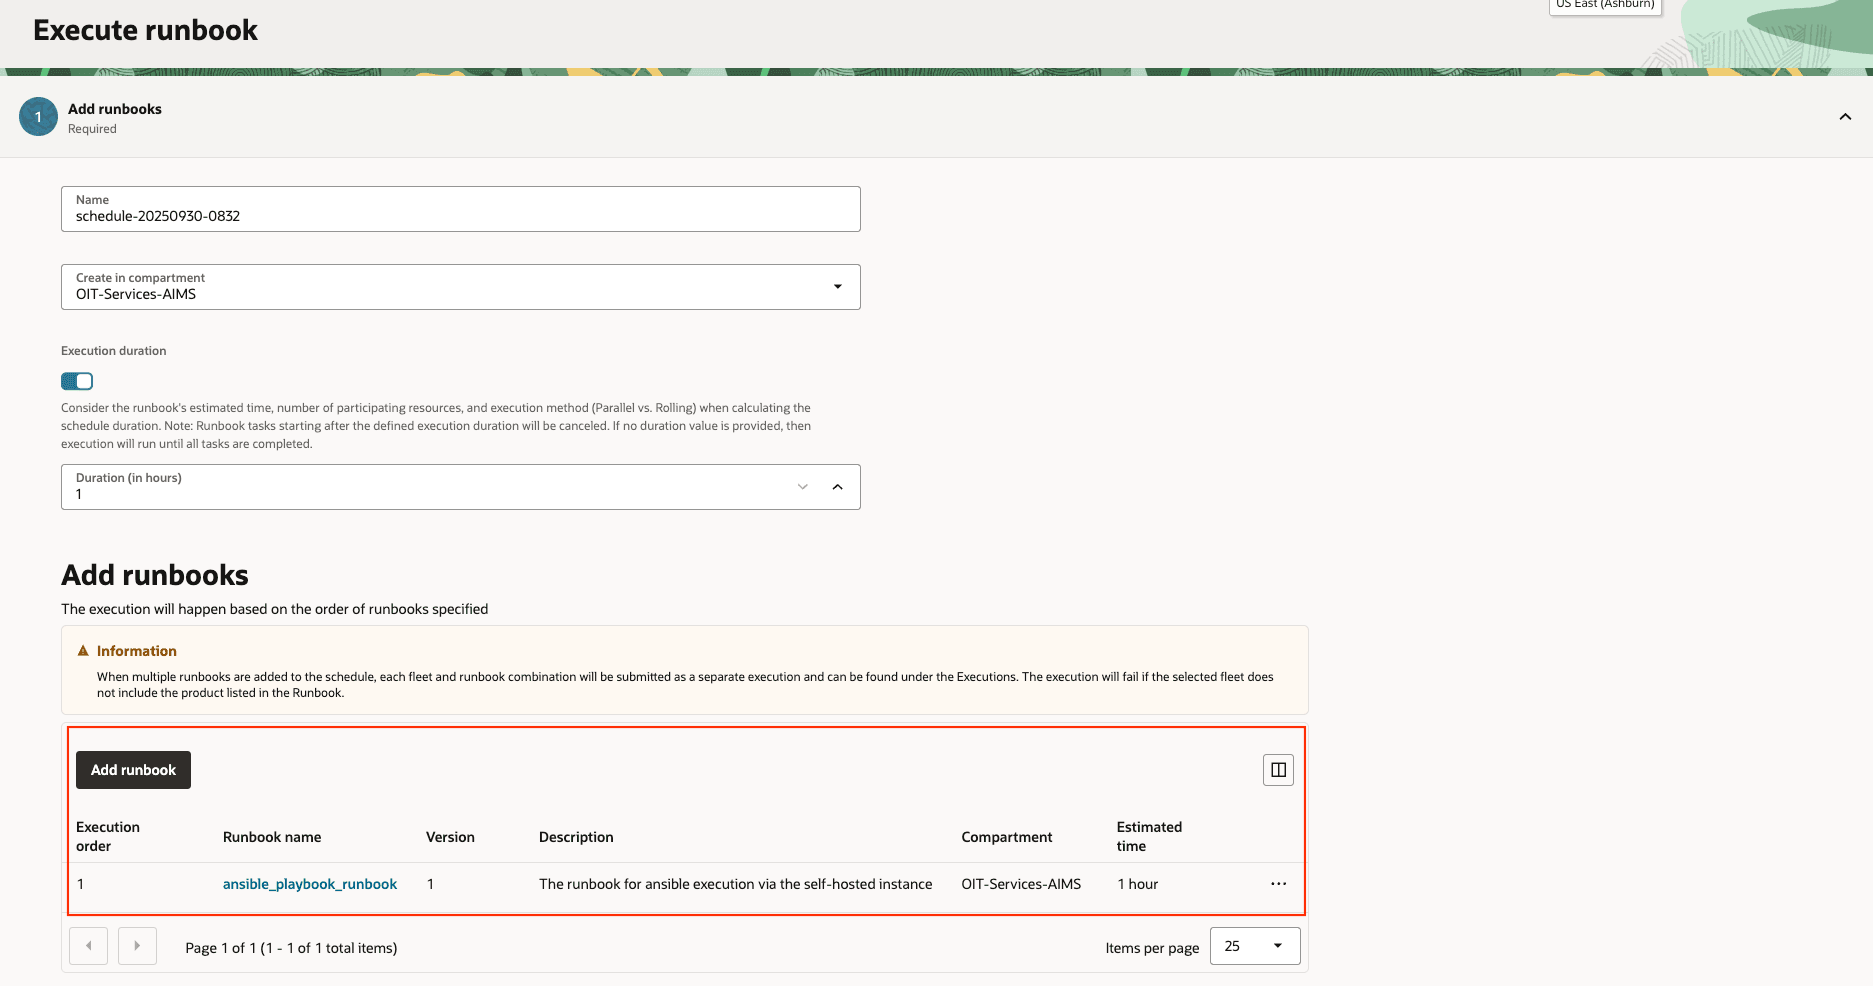
- Click to Execute.
- Executions

Execution Output
After the execution is complete or during the execution, you can monitor the progress of ansible playbook execution.
Check the execution logs in FAM to verify the script ran successfully.
- In the OCI Console, go to Fleet Application Management > Lifecycle Management > Jobs.
- Select the execution job and view its logs to check for errors or success messages (e.g., OS patching job progress).
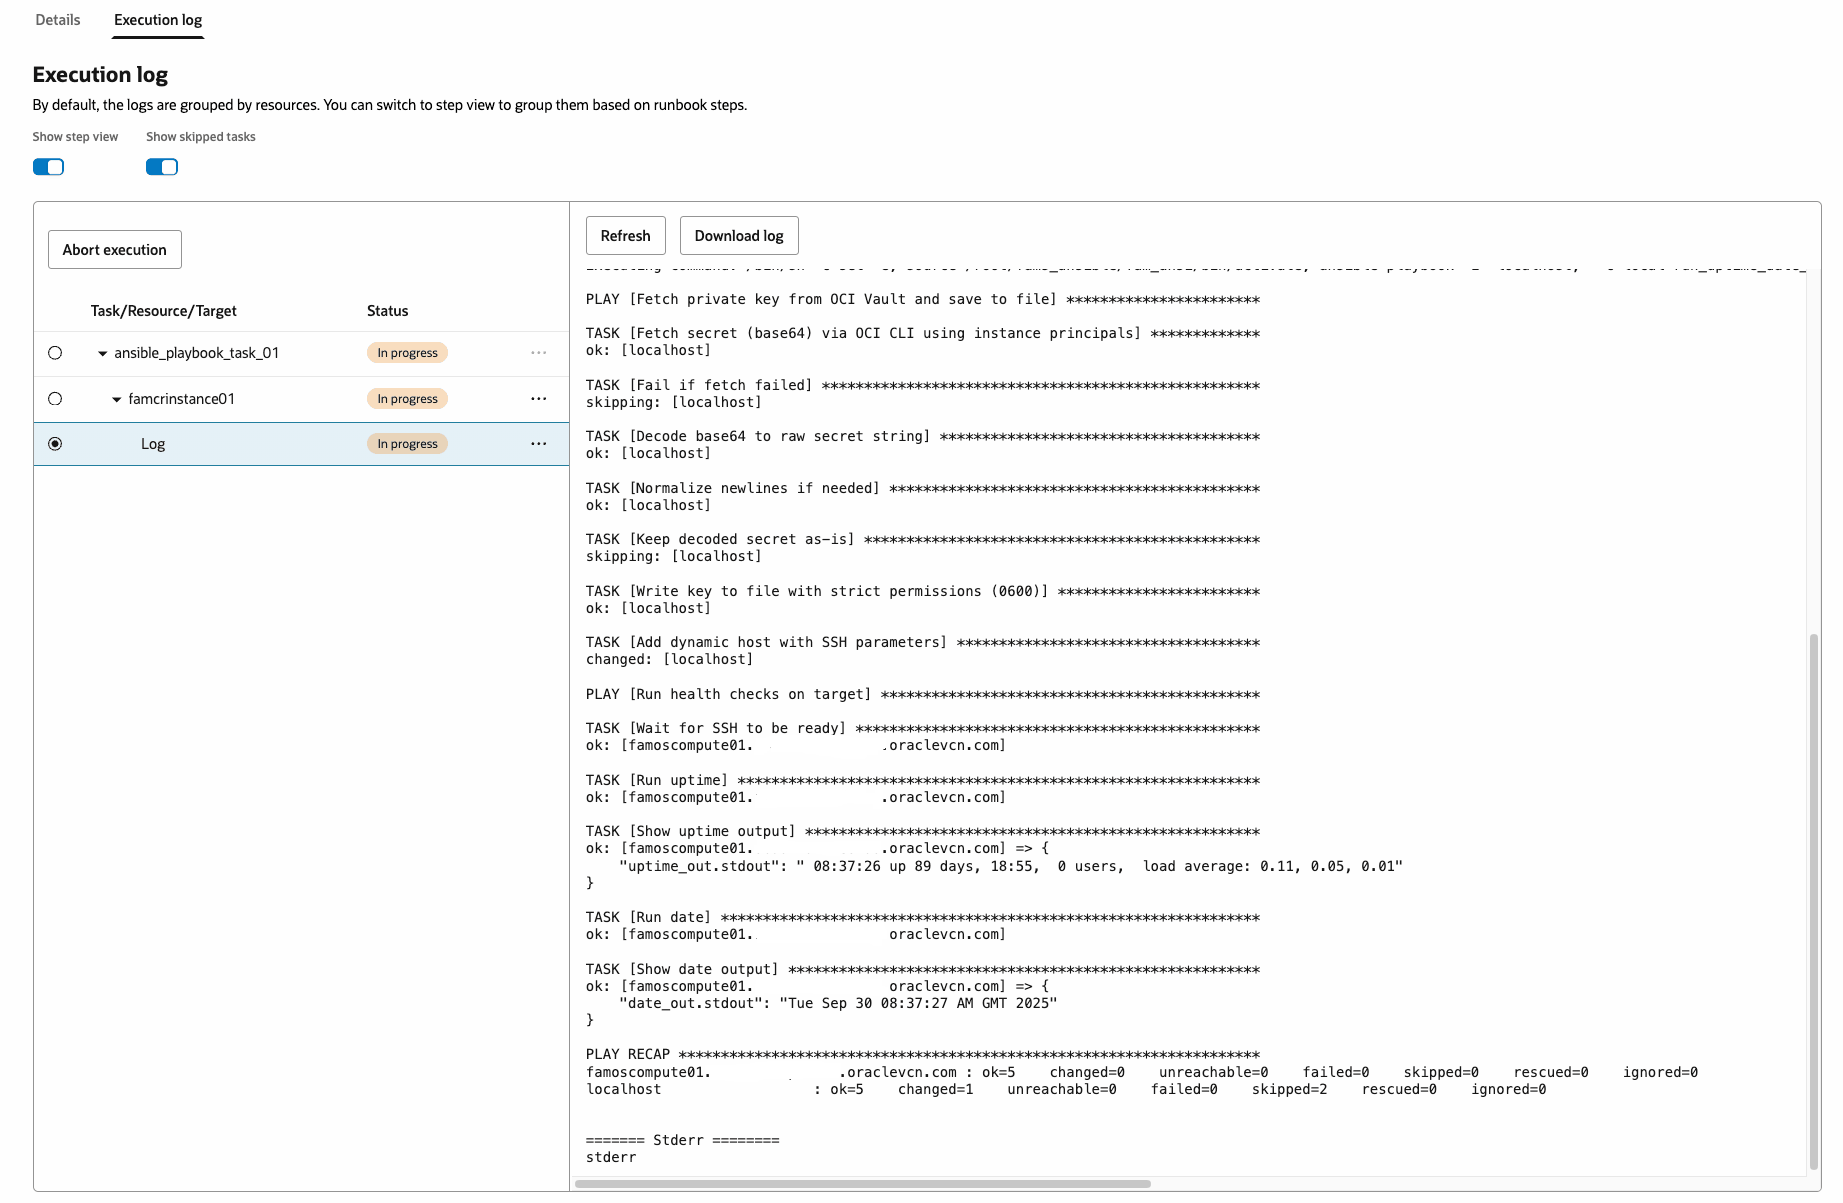
- Ansible log
Parsing the config file
Validating config format
Successfully validated config format
Processing target section
Target section not found or empty, skipping target parsing
Processing subjects section
Subject section patches is missing or invalid. Skipping
Subjects section parsed and written to file
Either Patches section not found or it has empty list
Processing script section
Script section extracted
Processing input\\_variables section
Input variables section not found or empty
Processing credentials section
Credentials section not found or has wrong format
Finished parseJSON function
Mount point: /
/var/lib/oracle-cloud-agent/plugins/oci-fams/executions/run/ocid1.famsschedulerjob.oc1.iad..amaaaaaal4gwqoaahh3nhaske7upkuttqsqkwjbesec525zxsosjxcw2nska/1861f58f-bb31-467e-9350-143060d360c9/run\\_uptime\\_date\\_commands.yml
object content written to file: /var/lib/oracle-cloud-agent/plugins/oci-fams/executions/run/ocid1.famsschedulerjob.oc1.iad..amaaaaaal4gwqoaahh3nhaske7upkuttqsqkwjbesec525zxsosjxcw2nska/1861f58f-bb31-467e-9350-143060d360c9/run\\_uptime\\_date\\_commands.yml
No input variable object storage namespace provided
Executing command: /bin/sh -c set -e; source /root/fams\\_ansible/fam\\_ansi/bin/activate; ansible-playbook -i "localhost," -c local run\\_uptime\\_date\\_commands.yml -e target\\_host="famoscompute01.xxxx.xxxx.oraclevcn.com" -e ssh\\_user="rduser" -e output\\_path="/root/fams\\_ansible/secret\\_value.txt"  -e ssh\\_port=22

PLAY [Fetch private key from OCI Vault and save to file] \\*\\*\\*\\*\\*\\*\\*\\*\\*\\*\\*\\*\\*\\*\\*\\*\\*\\*\\*\\*\\*\\*\\*

TASK [Fetch secret (base64) via OCI CLI using instance principals] \\*\\*\\*\\*\\*\\*\\*\\*\\*\\*\\*\\*\\*
ok: [localhost]

TASK [Fail if fetch failed] \\*\\*\\*\\*\\*\\*\\*\\*\\*\\*\\*\\*\\*\\*\\*\\*\\*\\*\\*\\*\\*\\*\\*\\*\\*\\*\\*\\*\\*\\*\\*\\*\\*\\*\\*\\*\\*\\*\\*\\*\\*\\*\\*\\*\\*\\*\\*\\*\\*\\*\\*\\*
skipping: [localhost]

TASK [Decode base64 to raw secret string] \\*\\*\\*\\*\\*\\*\\*\\*\\*\\*\\*\\*\\*\\*\\*\\*\\*\\*\\*\\*\\*\\*\\*\\*\\*\\*\\*\\*\\*\\*\\*\\*\\*\\*\\*\\*\\*\\*
ok: [localhost]

TASK [Normalize newlines if needed] \\*\\*\\*\\*\\*\\*\\*\\*\\*\\*\\*\\*\\*\\*\\*\\*\\*\\*\\*\\*\\*\\*\\*\\*\\*\\*\\*\\*\\*\\*\\*\\*\\*\\*\\*\\*\\*\\*\\*\\*\\*\\*\\*\\*
ok: [localhost]

TASK [Keep decoded secret as-is] \\*\\*\\*\\*\\*\\*\\*\\*\\*\\*\\*\\*\\*\\*\\*\\*\\*\\*\\*\\*\\*\\*\\*\\*\\*\\*\\*\\*\\*\\*\\*\\*\\*\\*\\*\\*\\*\\*\\*\\*\\*\\*\\*\\*\\*\\*\\*
skipping: [localhost]

TASK [Write key to file with strict permissions (0600)] \\*\\*\\*\\*\\*\\*\\*\\*\\*\\*\\*\\*\\*\\*\\*\\*\\*\\*\\*\\*\\*\\*\\*\\*
ok: [localhost]

TASK [Add dynamic host with SSH parameters] \\*\\*\\*\\*\\*\\*\\*\\*\\*\\*\\*\\*\\*\\*\\*\\*\\*\\*\\*\\*\\*\\*\\*\\*\\*\\*\\*\\*\\*\\*\\*\\*\\*\\*\\*\\*
changed: [localhost]

PLAY [Run health checks on target] \\*\\*\\*\\*\\*\\*\\*\\*\\*\\*\\*\\*\\*\\*\\*\\*\\*\\*\\*\\*\\*\\*\\*\\*\\*\\*\\*\\*\\*\\*\\*\\*\\*\\*\\*\\*\\*\\*\\*\\*\\*\\*\\*\\*\\*

TASK [Wait for SSH to be ready] \\*\\*\\*\\*\\*\\*\\*\\*\\*\\*\\*\\*\\*\\*\\*\\*\\*\\*\\*\\*\\*\\*\\*\\*\\*\\*\\*\\*\\*\\*\\*\\*\\*\\*\\*\\*\\*\\*\\*\\*\\*\\*\\*\\*\\*\\*\\*\\*
ok: [famoscompute01.xxx.xxx.oraclevcn.com]

TASK [Run uptime] \\*\\*\\*\\*\\*\\*\\*\\*\\*\\*\\*\\*\\*\\*\\*\\*\\*\\*\\*\\*\\*\\*\\*\\*\\*\\*\\*\\*\\*\\*\\*\\*\\*\\*\\*\\*\\*\\*\\*\\*\\*\\*\\*\\*\\*\\*\\*\\*\\*\\*\\*\\*\\*\\*\\*\\*\\*\\*\\*\\*\\*\\*
ok: [famoscompute01.xxx.xxx.oraclevcn.com]

TASK [Show uptime output] \\*\\*\\*\\*\\*\\*\\*\\*\\*\\*\\*\\*\\*\\*\\*\\*\\*\\*\\*\\*\\*\\*\\*\\*\\*\\*\\*\\*\\*\\*\\*\\*\\*\\*\\*\\*\\*\\*\\*\\*\\*\\*\\*\\*\\*\\*\\*\\*\\*\\*\\*\\*\\*\\*
ok: [famoscompute01.xxx.xxx.oraclevcn.com] => {
 `    `"uptime\\_out.stdout": " 08:37:26 up 89 days, 18:55,  0 users,  load average: 0.11, 0.05, 0.01"
 }

TASK [Run date] \\*\\*\\*\\*\\*\\*\\*\\*\\*\\*\\*\\*\\*\\*\\*\\*\\*\\*\\*\\*\\*\\*\\*\\*\\*\\*\\*\\*\\*\\*\\*\\*\\*\\*\\*\\*\\*\\*\\*\\*\\*\\*\\*\\*\\*\\*\\*\\*\\*\\*\\*\\*\\*\\*\\*\\*\\*\\*\\*\\*\\*\\*\\*\\*
ok: [famoscompute01.xxx.xxx.oraclevcn.com]

TASK [Show date output] \\*\\*\\*\\*\\*\\*\\*\\*\\*\\*\\*\\*\\*\\*\\*\\*\\*\\*\\*\\*\\*\\*\\*\\*\\*\\*\\*\\*\\*\\*\\*\\*\\*\\*\\*\\*\\*\\*\\*\\*\\*\\*\\*\\*\\*\\*\\*\\*\\*\\*\\*\\*\\*\\*\\*\\*
ok: [famoscompute01.xxx.xxx.oraclevcn.com] => {
 `    `"date\\_out.stdout": "Tue Sep 30 08:37:27 AM GMT 2025"
 }

PLAY RECAP \\*\\*\\*\\*\\*\\*\\*\\*\\*\\*\\*\\*\\*\\*\\*\\*\\*\\*\\*\\*\\*\\*\\*\\*\\*\\*\\*\\*\\*\\*\\*\\*\\*\\*\\*\\*\\*\\*\\*\\*\\*\\*\\*\\*\\*\\*\\*\\*\\*\\*\\*\\*\\*\\*\\*\\*\\*\\*\\*\\*\\*\\*\\*\\*\\*\\*\\*\\*\\*
famoscompute01.xxx.xxx.oraclevcn.com : ok=5    changed=0    unreachable=0    failed=0    skipped=0    rescued=0    ignored=0
 localhost                  : ok=5    changed=1    unreachable=0    failed=0    skipped=2    rescued=0    ignored=0


 ======= Stderr ========

   stderr
Acknowledgments
- Authors - Jerry Shin (Senior Principal Site Reliability Engineer)
- Contributors - Shabbir Hussain (Consulting Member Technical Staff), Saikumar Daram (Principal Site Reliability Engineer), Fabio Bonisoli (Senior Principal Product Manager)
More Learning Resources
Explore other labs on docs.oracle.com/learn or access more free learning content on the Oracle Learning YouTube channel. Additionally, visit education.oracle.com/learning-explorer to become an Oracle Learning Explorer.
For product documentation, visit Oracle Help Center.
Orchestrating Ansible Playbooks with OCI Fleet Application Management
G53227-01