Set up an OCI Hold Your Own Key using Thales CipherTrust Manager with OCI API Gateway
Introduction
This tutorial provides step-by-step instructions to set up Hold Your Own Key (HYOK) with Thales CipherTrust Manager (CTM) using the Oracle Cloud Infrastructure (OCI) API Gateway option.
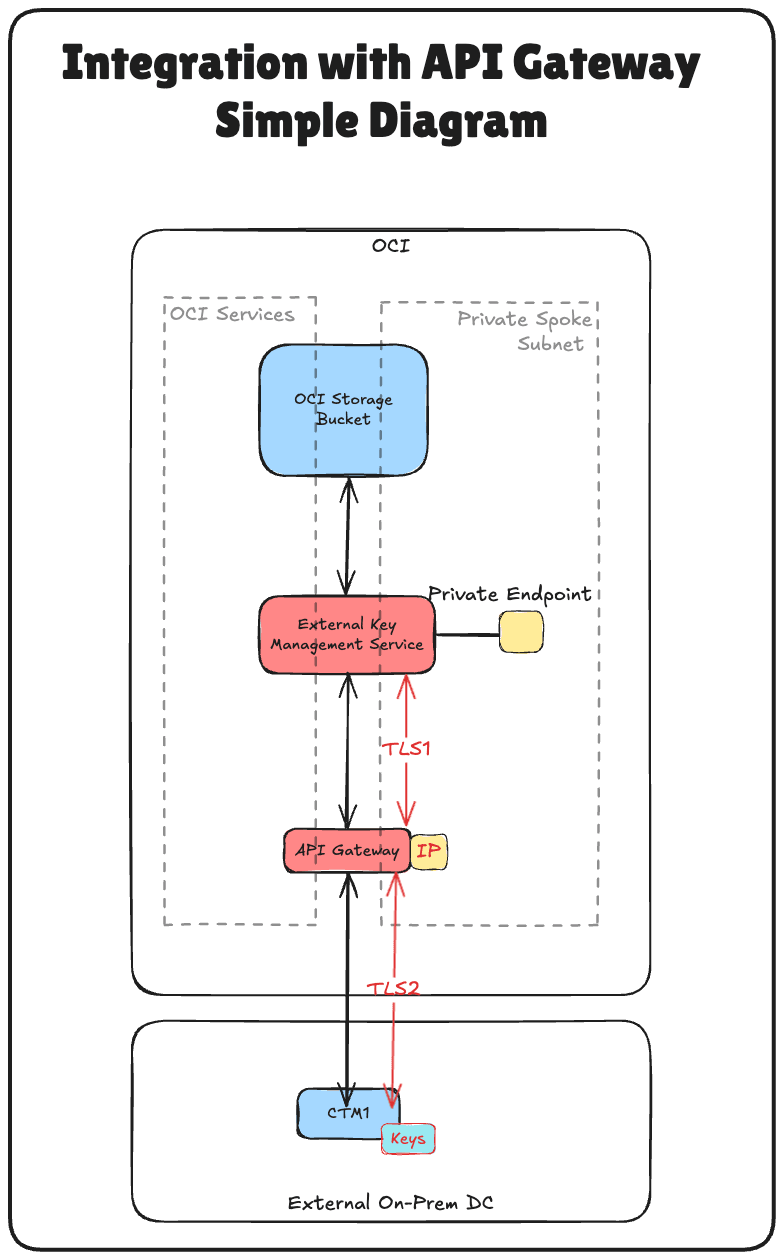
HYOK enables you to retain complete ownership and control over your encryption keys by hosting them externally—outside Oracle’s infrastructure, while allowing Oracle services to use them securely. In this setup, the OCI API Gateway plays a critical role as a secure, manageable, and scalable bridge between Oracle Cloud Infrastructure External Key Management Service (OCI External KMS) and your Thales CipherTrust Manager instance.
Why use OCI API Gateway?
By inserting an OCI API Gateway between the OCI External KMS and your Thales CipherTrust Manager, you gain:
- Secure Access Control: The gateway enforces authentication through OAuth2 using confidential client credentials, ensuring that only trusted requests reach your key manager.
- TLS Termination and Certificate Management: Easily manage SSL/TLS certificates, enabling secure encrypted communication between OCI and Thales CipherTrust Manager.
- Network Isolation: The OCI API Gateway abstracts direct access to your Thales CipherTrust Manager, allowing for controlled exposure thorugh private endpoints and strict security policies.
- Auditability and Observability: Gain visibility into key usage and access attempts through integrated logging and monitoring of API calls.
- Scalability and Flexibility: Future-proof your architecture by decoupling the OCI External KMS integration logic from the Thales CipherTrust Manager backend, making it easier to swap components, apply updates, or add middleware if needed.
In the rest of this tutorial, you will configure all required infrastructure components, including networking, DNS, certificate management, identity federation, and finally, integration with OCI Vault and OCI Object Storage using external keys.
This tutorial builds upon the technical foundation established in the tutorial: Set Up Two Thales CipherTrust Cloud Key Manager Appliances in OCI, Create a Cluster between them, and Configure One as a Certificate Authority.
If you want to implement Hold Your Own Key (HYOK) using Thales CipherTrust Manager without OCI API Gateway option, follow this tutorial: Set up OCI Hold Your Own Key (HYOK) using CipherTrust Manager without the API Gateway.
Note: In this tutorial, the terms Thales CipherTrust Cloud Key Manager (CCKM) and Thales CipherTrust Manager (CTM) are used interchangeably. Both refer to the same product.
Objectives
- Task 1: Review the cloud network architecture.
- Task 2: Configure OCI domain name service (DNS) for all locations.
- Task 3: Create a certificate for the OCI API Gateway.
- Task 4: Upload the signed OCI API Gateway certificate with the CA bundle.
- Task 5: Make sure the private endpoint is allowed to communicate with the OCI API Gateway from the firewall/security list/network security group perspective.
- Task 6: Create an OCI API Gateway.
- Task 7: Create API deployment with FQDN details.
- Task 8: Create a confidential resource app and associated confidential client applications (application integrations) and collect the client and secrets in OCI.
- Task 9: Collect the identity domain URL from OCI.
- Task 10: Create identity providers in Thales CipherTrust Manager.
- Task 11: Add Oracle tenancies in Thales CipherTrust Manager.
- Task 12: Create a private endpoint for the OCI External Key Manager Service.
- Task 13: Add external vaults in Thales CipherTrust Manager.
- Task 14: Create an OCI External Key Management Service vault.
- Task 15: Add external keys in Thales CipherTrust Manager.
- Task 16: Create key references in OCI.
- Task 17: Create an OCI Object Storage bucket with customer-managed keys.
- Task 18: Block and unblock Oracle keys and test the object storage bucket accessibility in Thales CipherTrust Manager and OCI.
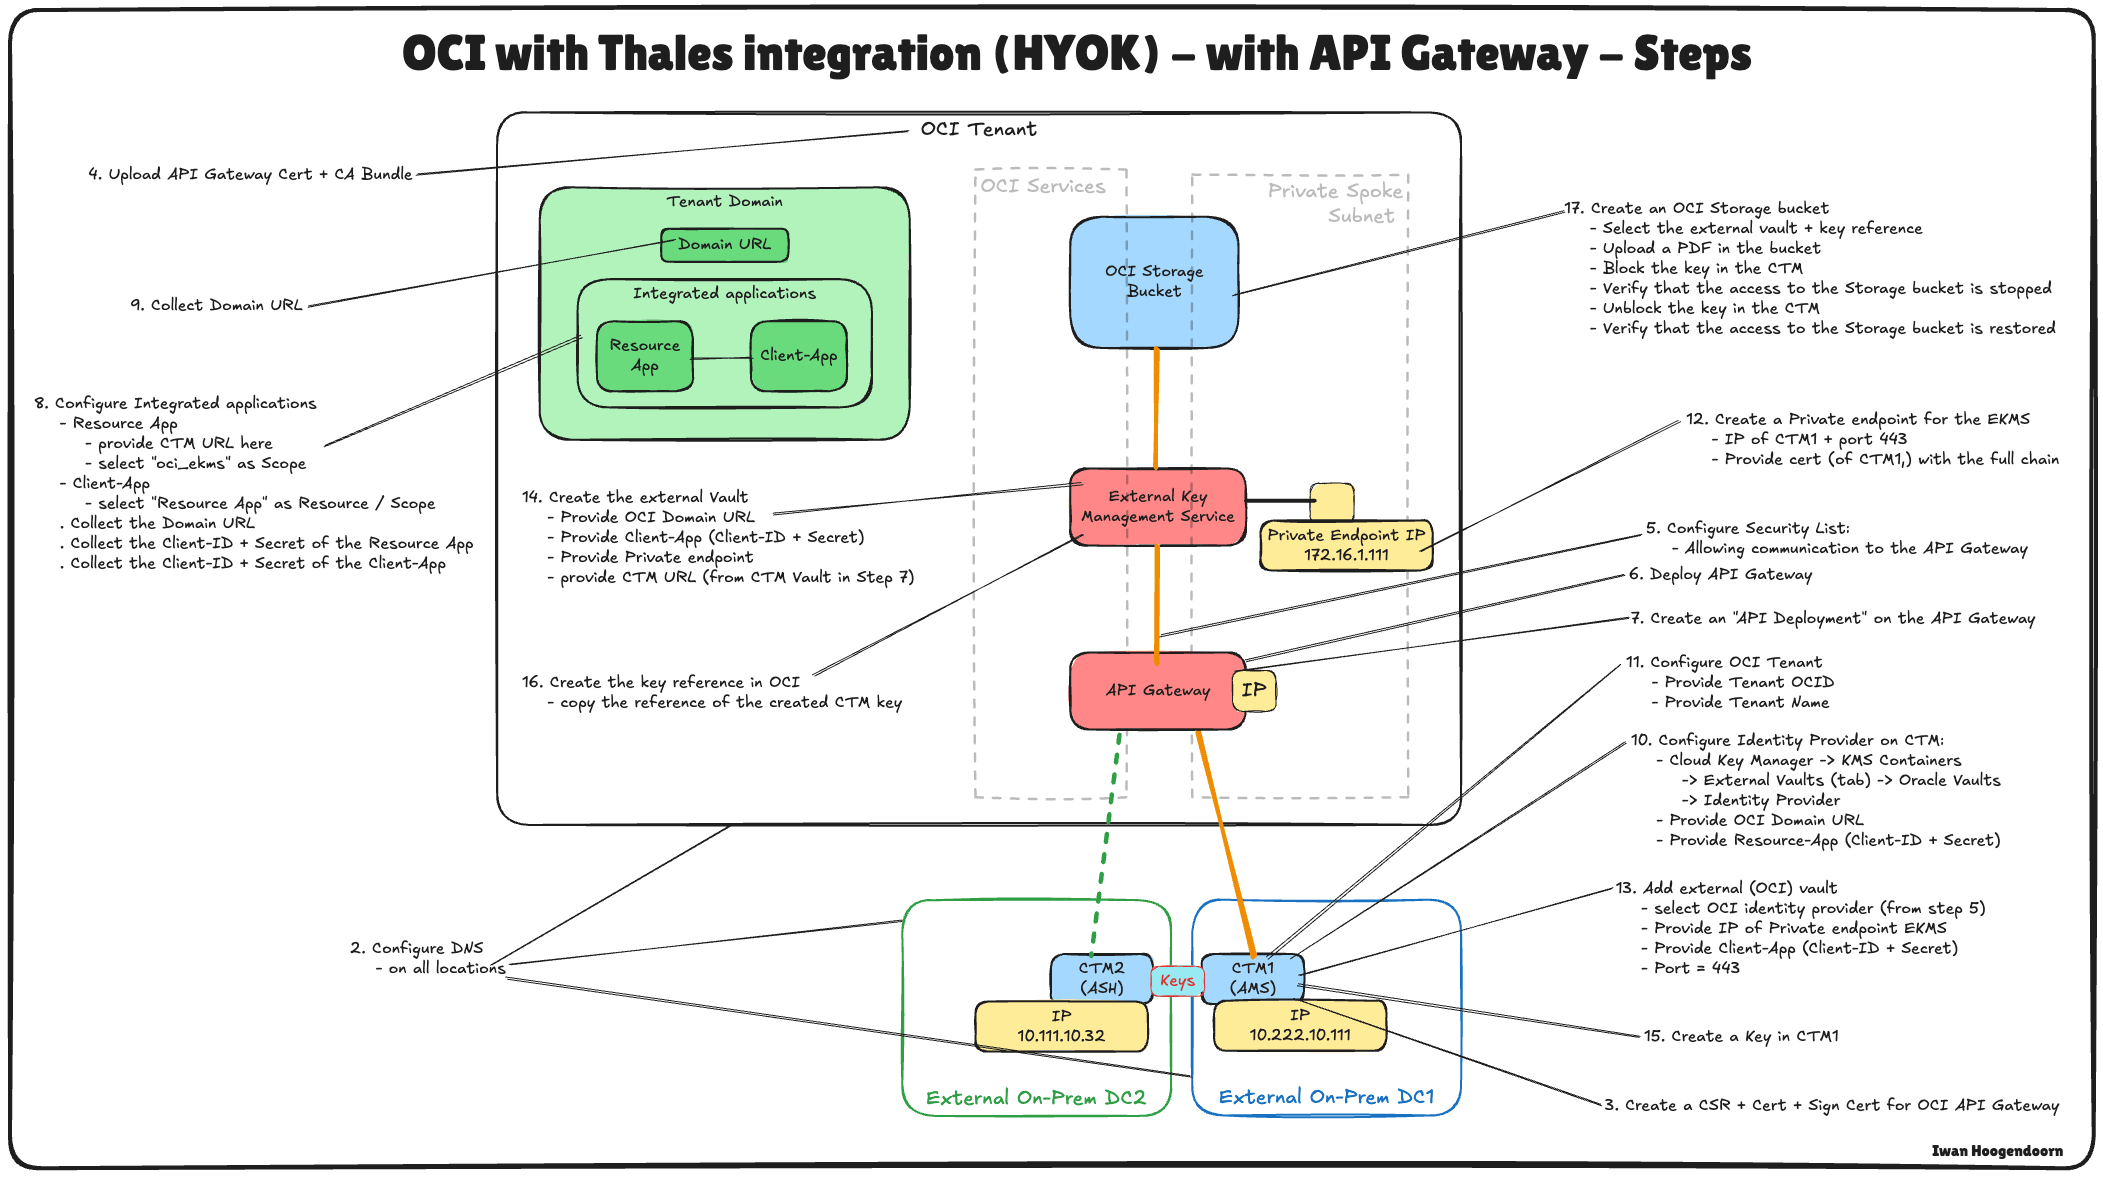
The following image illustrates the components and configuration setup for all the steps in this tutorial.
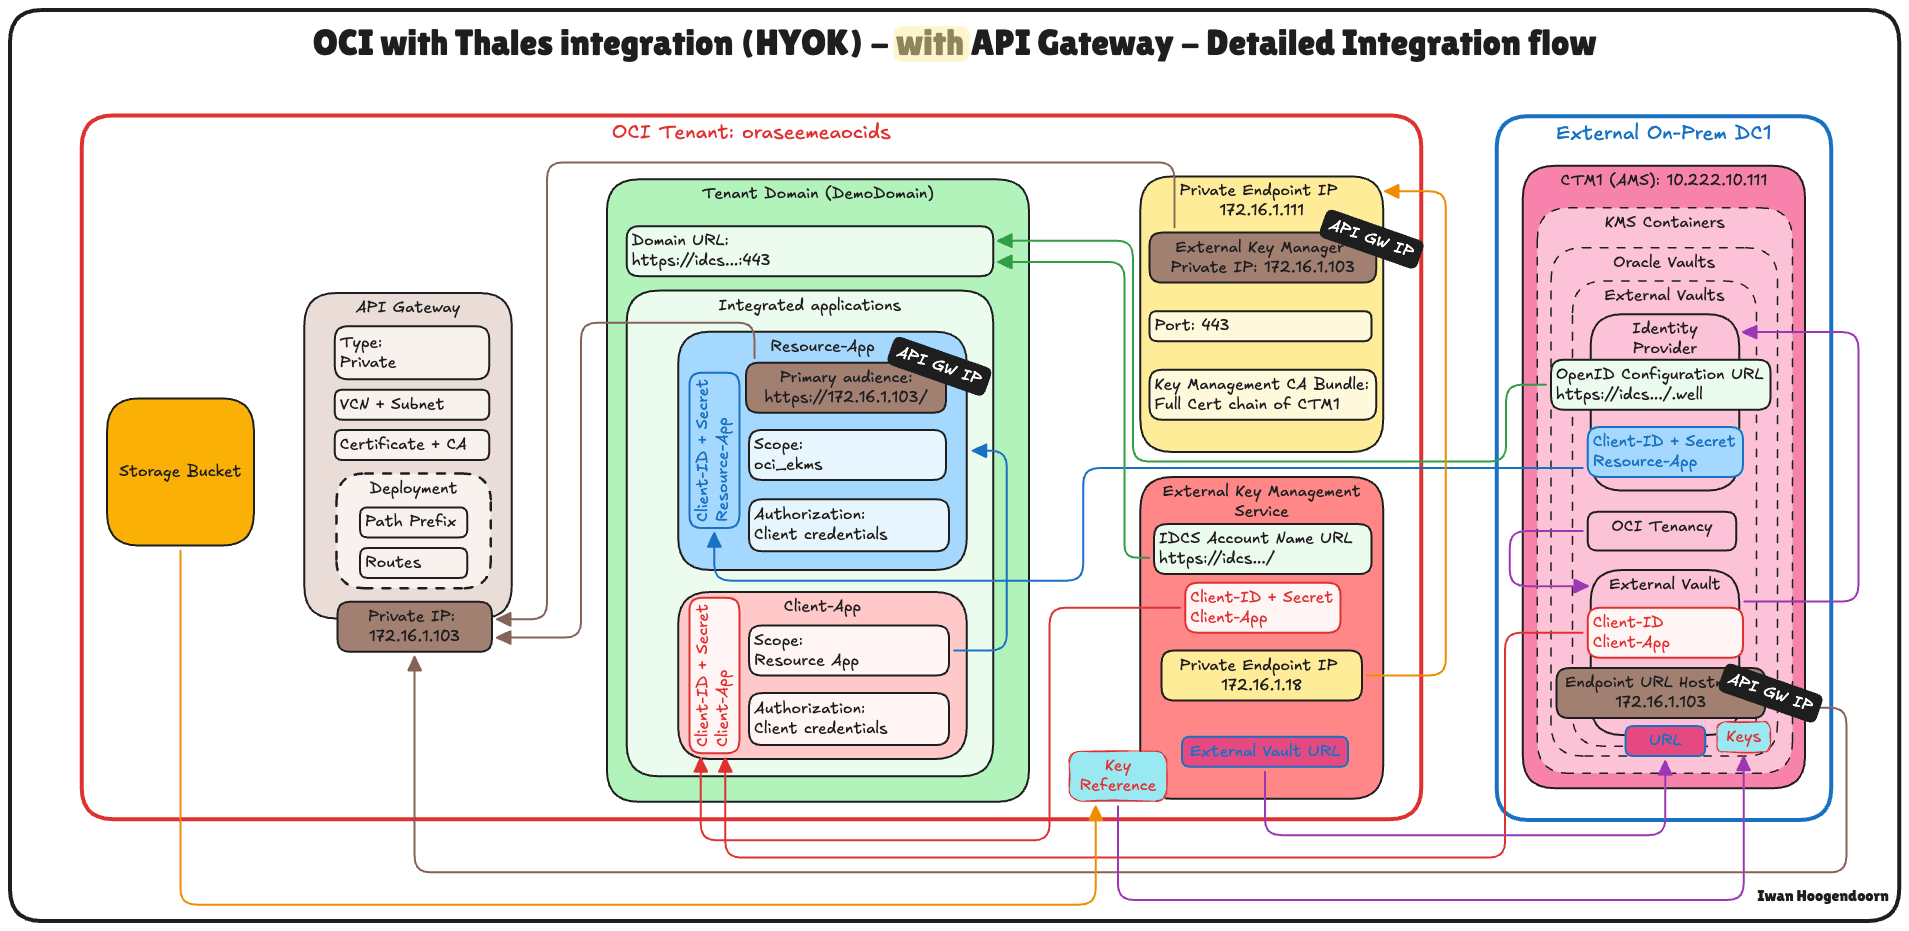
Task 1: Review the Cloud Network Architecture
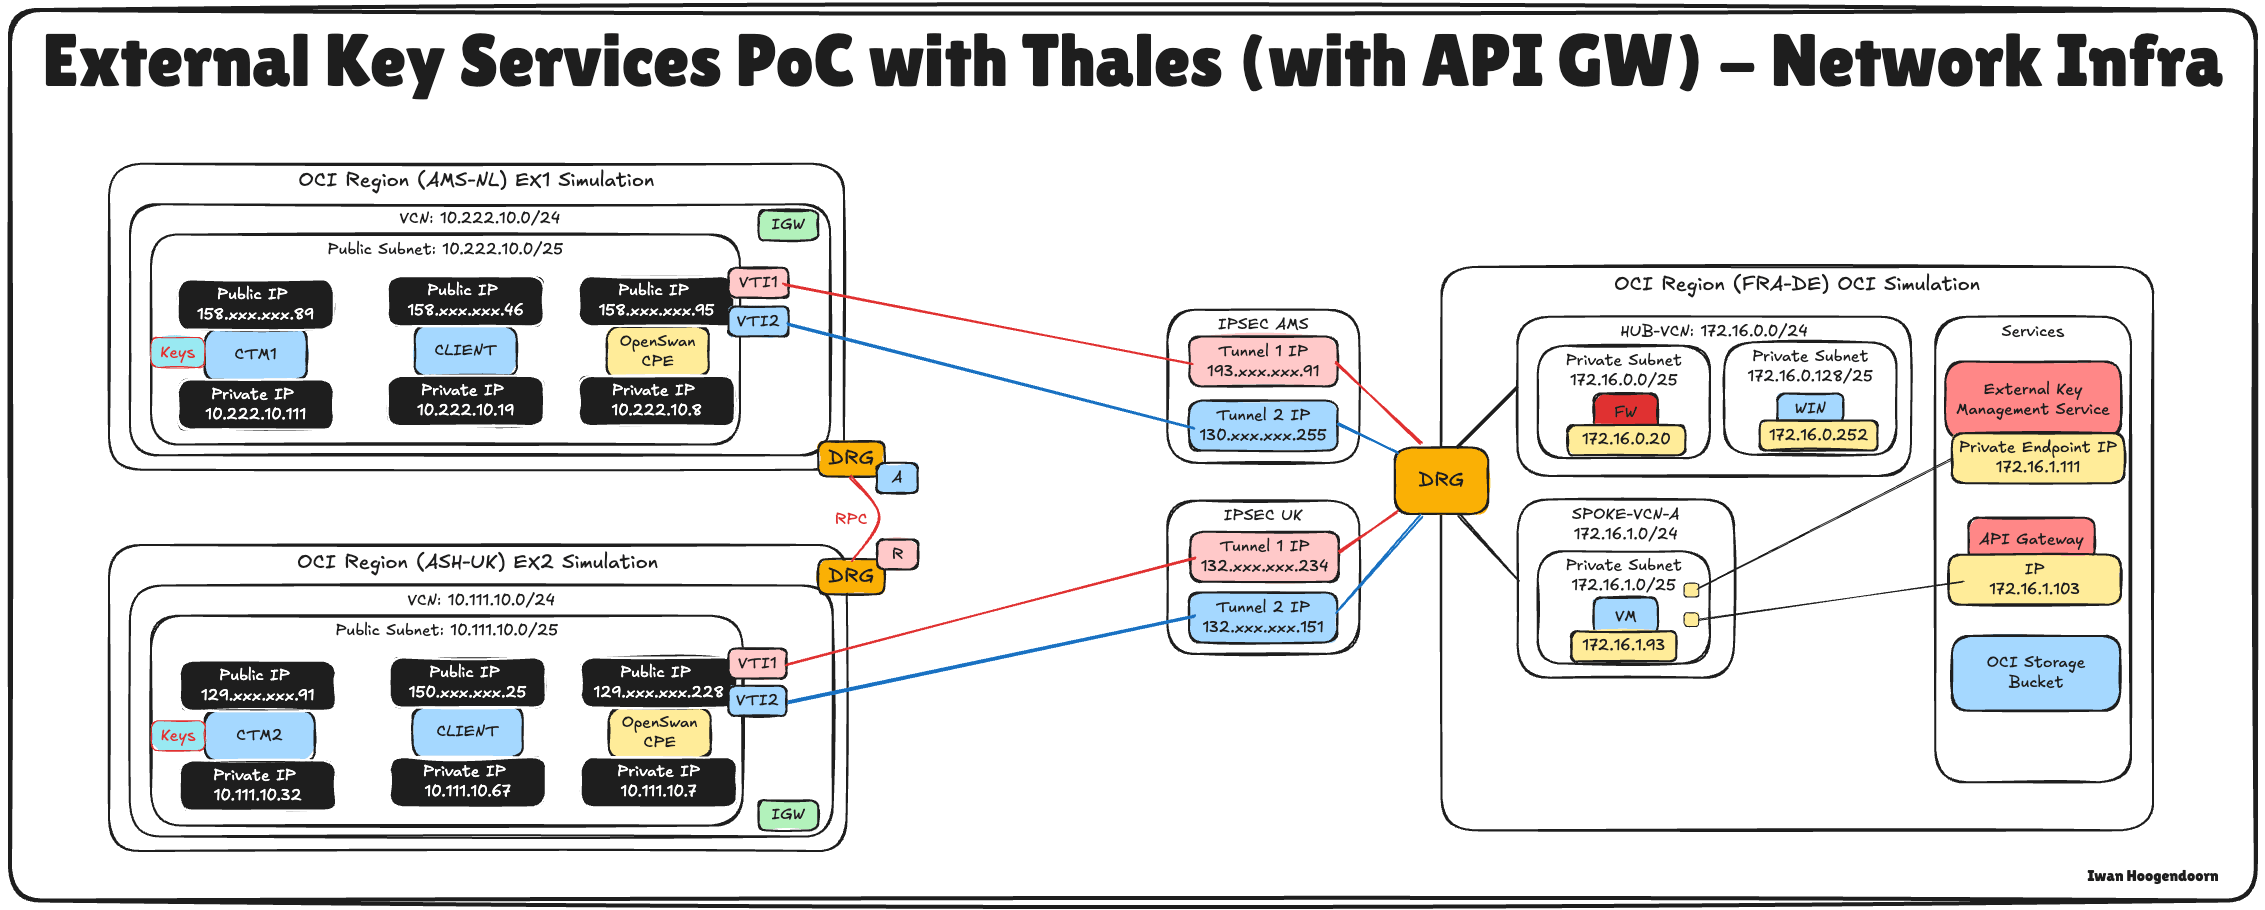
Before we dive into the technical steps of configuring Hold Your Own Key (HYOK) with Thales CipherTrust Manager, it is essential to understand the cloud network architecture in which this setup resides.
In this scenario, three OCI regions are used:
- Two OCI regions simulate on-premises data centers. These regions are connected to OCI through VPN tunnels, representing hybrid environments.
- The third OCI region represents the primary OCI environment and follows a hub-and-spoke Virtual Cloud Network (VCN) architecture. In this design:
- The hub VCN hosts shared network services such as firewalls.
- Multiple spoke VCNs connect to the hub and host various workloads.
Connectivity between the two simulated on-premises data centers is established using Remote Peering Connections (RPC). However, for this tutorial, the VPN setup, RPC configuration, and hub-and-spoke VCN architecture details are considered out of scope and will not be covered.
-
To set up VPN connections to OCI where a data center is simulated, see Set up an Oracle Cloud Infrastructure Site-to-Site VPN with Static Routing Between two OCI Regions.
-
To set up RPC connections between OCI regions, see Set up RPC Connection between Two Tenants and their Dynamic Routing Gateways.
-
To set up an OCI hub and spoke VNC network architecture, see Route Hub and Spoke VCN with pfSense Firewall in the Hub VCN.
This tutorial focuses strictly on setting up HYOK using Thales CipherTrust Manager deployed in the Amsterdam (AMS) region, which is one of the simulated on-premises data centers. All key management operations will be performed from this Thales CipherTrust Manager instance.
The external key manager private enables OCI to communicate securely with the external Thales CipherTrust Manager and will be deployed in one of the spoke VCNs in the primary OCI region. This ensures a secure and direct communication path between OCI services and the external key manager without exposing traffic to the public internet.
This architecture supports strong security and compliance postures for sensitive workloads in OCI by isolating the key management within a well-defined and secure network boundary.
The following image illustrates the complete architecture.
Task 2: Configure OCI DNS for All Locations
To ensure proper communication between OCI, the API gateway, and the Thales CipherTrust Manager, you must configure DNS resolution for all relevant components using Private DNS Zones in the OCI Console.
The following image illustrates the components and configuration setup in this task.
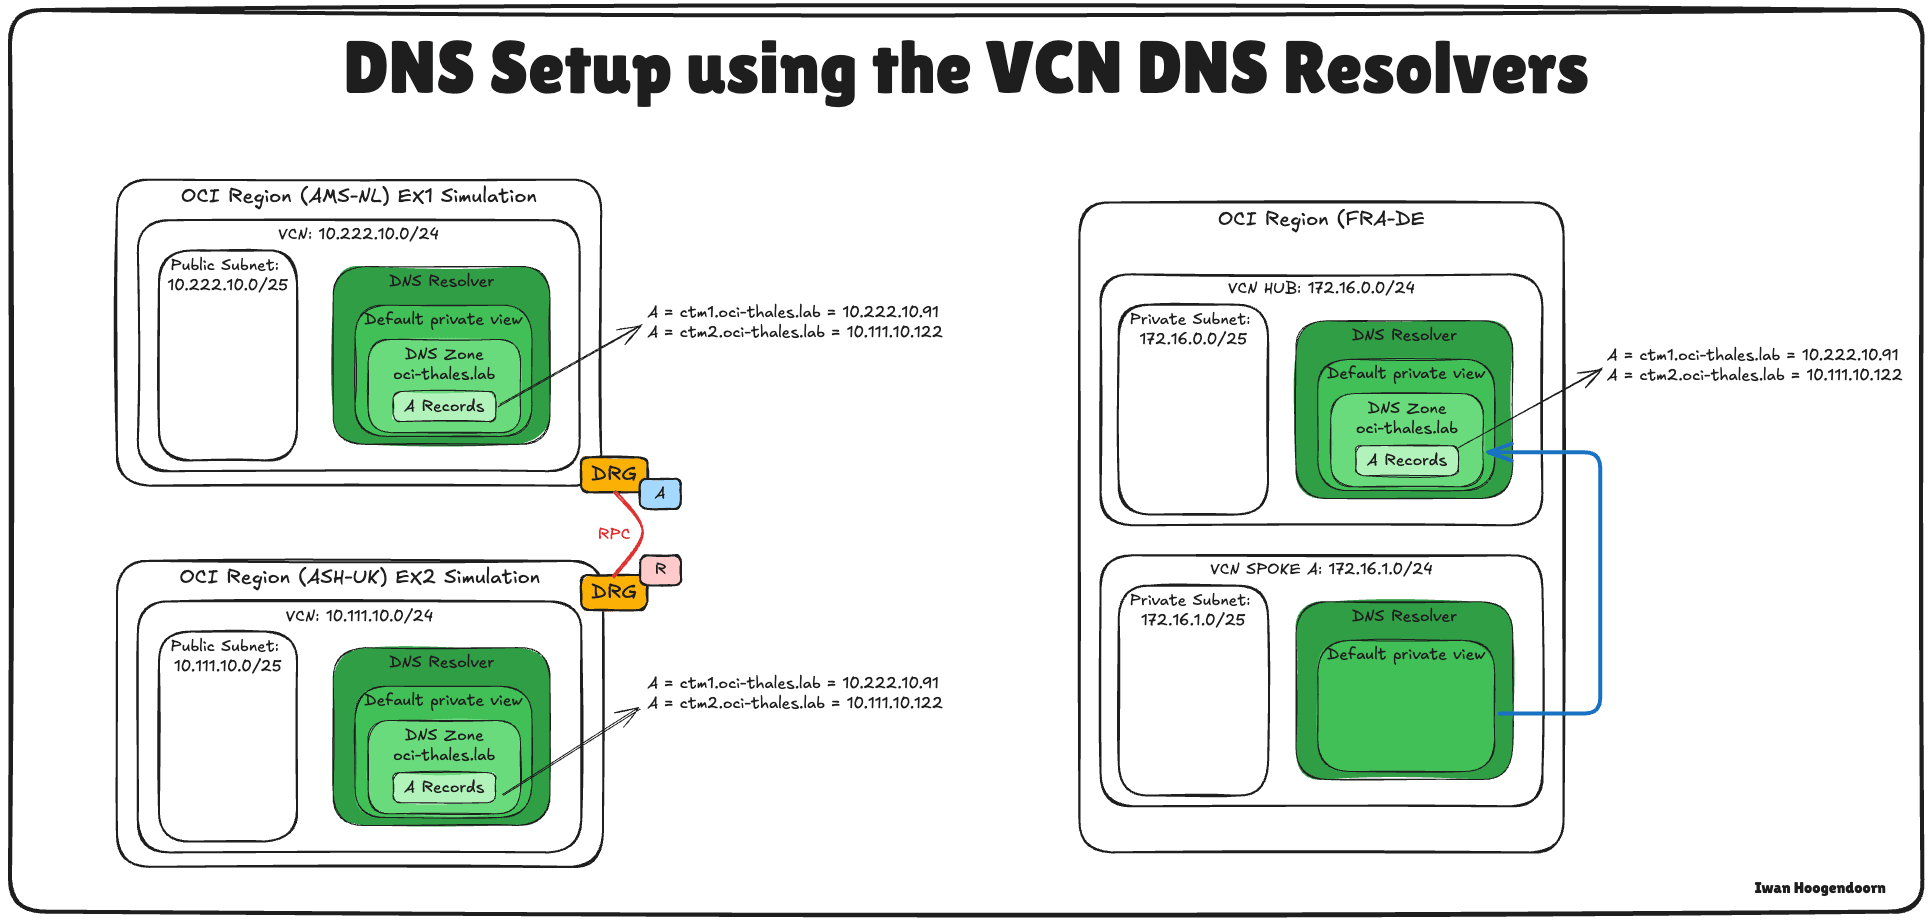
Configuring OCI DNS for AMS and ASH were already done in this tutorial, see Set Up Two Thales CipherTrust Cloud Key Manager Appliances in OCI, Create a Cluster between them, and Configure One as a Certificate Authority. Use the same tutorial to configure the DNS in FRA’s Hub VCN.
-
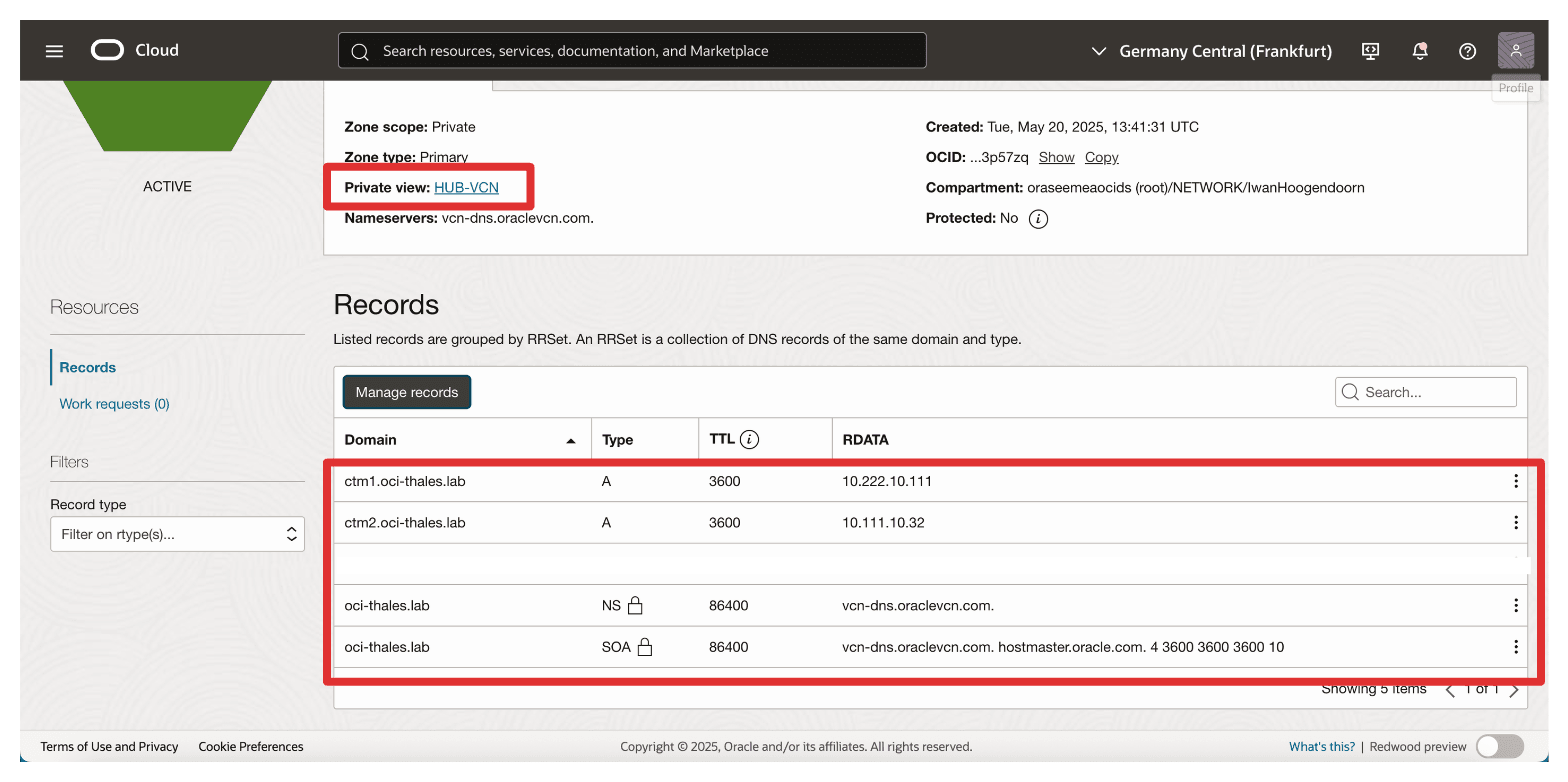
The private view of the hub VCN in FRA should look like this:
We have two options to enable DNS resolution from the spoke A VCN, configure a separate private view for spoke A or associate the hub VCN’s private view with spoke A.
In this setup, we will use the latter approach by associating the hub private view with the spoke A VCN.
-
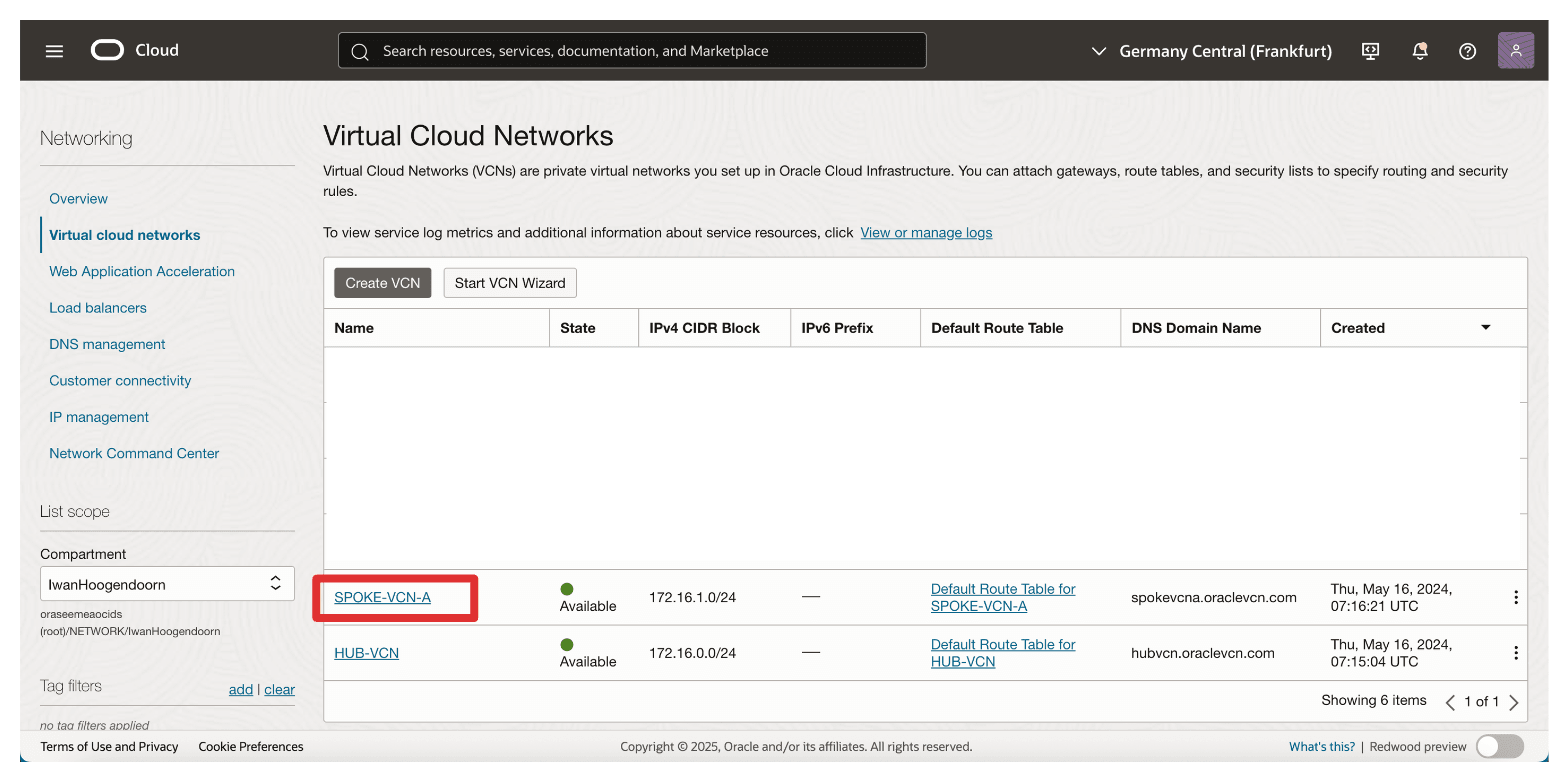
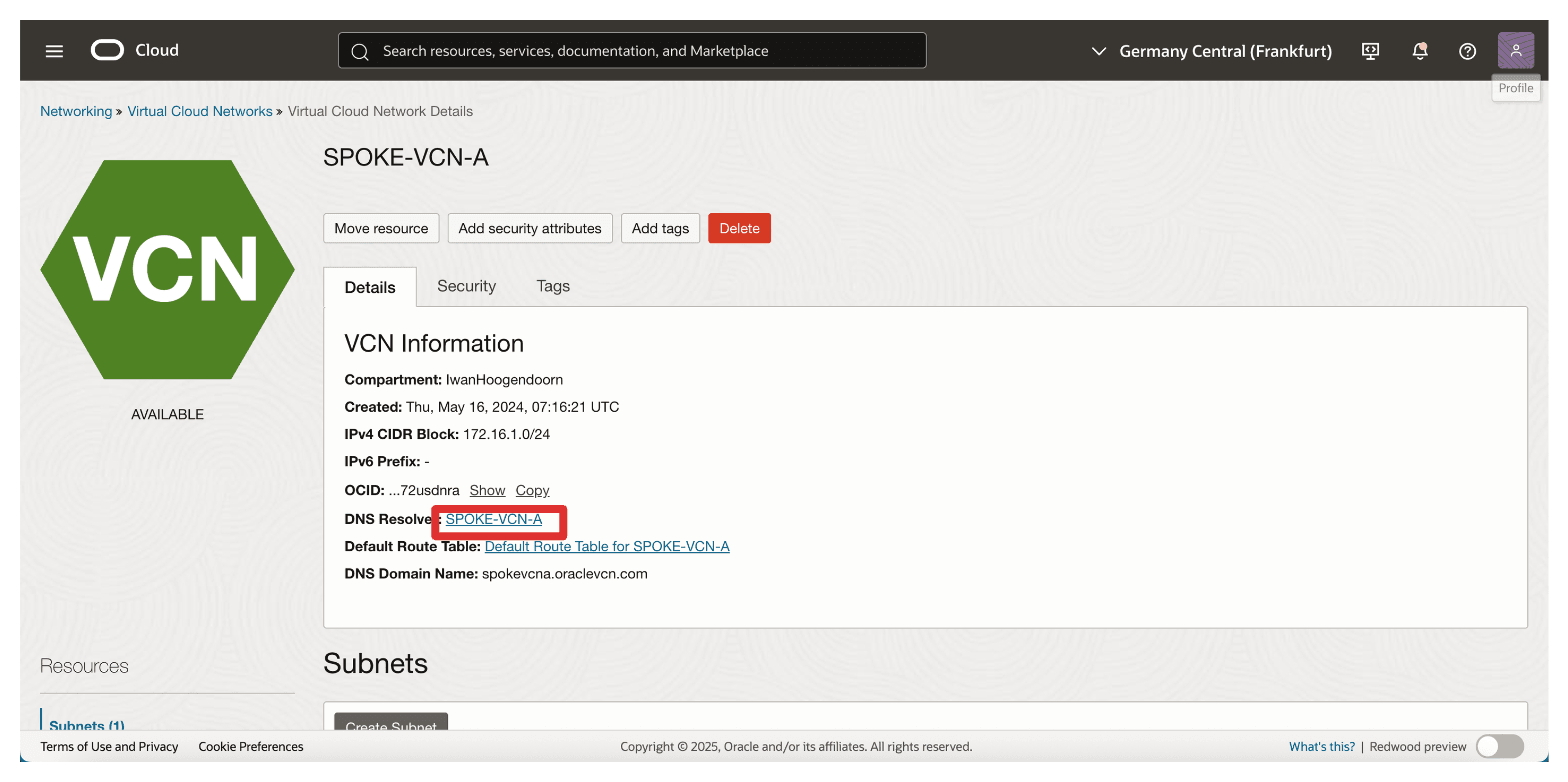
Log in to the OCI Console, navigate to Virtual cloud networks and select Spoke A VCN.
-
Click DNS Resolver.
-
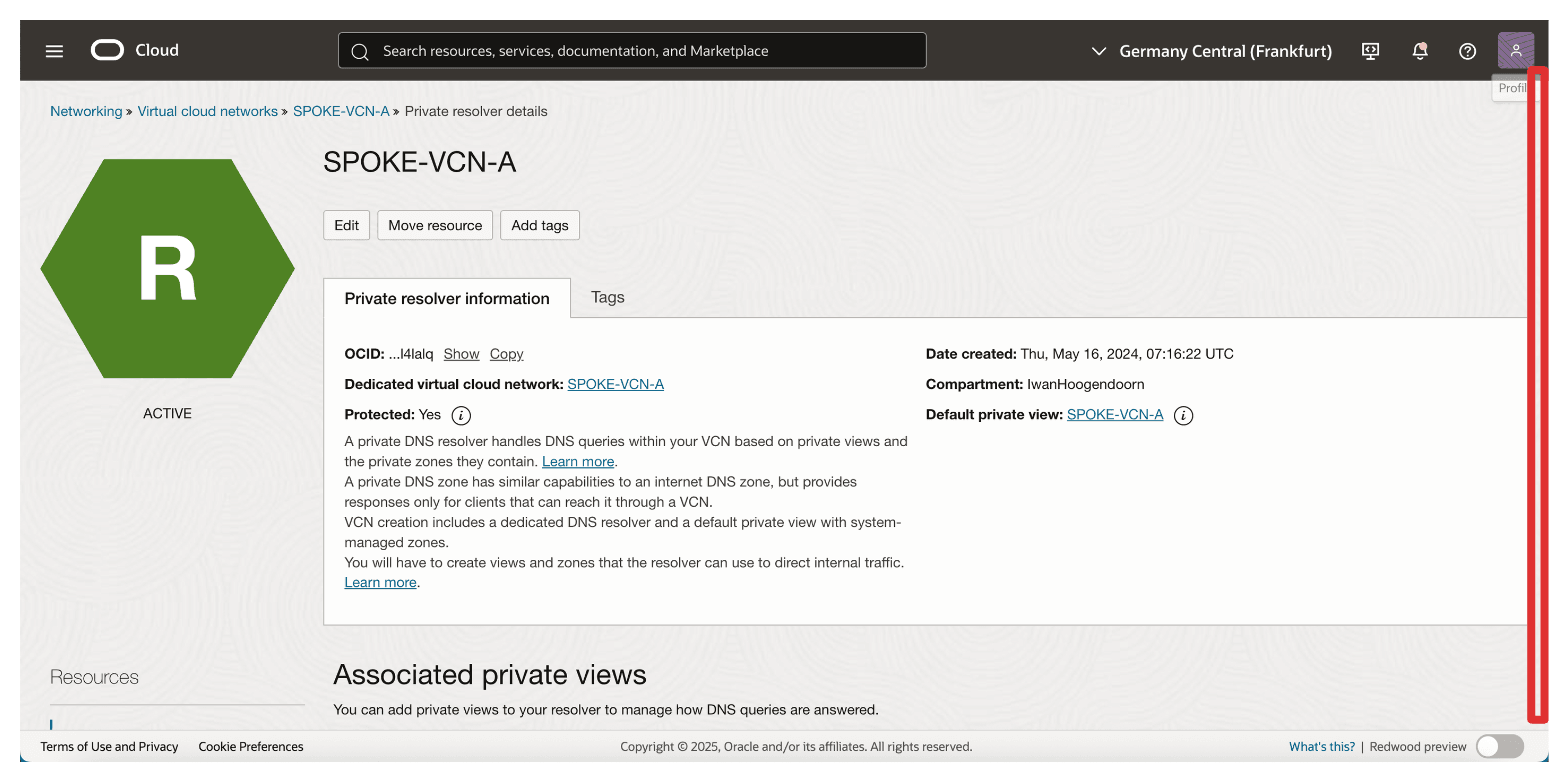
Scroll down.
-
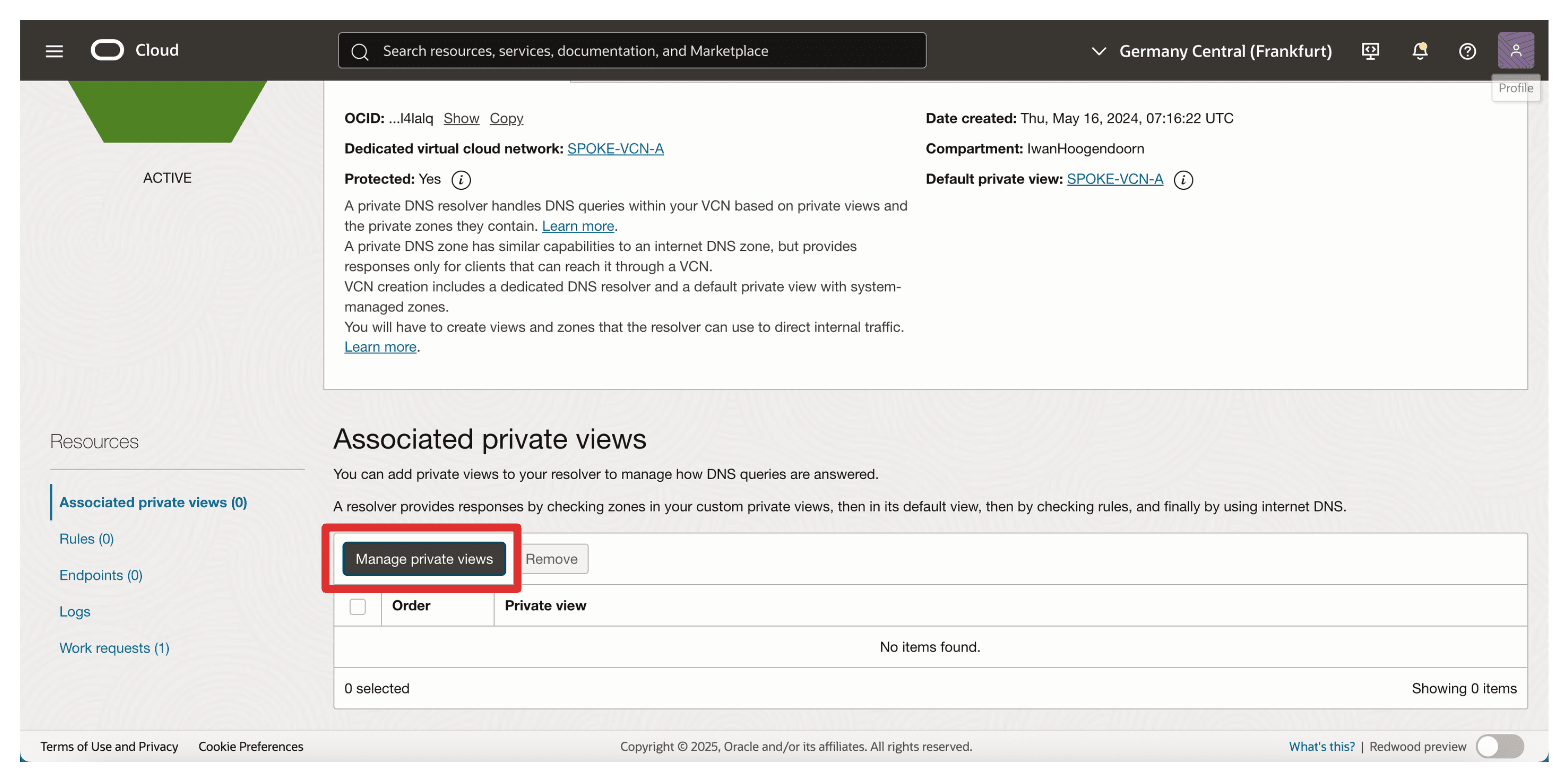
Click Manage private views.
-
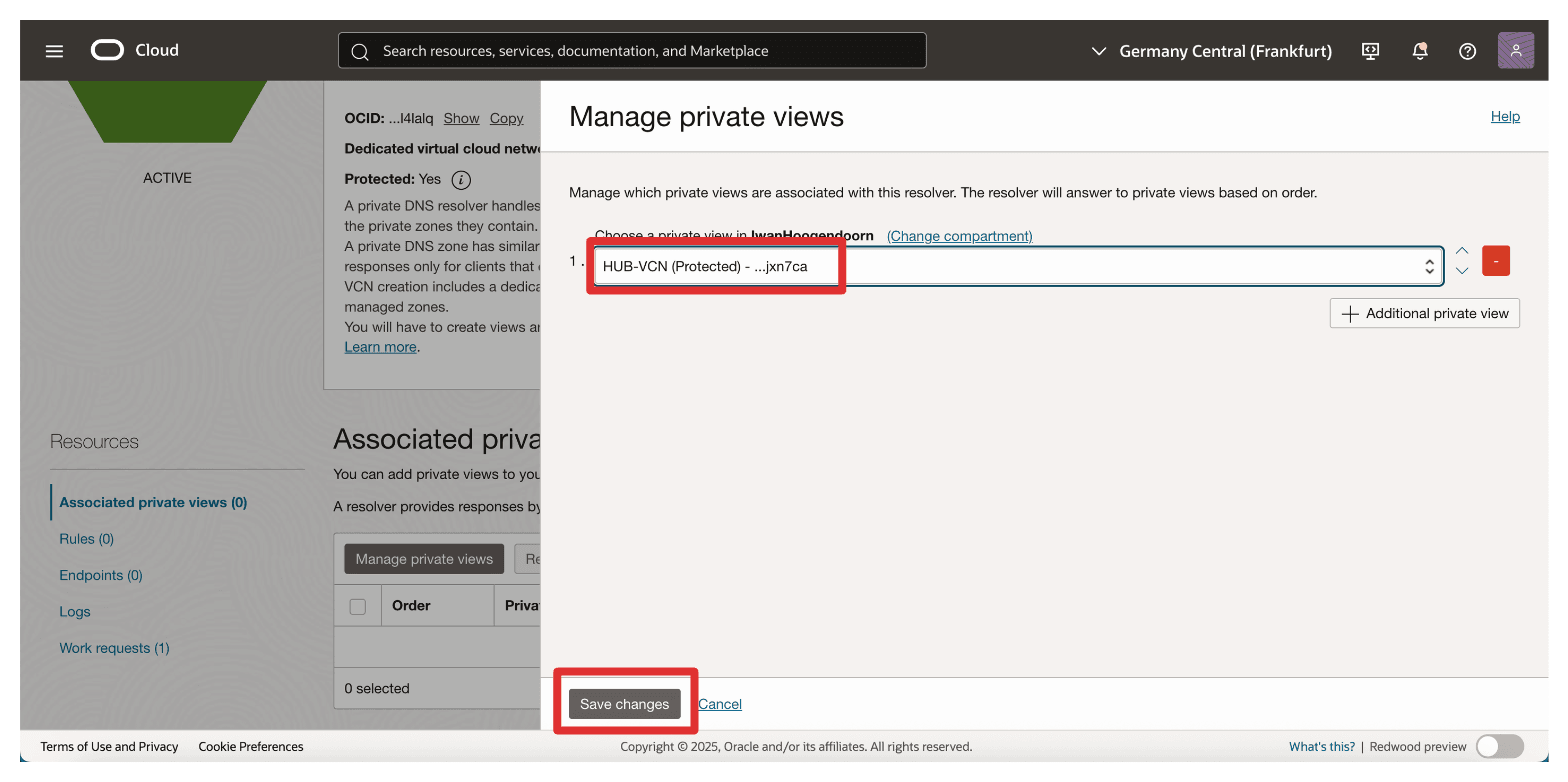
Select the Hub VCN private view and click Save changes.
-
Note that the Hub VCN private view is now associated with the spoke A VCN. If you do not see the change, refresh the browser.
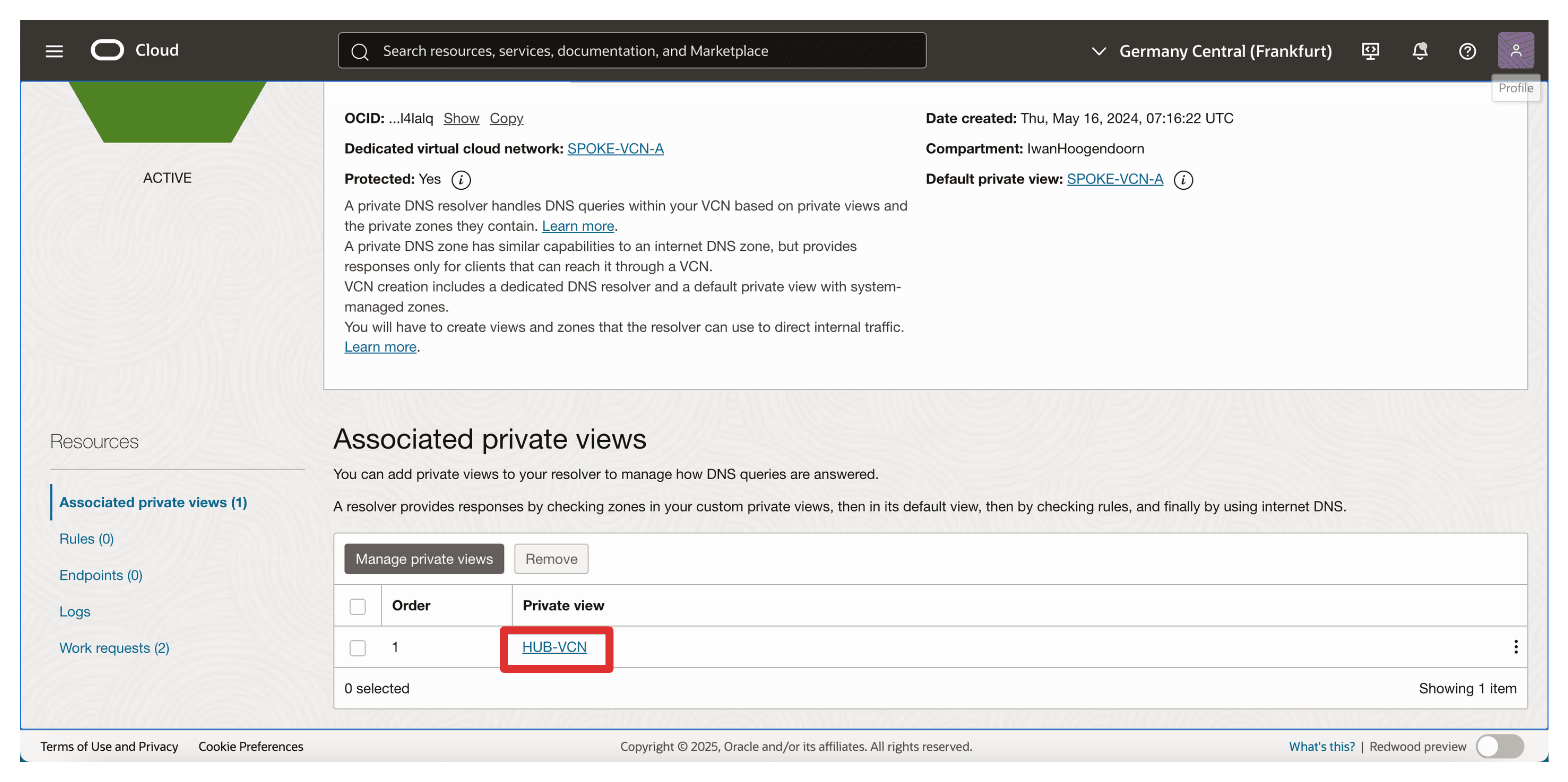
Correct DNS setup is a critical foundation for mutual TLS, OAuth authentication, and reliable connectivity between OCI and the Thales CipherTrust Manager.
Double-check your DNS zone association and name resolution before proceeding to certificate configuration.
Task 3: Create a Certificate for the OCI API Gateway
To enable secure TLS communication between OCI and the Thales CipherTrust Manager, the OCI API Gateway must present a trusted SSL certificate. In this setup, the certificate will be created by first generating a Certificate Signing Request (CSR) on the CTM1 Certificate Authority (CA)and then signing it using that same CA.
Once the certificate is signed, it will be uploaded in OCI and attached to the OCI API Gateway, allowing it to serve encrypted traffic trusted by your internal systems.
The following image illustrates the steps to create the signed certificate for the OCI API Gateway.
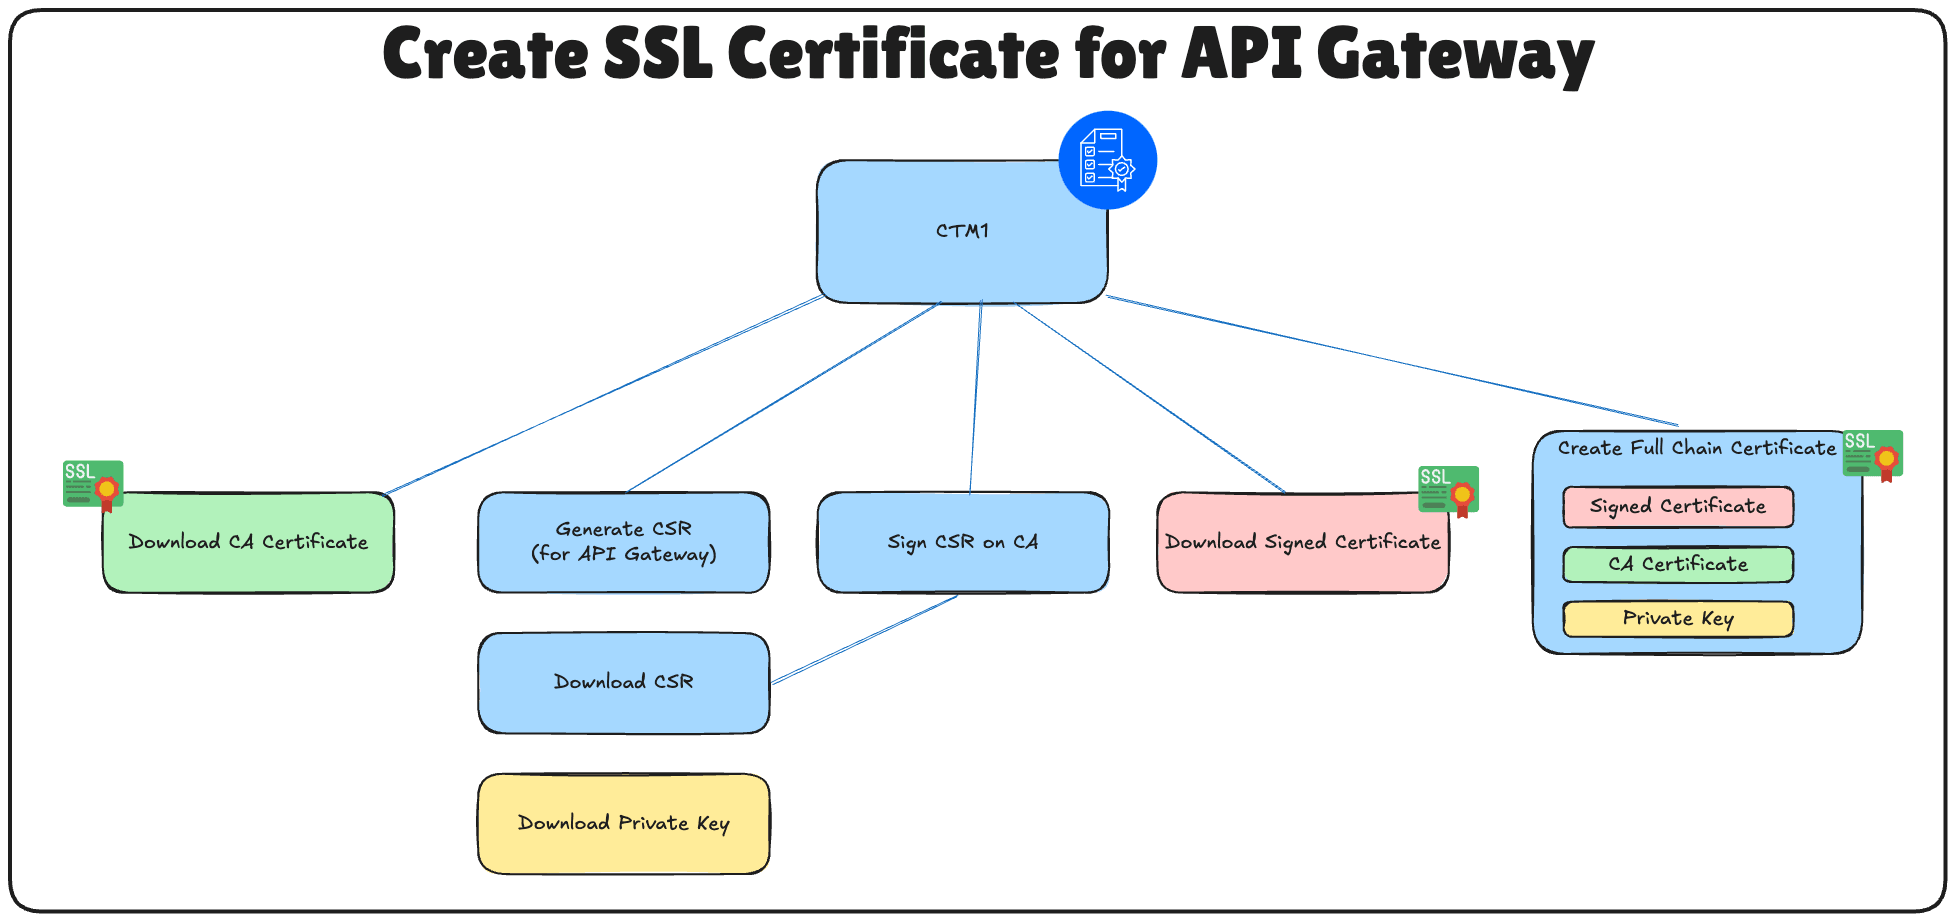
Perform these steps only on the AMS CTM.
-
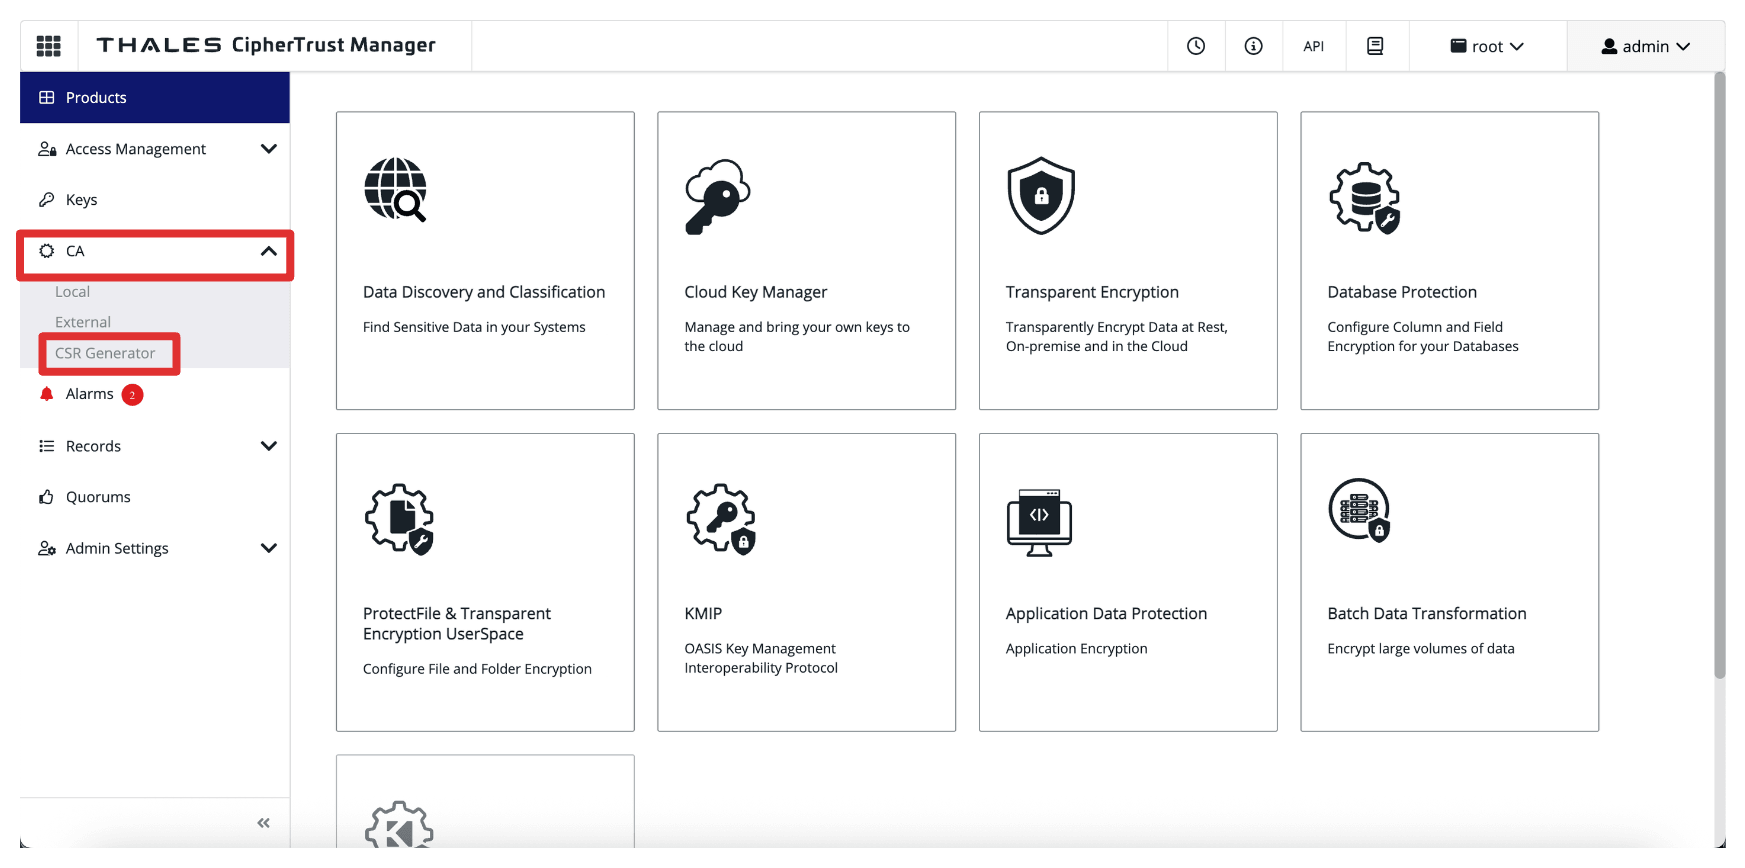
Log in to the Thales CipherTrust Manager AMS Console, navigate to CA and click CSR Generator.
-
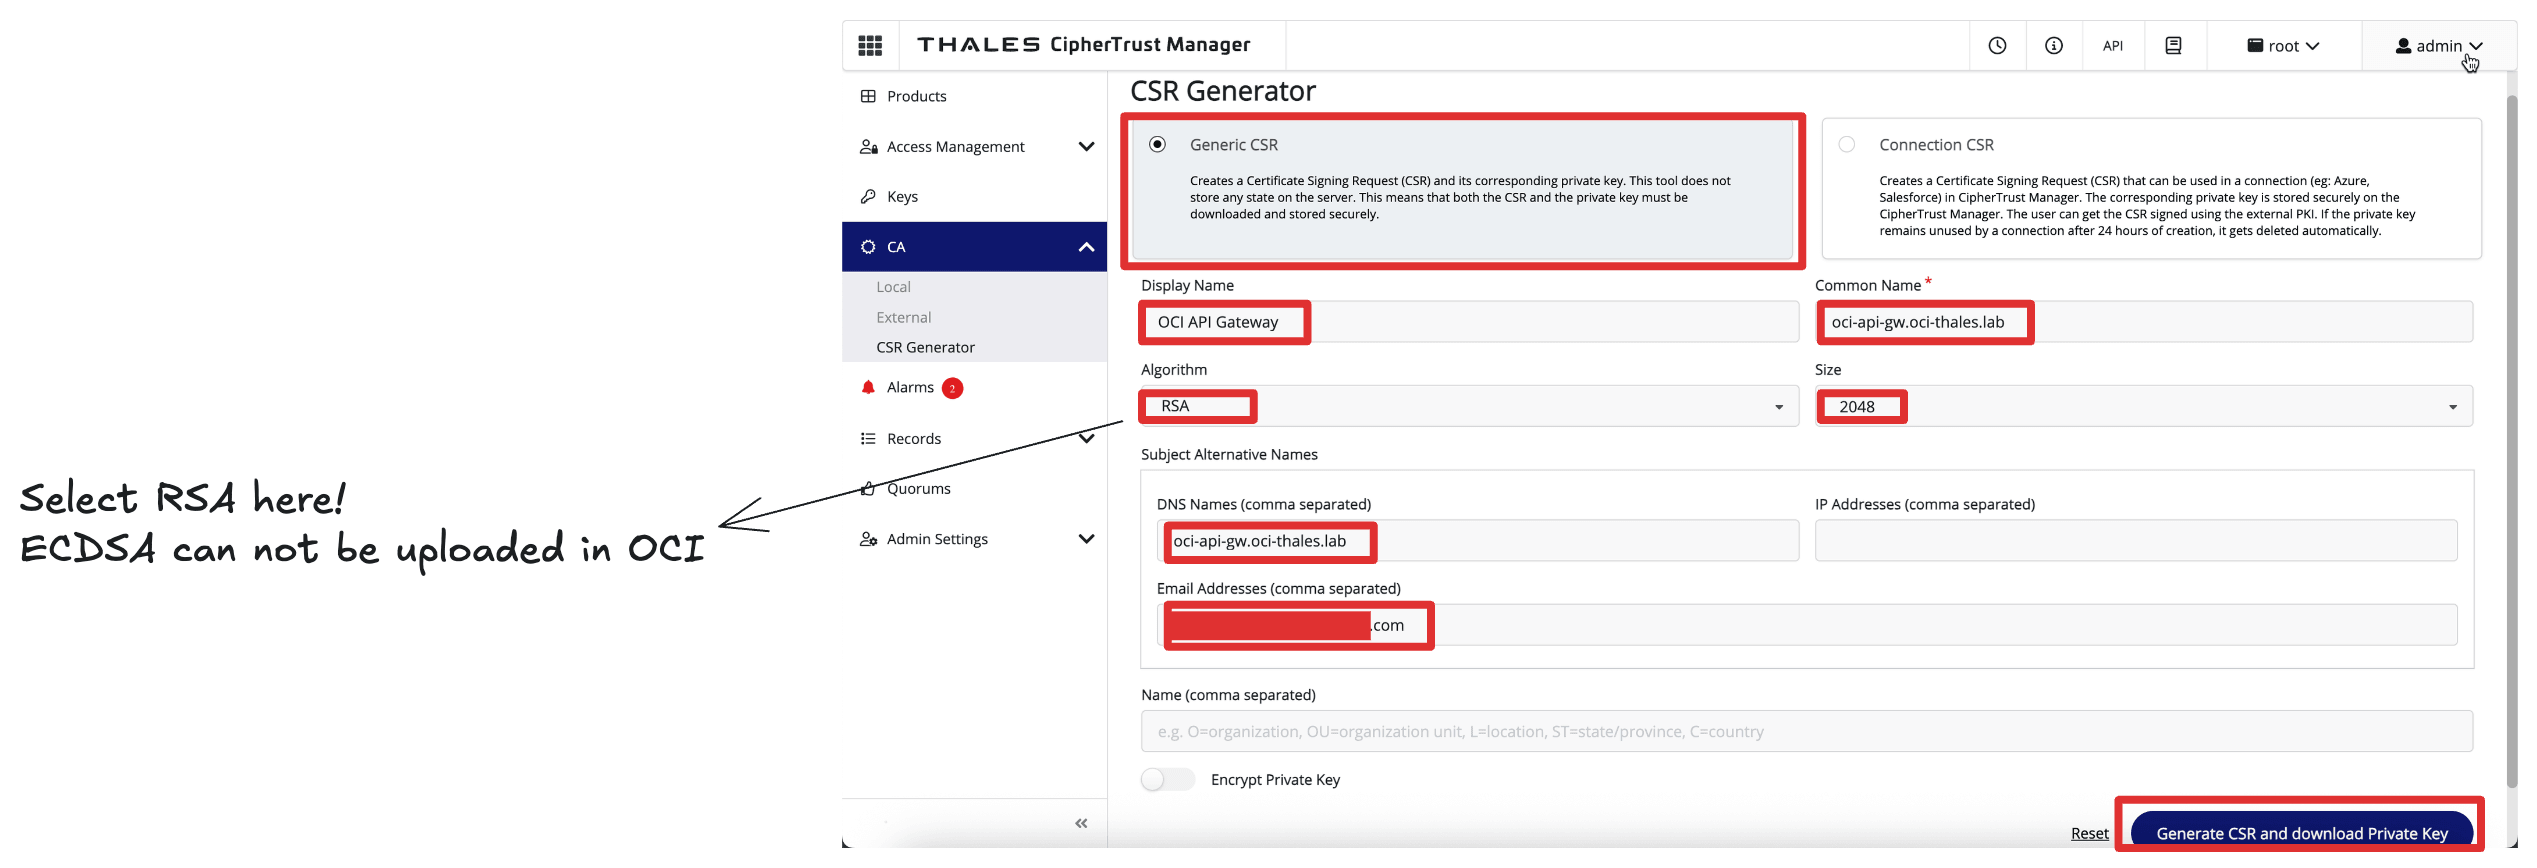
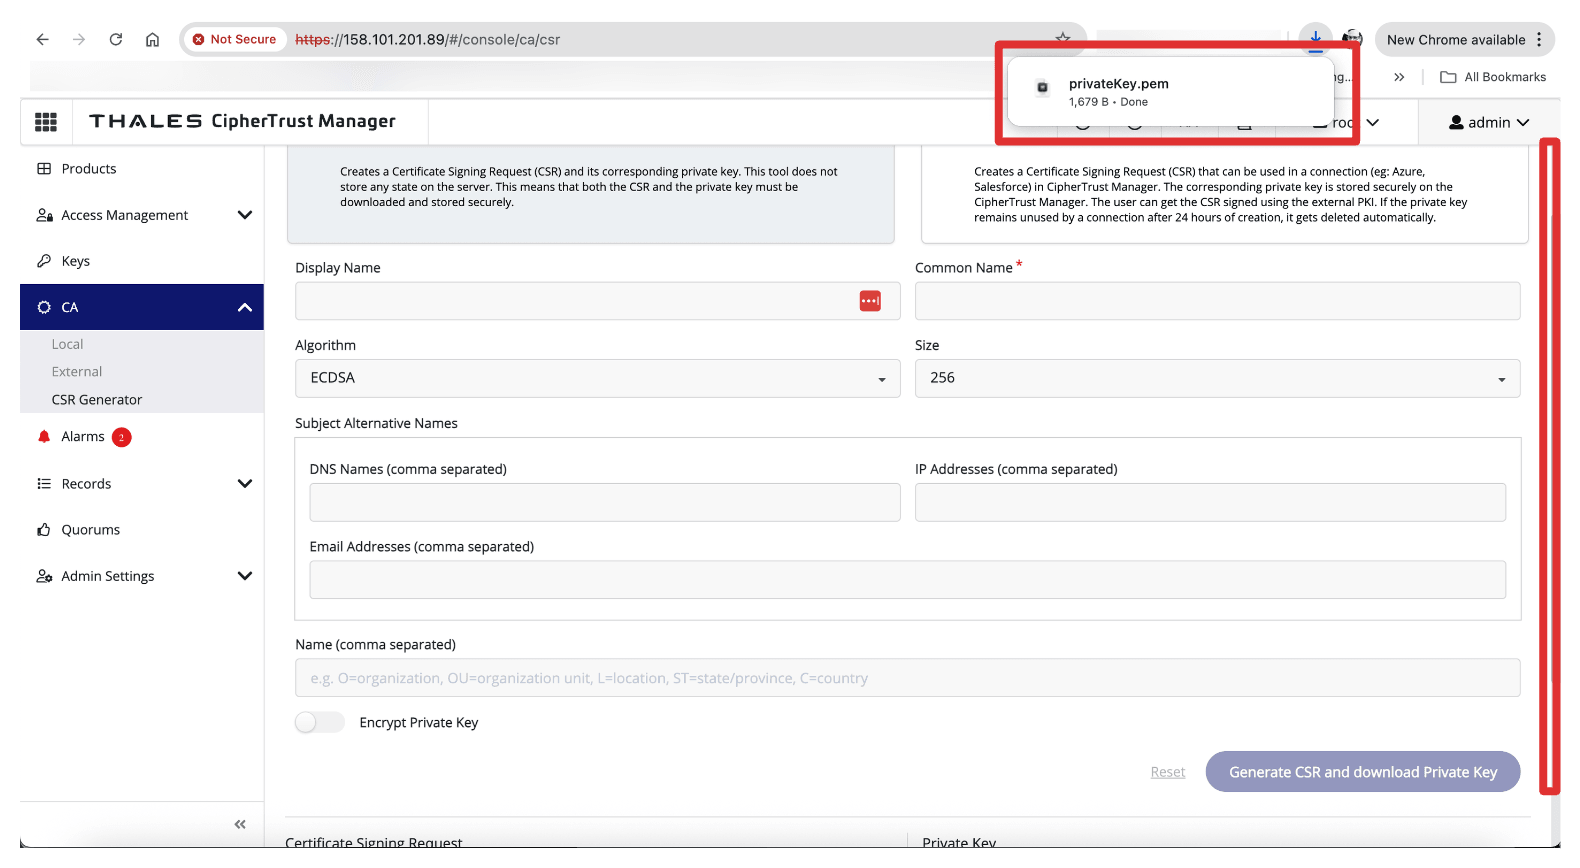
Enter the following information and click Generate CSR and download Private Key.
- Select Generic CSR.
- Common Name (CN): Enter the Thales CipherTrust Manager’s FQDN. For example,
oci-api-gw.oci-thales.lab.- Display Name: Enter a name. For example,
OCI API Gateway. - Algorithm: Select RSA.
- Size: Select 2048.
- Display Name: Enter a name. For example,
- Subject Alternative Name (SAN): Also include the FQDN here. For example,
oci-api-gw.oci-thales.lab.
-
Note that the private key will be automatically downloaded.
-
Click Download CSR to download and save the generated
.csrfile.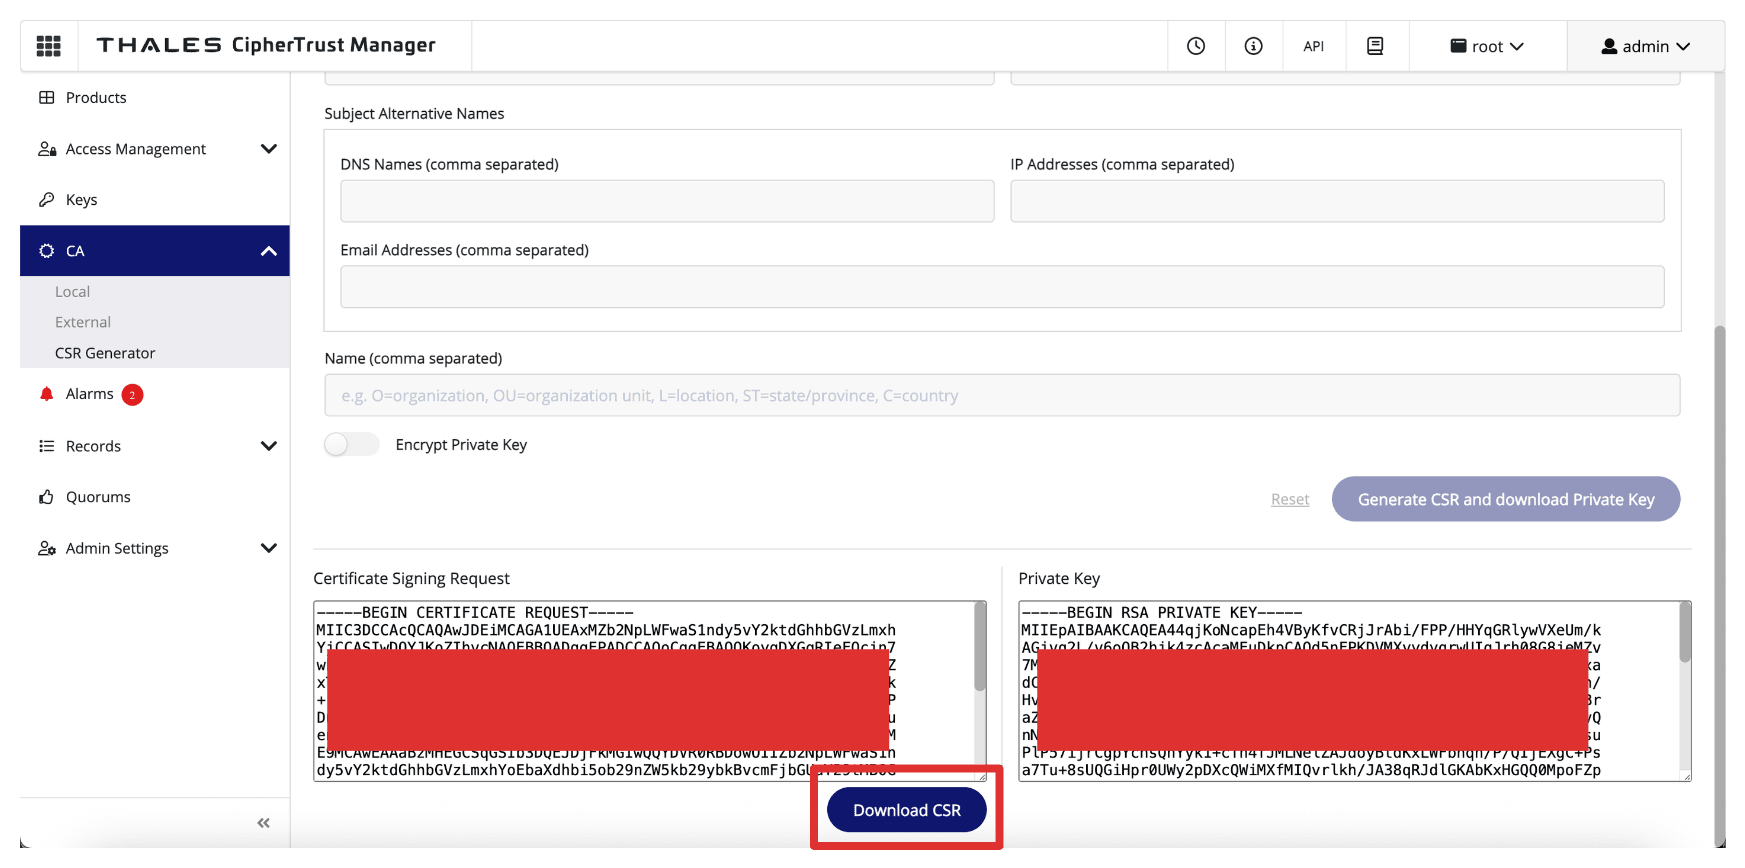
-
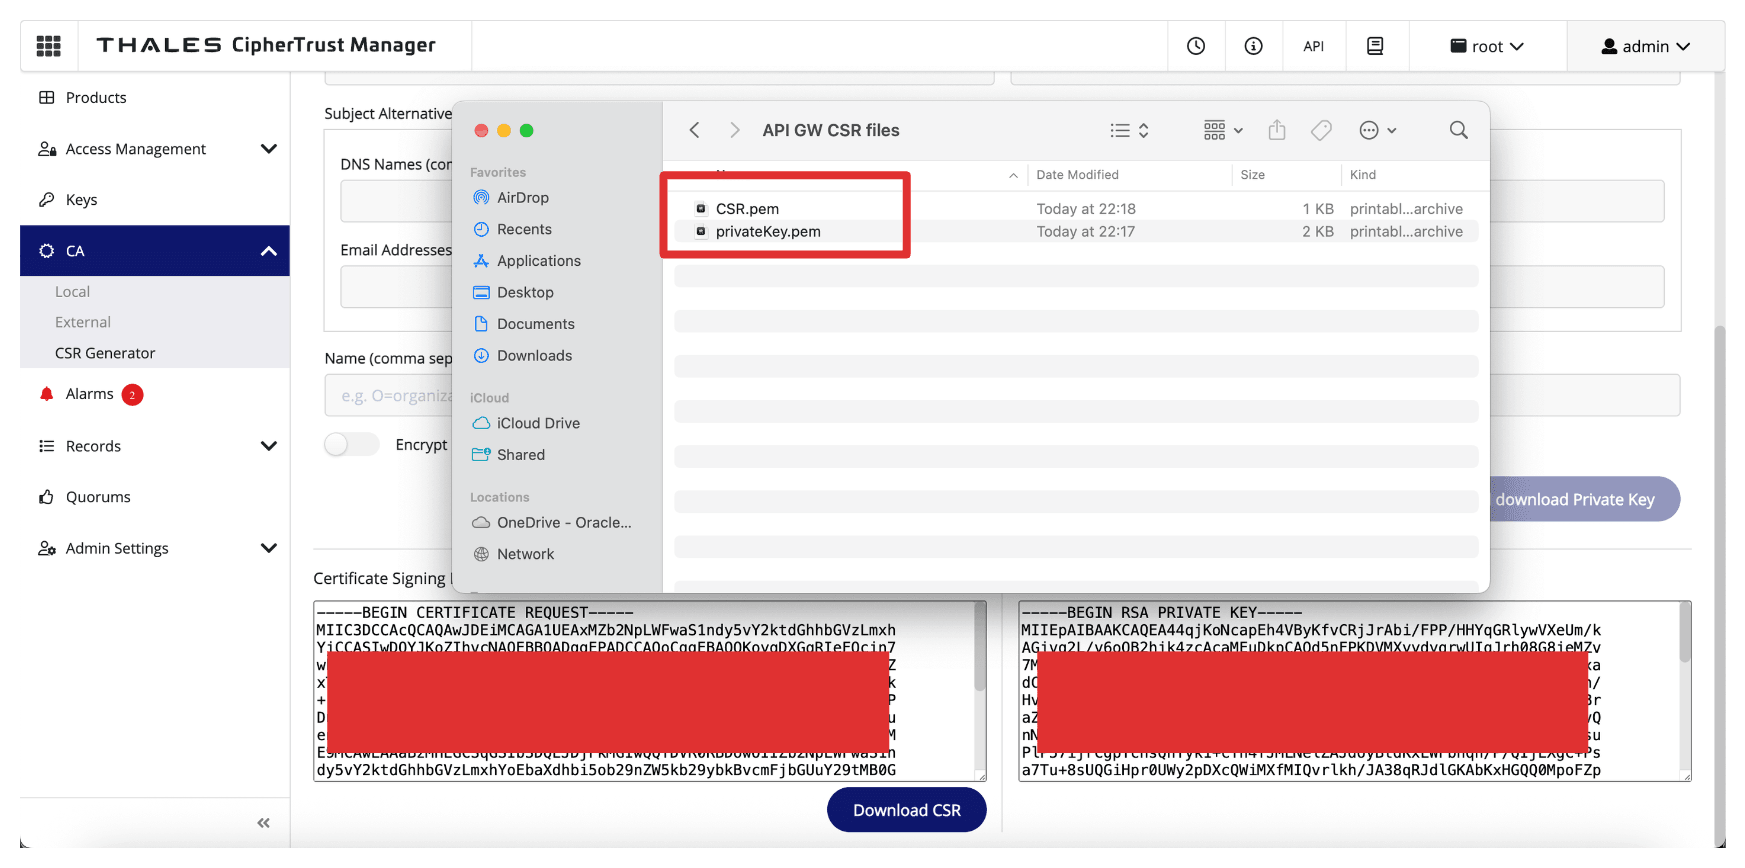
Ensure the CSR and the private key are stored in a folder.
-
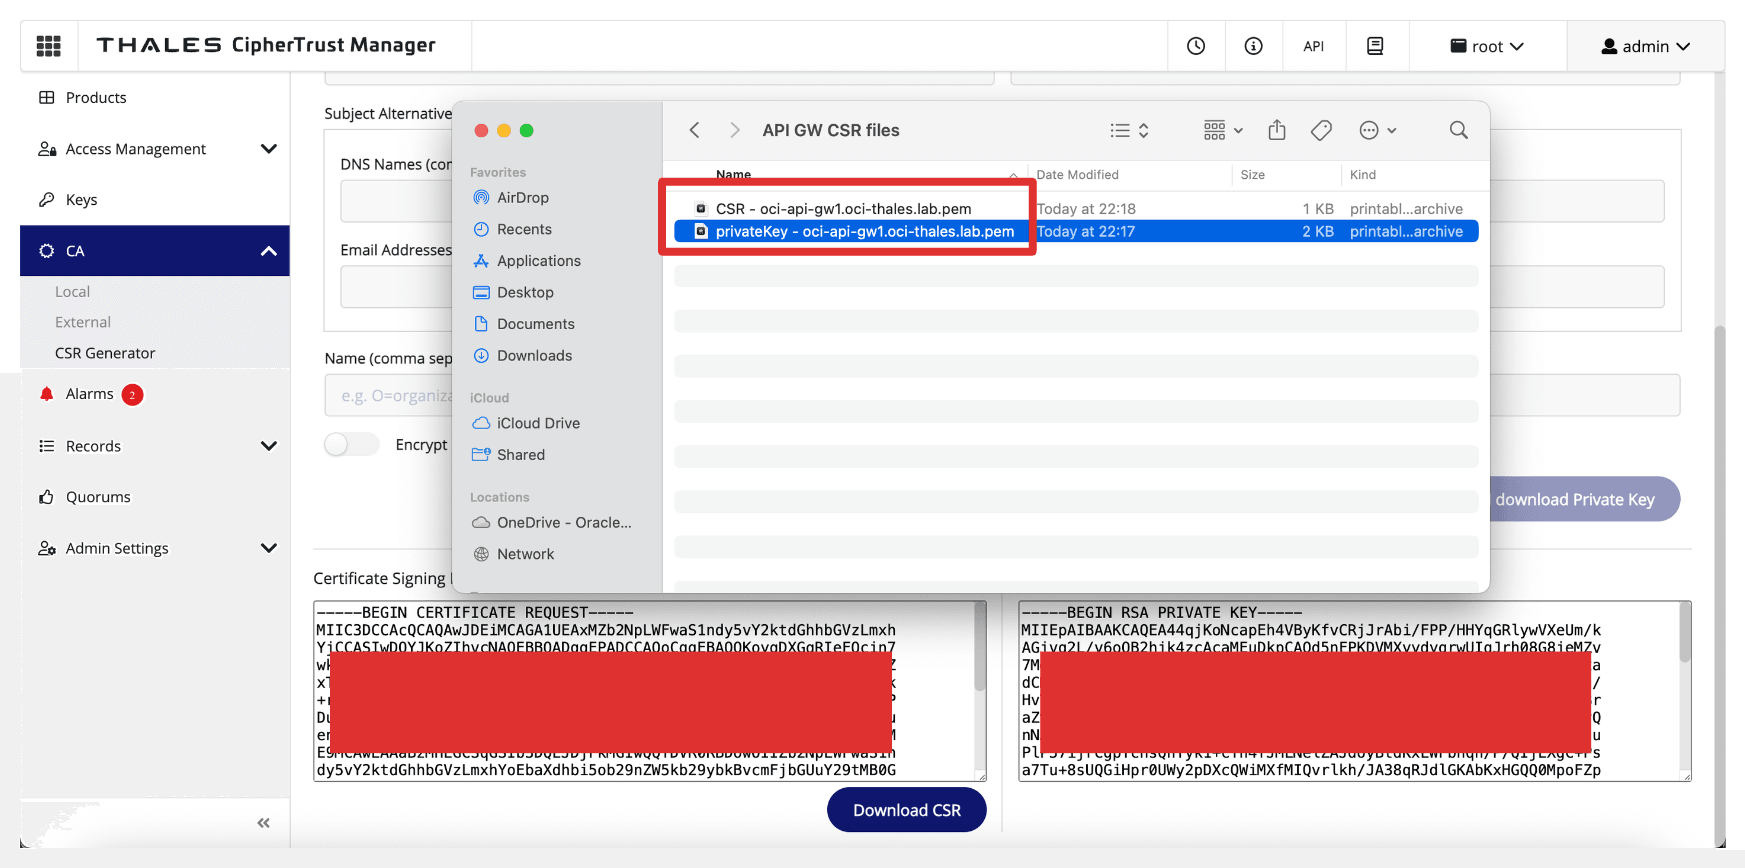
Rename the CSR and private key.
-
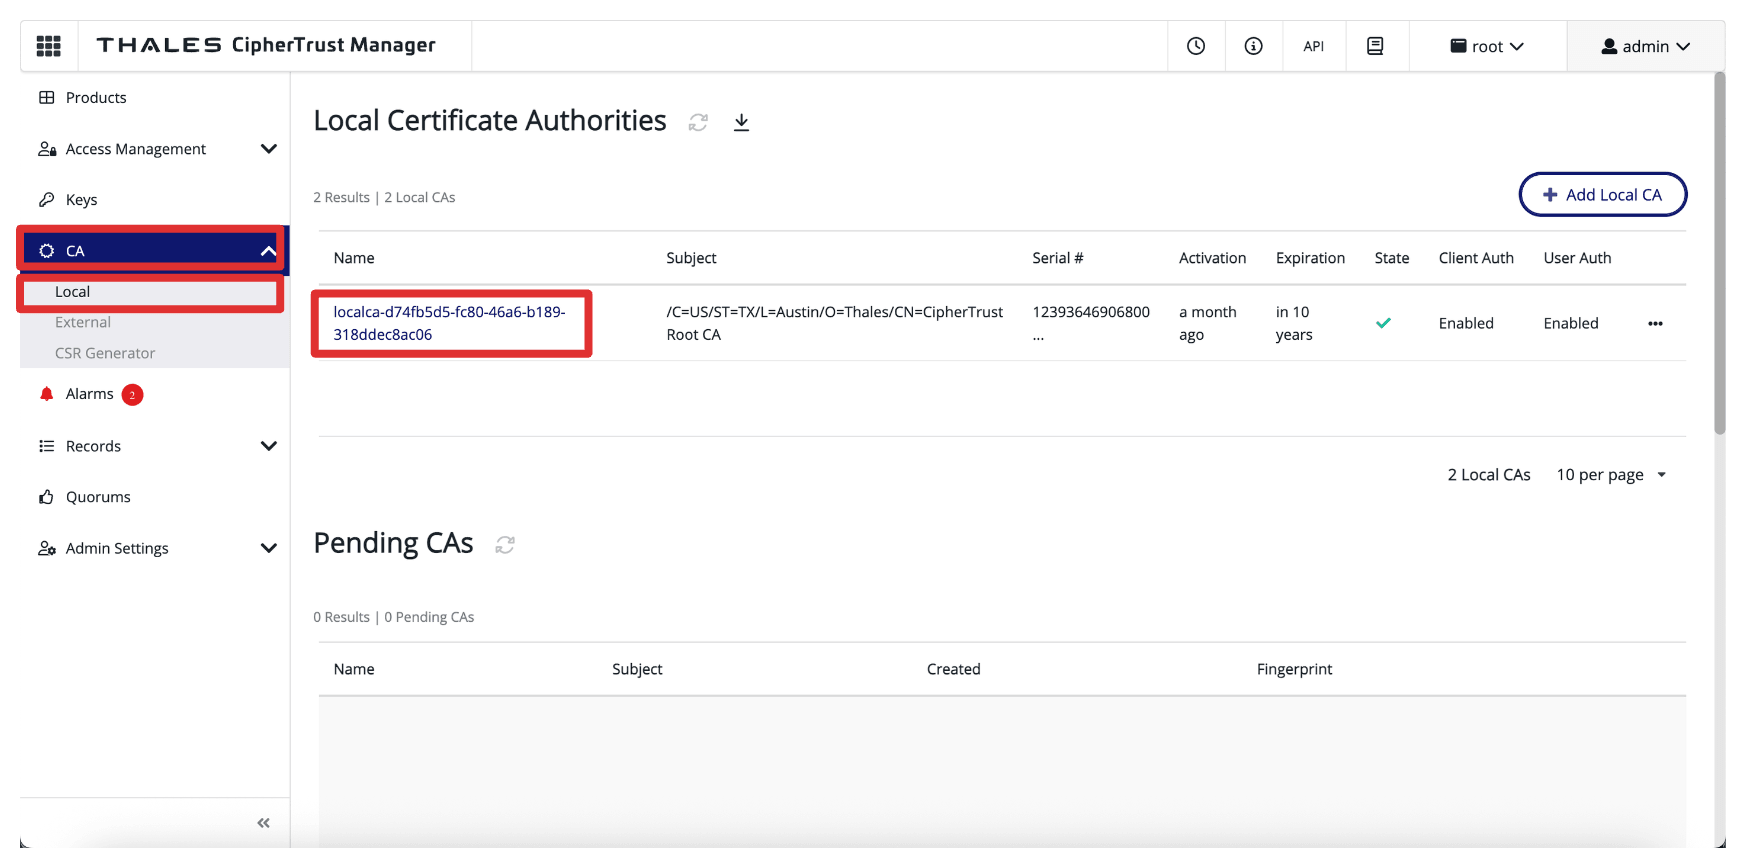
Navigate to CA, click Local and select the CA.
-
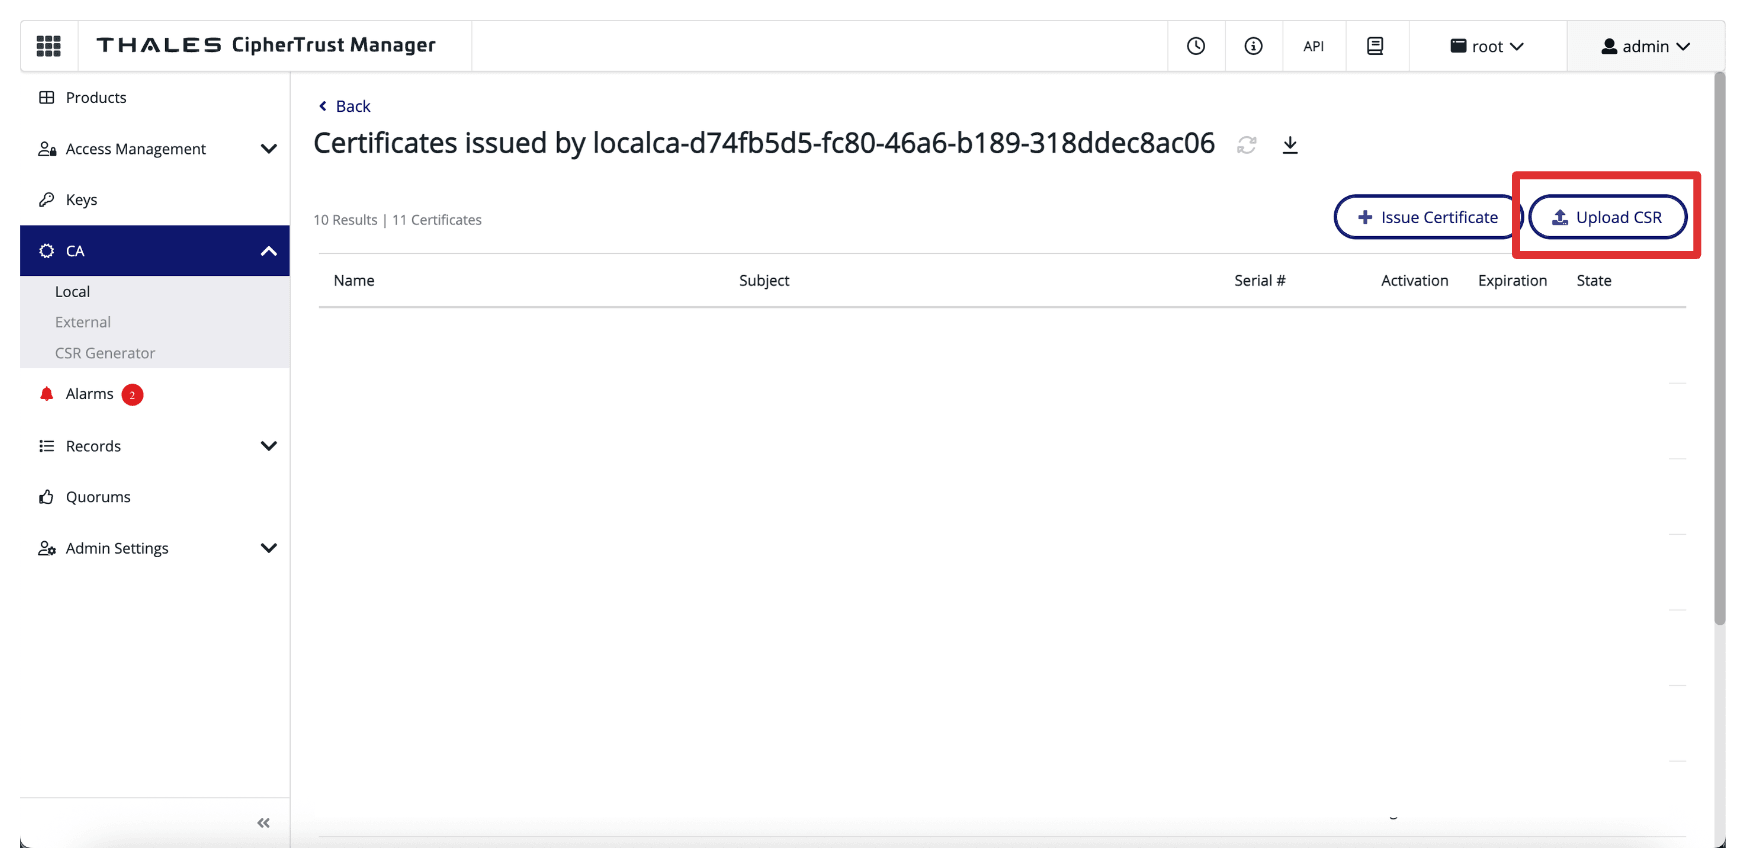
Click Upload CSR.
-
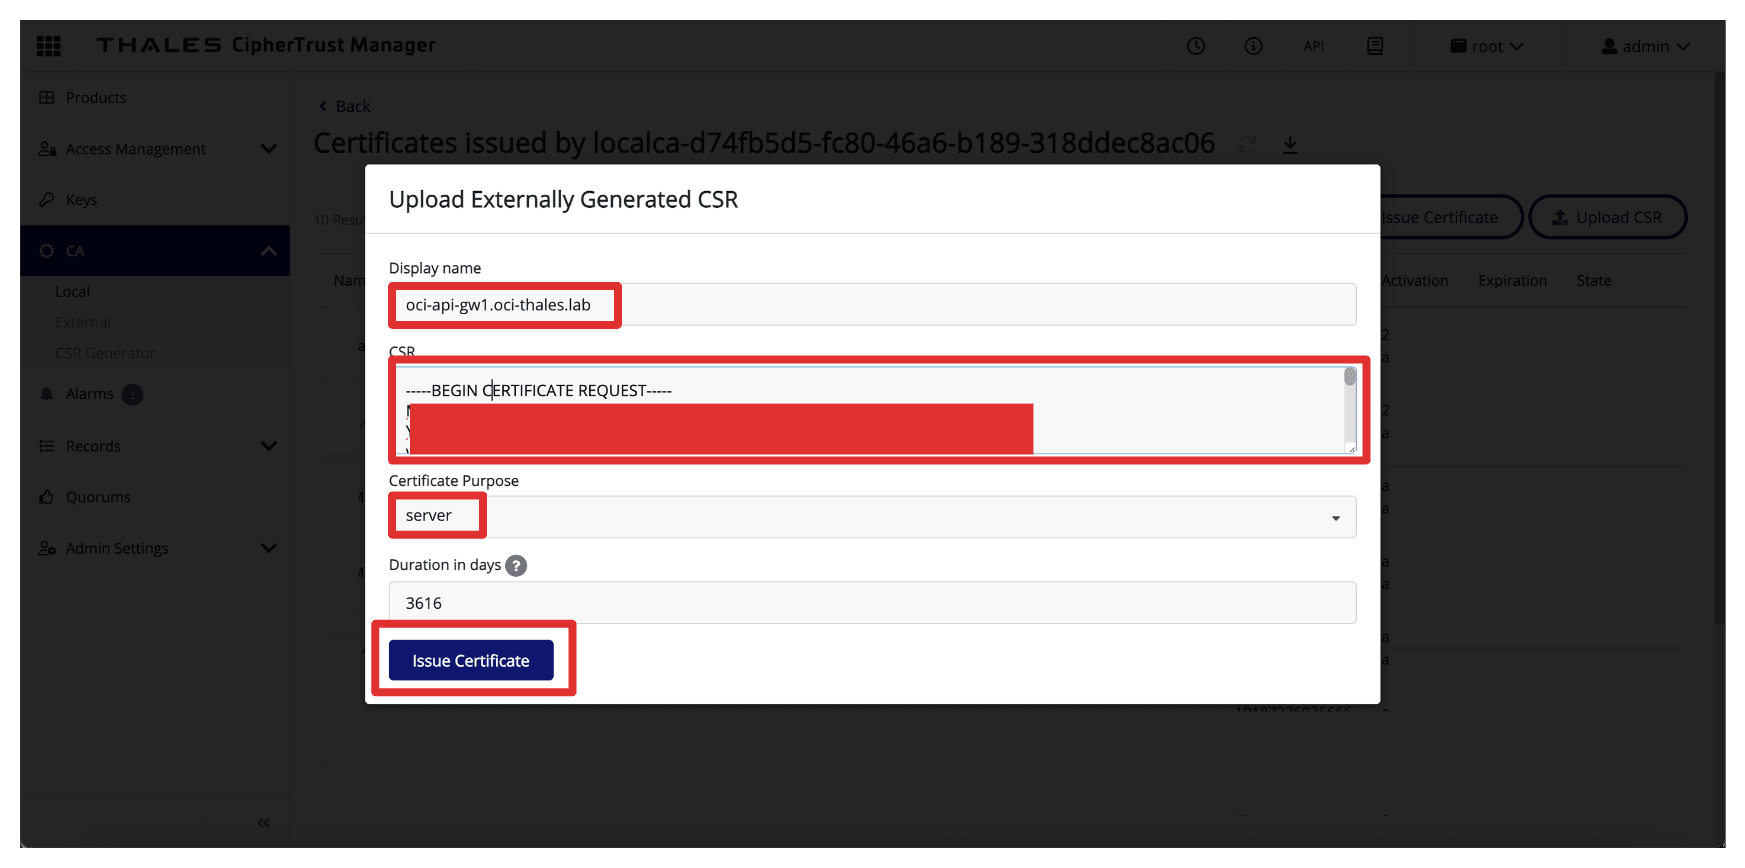
In Upload Externally Generated CSR, enter the following information.
- Display Name: Enter the OCI API Gateway’s FQDN. For example,
oci-api-gw.oci-thales.lab. - Copy the content of the generated CSR in the CSR field.
- Certificate Purpose: Select Server.
- Click Issue Certificate.
- Display Name: Enter the OCI API Gateway’s FQDN. For example,
-
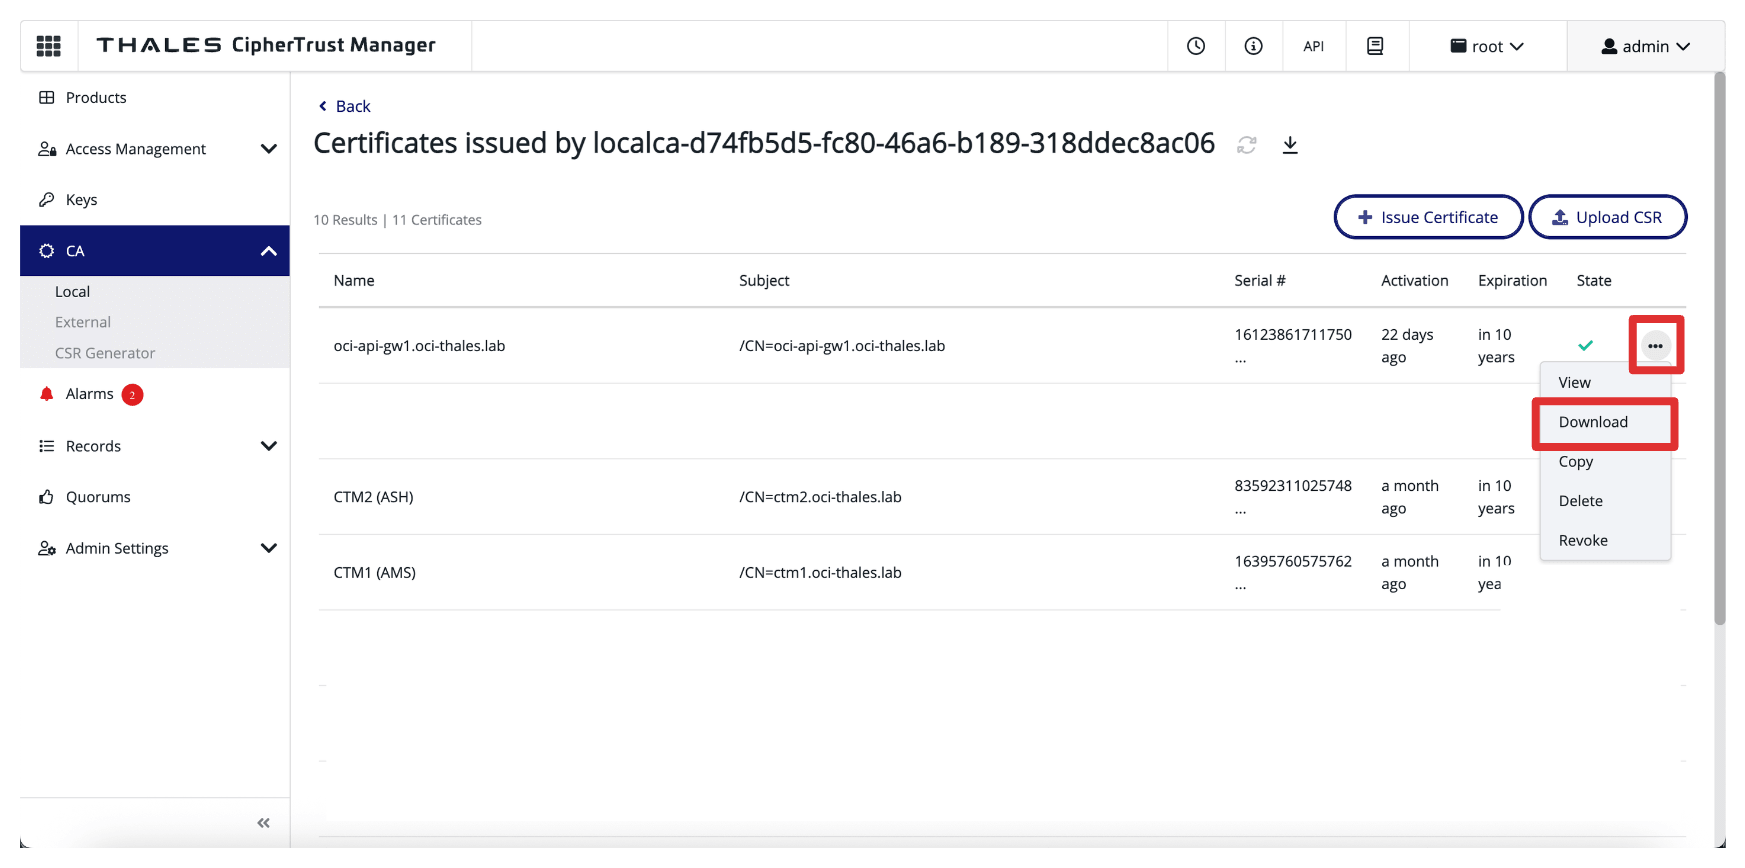
Click the three dots at the end of the signed certificate entry and then click Download to download the signed certificate for OCI API Gateway.
-
Ensure the signed certificate is stored in the same CSR and private key folders.
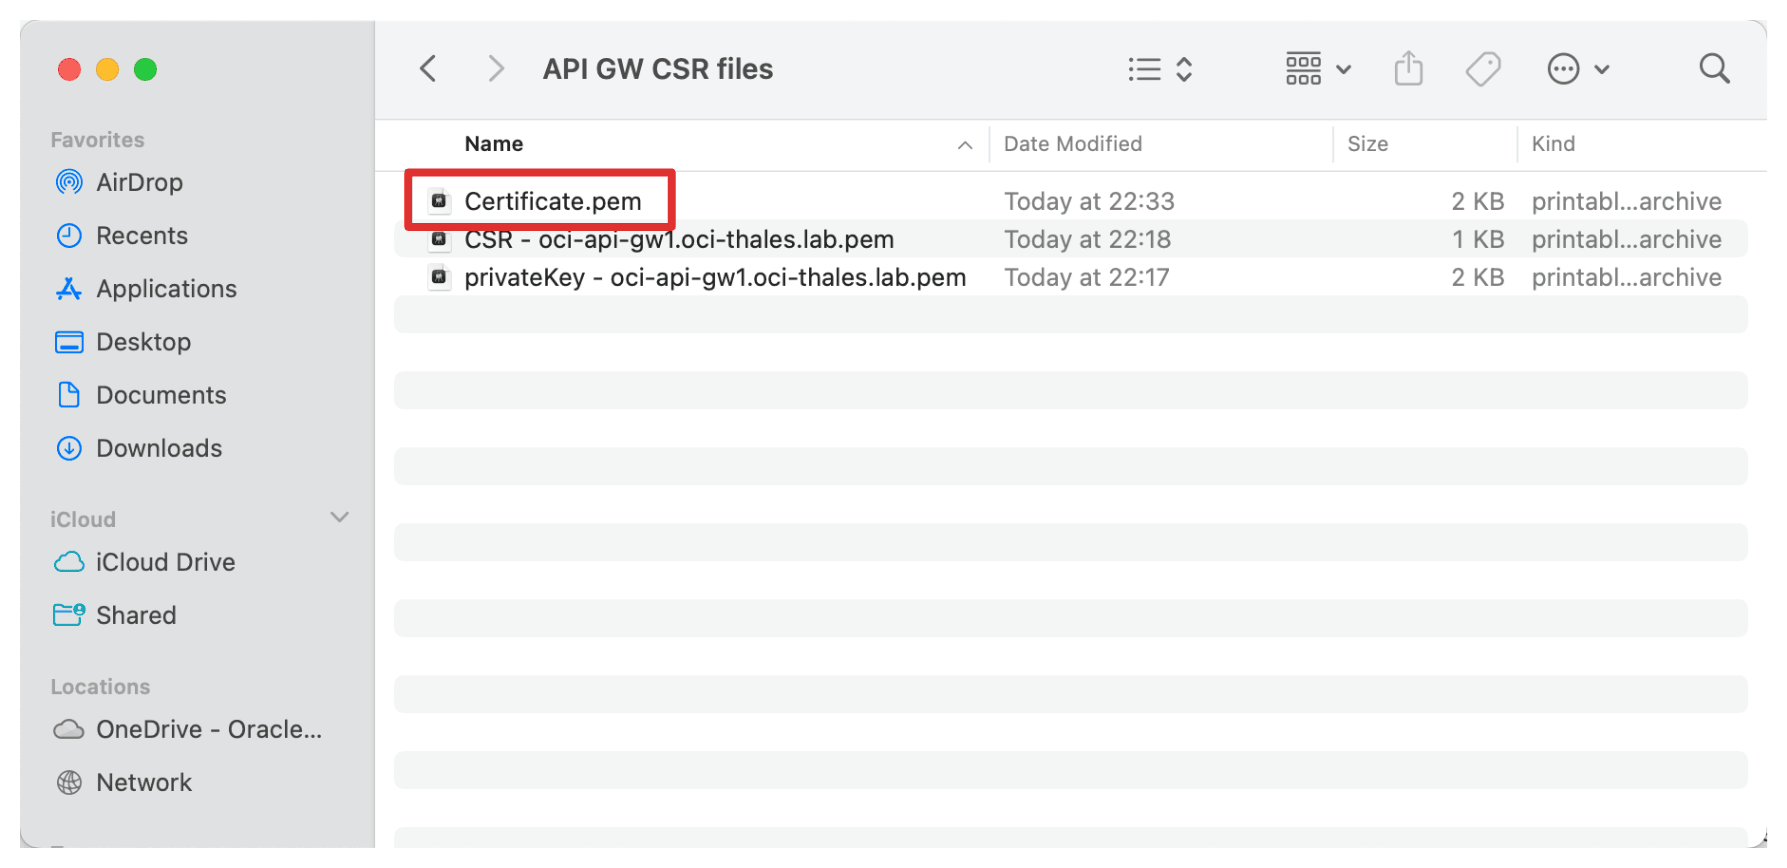
-
Rename the signed certificate.
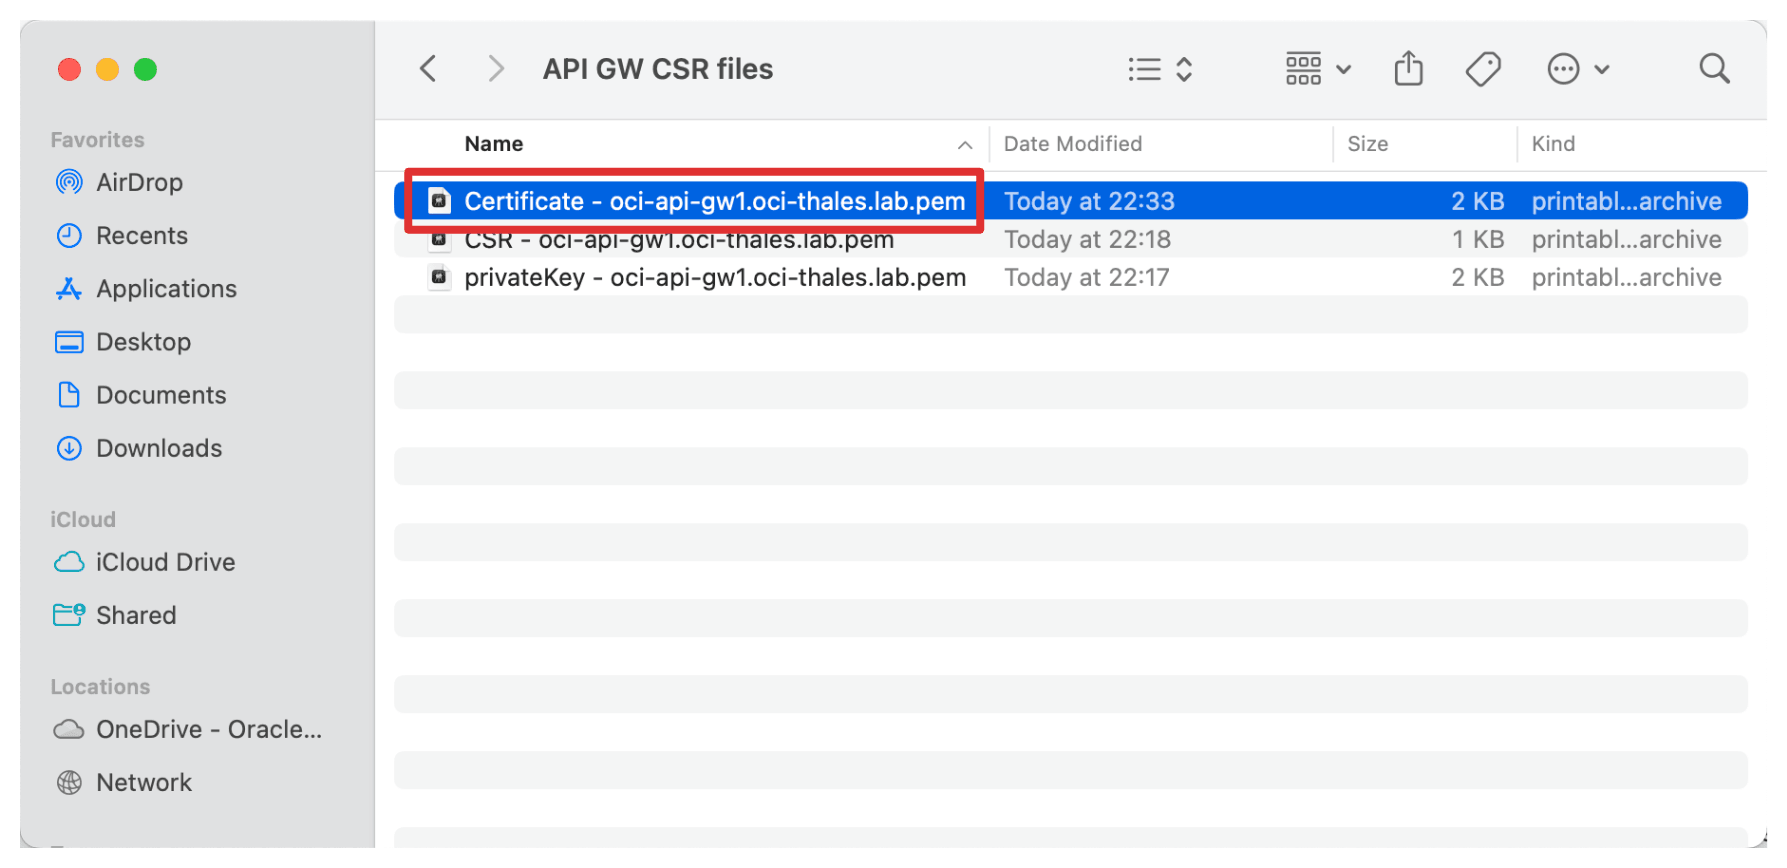
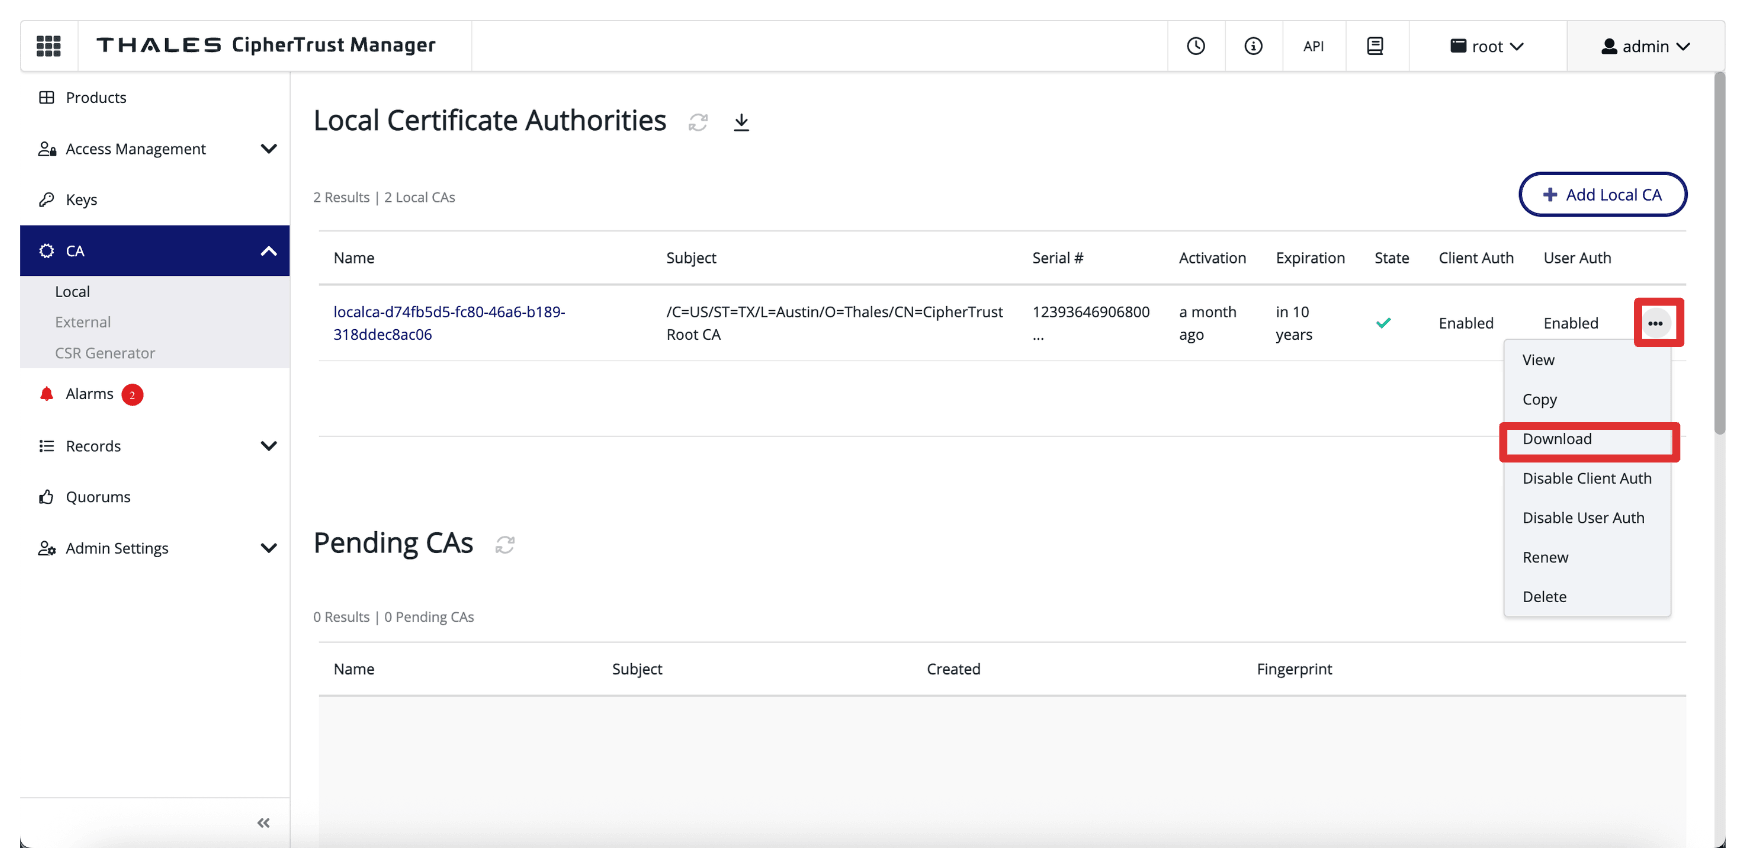
In addition to signing the individual Thales CipherTrust Manager certificates, the CA Root Certificate is a critical piece of the trust chain. This root certificate establishes the foundation of trust for all certificates issued by your Thales CipherTrust Manager, acting as the Certificate Authority (CA).
-
Navigate to CA and click Local. Click the three dots at the end of the CTM AMS CA and then click Download to download the Root CA certificate of CTM AMS CA.
-
Store the downloaded root certificate in the same folder.
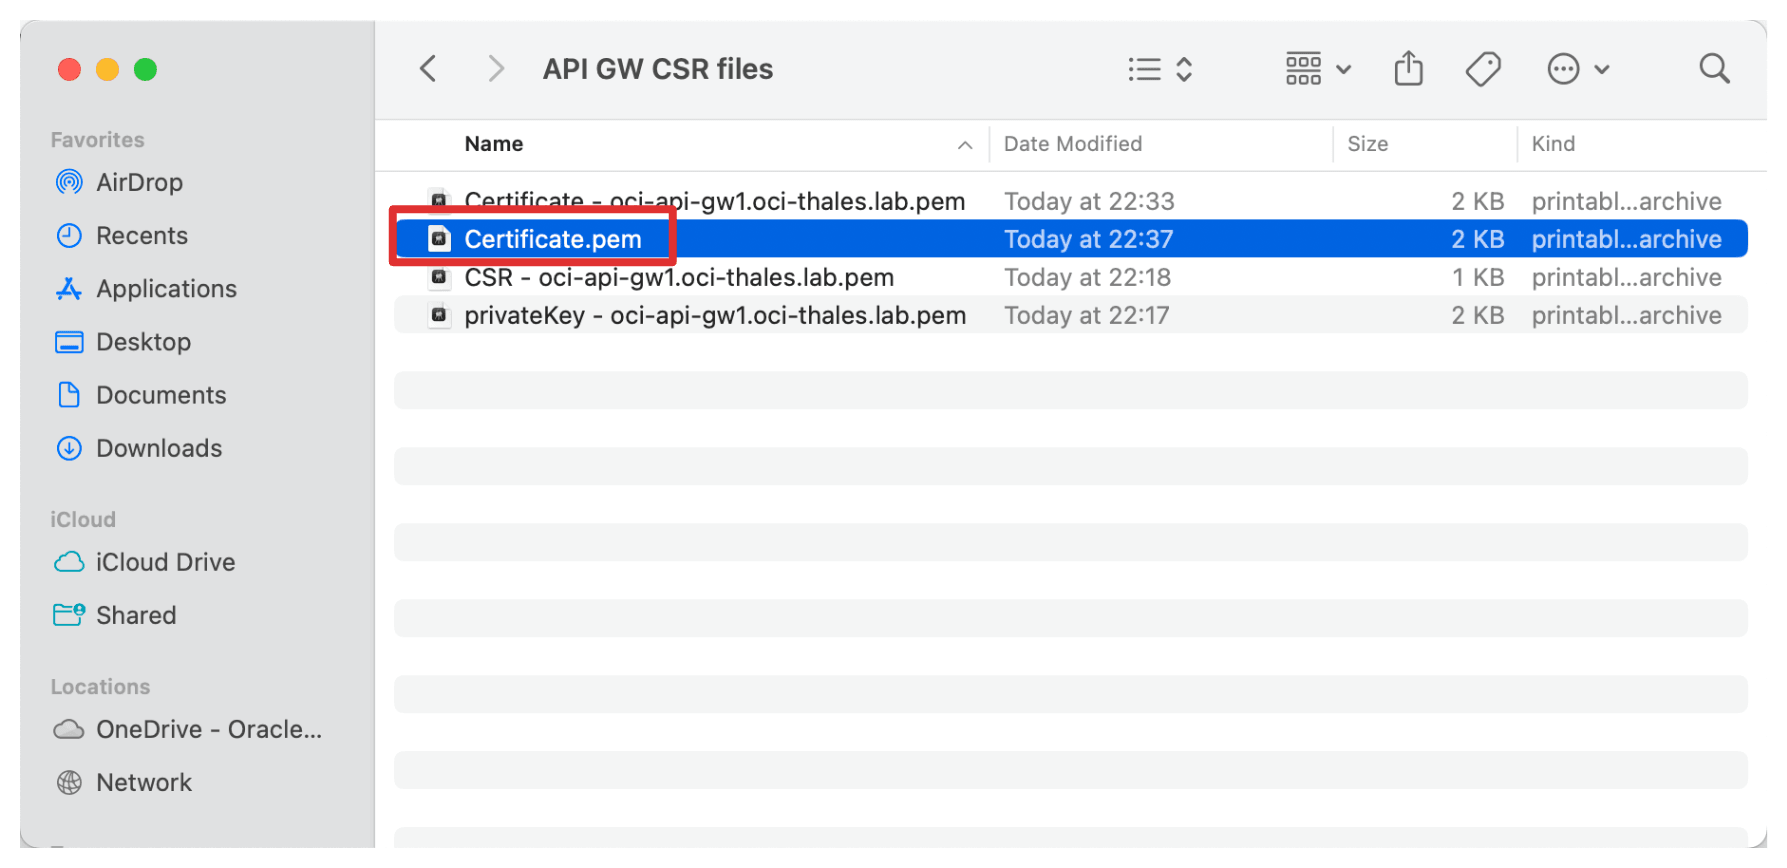
-
Rename the root certificate.
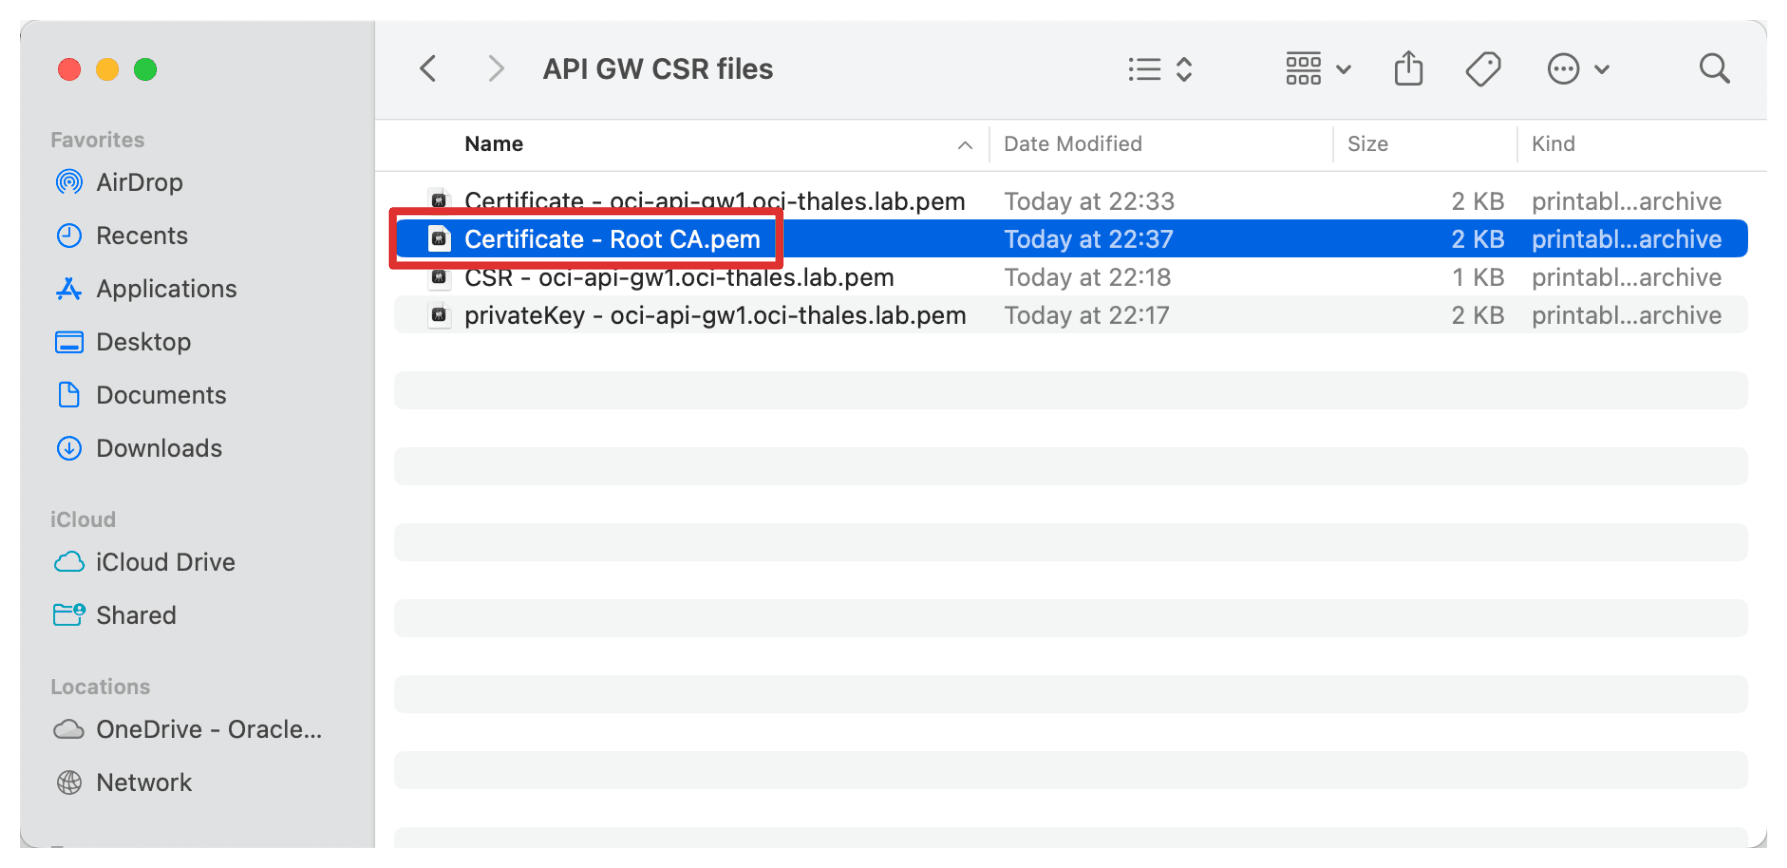
This certificate will later be attached to the OCI API Gateway deployment, allowing OCI to securely communicate with the Thales CipherTrust Manager over HTTPS using a certificate issued and trusted within your environment.
Task 4: Upload the Signed OCI API Gateway Certificate with the CA Bundle
After generating and signing the OCI API Gateway certificate using the CTM1 Certificate Authority (CA), the next task is to upload this certificate in OCI to be associated with the OCI API Gateway deployment.
This ensures that any communication with the OCI API Gateway such as requests from OCI External KMS occurs over a trusted and encrypted TLS connection using your internal certificate authority.
Let’s first start with uploading the root CA certificate.
-
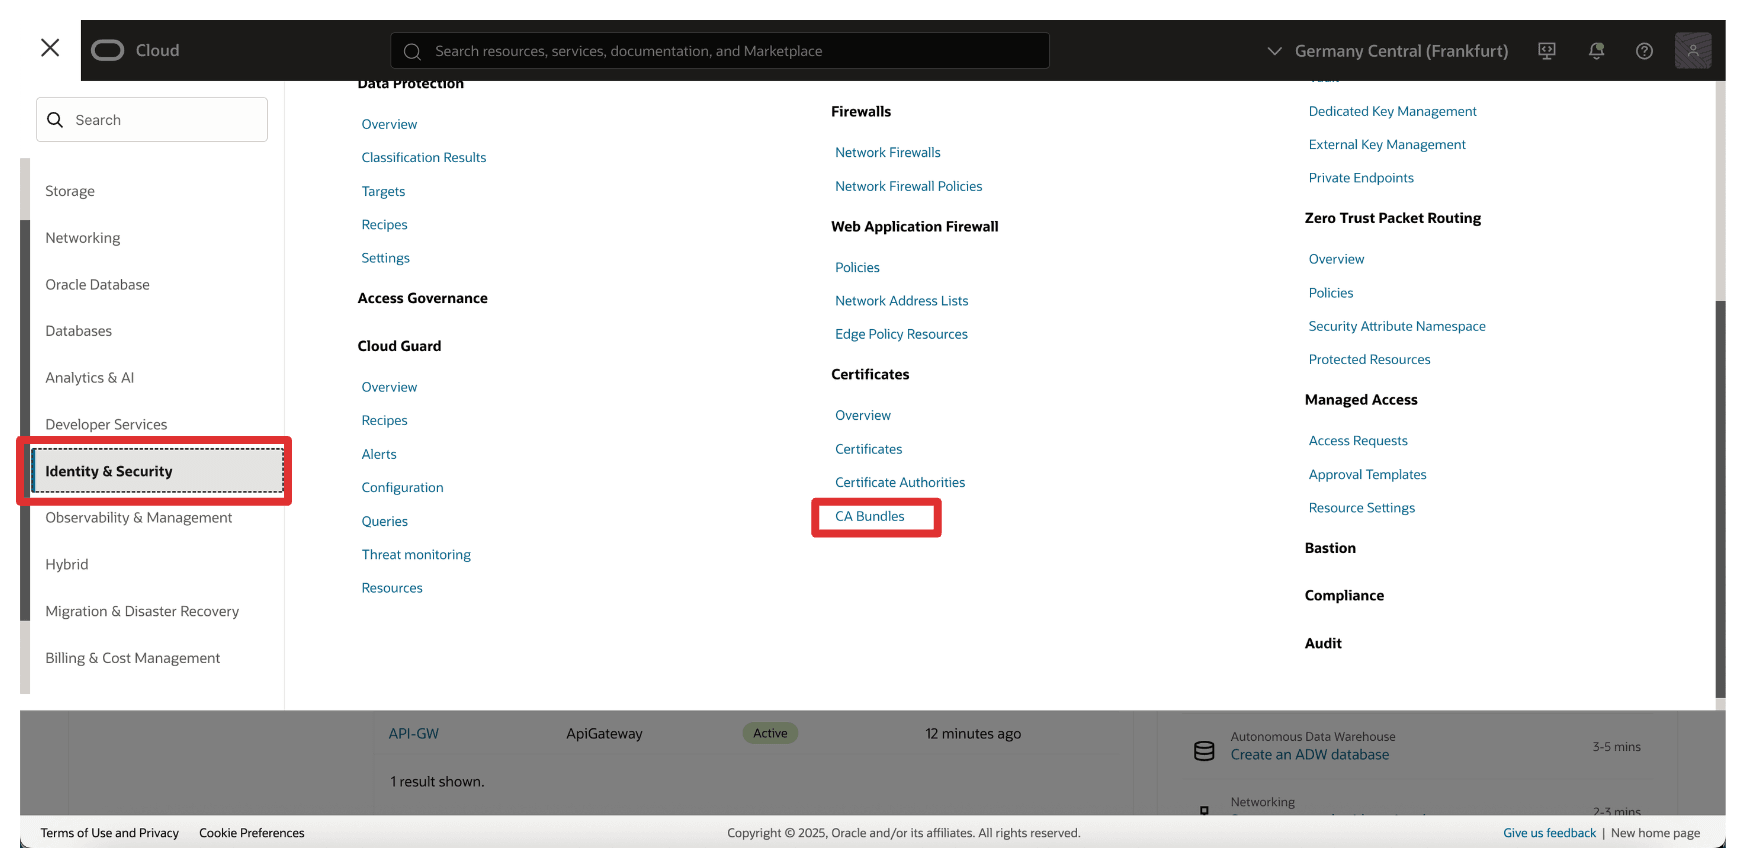
Go to the OCI Console, navigate to Identity & Security and click CA Bundles.
-
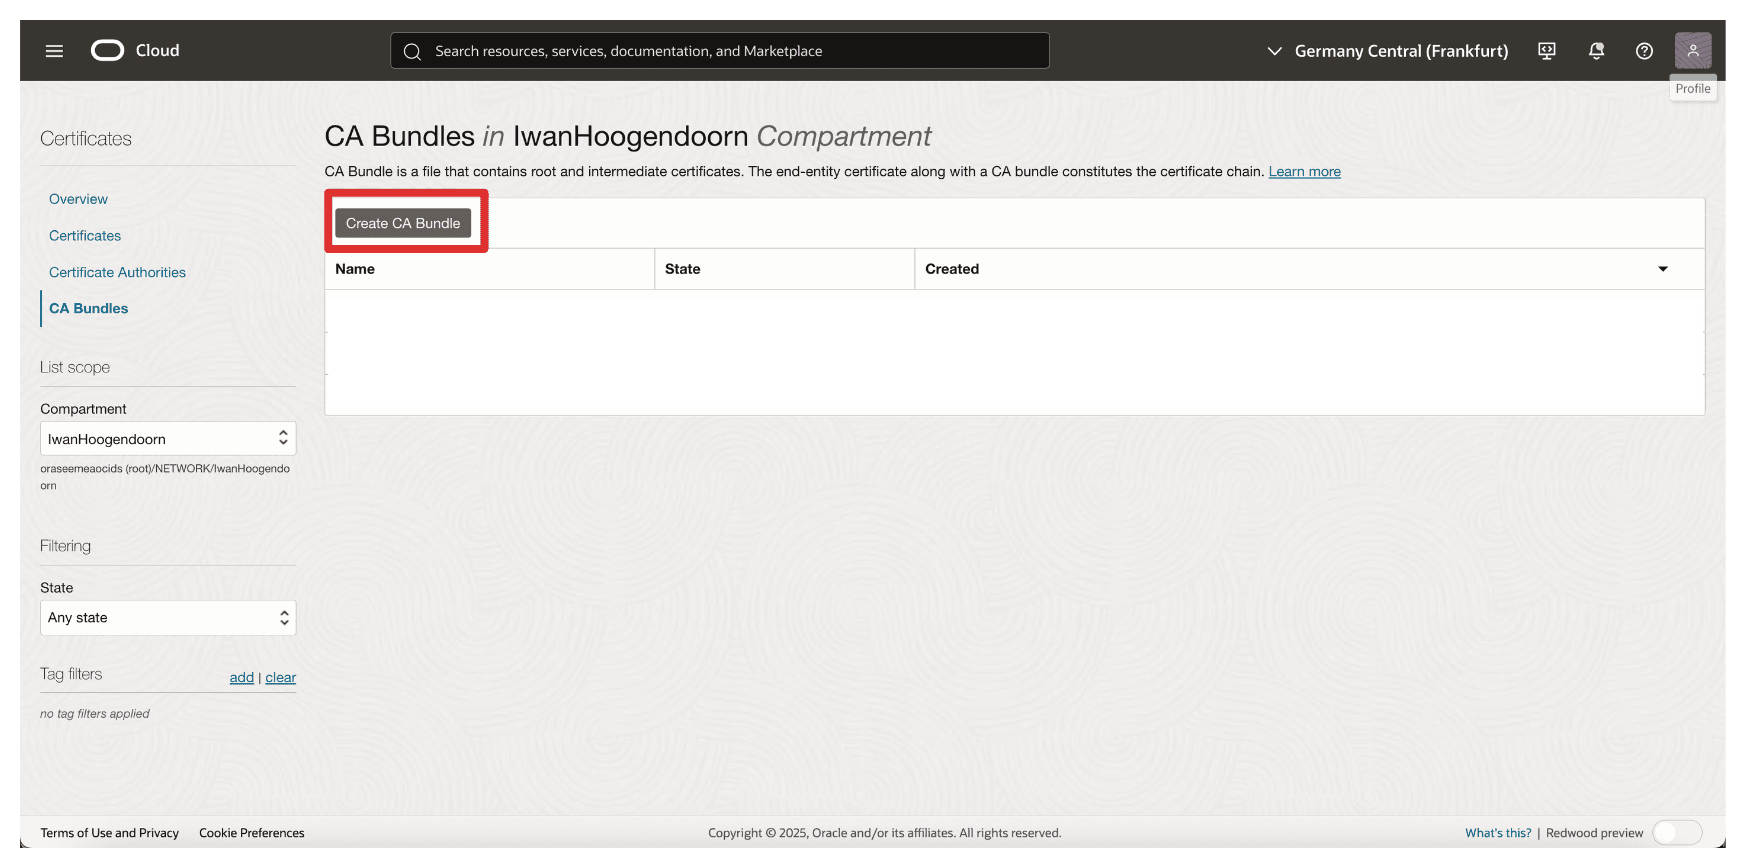
Click Create CA Bundle.
-
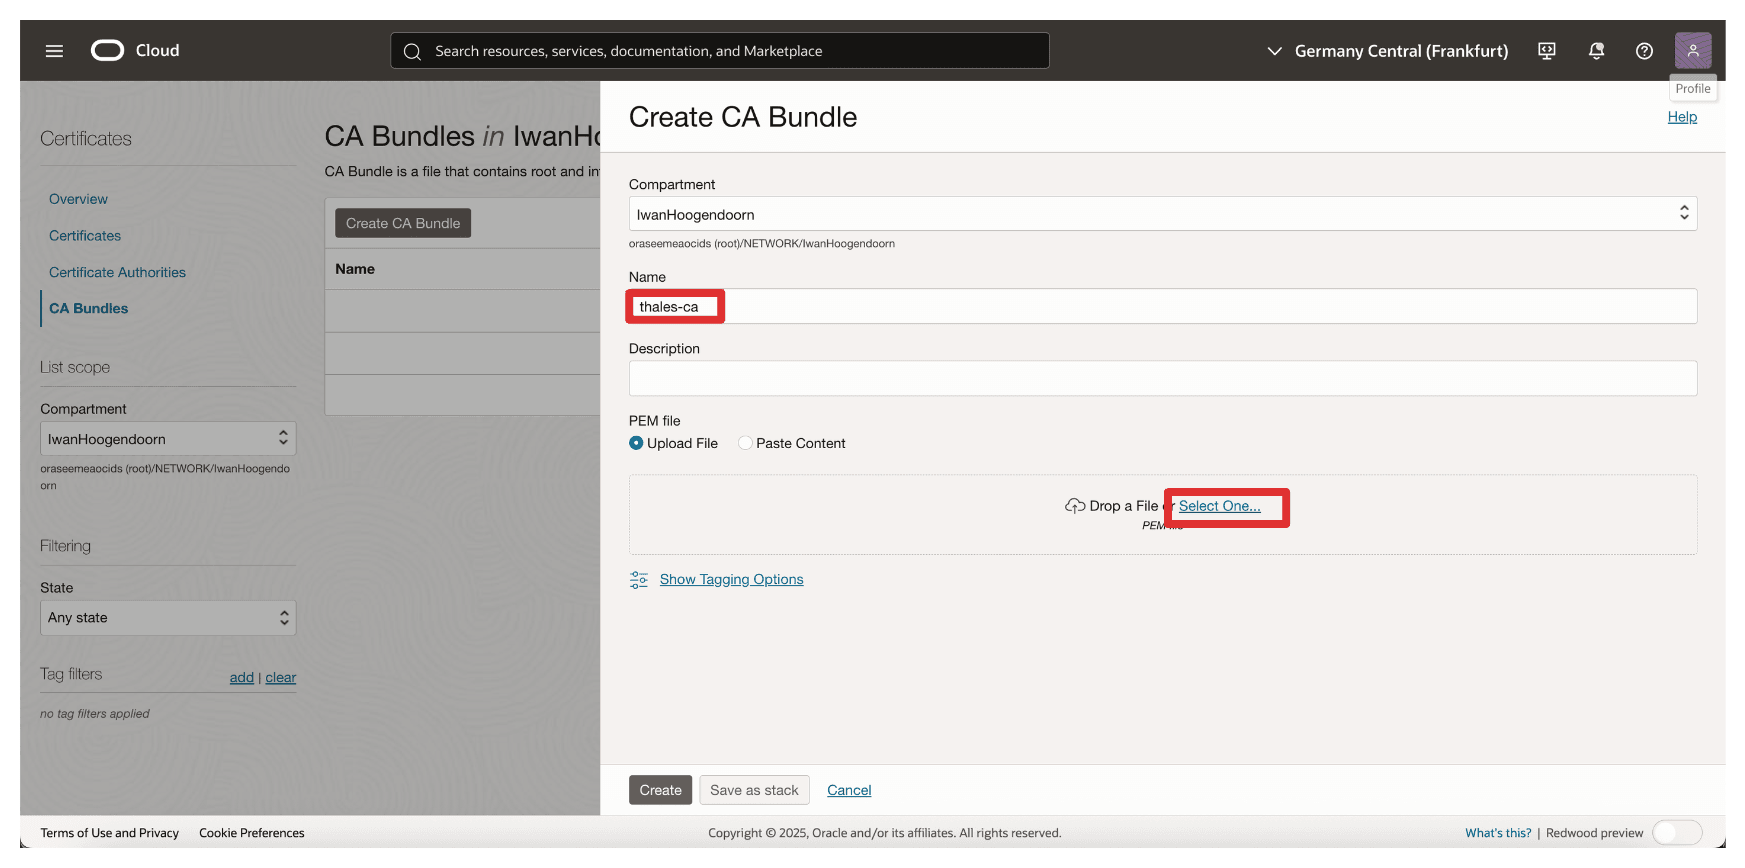
In Create CA Bundle, enter the following information.
- Enter a Name. For example,
thales-ca. - Select a PEM file.
- Enter a Name. For example,
-
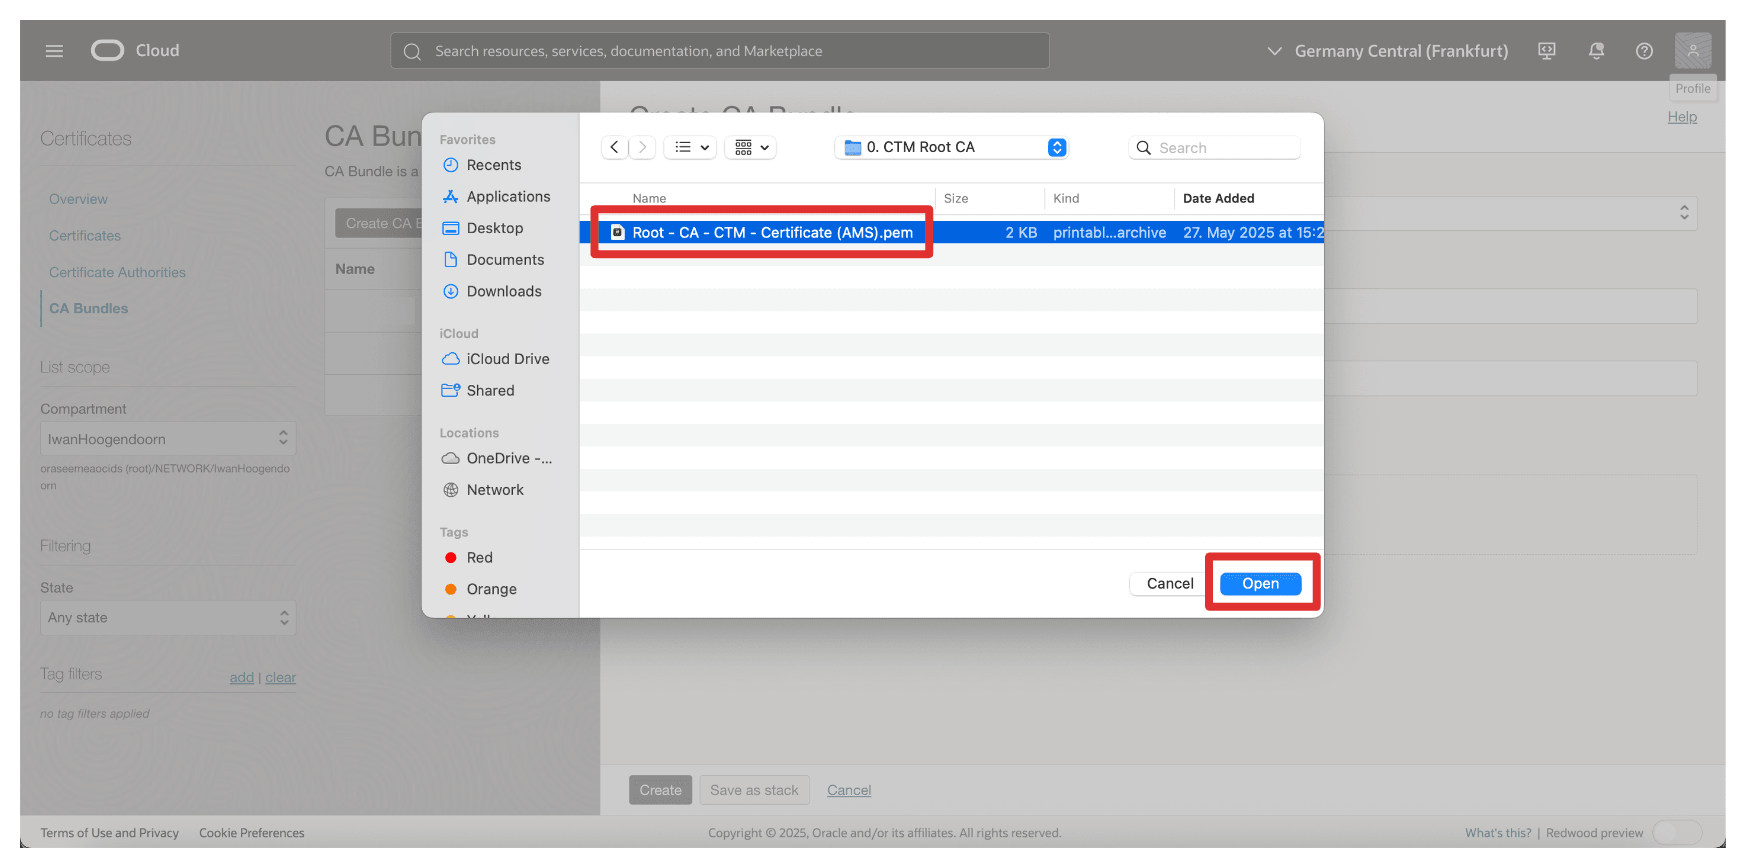
Select Root CA Certificate of the AMS CTM1 CA and click Open.
-
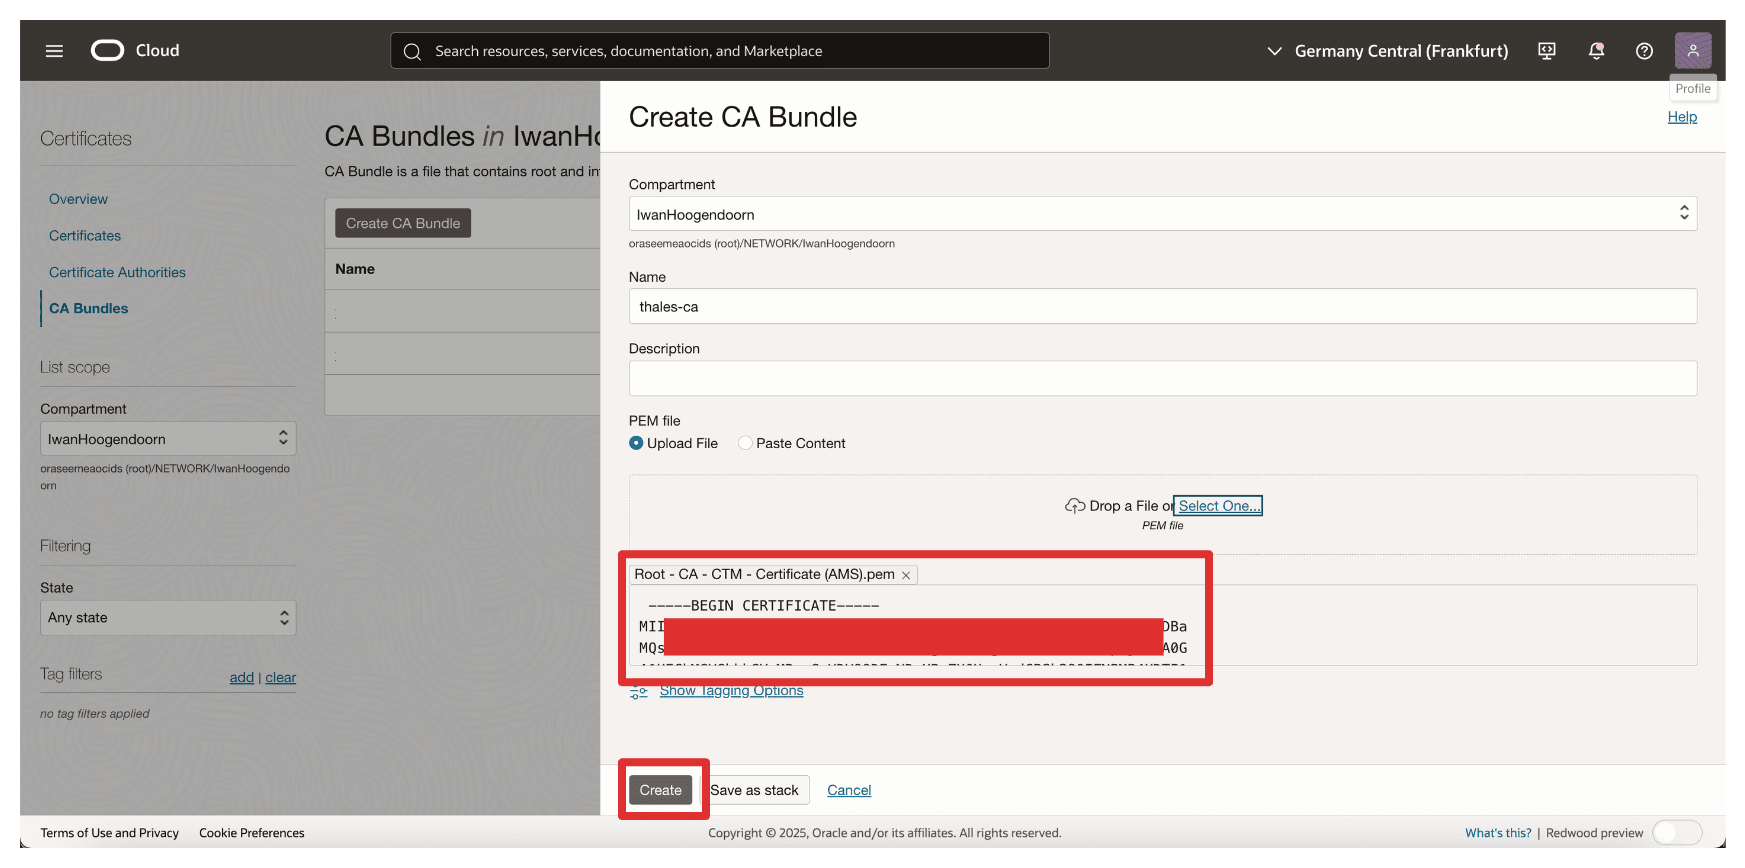
Note the content of the Root CA Certificate of the AMS CTM1 CA and click Create.
-
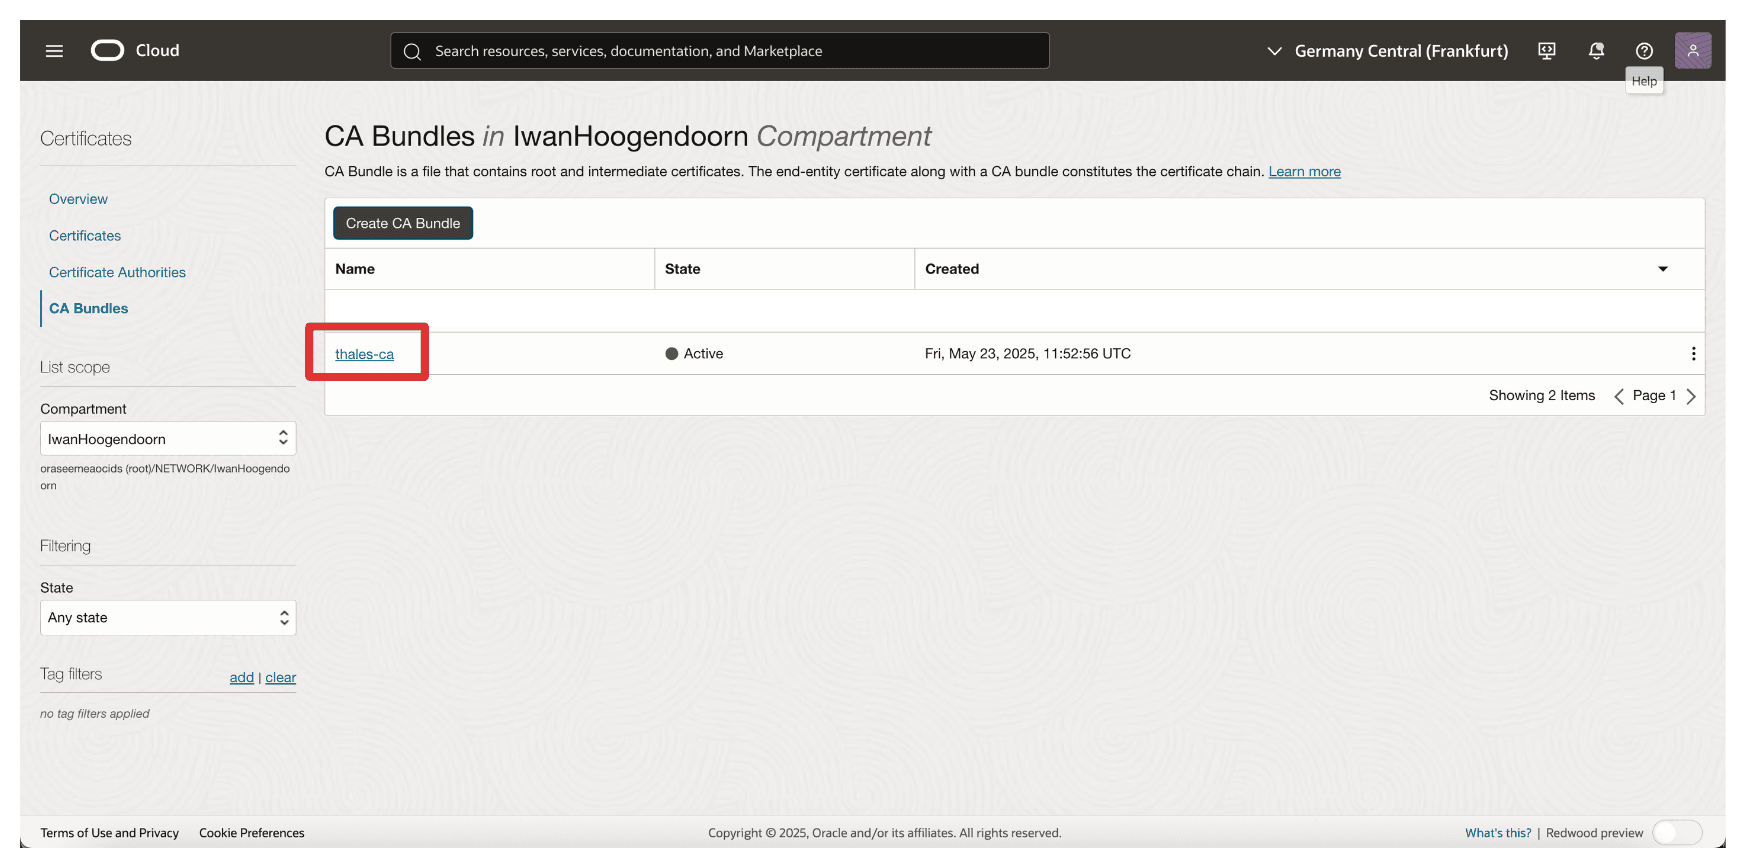
Note that the CA Bundle is created.
Now, let’s upload the signed certificate of the OCI API Gateway.
-
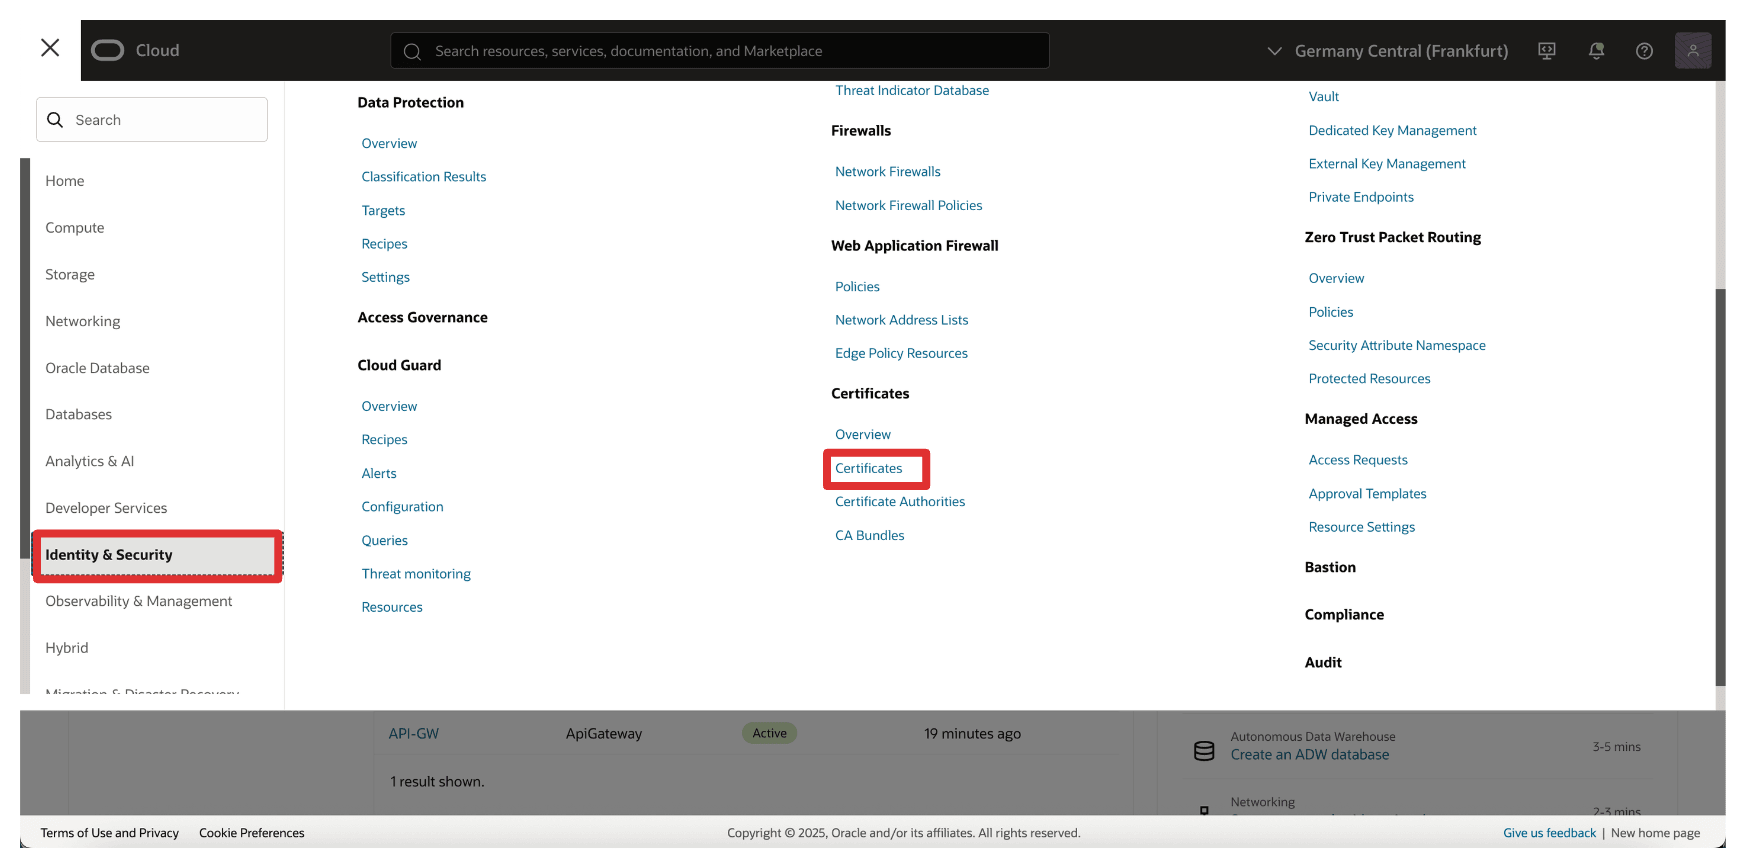
Go to the OCI Console, navigate to Identity & Security and click Certificates.
-
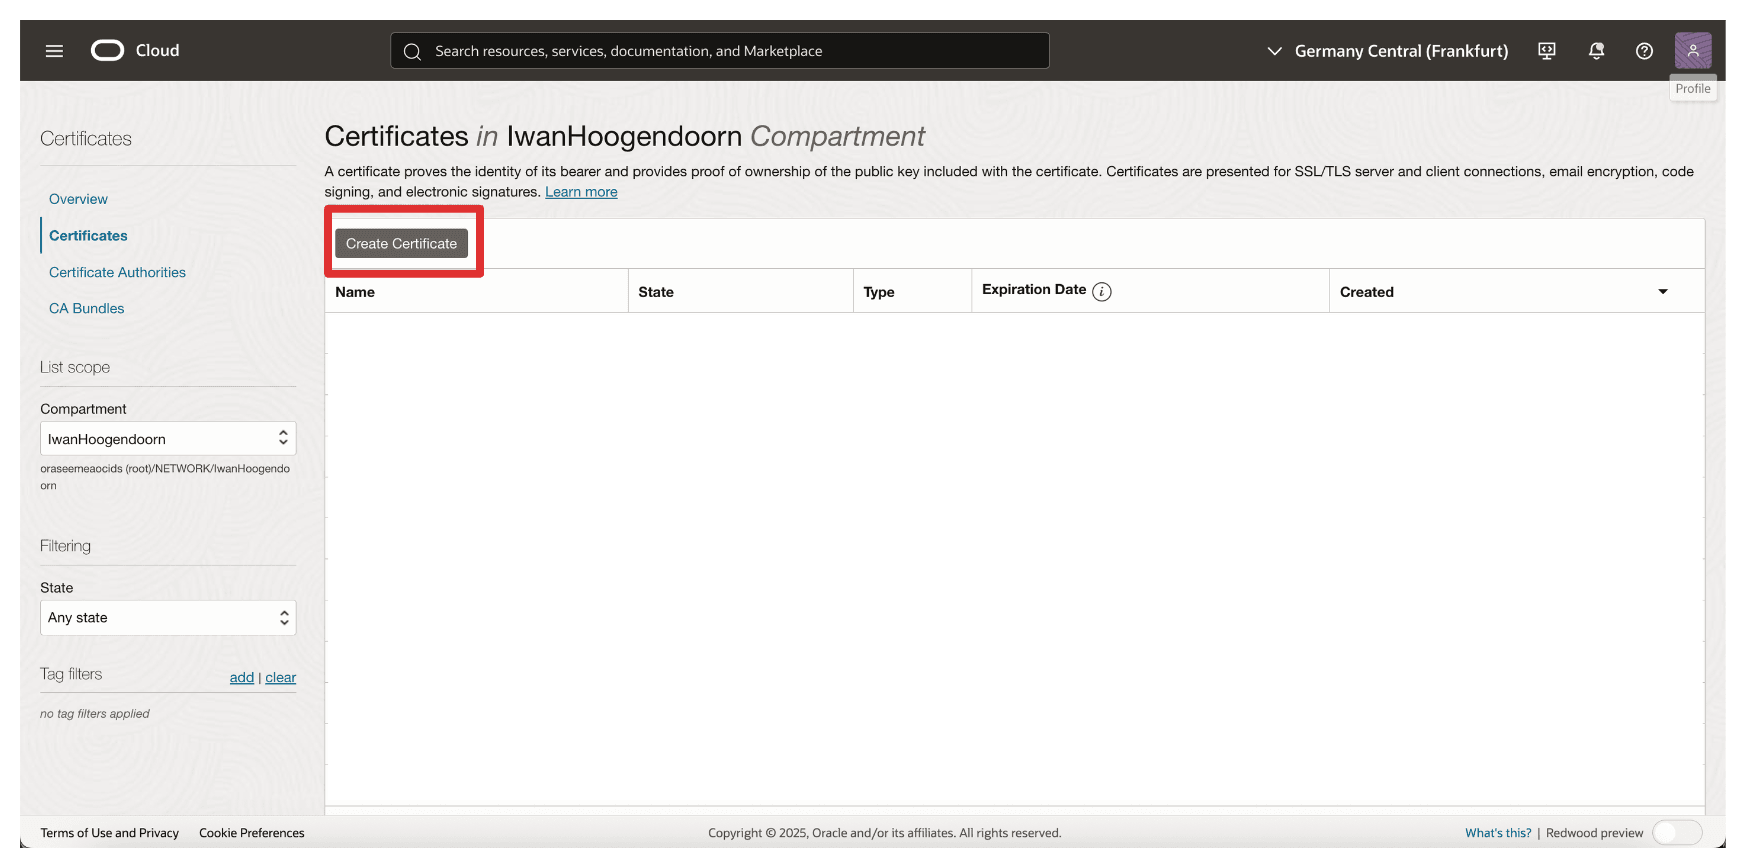
Click Create Certificate.
-
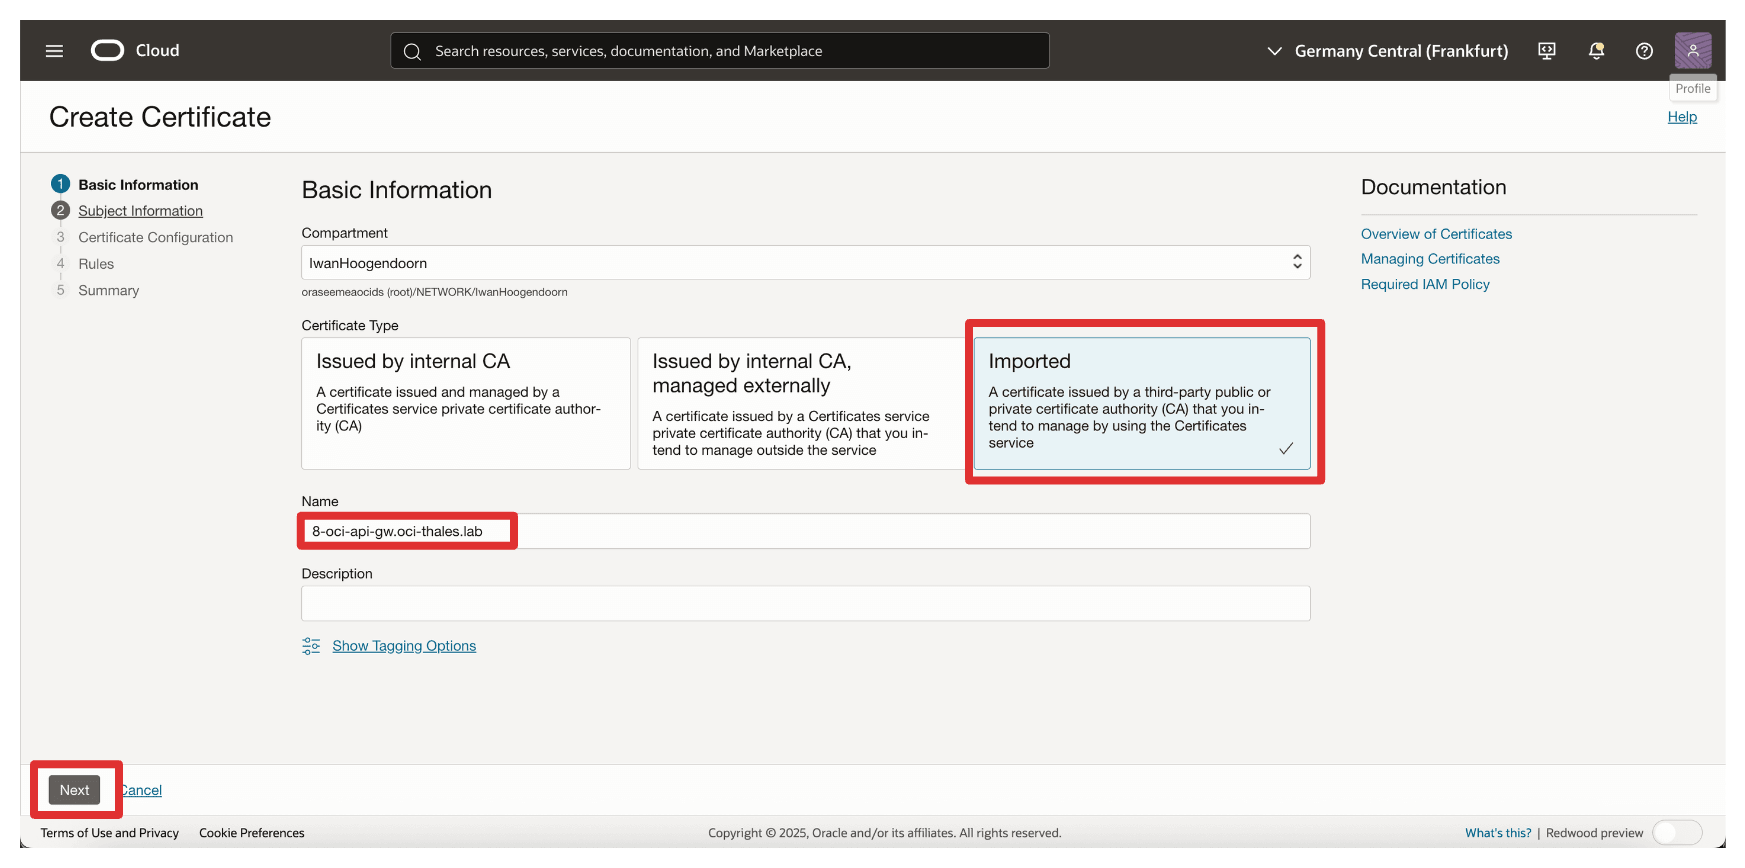
In Basic Information, enter the following information.
- Select Certificate Type as Imported.
- Enter the certificate Name. For example,
8-oci-api-gw.oci-thales.lab. - Click Next.
-
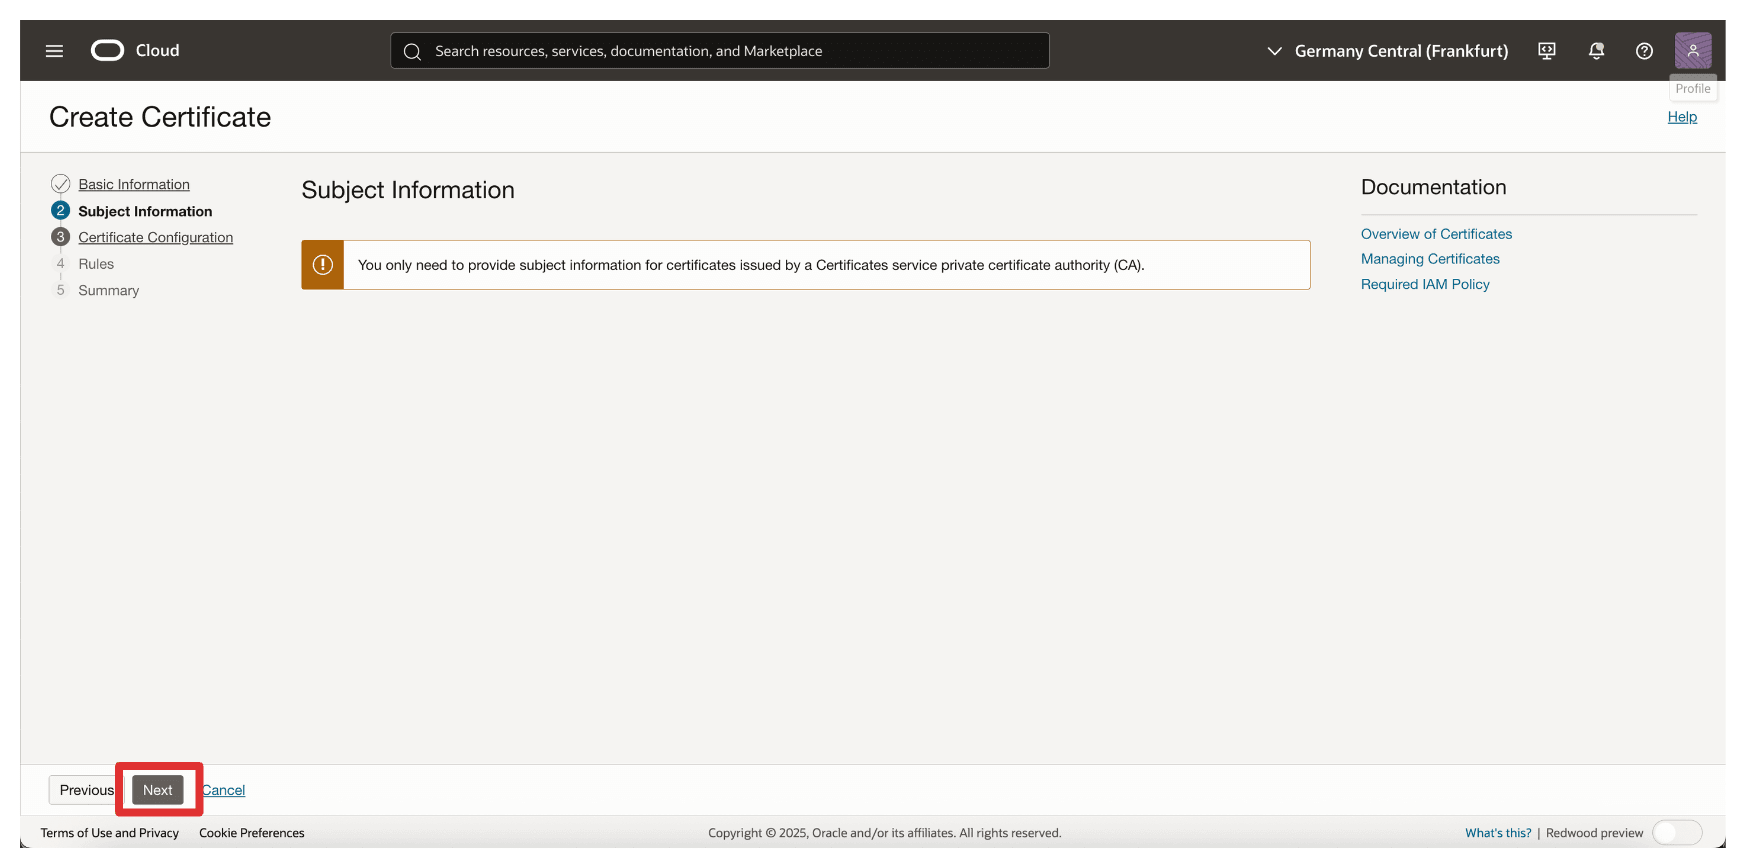
Click Next.
-
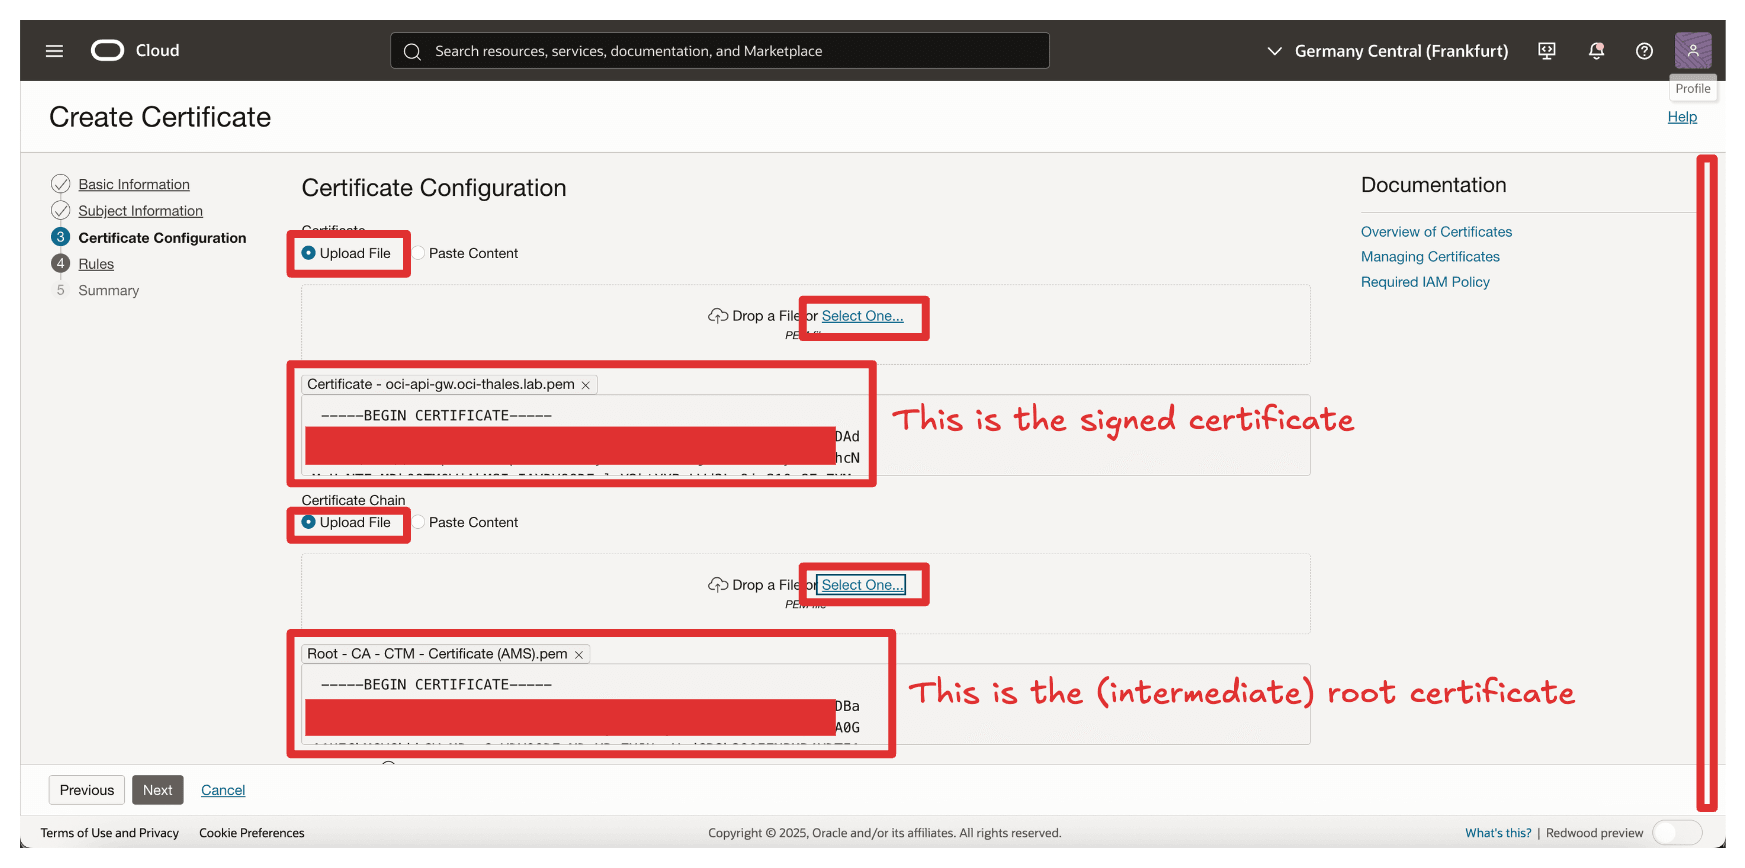
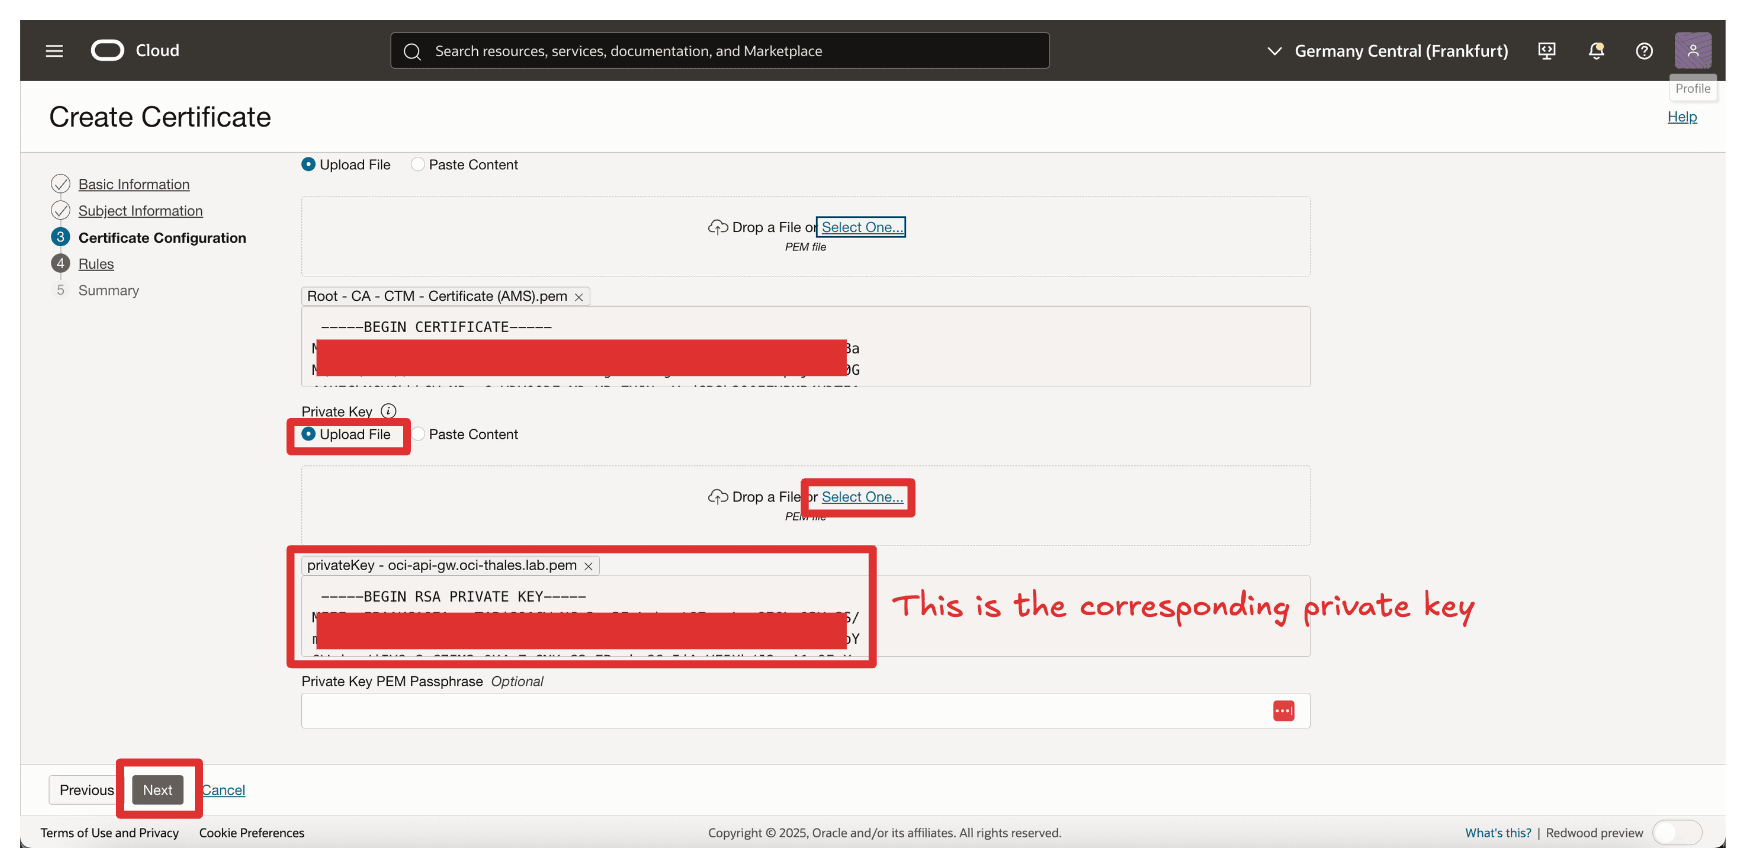
Click Upload File and upload the signed certificate file of the OCI API Gateway.
-
Click Upload File and upload the root certificate file of the CTM1 in AMS.
-
Click Upload File and upload the corresponding private key file of the signed OCI API Gateway.
-
Click Next.
-
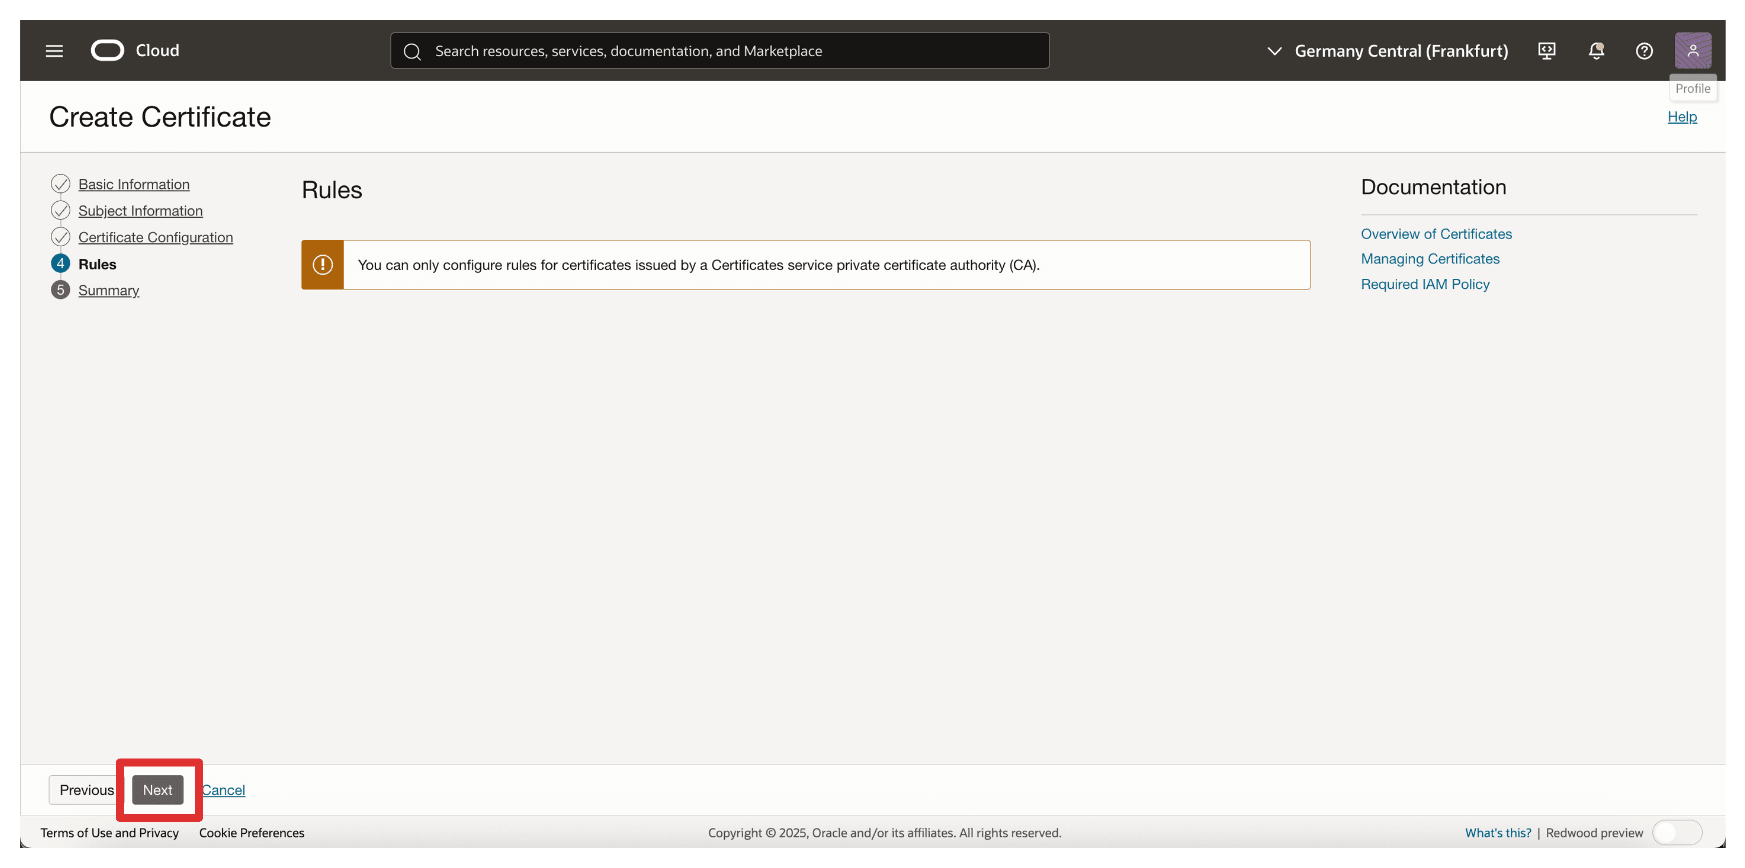
Click Next.
-
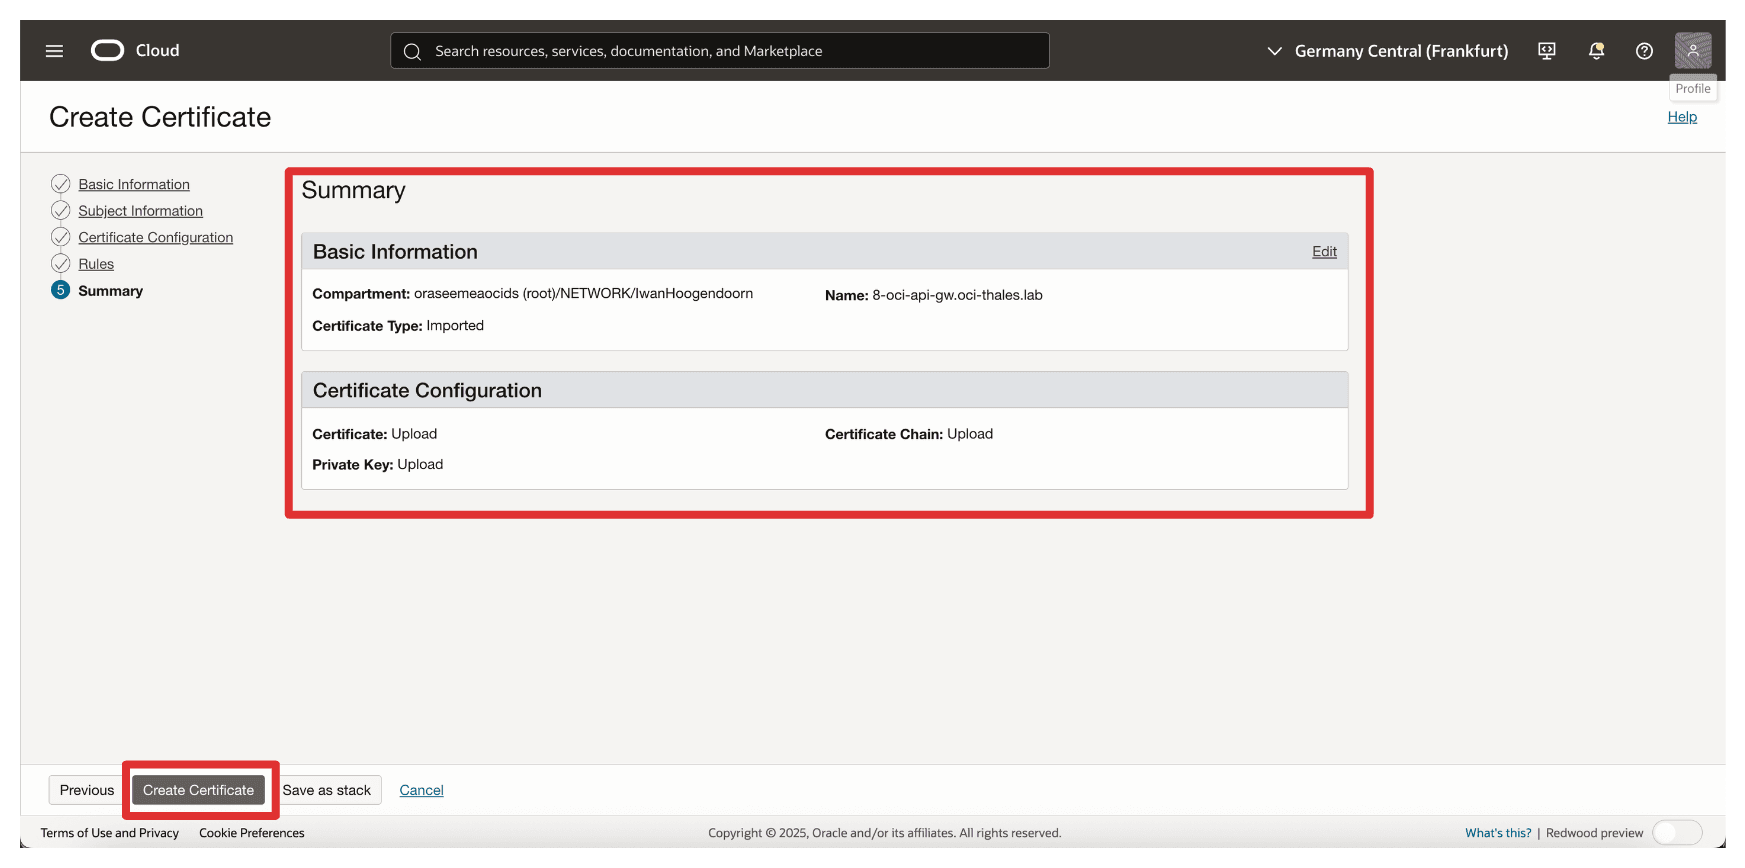
Review the Summary section and click Create Certificate.
-
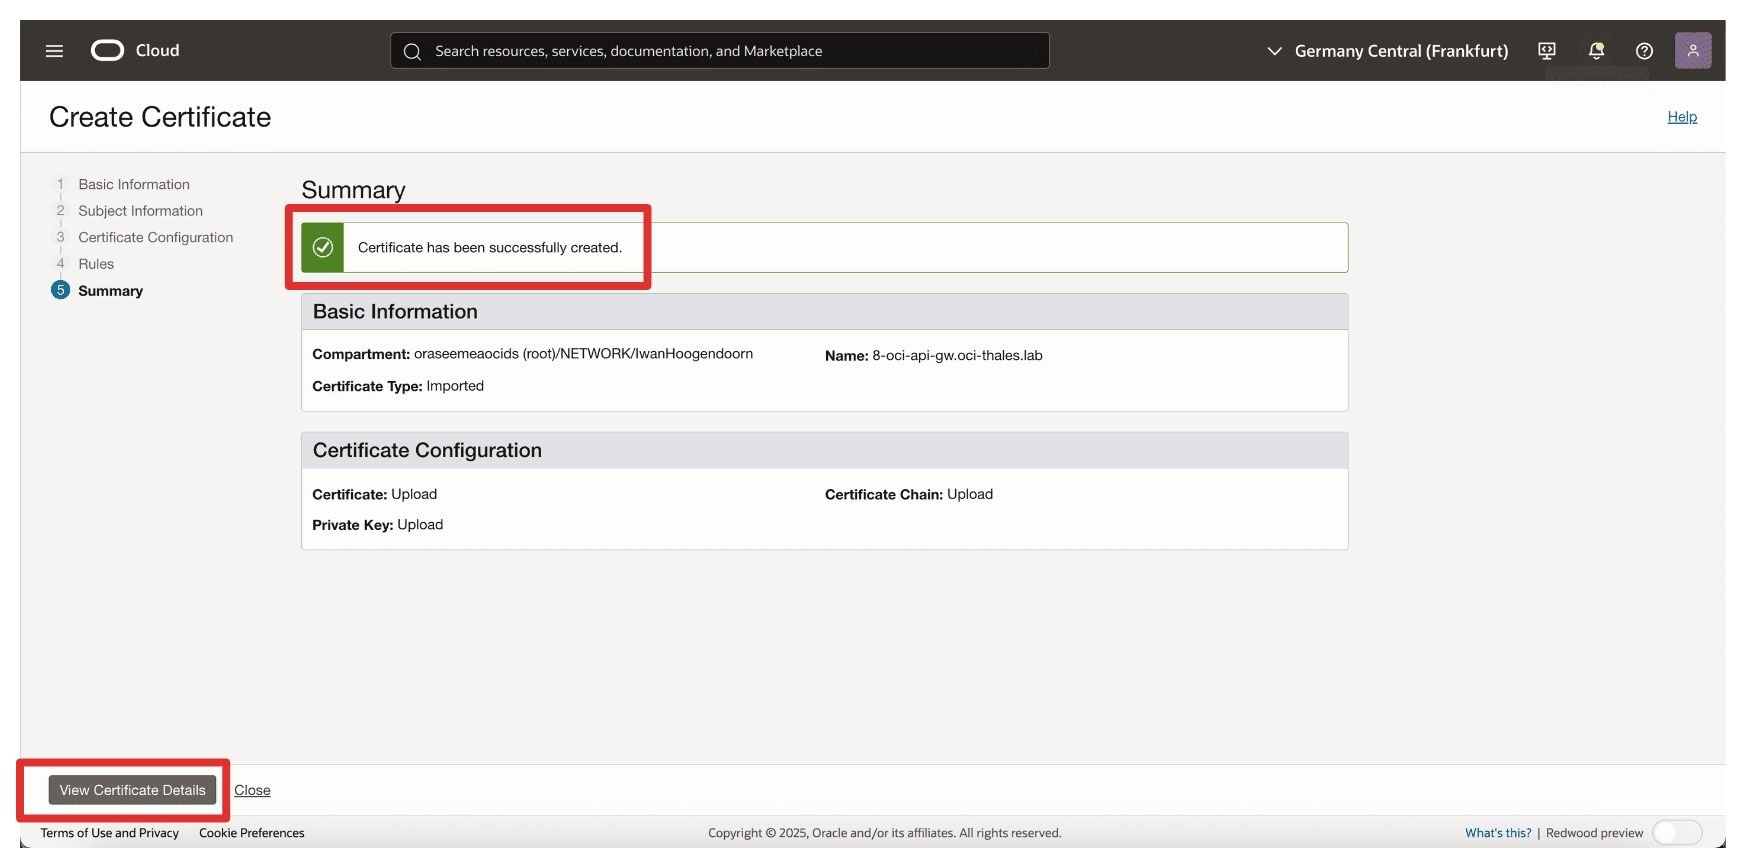
Review the Summary and click View Certificate Details.
-
Note that the certificate is Active.
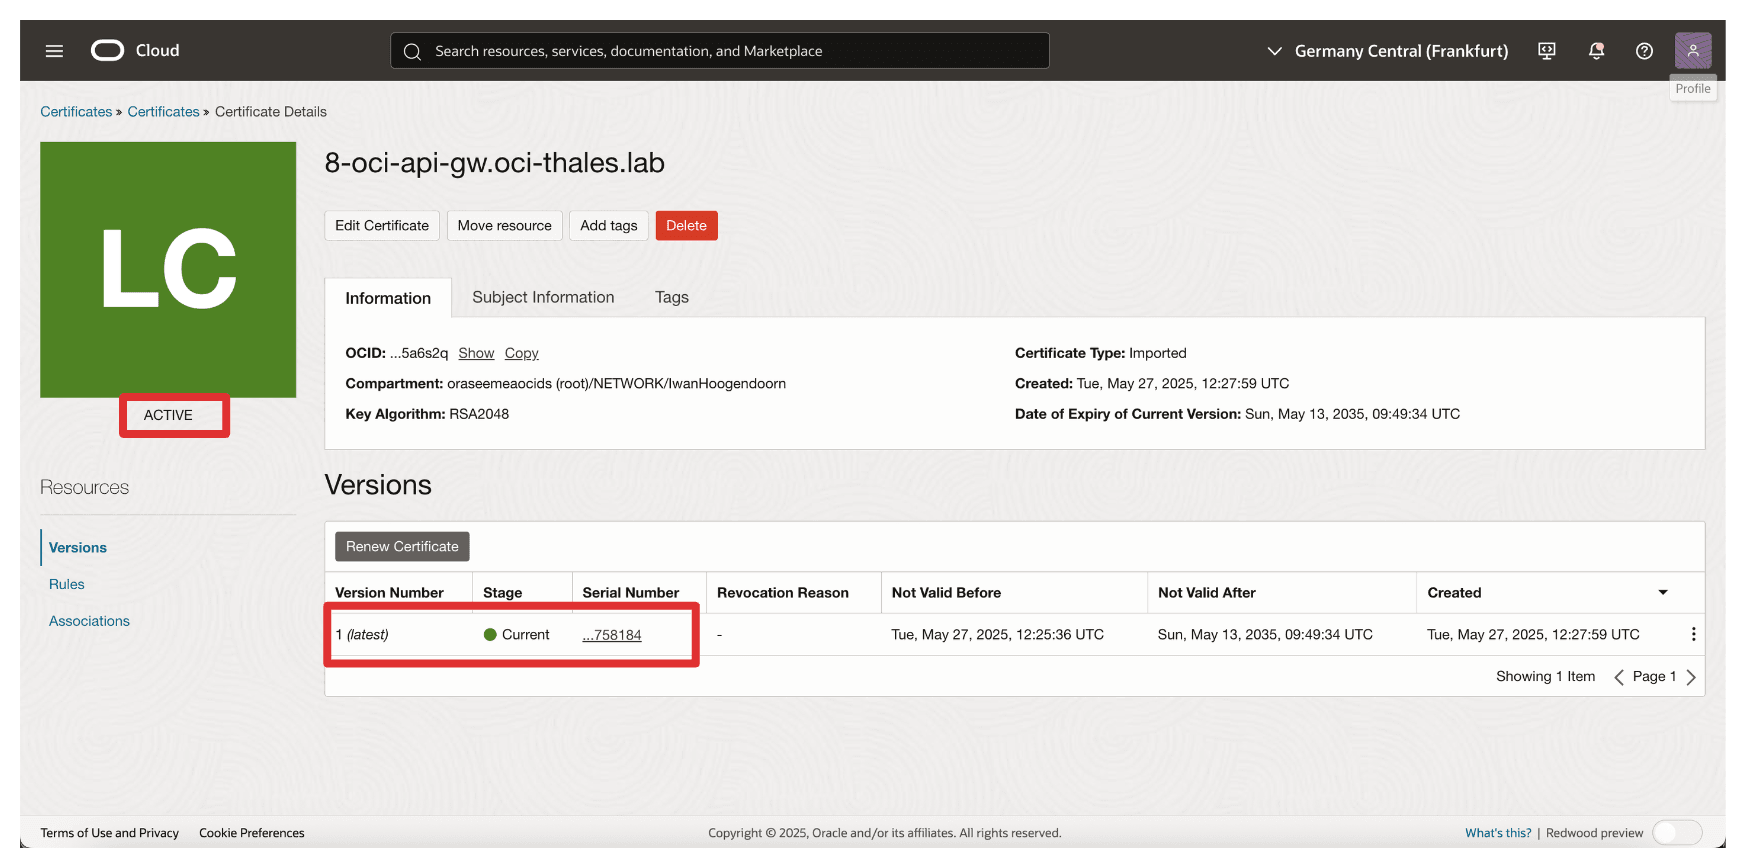
Note: If the certificate upload fails, it may be due to the algorithm used when generating the CSR. The certificates using the ECDSA algorithm were not accepted by OCI. To resolve this, we regenerated the CSR using the RSA algorithm, which worked successfully.
Once uploaded, this certificate will be available to attach to your API Gateway deployment, allowing it to present a trusted identity to OCI services such as the OCI External KMS. This task is critical to enabling secure, certificate-based trust between Oracle and your external key manager.
Task 5: Make sure the Private Endpoint is Allowed to Communicate with the OCI API Gateway from the Firewall/Security List/Network Security Group
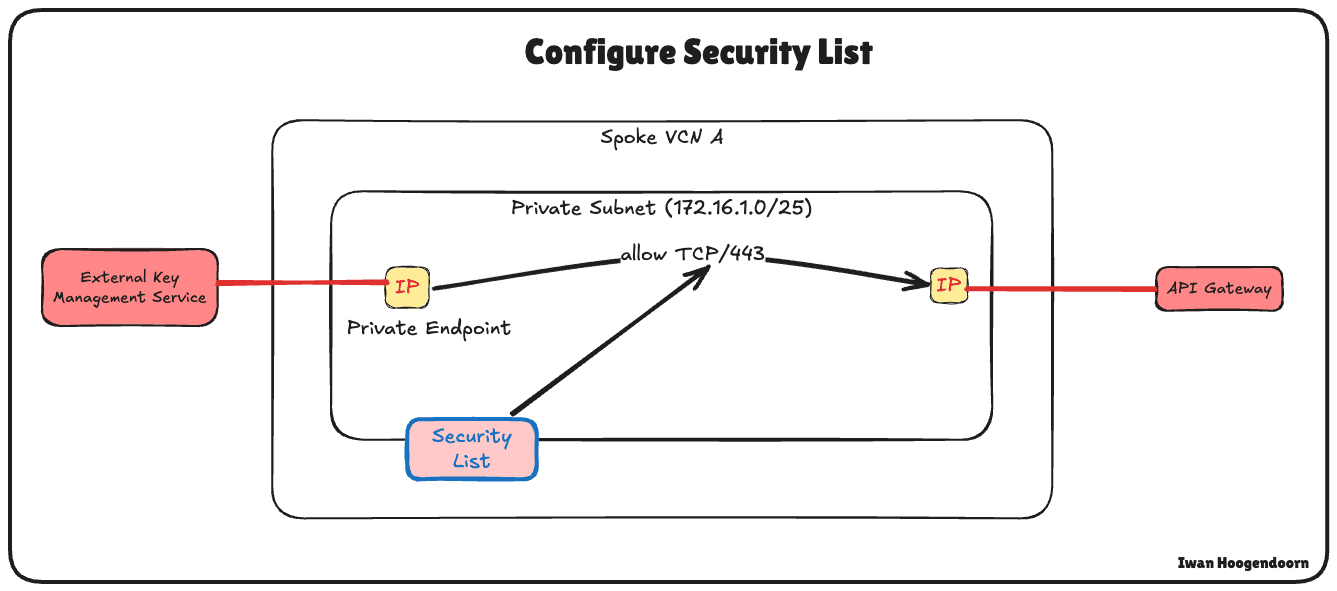
Before deploying the OCI API Gateway or testing the integration between OCI and the Thales CipherTrust Manager, it is essential to ensure that network connectivity is in place between the Private Endpoint used by the OCI External KMS and the OCI API Gateway.
Note:
Traffic within the same subnet is not automatically allowed in OCI. Even if the private endpoint and the OCI API Gateway reside in the same subnet, you must still explicitly allow traffic between them in the security list or network security group.
For example, to allow HTTPS traffic between resources in the same subnet, you must create an ingress rule that permits traffic on TCP port 443 from the subnet’s CIDR block.
-
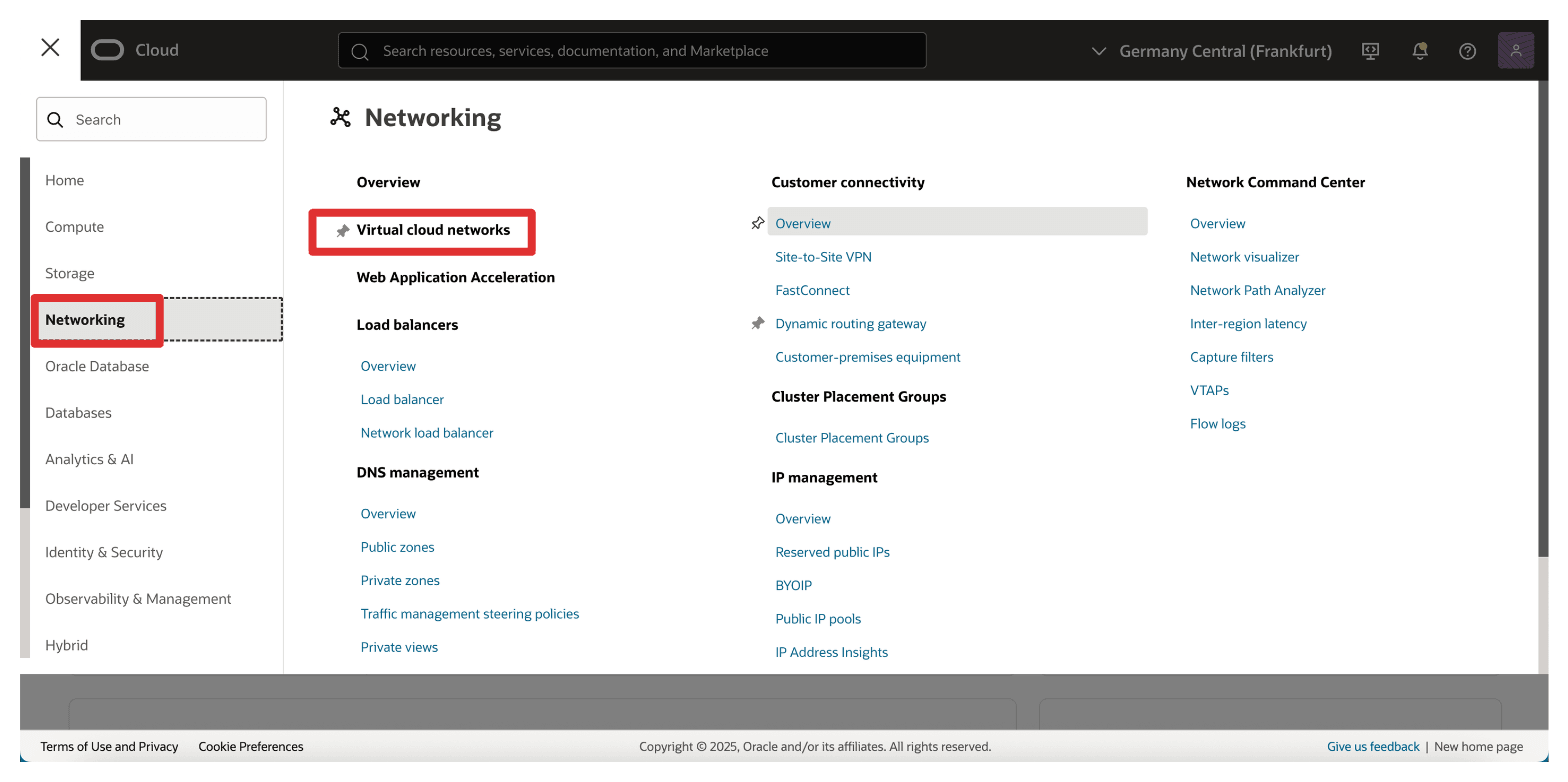
Go to the OCI Console, navigate to Networking and click Virtual Cloud Networks.
-
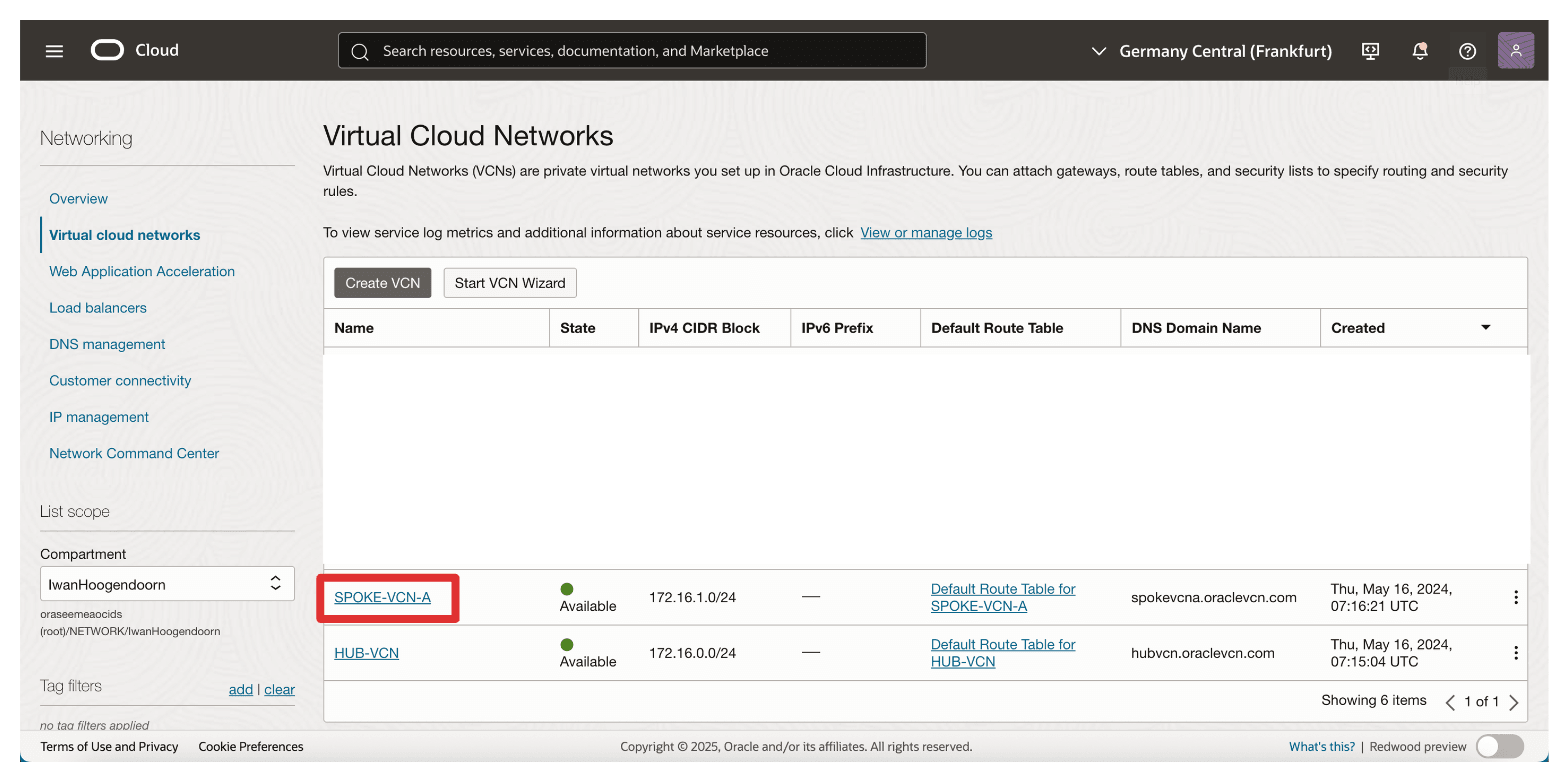
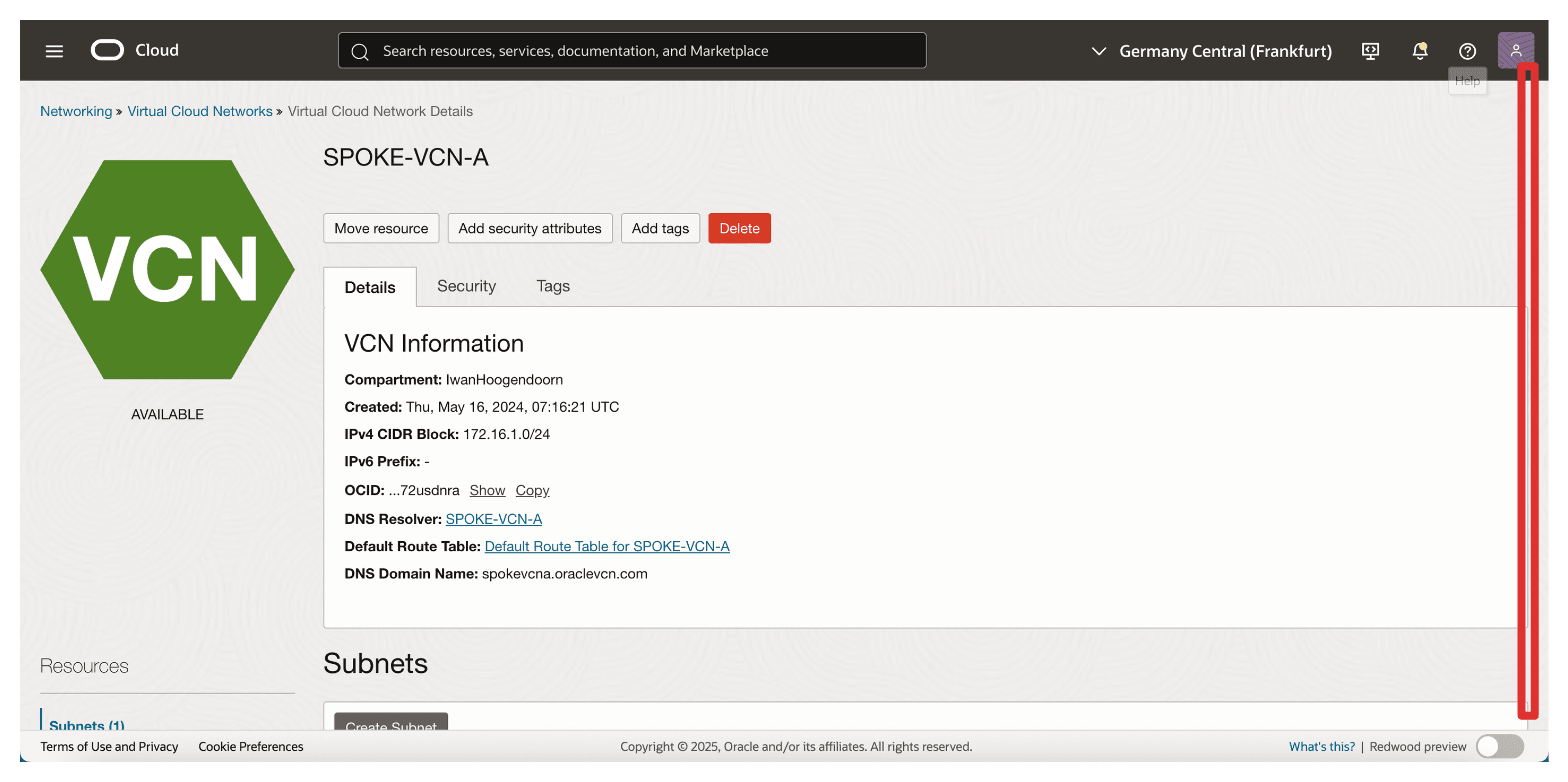
Click the Spoke A VCN.
-
Scroll down.
-
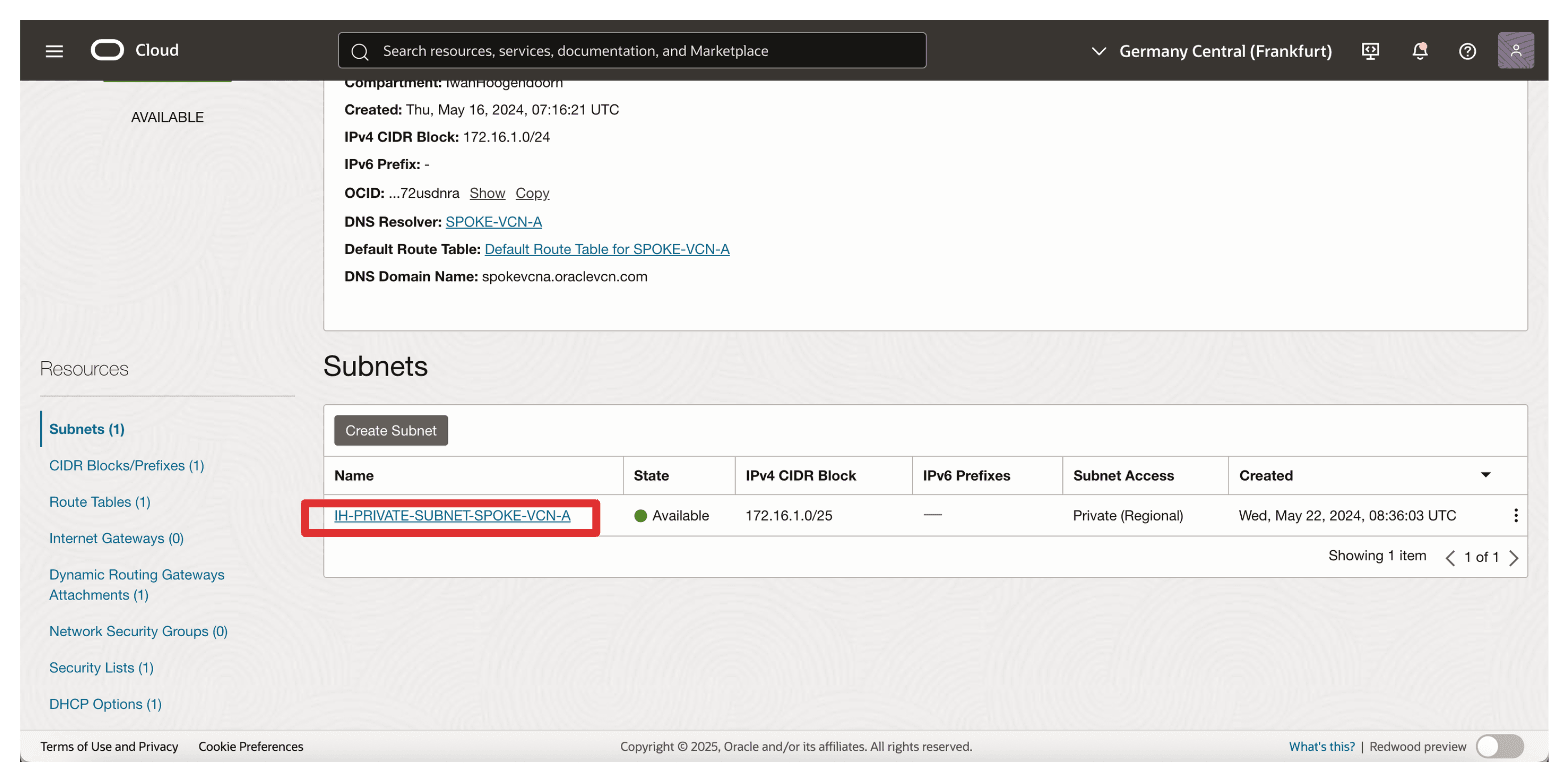
Click the private subnet of the spoke A VCN. This is the VCN where the private endpoint of the OCI External KMS will be and the IP address of the OCI API Gateway.
-
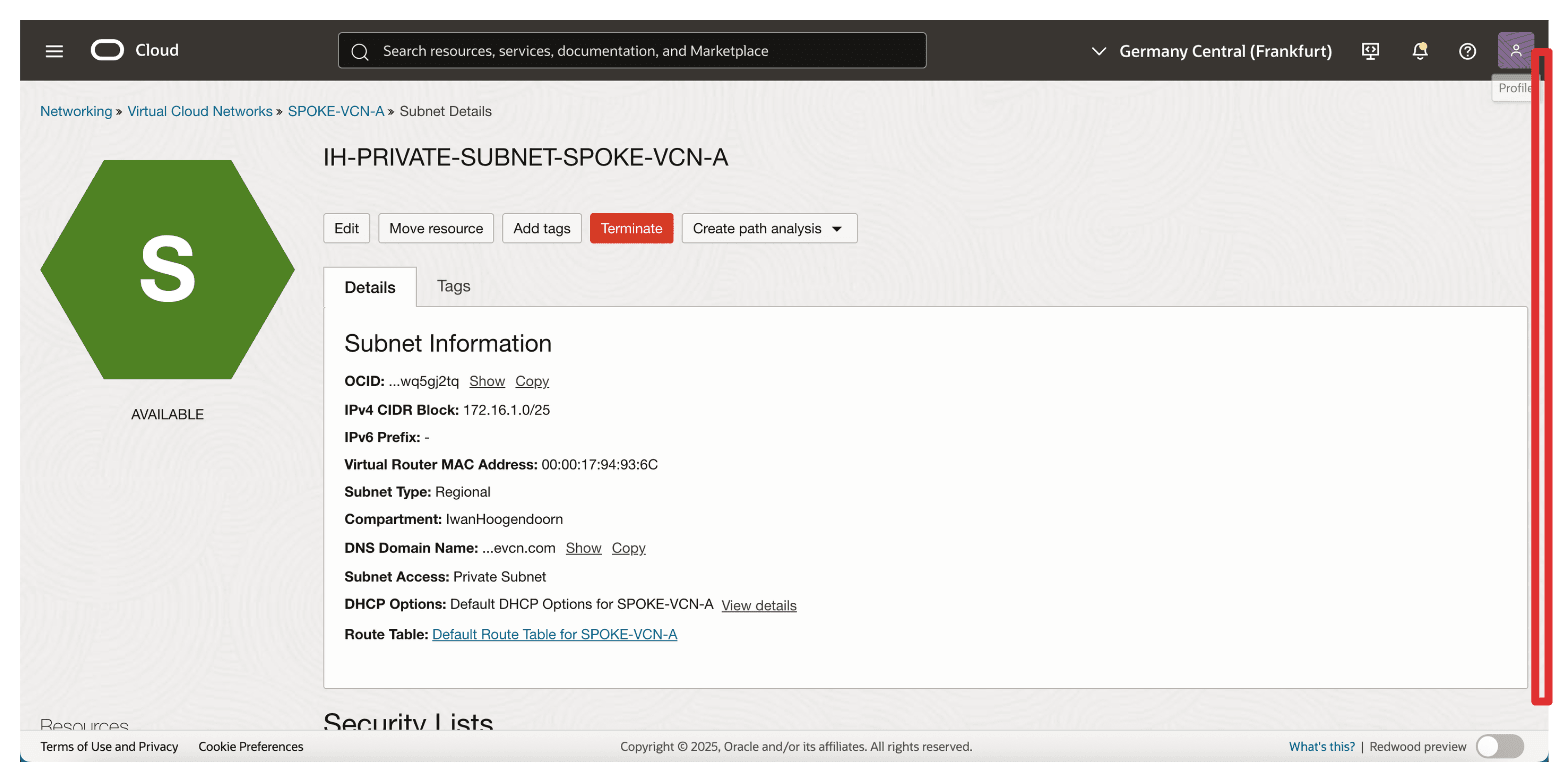
Scroll down.
-
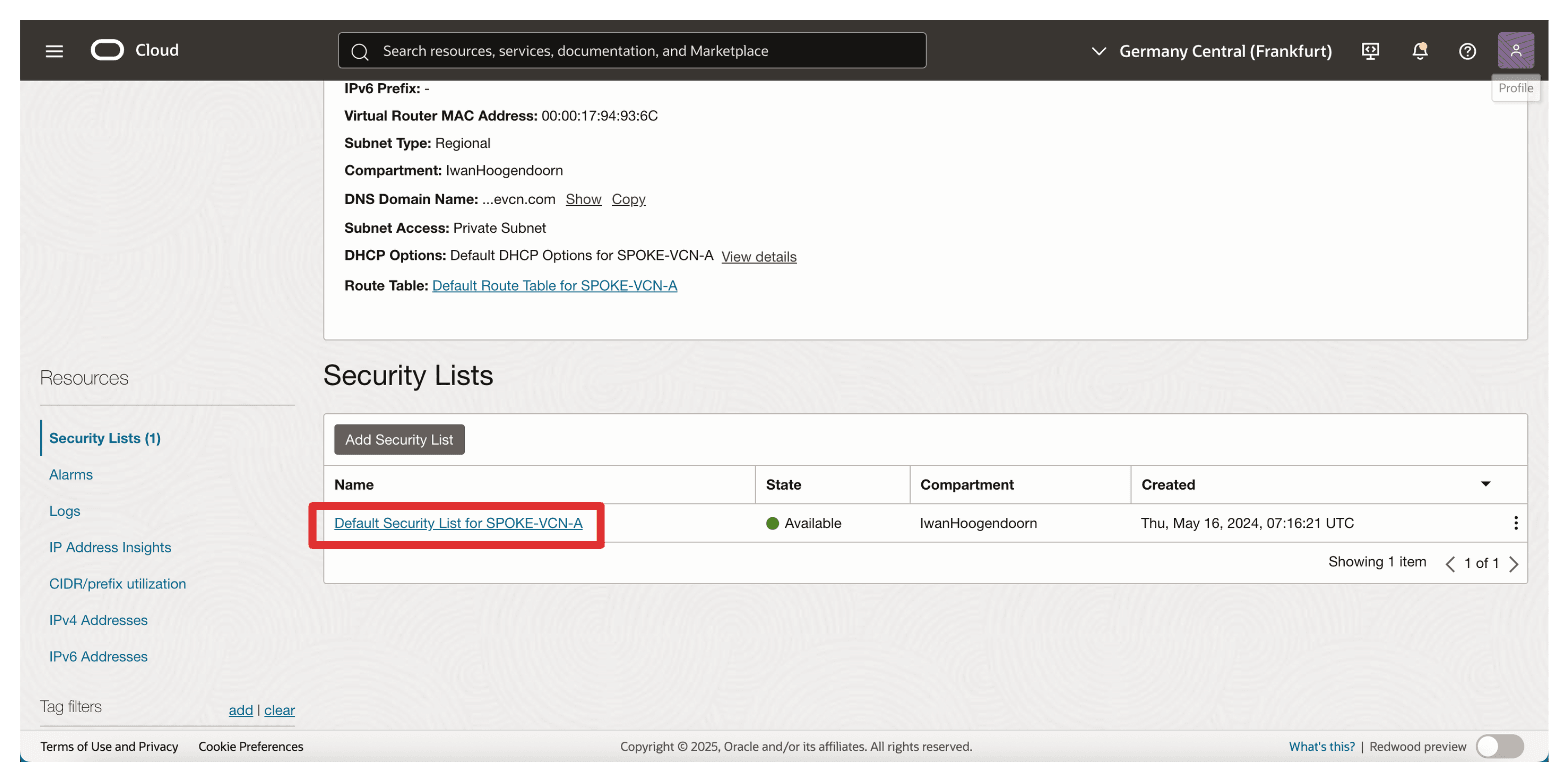
Click the default security list attached to the subnet.
-
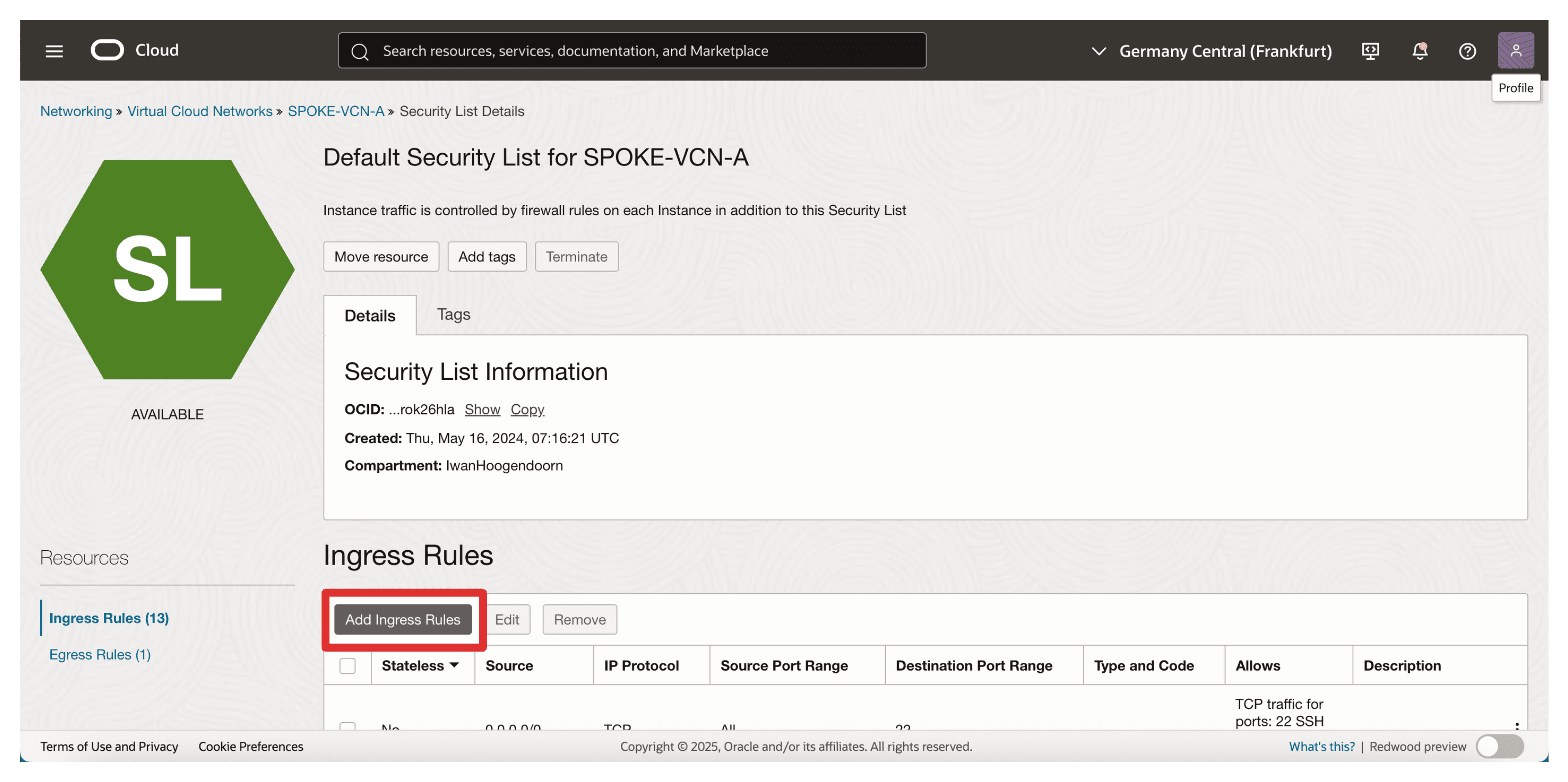
Click Add Ingress Rules.
-
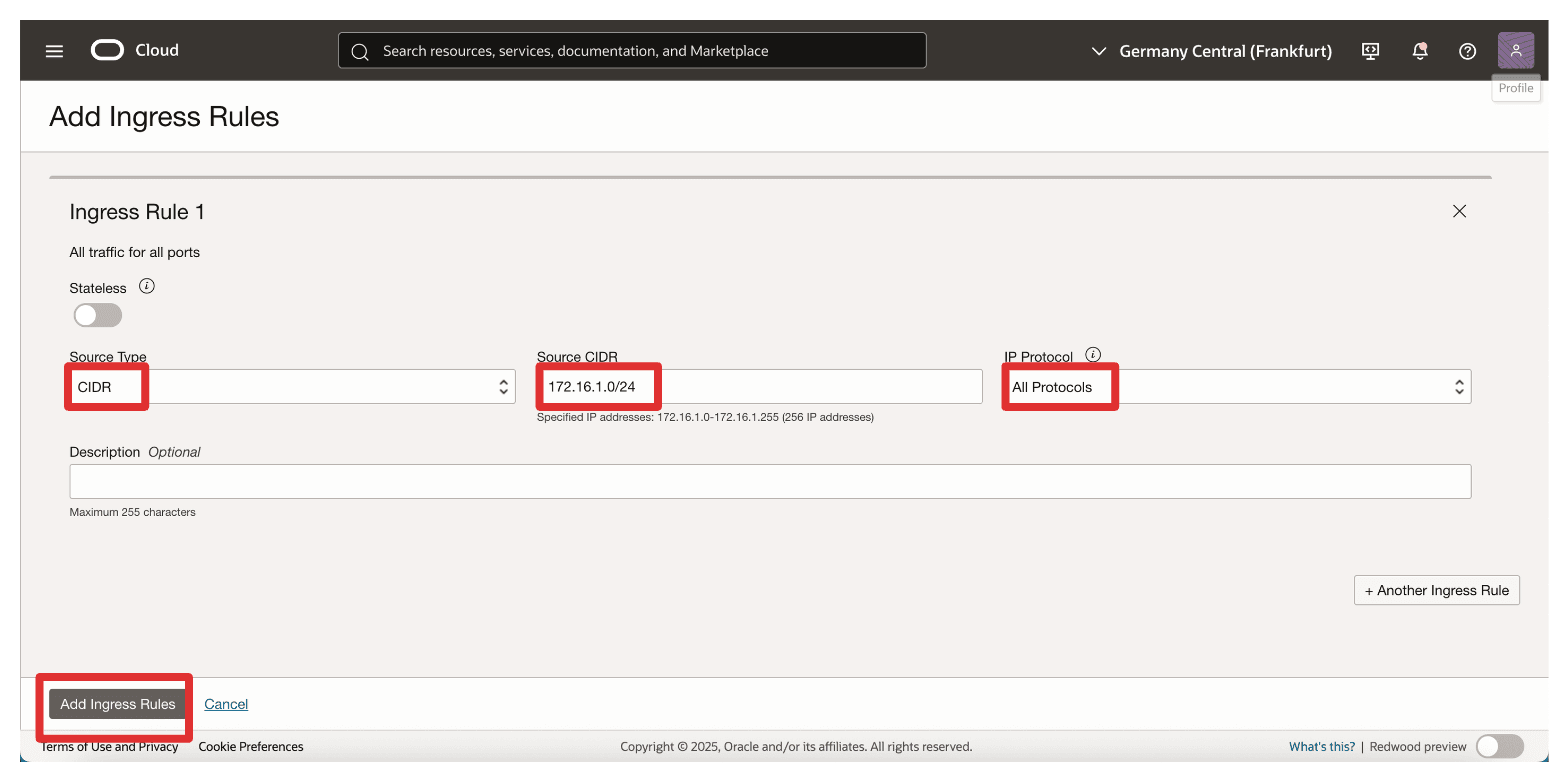
To configure Ingress Rule 1, enter the following information and click Add Ingress Rules.
- Source Type: Select CIDR.
- Source CIDR: Enter
172.16.1.0/24. - IP Protocol: Select All Protocols.
-
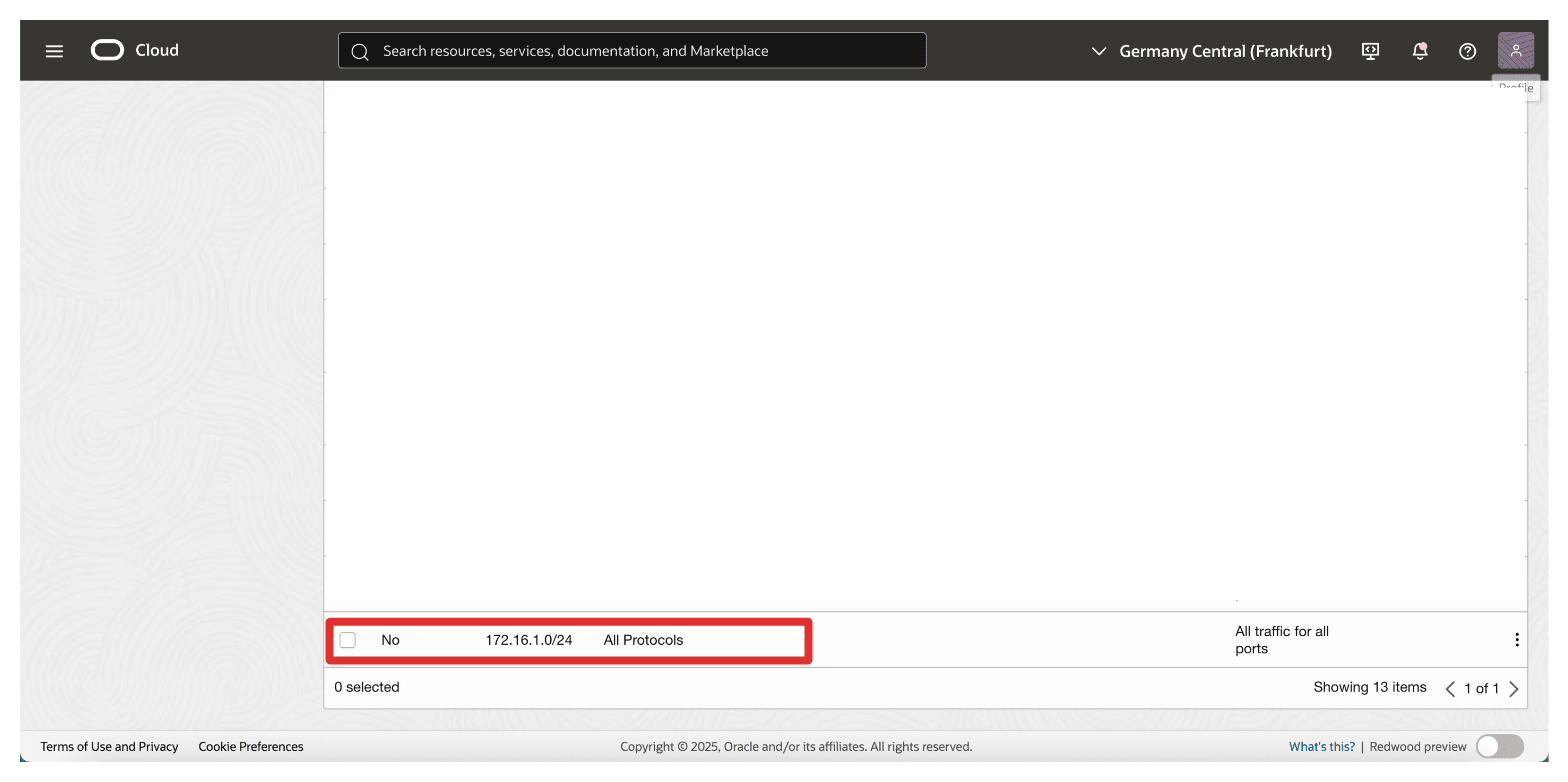
Note that the ingress security list rule has been added to the security list.
Note: If an OCI API Gateway cannot reach the Thales CipherTrust Manager through its FQDN during deployment, it may fail to become active. Therefore, ensuring a clear and secure network path between the private endpoint and the OCI API Gateway is a critical prerequisite for a successful HYOK integration.
Task 6: Create an OCI API Gateway
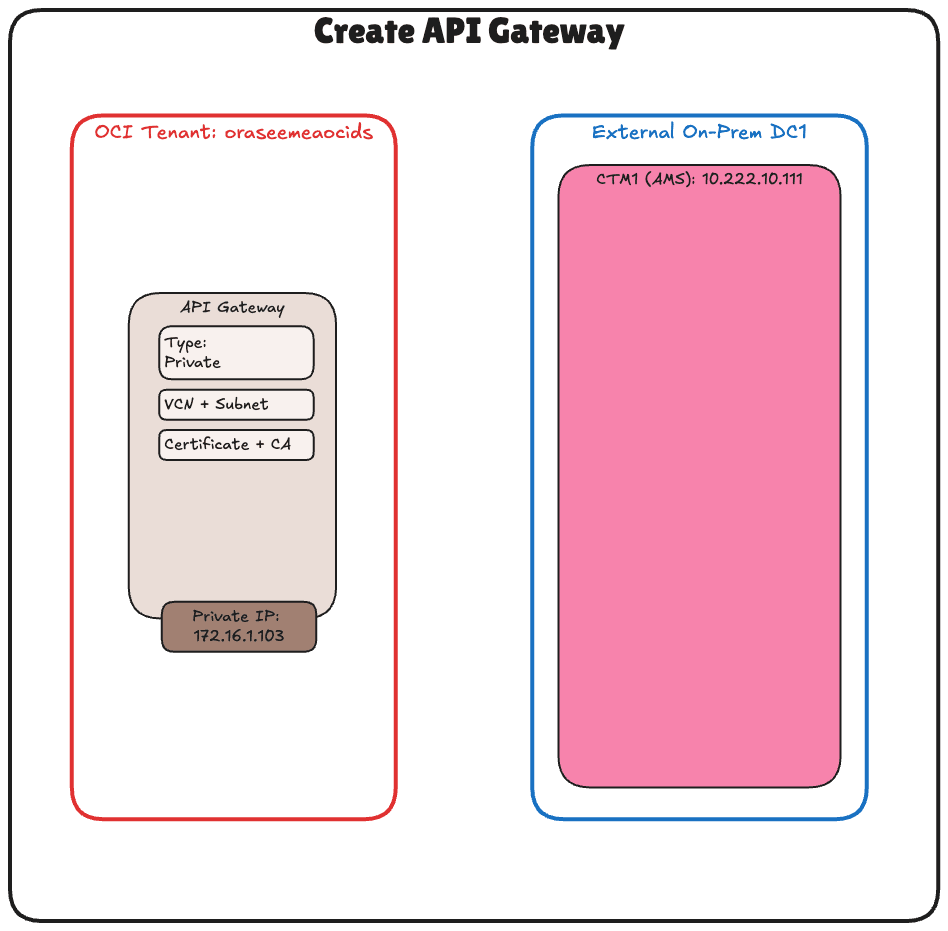
With the signed TLS certificate uploaded, the next task is to create an OCI API Gateway that will serve as the secure entry point for OCI to communicate with your Thales CipherTrust Manager.
This OCI API Gateway will later be configured to route requests to the CTM using its fully qualified domain name (FQDN) and enforce secure communication using the uploaded TLS certificate.
The following image illustrates the components and configuration setup in this task.
-
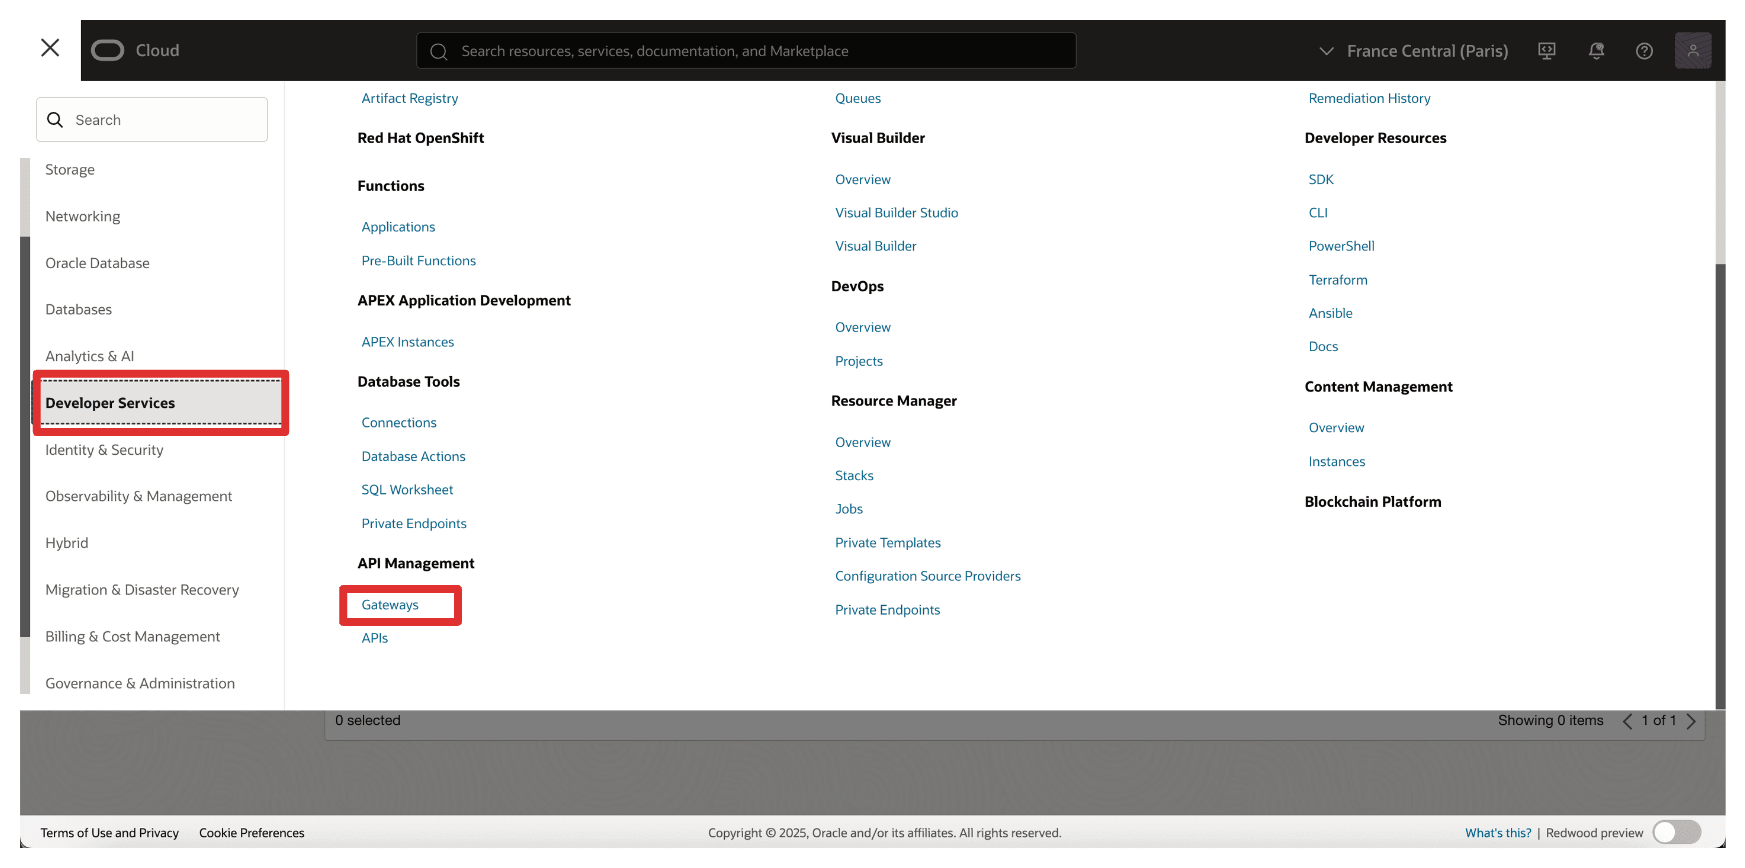
Go to the OCI Console, navigate to Developer Services and click Gateways.
-
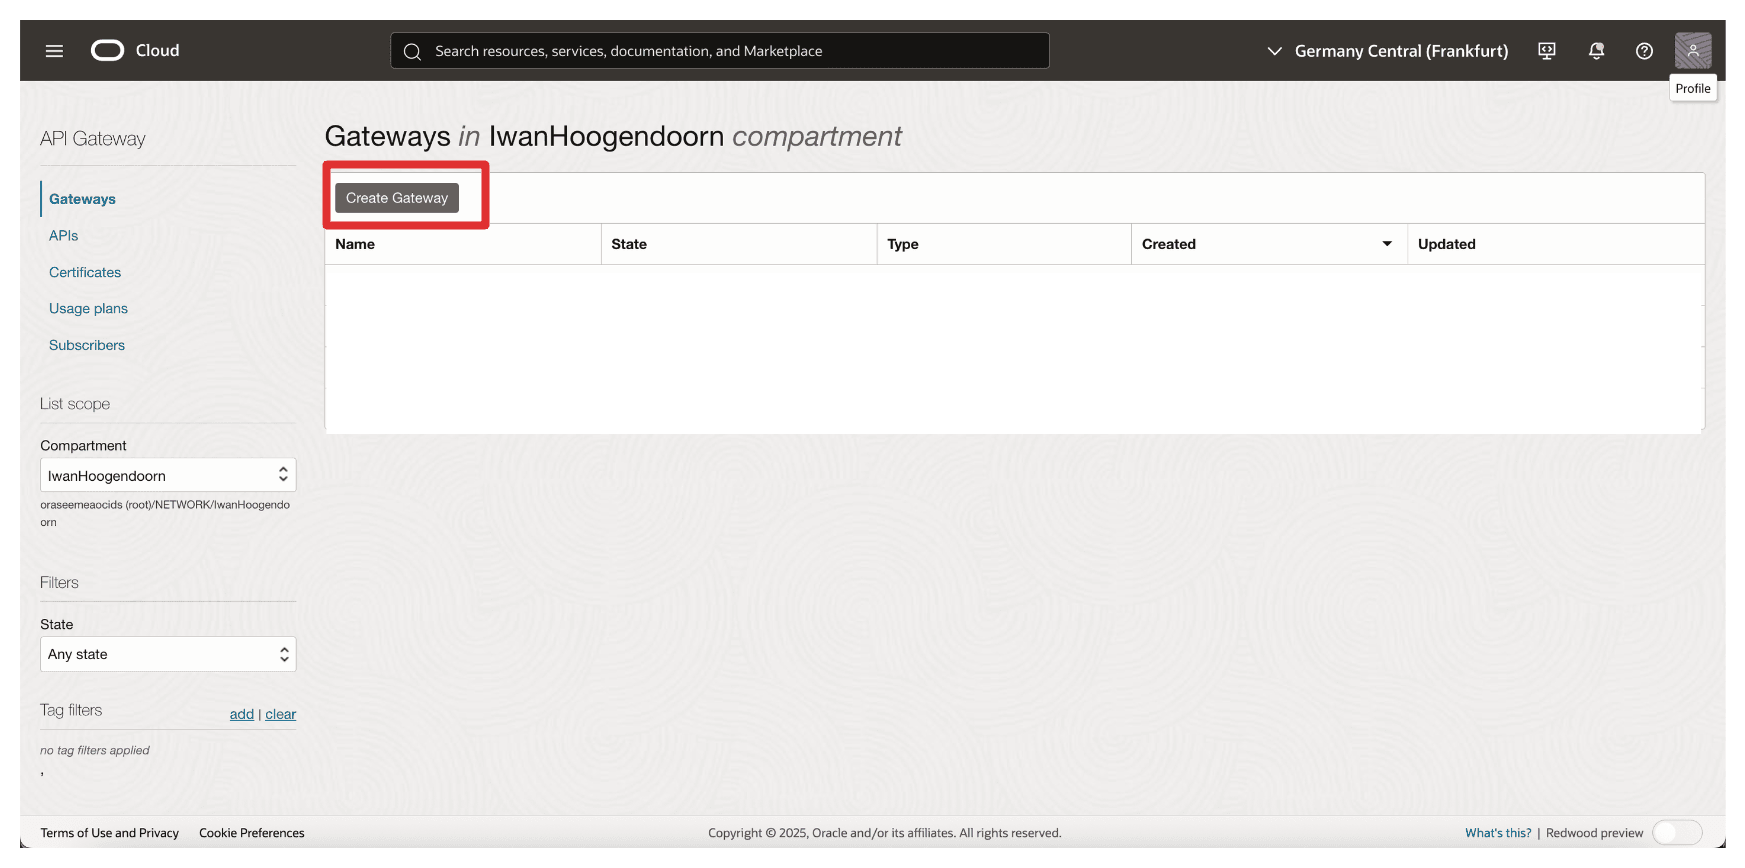
Click Create Gateway.
-
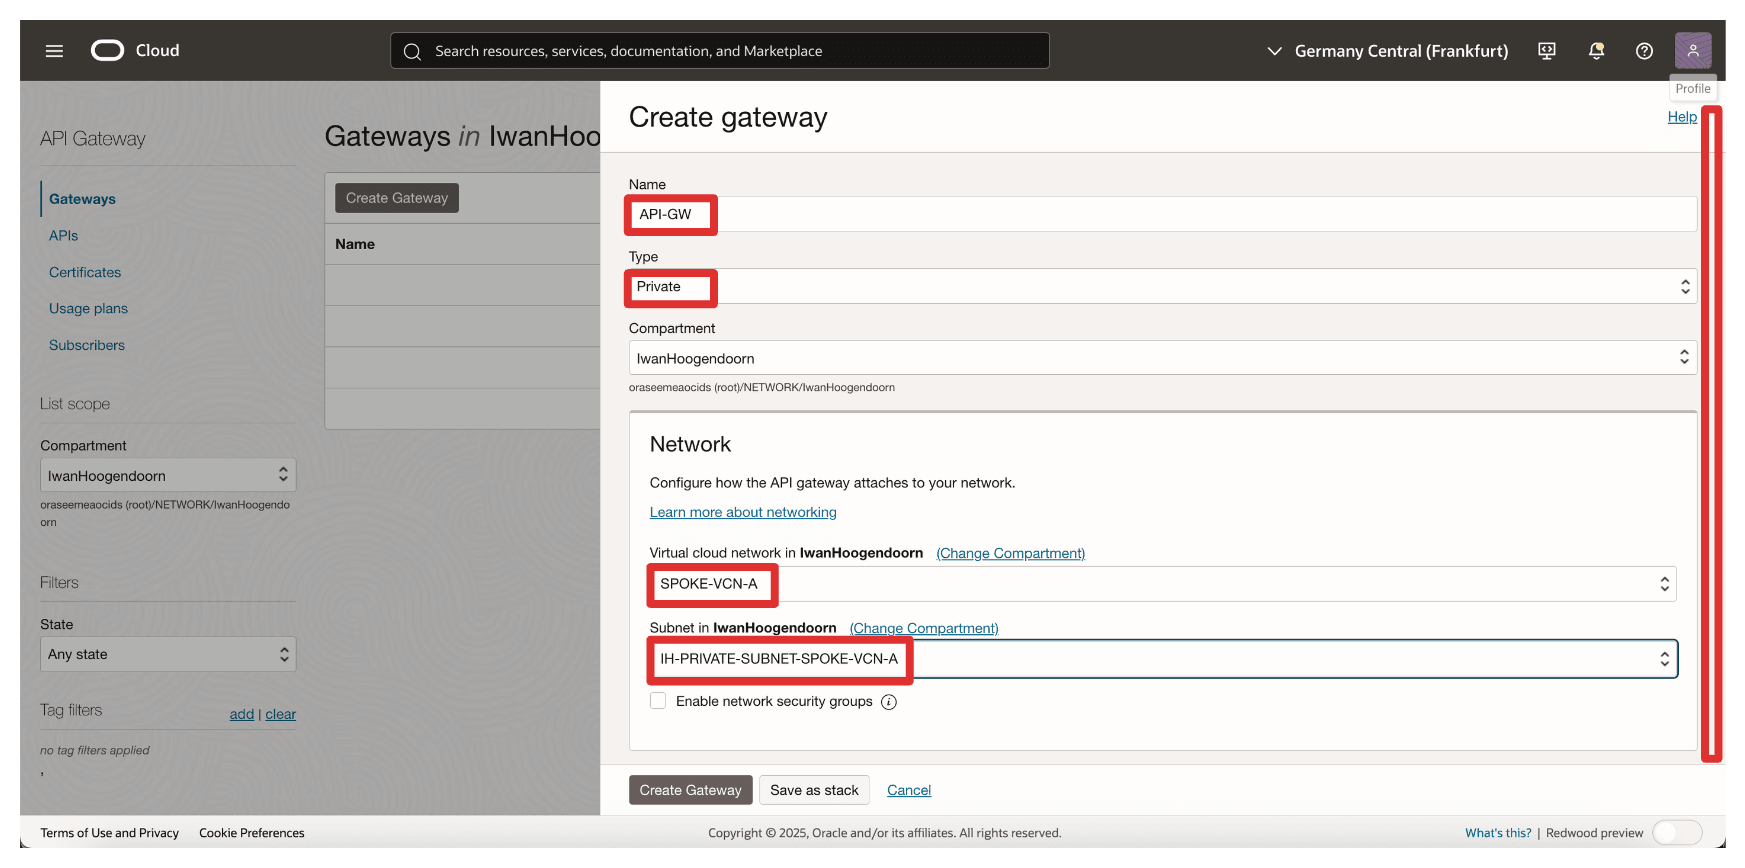
In Create gateway, enter the following information.
- Enter a Name. For example,
API-GW. - Type: Select Private.
- VCN: Select the VCN from which the Thales CipherTrust Manager is reachable.
- Subnet: Select private subnet with access to Thales CipherTrust Manager.
- Enter a Name. For example,
-
Select the certificate we uploaded earlier (
8-oci-api-gw.oci-thales.lab) and click Create Gateway.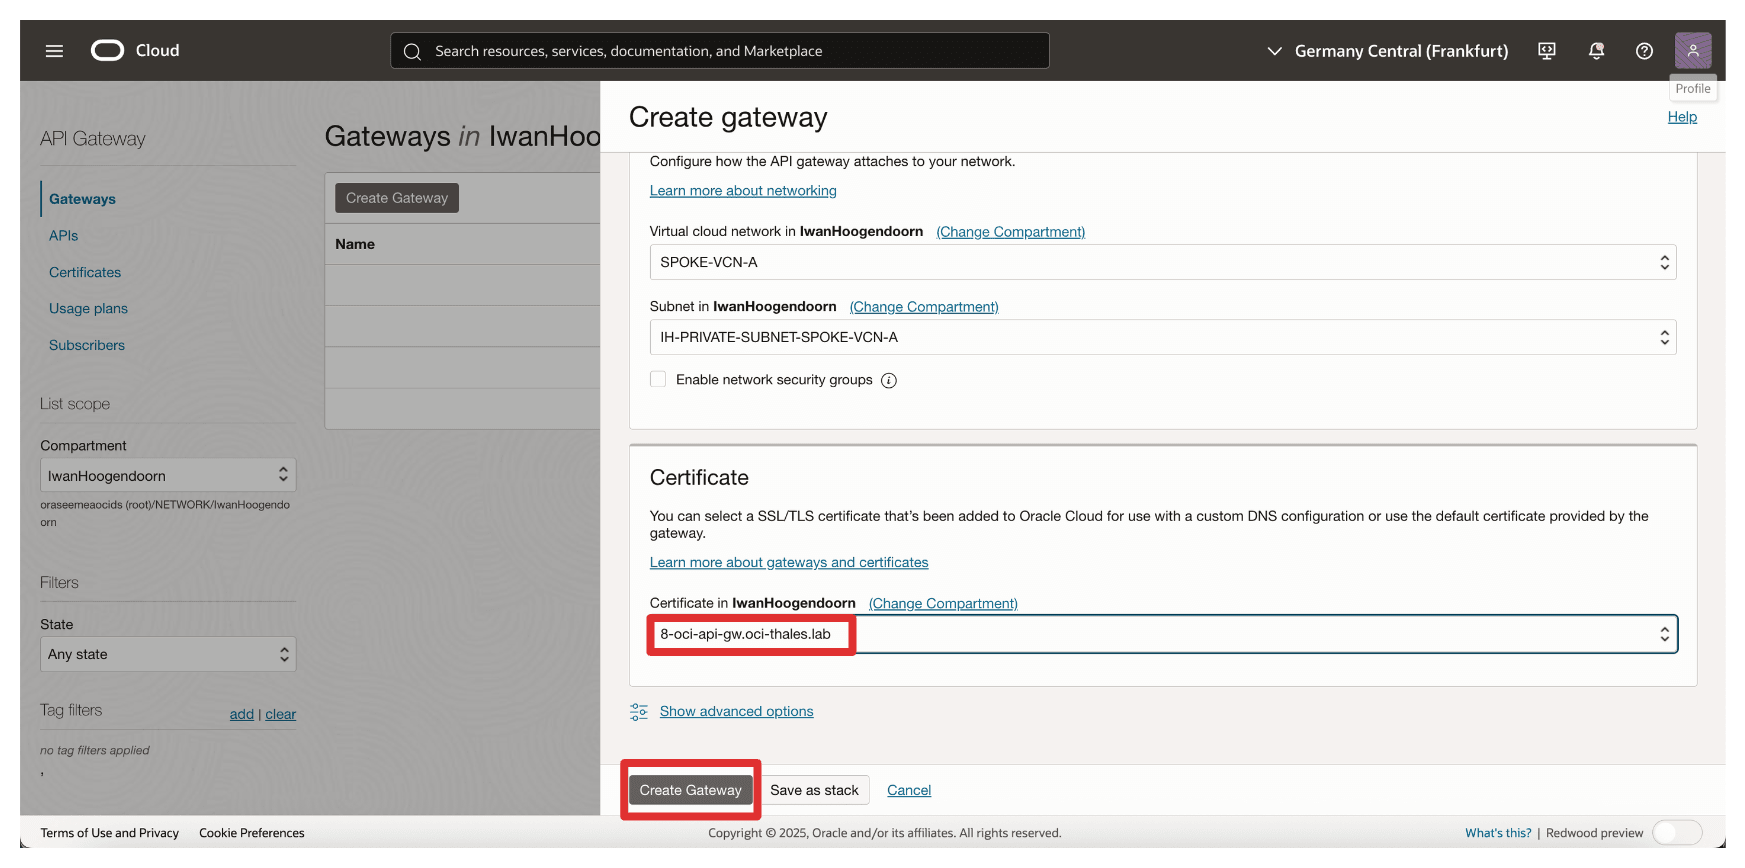
-
Note that the OCI API Gateway is created.
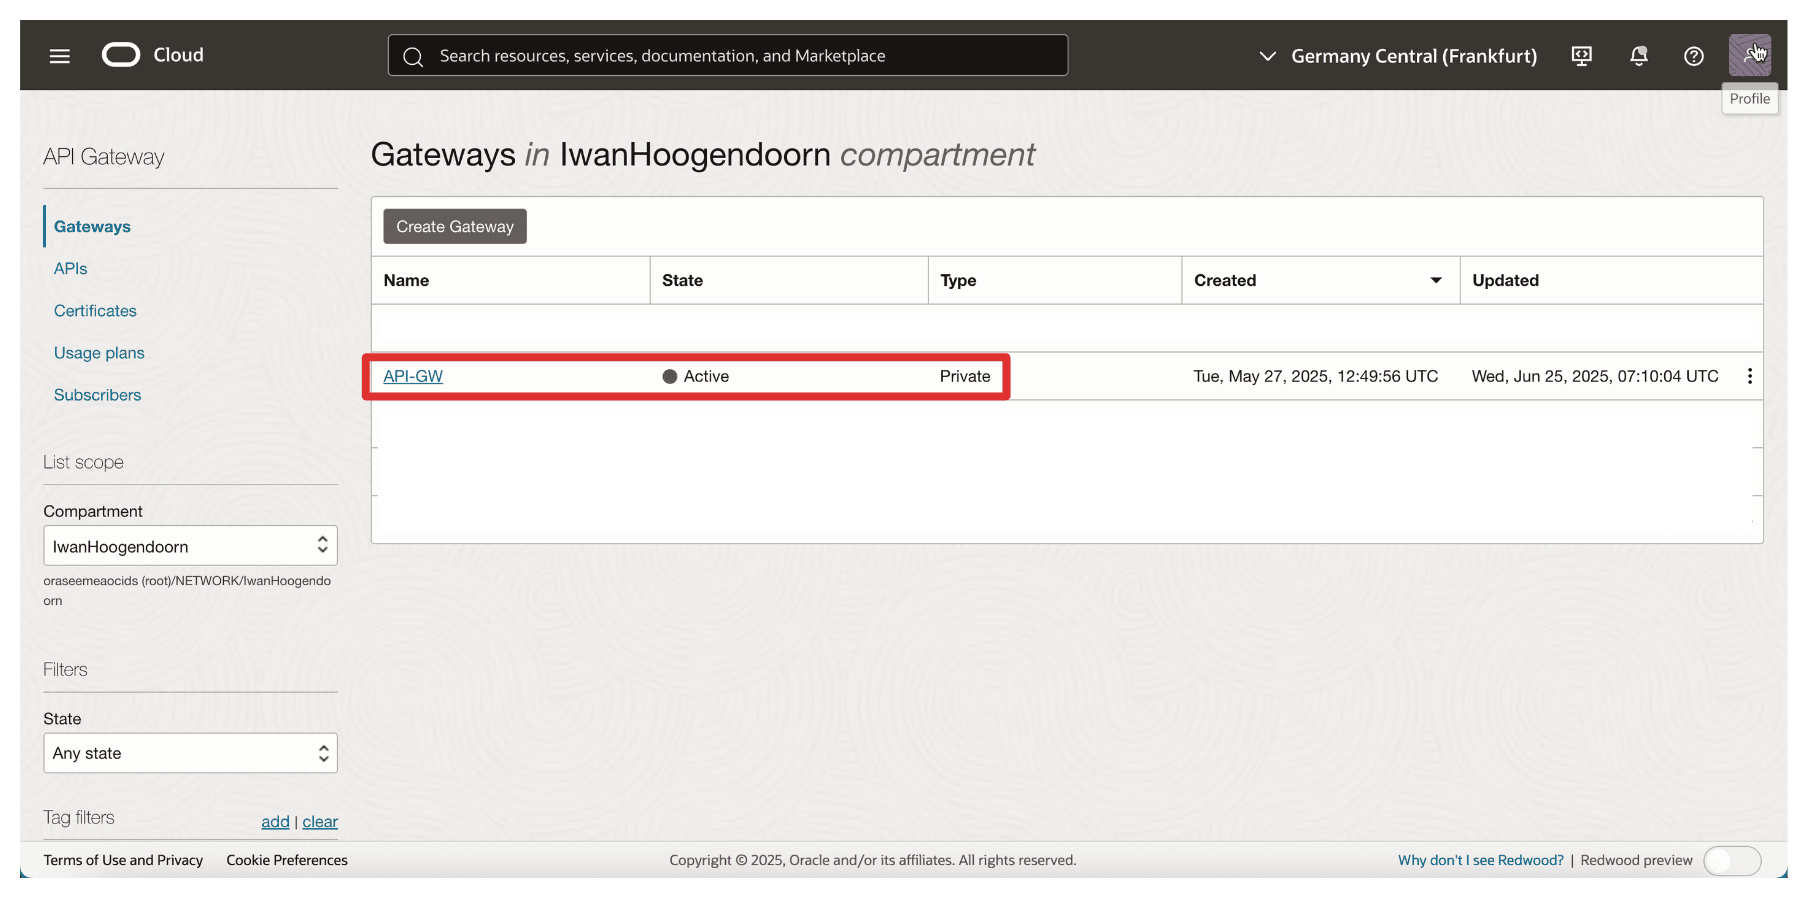
Note: The OCI API Gateway deployment may fail if it cannot reach the Thales CipherTrust Manager over the configured backend URL. To avoid this, ensure that:
- Routing is correctly configured between the OCI API Gateway’s private subnet and Thales CipherTrust Manager.
- Security Lists or Network Security Groups (NSGs) allow HTTPS (TCP port 443) traffic from the API Gateway subnet to the CTM.
- The FQDN of the Thales CipherTrust Manager resolves correctly through the configured Private DNS.
Inaccessible backends during deployment will cause health checks to fail, resulting in deployment errors or an inactive state.
This OCI API Gateway will later be used in a deployment to expose an endpoint that the OCI External KMS can call. The gateway acts as a secure, authenticated proxy between OCI and your Thales CipherTrust Manager, enforcing TLS and identity validation.
Task 7: Create an API Deployment with FQDN Details
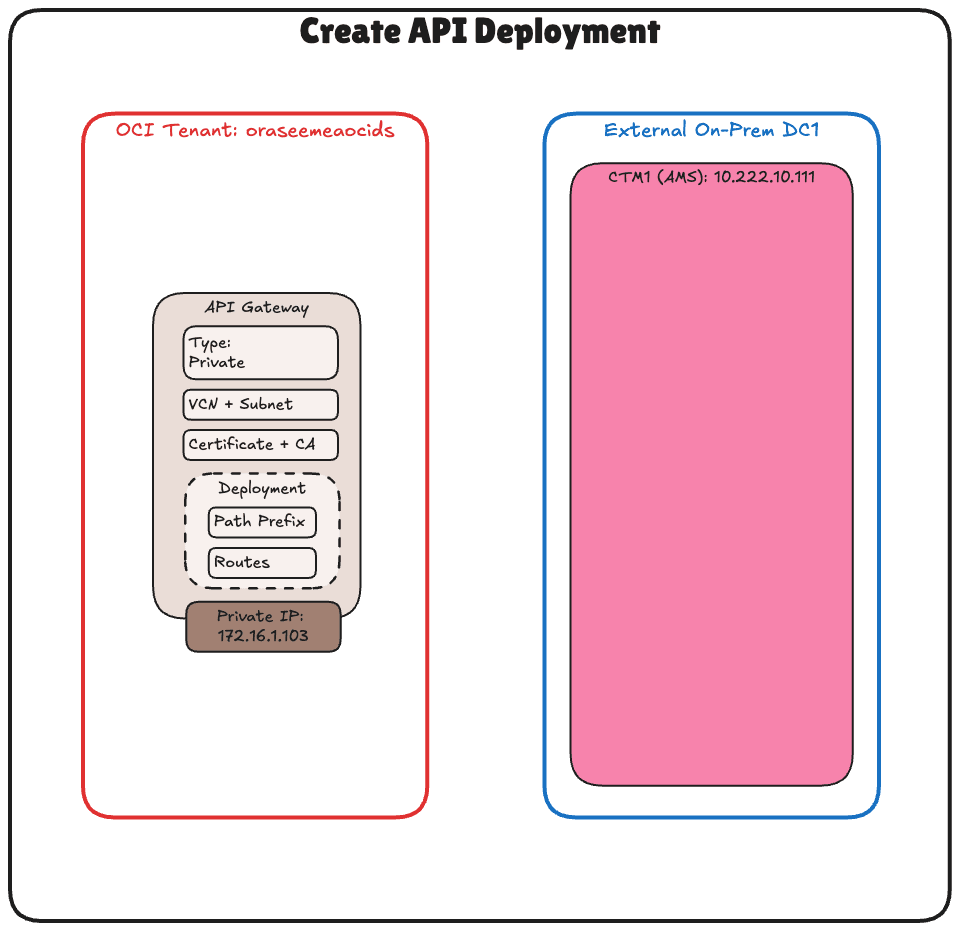
Now that the OCI API Gateway is created and the certificate is in place, the next task is to create an API deployment. This defines the routing behaviour of the gateway specifically, how incoming requests from OCI External KMS are forwarded to your Thales CipherTrust Manager using its internal FQDN.
The deployment bridges OCI and Thales CipherTrust Manager, handling path-based routing and TLS termination for inbound requests.
The following image illustrates the components and configuration setup in this task.
-
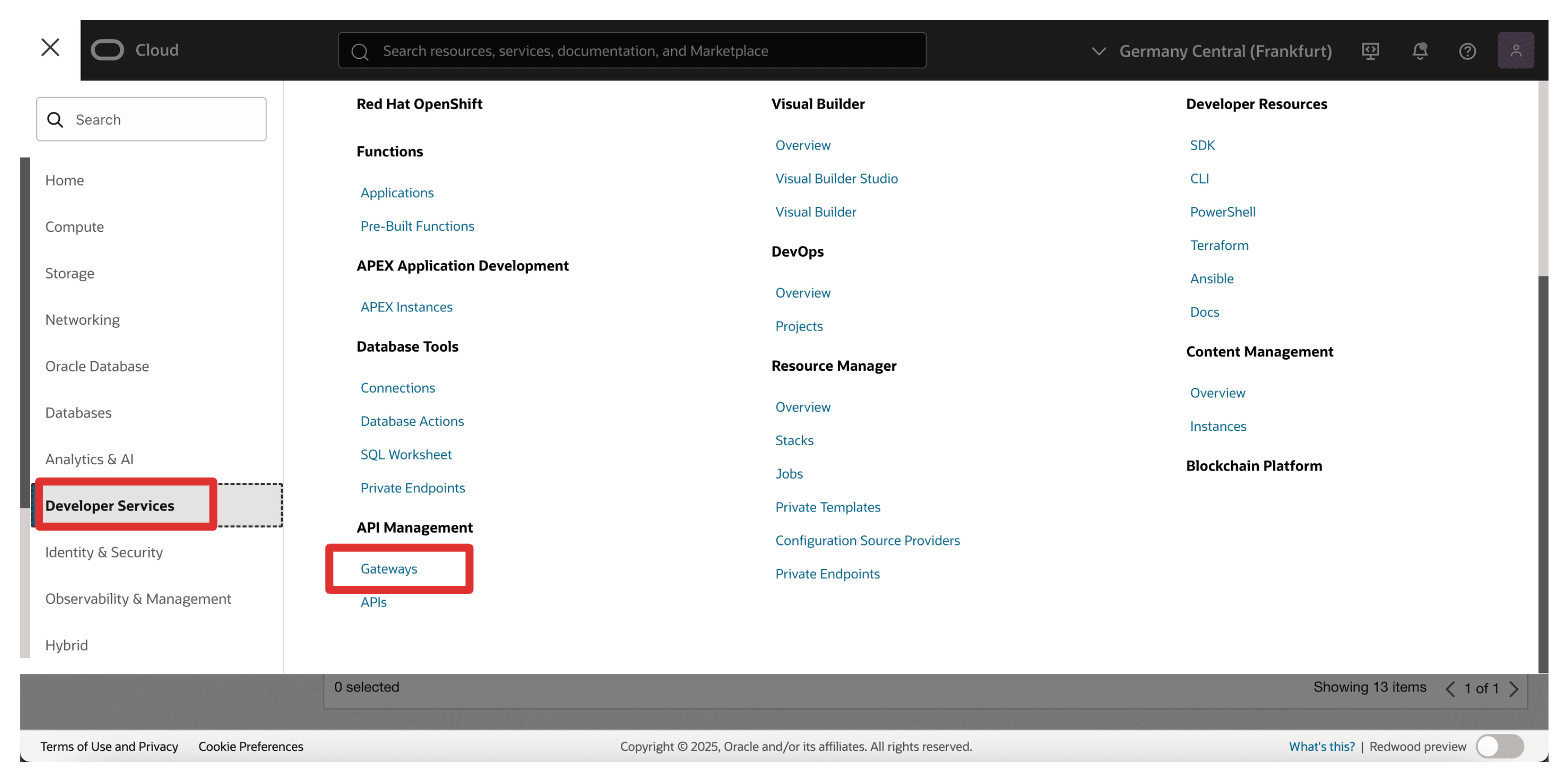
Go to the OCI Console, navigate Developer Services and click Gateways.
-
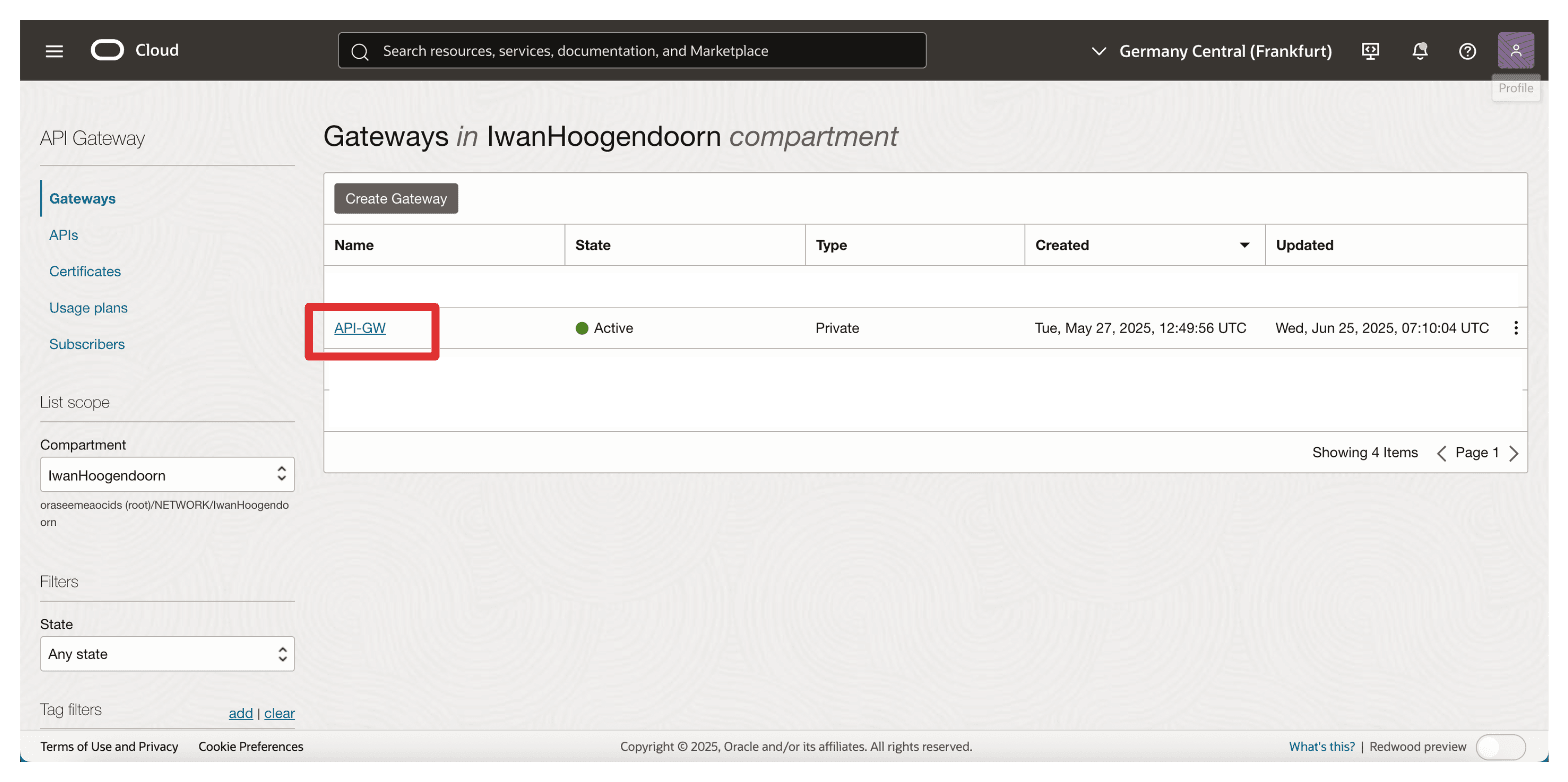
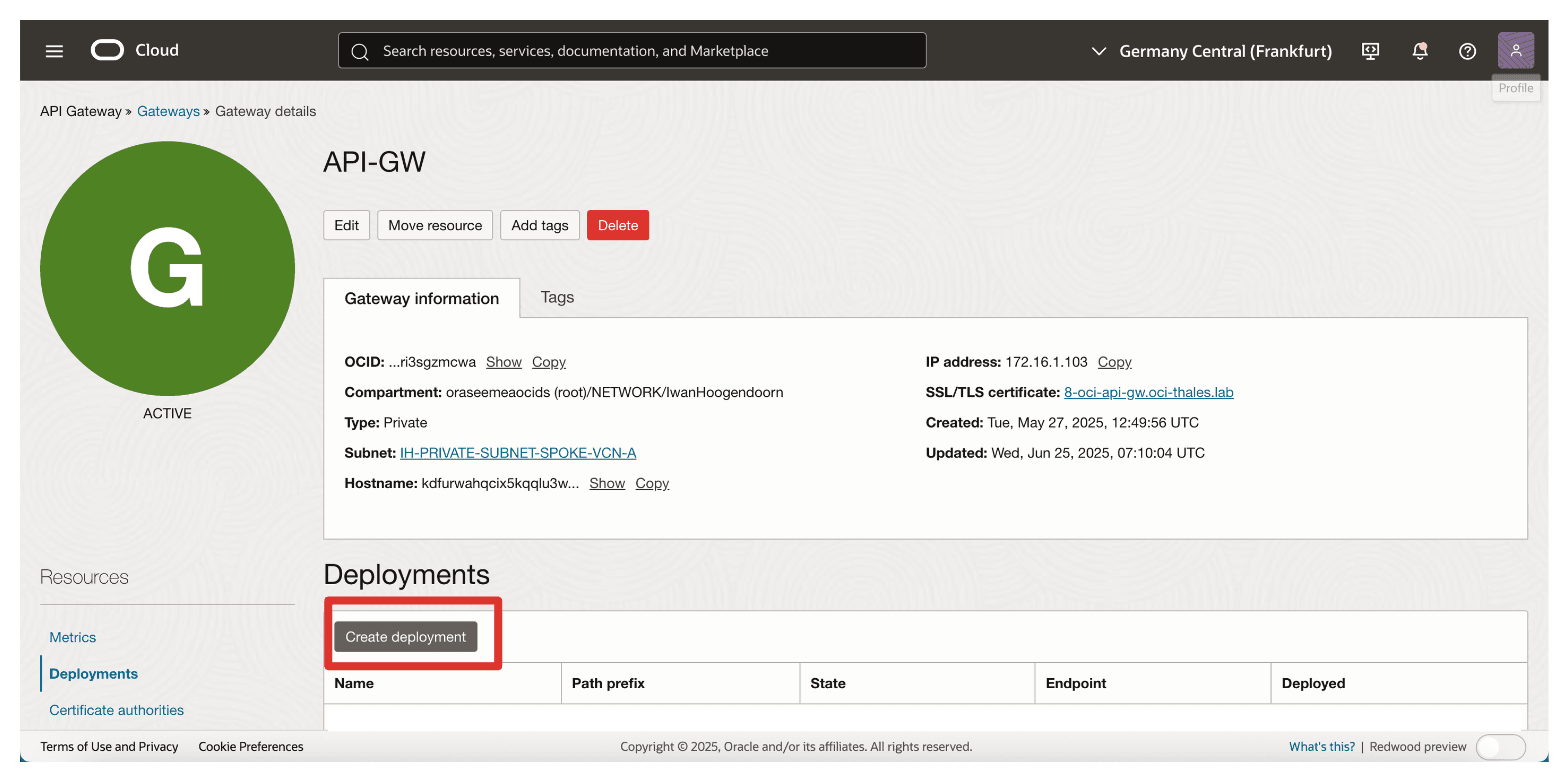
Click the API gateway.
-
Click Create deployment.
-
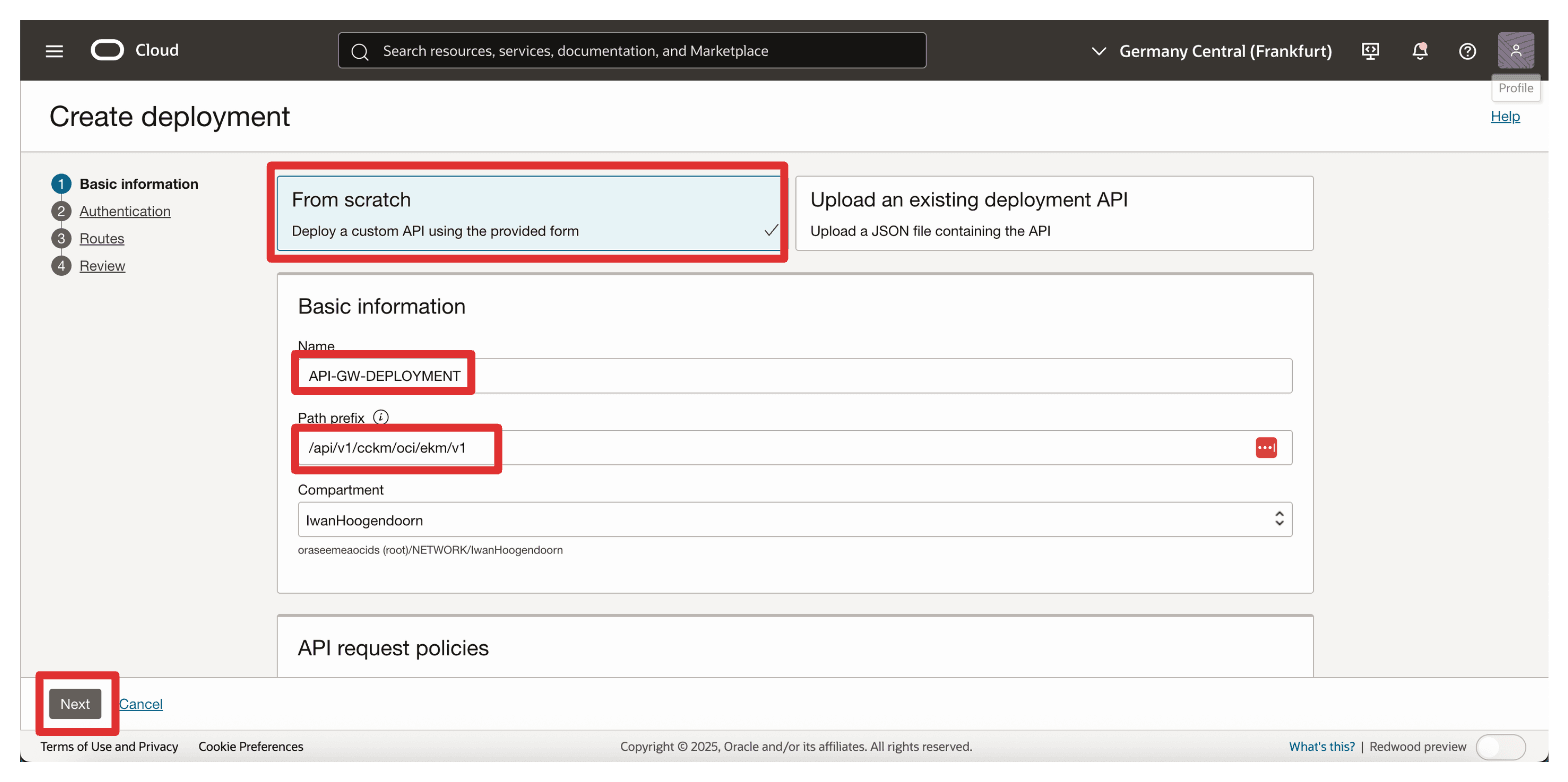
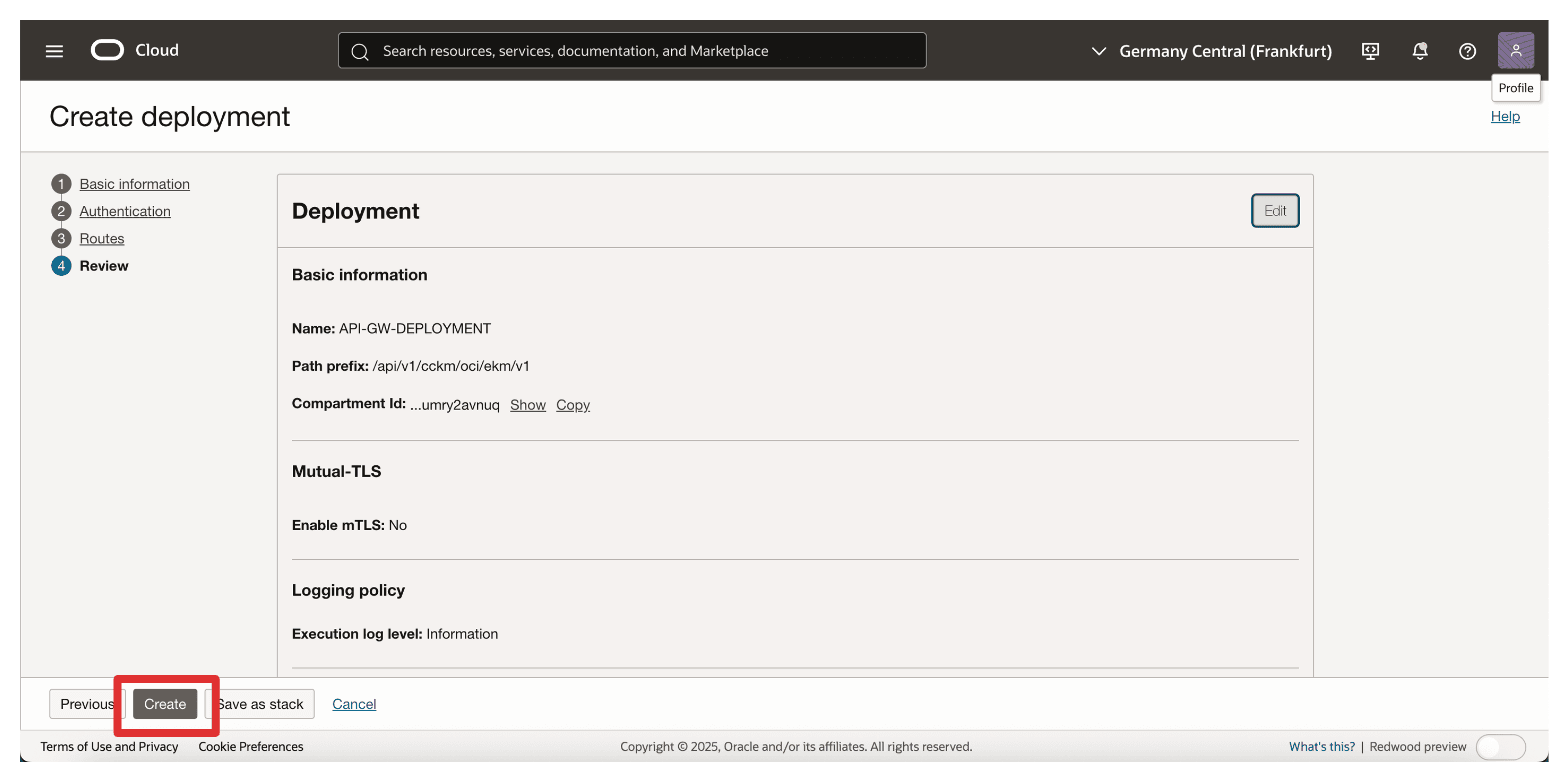
In Create deployment, enter the following information.
- Select From scratch.
- Enter a Name. For example,
API-GW-DEPLOYMENT. - Path Prefix: Enter
/api/v1/cckm/oci/ekm/v1. - Click Next.
-
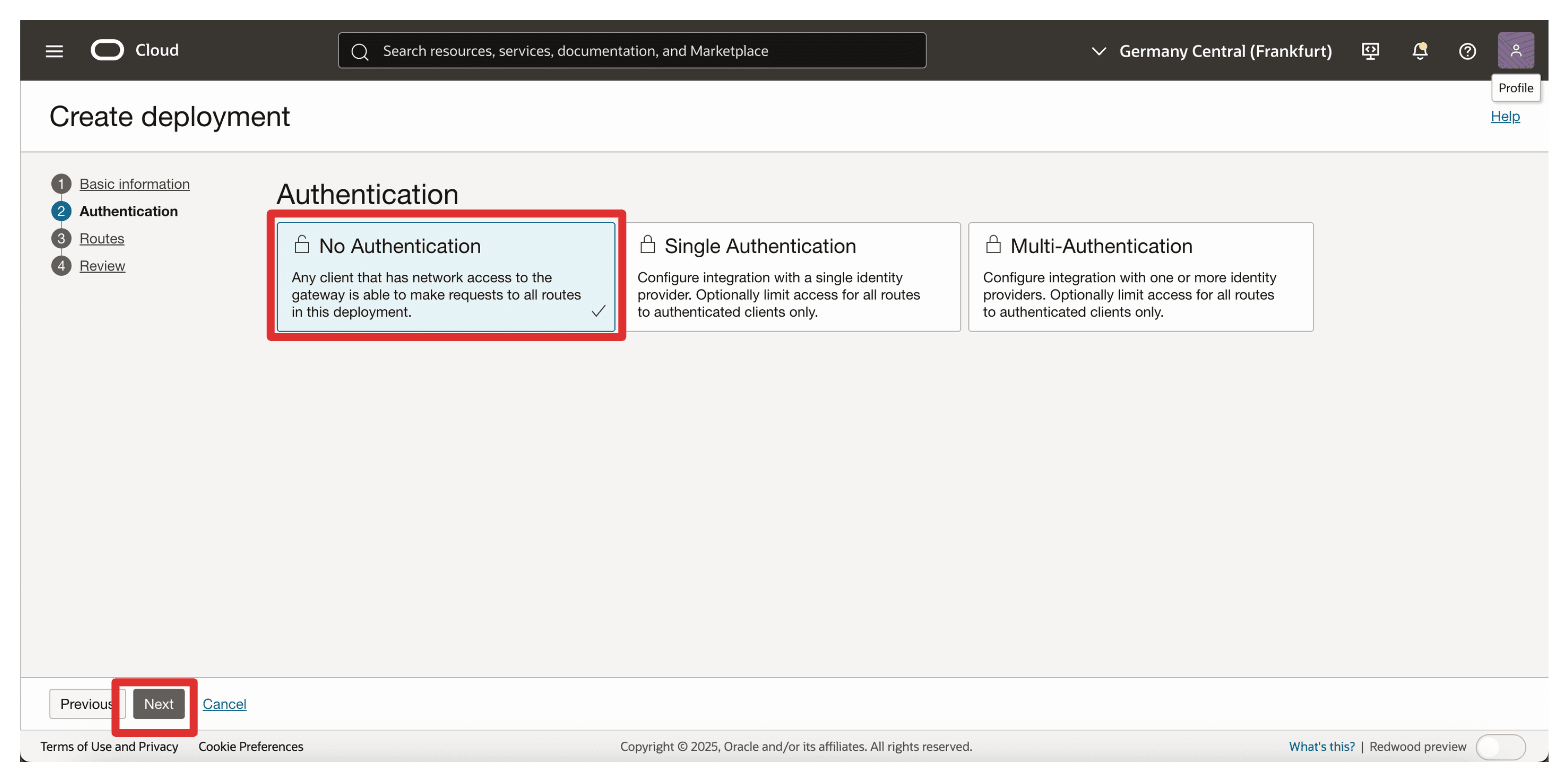
Authentication: Select No Authentication.
-
Click Next.
-
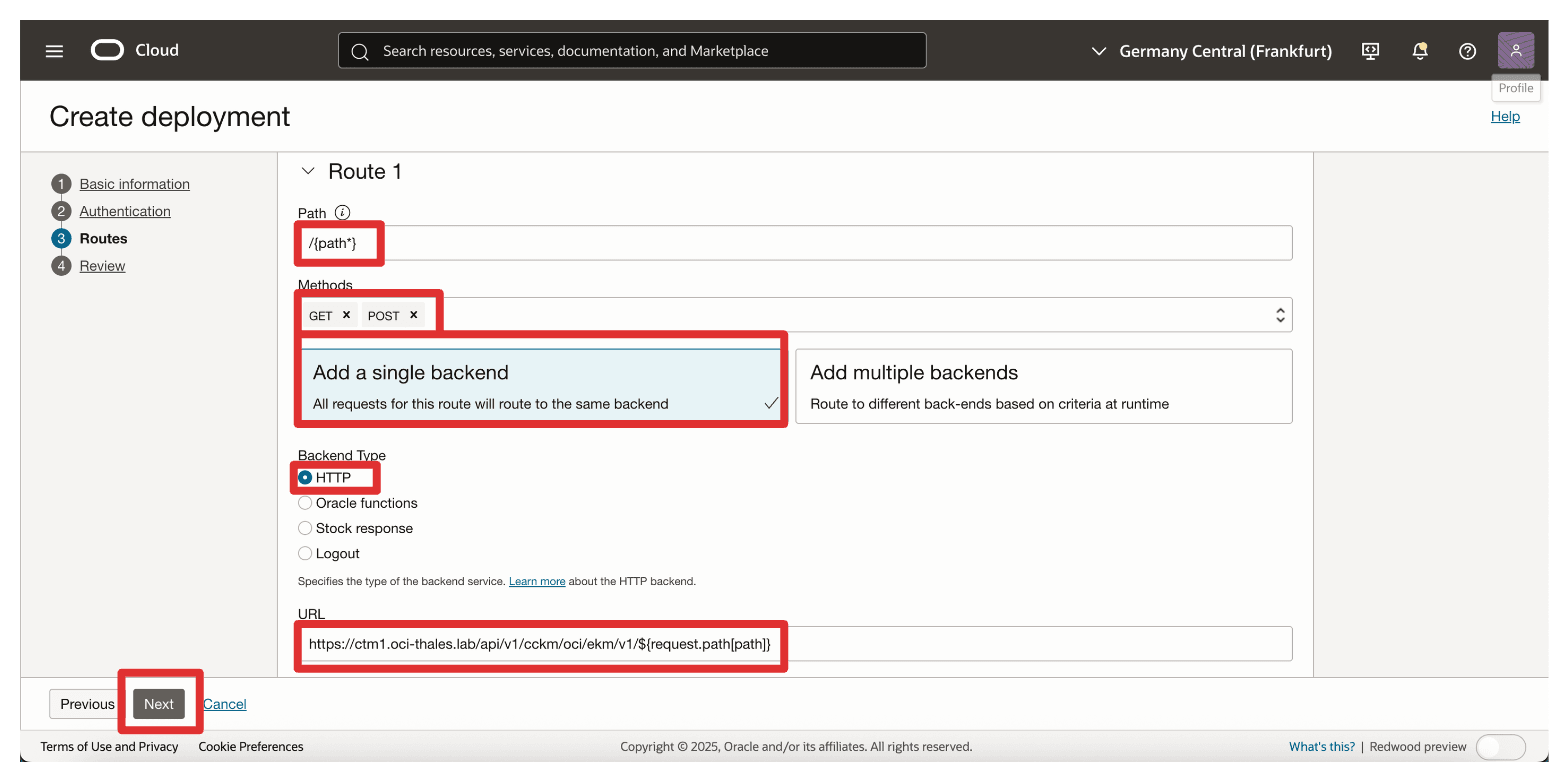
In the Route 1 section, enter the following information and click Next.
- Path: Enter
/{path*}. - Methods: Select
GET,POST. - Backend Type: Select the backend type as HTTP and specify the URL as
https://**<your-ctm-fqdn>**/api/v1/cckm/oci/ekm/v1/${request.path[path]}.
- Path: Enter
-
Click Create.
-
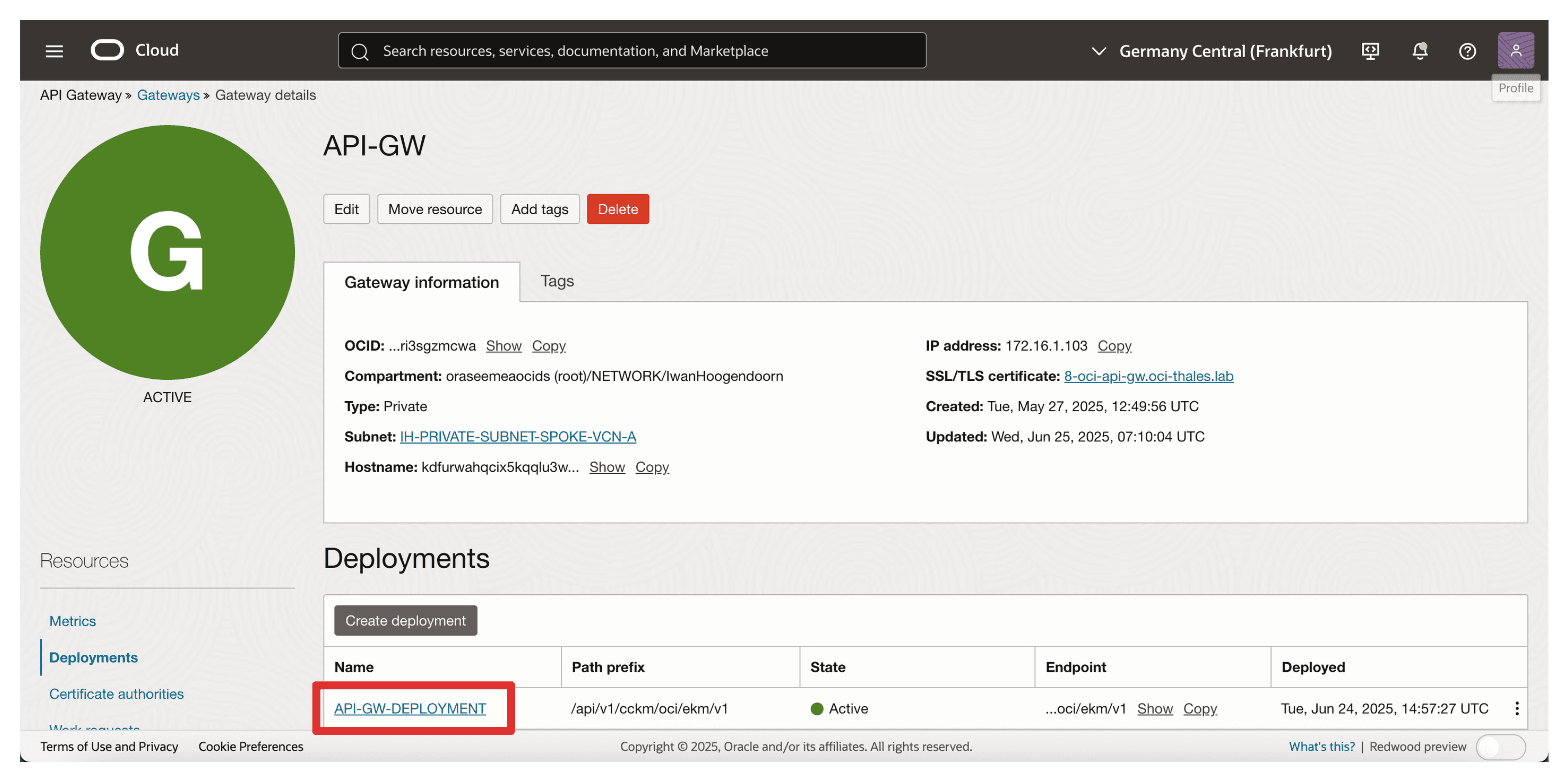
Note that the API deployment is created. Click on it.
-
Note that the API deployment is ACTIVE.
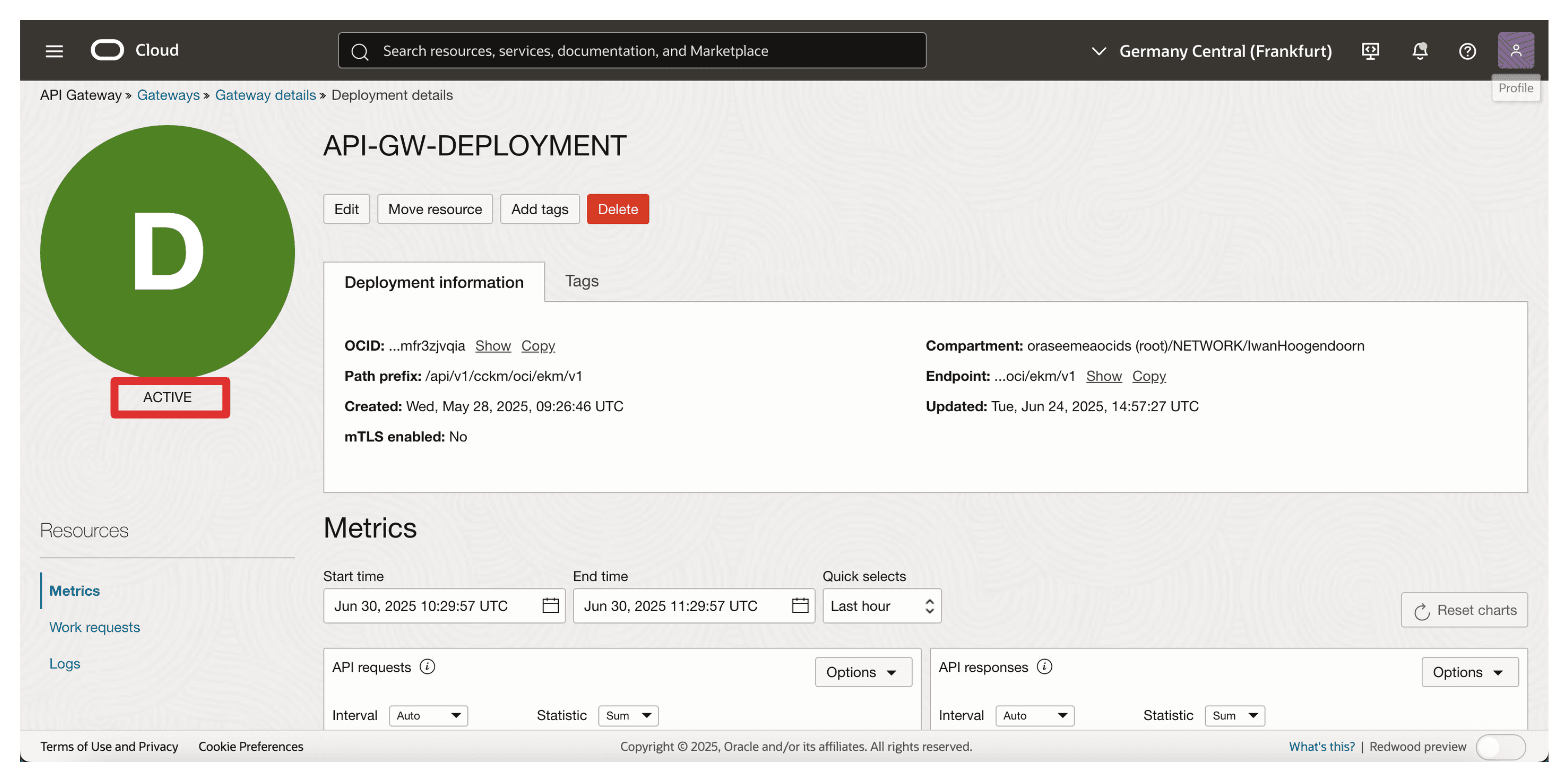
Once the deployment is active, the OCI API Gateway can securely forward authenticated requests from OCI to your Thales CipherTrust Manager. The FQDN configuration is critical here make sure it matches the Common Name (CN) or SAN in the Thales CipherTrust Manager certificate and resolves correctly through DNS.
This deployment will act as the key endpoint that the OCI External KMS calls to interact with your external keys hosted in Thales CipherTrust Manager.
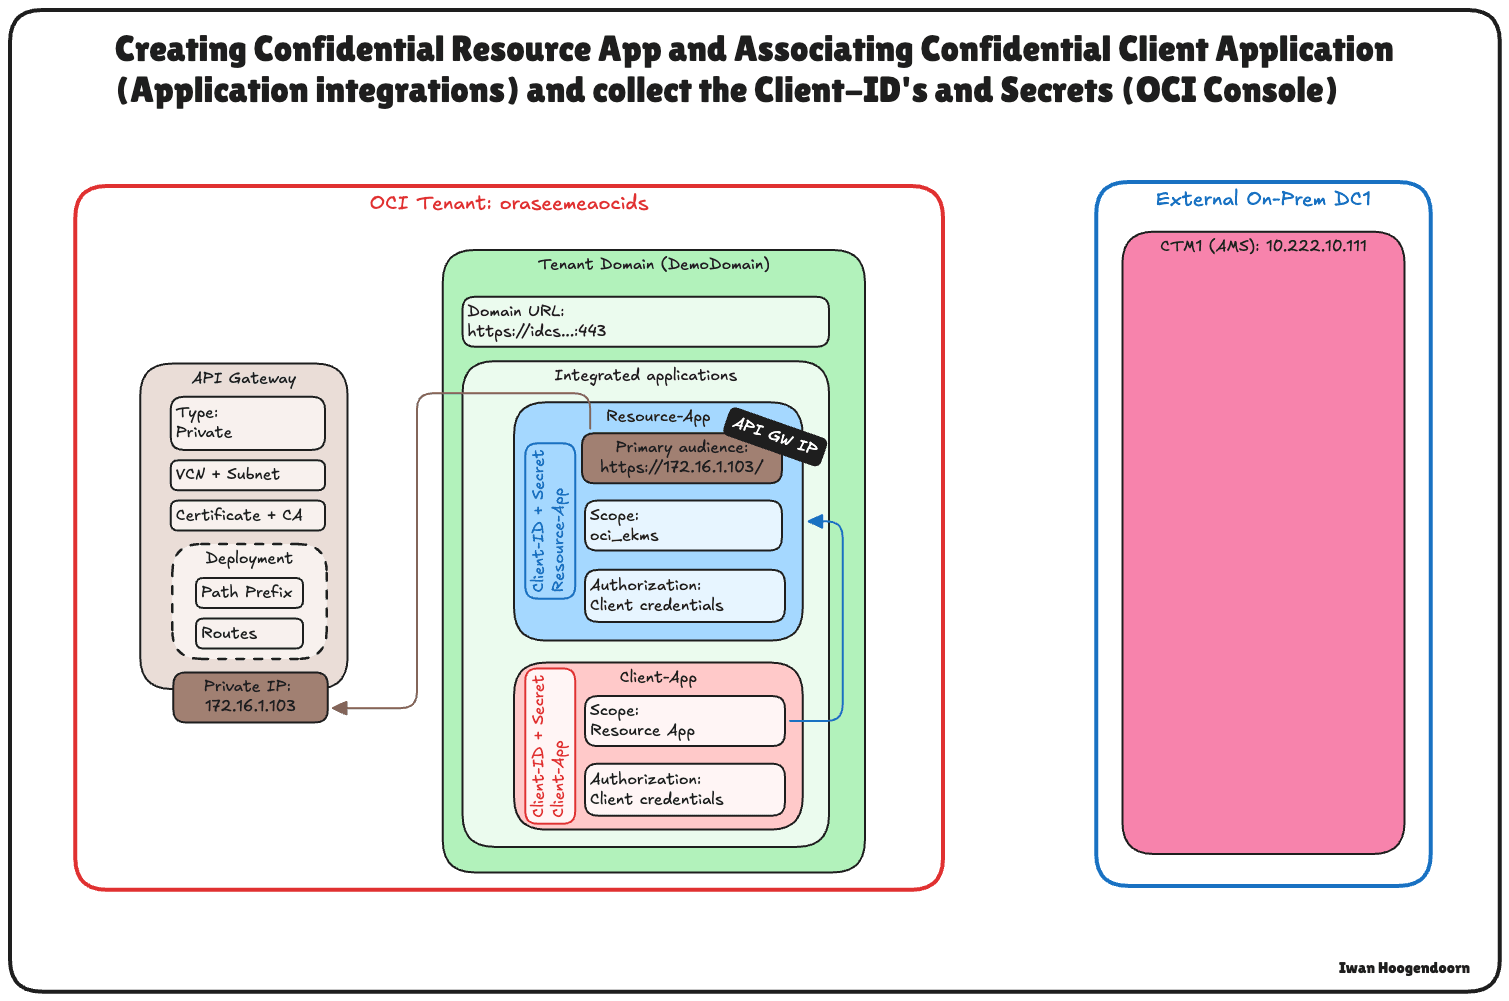
Task 8: Create a Confidential Resource Application, Associate Confidential Client Applications (Application Integrations) and Collect the Client and Secrets in OCI
To enable HYOK integration with Thales CipherTrust Manager, you must establish trust between OCI and the external key manager.
This is done by registering two key components in OCI Identity and Access Management (OCI IAM): a Confidential Resource Application and a Confidential Client Application. These are essential to authenticate and authorize communication between OCI and Thales CipherTrust Manager.
This setup enables the Thales CipherTrust Manager to authenticate with OCI IAM through OAuth 2.0. The confidential client acts on behalf of the external key manager, while the confidential resource defines the scope of access and trust configuration. OCI cannot validate or securely communicate with the external key source without these components.
The following image illustrates the components and configuration setup in this step.
-
Log in to the OCI Console, navigate to Identity & Security and click Domains.
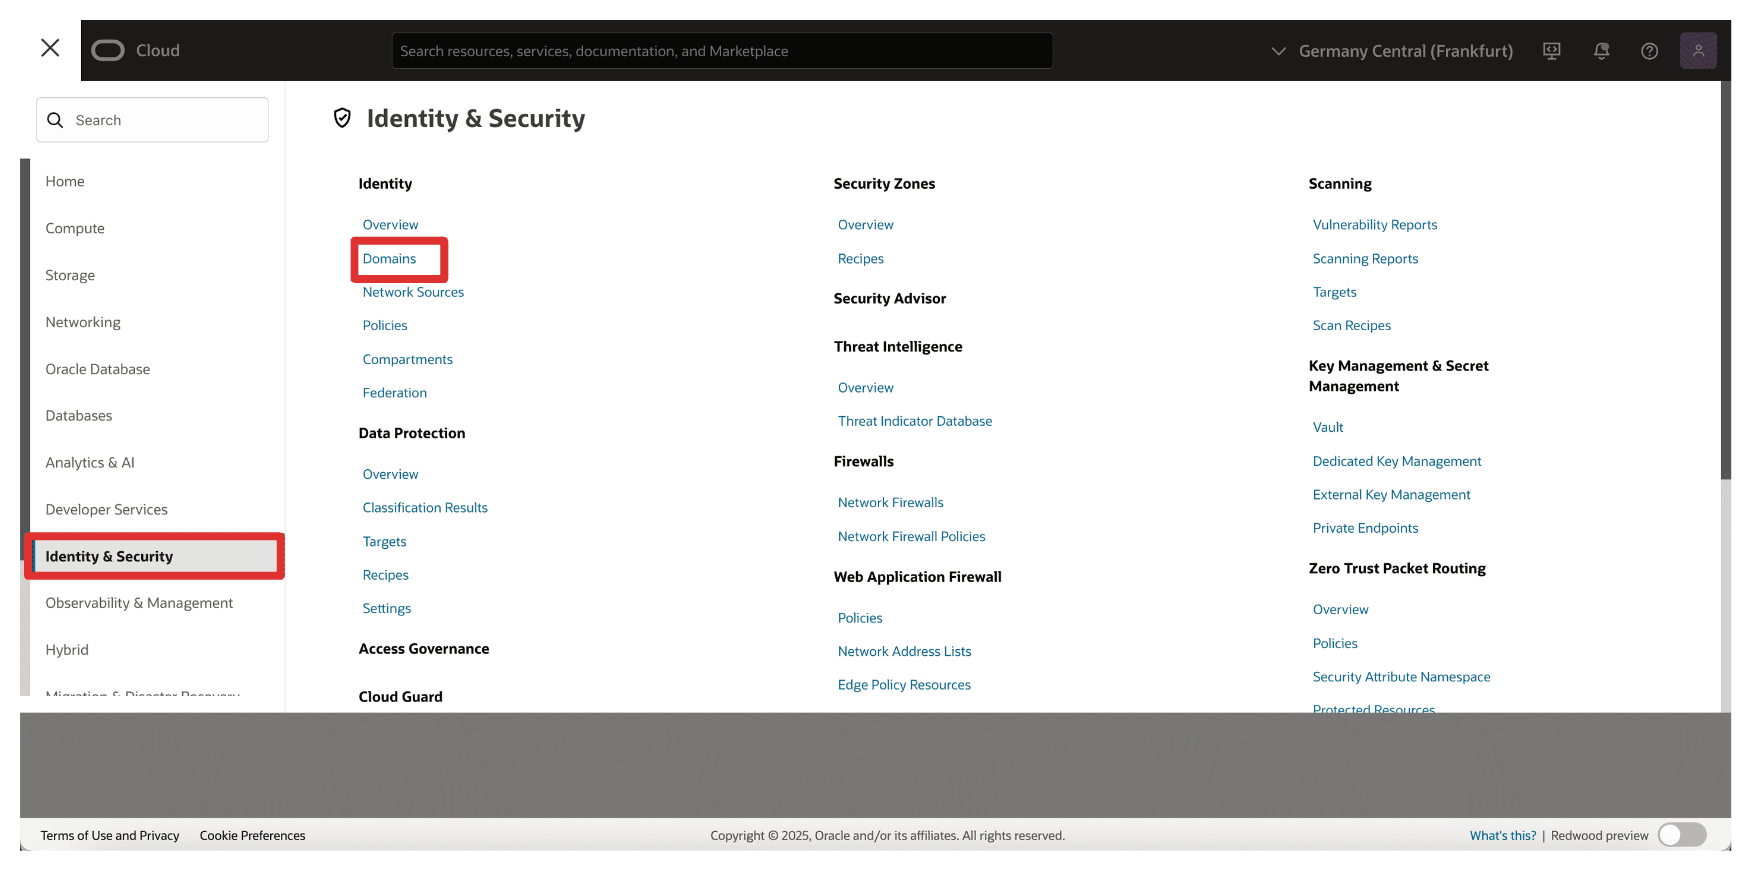
-
Click the domain that you want to use for the authentication.
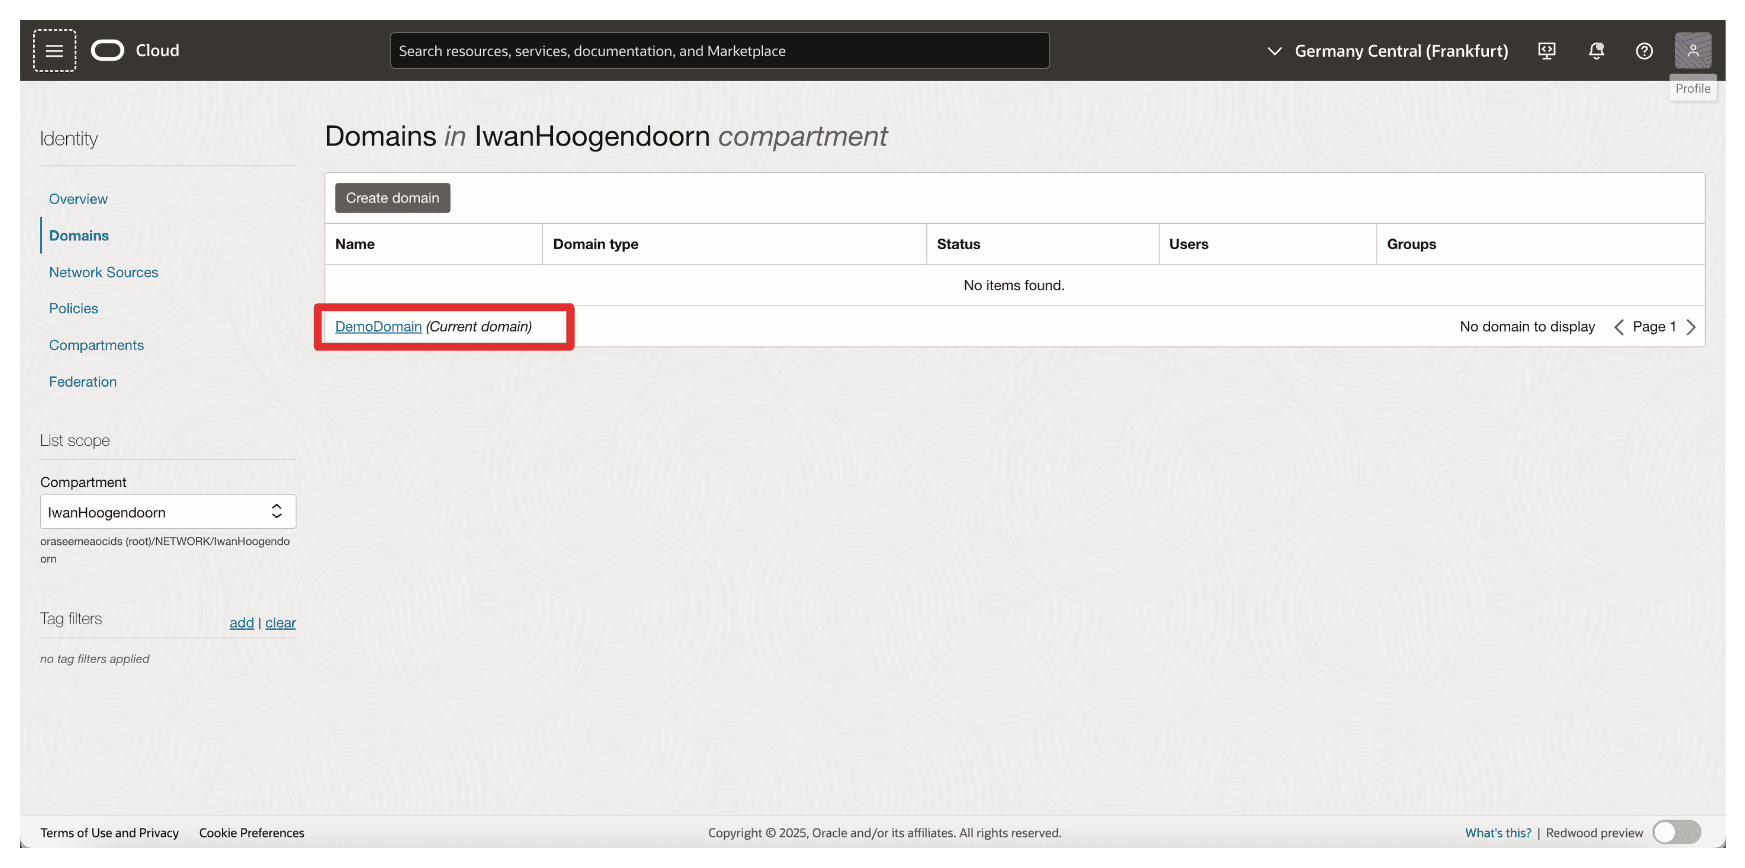
-
Click Integrated applications and Add application.
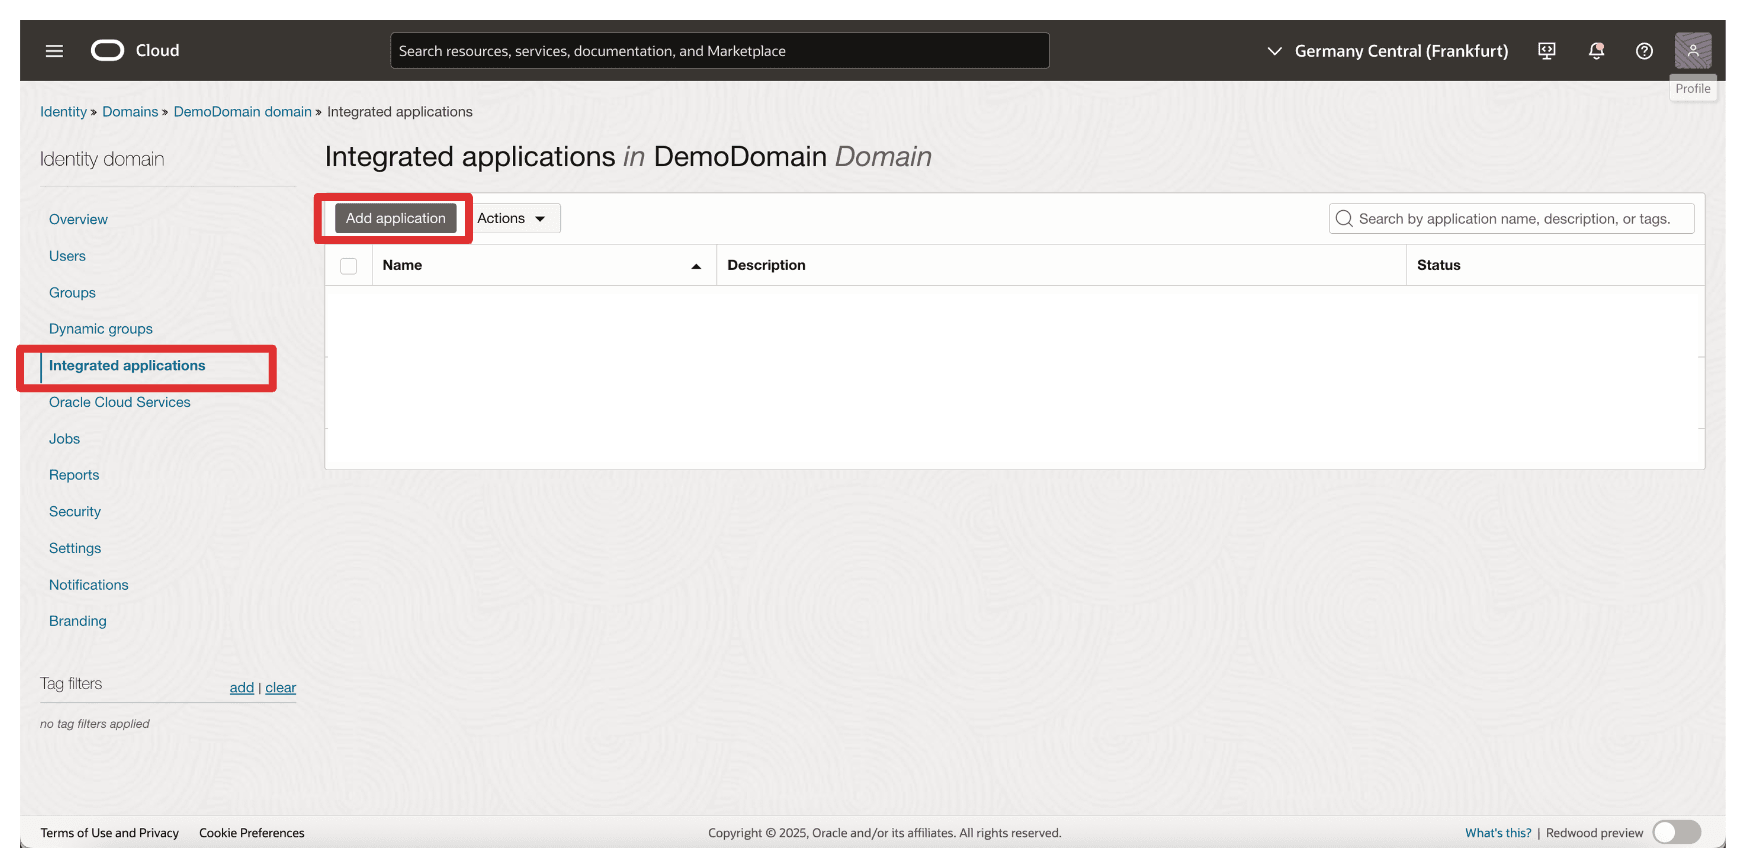
-
Select Confidential Application and click Launch workflow.
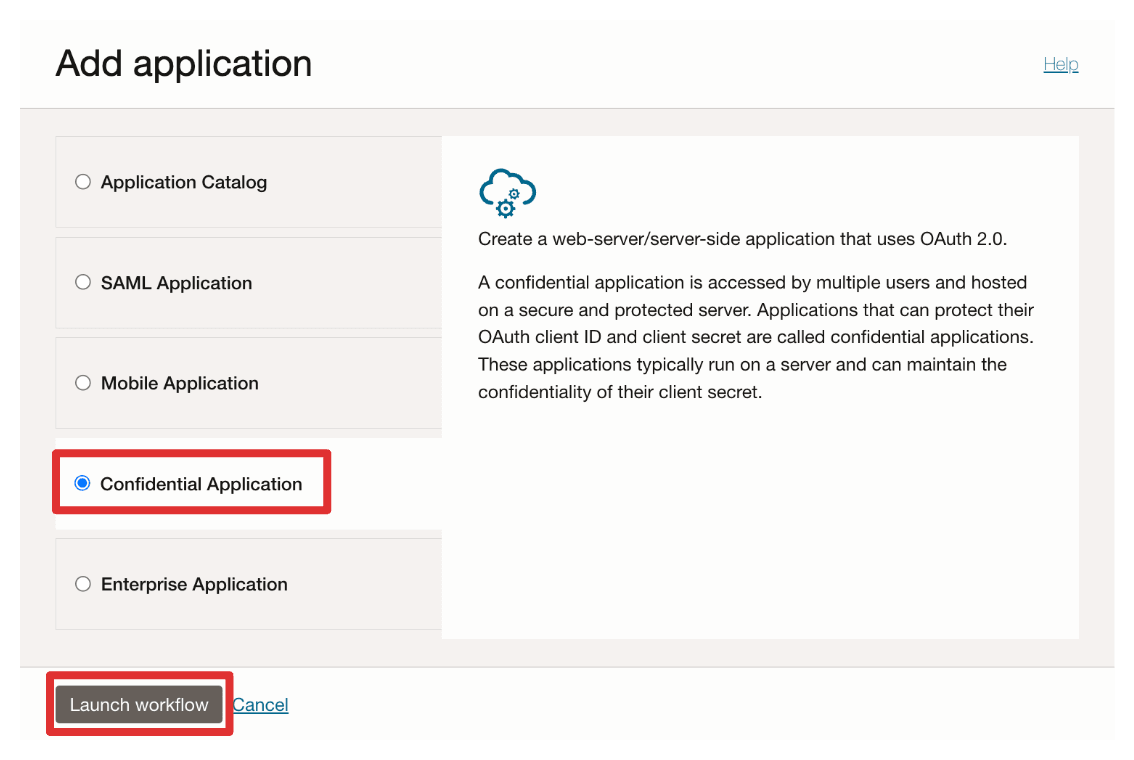
-
Enter application Name (
Resource_App) and click Next.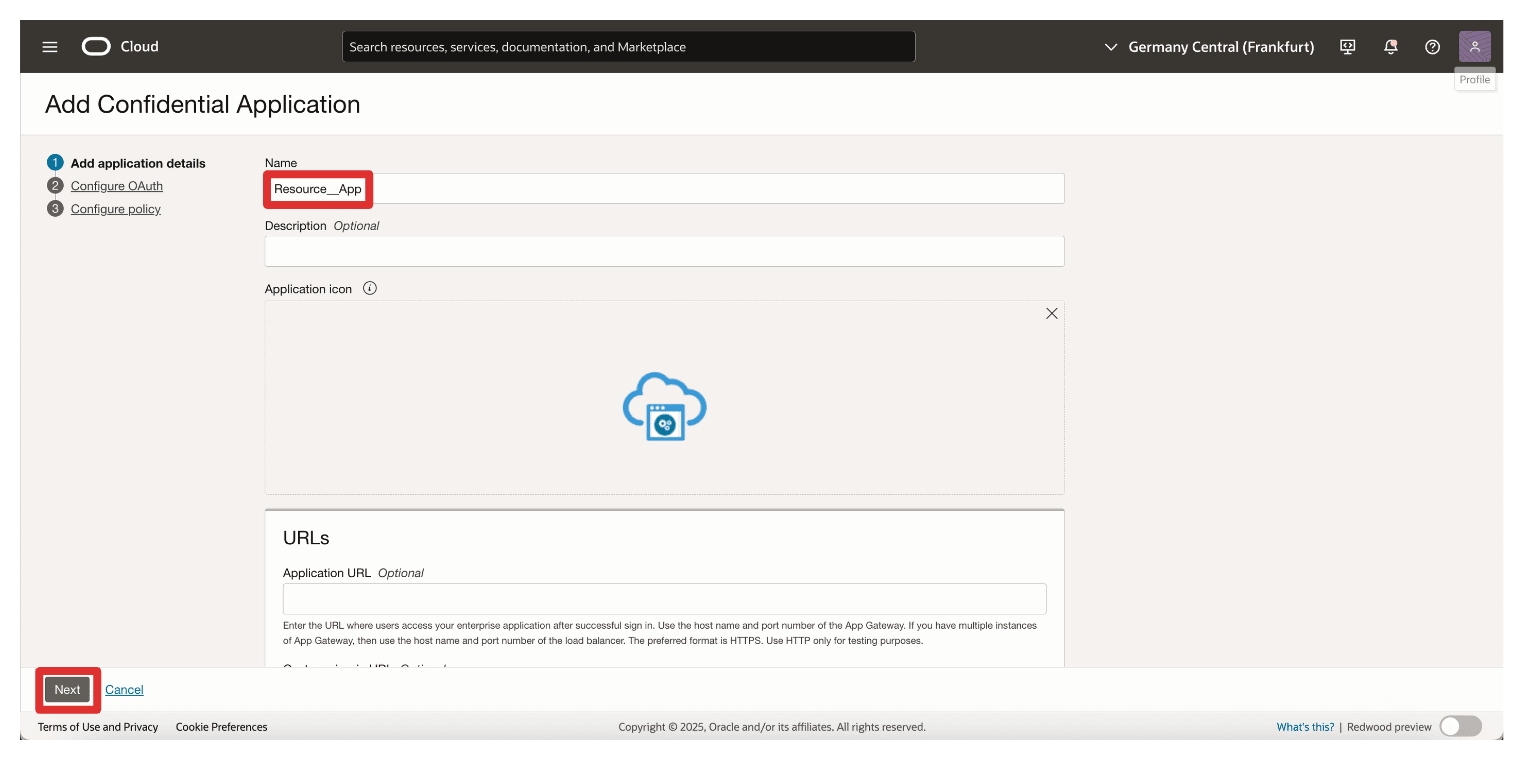
-
In the Resource Server configuration section, enter the following information.
- Select Configure this application as a resource server now.
- In Primary audience, enter
https://172.16.1.103/(The IP address of the API Gateway).
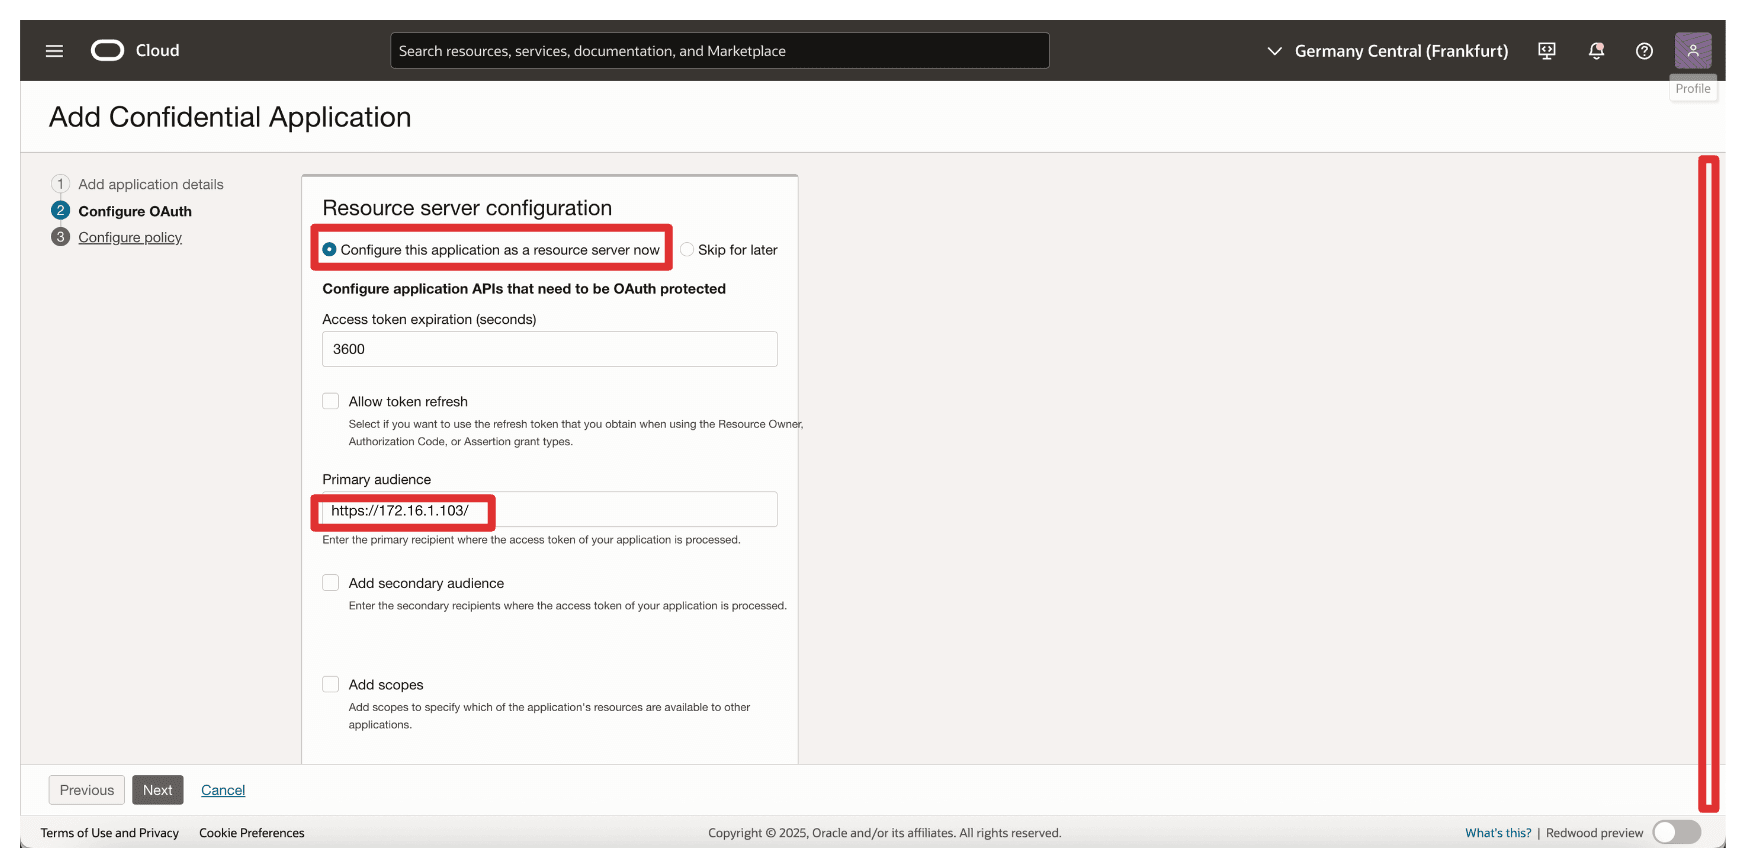
-
In Add Scope, enter the following information.
- Select Add scopes.
- Click Add.
- In Scope, enter
oci_ekms. - Click Add.
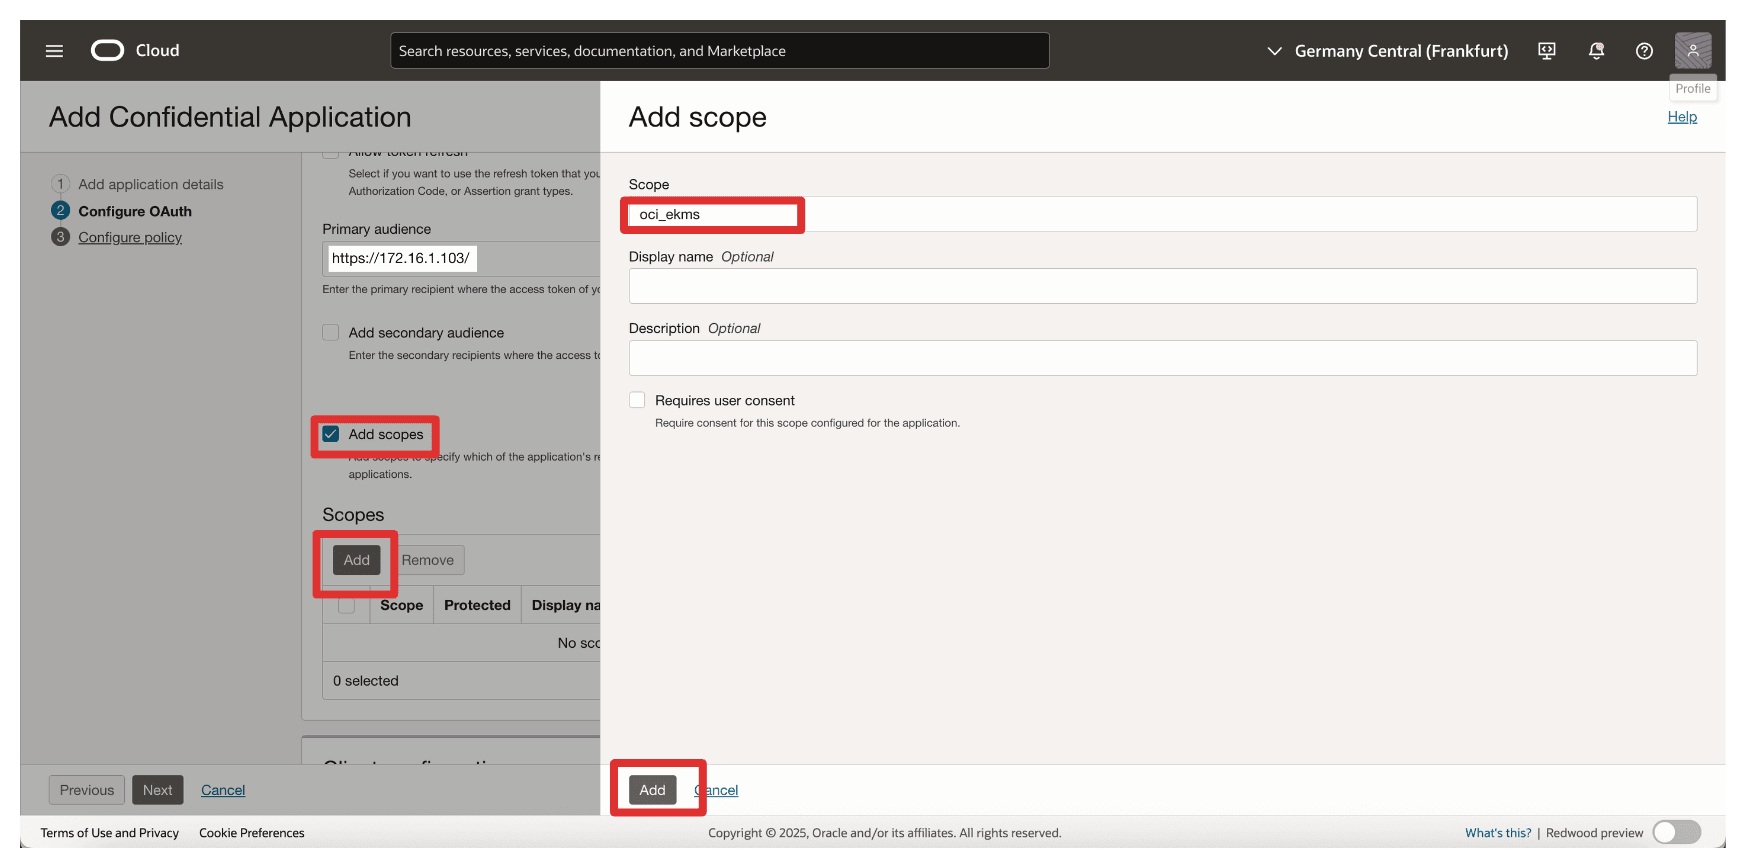
-
Note the added scope
oci_ekmsand scroll down.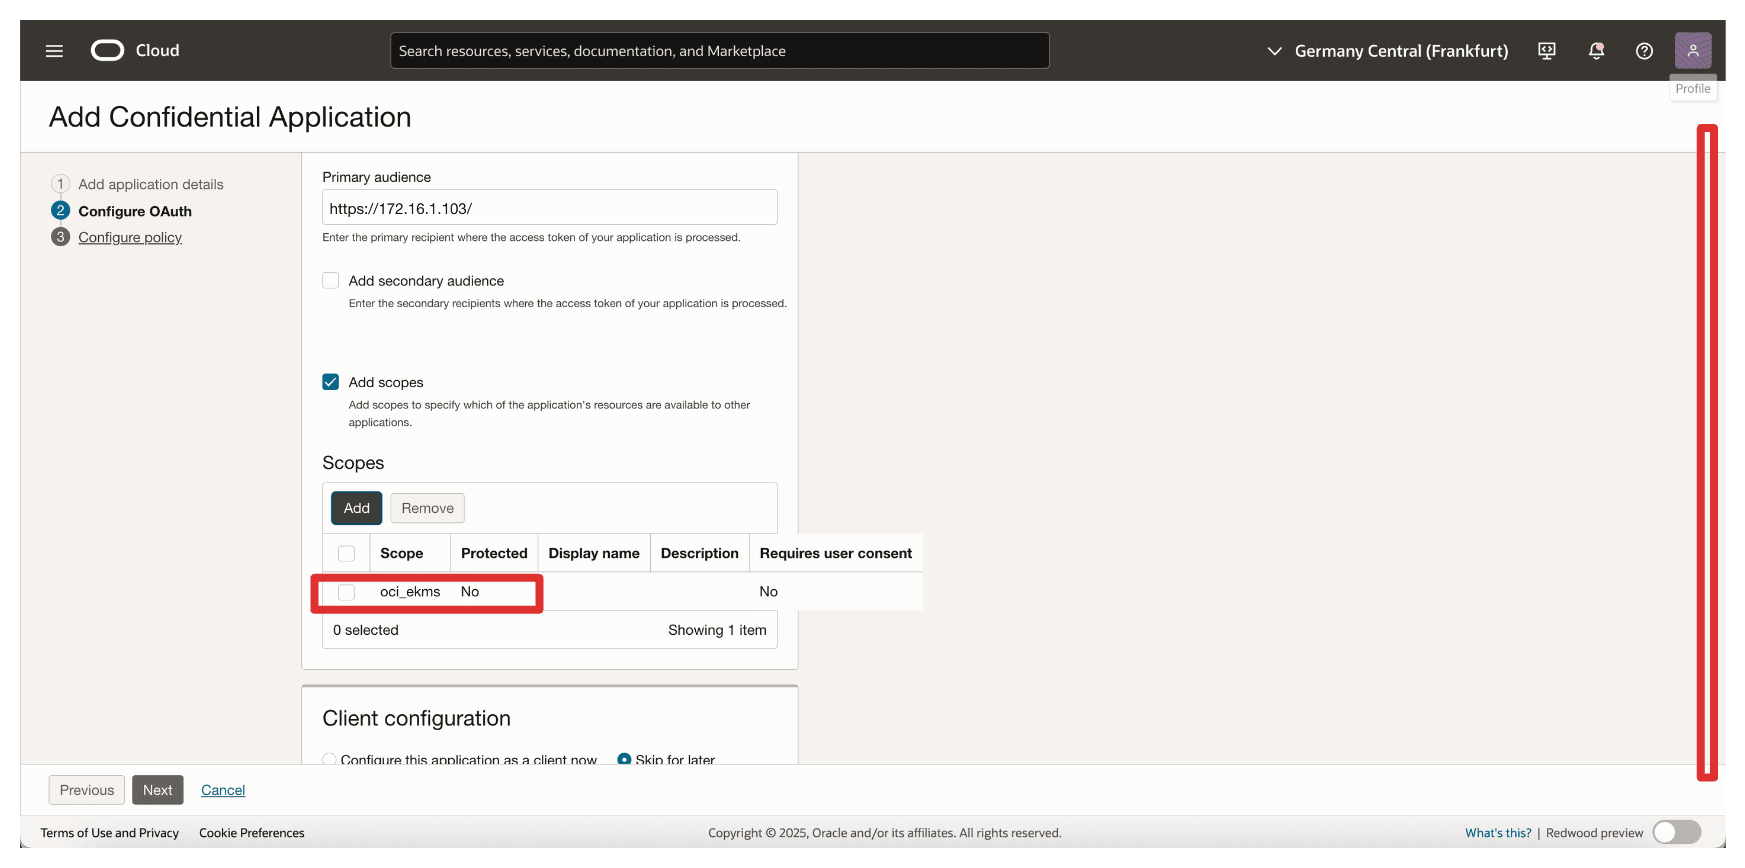
-
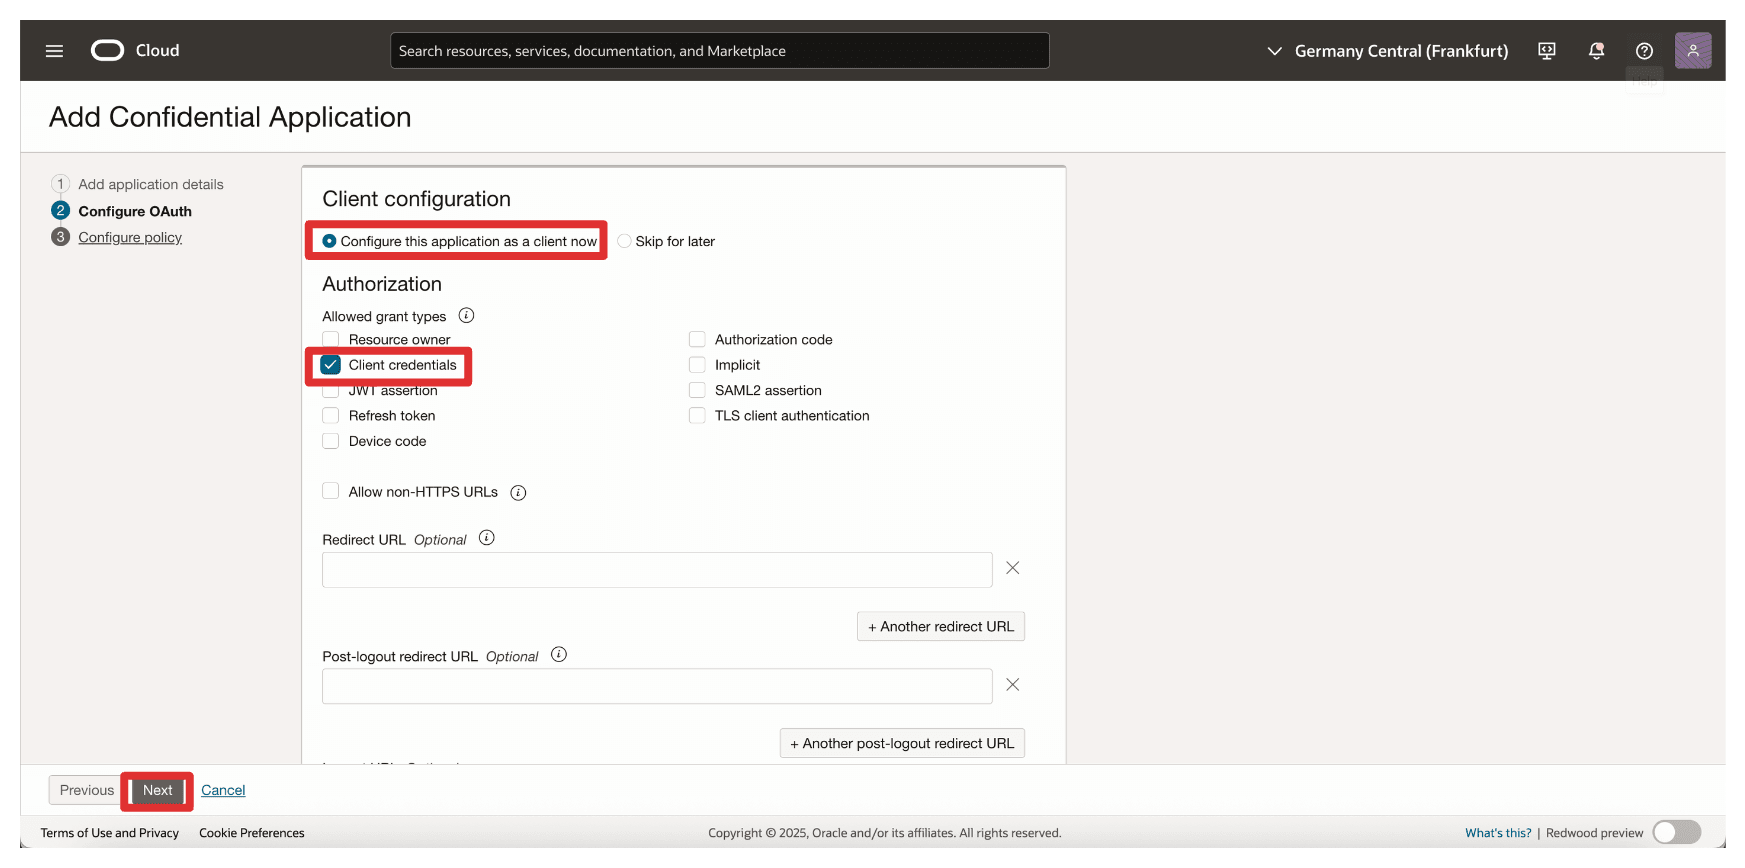
In the Client configuration section, enter the following information.
- Select Configure this application as a client now.
- Select Client credentials.
- Click Next.
-
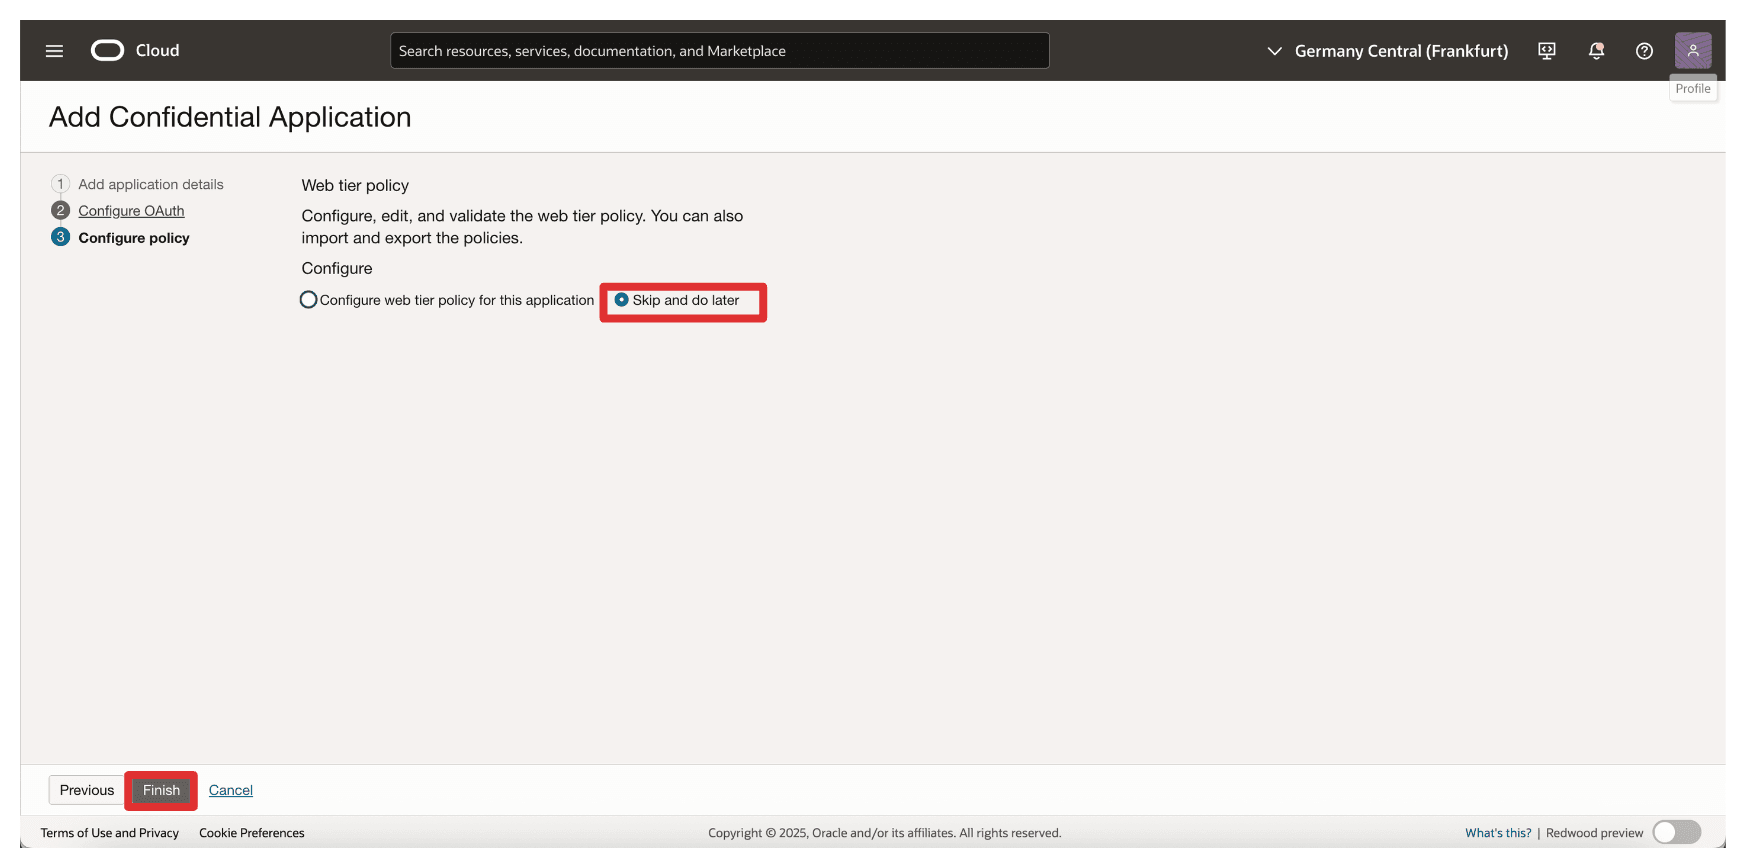
Click Skip and do later to skip the web tier policy creation and click Finish.
-
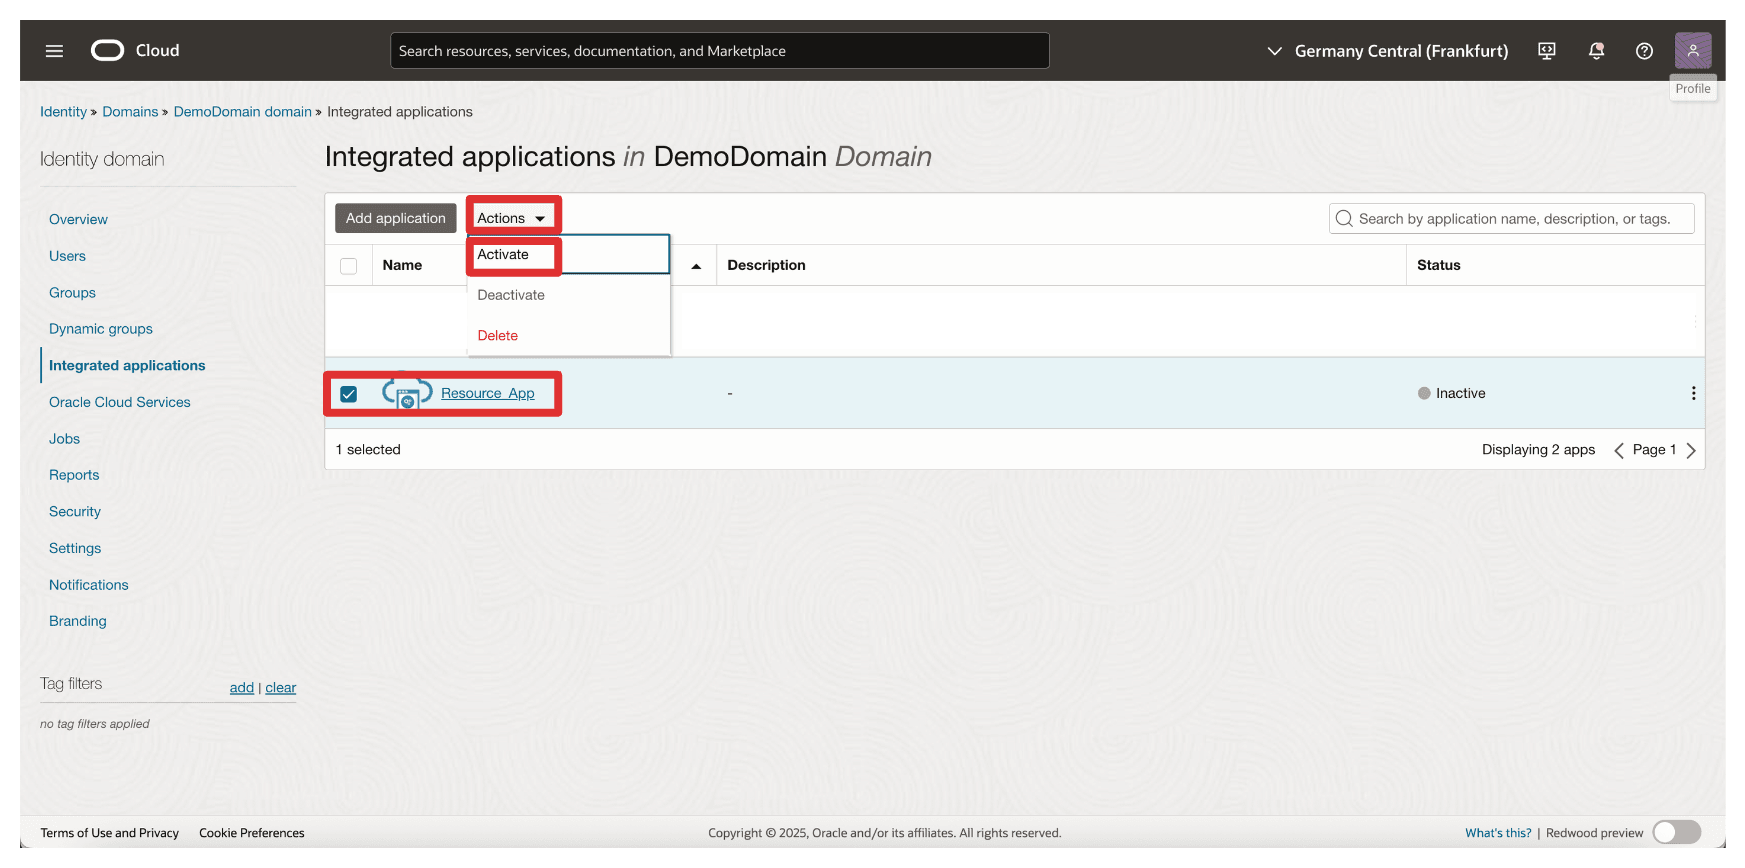
Go to the Integrated applications page.
- Note that the
Resource_Appintegration application is created. - Select the
Resource_Appintegration application. - Click the Actions drop-down menu.
- Click Activate.
- Note that the
-
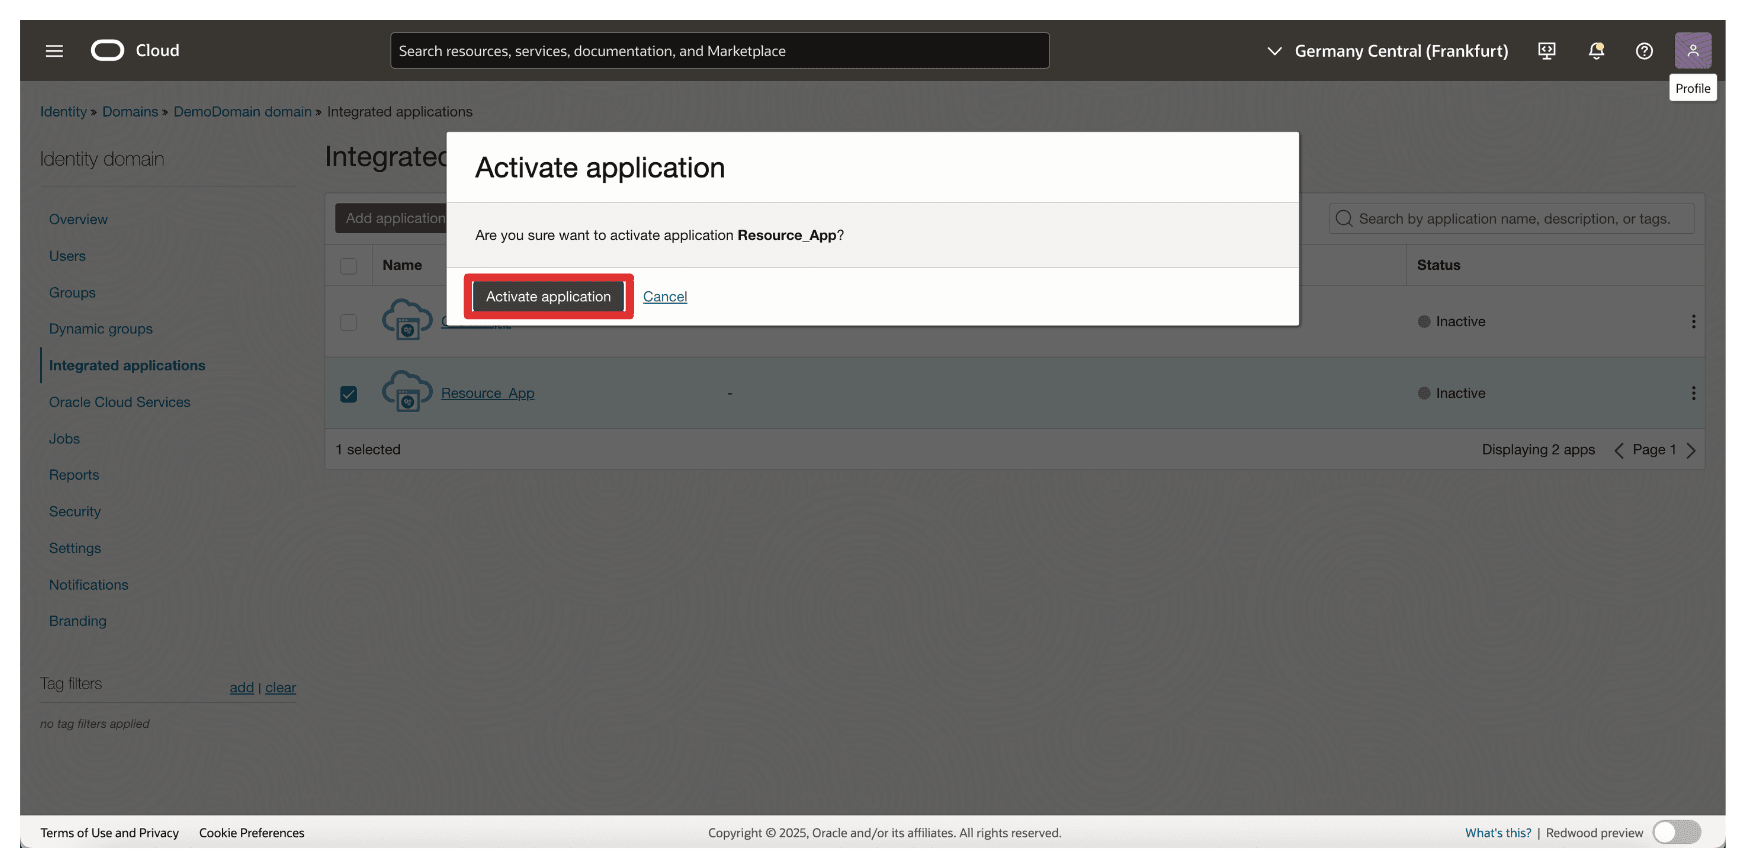
Click Activate application.
-
Click the
Resource_Appintegration application.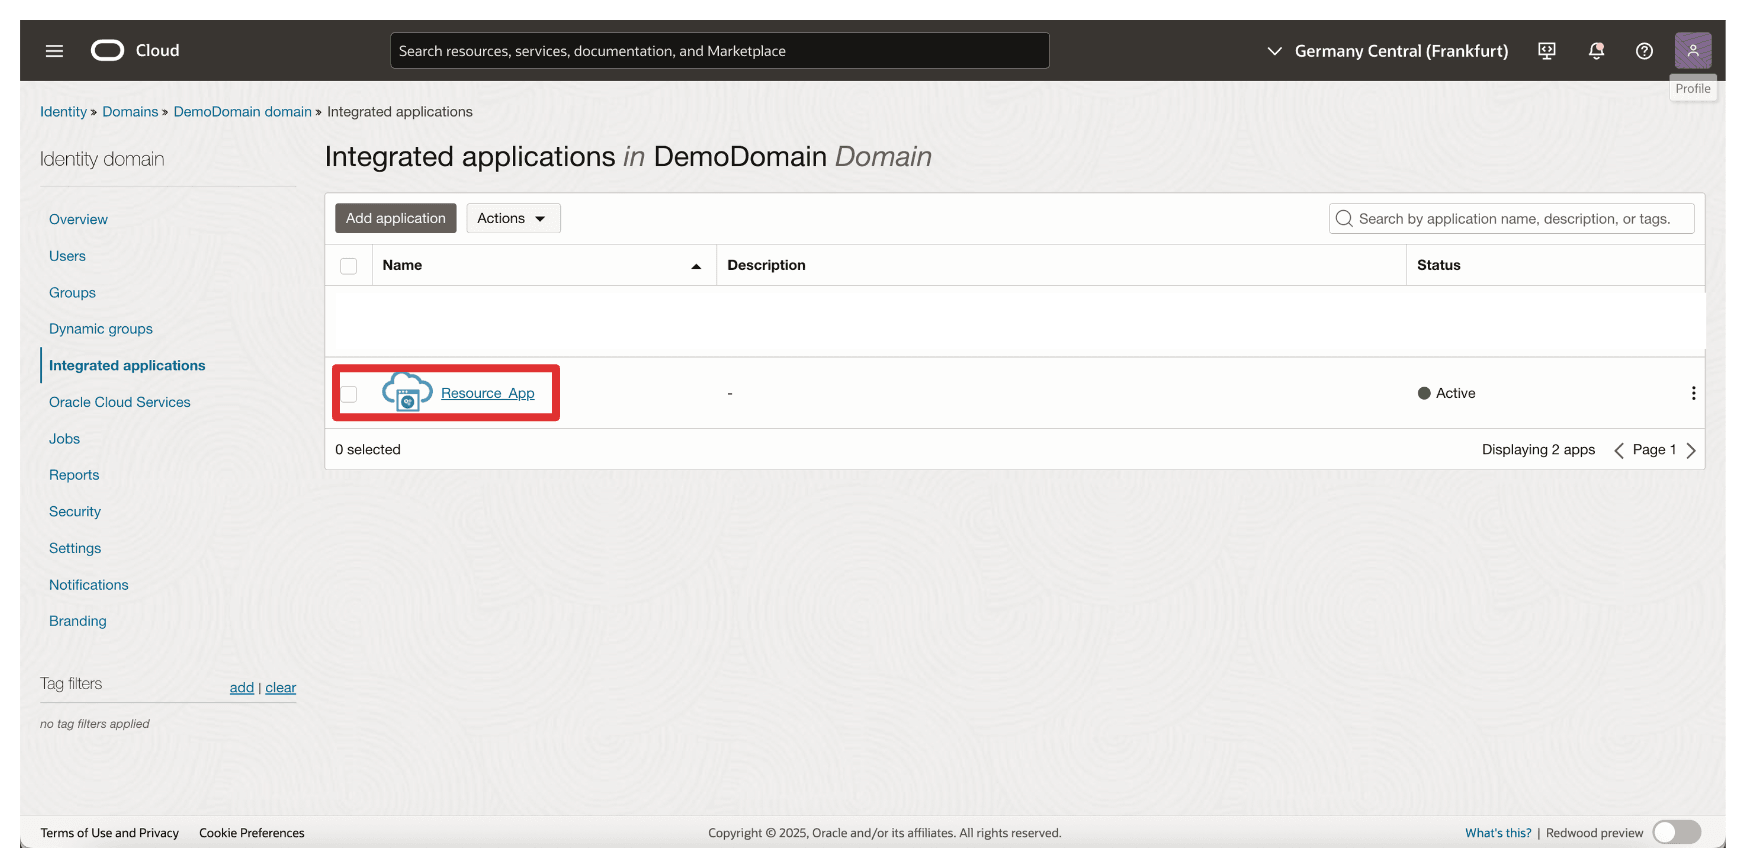
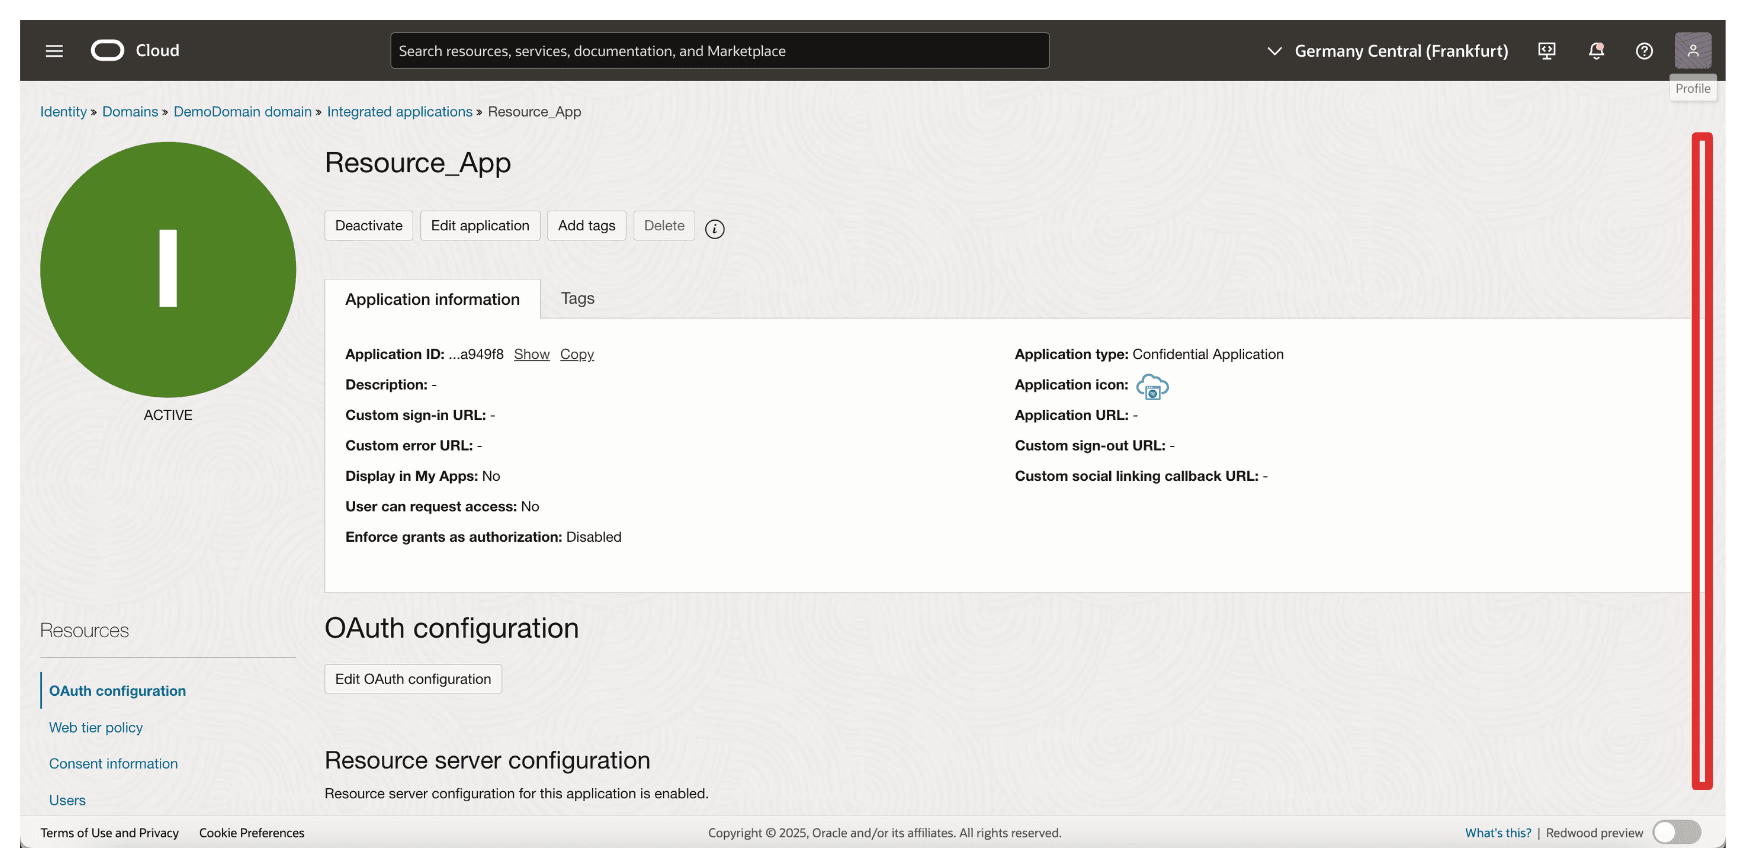
-
Scroll down.
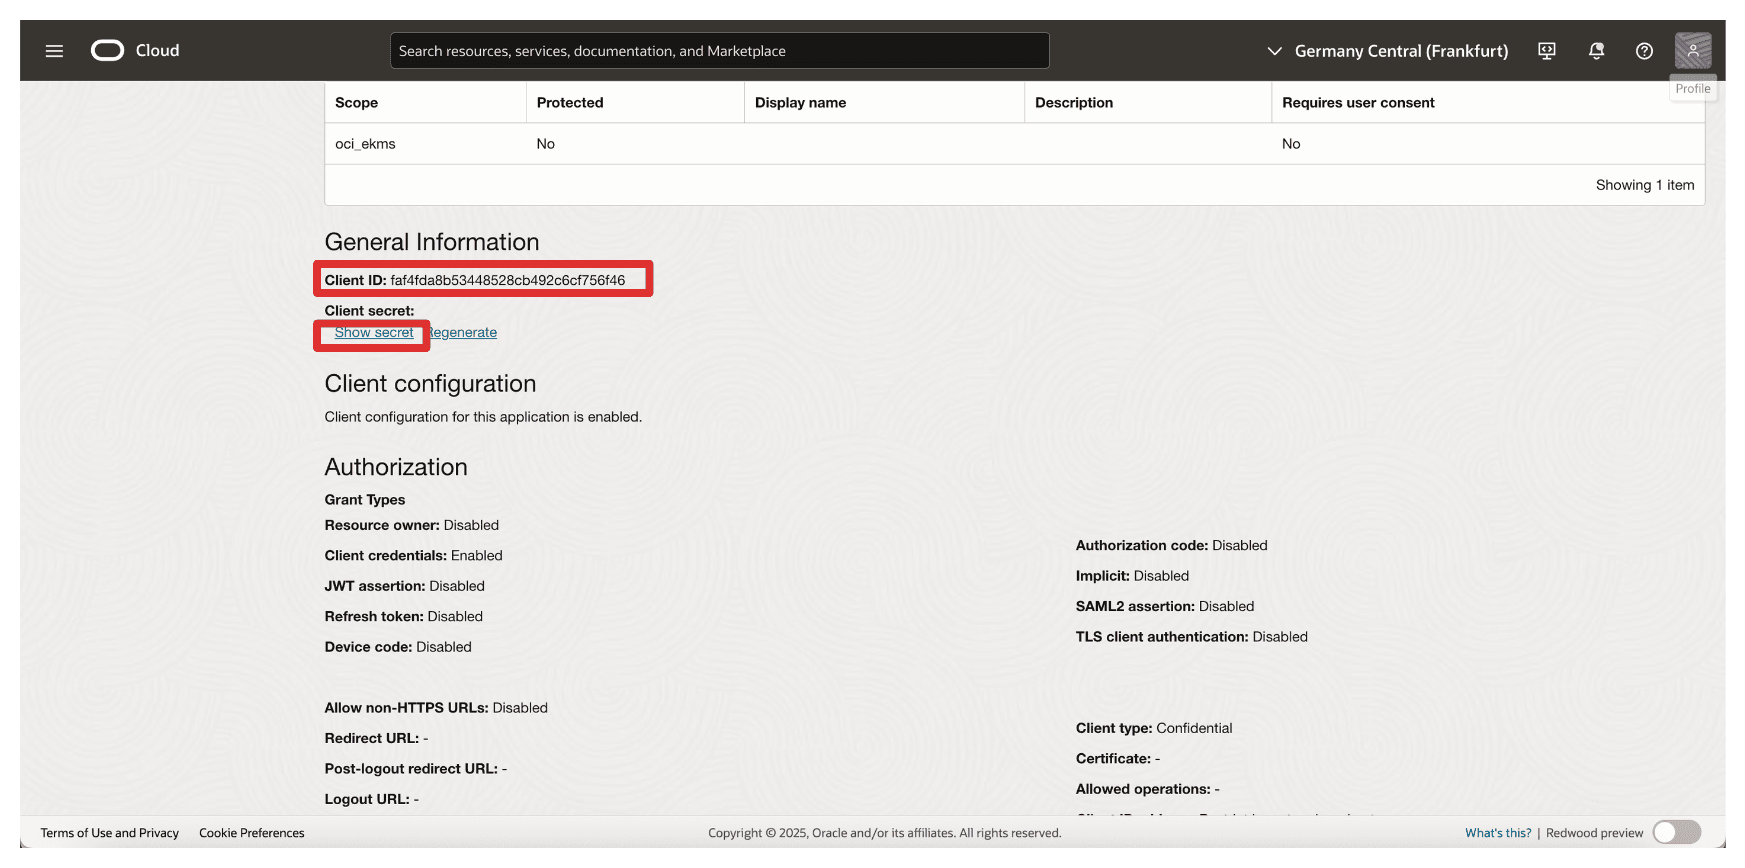
-
Copy the Client ID and store this on a notepad. Click Show secret to show the Client secret.
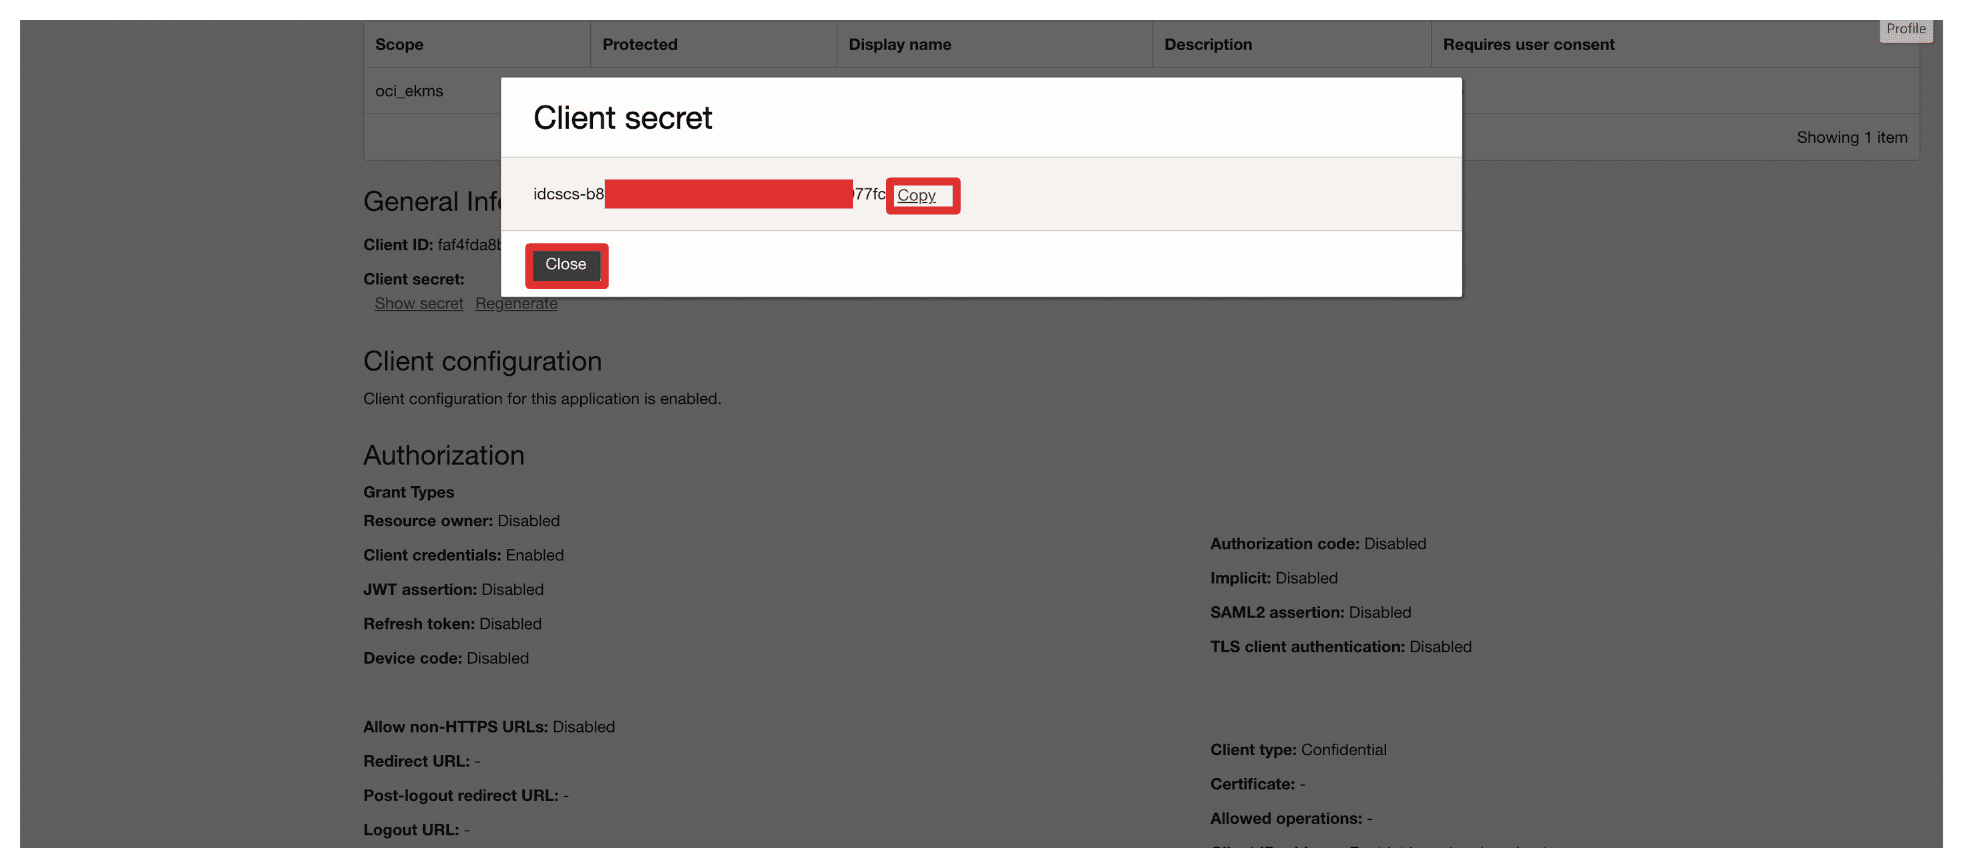
-
Click Copy to copy the Client secret and store this on a notepad. Click Close.
-
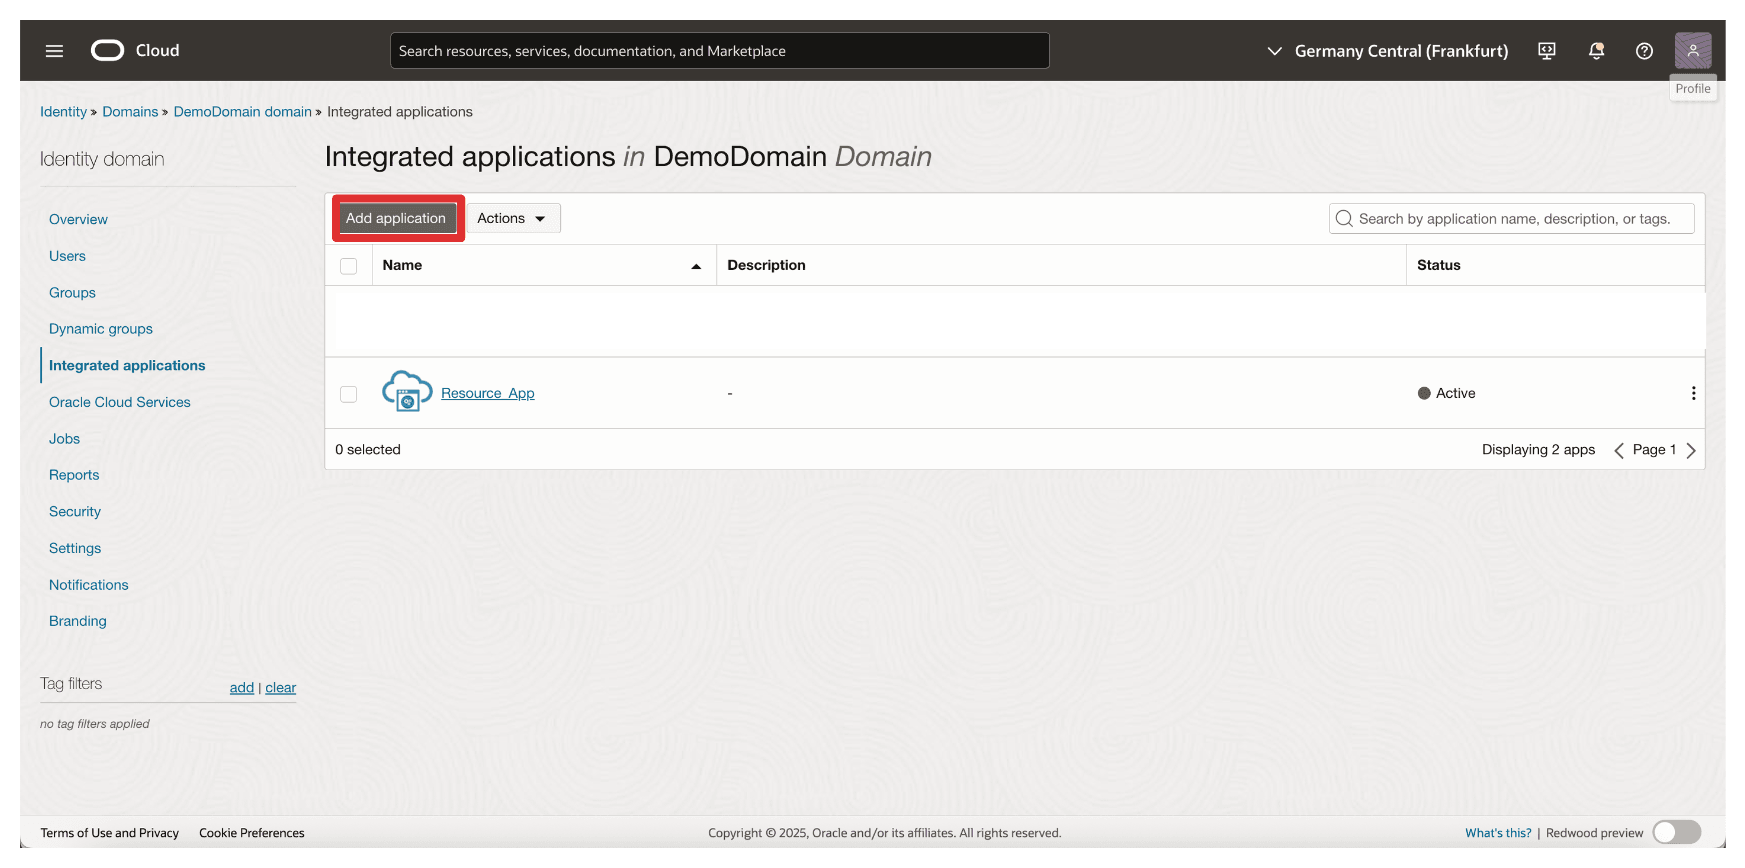
Click Add application.
-
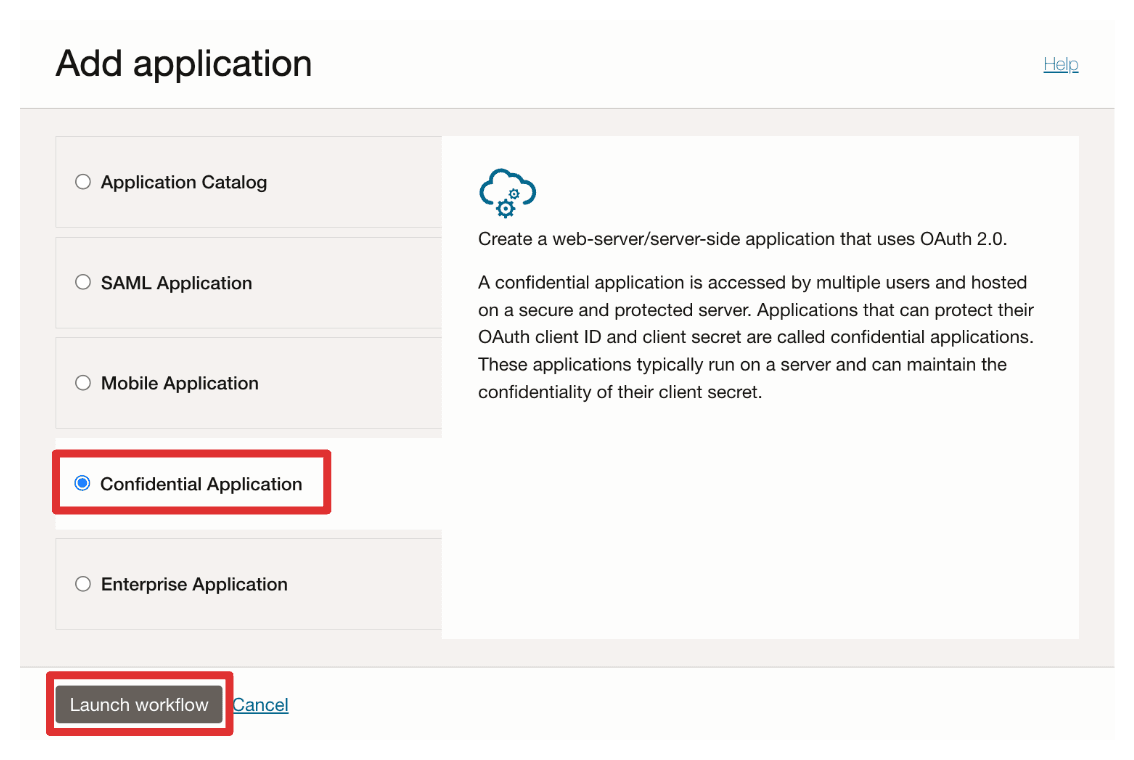
Select Confidential Application and click Launch workflow.
-
Enter the application Name (
Client_App) and click Next.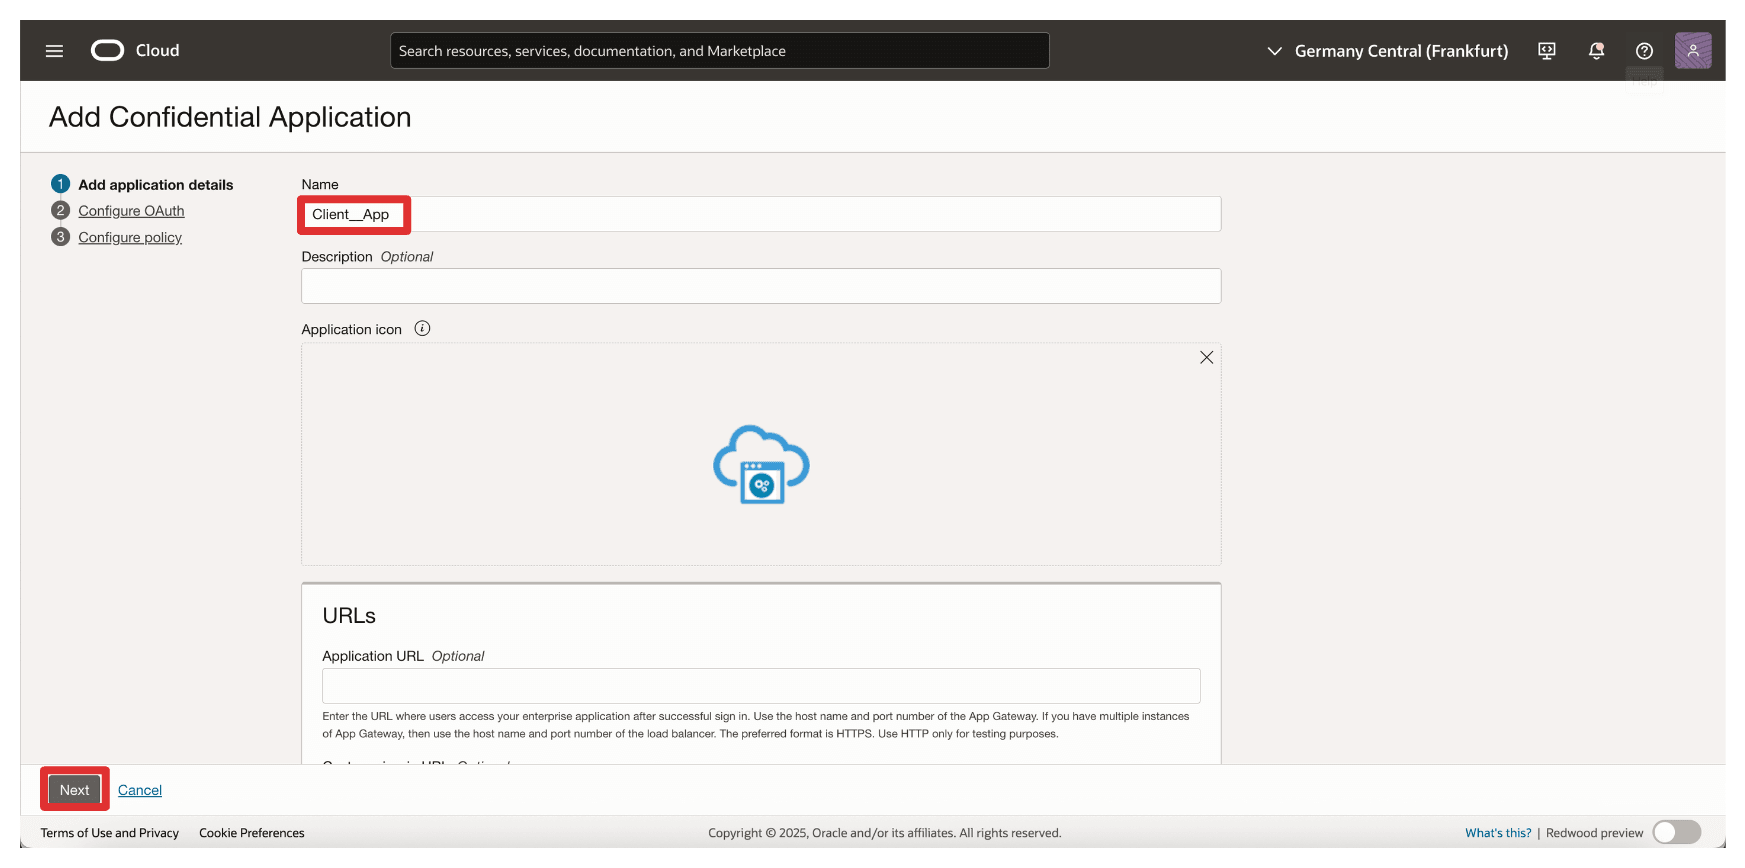
-
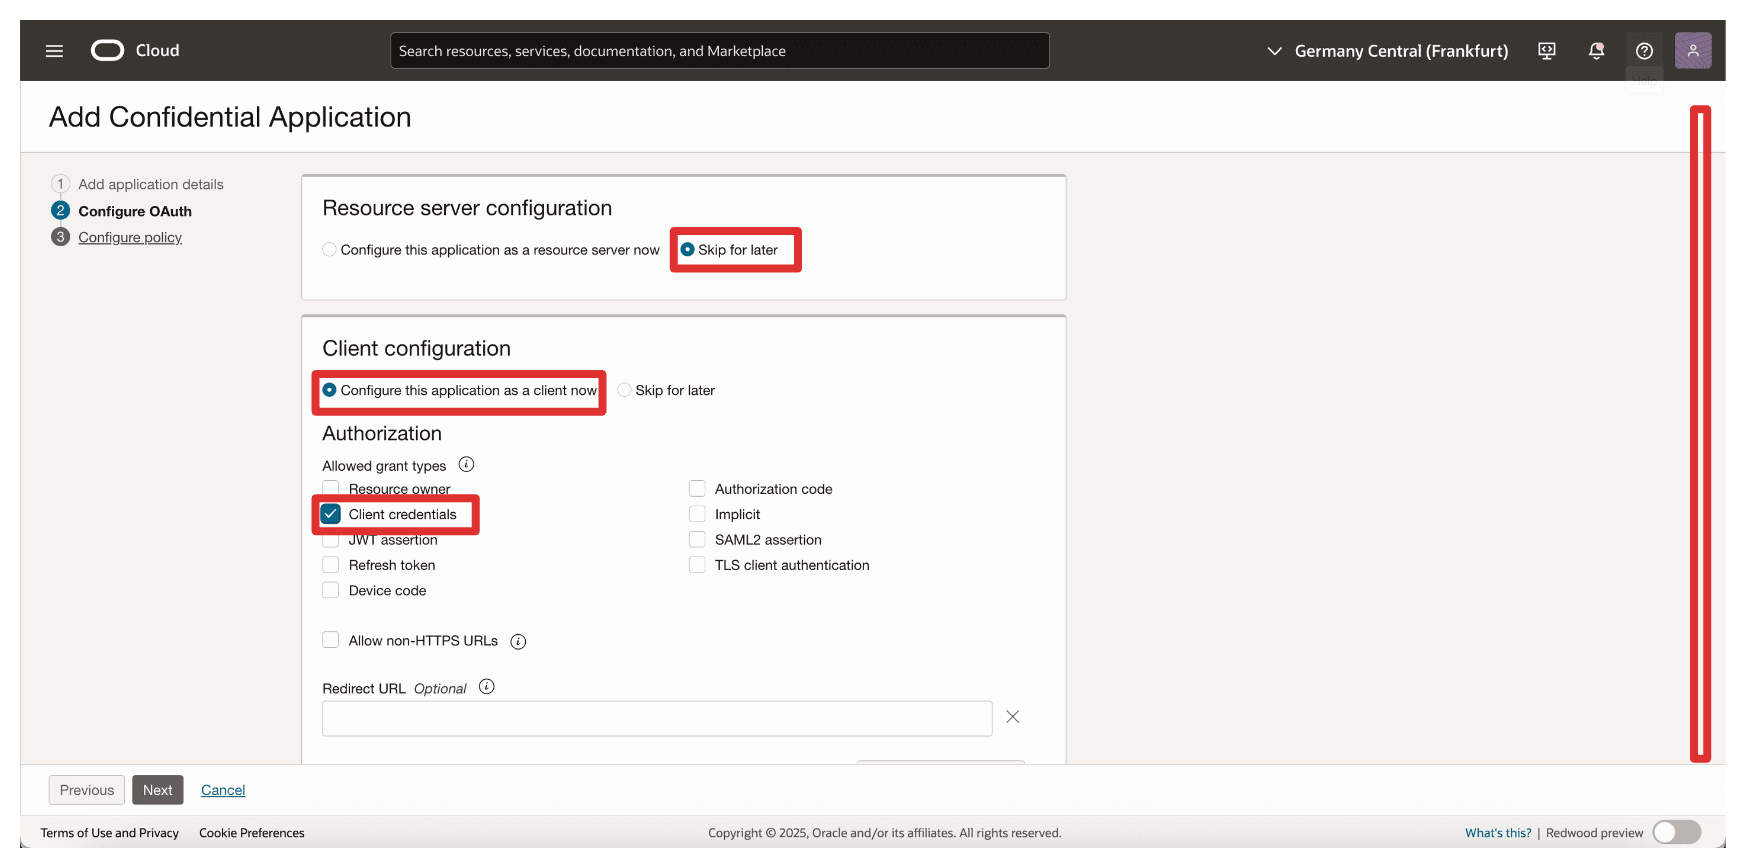
In Resource Server configuration, select Skip for later.
-
In Client configuration, enter the following information.
- Select Configure this application as a client now.
- Select Client credentials.
- Scroll down.
-
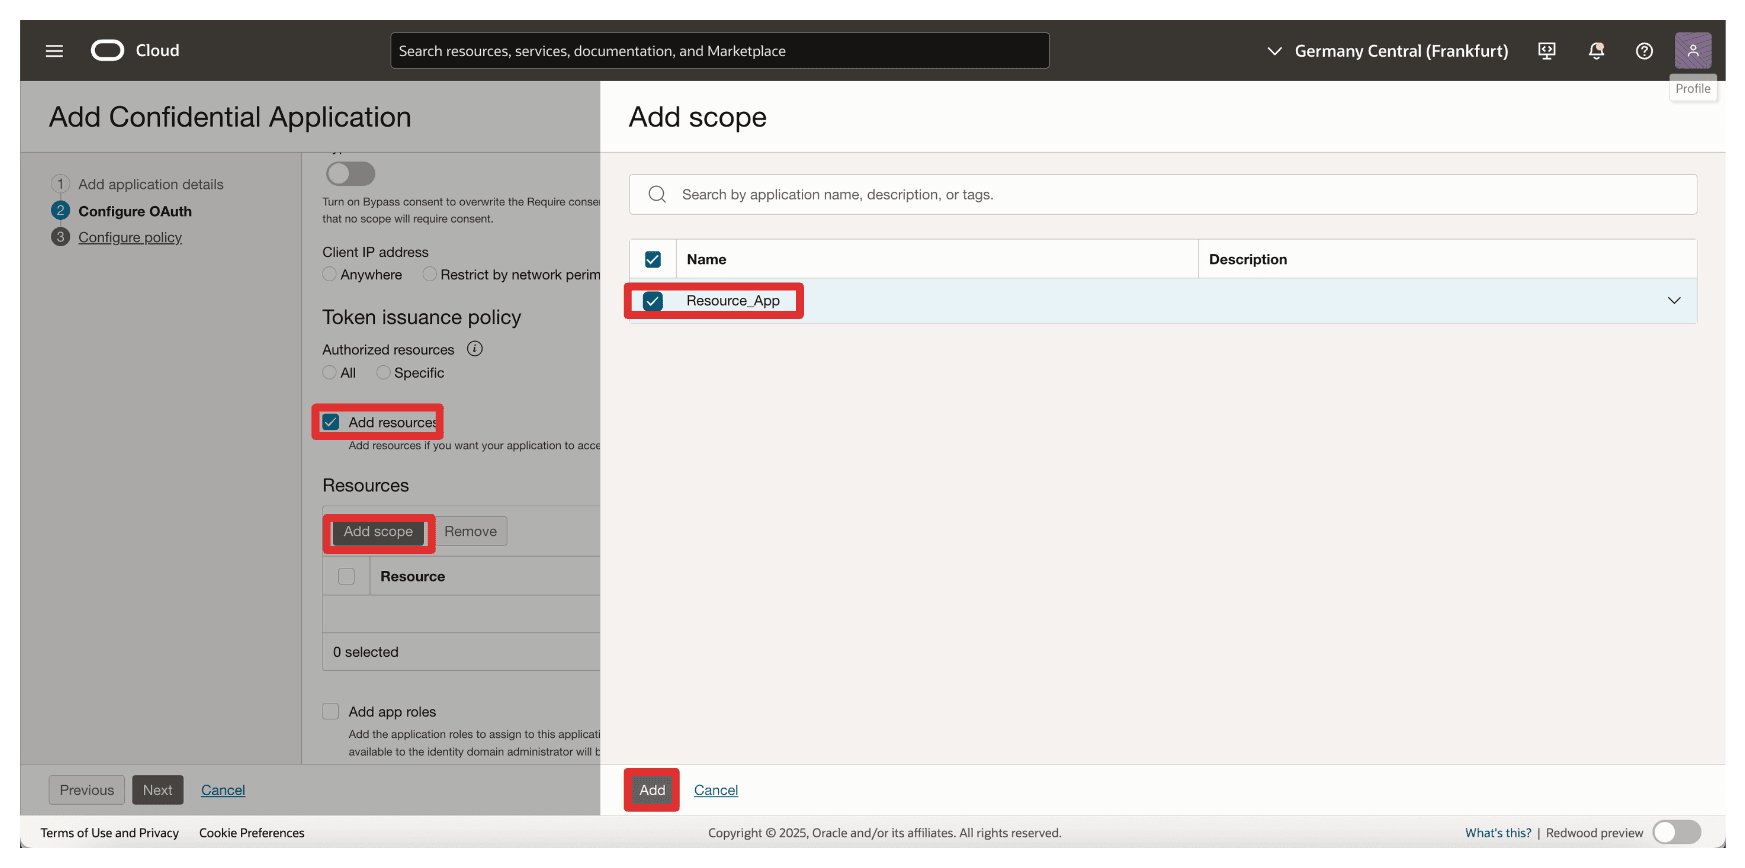
In Add Scope, enter the following information.
- Select Add resources.
- Select Add scopes.
- In Scope, enter
Resource_App. - Click Add.
-
Note the added resource
Resource_Appand click Next.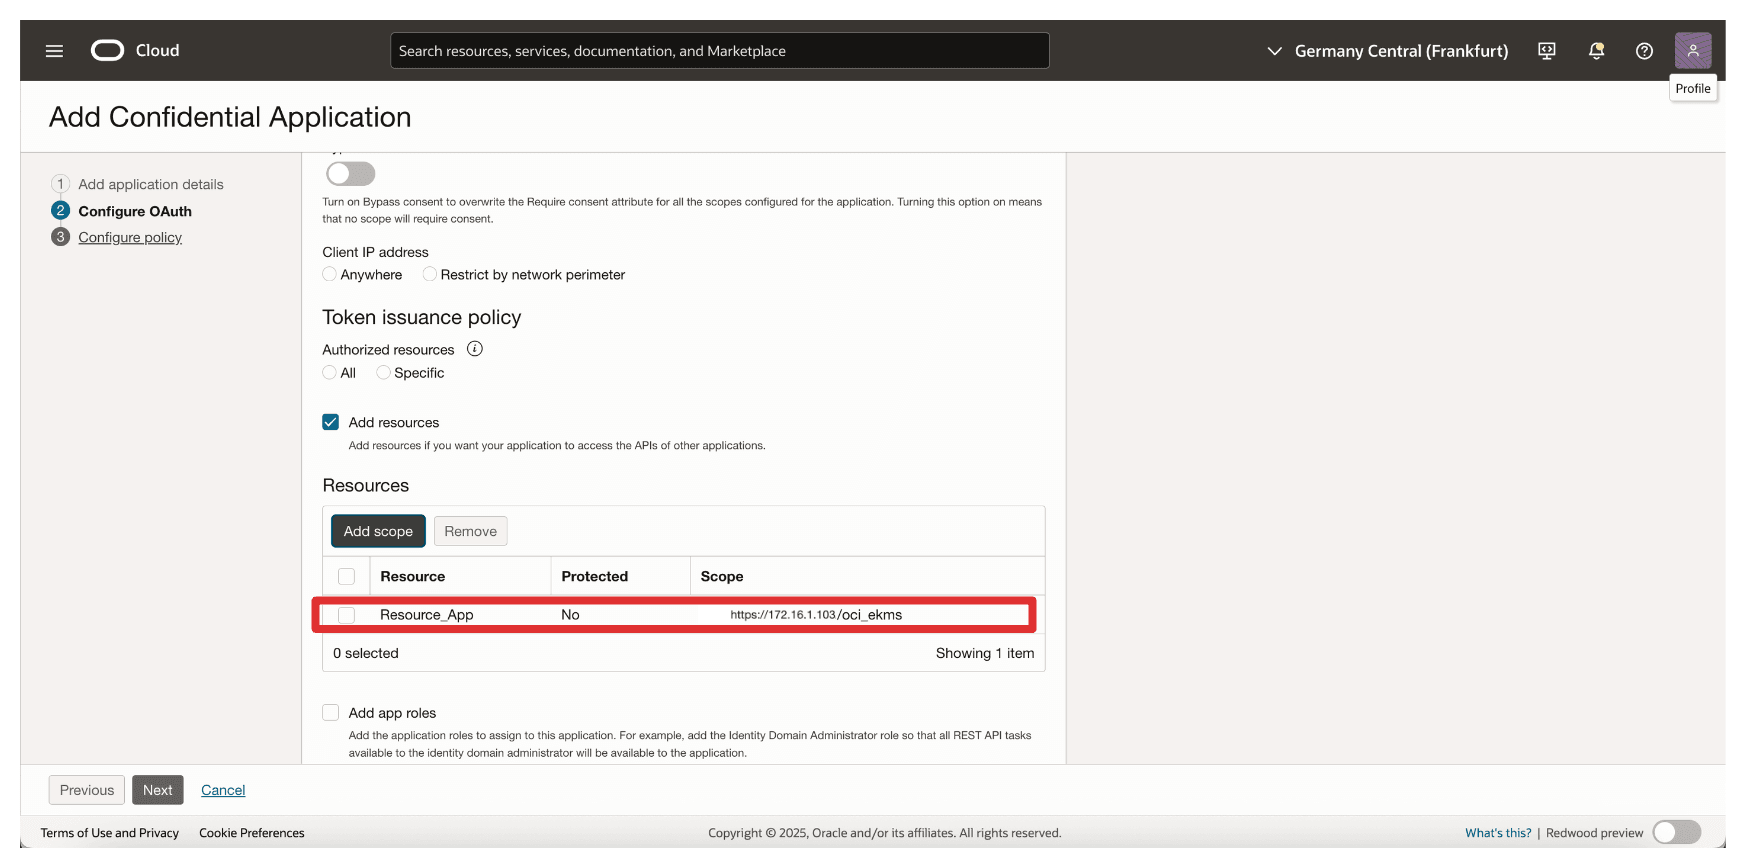
-
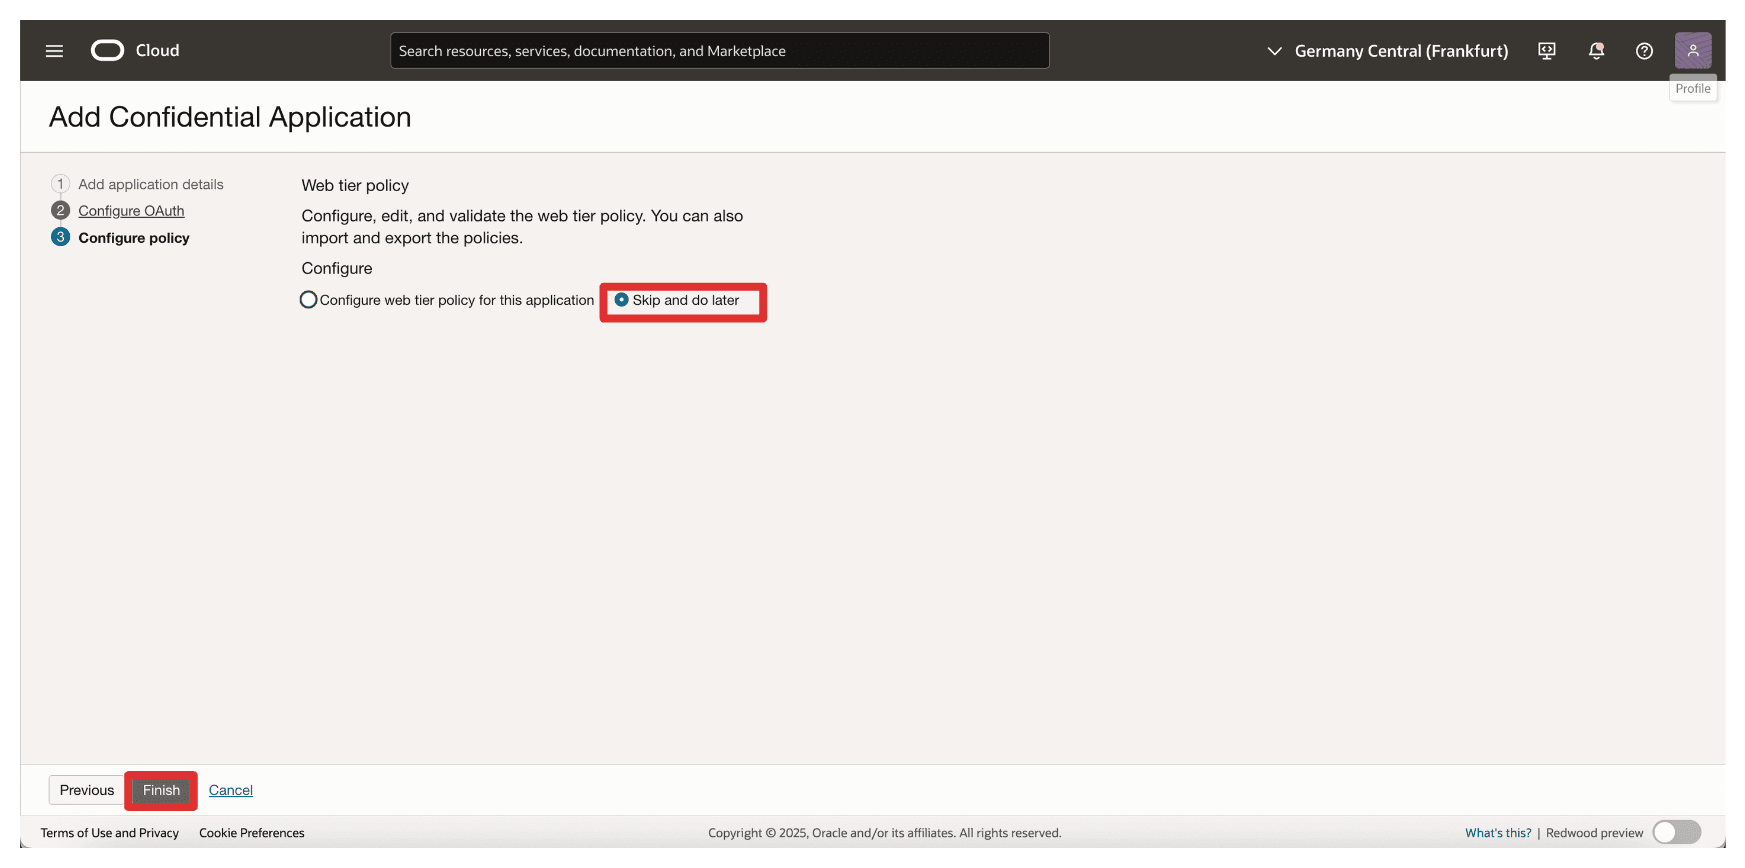
Click Skip and do later to skip the web tier policy creation and click Finish.
-
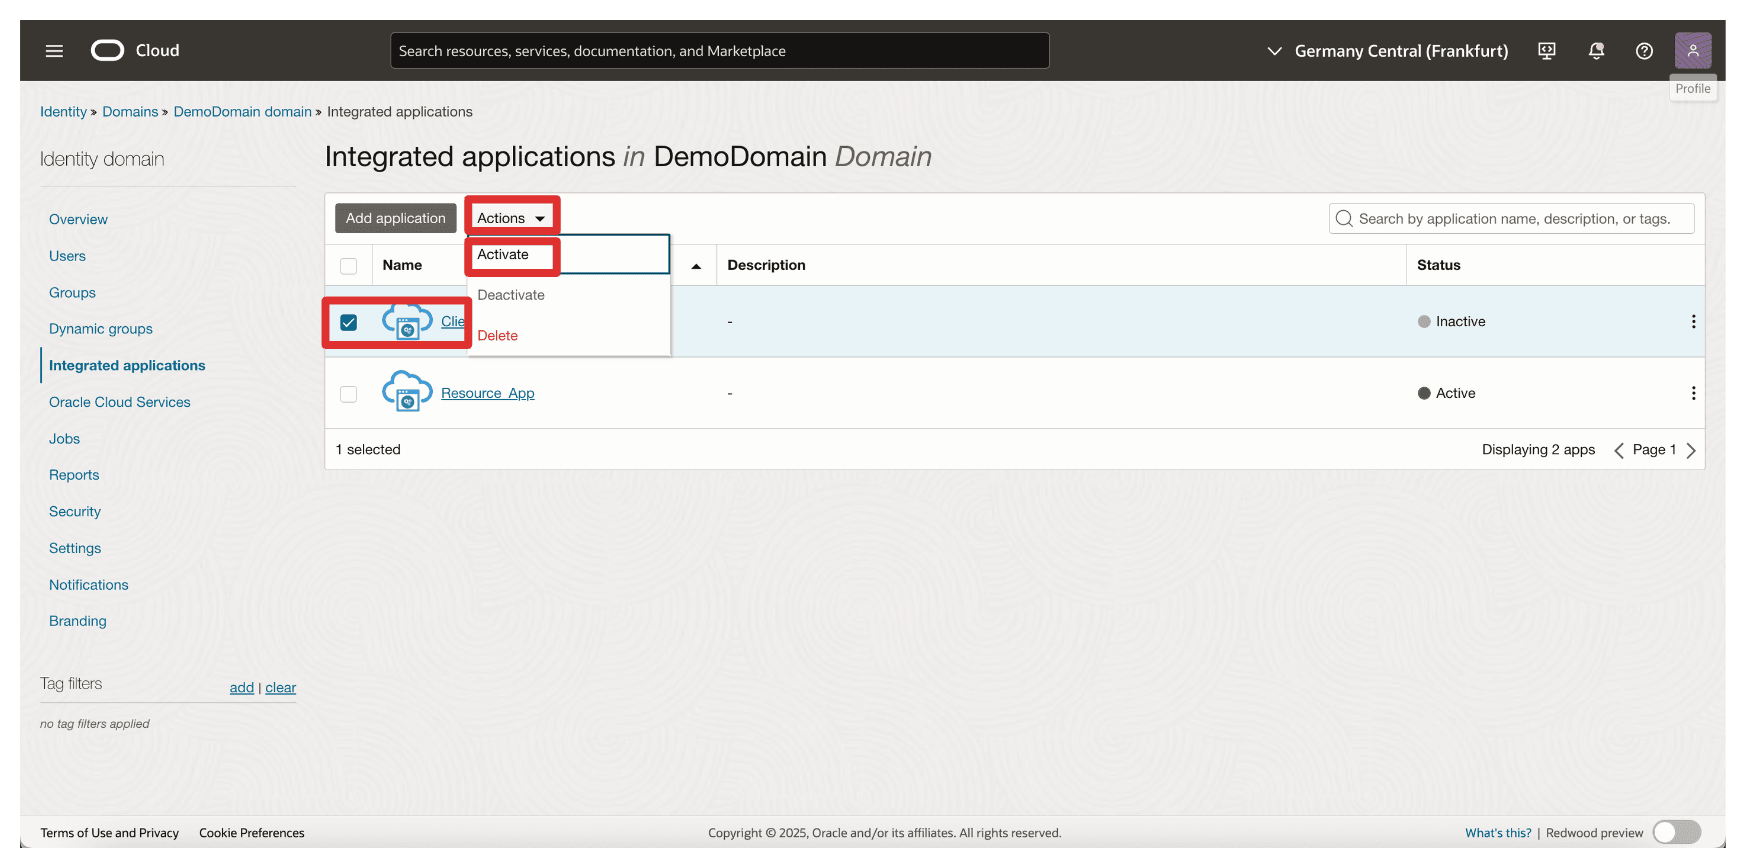
Go to the Integrated applications page.
- Note that the
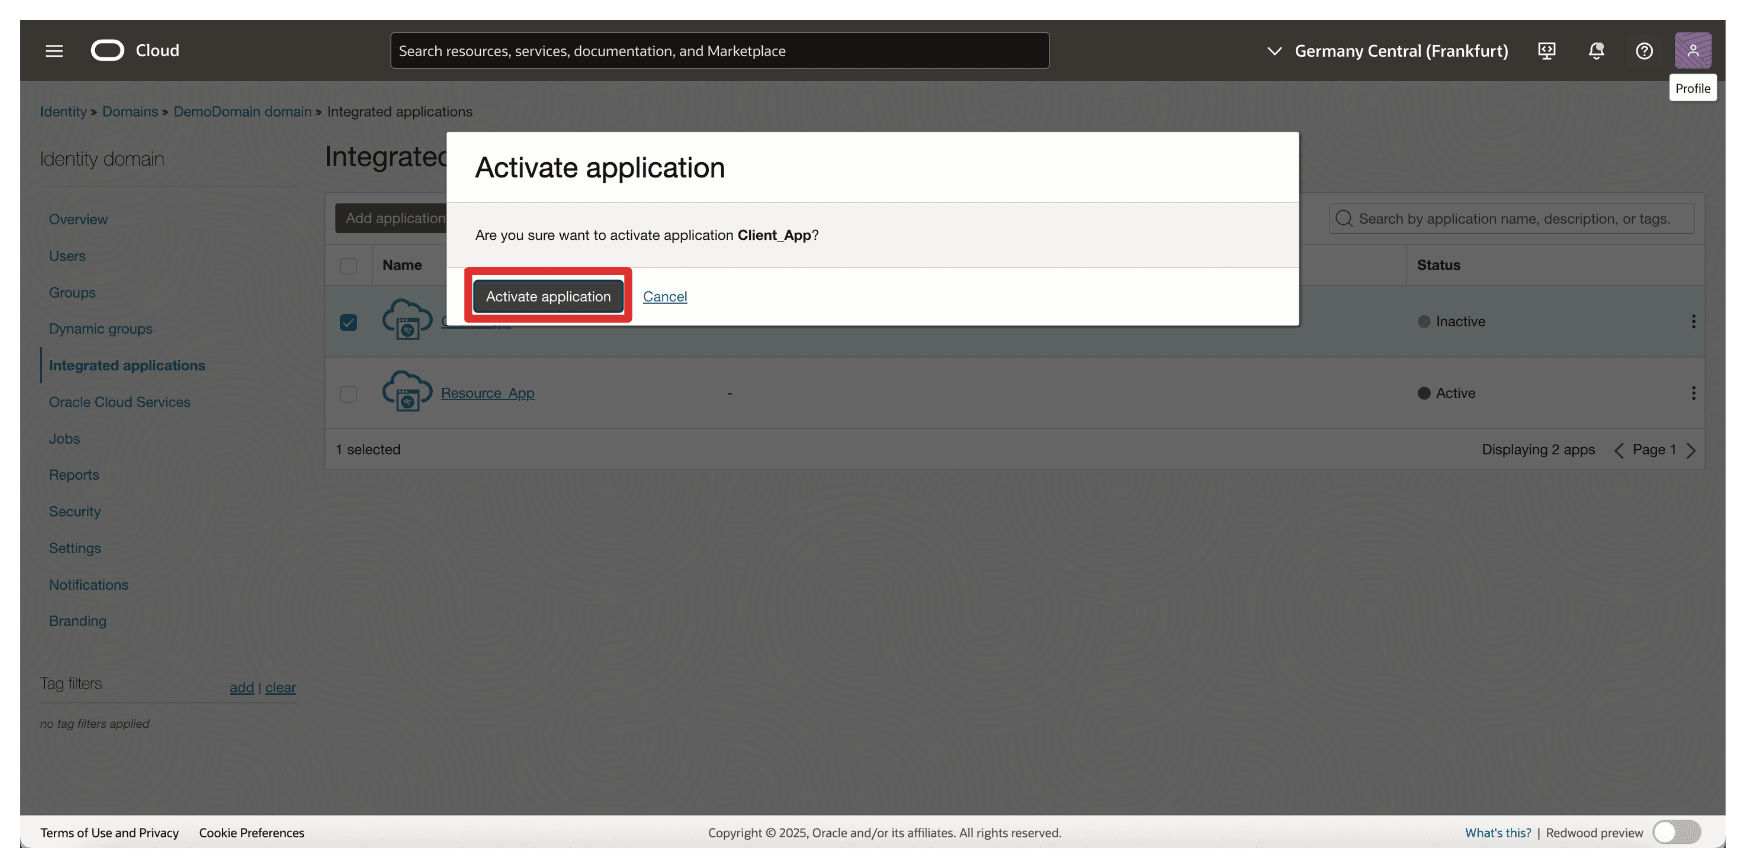
Client_Appintegration application is created. - Select the
Client_Appintegration application. - Click the Actions drop-down menu.
- Click Activate.
- Note that the
-
Click Activate application.
-
Click the
Client_Appintegration application.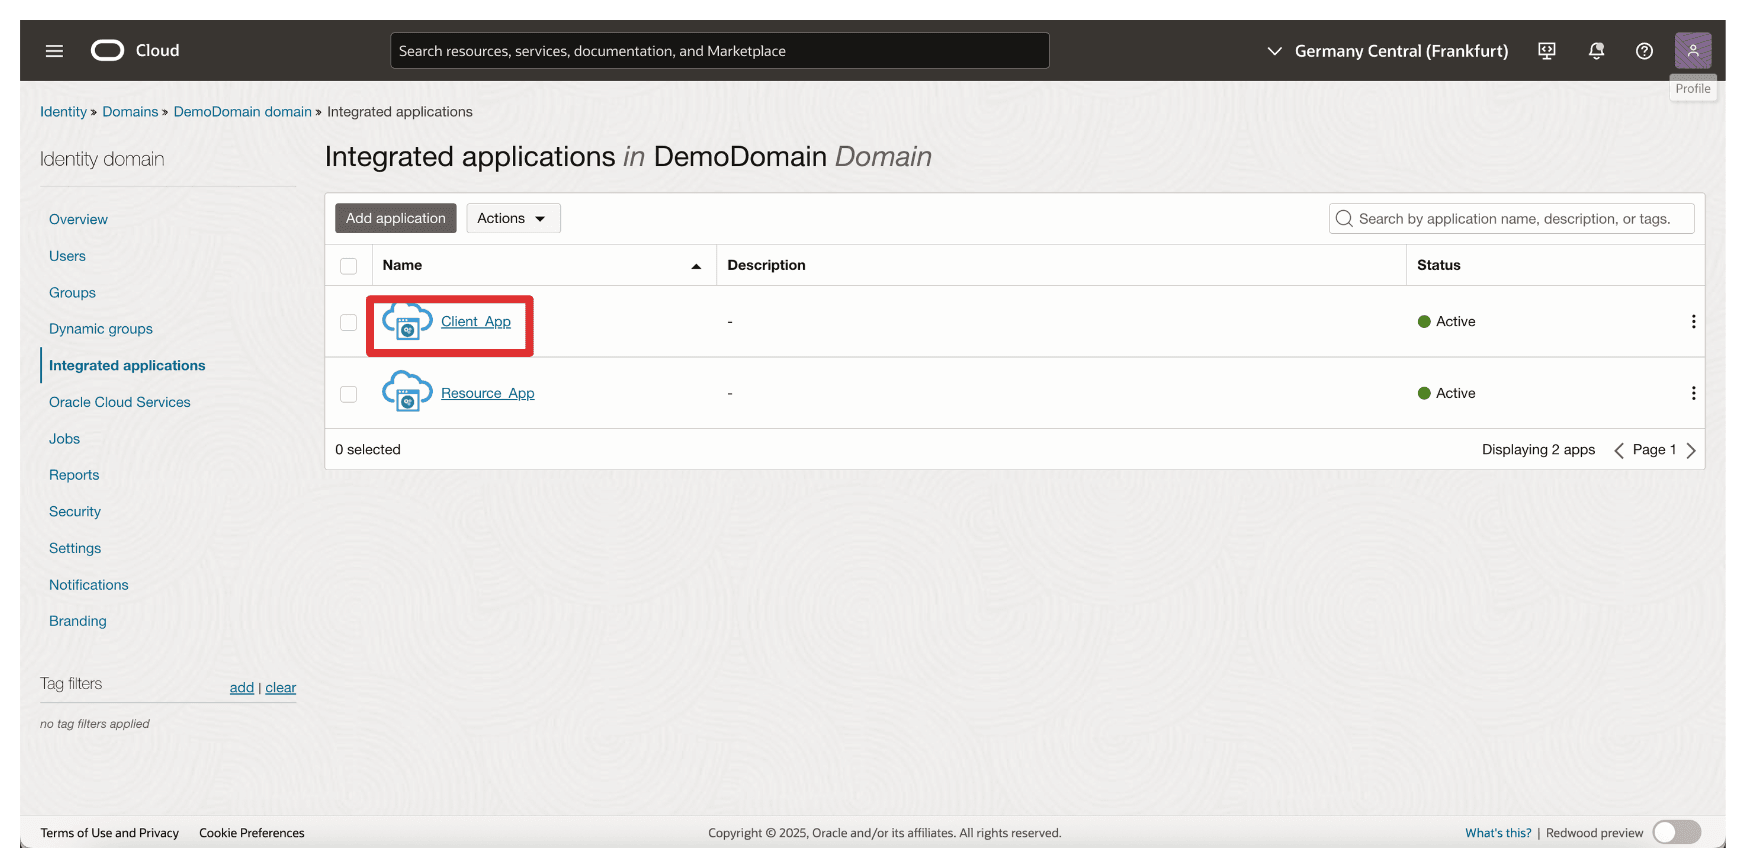
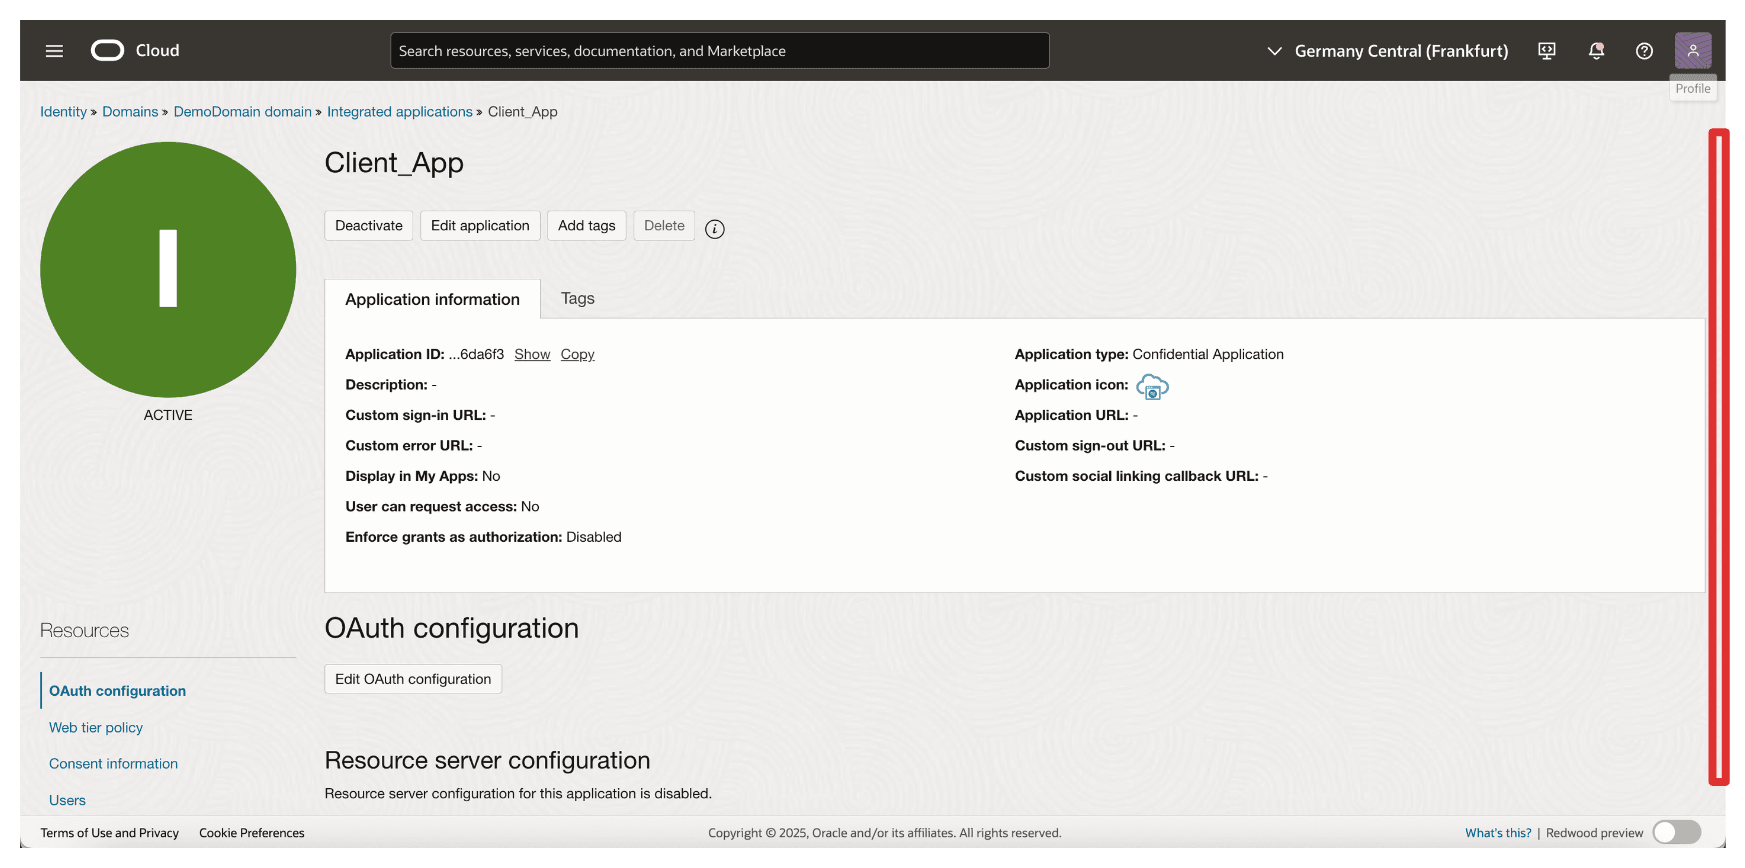
-
Scroll down.
-
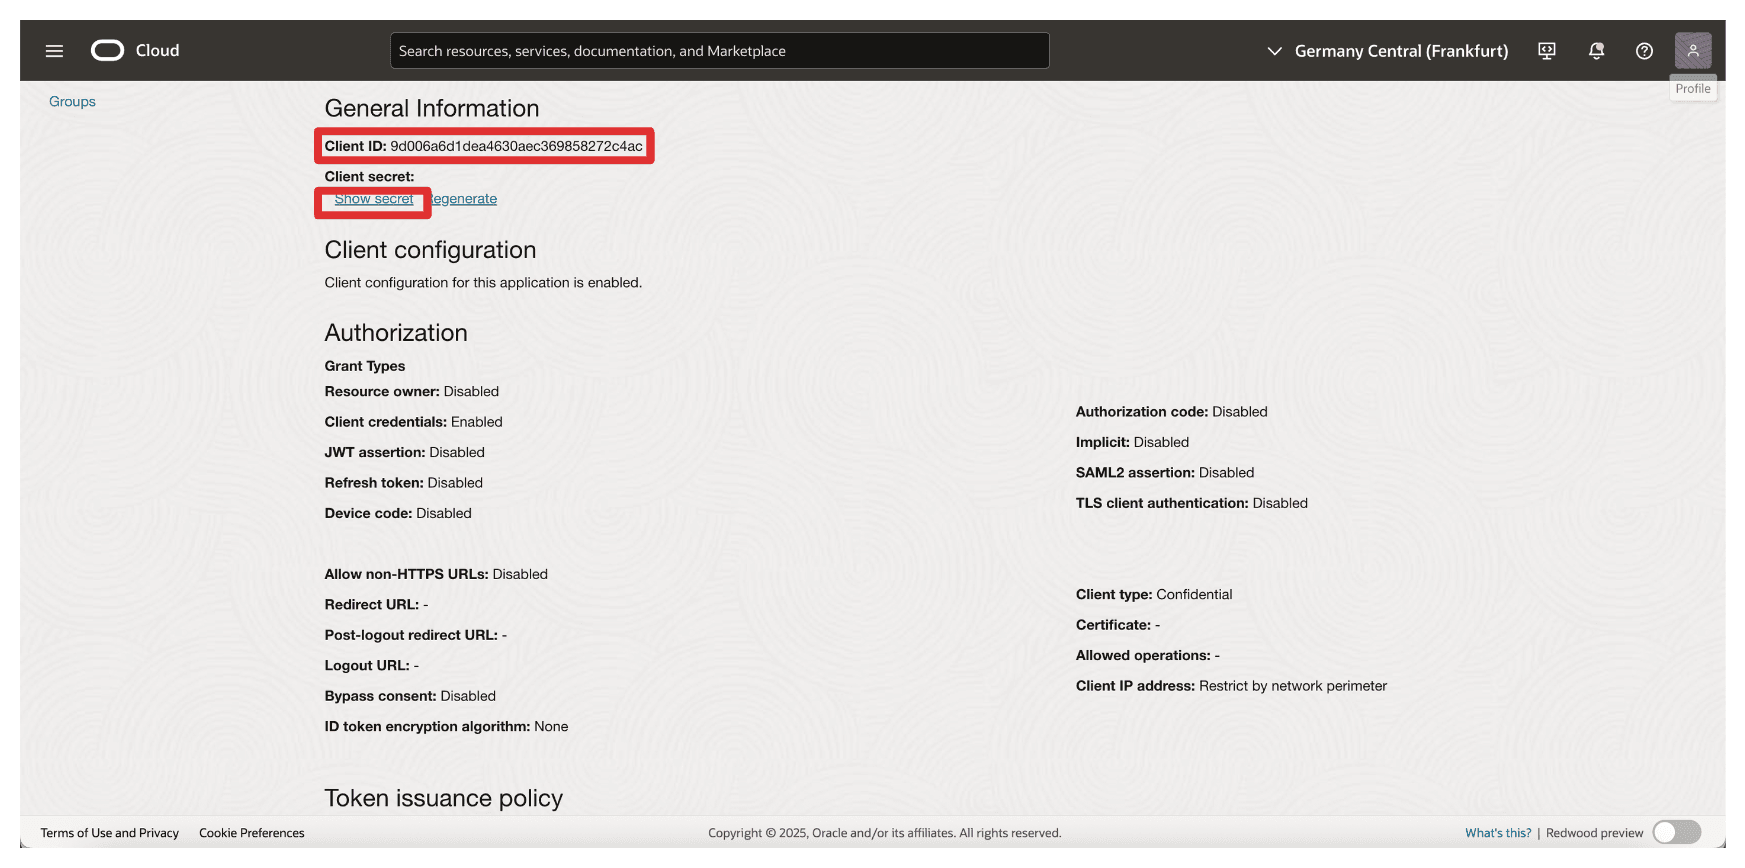
Copy the Client ID and store this on a notepad. Click Show secret to show the Client secret.
-
Click Copy to copy the Client secret and store this on a notepad. Click Close.
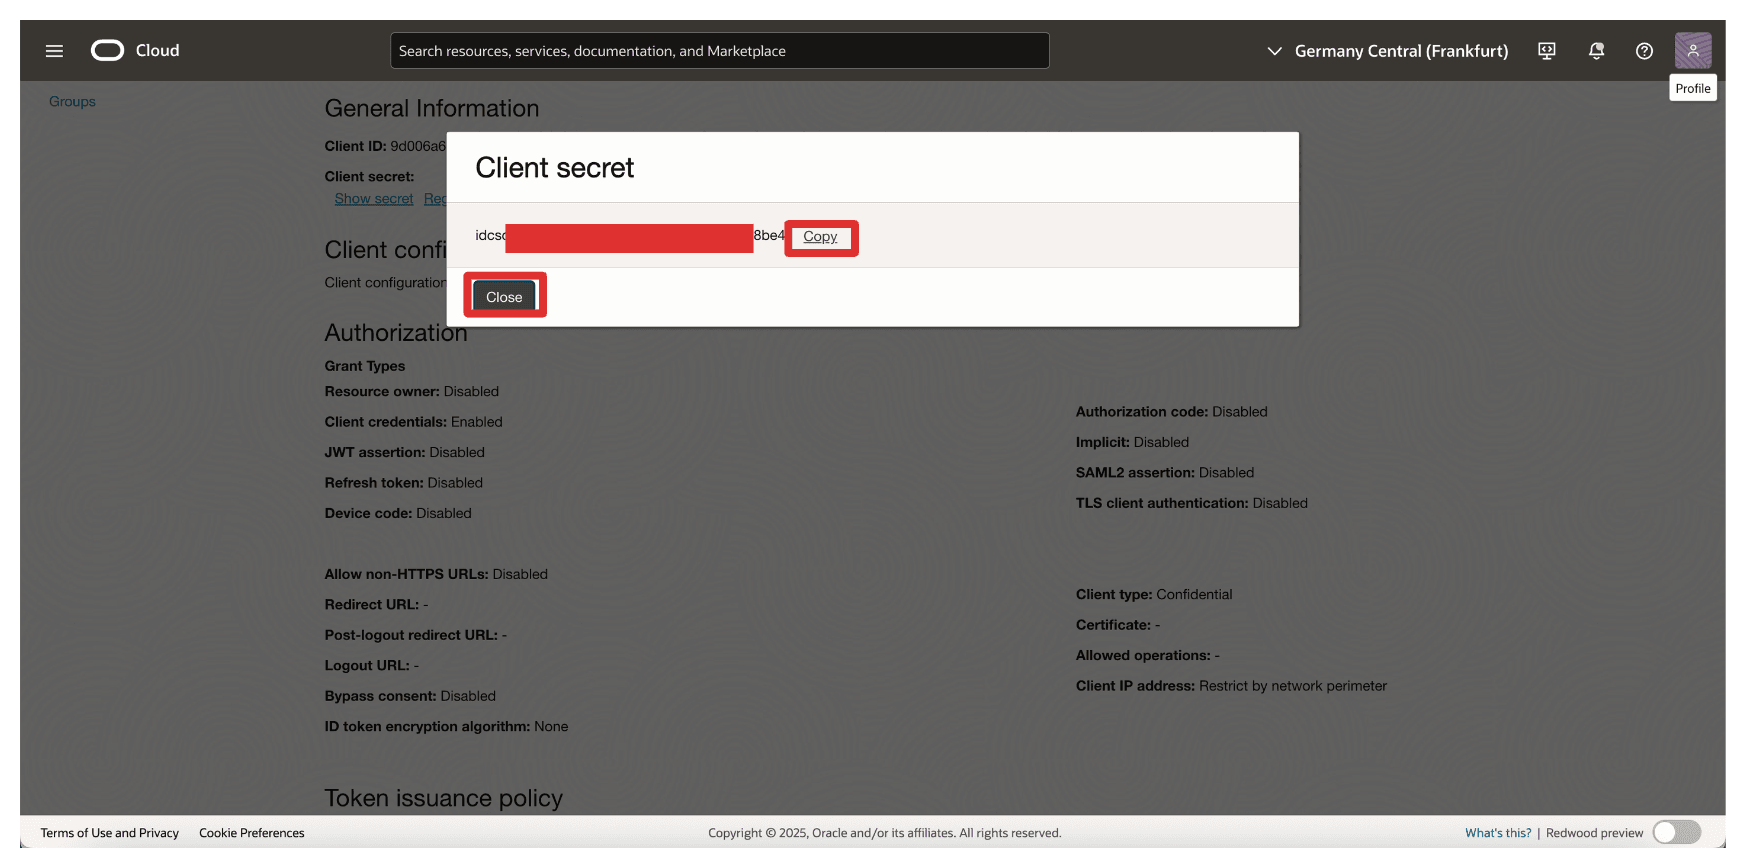
Note:
- You have collected the
Resource_AppandClient_Appclient IDs and client secrets.- Do not mix these two and configure them in the appropriate places.
Task 9: Collect the Identity Domain URL from OCI
To enable OAuth-based communication between OCI and Thales CipherTrust Manager, you need to provide the Identity Domain URL during the configuration of the identity provider in Thales CipherTrust Manager.
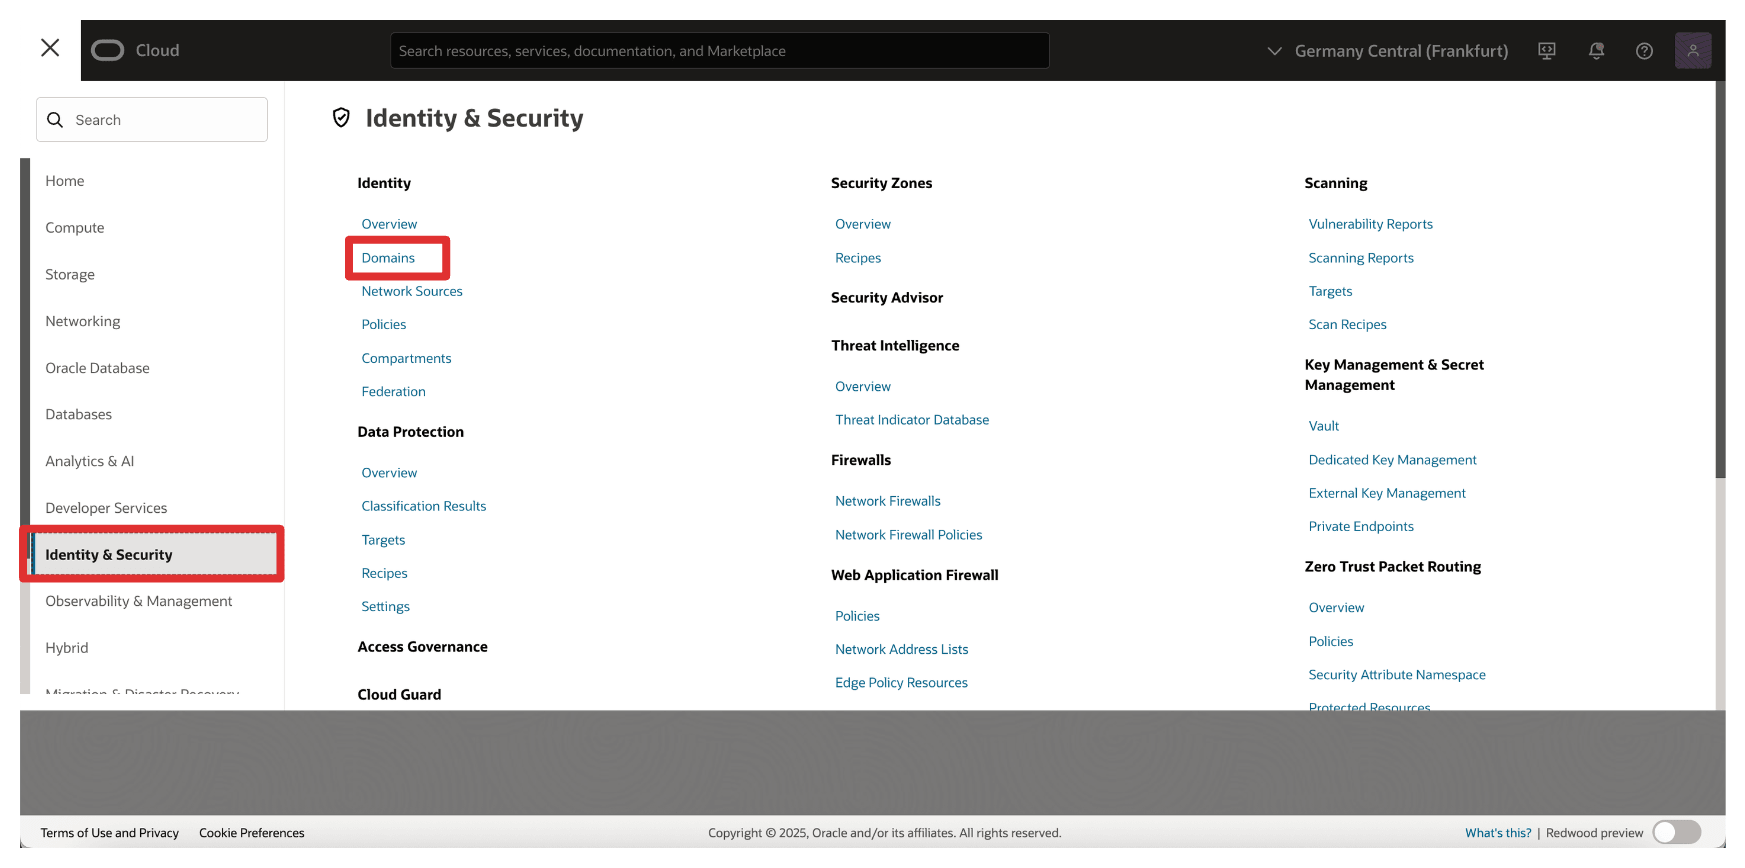
-
Go to the OCI Console, navigate to Identity & Security and click Domains.
-
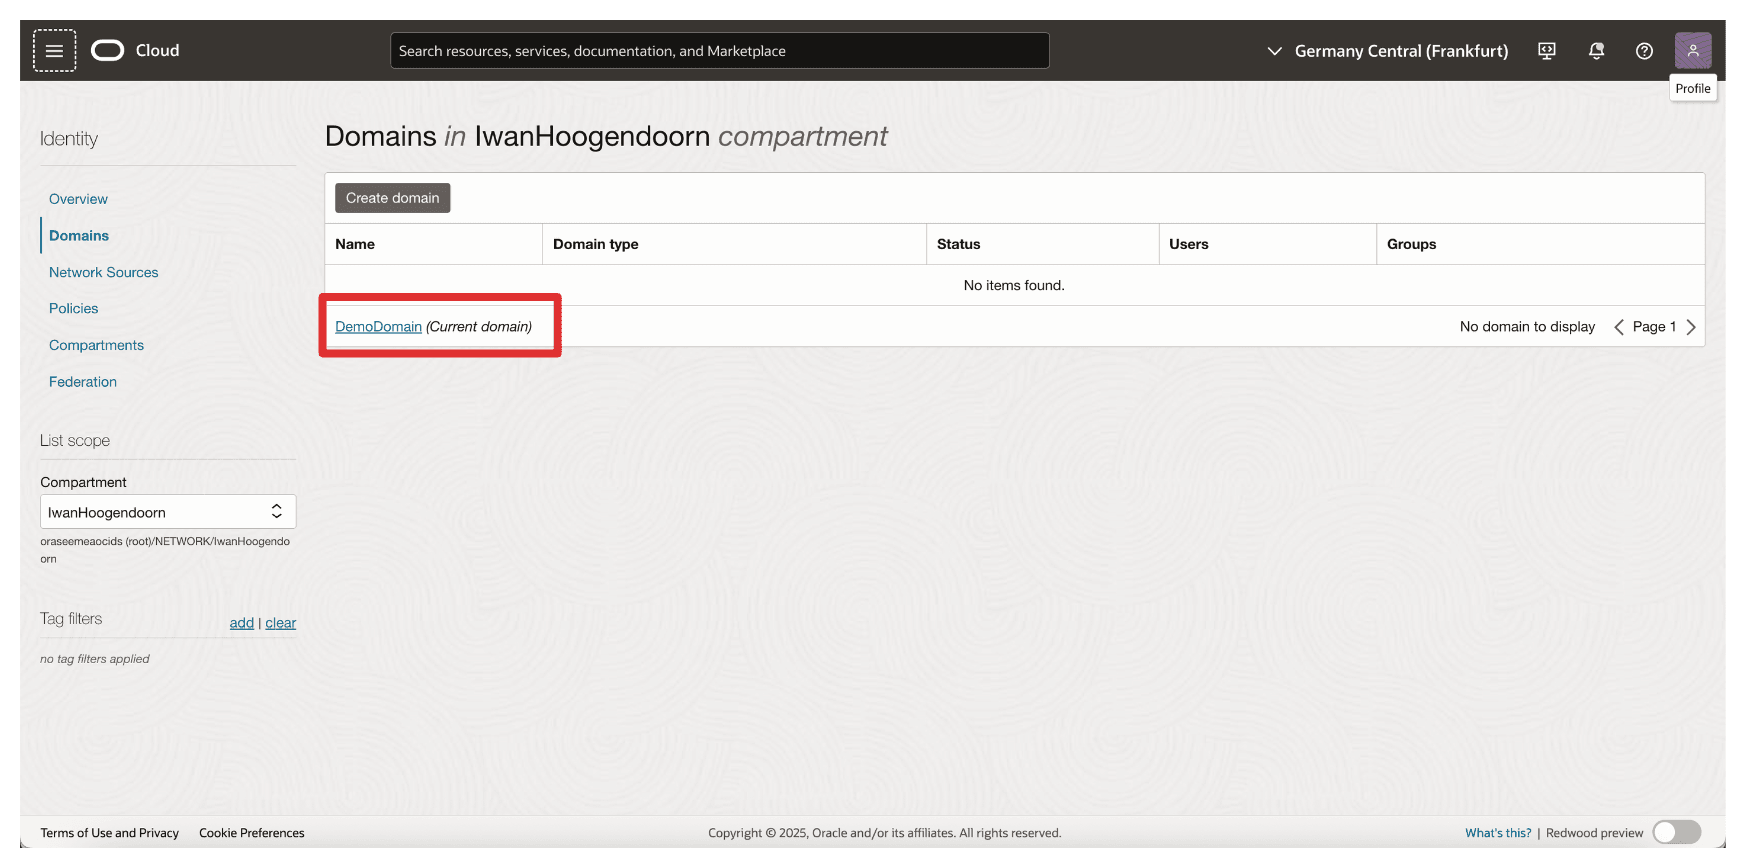
Select the Identity Domain where your confidential applications were created.
-
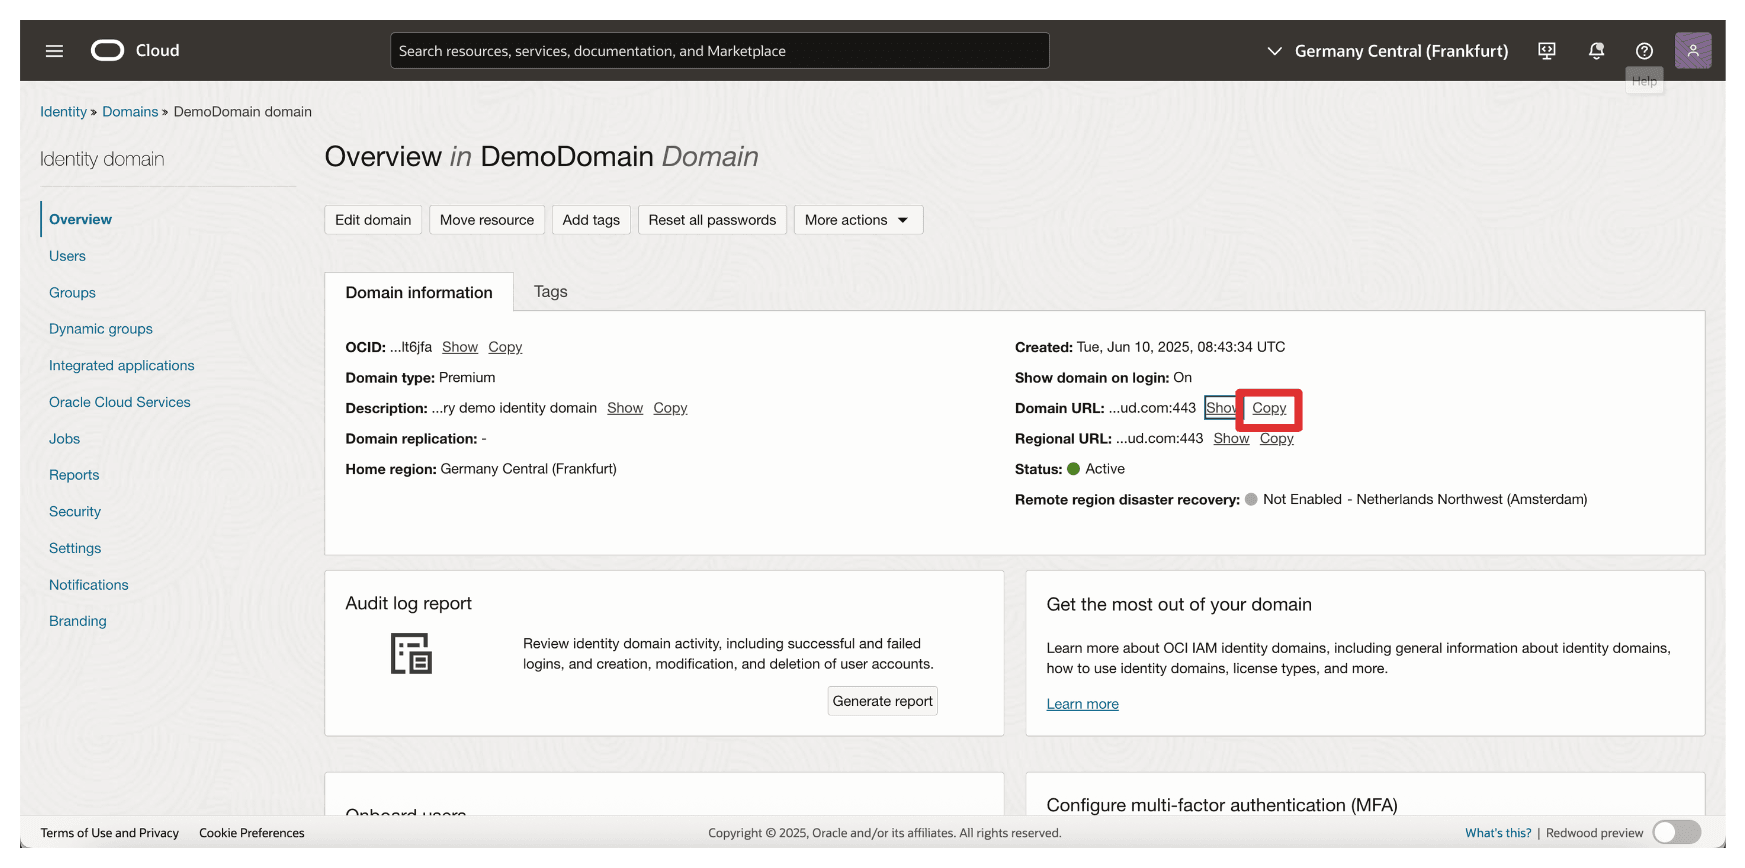
In the domain details page, click Copy to copy Domain URL and store this on a notepad.
Task 10: Create Identity Providers in Thales CipherTrust Manager
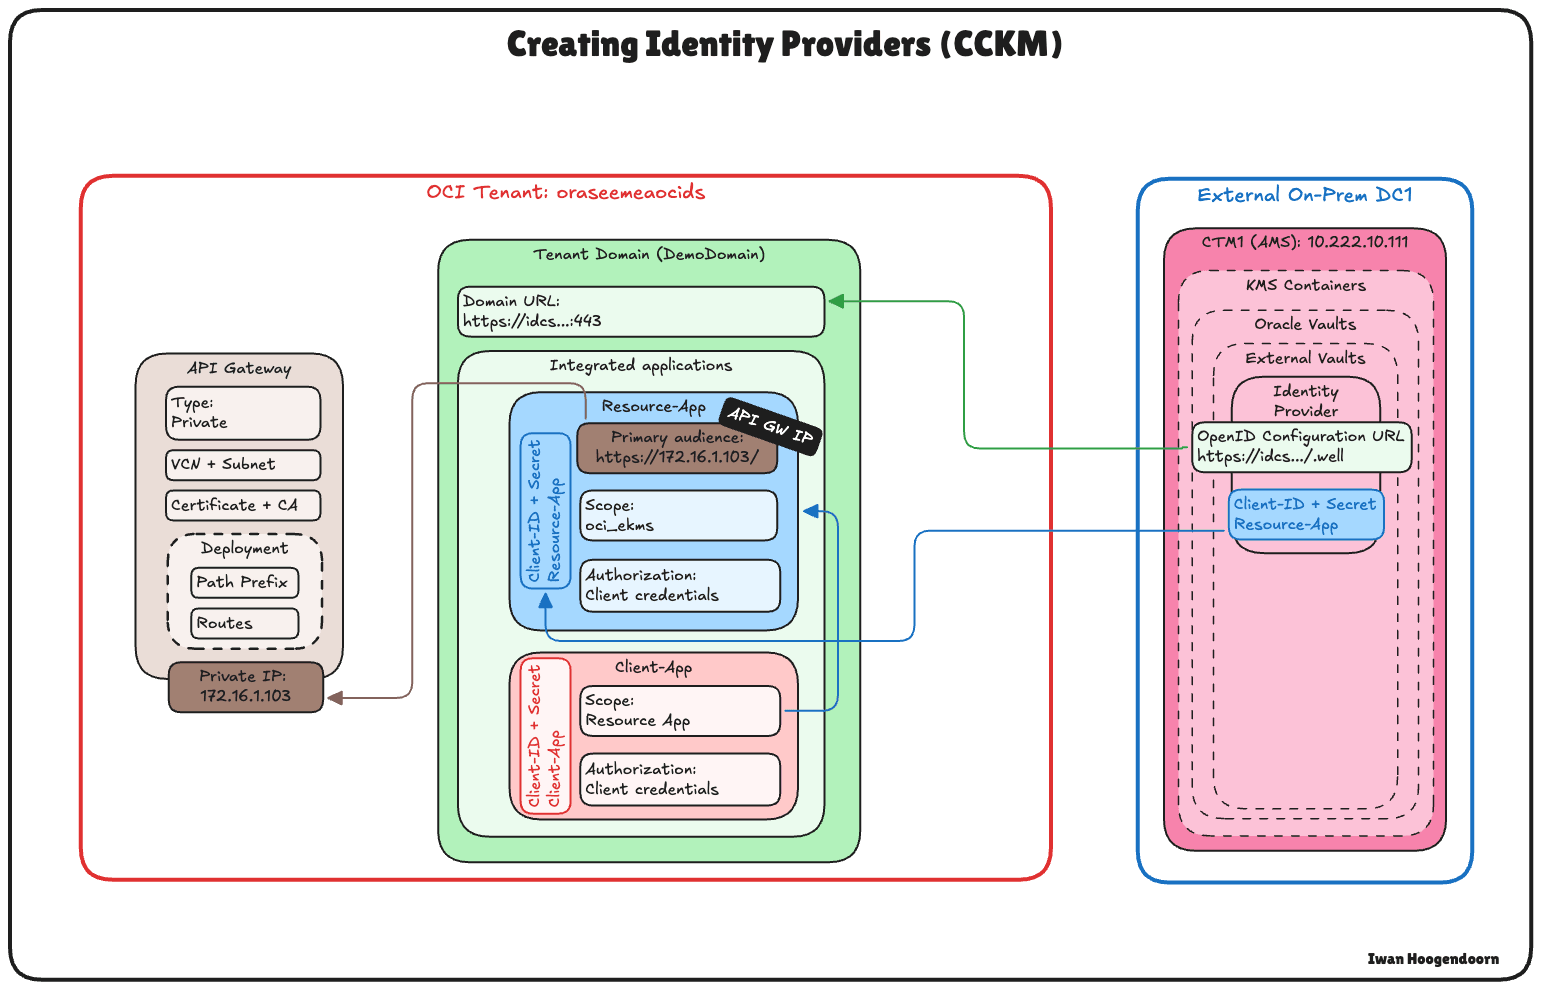
In this task, you will configure the Identity Provider in the Thales CipherTrust Manager. This setup allows Thales CipherTrust Manager to authenticate with OCI using the OAuth 2.0 credentials created in Task 3.
The following image illustrates the components and configuration setup in this task.
-
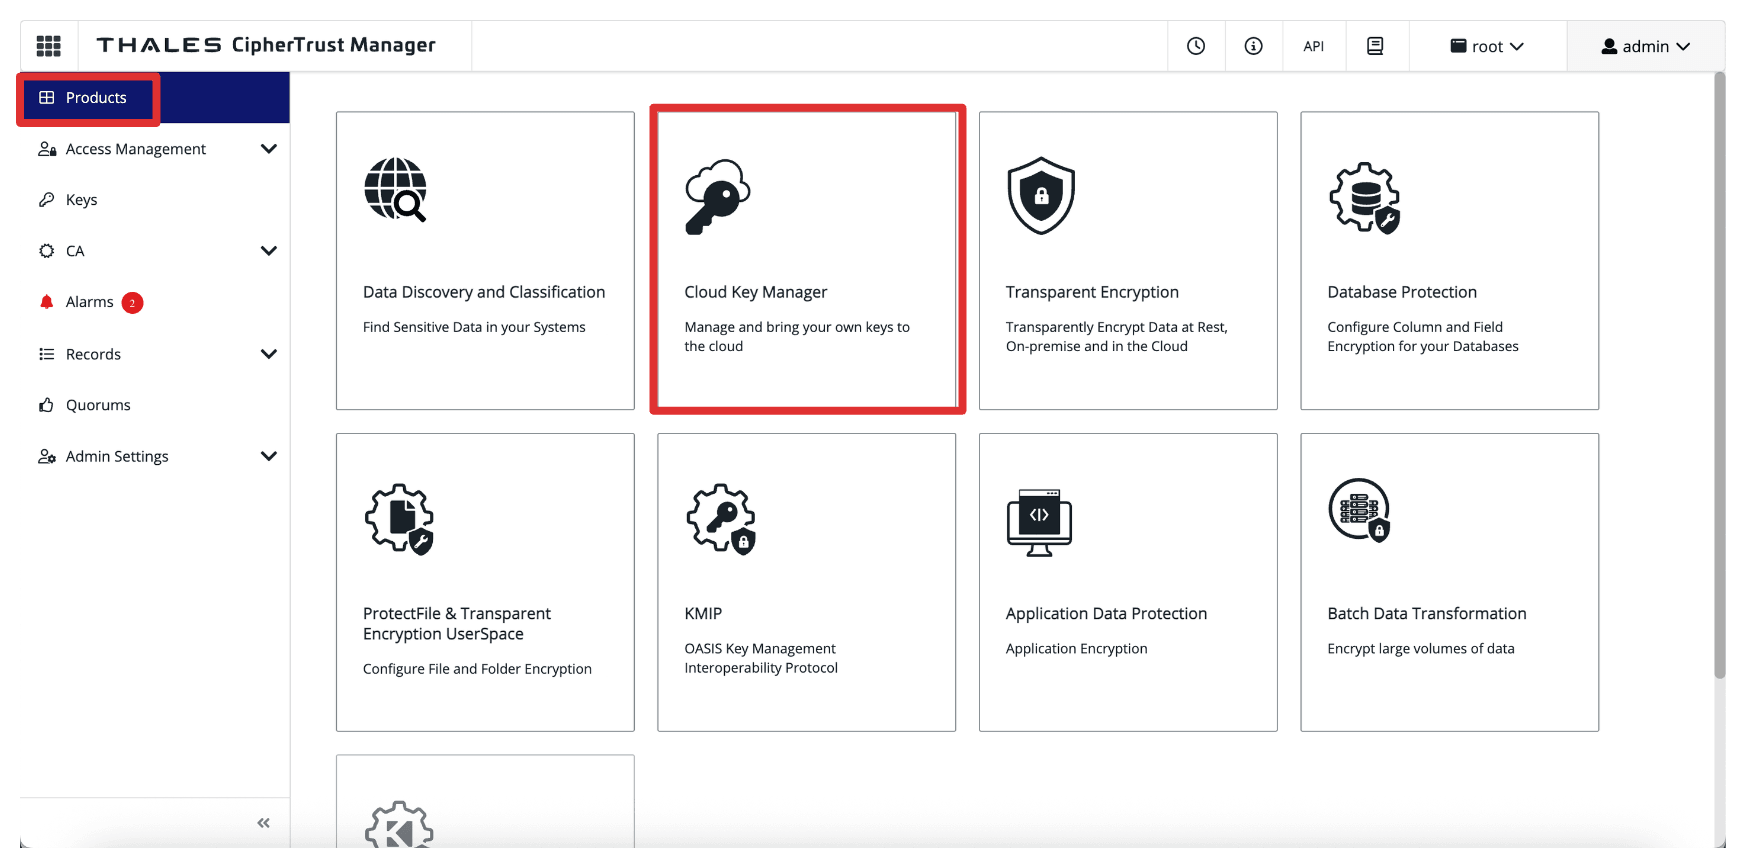
In Thales CipherTrust Manager, go to the CTM1 in AMS and click Products and Cloud Key Manager.
-
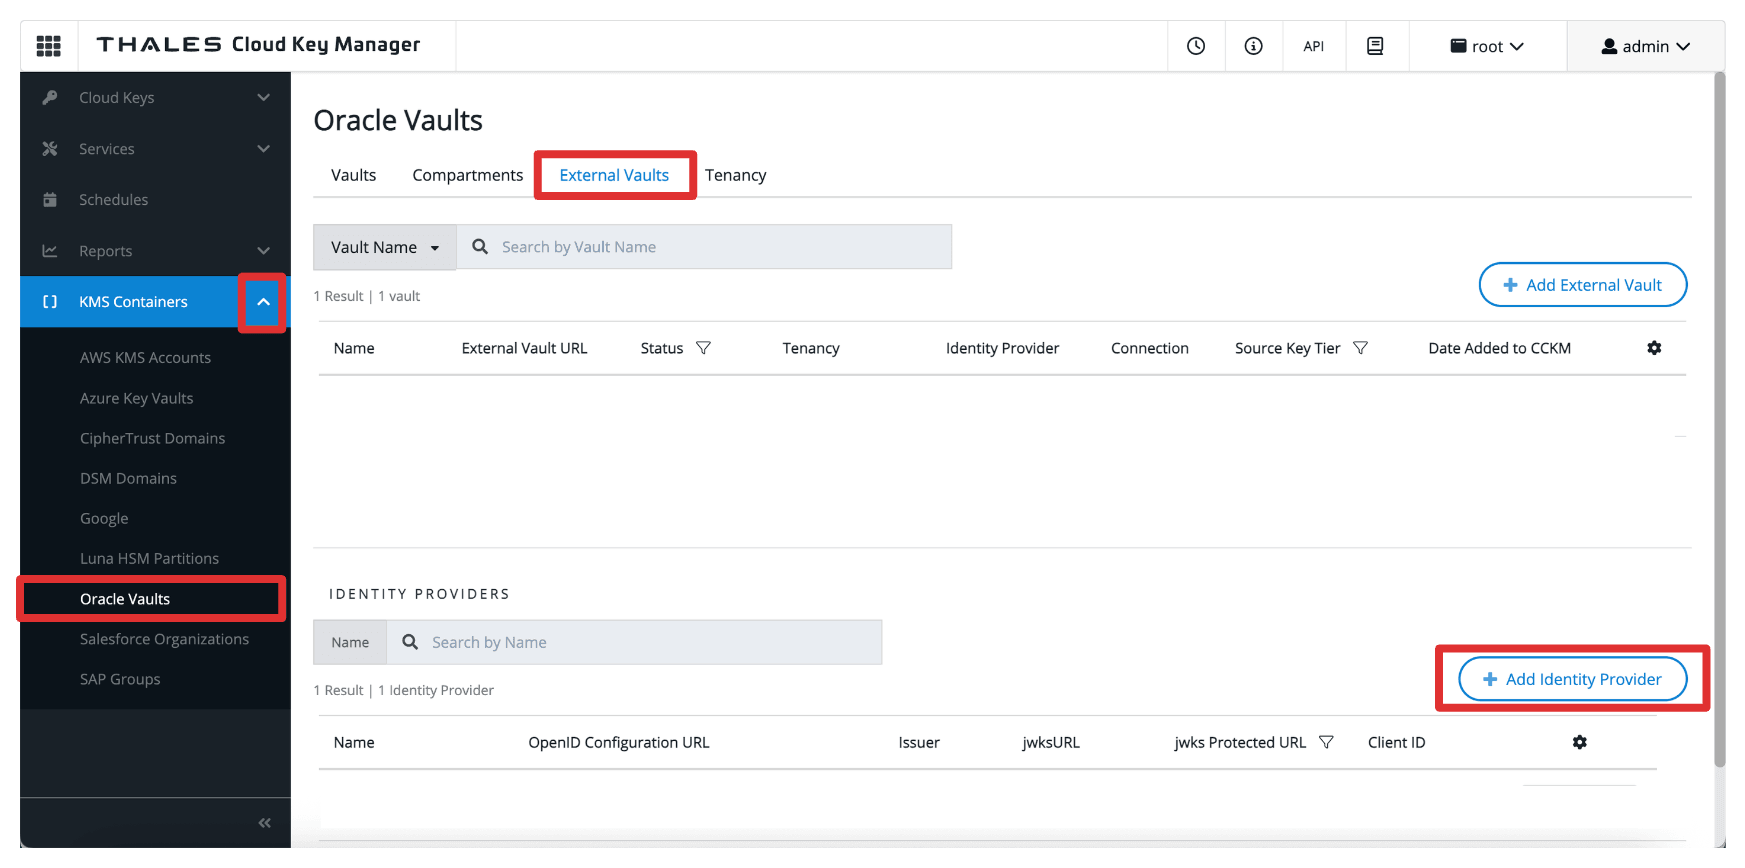
Click KMS Containers, Oracle Vaults, select External Vaults and click Add Identity Provider.
-
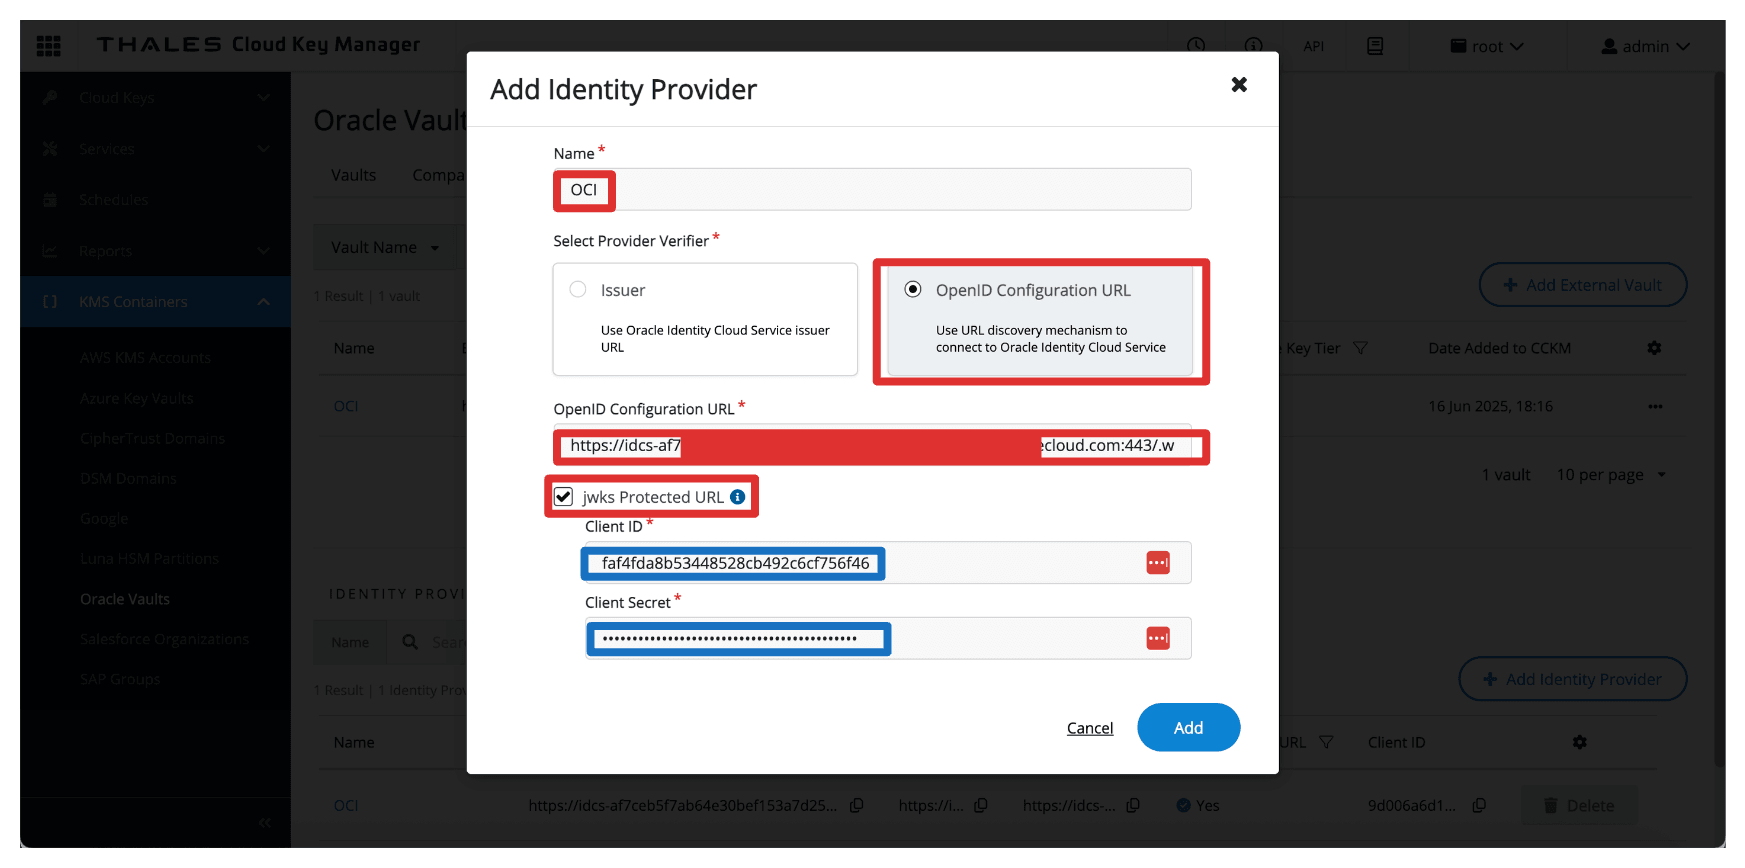
In Add Identity Provider, enter the following information and click Add.
- Enter Name (
OCI). - Select OpenID Configuration URL as the Provider Verifier.
- Enter OpenID Configuration URL, the domain URL copied in Task 3.
- Add the following suffix to the URL:
.well-known/openid-configuration. So the full OpenID Configuration URL will be:https://idcs-<xxx>.identity.oraclecloud.com:443/.well-known/openid-configuration.
- Add the following suffix to the URL:
- Select jwks Protected URL.
- Enter Client ID and Client Secret of the
Resource_Appintegrated application.
- Enter Name (
-
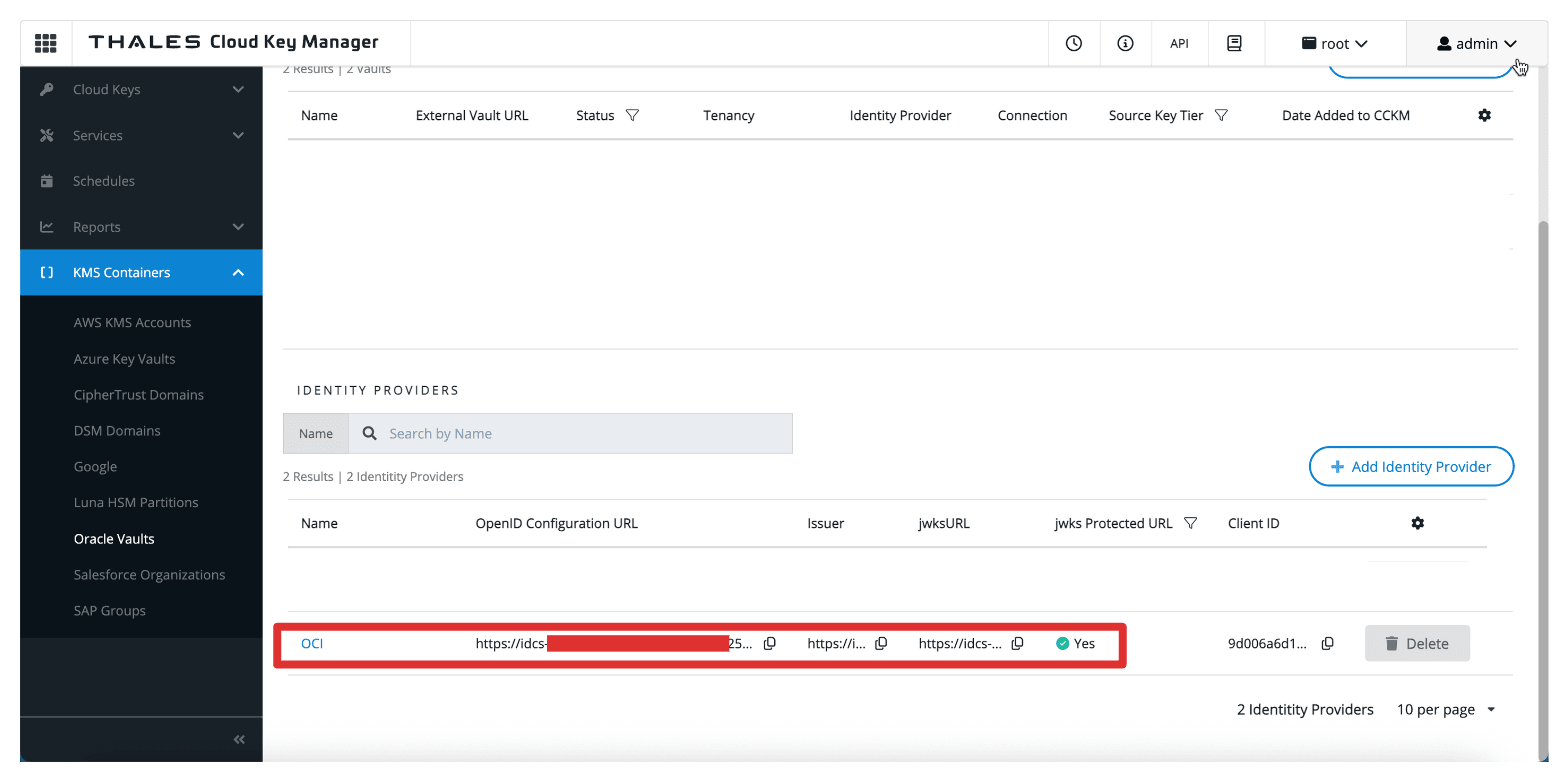
Note that the Identity Provider is created.
Task 11: Add OCI Tenancies in Thales CipherTrust Manager
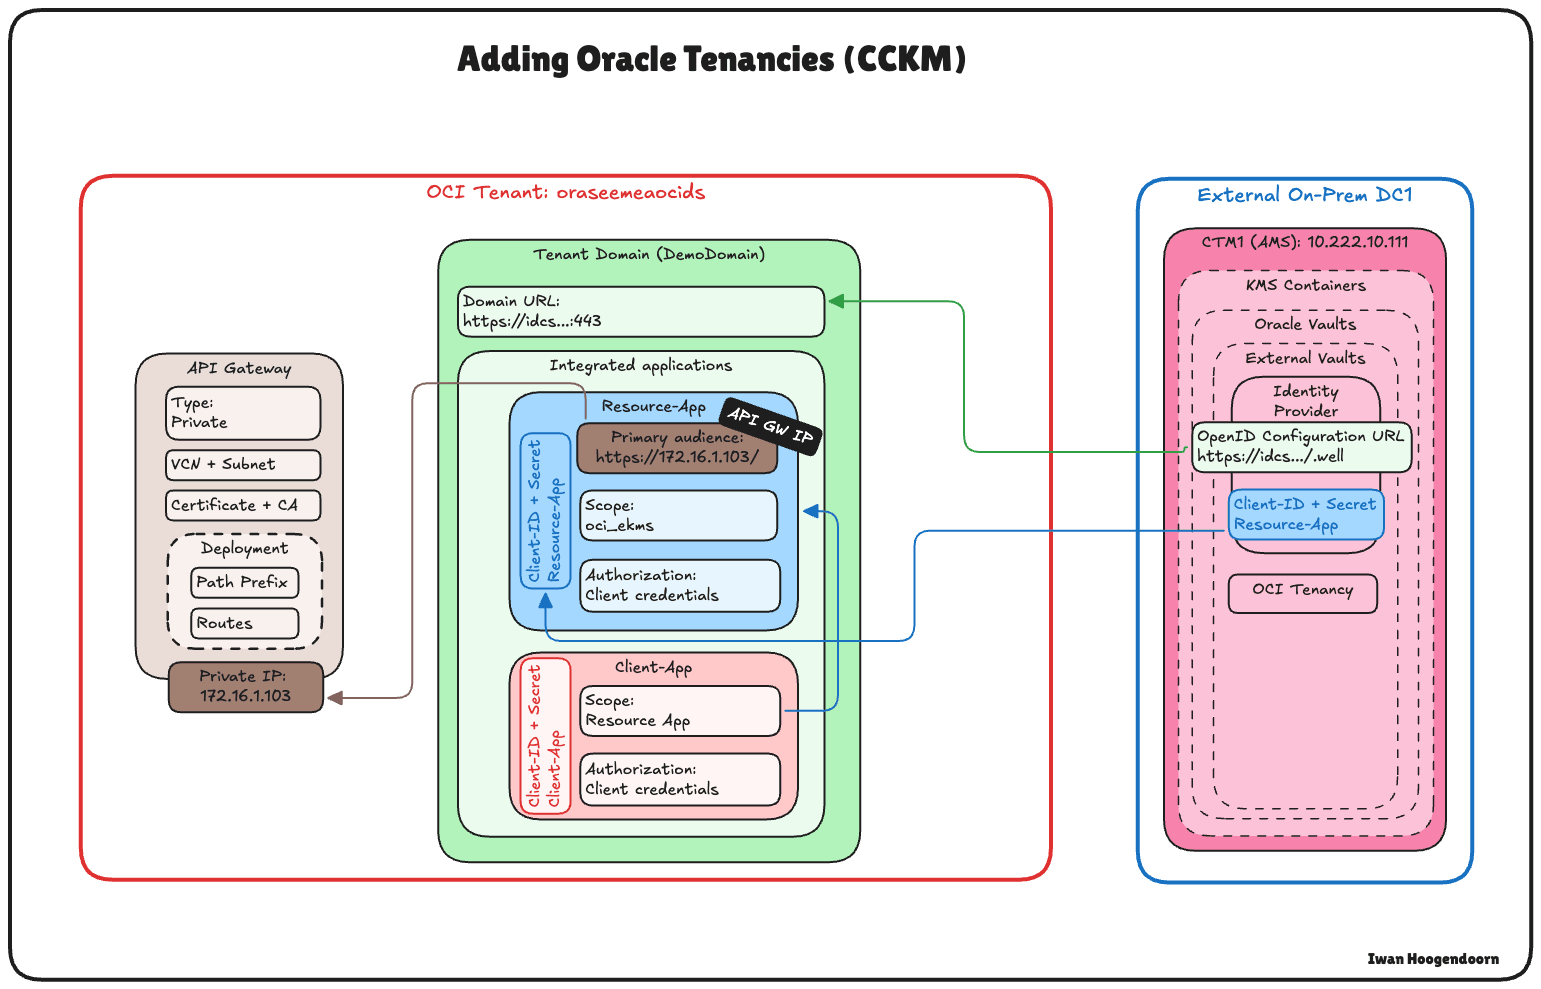
After configuring the identity provider in Thales CipherTrust Manager, the next task is registering your OCI tenancy. This allows Thales CipherTrust Manager to manage external vaults and keys on behalf of your OCI environment using the previously configured OAuth credentials.
The following image illustrates the components and configuration setup in this task.
-
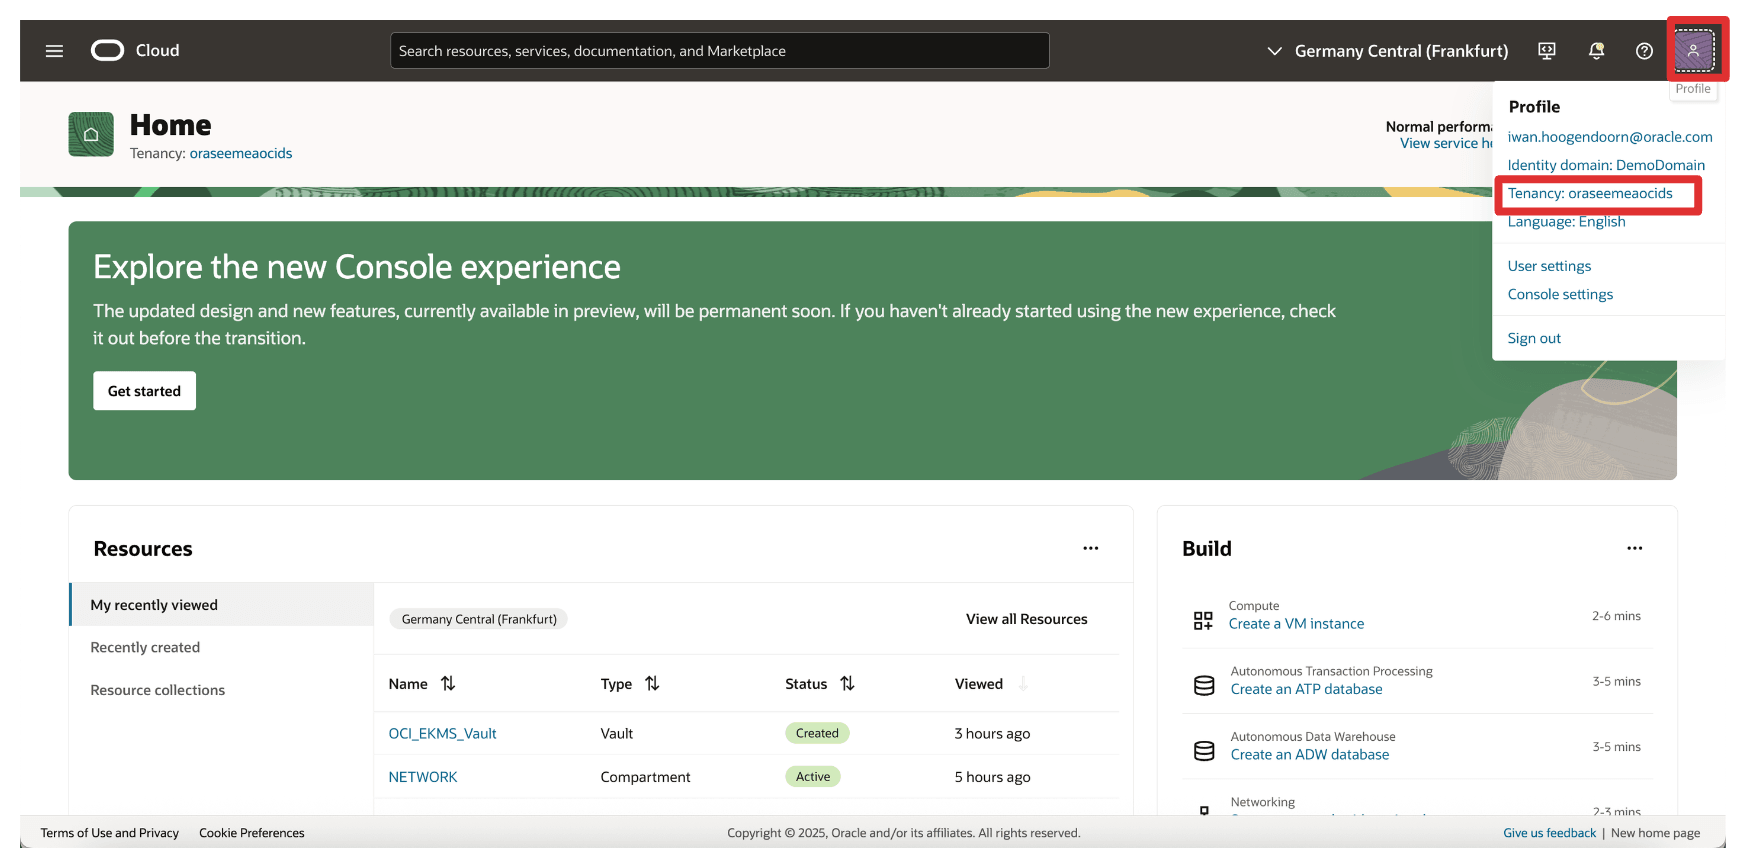
First, we must get the tenant’s name and OCID from OCI. Click your profile in the upper-right corner and click Tenancy.
-
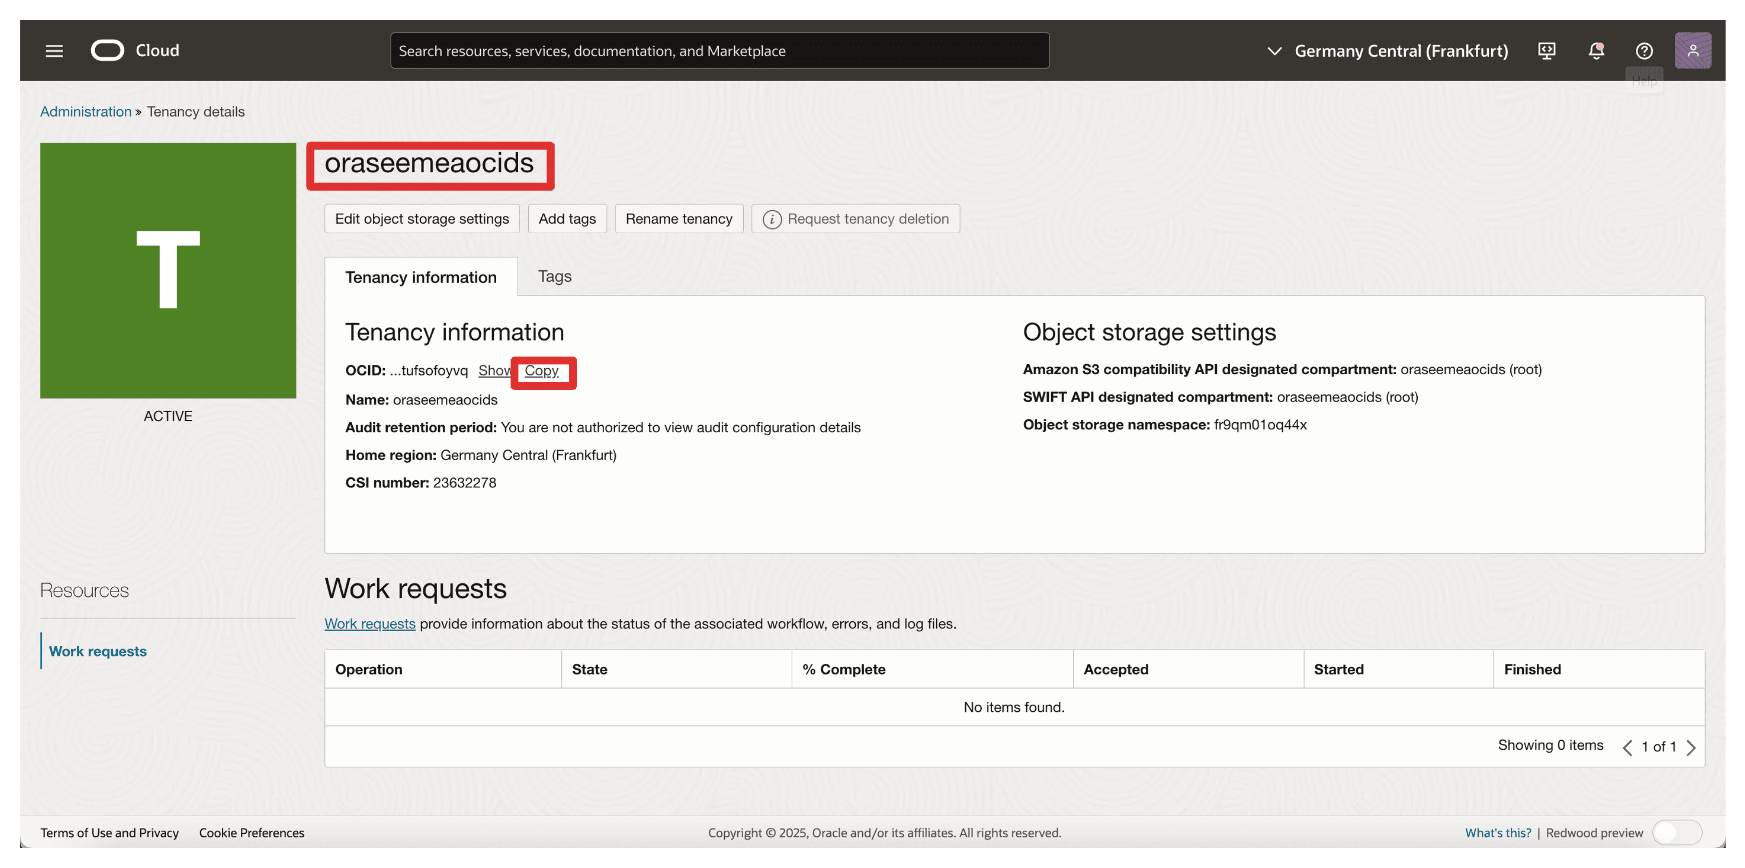
Copy the tenant’s name and the tenant’s OCID and store both on a notepad.
-
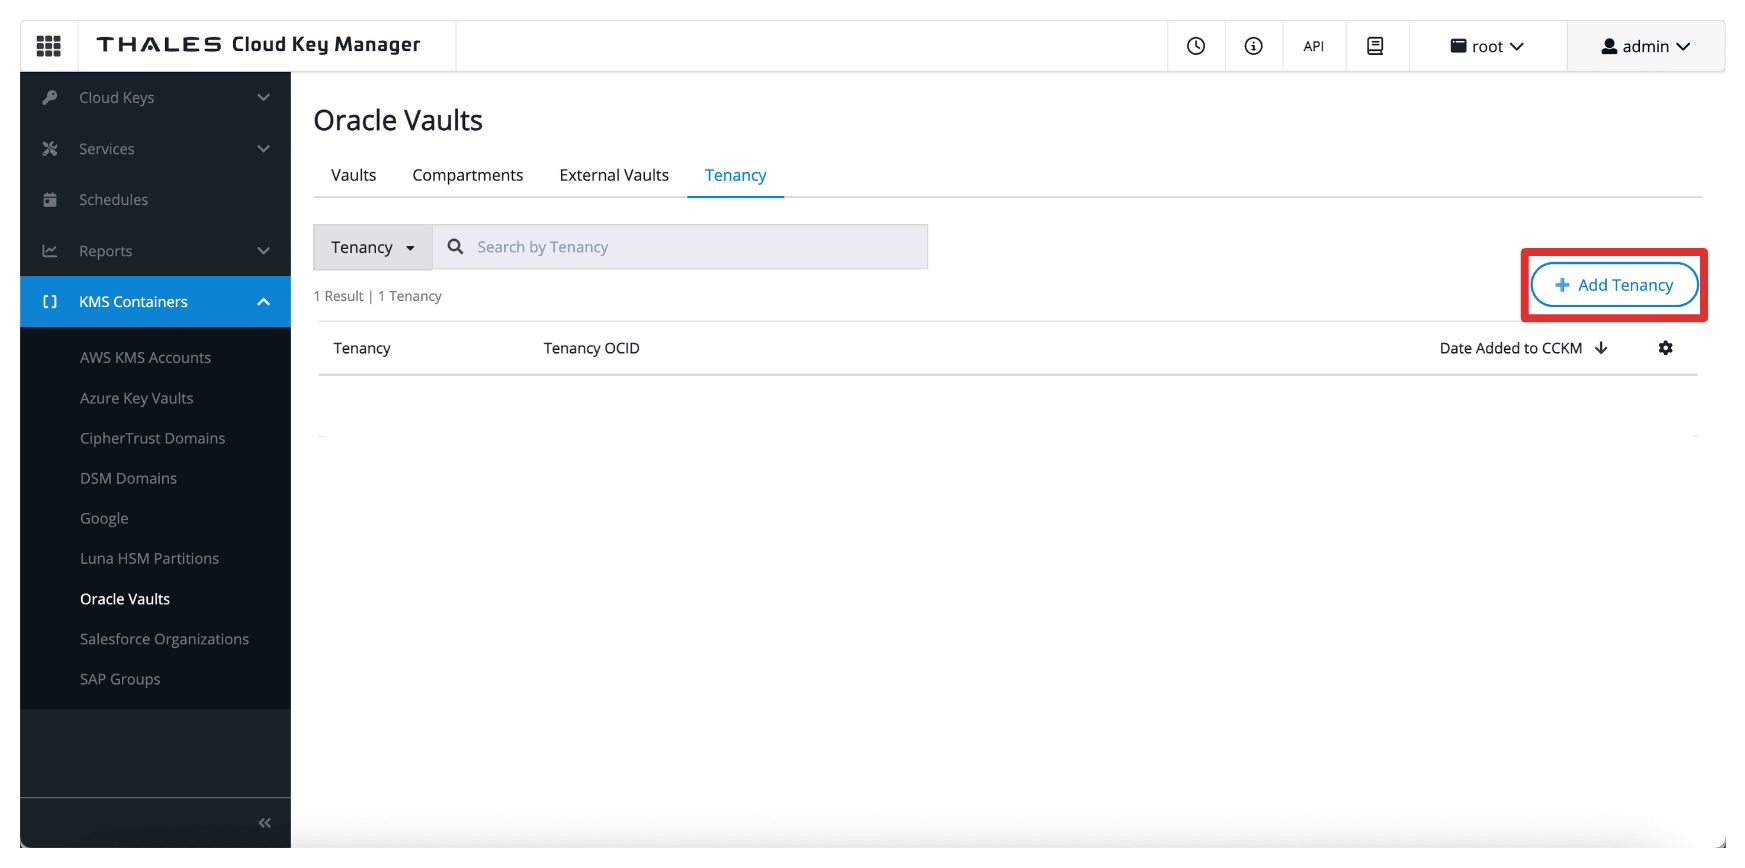
Go to the Thales Cloud Key Manager Console.
- Click KMS Containers.
- Click Oracle Vaults.
- Click Tenancy.
- Click Add Tenancy.
-
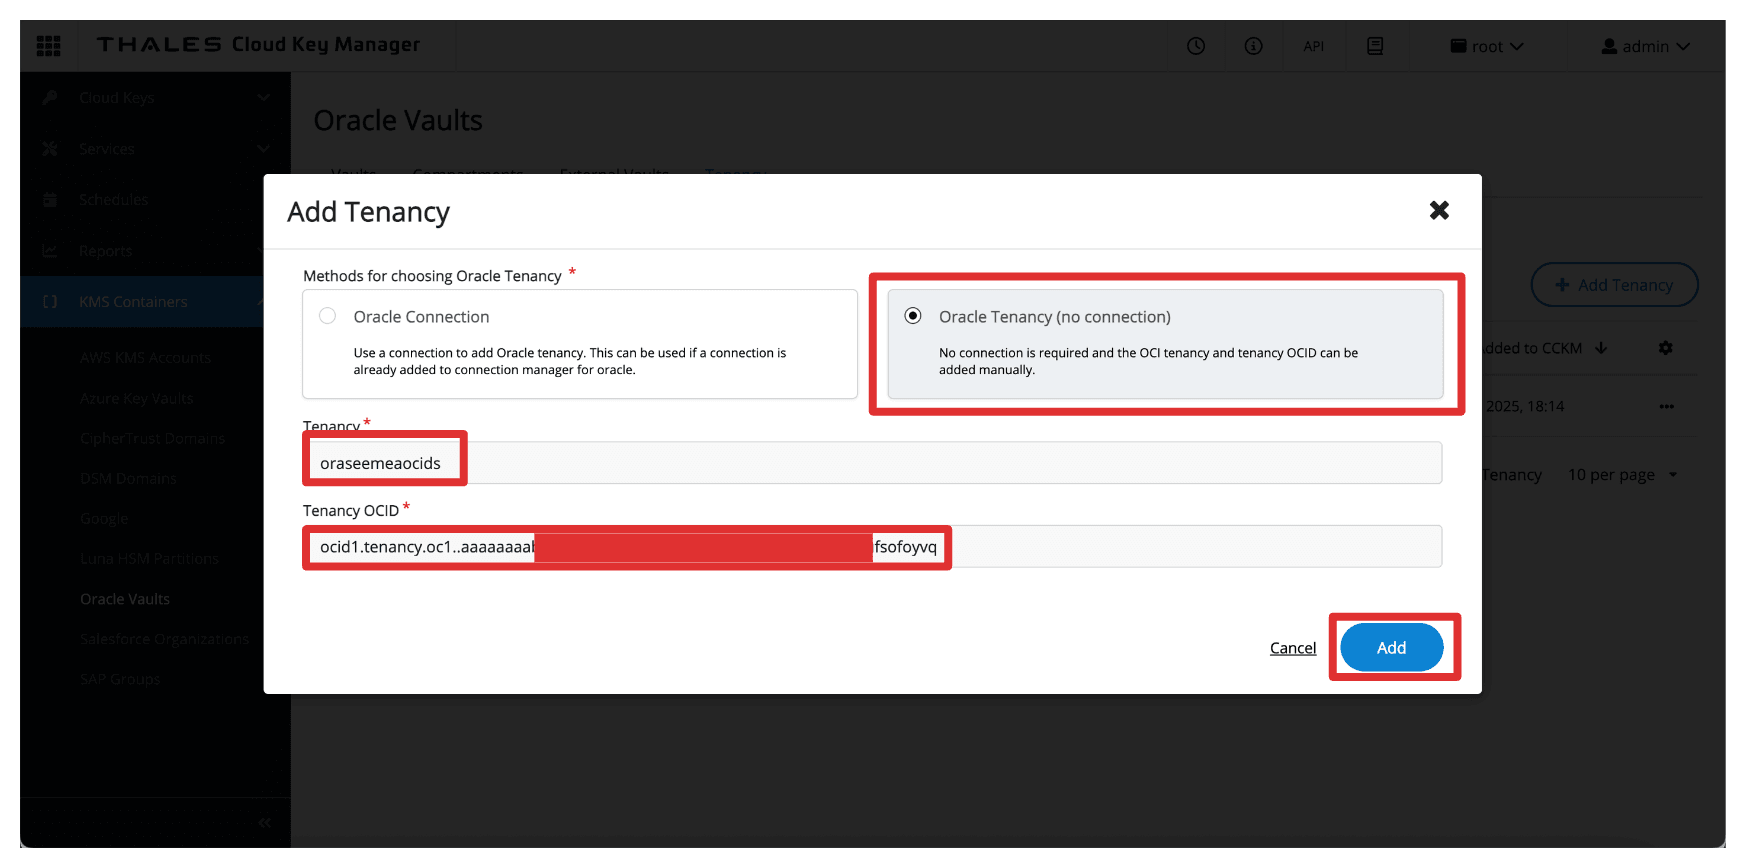
In Add tenancy, enter the following information.
- Select Oracle Tenancy (no connection) as the method.
- Enter the Name of the tenancy collected from OCI.
- Enter the Tenancy OCID collected from OCI.
- Click Add.
-
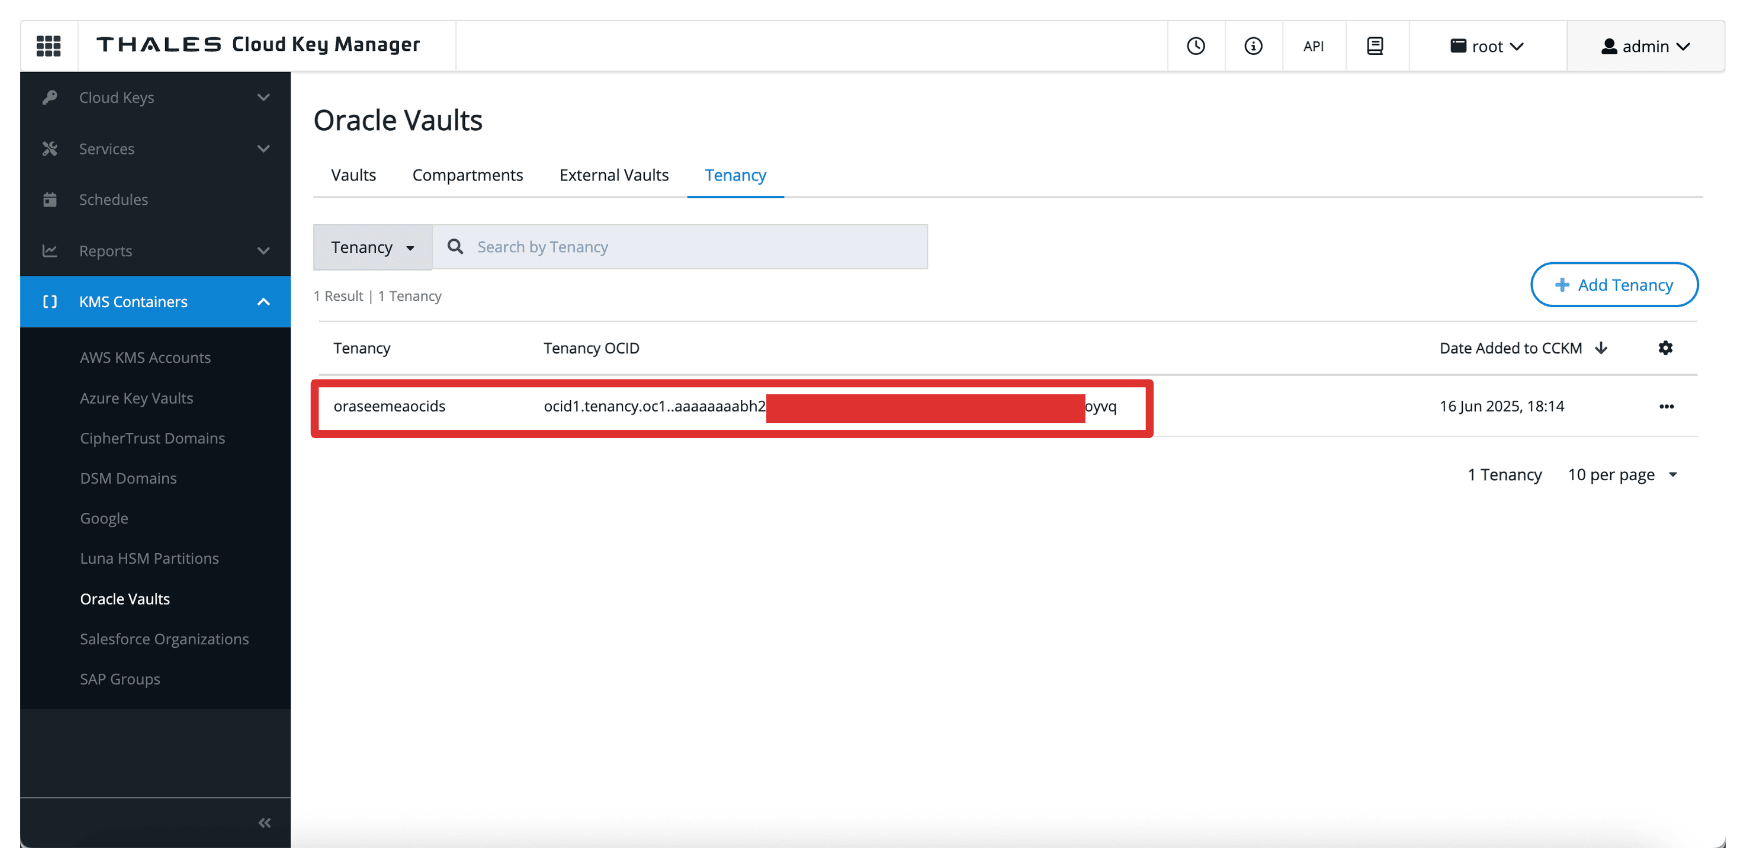
Note that the OCI tenant is added to the Thales CipherTrust Manager.
Task 12: Create a Private Endpoint for the External Key Manager Service in OCI
To securely connect OCI to the Thales CipherTrust Manager without exposing traffic to the public internet, you must create a Private Endpoint for the OCI External Key Management Service.
This ensures all communication between OCI and Thales CipherTrust Manager happens over a private, controlled network path.
Make sure the following prerequisites are met:
- The Thales CipherTrust Manager must be reachable from OCI through your private network setup. For example, through VPN.
- Ensure the subnet has routing and security rules allowing traffic to the Thales CipherTrust Manager instance.
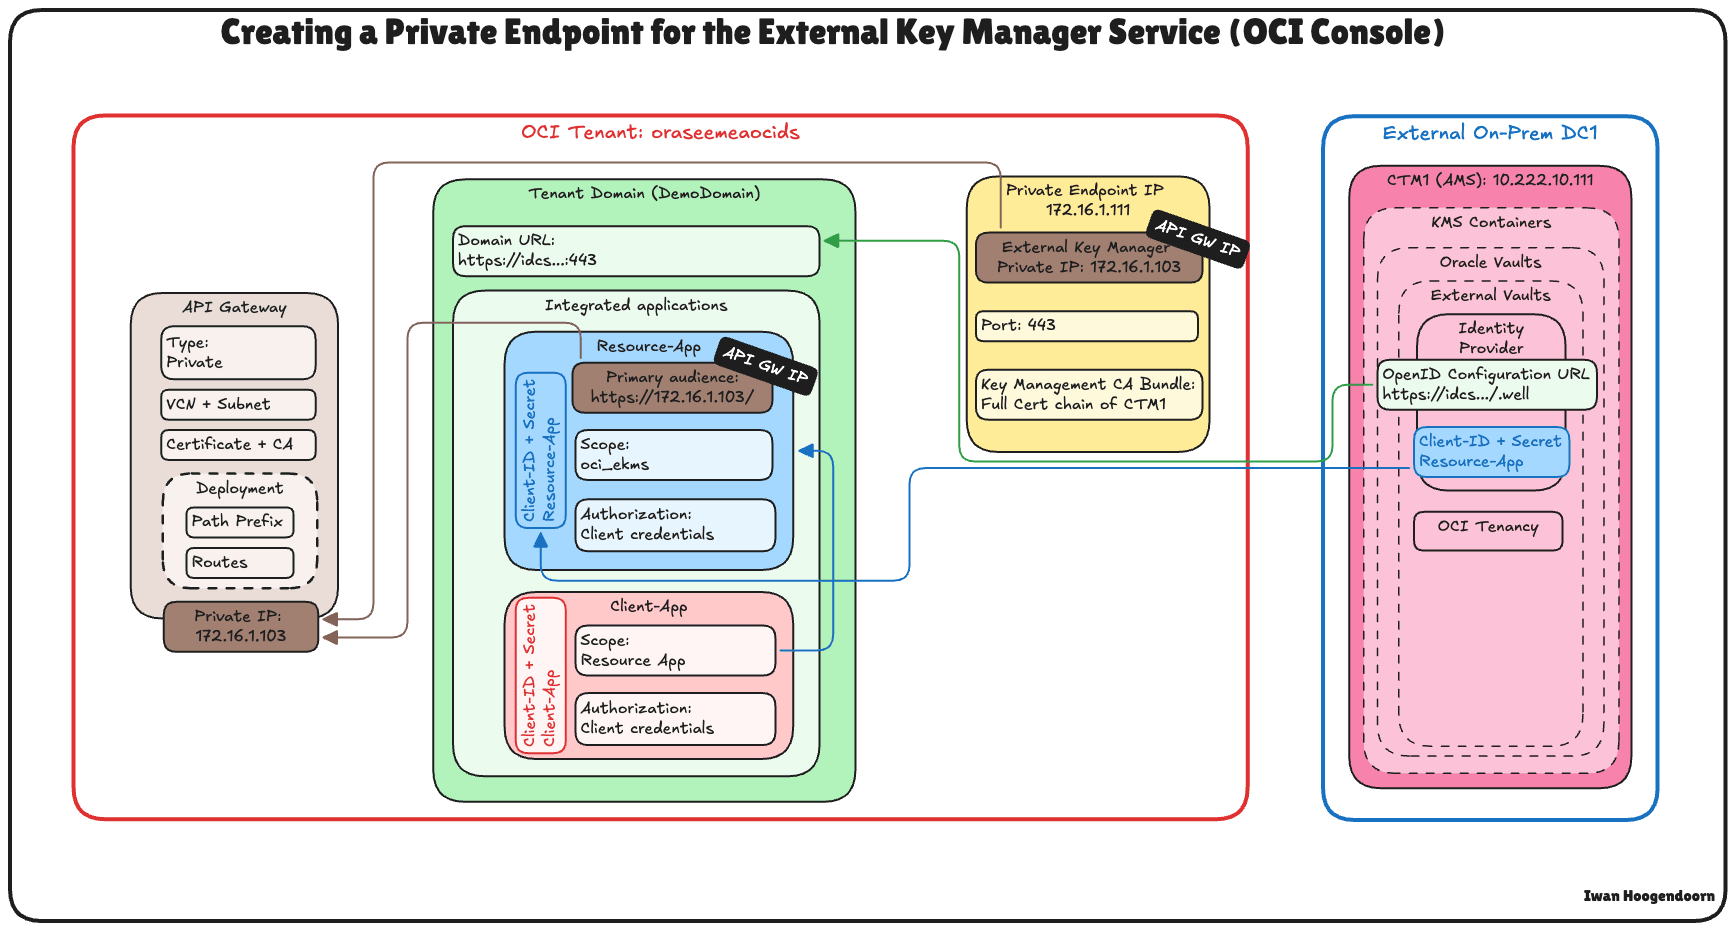
The following image illustrates the components and configuration setup in this task.
-
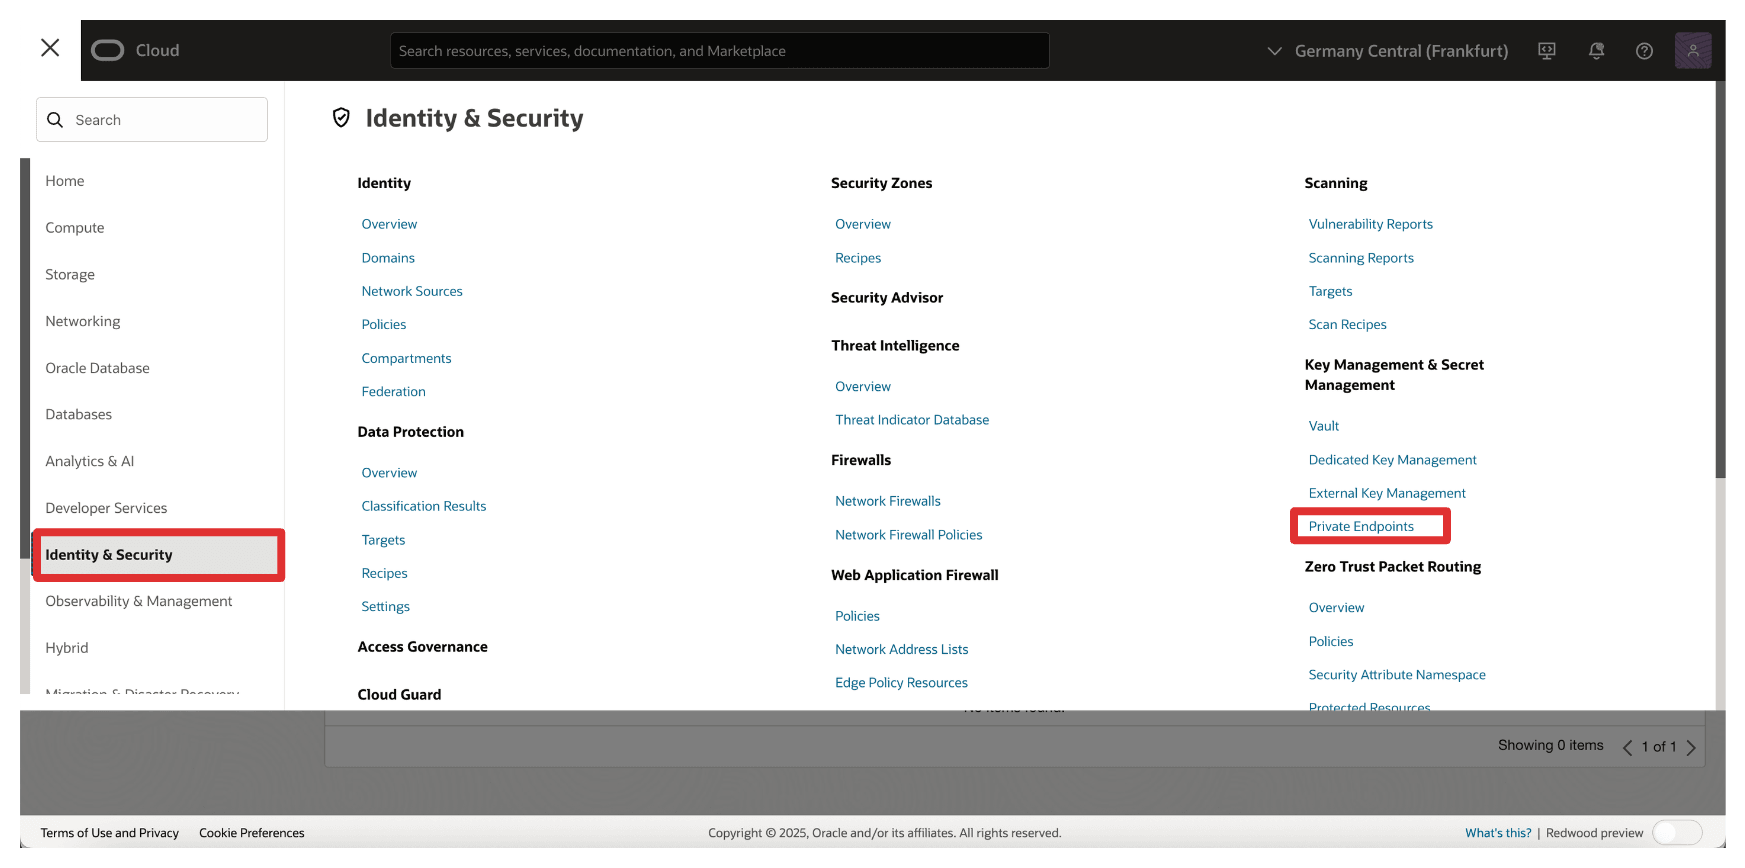
In the OCI Console, navigate to Identity & Security and click Private Endpoints.
-
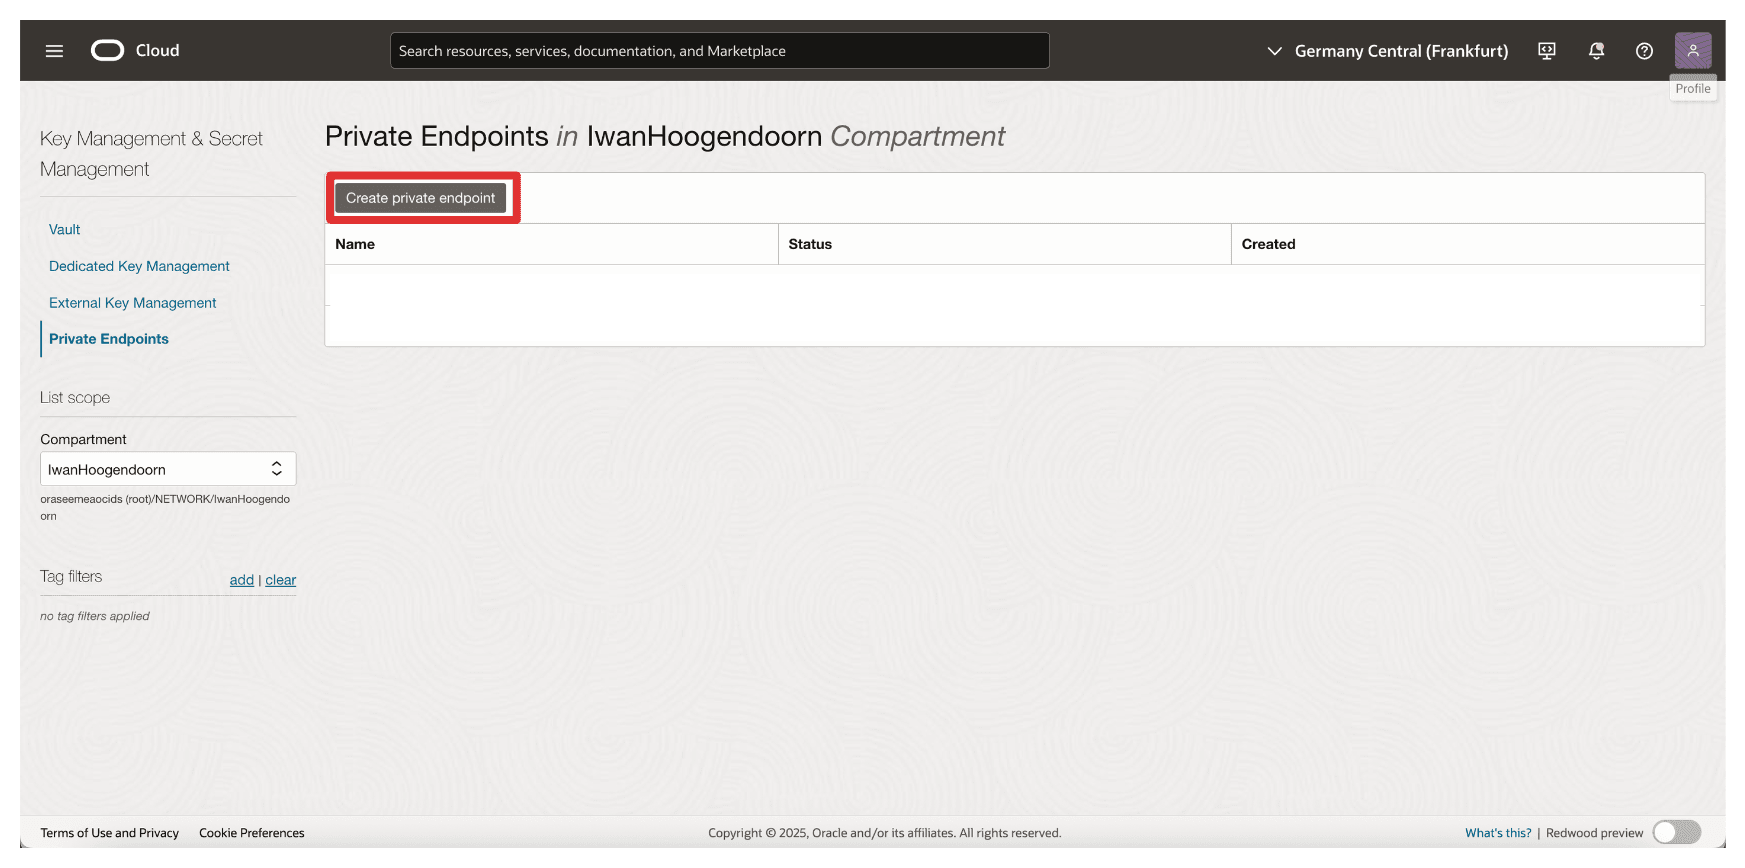
Go to Private Endpoints and click Create Private Endpoint.
-
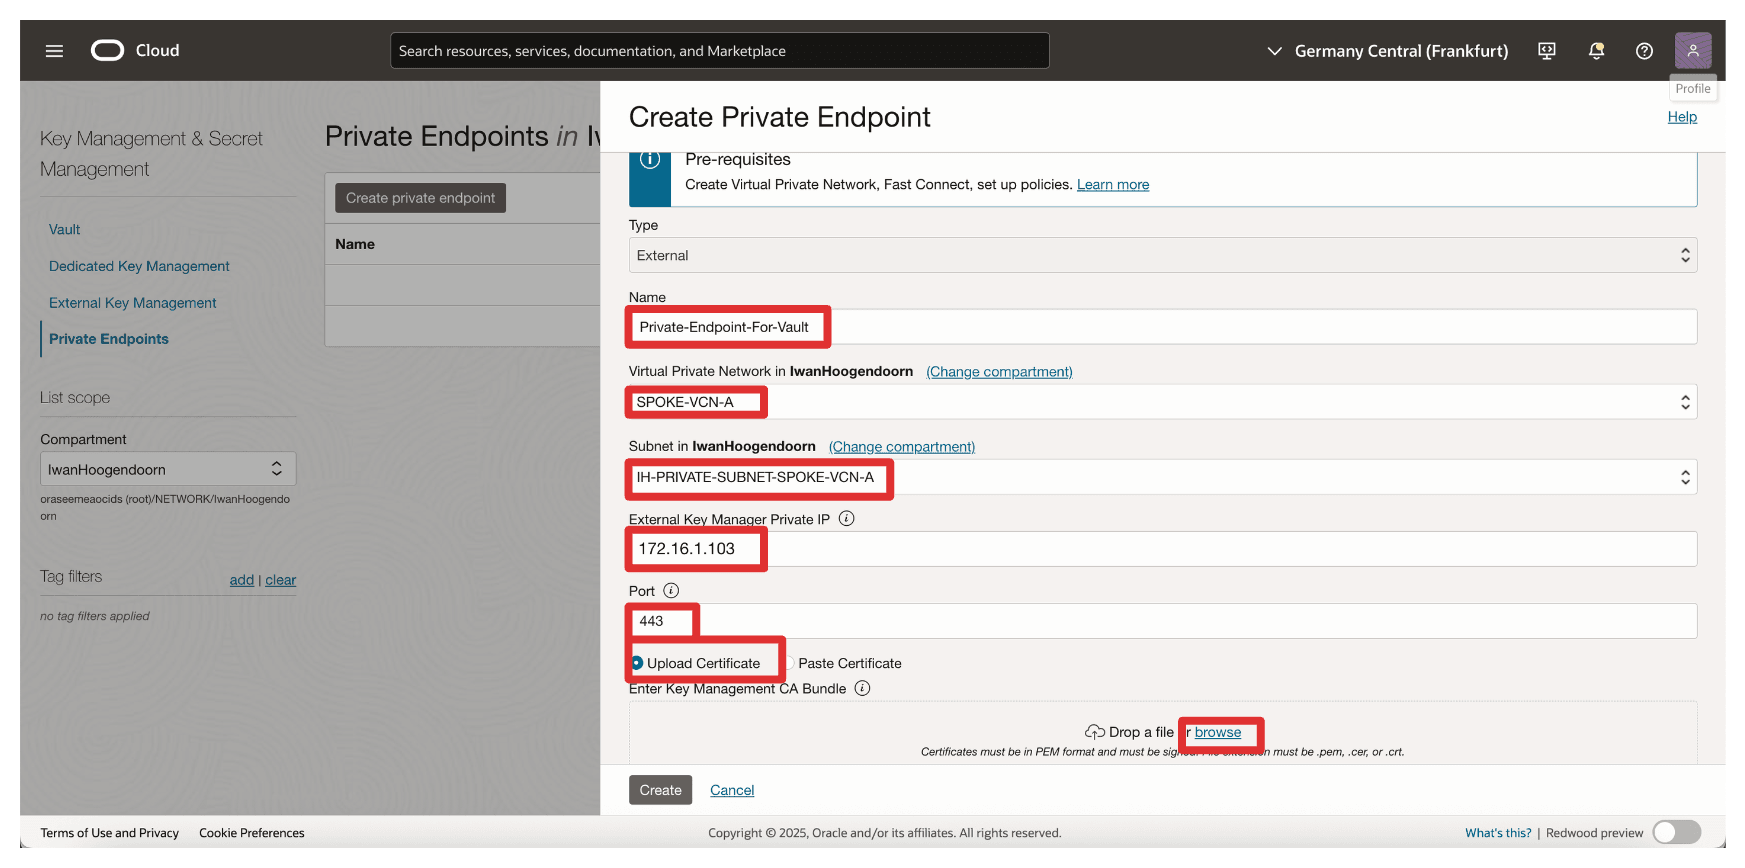
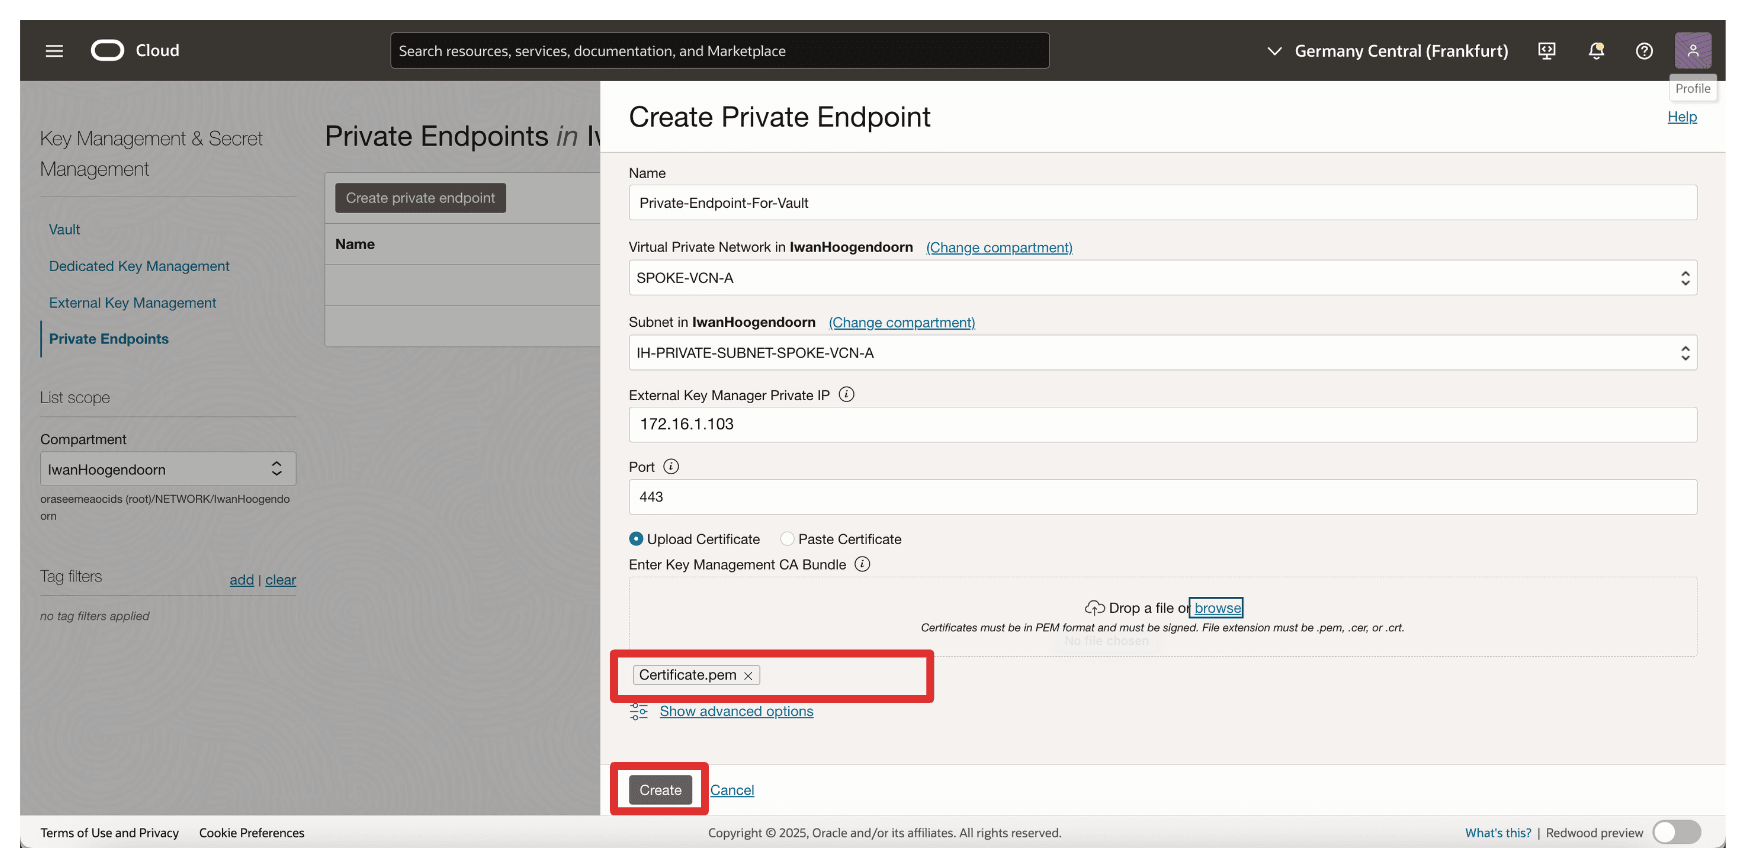
In Create Private Endpoint, enter the following information.
- Enter private endpoint Name (
Private-Endpoint-For-Vault). - Select a VCN and Subnet where this private endpoint needs to be in.
- Enter Private IP address of the External Key Manager as
172.16.1.103The IP address of the API Gateway. - Enter Port as
443. - Upload the External Key Management CA bundle and click Browse.
- Enter private endpoint Name (
-
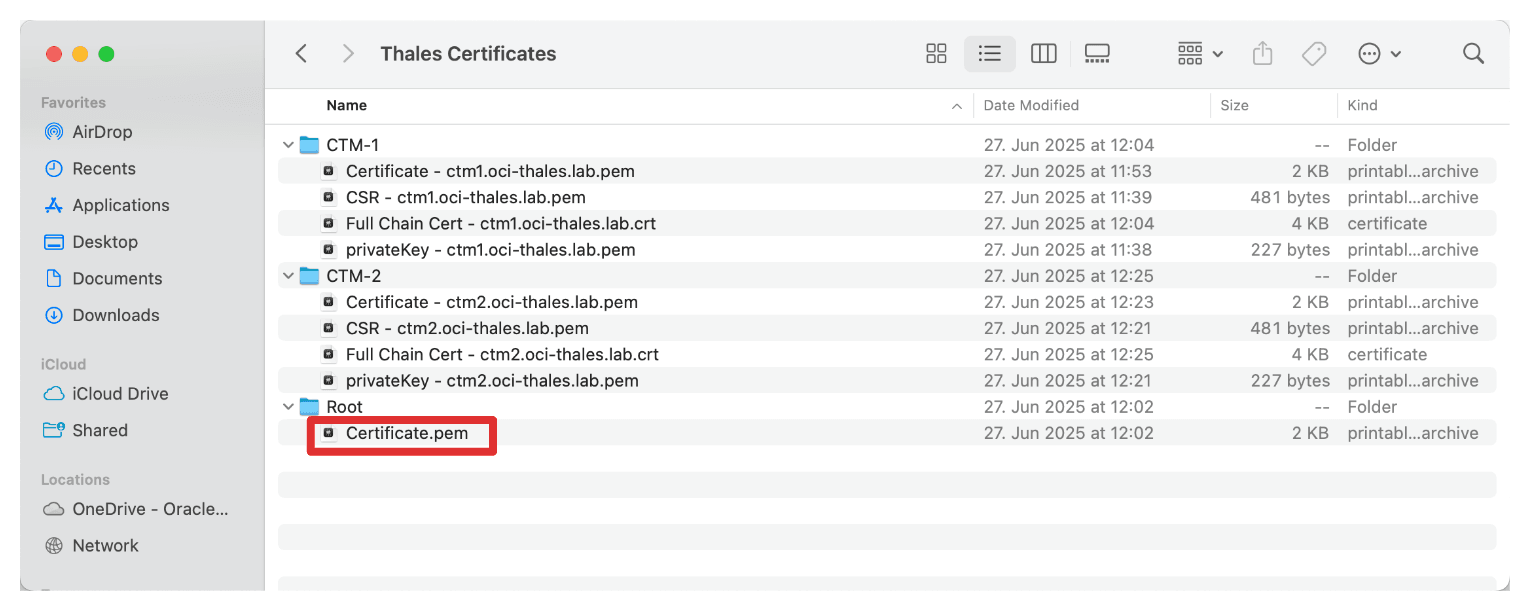
We have selected the full chain certificate that was created in this tutorial: Set Up Two Thales CipherTrust Cloud Key Manager Appliances in OCI, Create a Cluster between them, and Configure One as a Certificate Authority, but you can also only select the CA root certificate. Click Open.
-
Make sure the certificate, the root CA, or the full chain certificates of the Thales CipherTrust Manager is selected. Click Create.
-
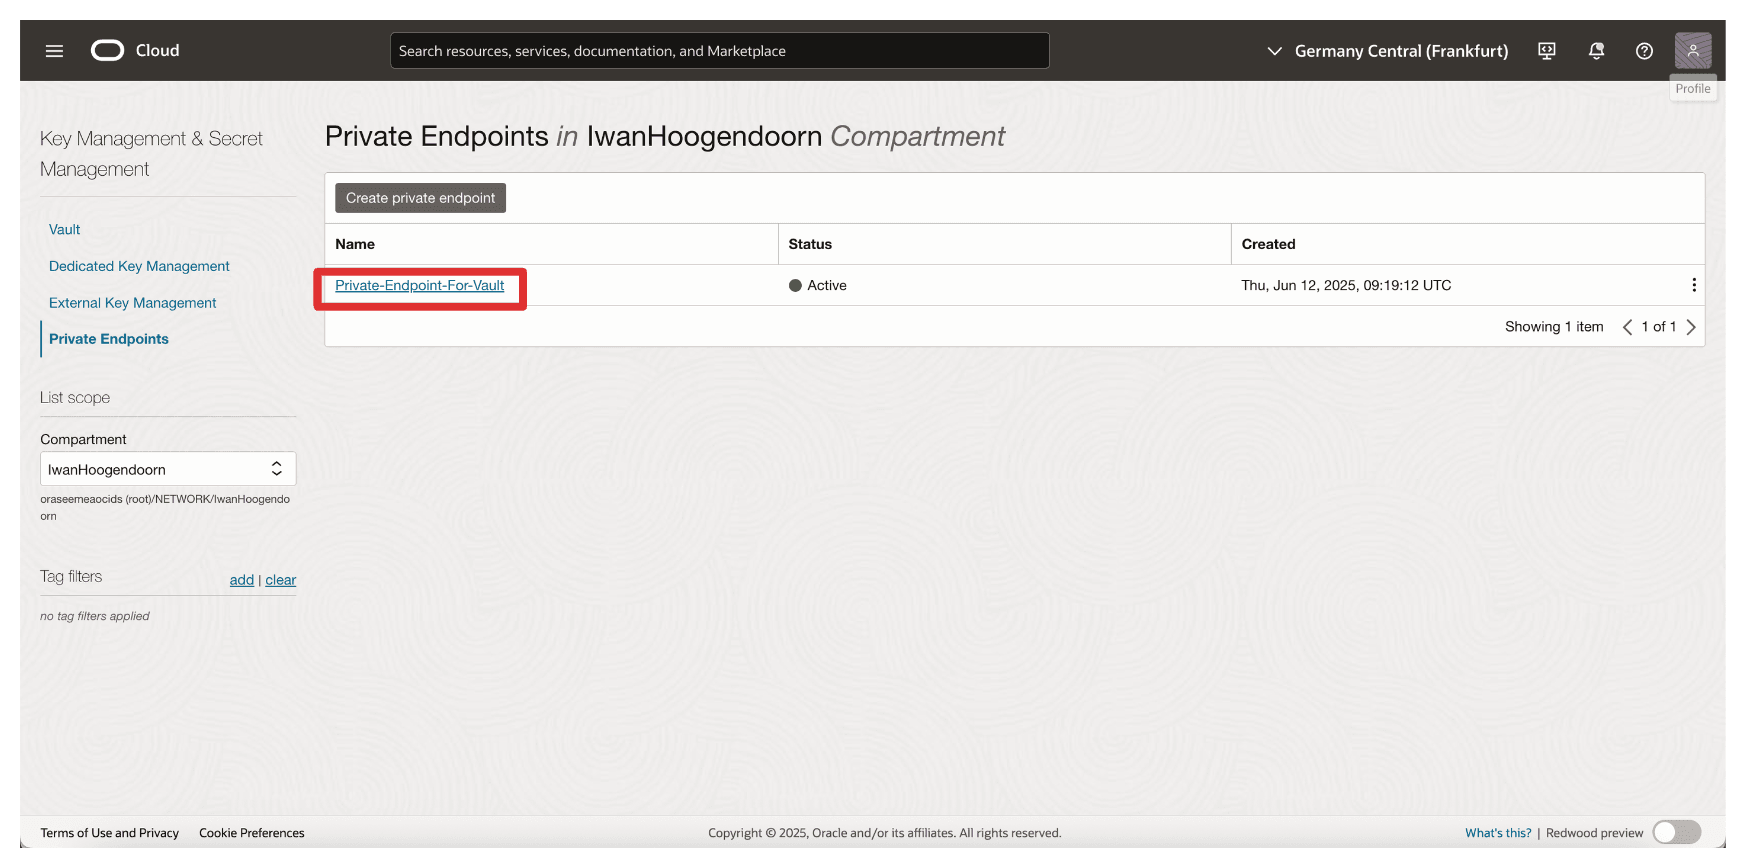
Note that the Private Endpoint is created. Now, click the private endpoint.
-
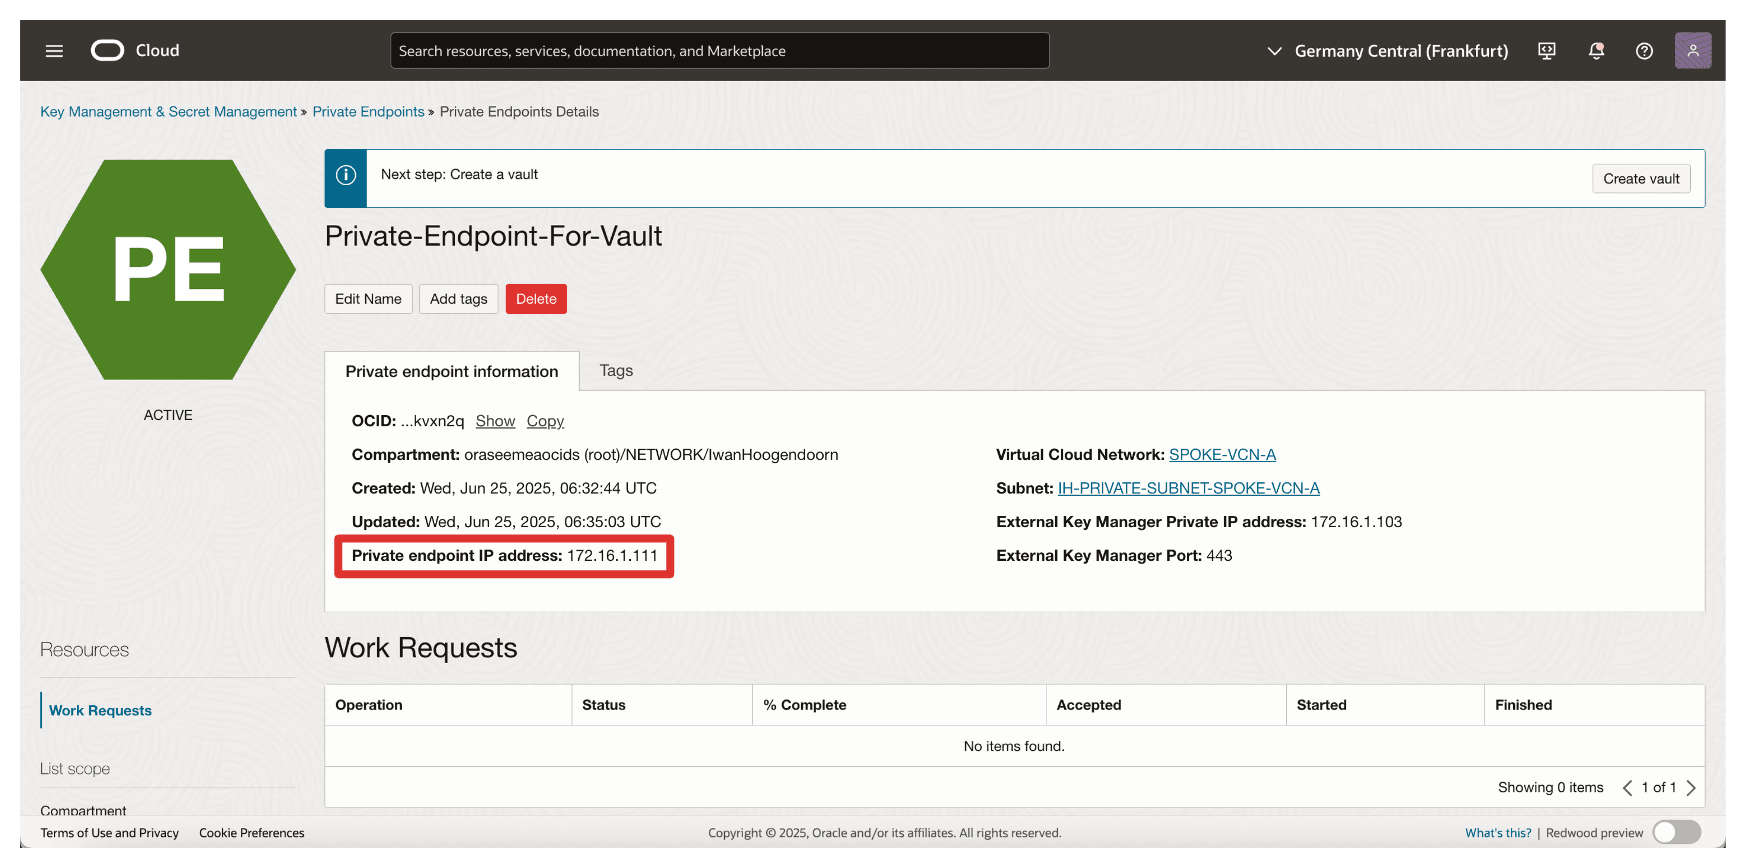
Note that the IP address of the private endpoint is configured.
Task 13: Add External Vaults in Thales CipherTrust Manager
With the OCI tenancy and private endpoint in place, the next task is to add an External Vault in Thales CipherTrust Manager. An external vault in Thales CipherTrust Manager is a logical container that maps to the external key management vault in OCI, enabling the Thales CipherTrust Manager to manage keys used for HYOK encryption.
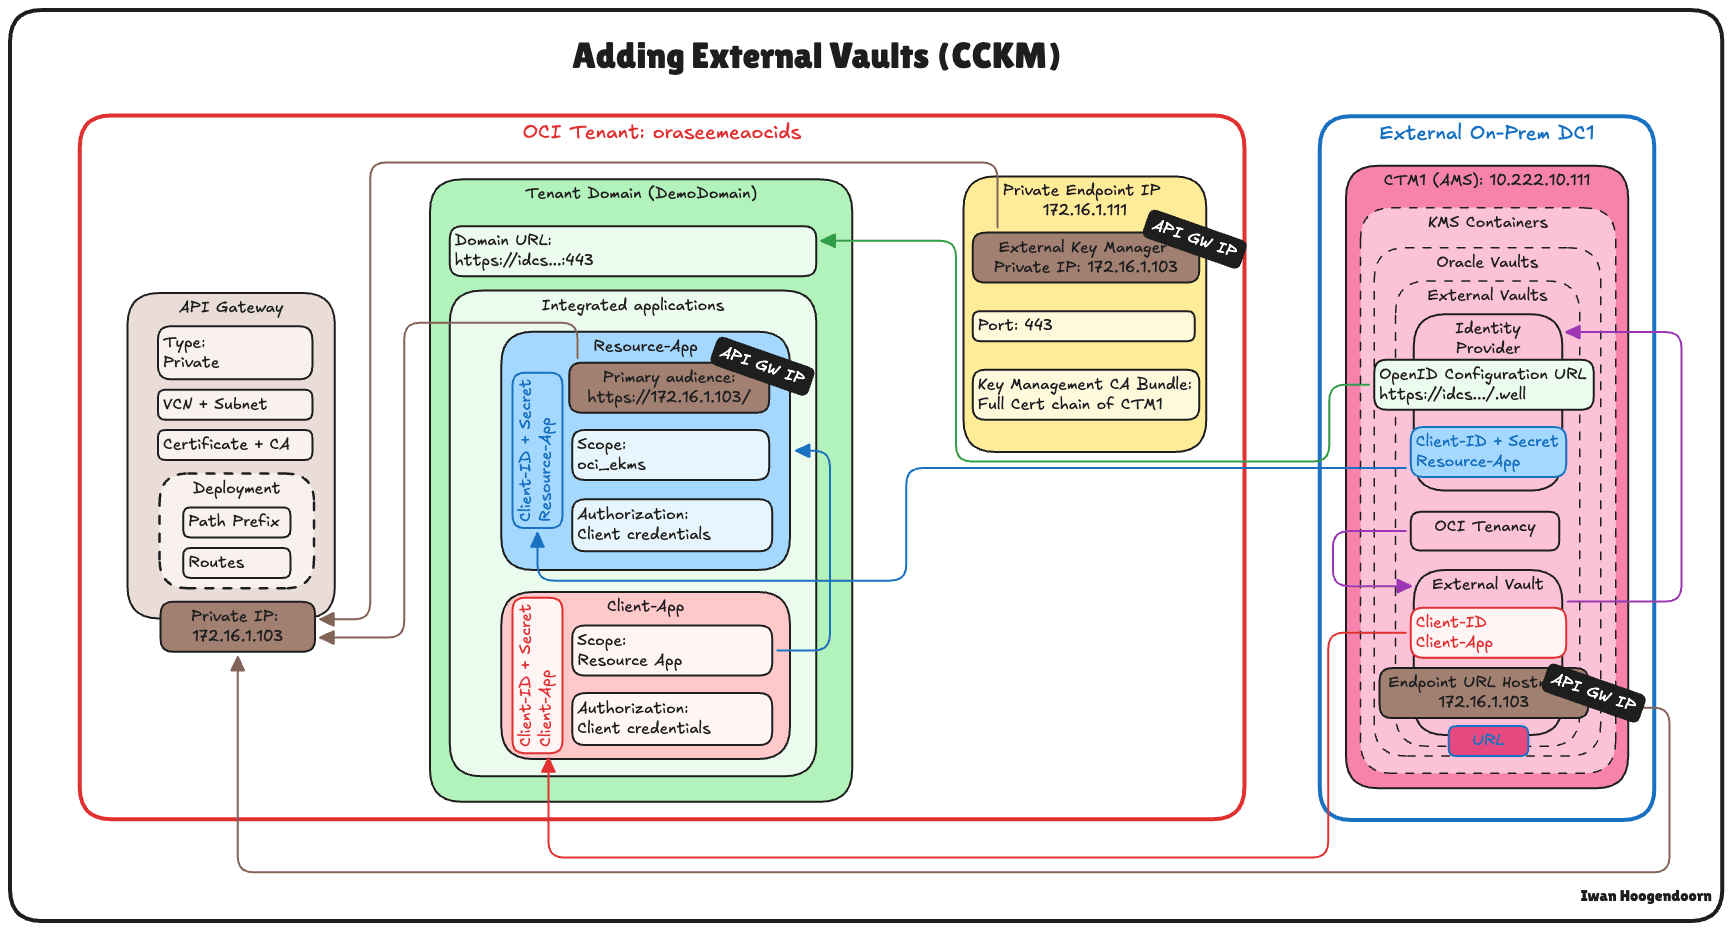
The following image illustrates the components and configuration setup in this task.
-
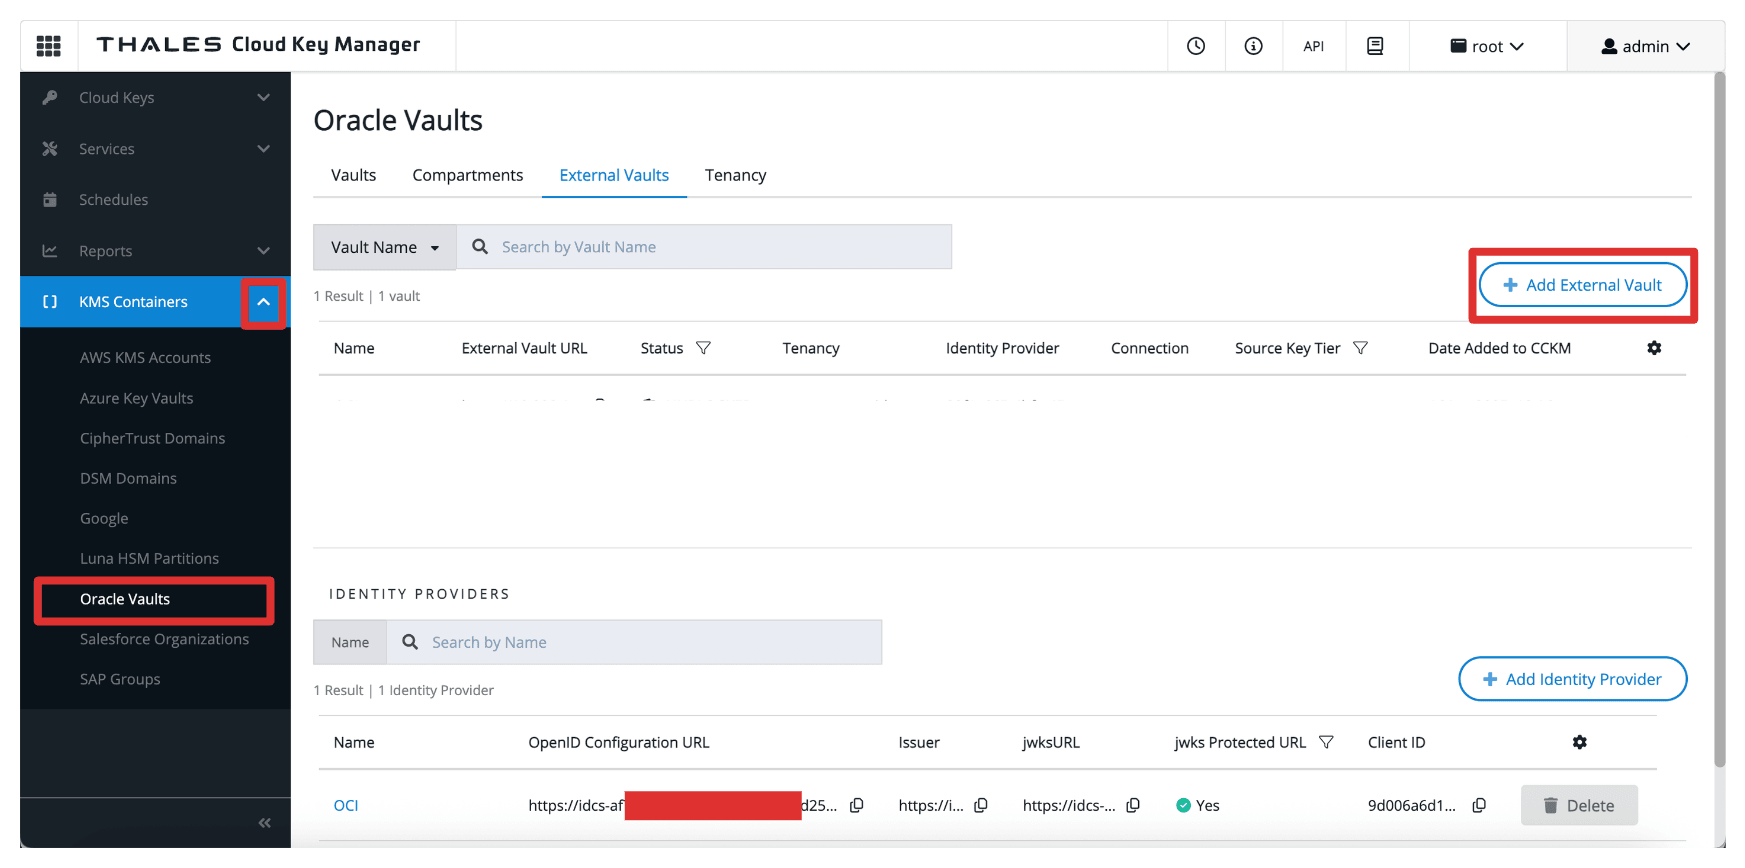
Go to the Thales Cloud key Manager Console.
- Click KMS Containers.
- Click Oracle Vaults.
- Select External Vaults.
- Click Add External Vault.
-
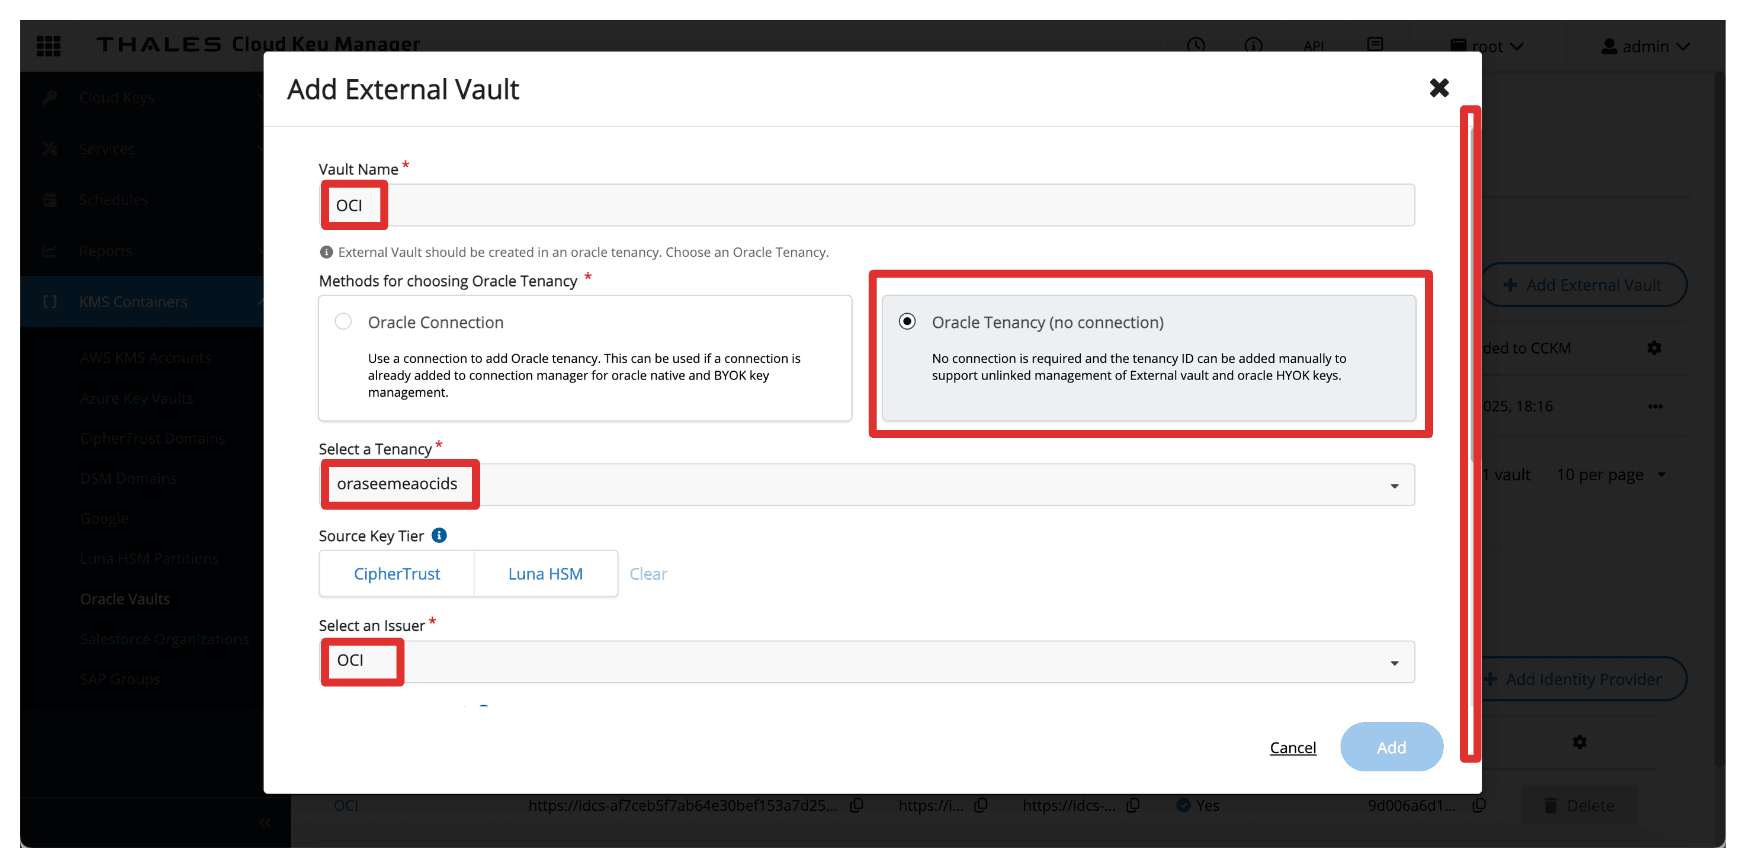
In Add External Vault, enter the following information.
- Enter Name (
OCI). - Select Oracle Tenancy (no connection) as the Methods.
- Select the Tenancy create in Task 5.
- Select the Issuer, the identity provider created in Task 4.
- Scroll down.
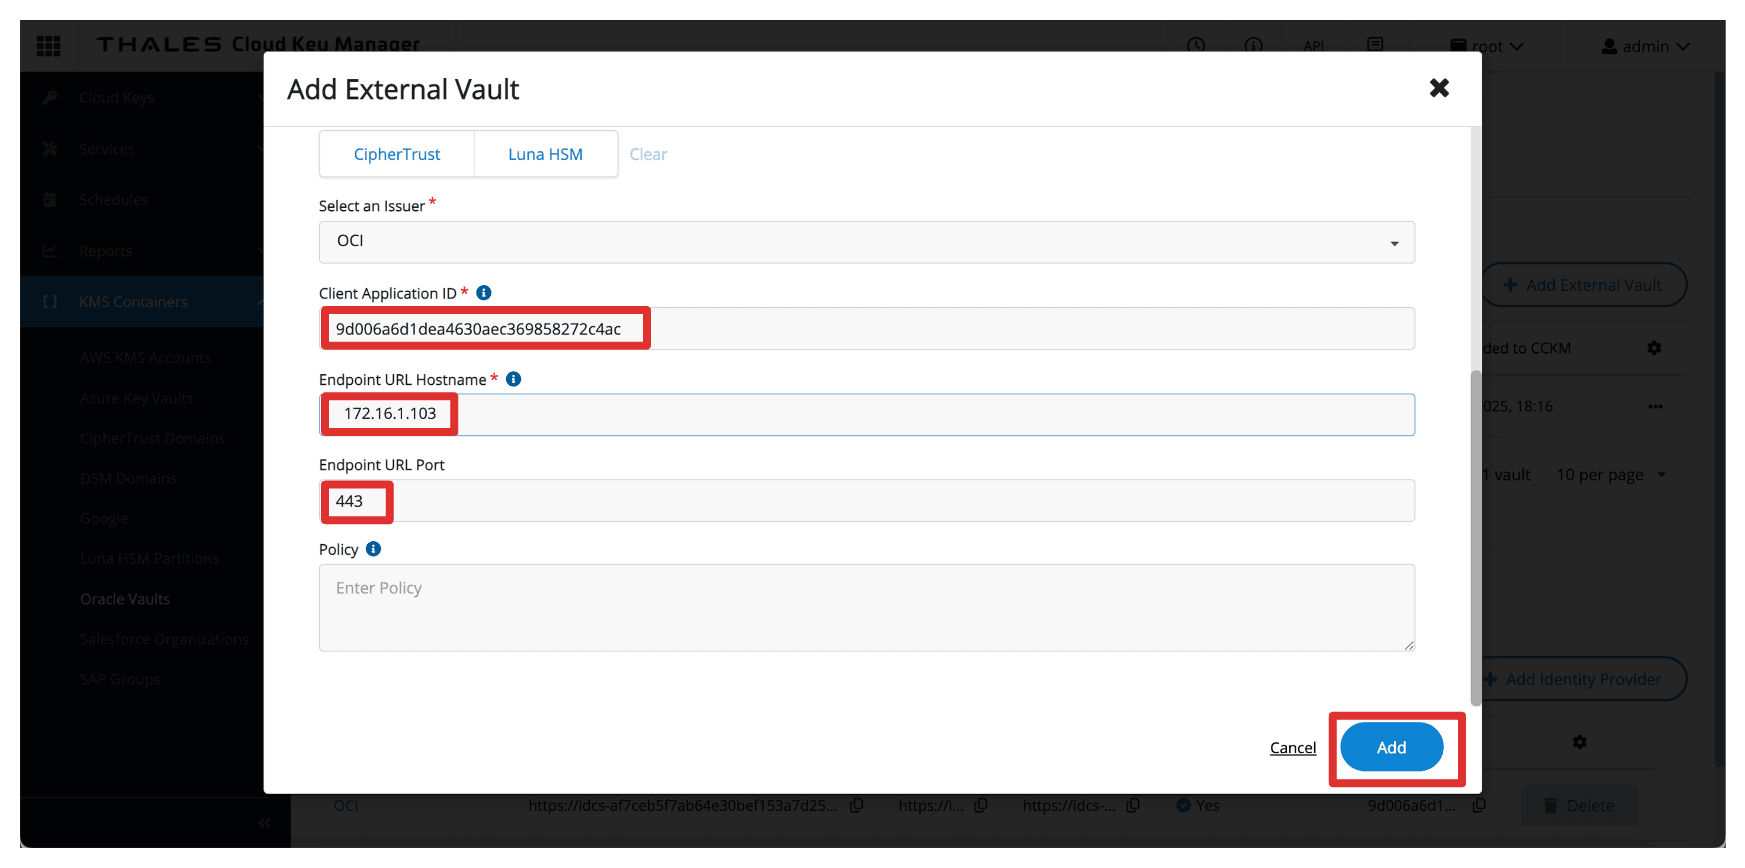
- Enter Client ID of the
Client_Appintegrated application. - Enter the Endpoint URL Hostname as
172.16.1.103, the IP address of the API Gateway. - Enter Port as
443. - Click Add.
- Enter Name (
-
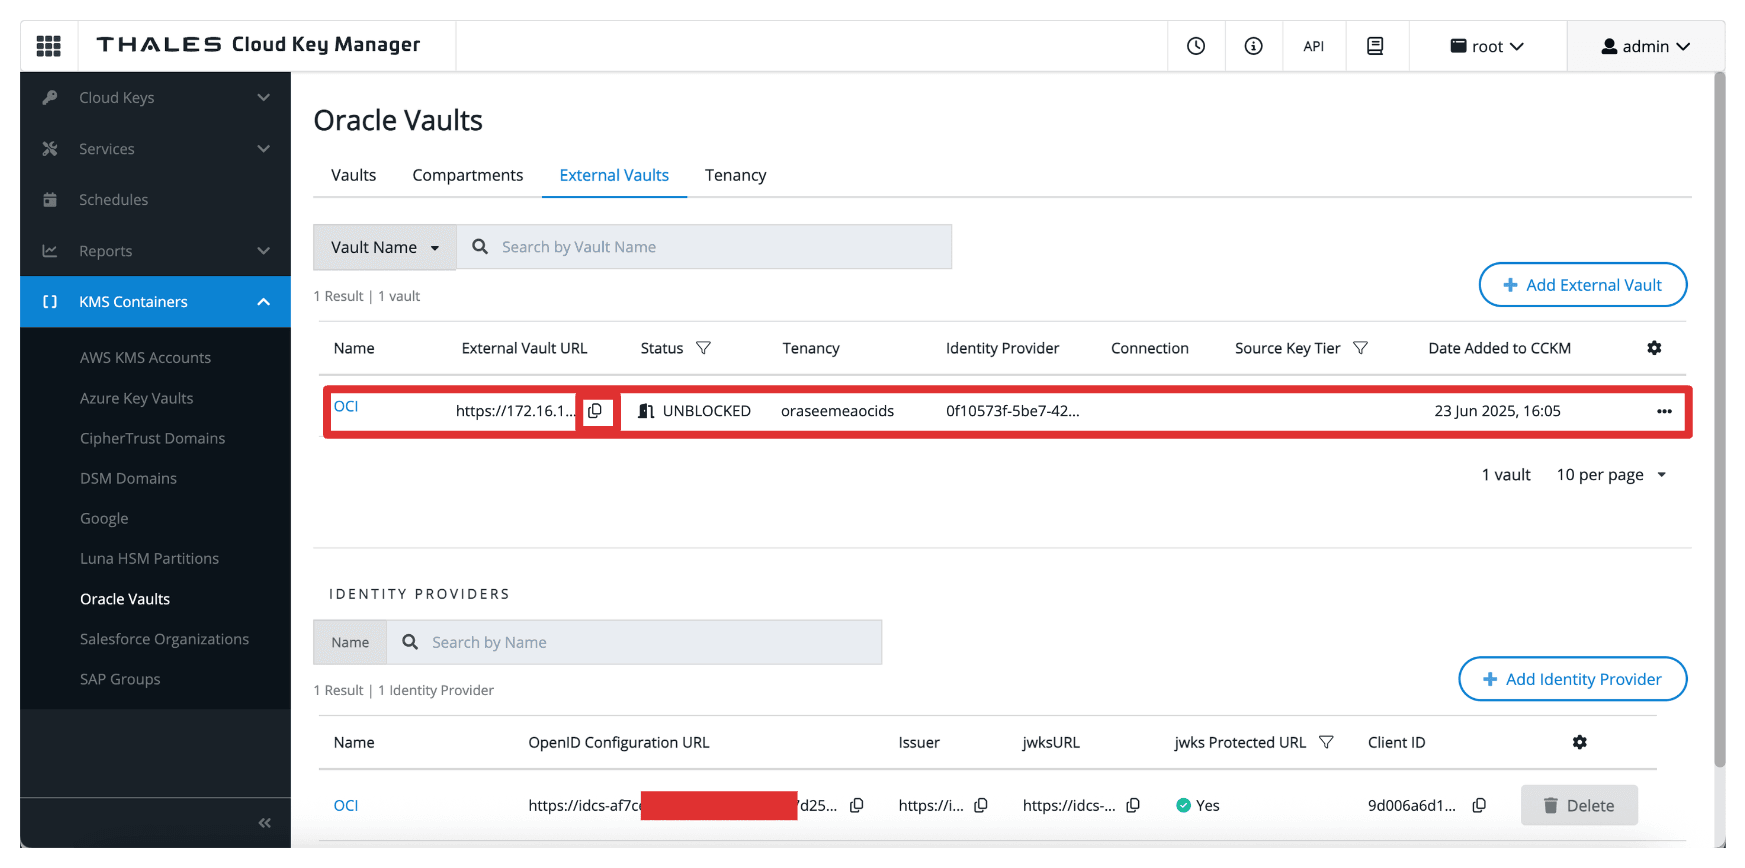
Note that the external vault is configured. Copy the external vault URL and store this on a notepad.
Once configured, this vault becomes the target location for storing external keys that OCI services will reference. It bridges your OCI environment and the CipherTrust-managed keys, enabling complete control over encryption operations in a HYOK model.
Task 14: Create an OCI External Key Management Service Vault
Now that the external vault has been defined in Thales CipherTrust Manager, the next task is to create a corresponding External Key Management Vault in the OCI Console.
This OCI vault will be linked to your Thales CipherTrust Manager and used by OCI services to perform encryption and decryption operations using external keys.
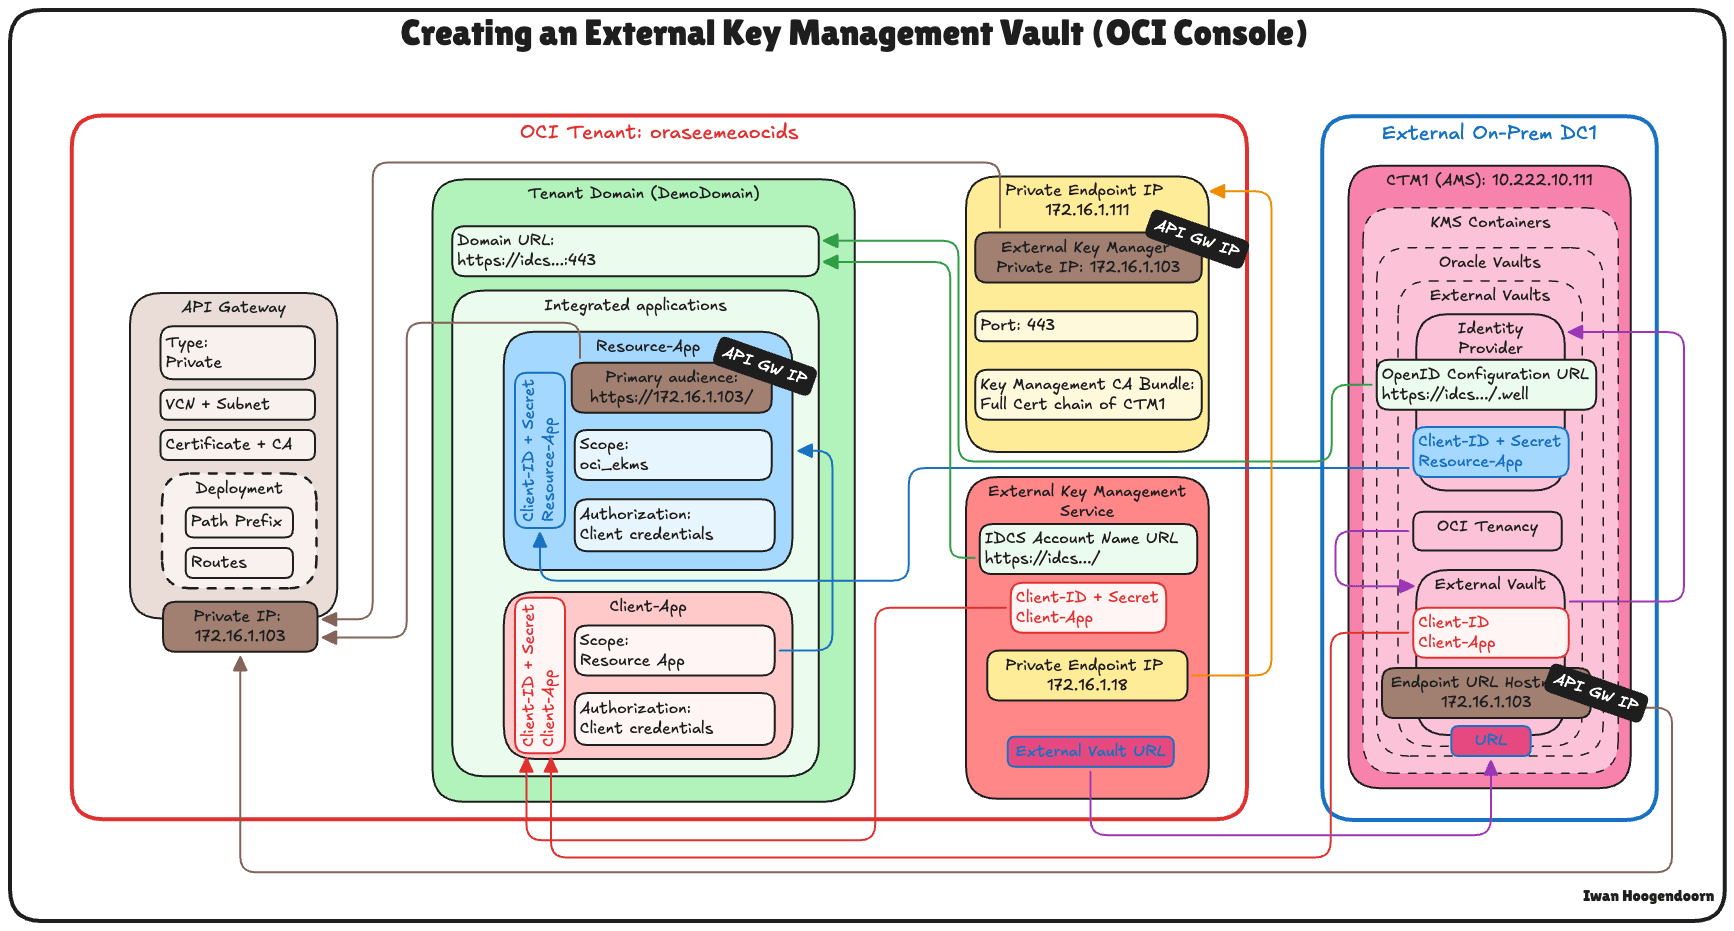
The following image illustrates the components and configuration setup in this task.
-
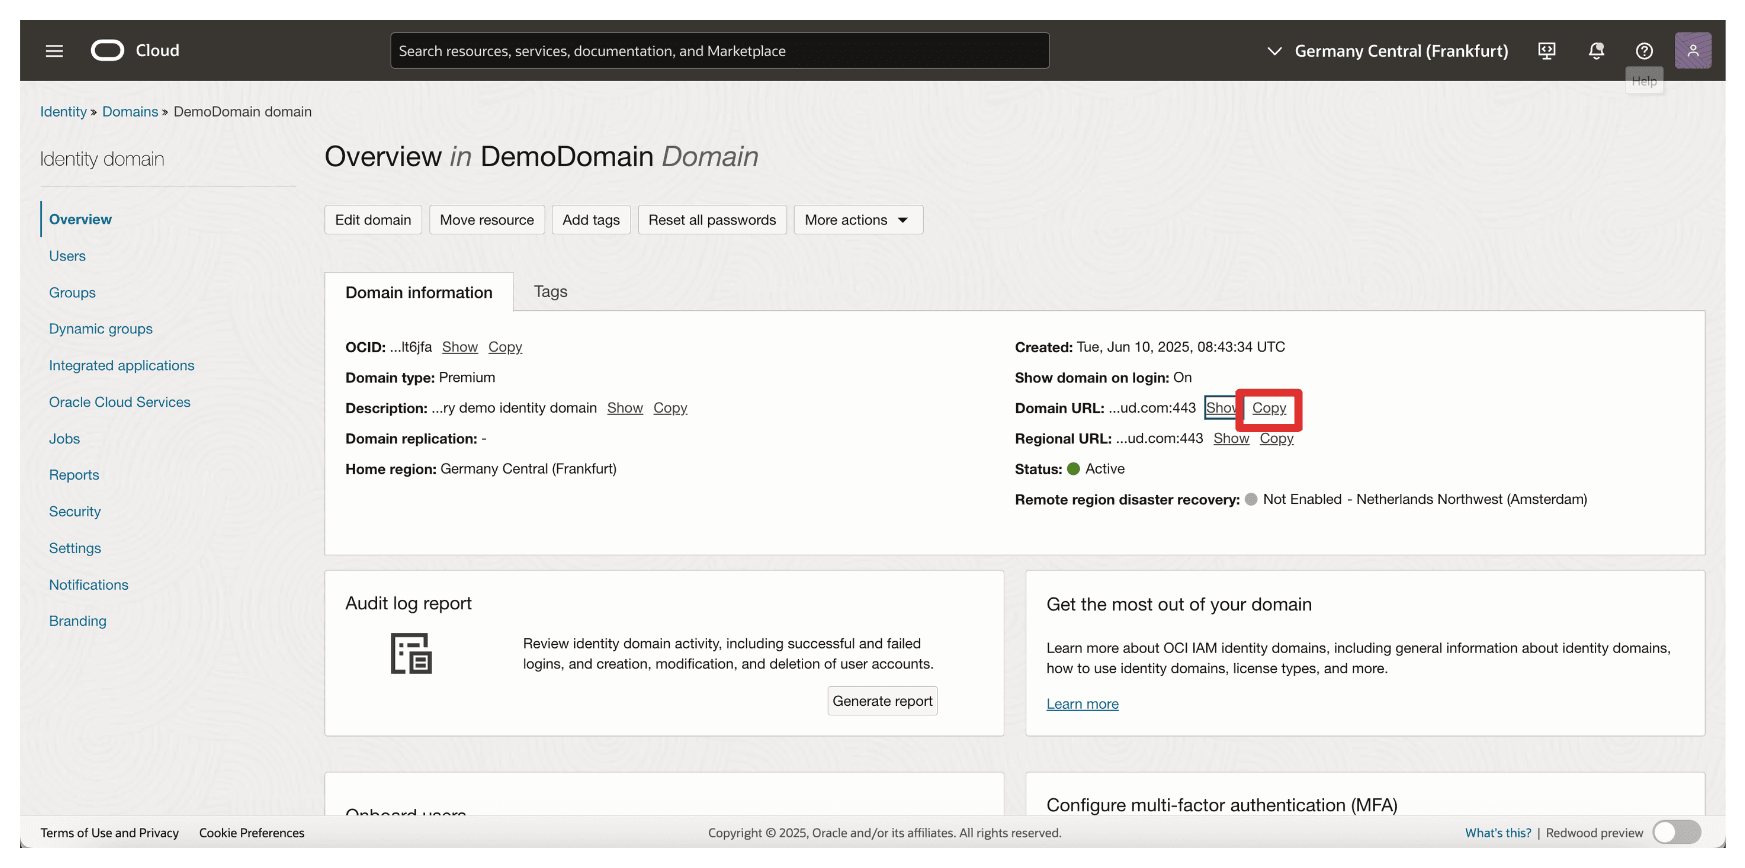
Retrieve the Domain URL from Task 9, you will need this to configure the external key vault in OCI.
-
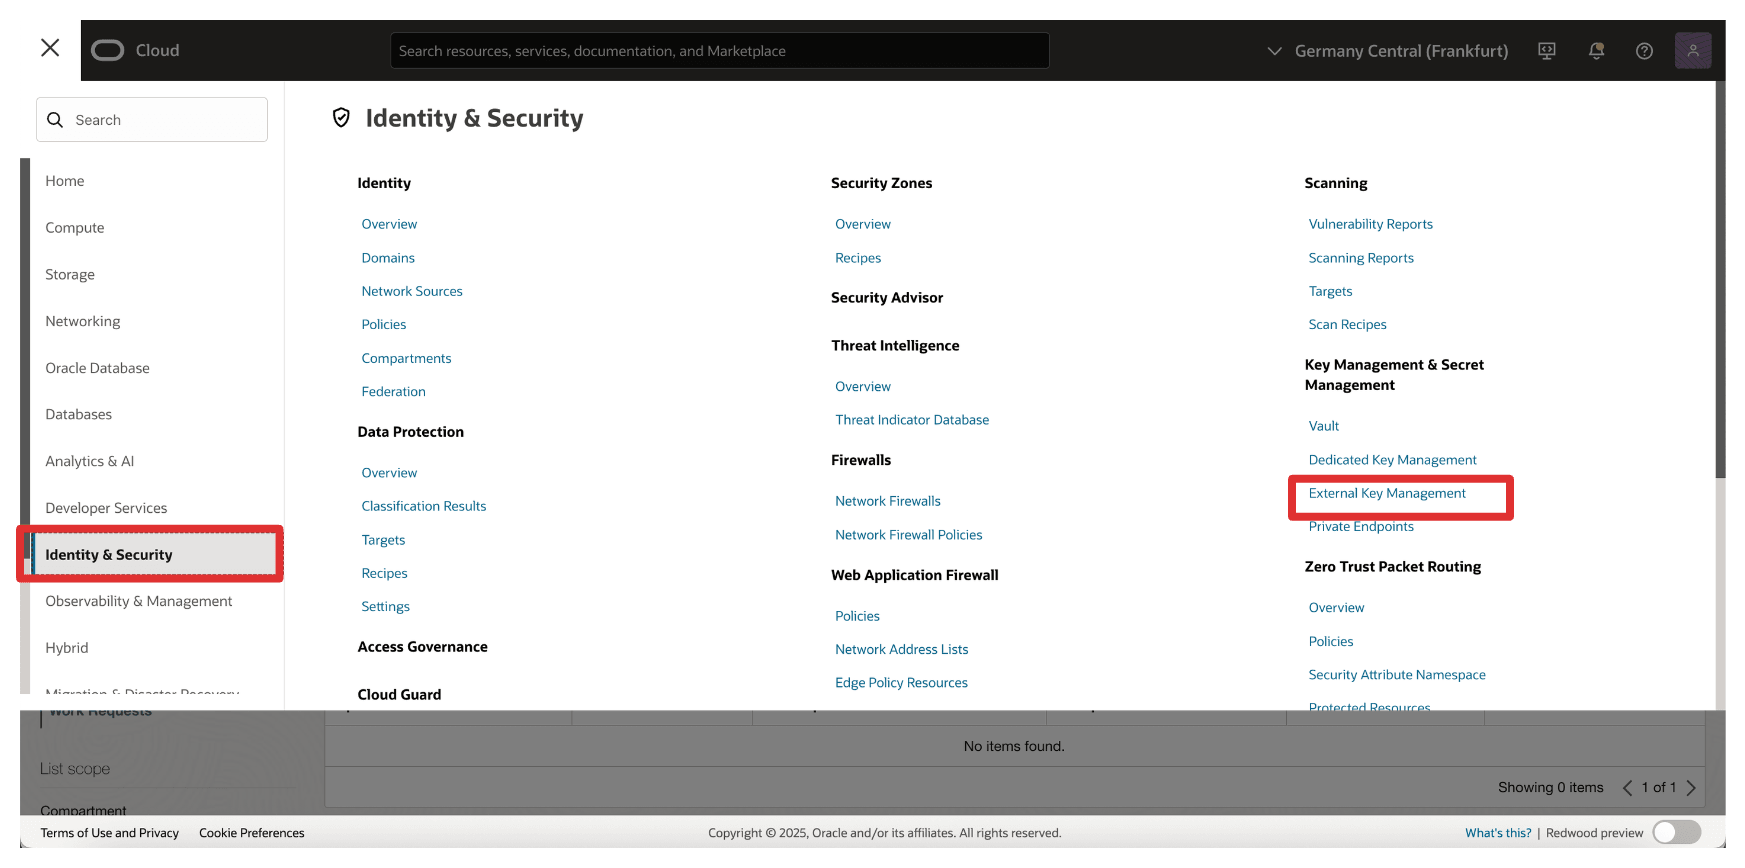
In the OCI Console, go to Identity & Security and click External Key Management.
-
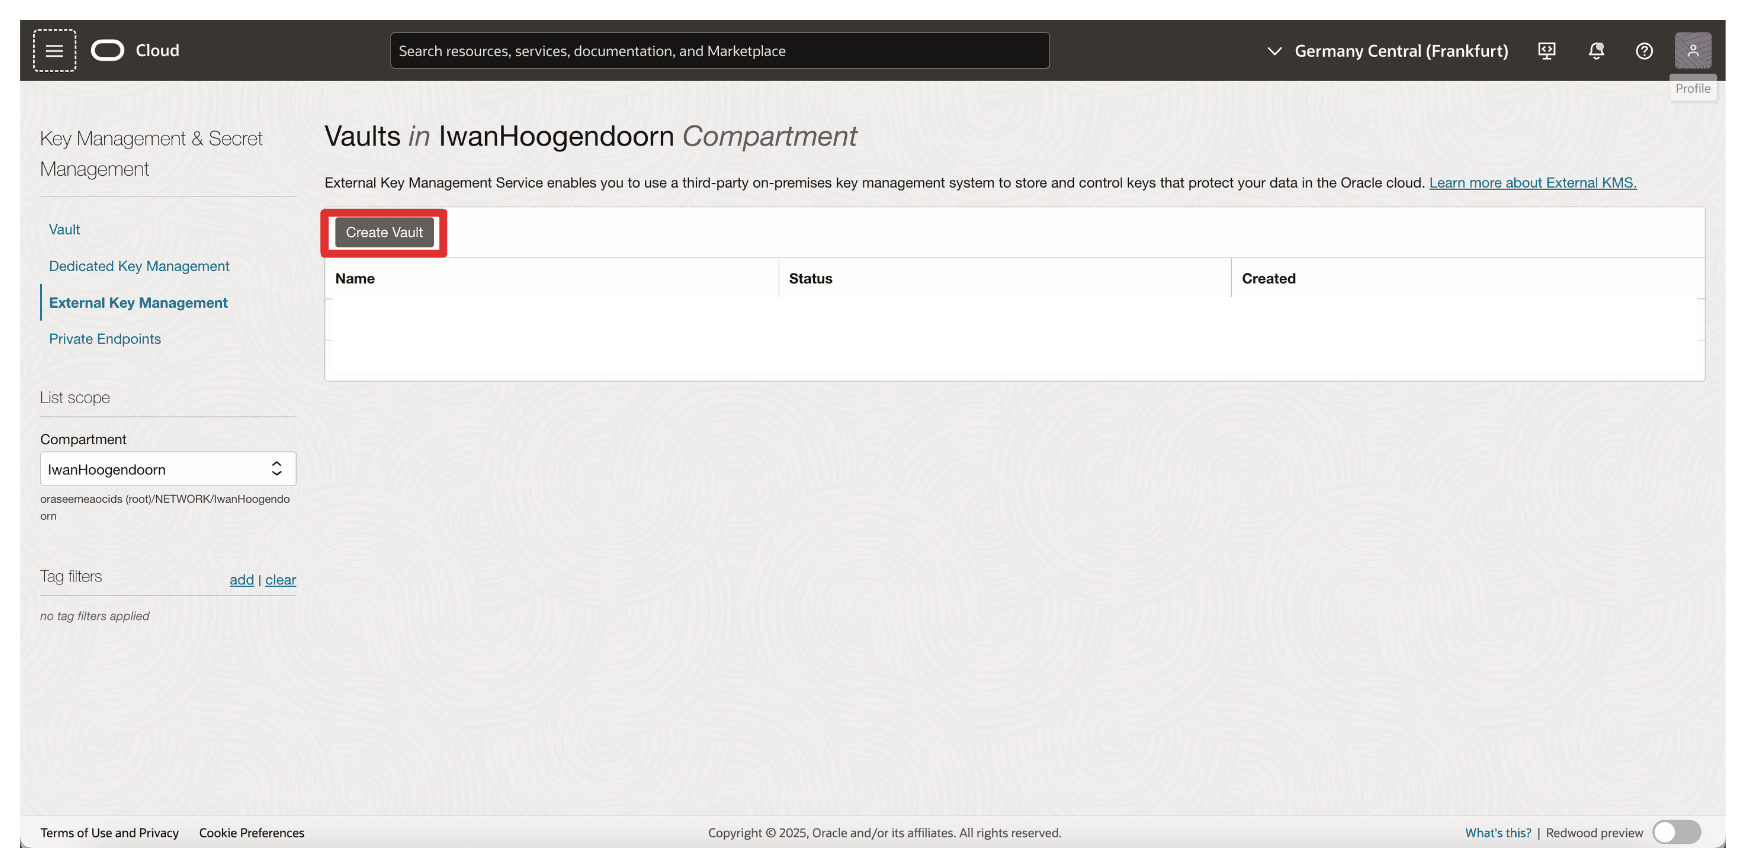
Click Create Vault.
-
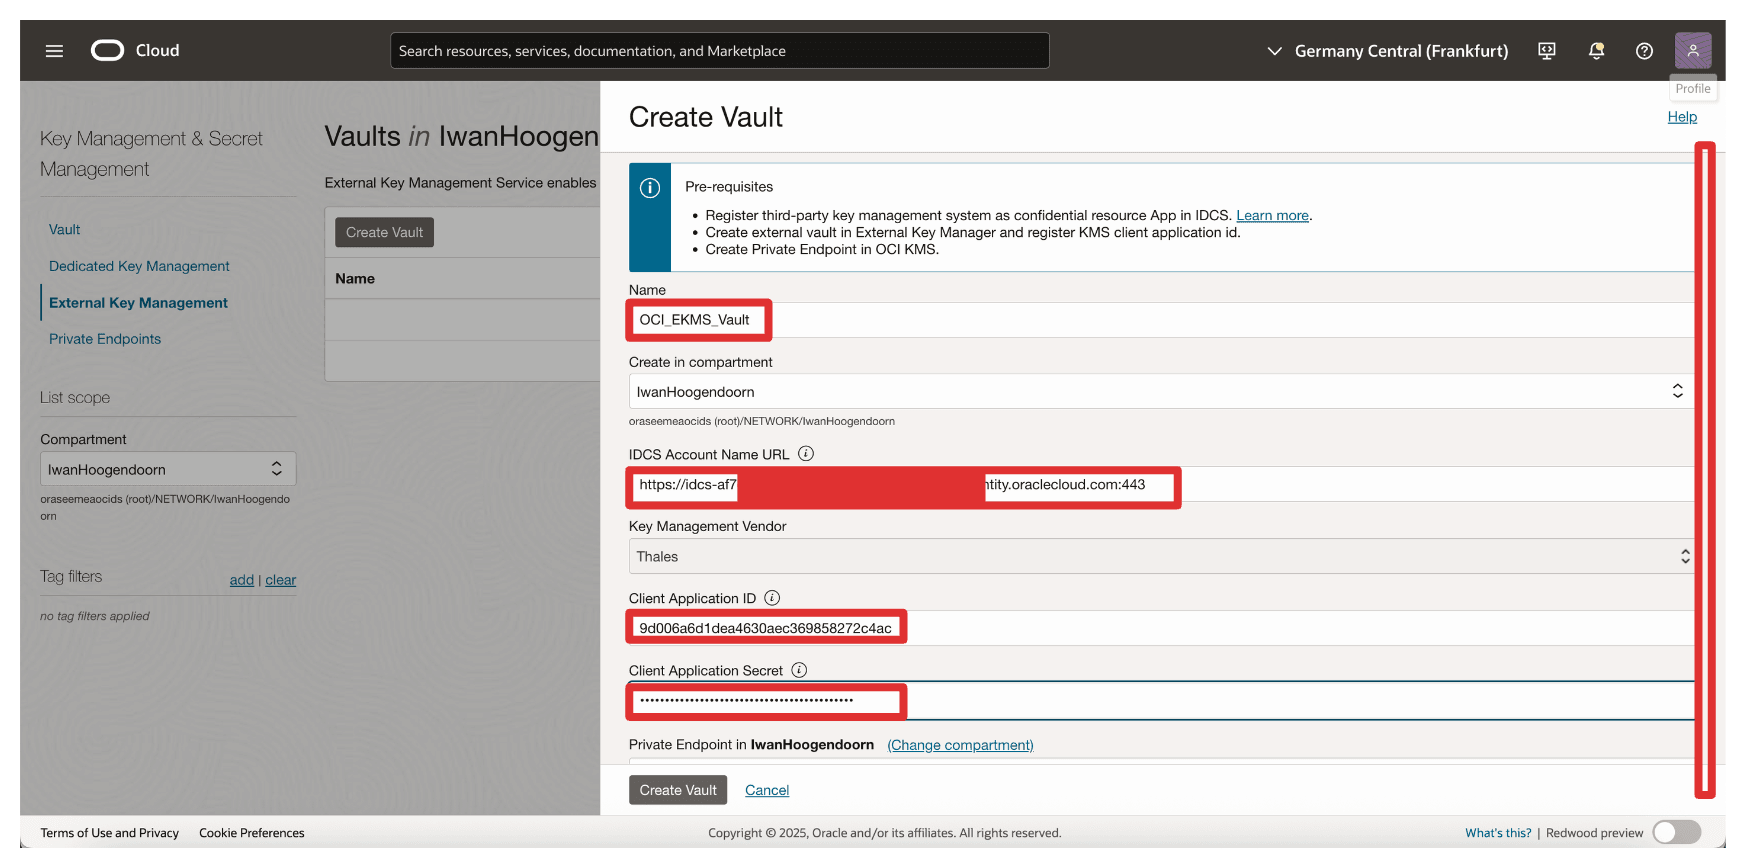
In Create Vault, enter the following information.
- Enter Name (
OCI_EKMS_Vault). - Enter IDCS Account Name URL, the domain URL copied from Task 7. So the full URL will be:
https://idcs-<xxx>.identity.oraclecloud.com:443/. - Enter Client ID and Client Application Secret of the
Client_Appintegrated application. - Scroll down.
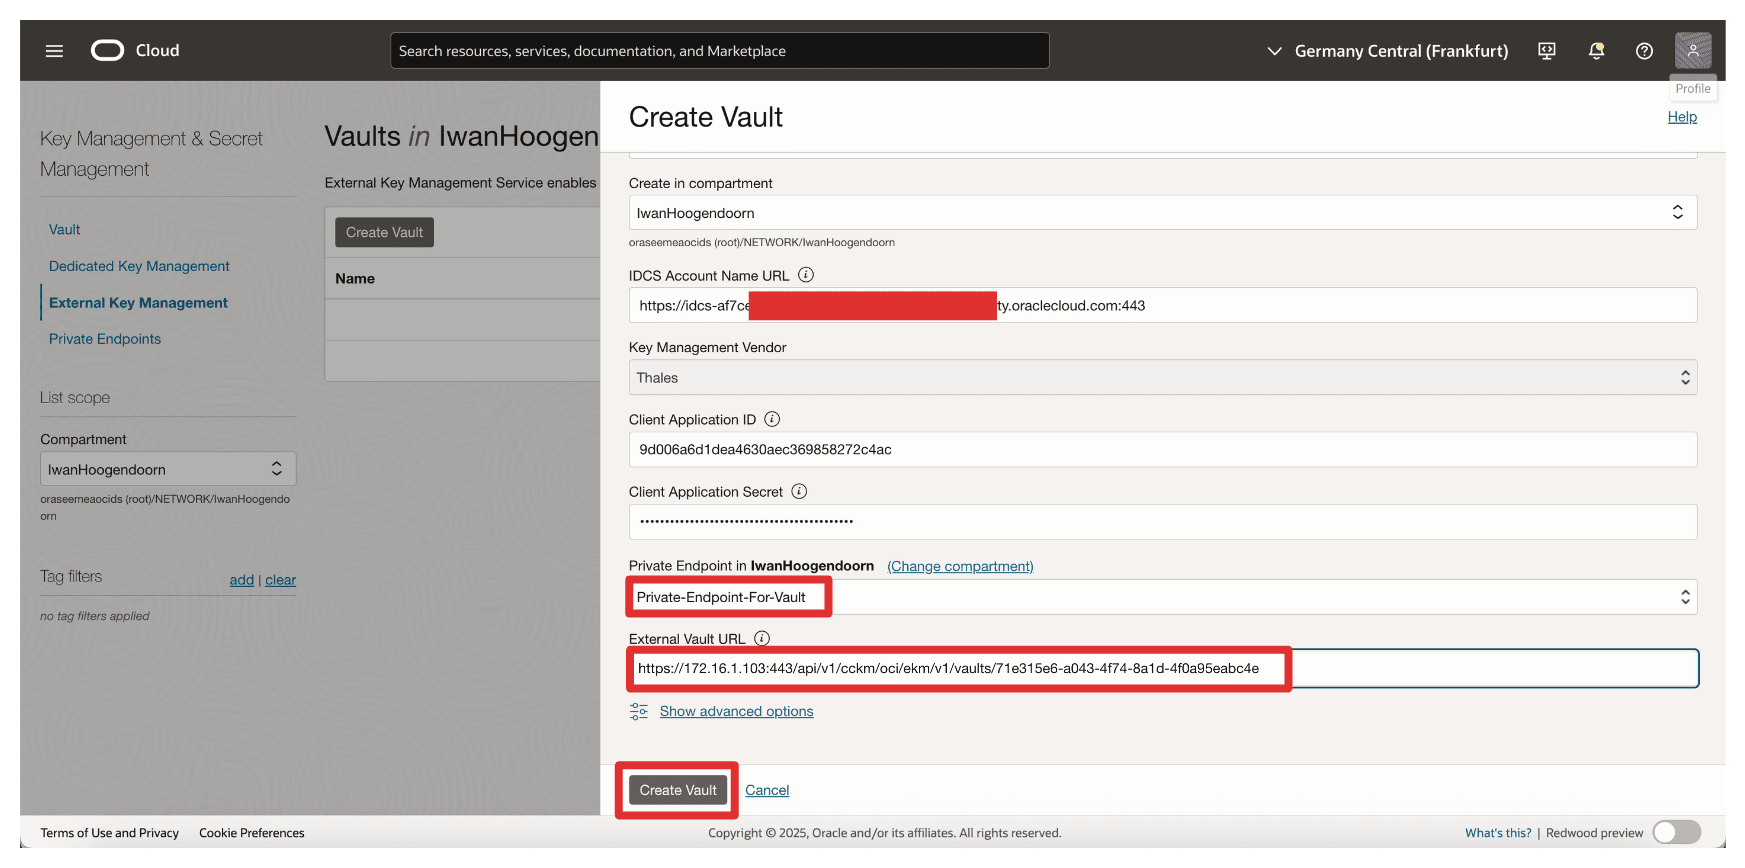
- Select the Private Endpoint created in Task 6.
- Enter the external vault URL copied from Task 7 when we created the external vault on CTM1.
- Click Create Vault.
- Enter Name (
-
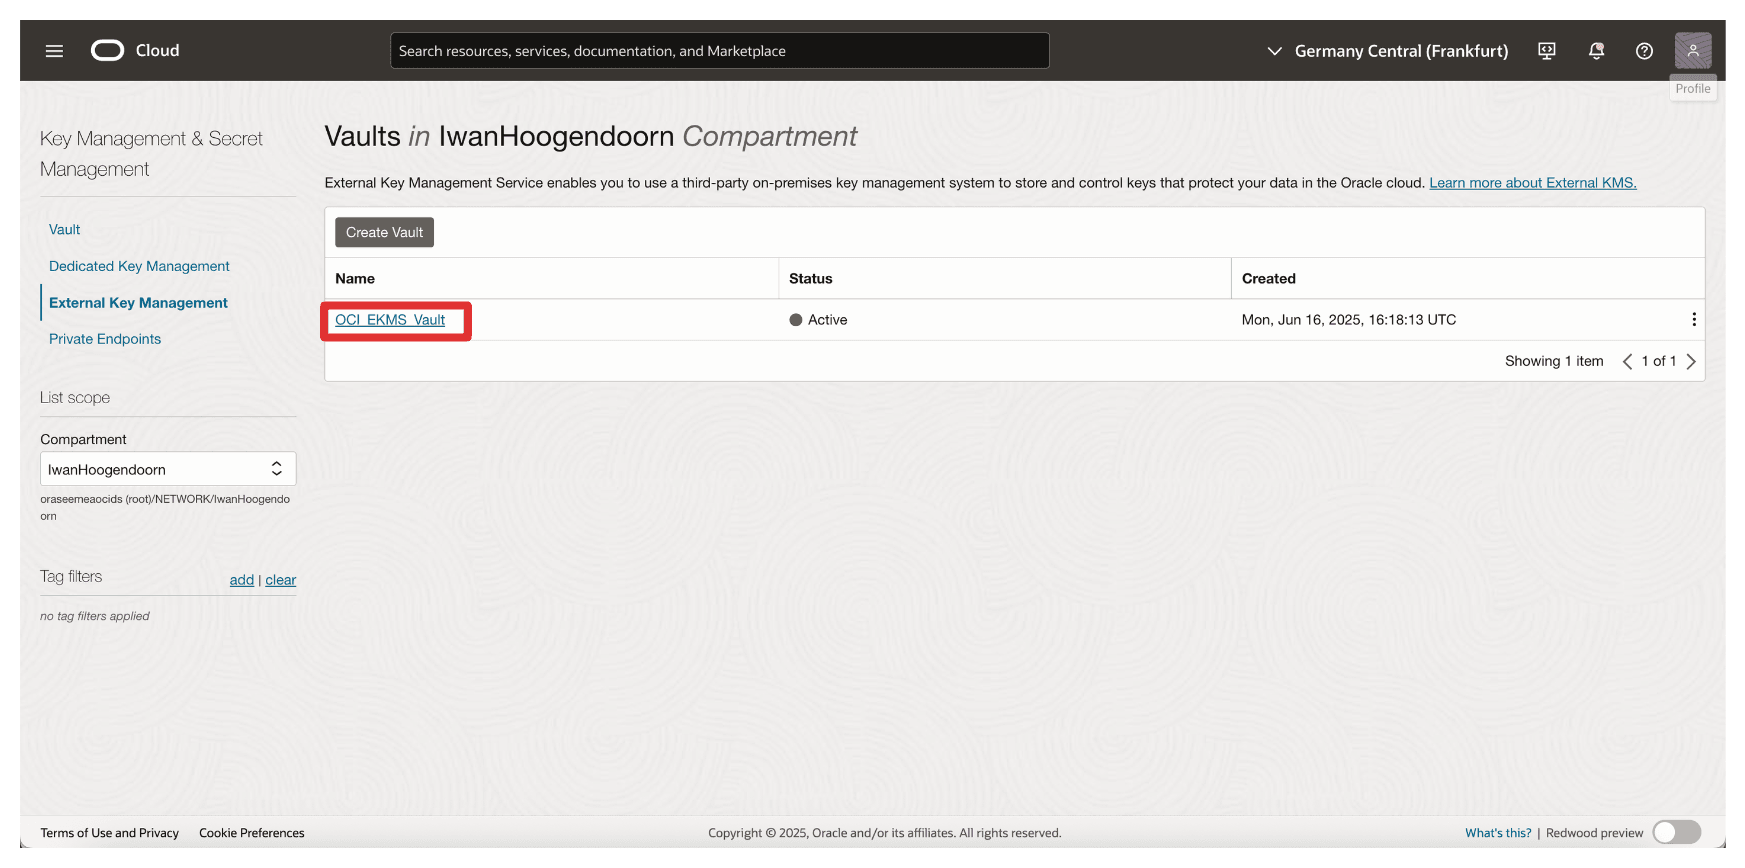
Note that the vault has been created. Now, click the vault.
-
Review the Vault Details.
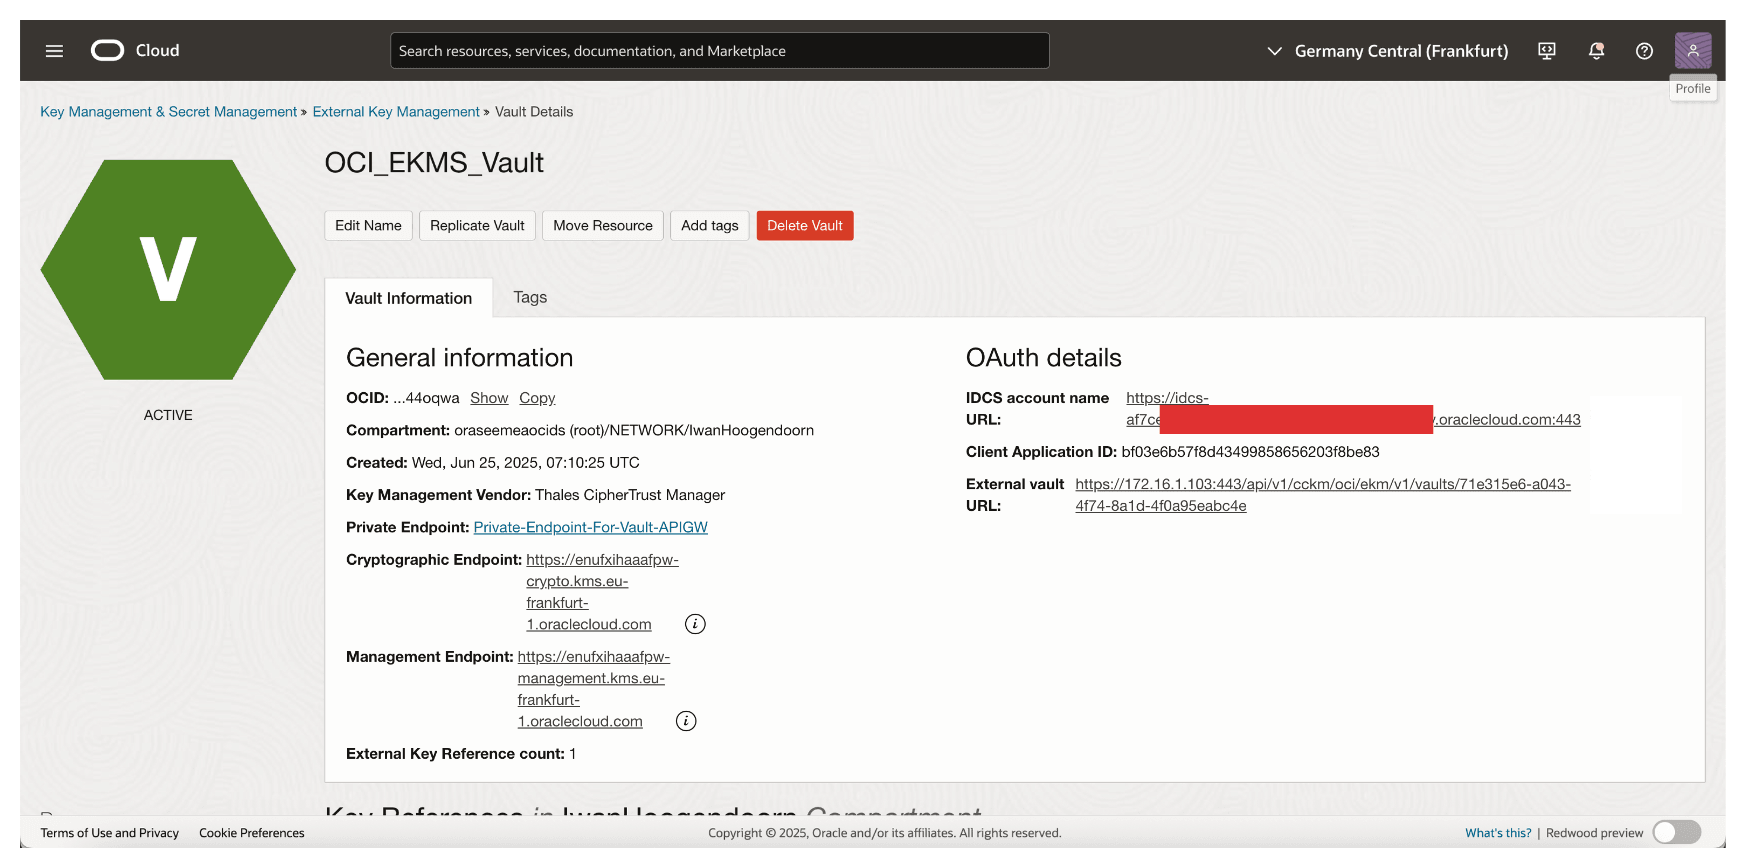
OCI will now connect to your Thales CipherTrust Manager using the specified private endpoint. Once this vault is active, it becomes the interface through which OCI interacts with external keys managed by CCKM enabling HYOK support for OCI services like OCI Object Storage, OCI Block Volumes, and more. Later, we will perform some tests with OCI Object Storage.
Task 15: Add External Keys in Thales CipherTrust Manager
With the external vault set up in Thales CipherTrust Manager and linked to OCI, the next task is to create or import the external encryption keys that OCI will use for HYOK-enabled services.
These keys reside securely within the Thales CipherTrust Manager and are referenced by OCI through the external key management interface. Depending on your organizational requirements, you can generate a new key directly within Thales CipherTrust Manager or import an existing one.
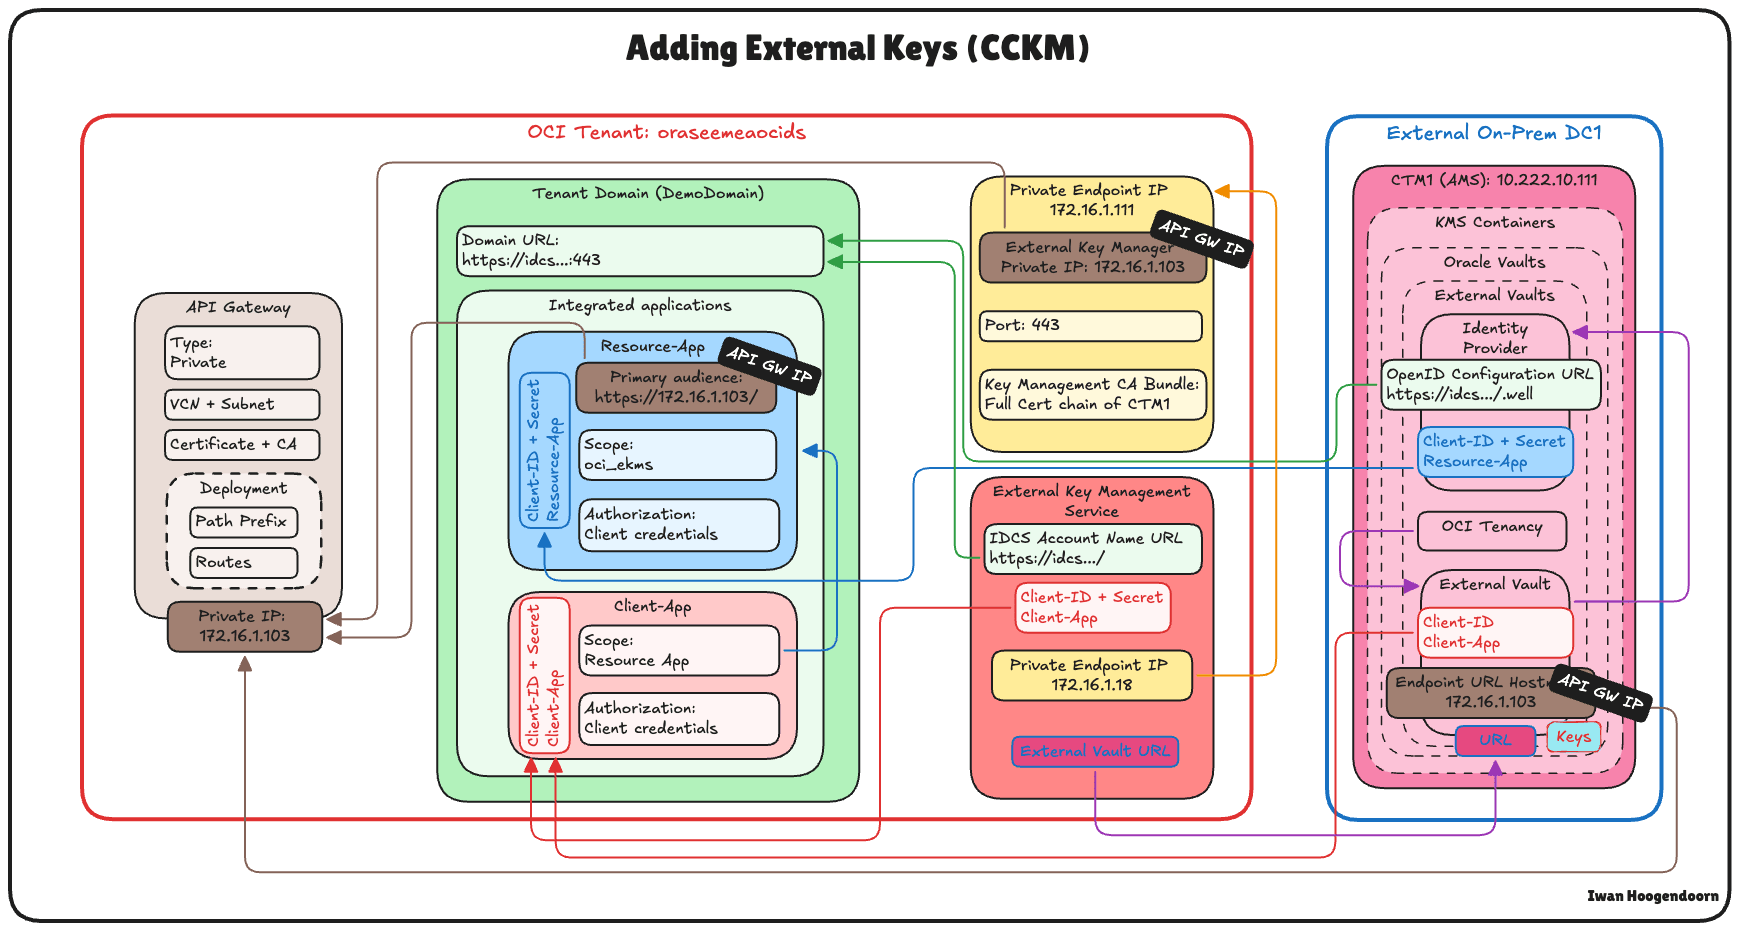
The following image illustrates the components and configuration setup in this task.
-
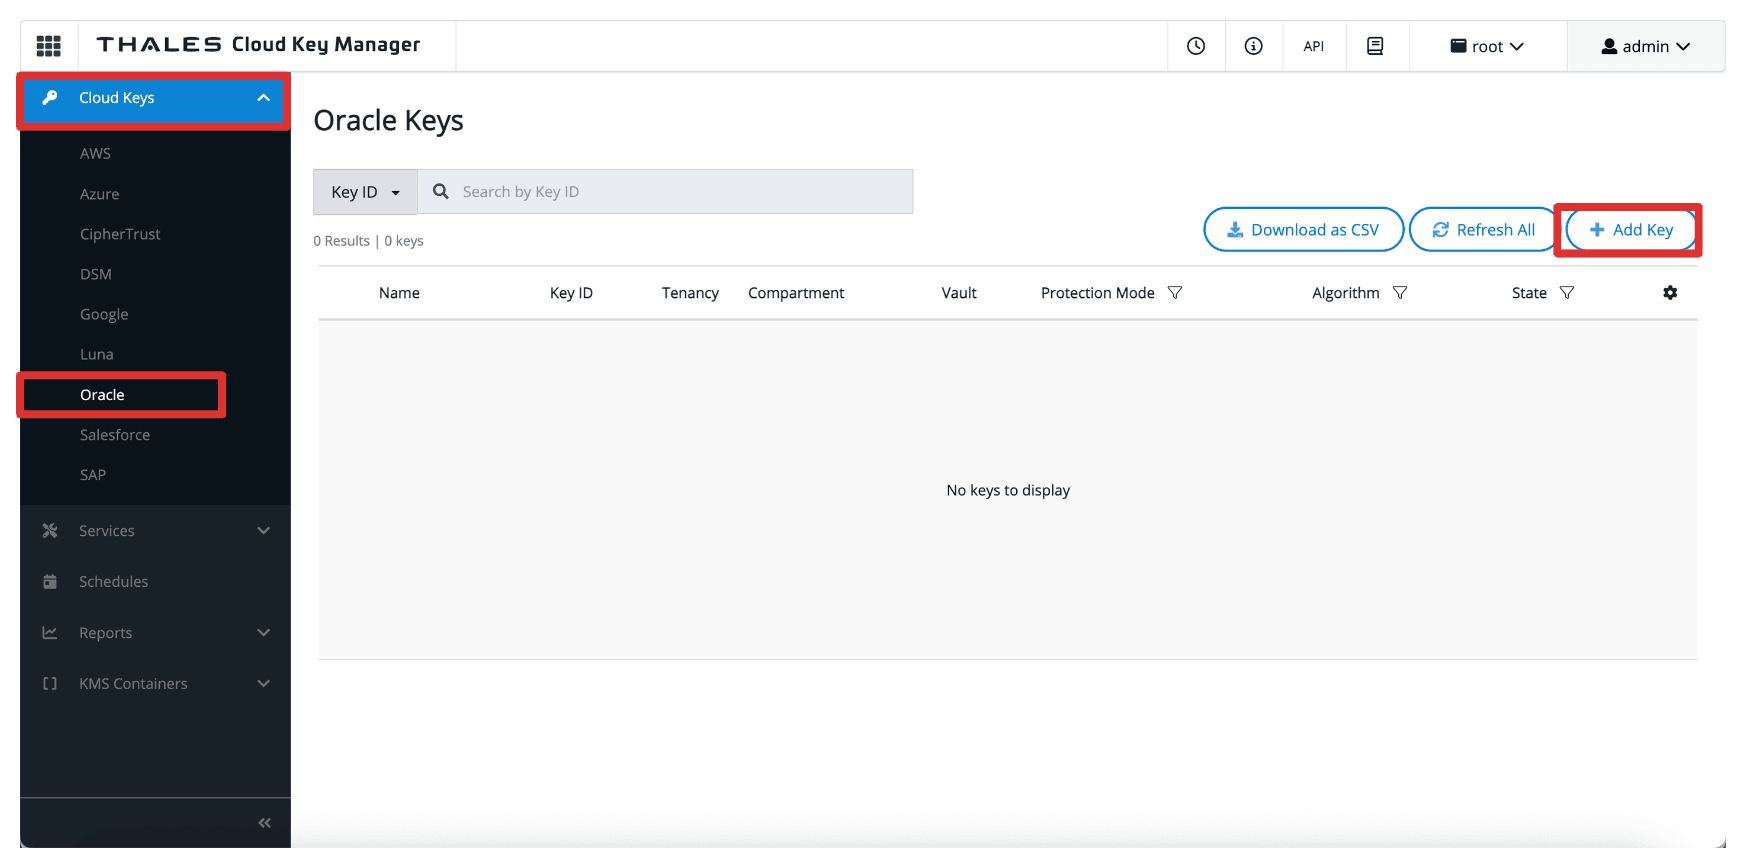
Go to the Thales Cloud Key Manager Console.
- Click Cloud Keys.
- Click Oracle.
- Click Add Key.
-
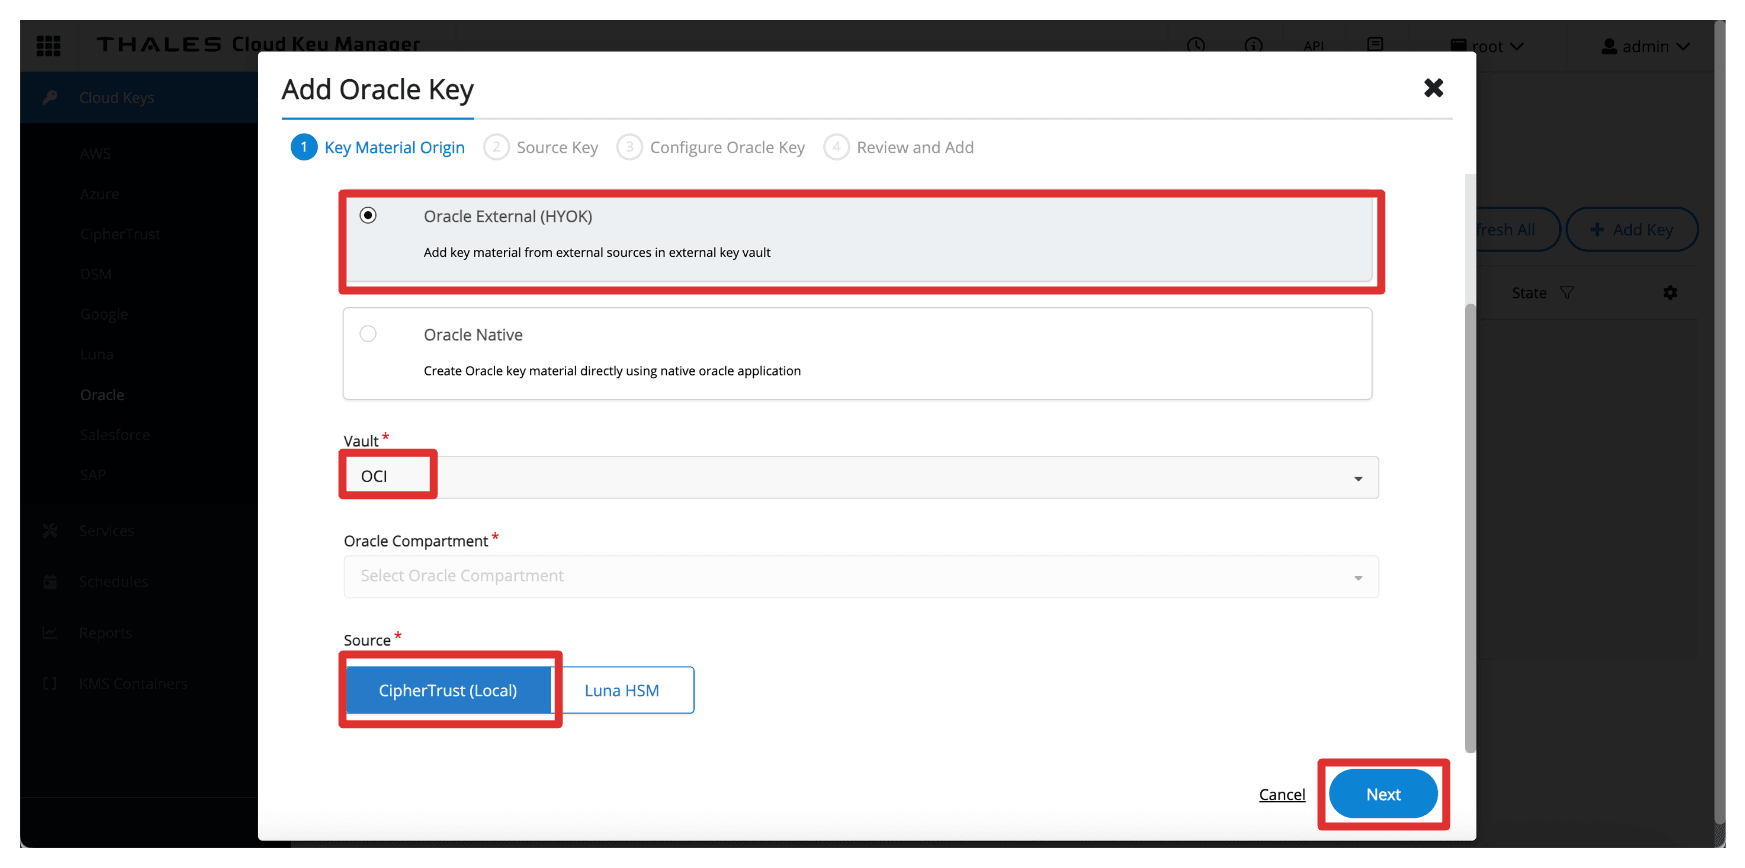
In Add Oracle Key, enter the following information.
- Select Oracle External (HYOK).
- Select the Thales CipherTrust Manager Vault created in Task 8.
- Select the Source to be CipherTrust (Local).
- Click Next.
-
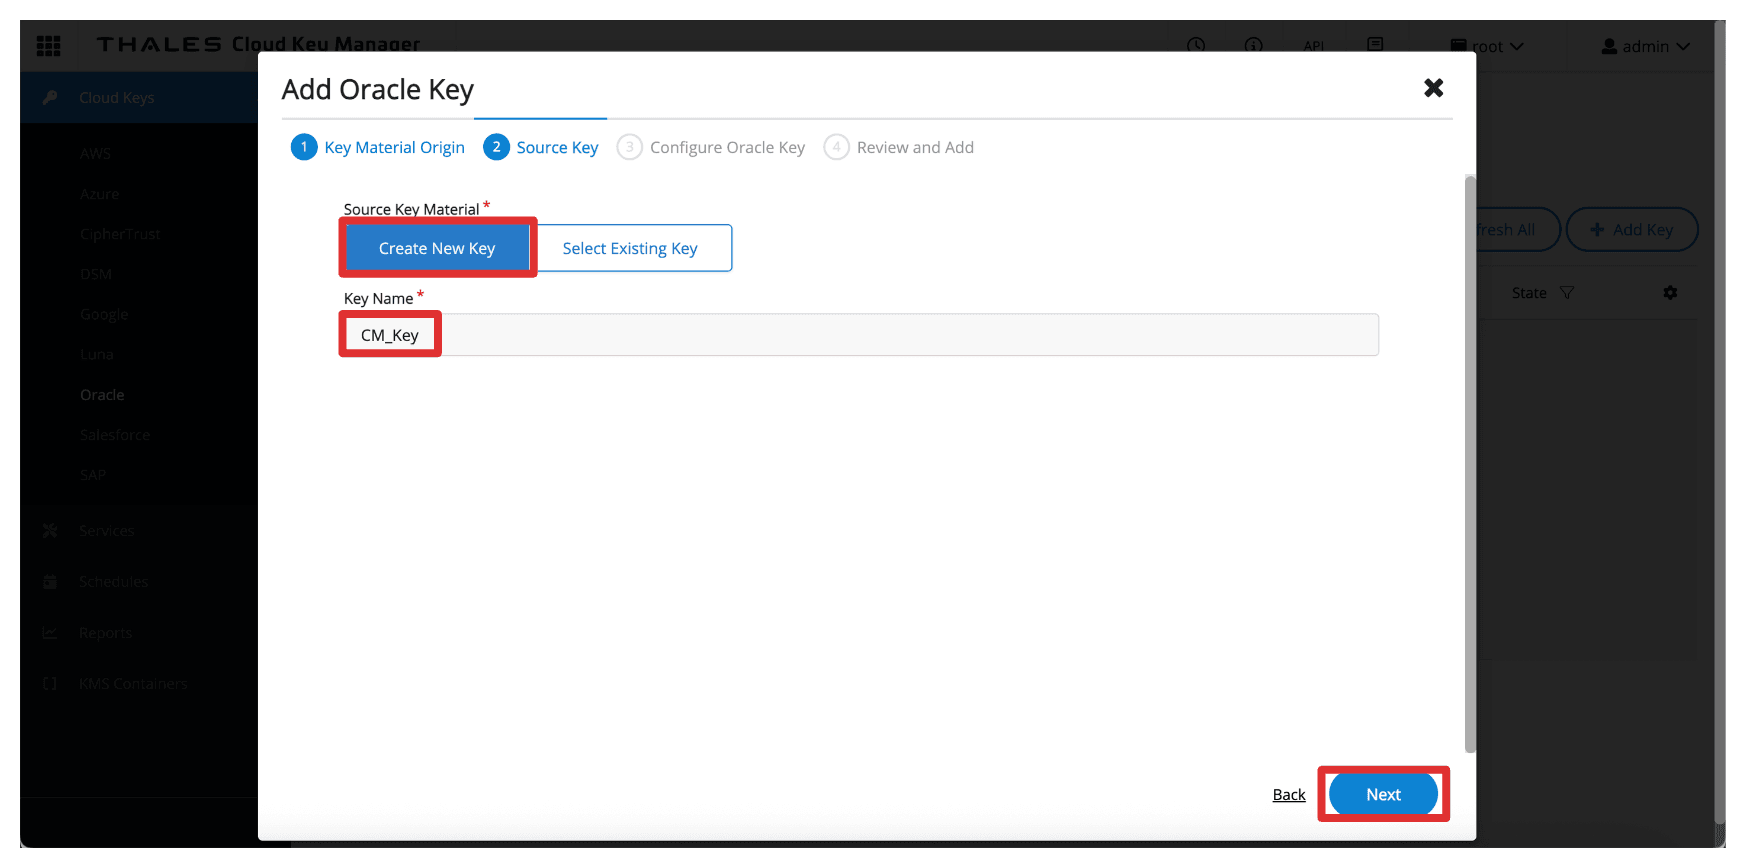
In Source Key. enter the following information.
- Select the Source Key Material to be Create New Key.
- Enter the key Name (
CM_Key). - Click Next.
-
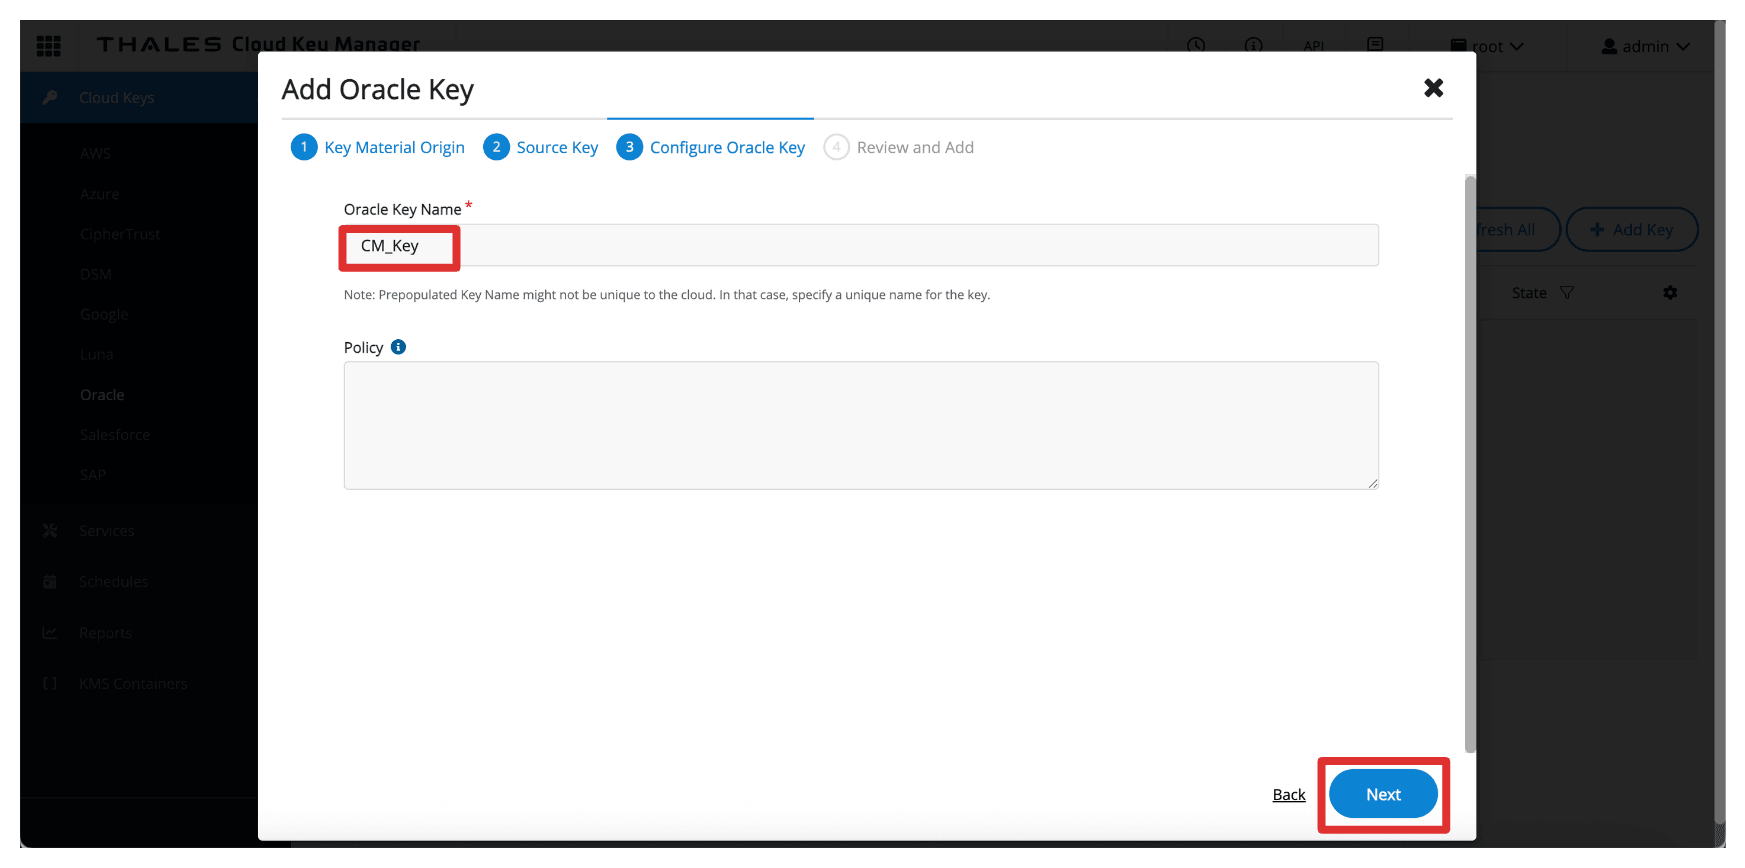
In Configure Oracle Key, enter the following information.
- Enter Oracle Key Name (
CM_Key). - Click Next.
- Enter Oracle Key Name (
-
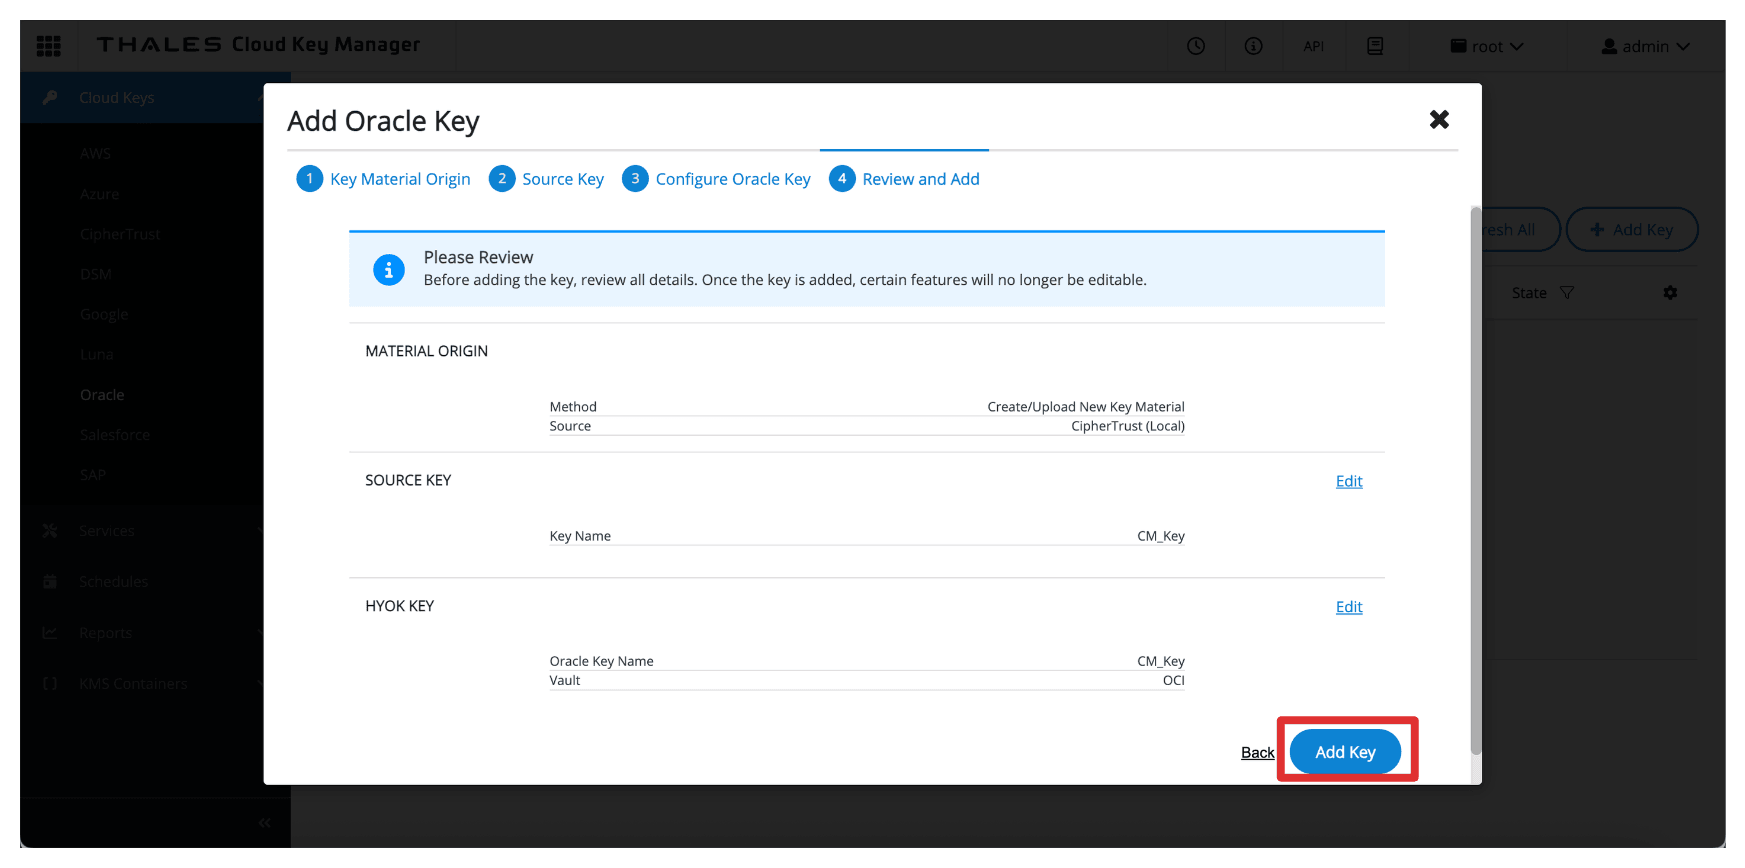
Click Add Key.
-
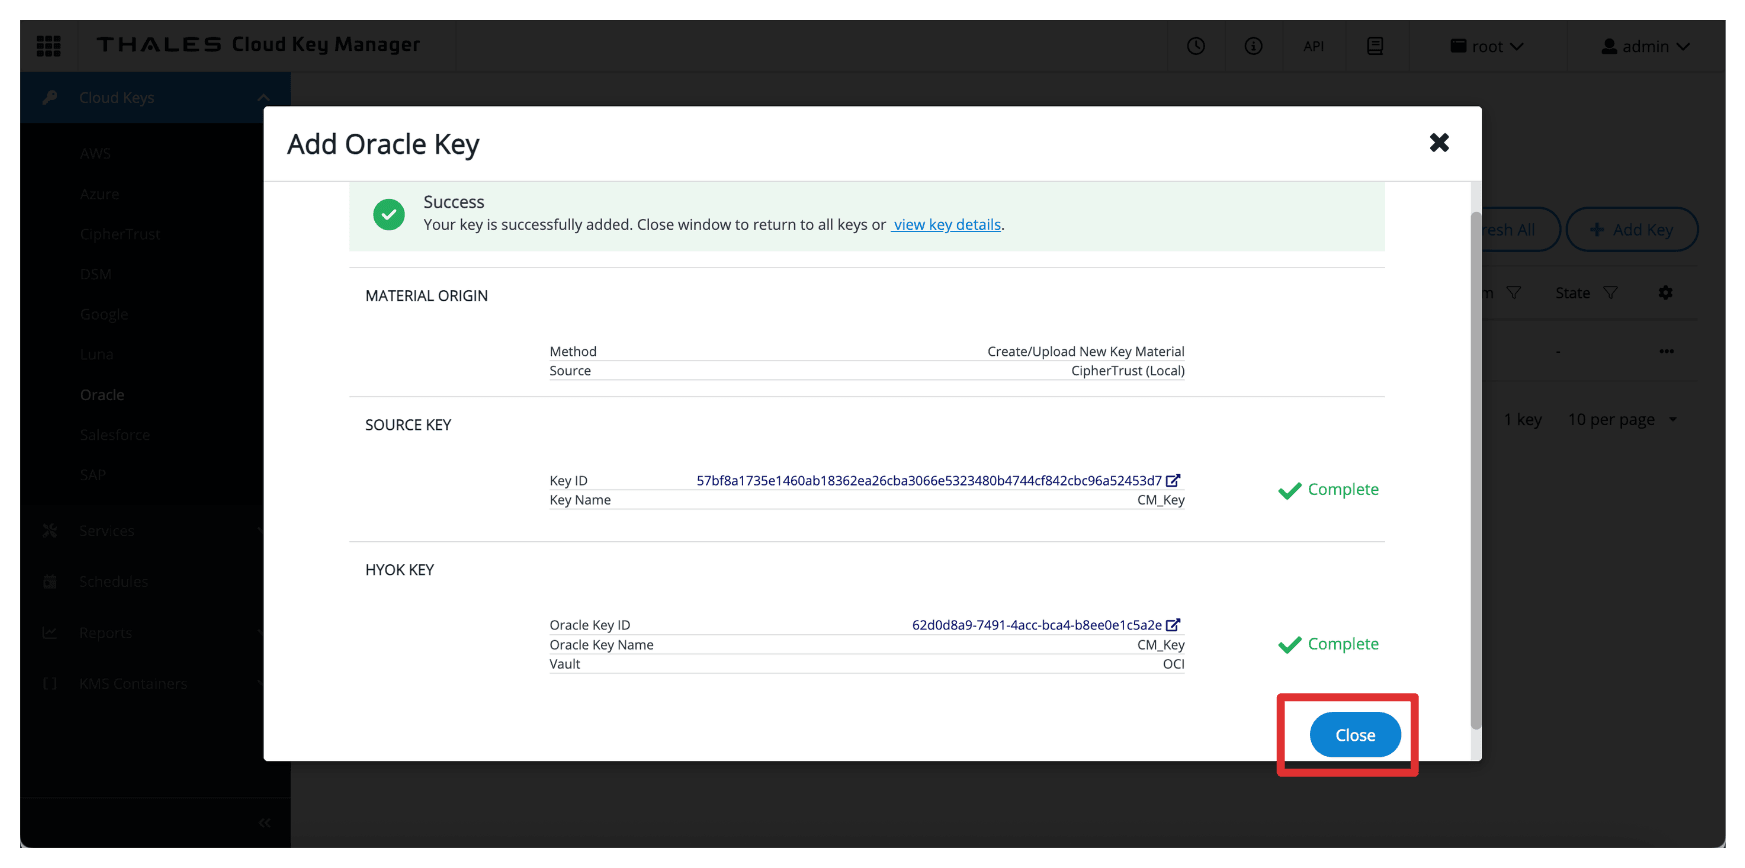
Click Close.
-
Note the created key.
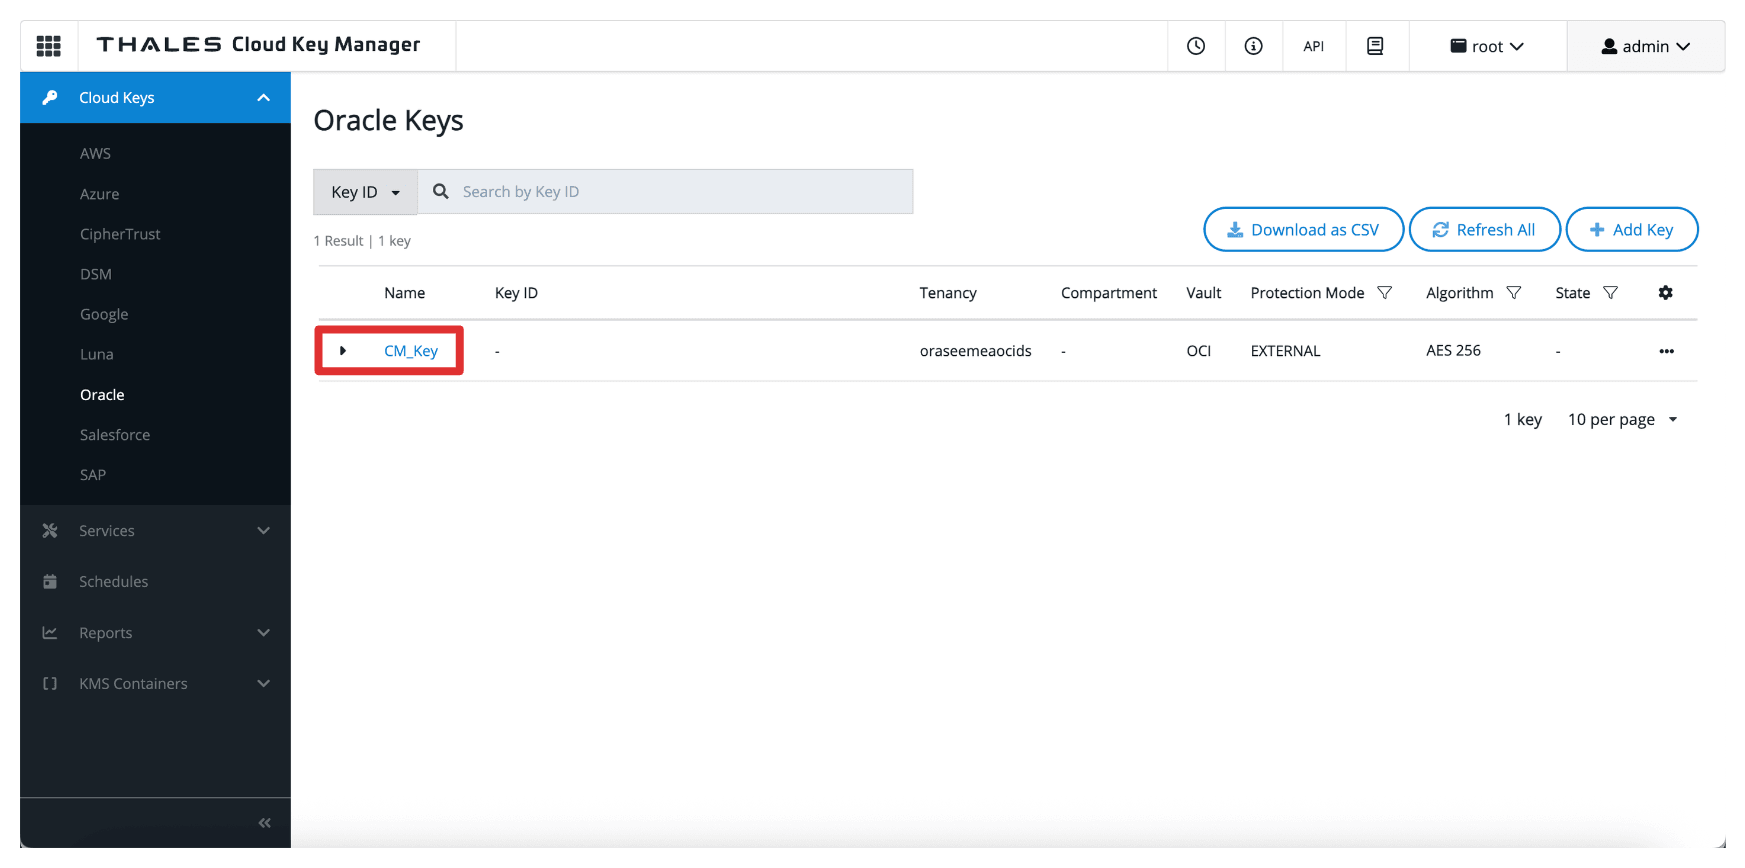
Once added, the key becomes available to OCI through the external key management vault. However, to allow OCI services to use the key, you must create a key reference in the OCI Console, which we will cover in the next task.
Note:
- These keys never leave the Thales CipherTrust Manager.
- OCI only sends encryption/decryption requests to the external key manager, ensuring you always maintain full control over key material.
Task 16: Create Key References in OCI
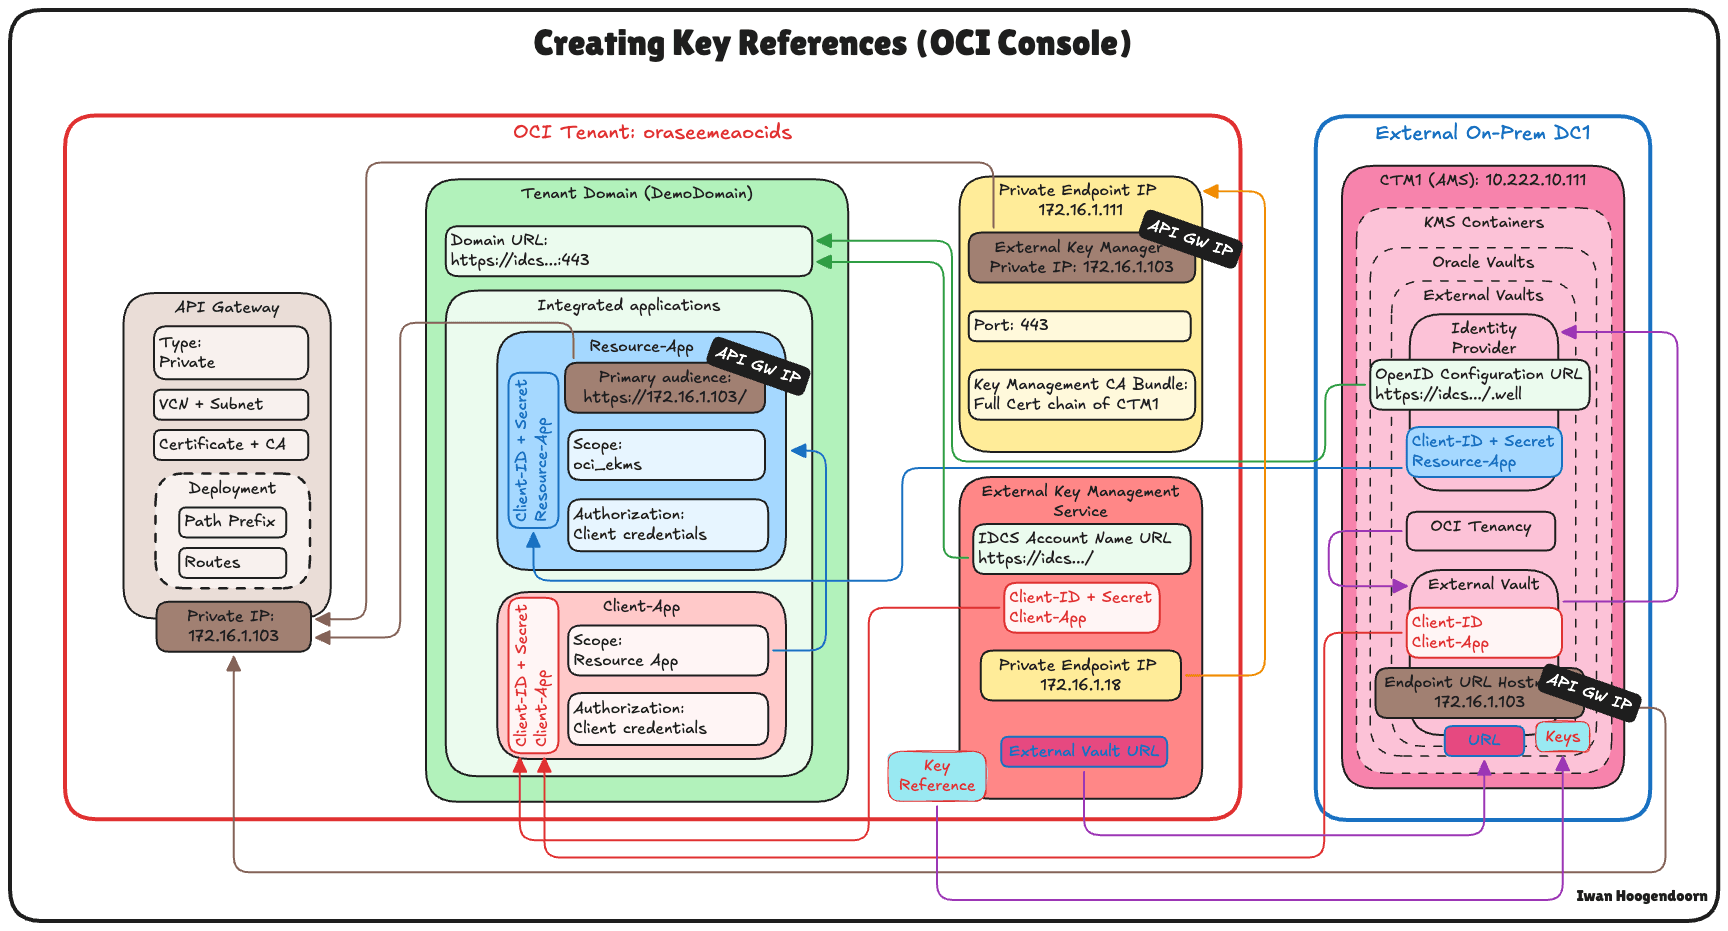
Once the external key has been created or imported into the Thales CipherTrust Manager, the next task is to create a key reference in the OCI Console. A key reference acts as a pointer that allows OCI services to access and use the external key stored in your Thales CipherTrust Manager through the external key management vault.
The following image illustrates the components and configuration setup in this task.
-
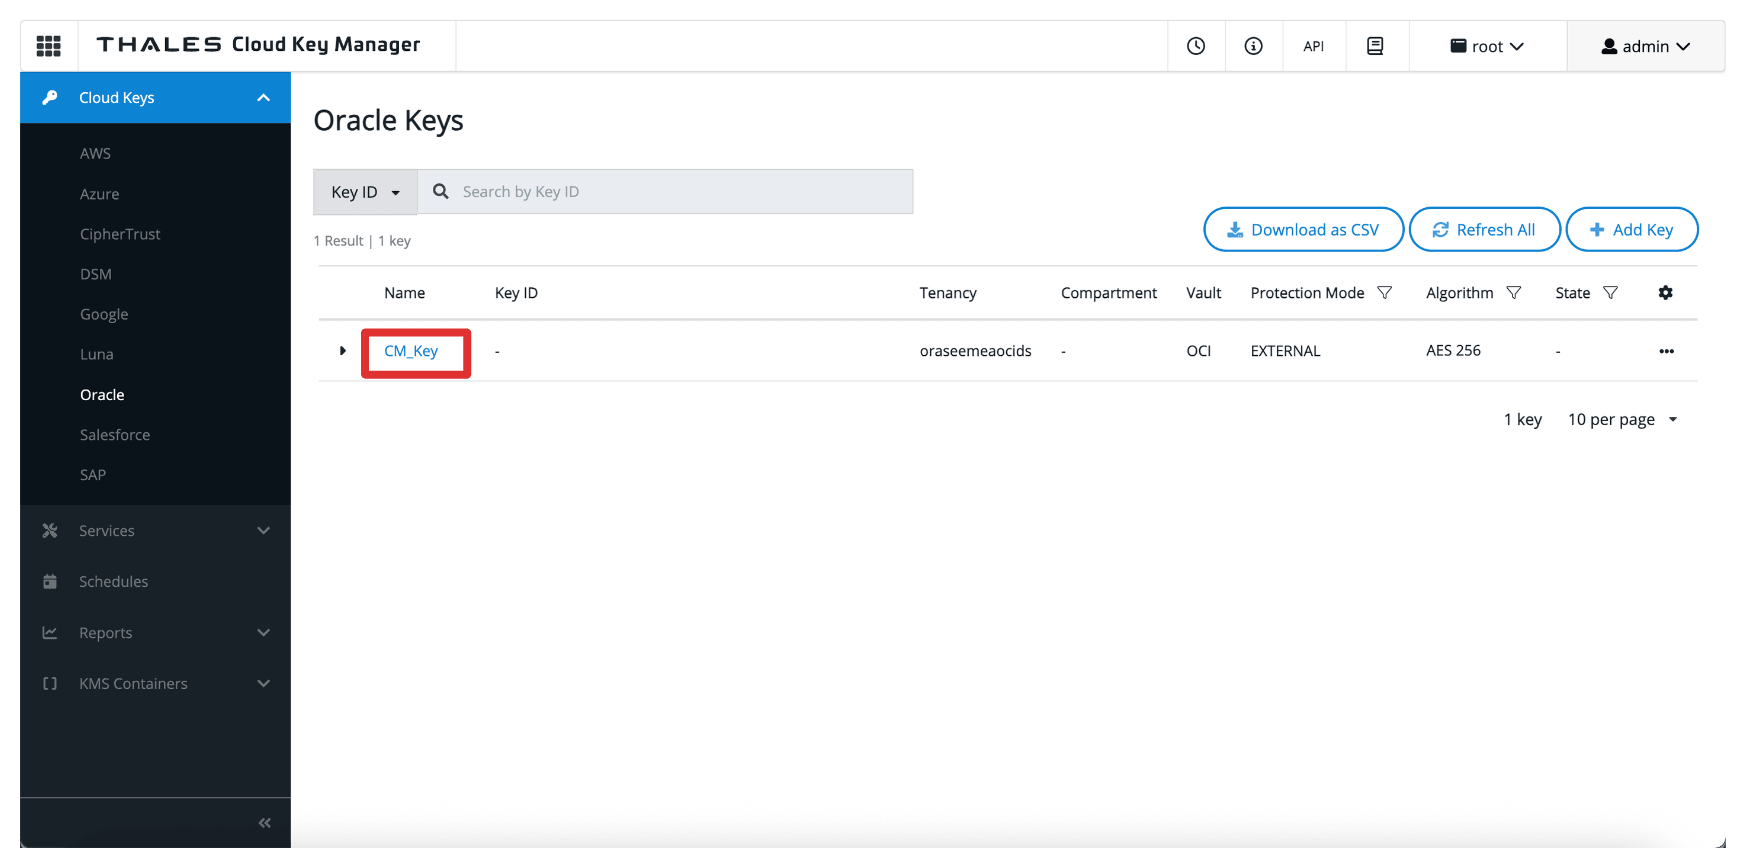
Go to the Thales Cloud Key Manager Console.
- Click Cloud Keys.
- Click Oracle.
- Click Key created in Task 15.
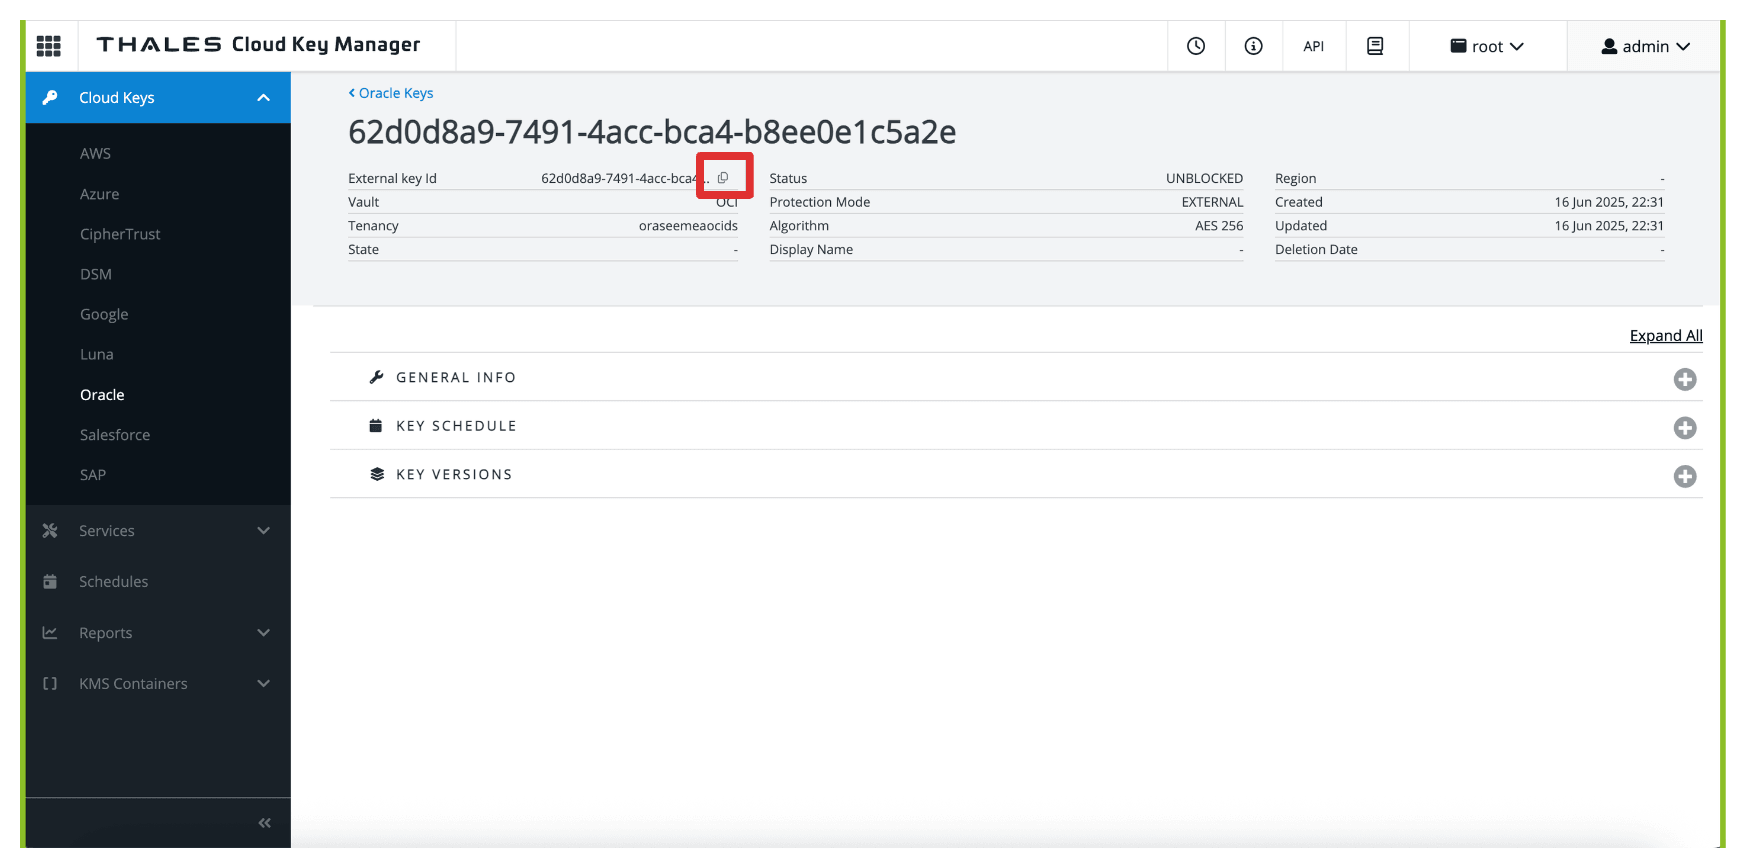
-
Note that the key will have an External Key ID, copy this ID.
-
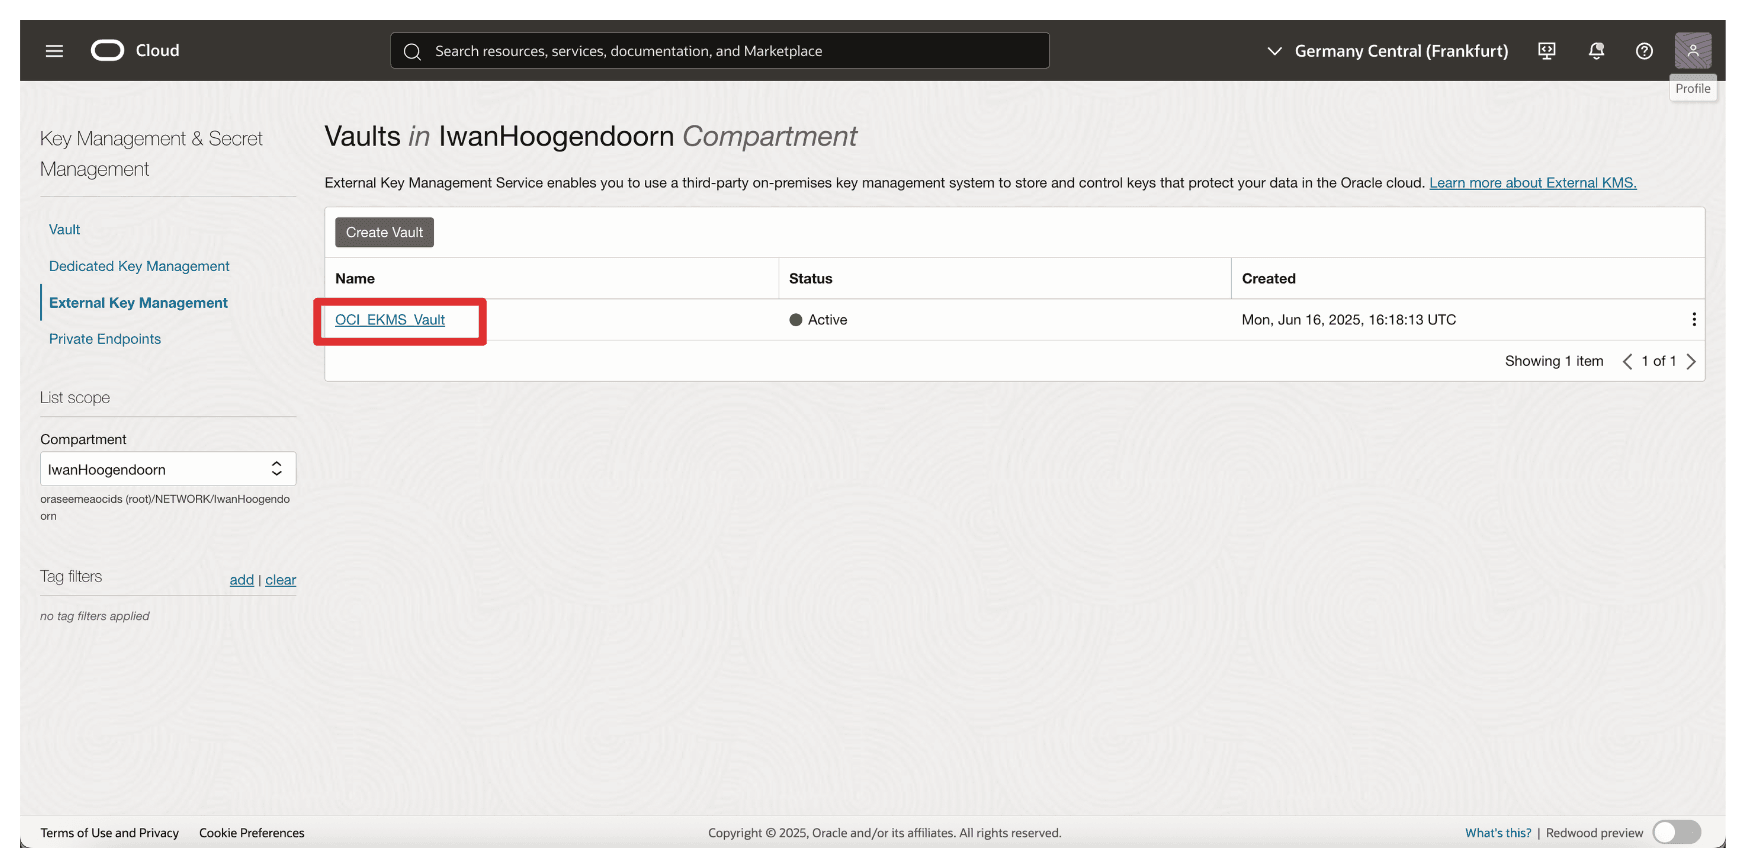
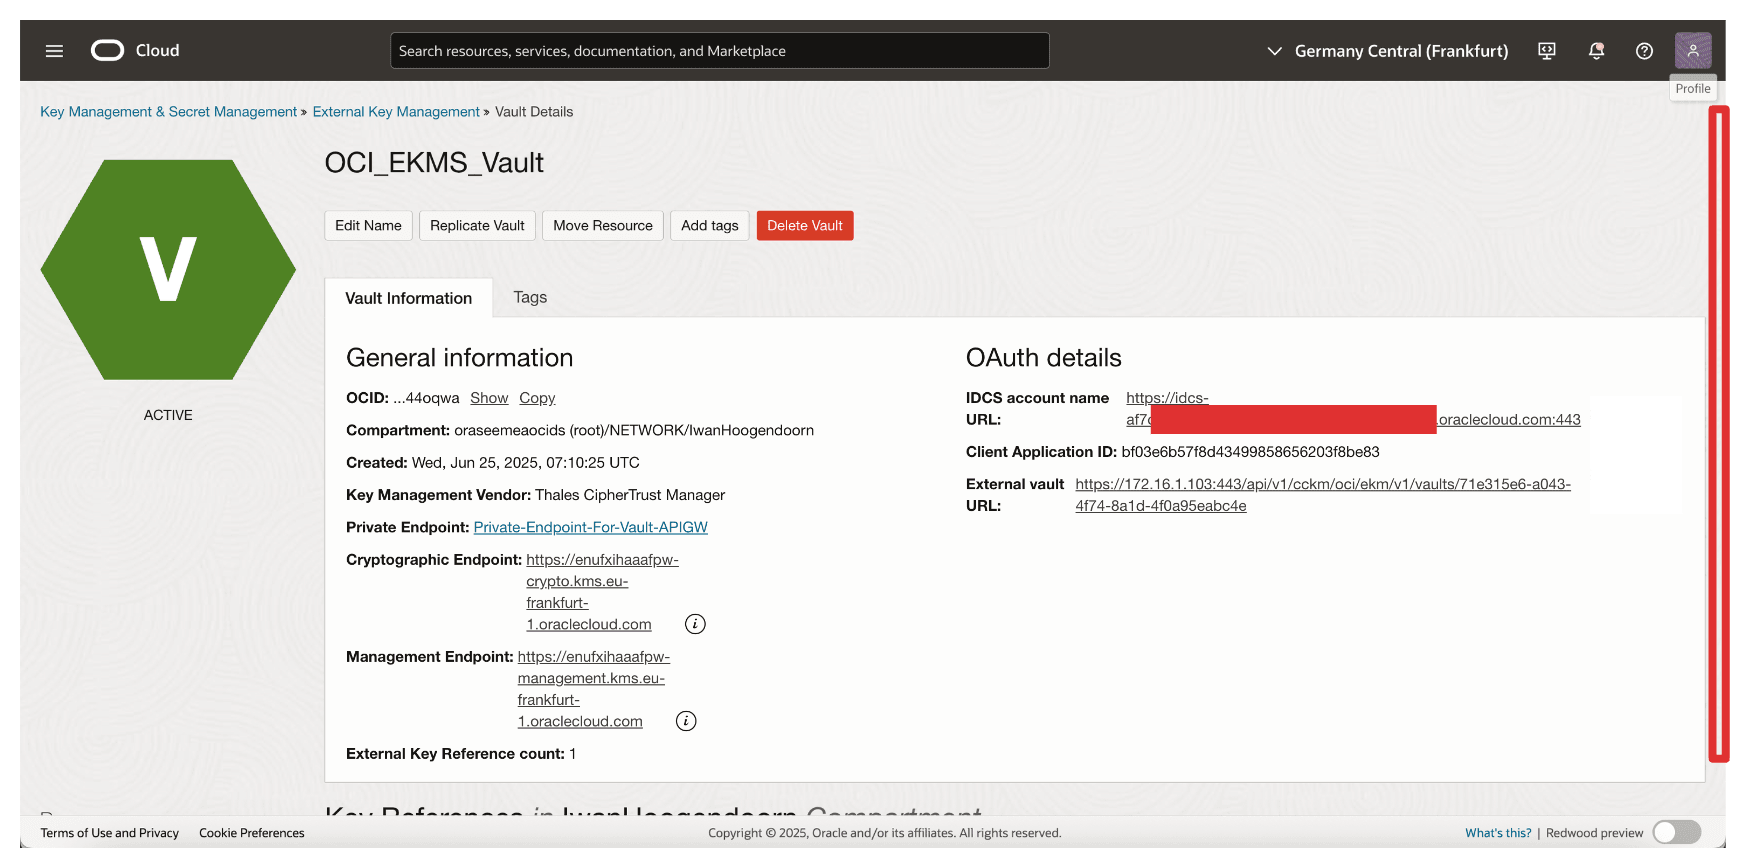
Return to the vault in OCI created in Task 9 and click the vault.
-
Scroll down.
-
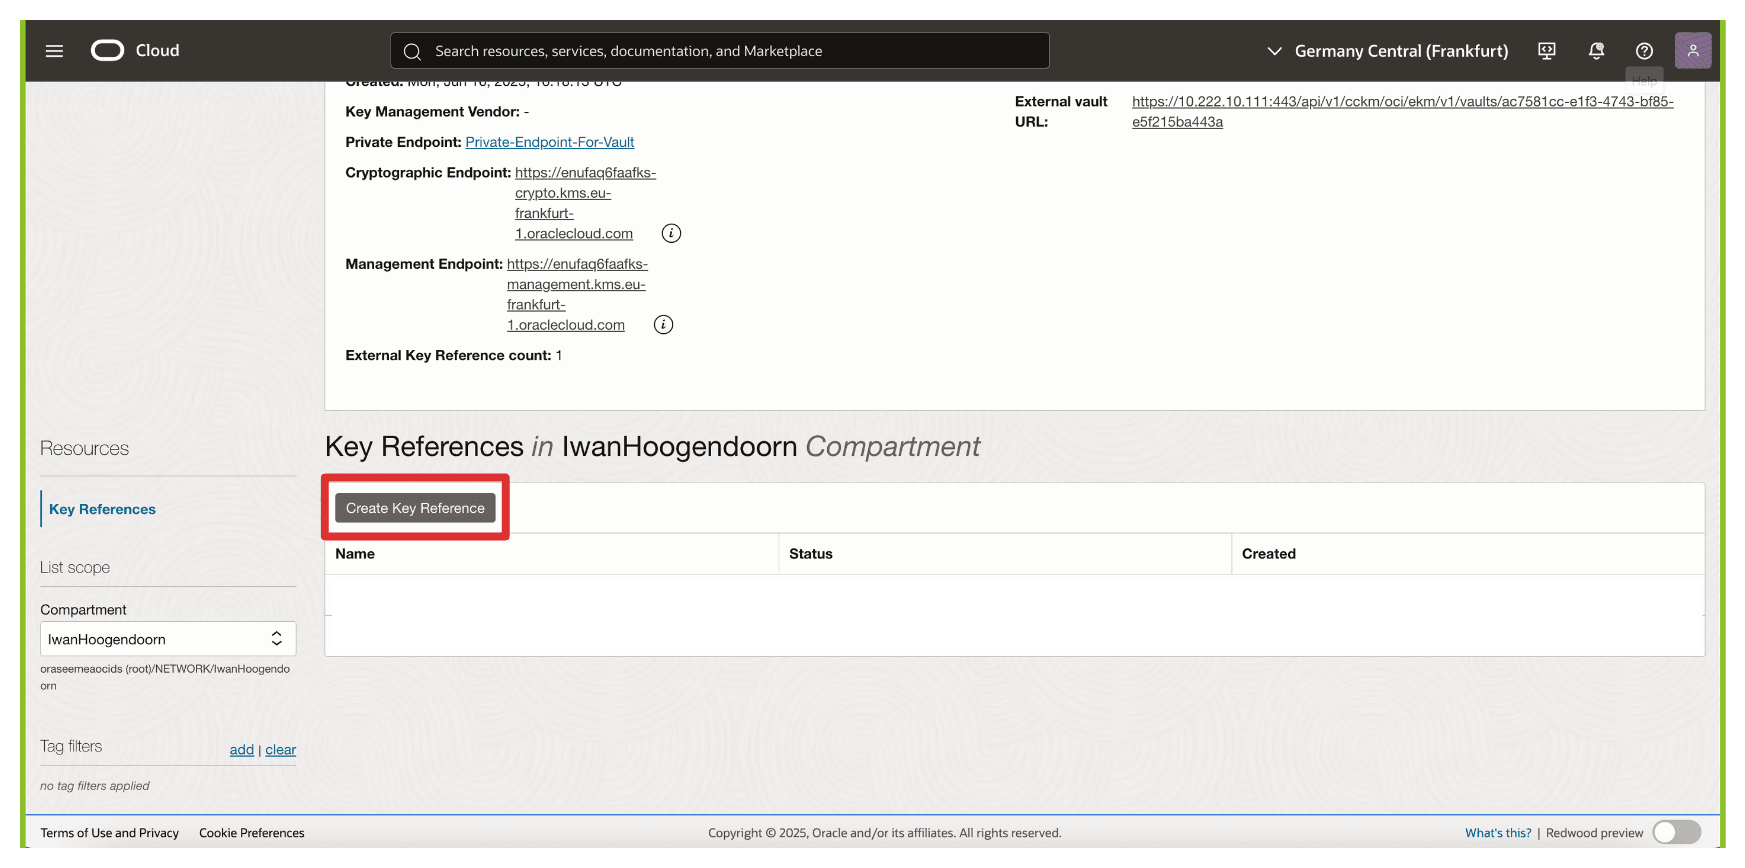
Click Create Key Reference.
-
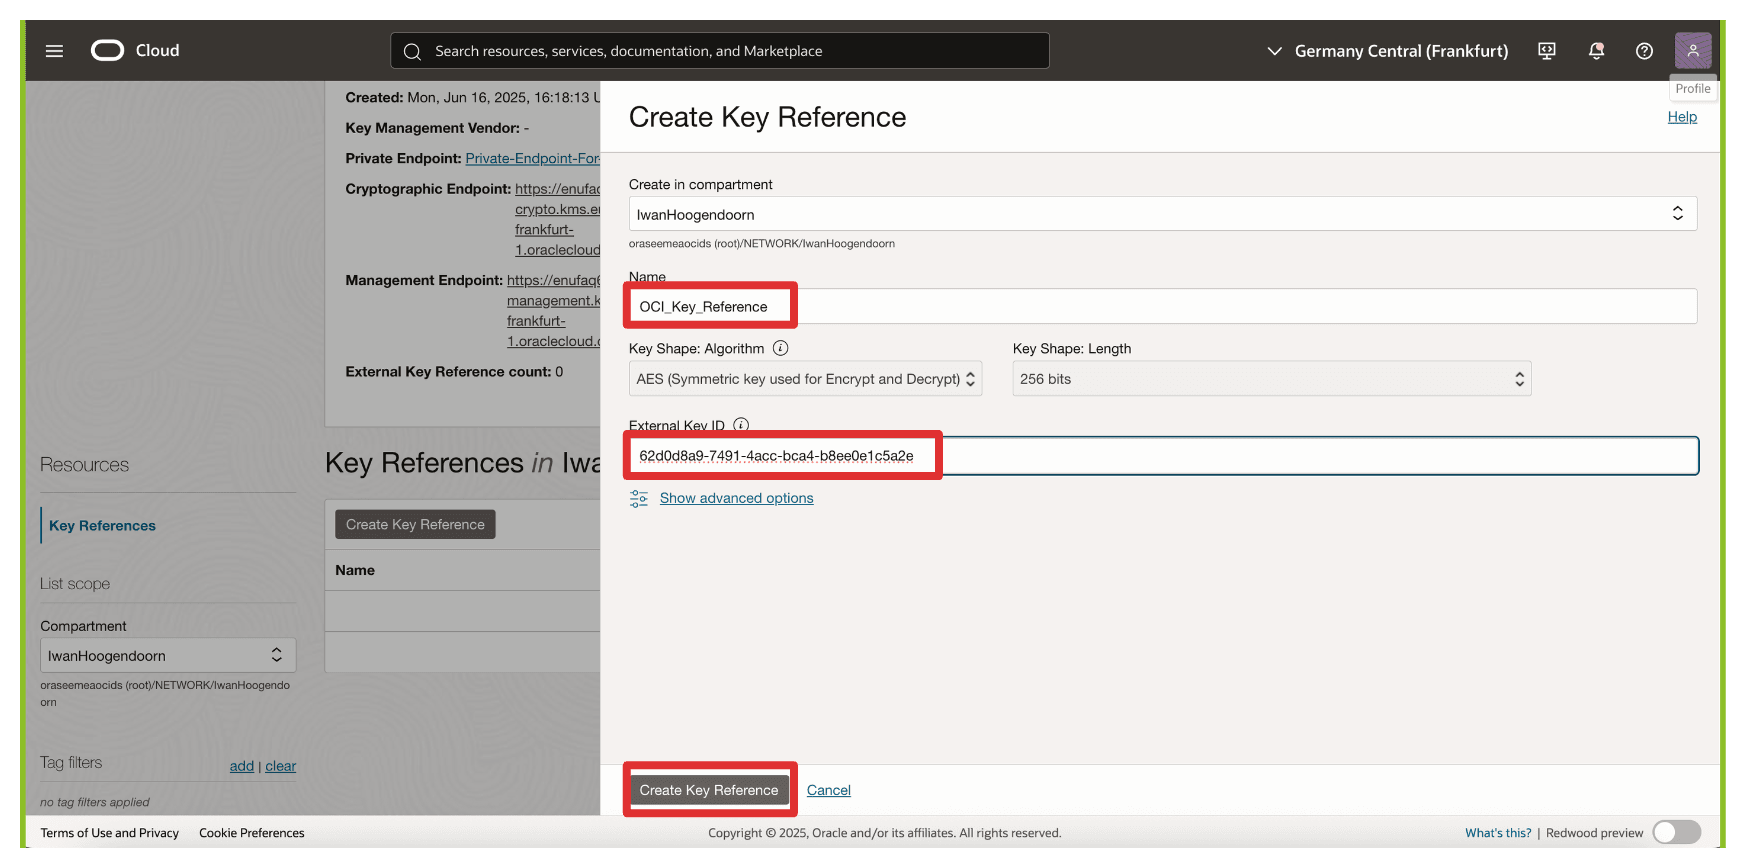
In Create Key Reference, enter the following information.
- Enter Name (
OCI_Key_Reference). - Enter the copied External Key ID (Thales CipherTrust Manager) key.
- Click Create Key Reference.
- Enter Name (
-
Note that the key reference has been created.
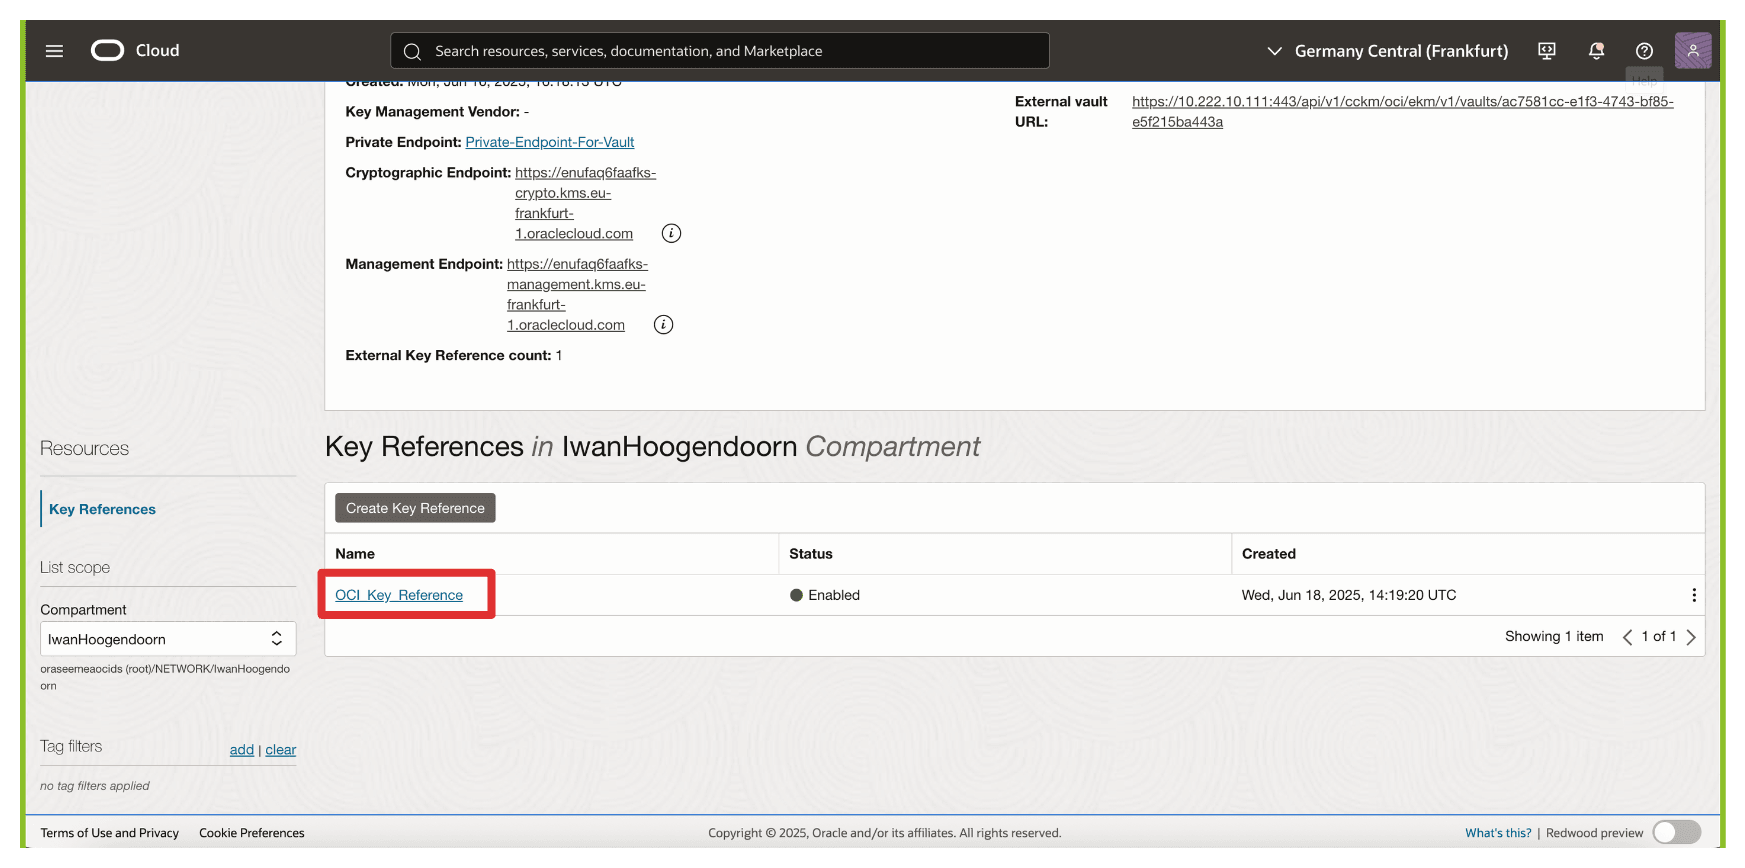
OCI will now associate this key reference with the external key managed in Thales CipherTrust Manager. This enables OCI services such as OCI Object Storage, OCI Block Volumes, and others to send cryptographic requests to the external key over the private endpoint. In contrast, the key material itself remains entirely under your control.
We will test the key reference immediately by attaching it to an OCI Object Storage bucket to verify that the integration is working as expected.
Task 17: Create an OCI Object Storage Bucket with Customer-Managed Keys
You can encrypt resources using the external key referenced in OCI. In this task, we will create an OCI Object Storage bucket that uses the external, customer-managed key hosted on the Thales CipherTrust Manager through the external key management vault.
This setup ensures that all objects stored in the bucket are encrypted using a key you fully control, meeting strict compliance, sovereignty, or internal policy requirements.
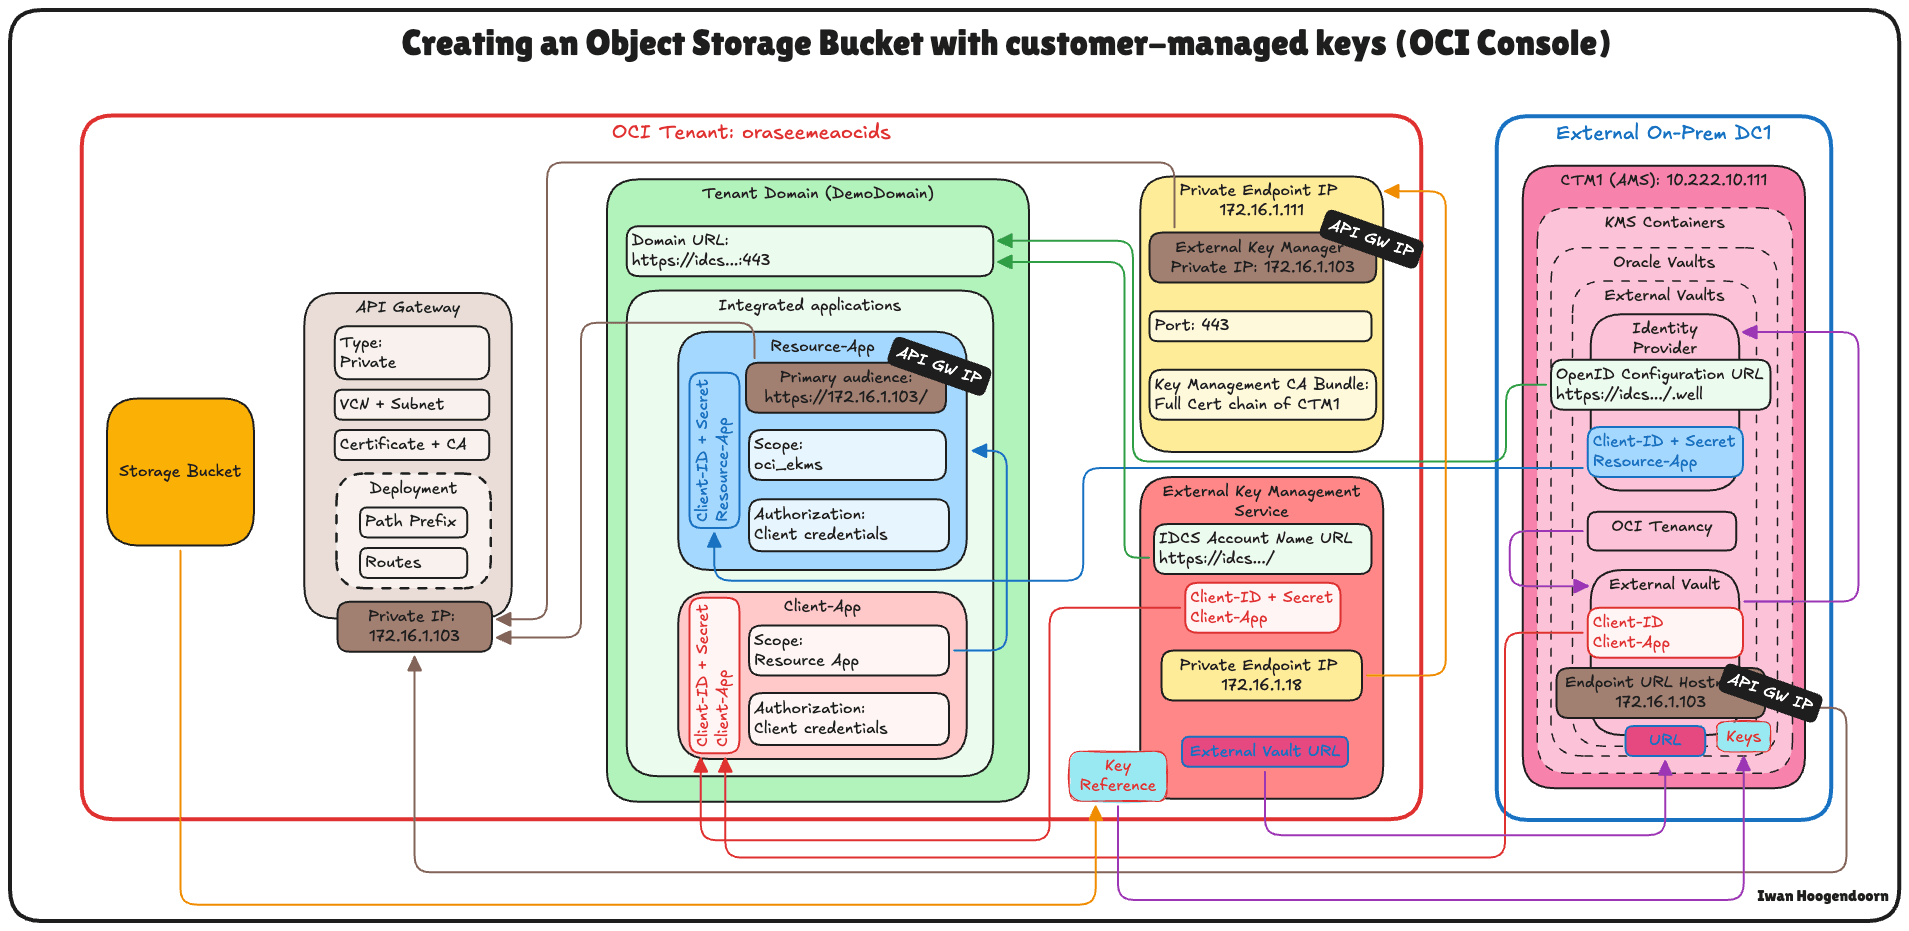
The following image illustrates the components and configuration setup in this task.
-
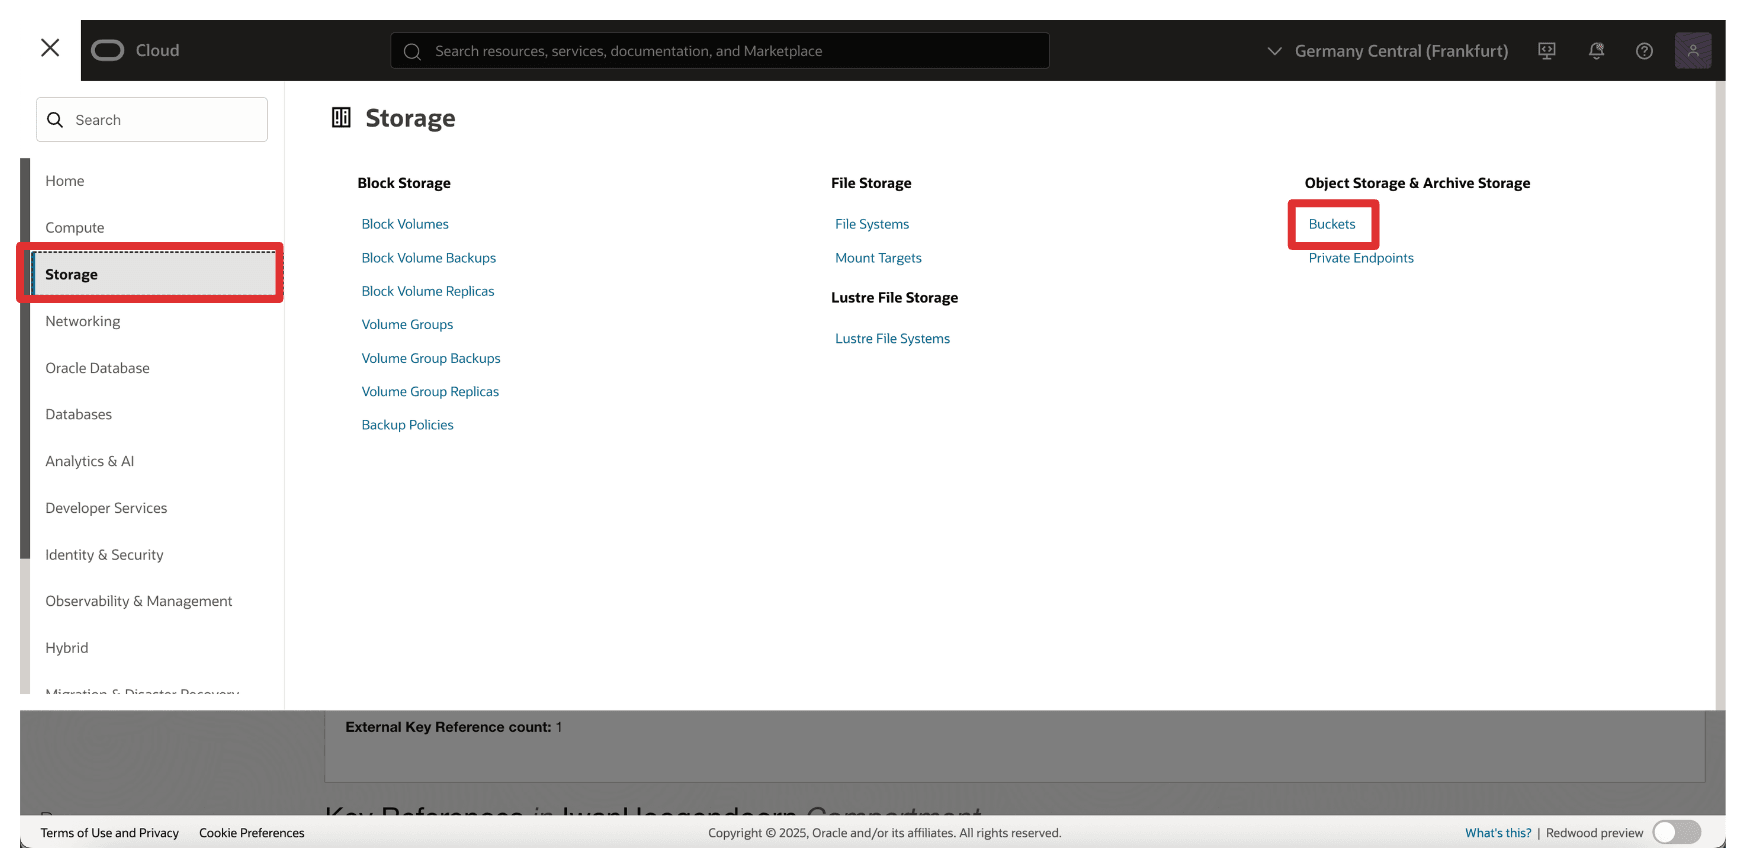
Go to the OCI Console, navigate to Storage and click Buckets.
-
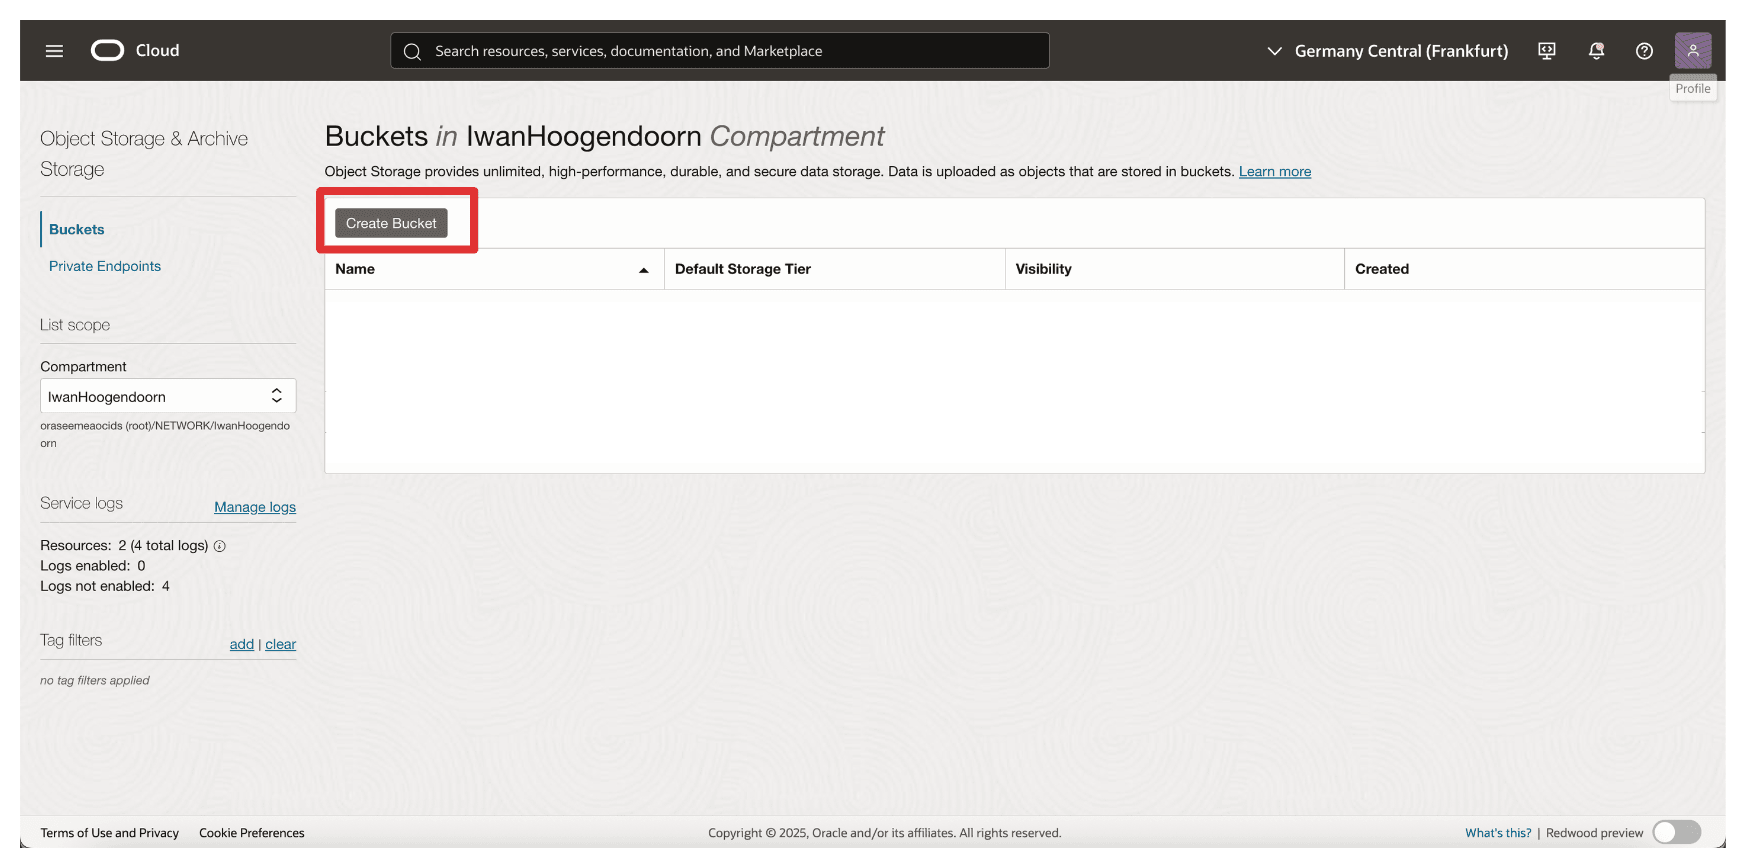
Click Create Bucket.
-
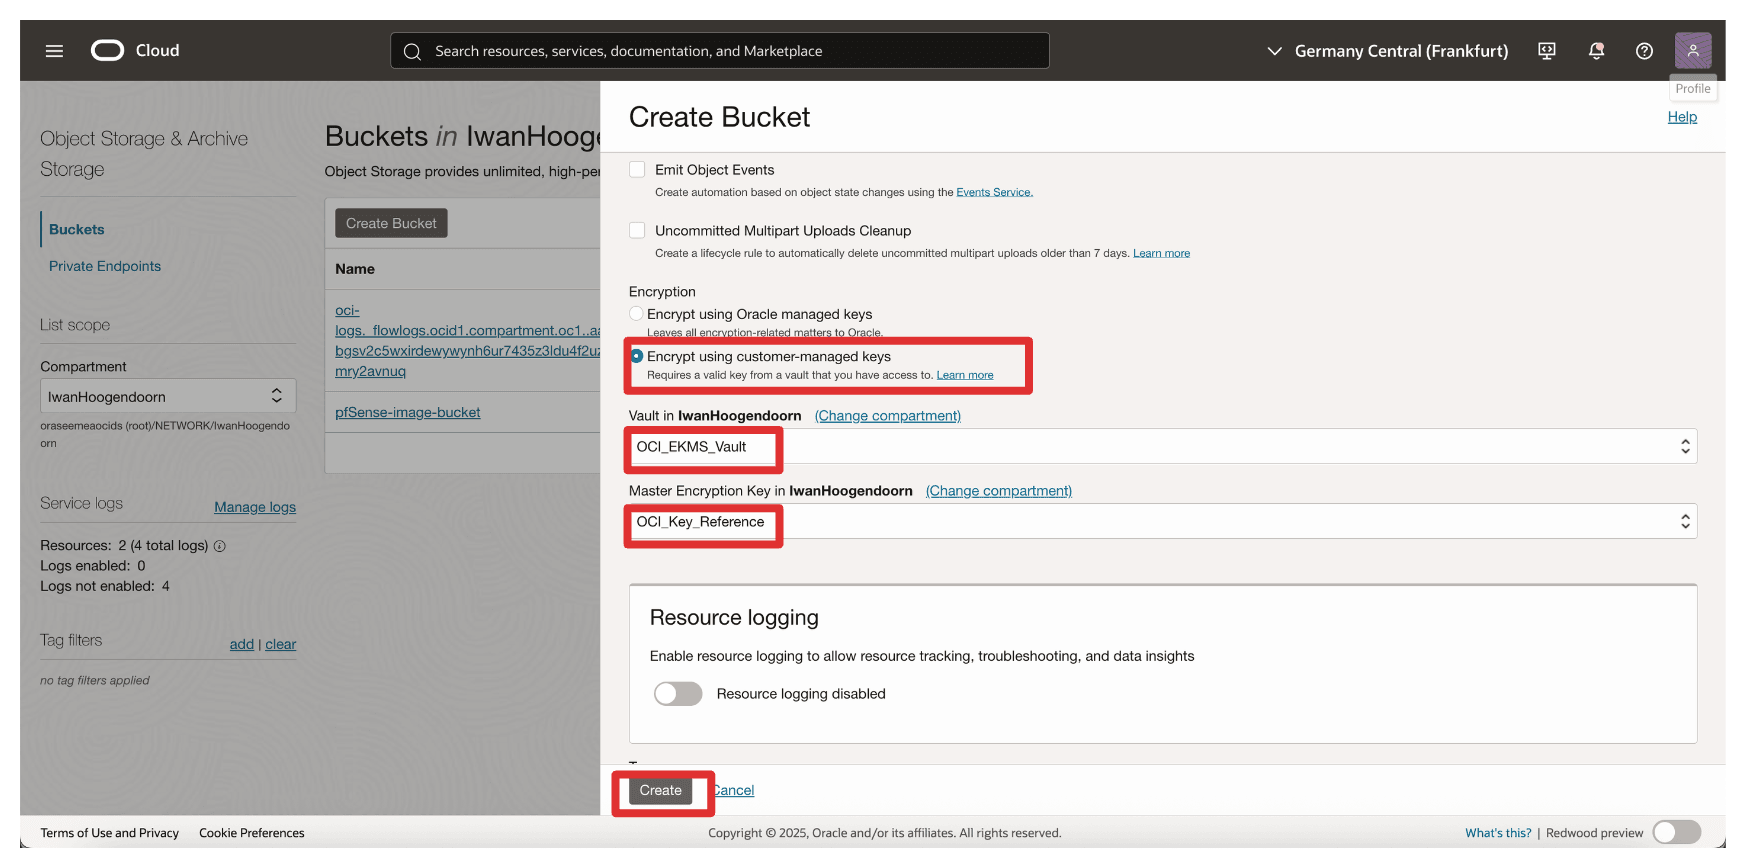
In Create Bucket, enter the following information.
- Enter Name (
OCI_EKMS_Test_Bucket). - Scroll down.
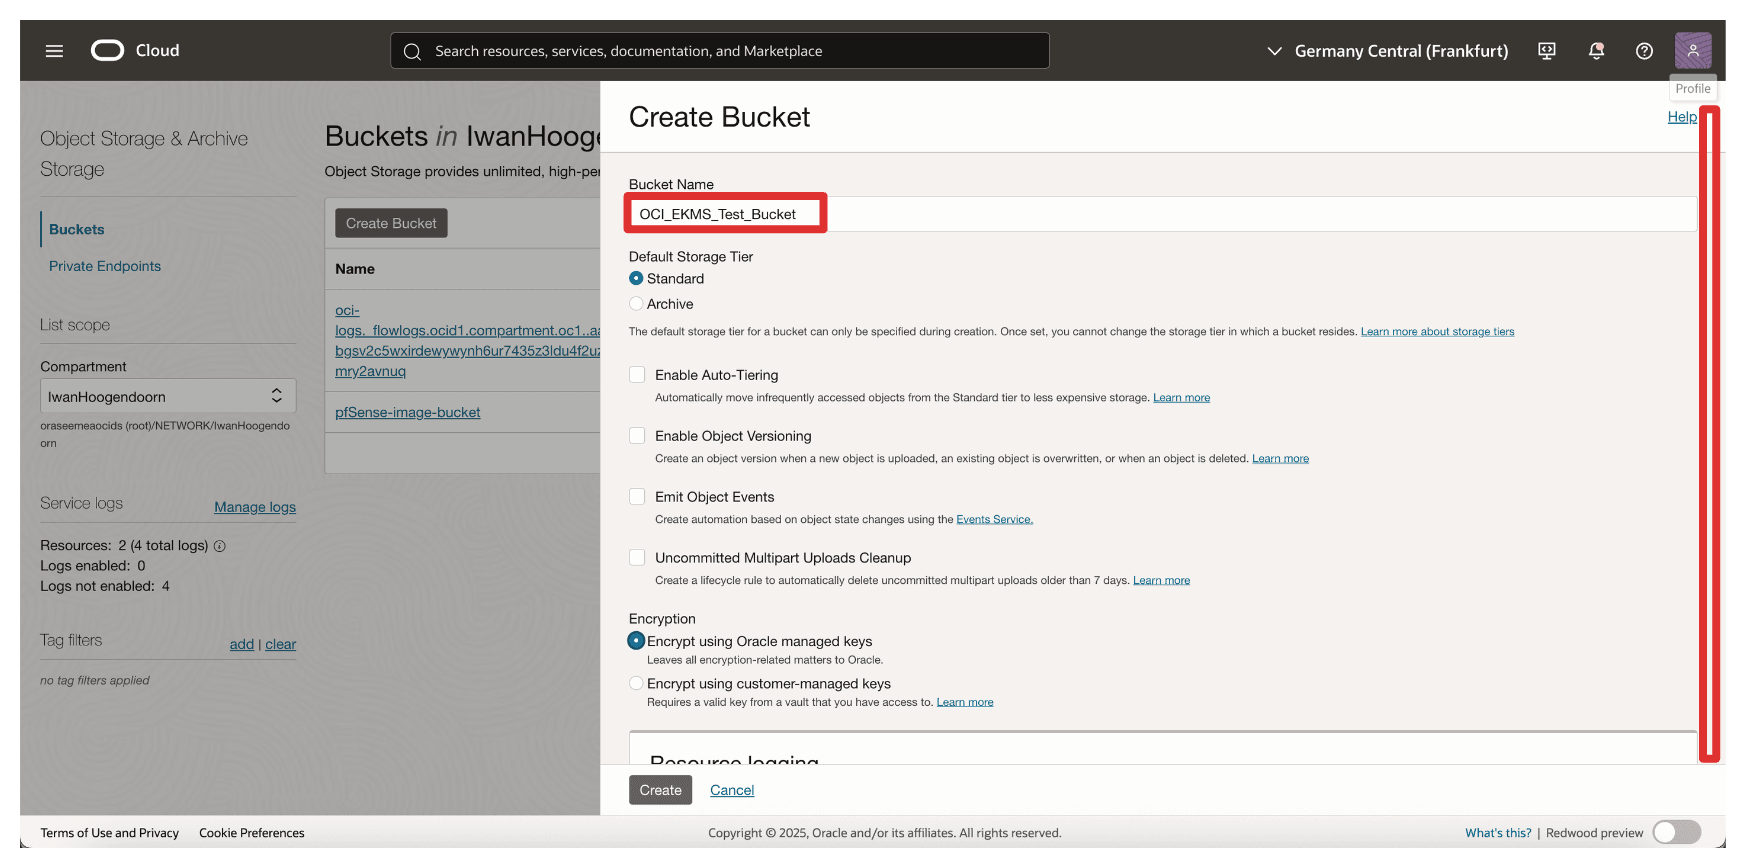
- In Encryption, select Encrypt using customer-managed keys.
- In Vault, select your External Key Management Vault created in Task 8.
- In Key, select key reference created in Task 16.
- Click Create.
- Enter Name (
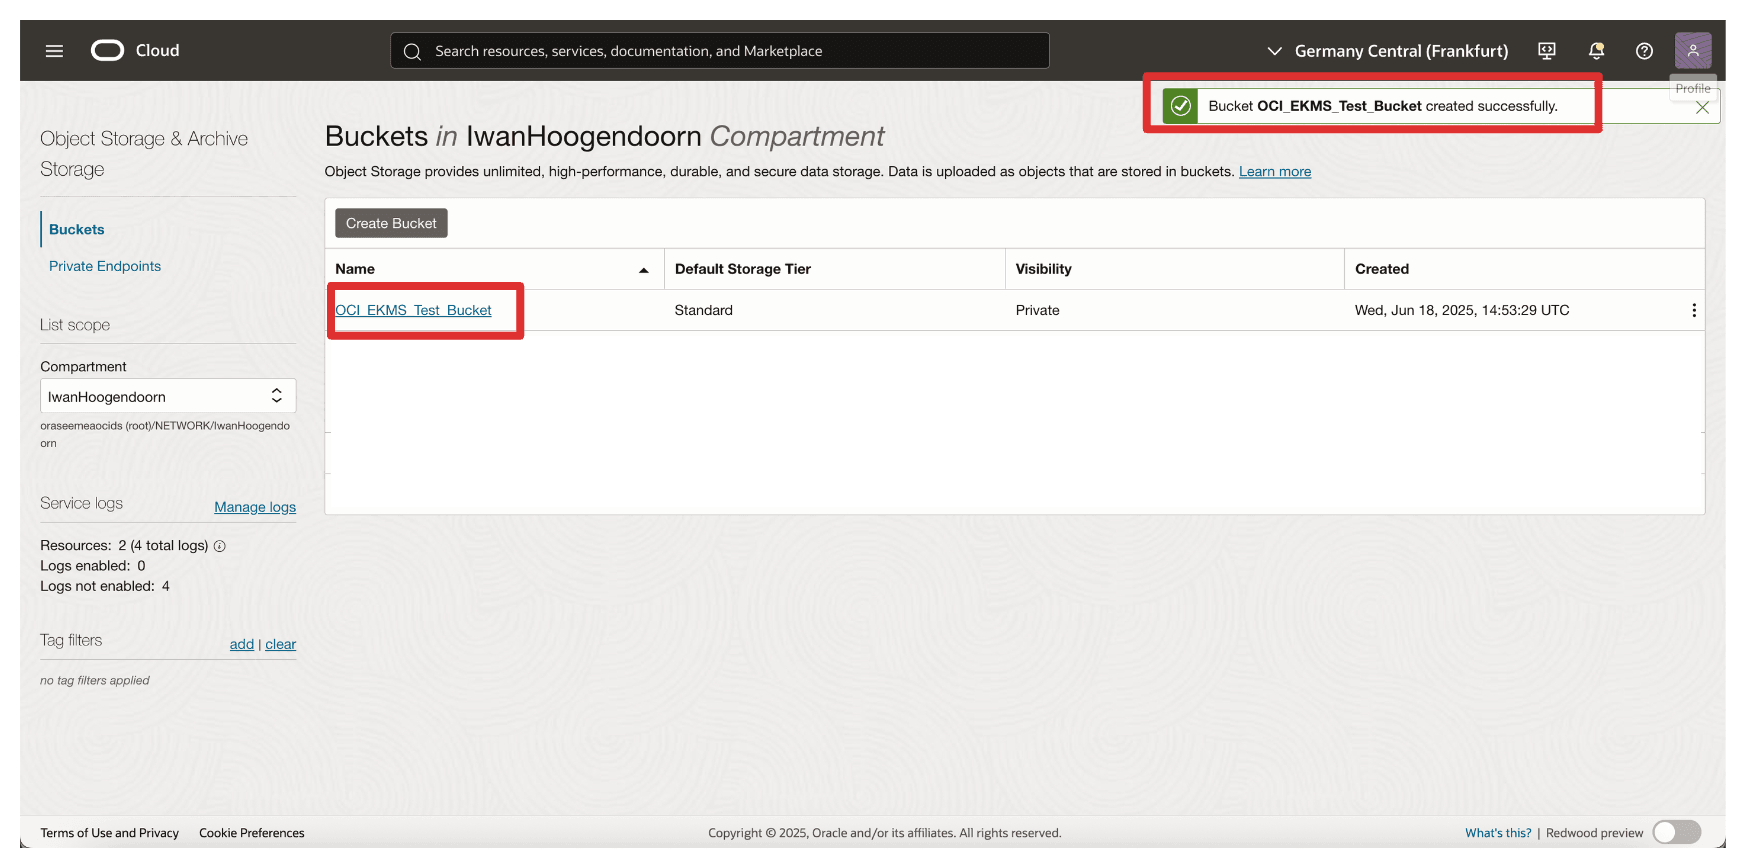
-
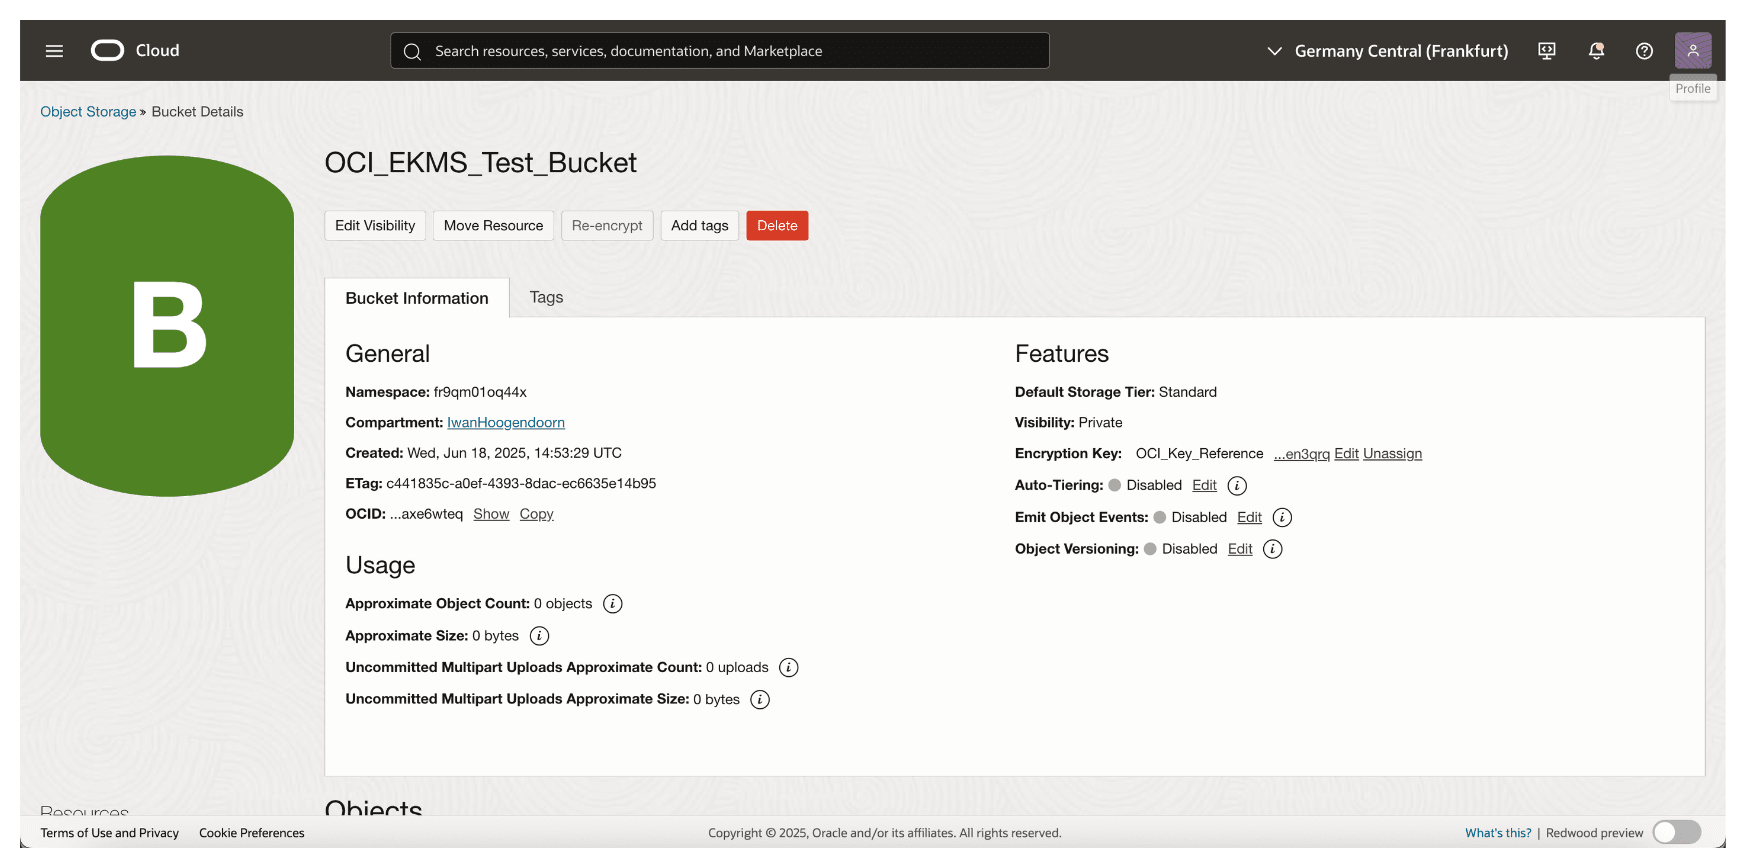
Note that the bucket is created. Click the bucket.
-
You can scroll down to upload files or leave them empty.
-
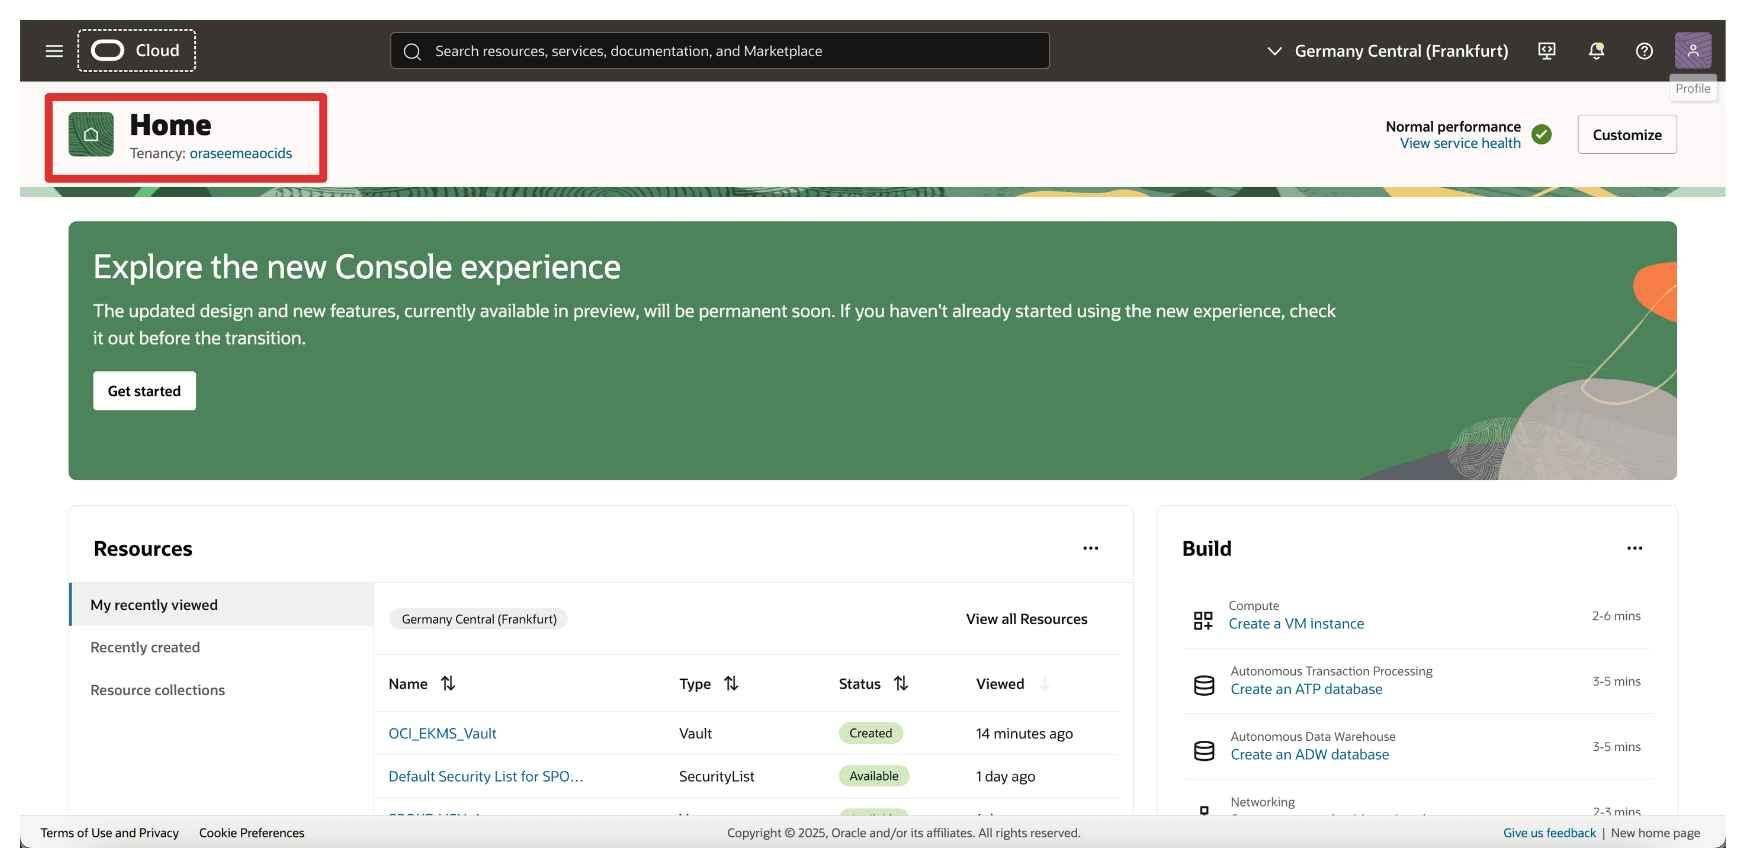
Navigate to the home screen of the OCI Console or any other page.
Once the bucket is created, all data stored in it will be encrypted using the external key managed by Thales CipherTrust Manager. This ensures that OCI relies on your key infrastructure for access and control, enabling complete Hold Your Own Key (HYOK) capabilities.
Suppose the external key becomes unavailable (for example, disabled or blocked in Thales CipherTrust Manager). In that case, access to the bucket and its contents will be denied, offering a powerful control point for your data security posture. This is something we will test in the next task.
Task 18: Block and Unblock Oracle Keys and Test the OCI Object Storage Bucket Accessibility in Thales CipherTrust Manager and OCI
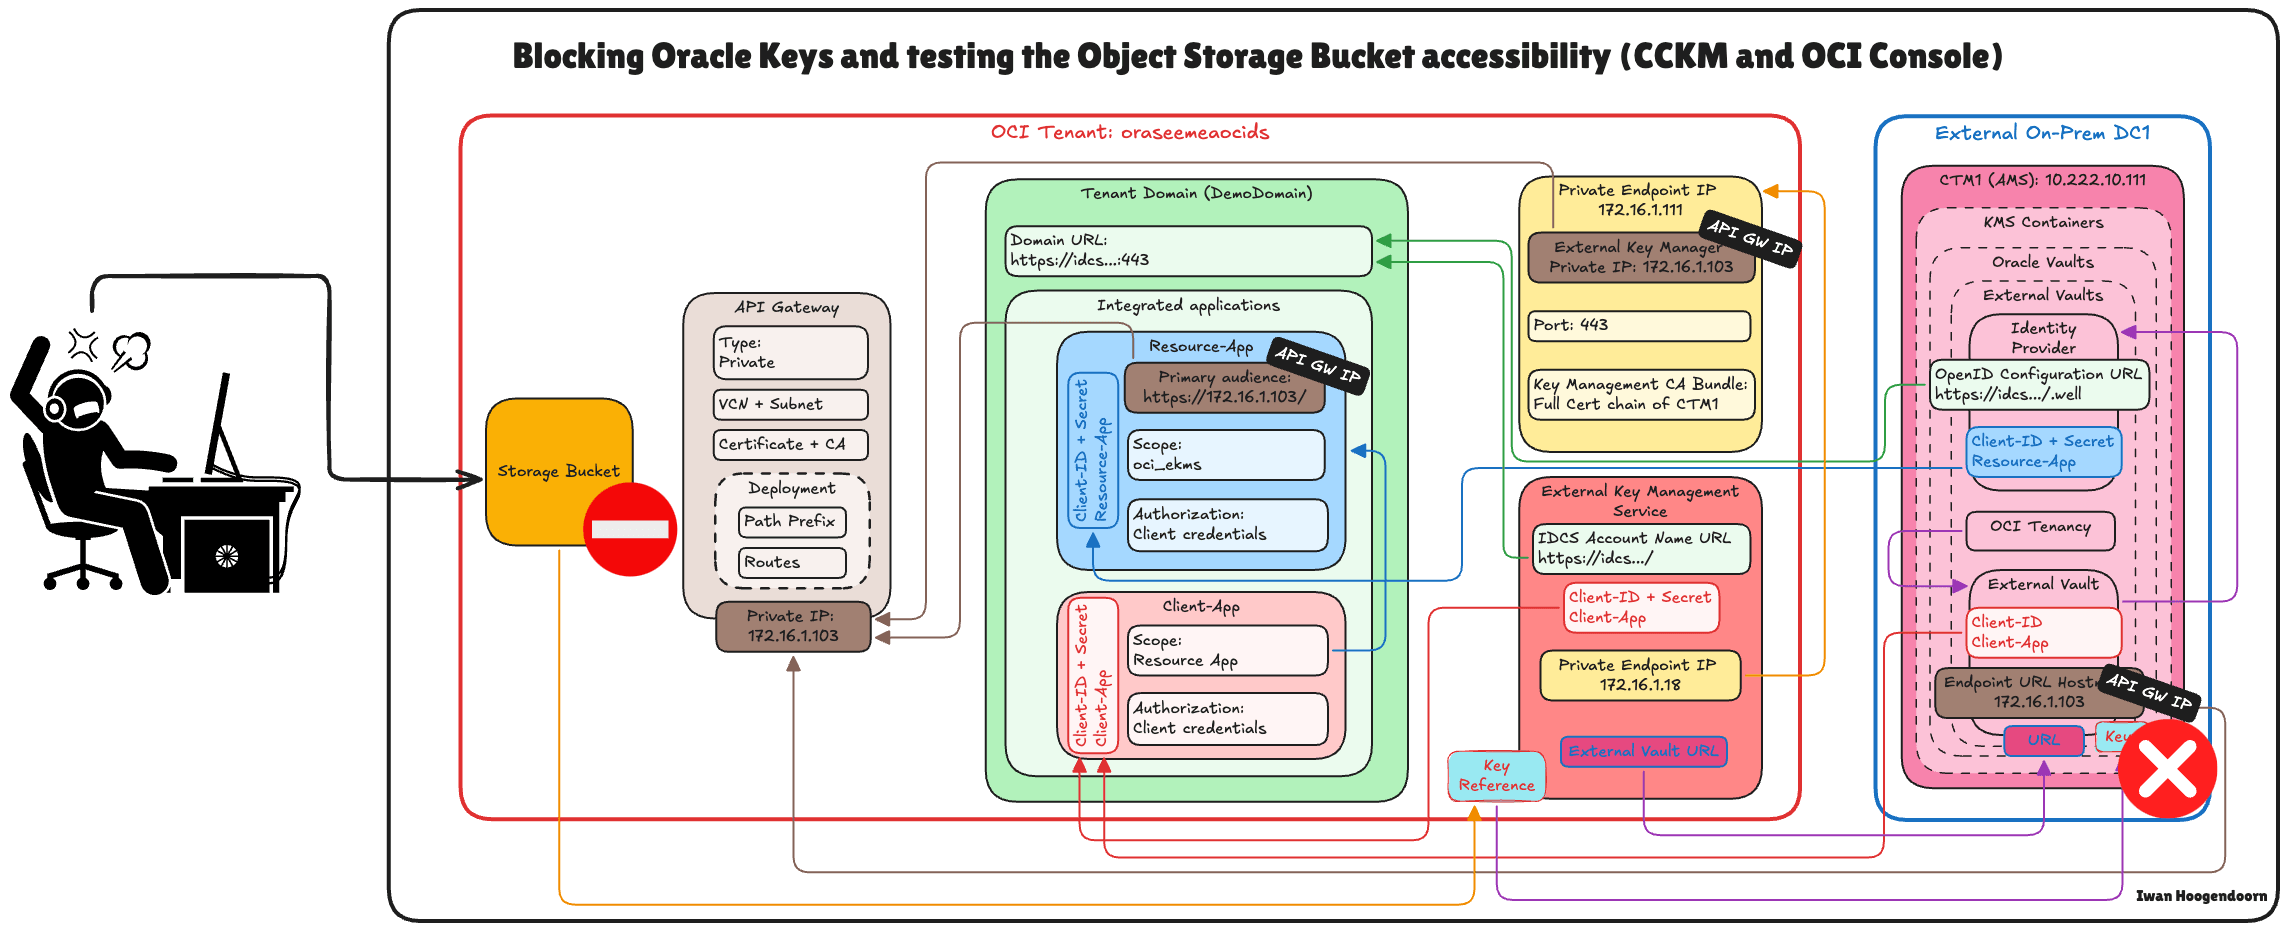
One of the key benefits of the Hold Your Own Key (HYOK) model is the ability to retain complete operational control over your encryption keys including the power to block or unblock them at any time. This section demonstrates how to use Thales CipherTrust Manager to control access to an Oracle-managed object storage bucket by blocking or unblocking the external key.
Blocking a key effectively restricts access to any OCI resource encrypted with that key without deleting the key or the data. Unblocking restores access.
-
Go to the Thales Cloud Key Manager Console.
- Click Cloud Keys.
- Click Oracle.
- Click the three dots at the end of the Key.
- Select Block.
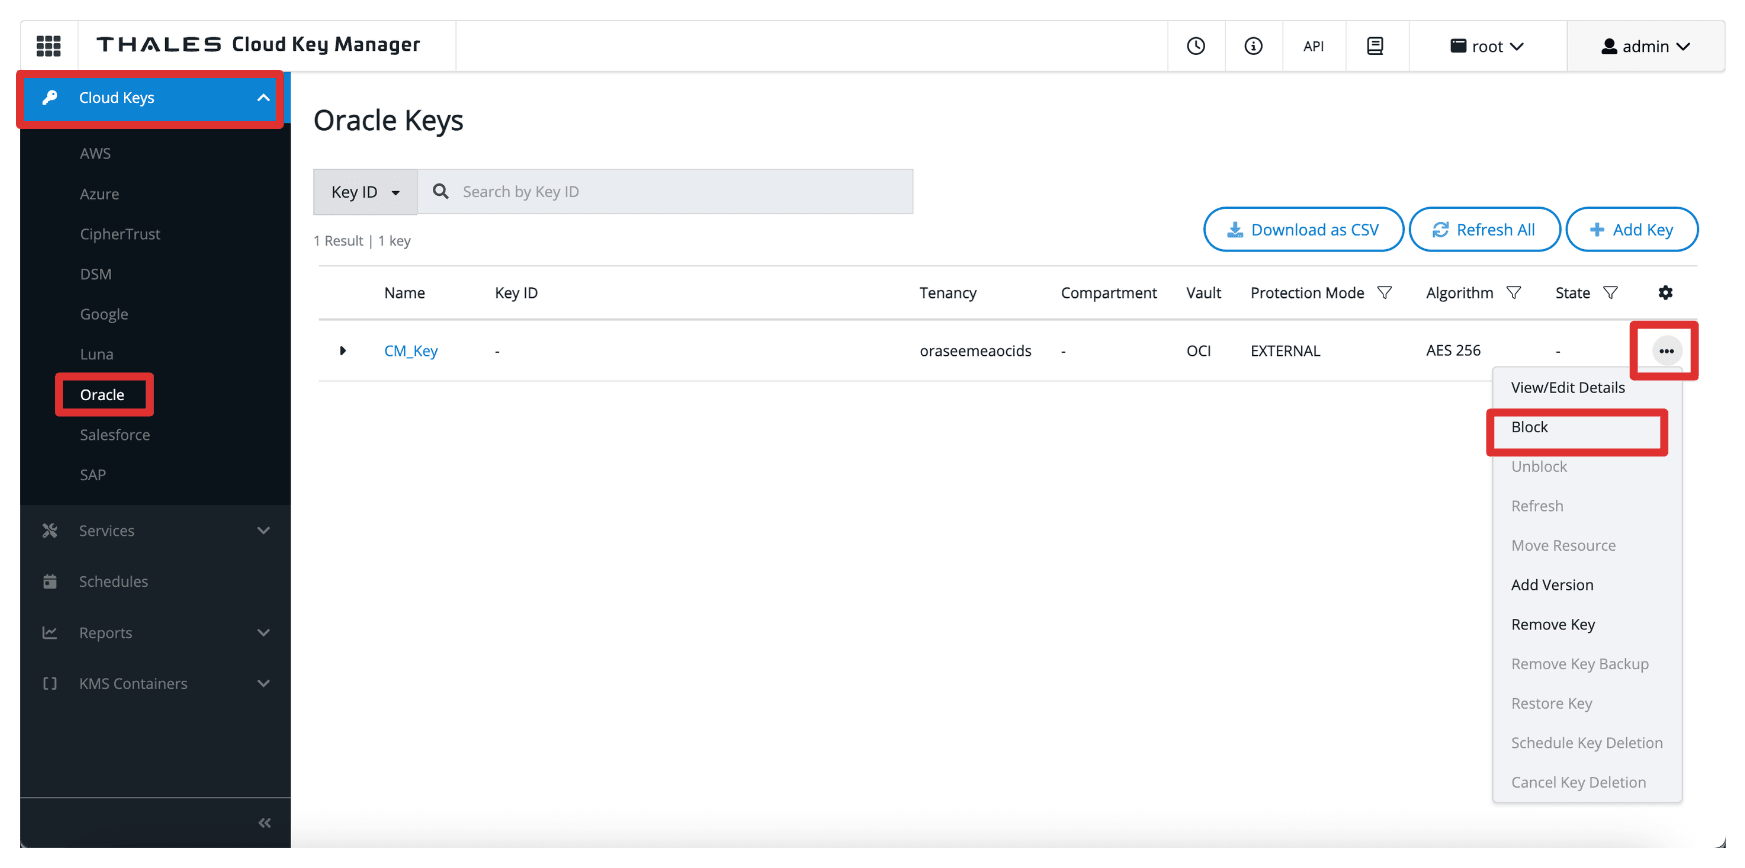
-
Select Block.
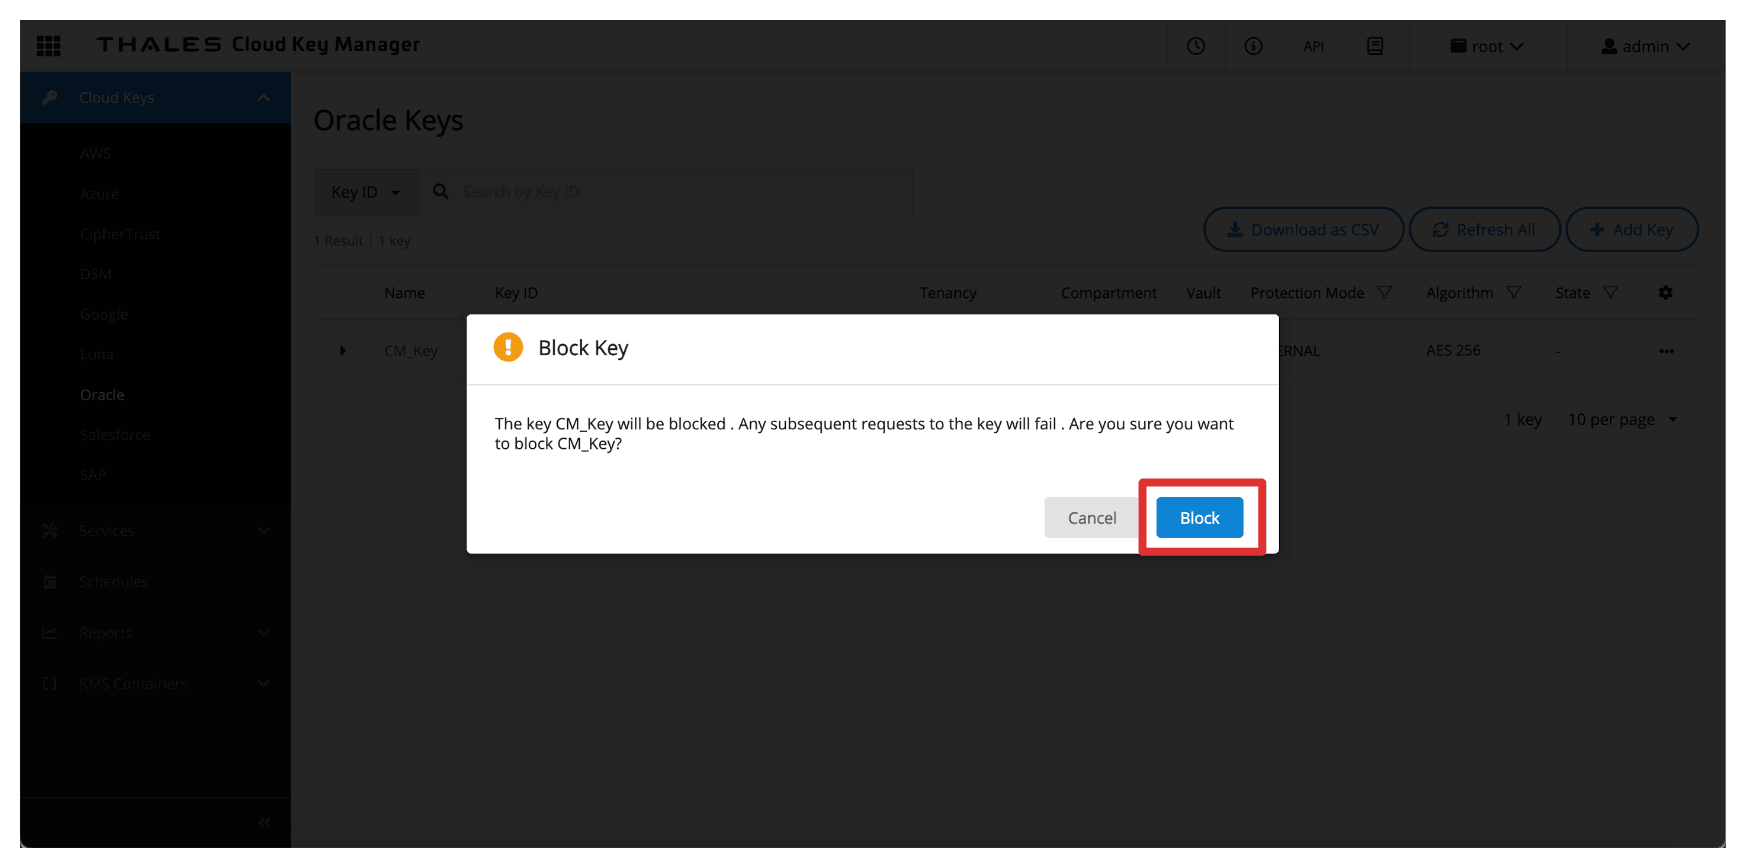
-
Note that the key is now Blocked in the Thales CipherTrust Manager.
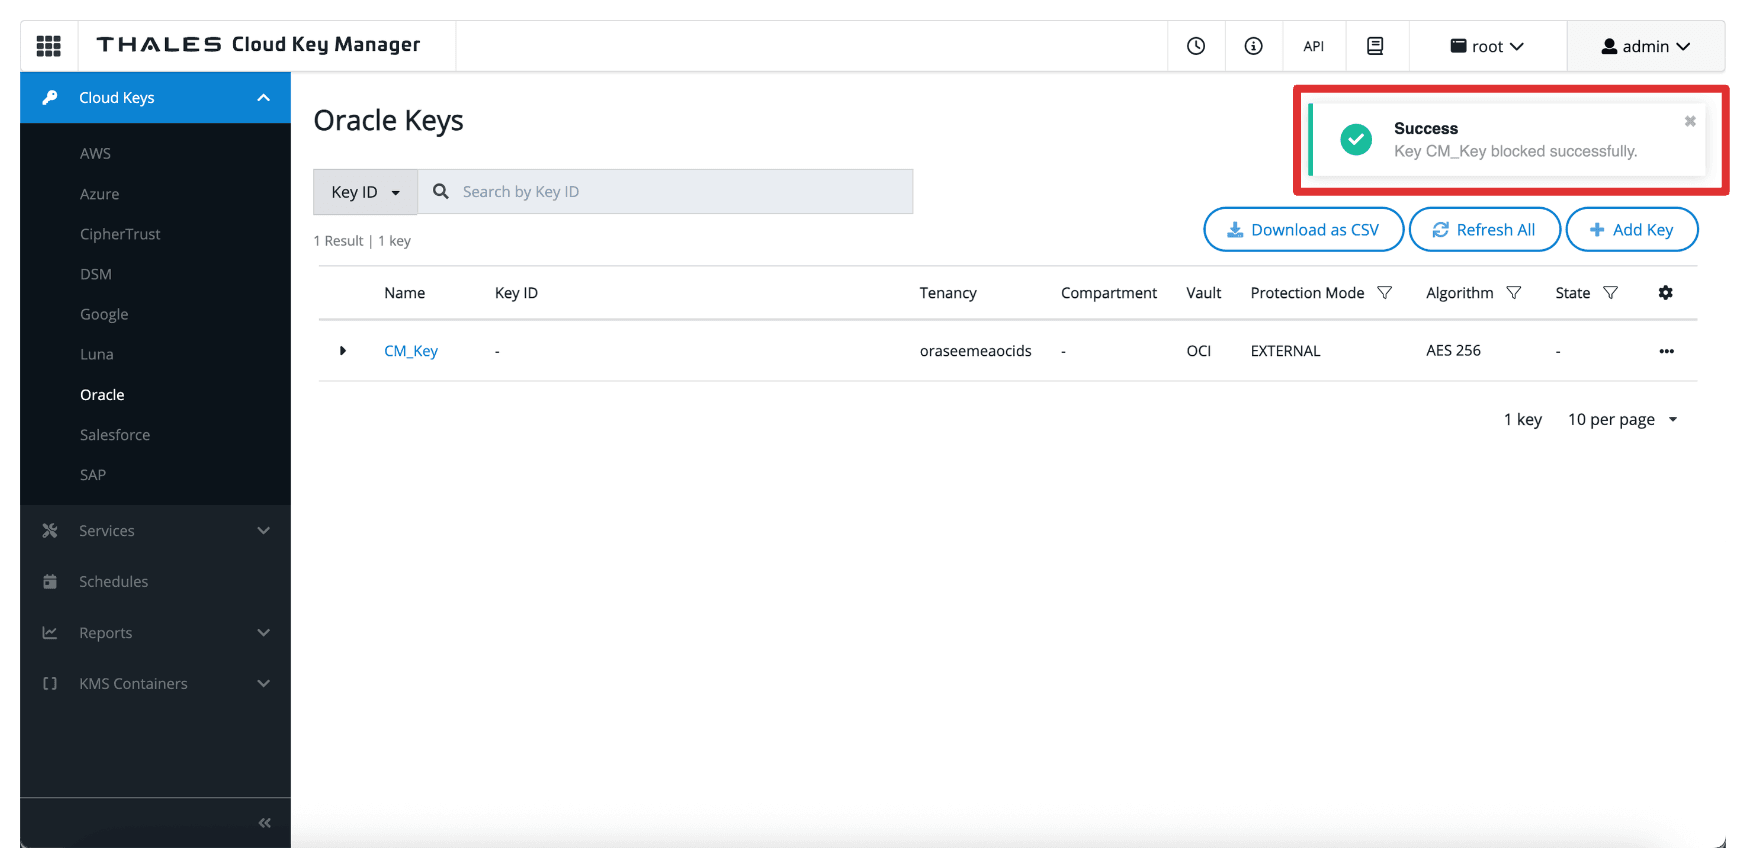
-
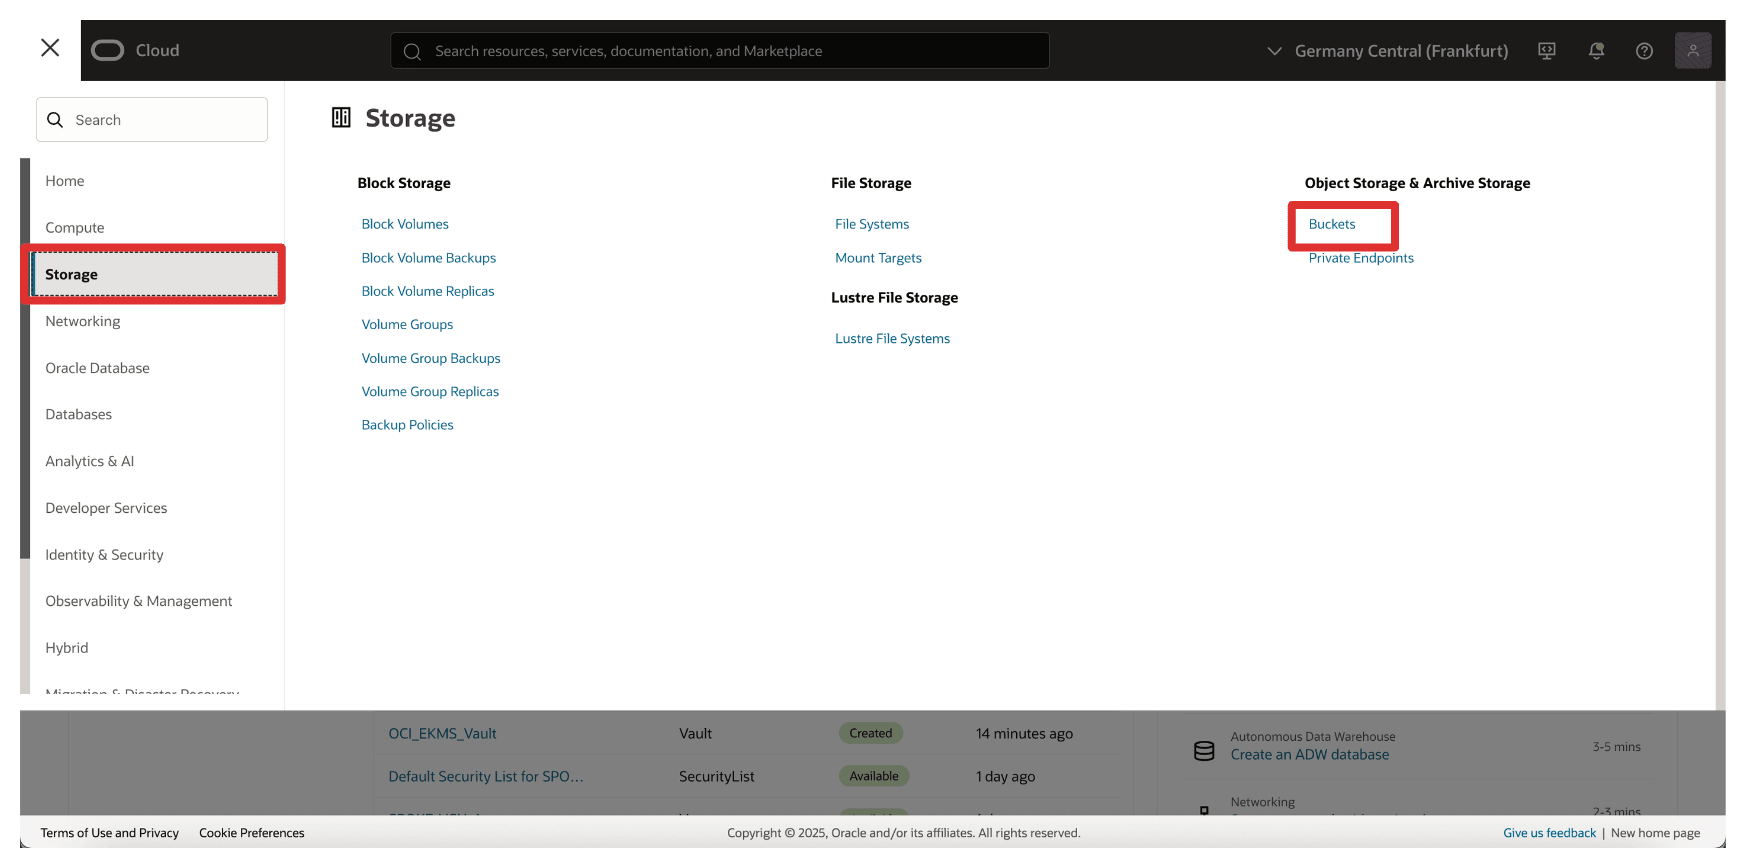
Go to the OCI Console, navigate to Storage and click Buckets.
-
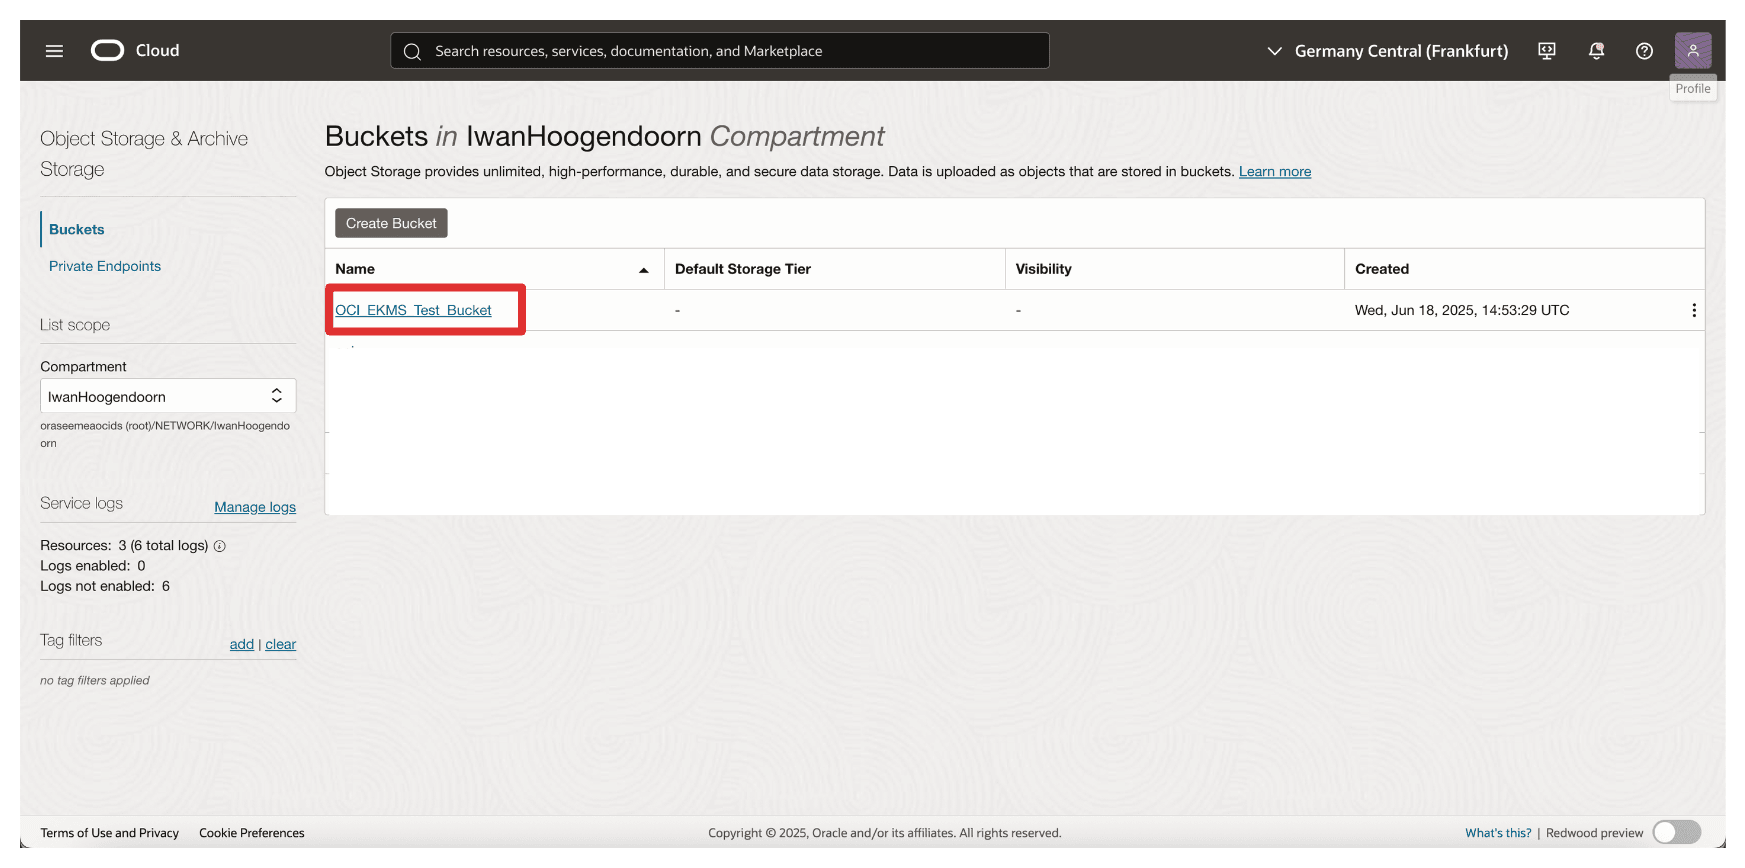
Click the bucket created in Task 17.
-
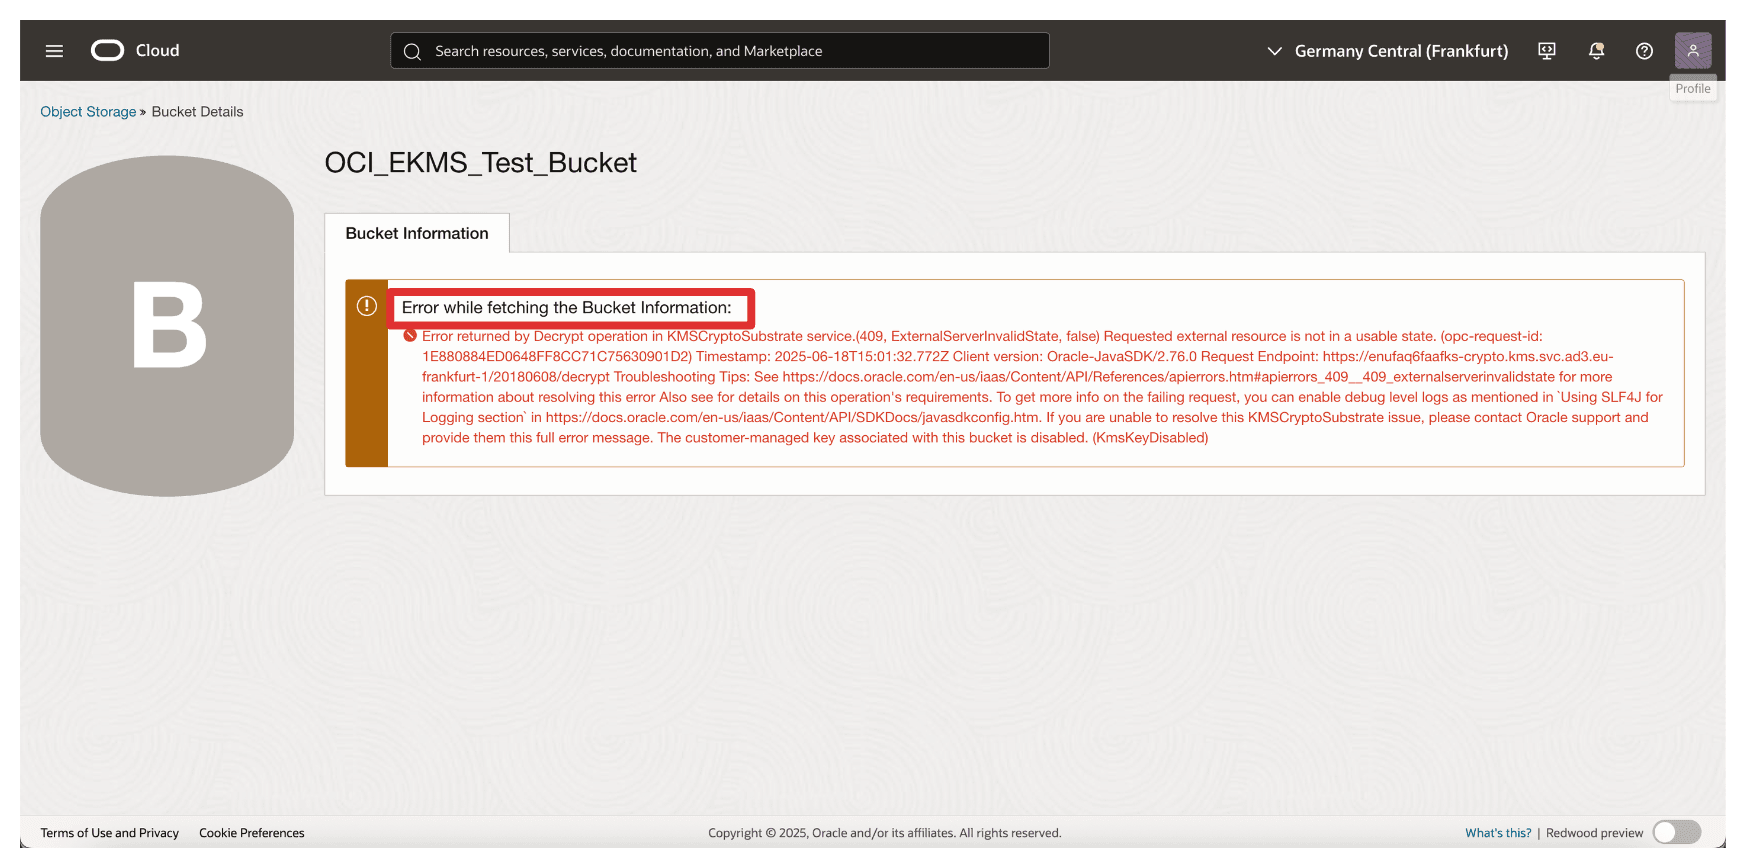
Note that you will now have an error and cannot access the bucket or any file uploaded in the bucket.
Now, let’s unblock the key in Thales CipherTrust Manager again.
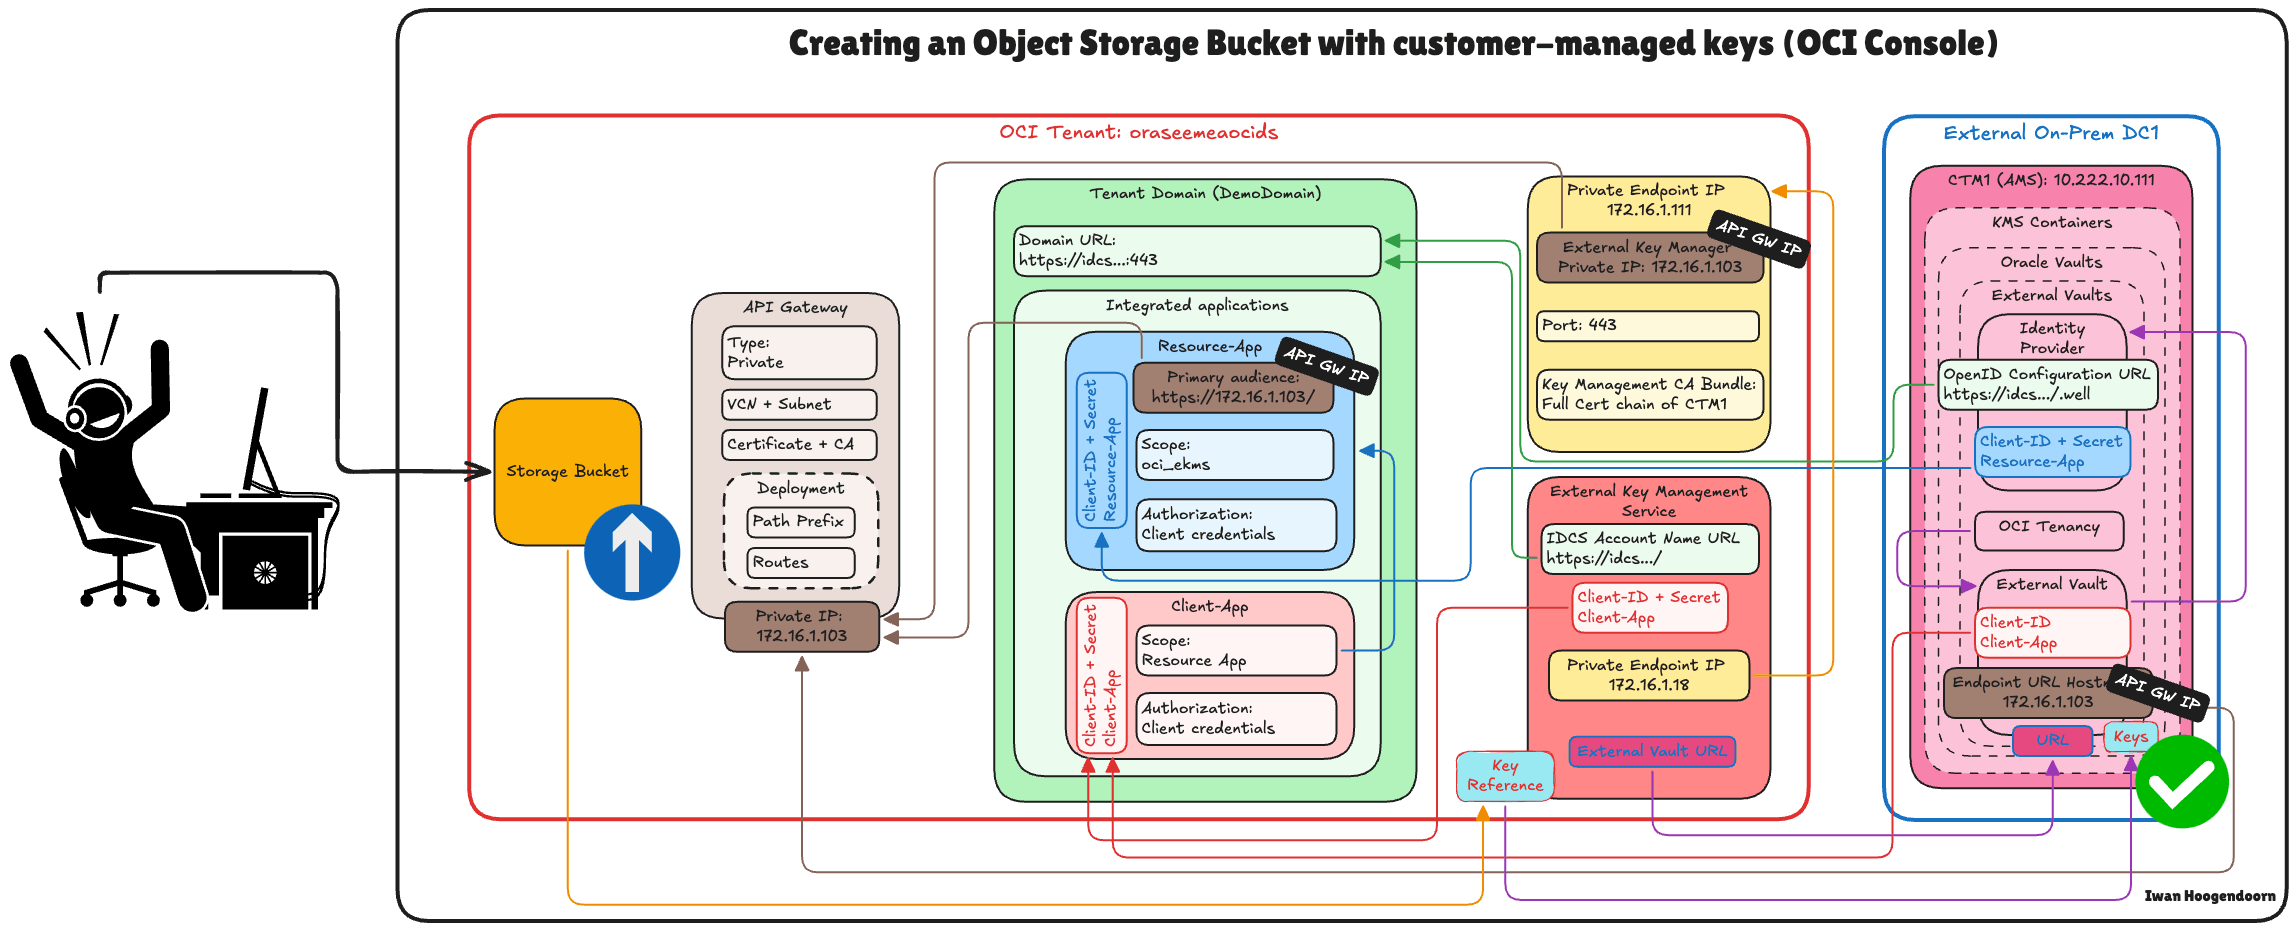
The diagram below illustrates the components and configuration setup in this task.
-
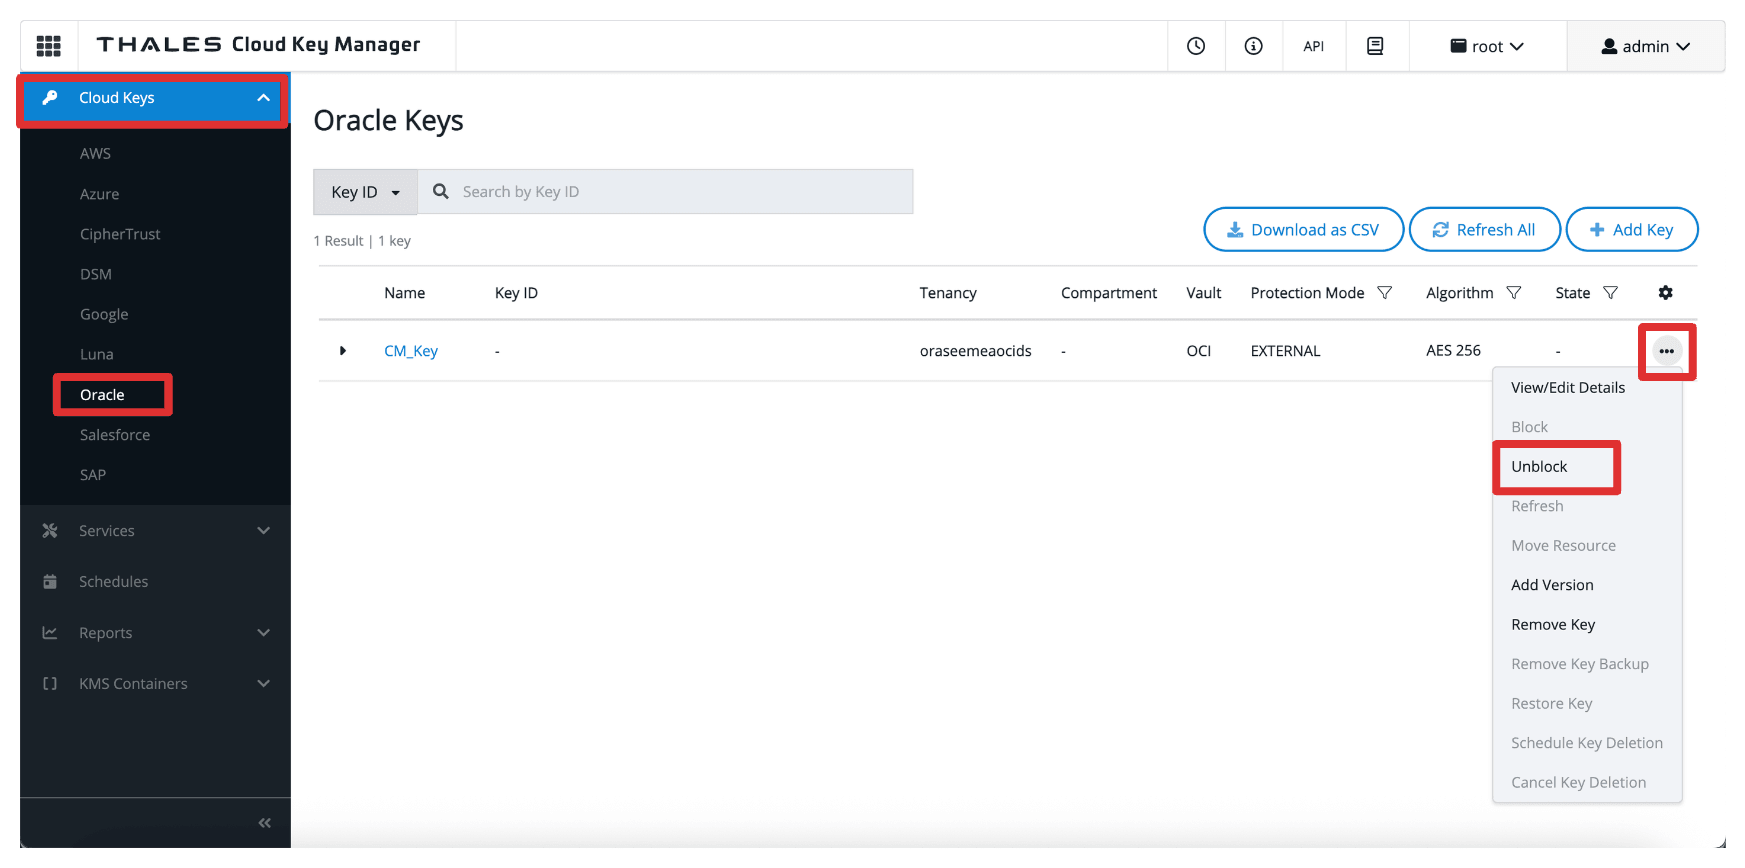
Go to the Thales Cloud Key Manager Console.
- Click Cloud Keys.
- Click Oracle.
- Click the three dots at the end of the key.
- Select Unblock.
-
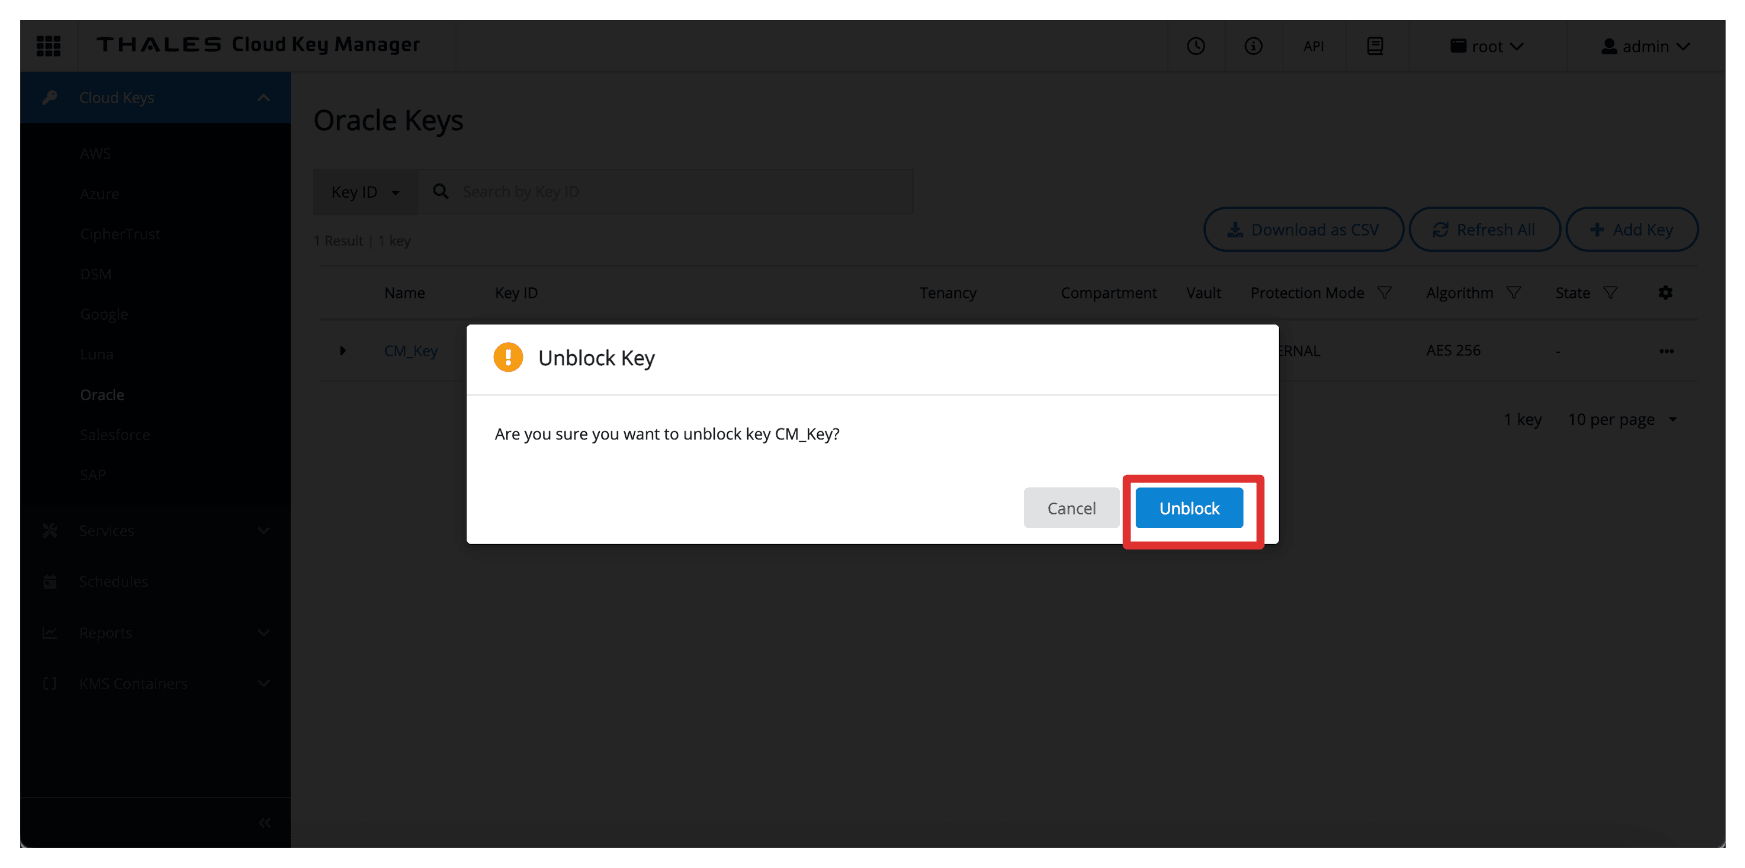
Select Unblock.
-
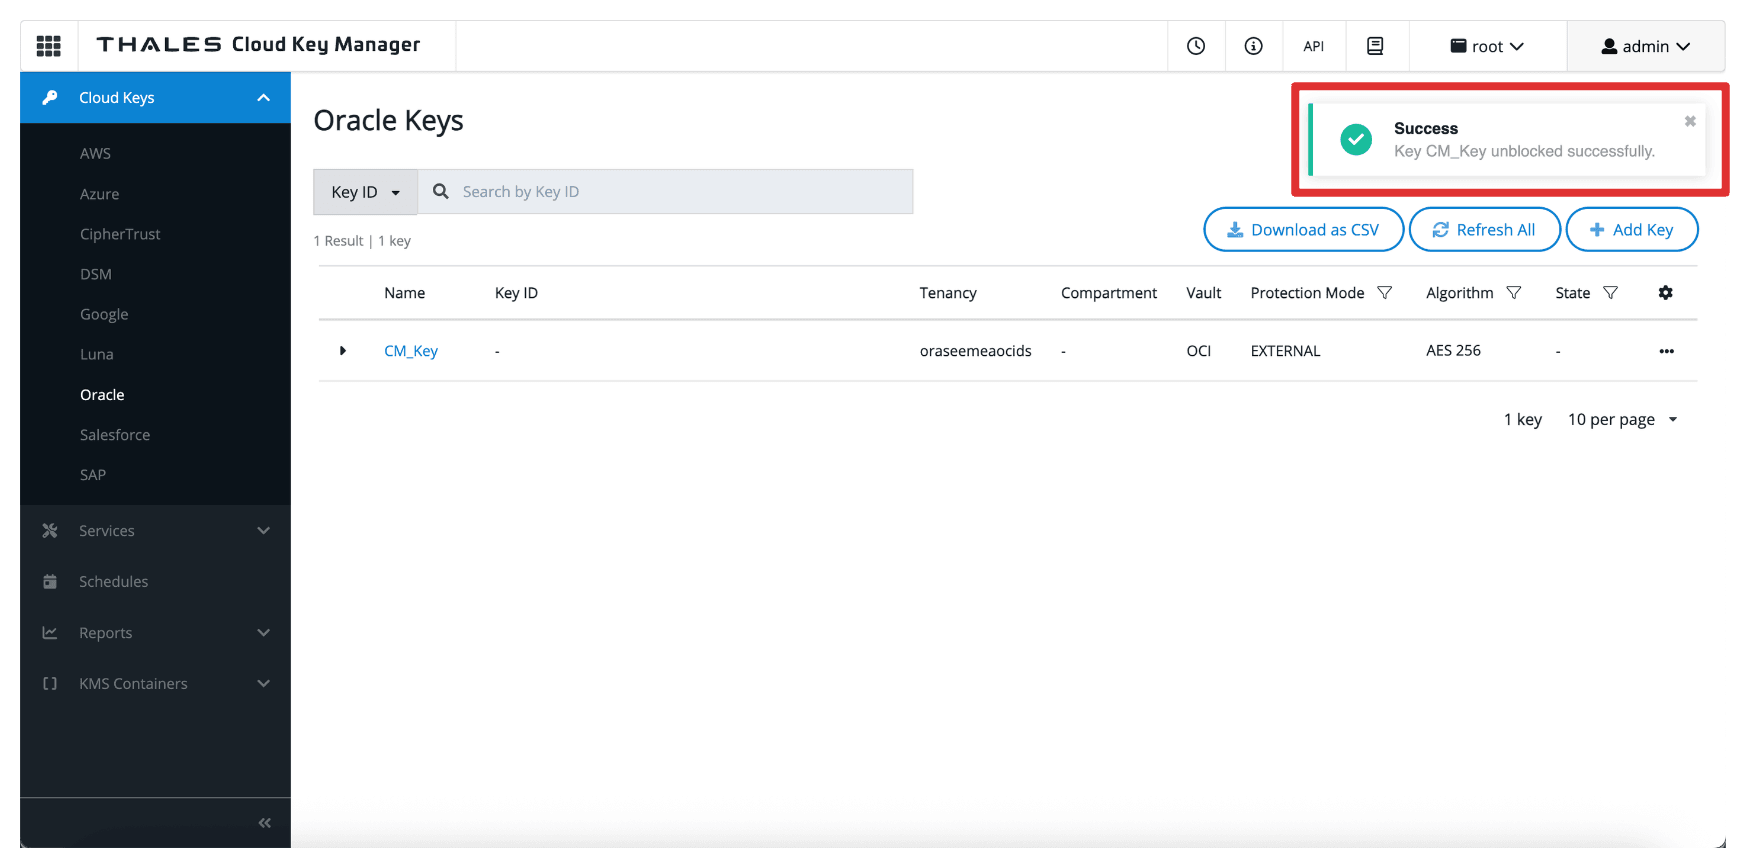
Note that the key is now unblocked in the Thales CipherTrust Manager.
-
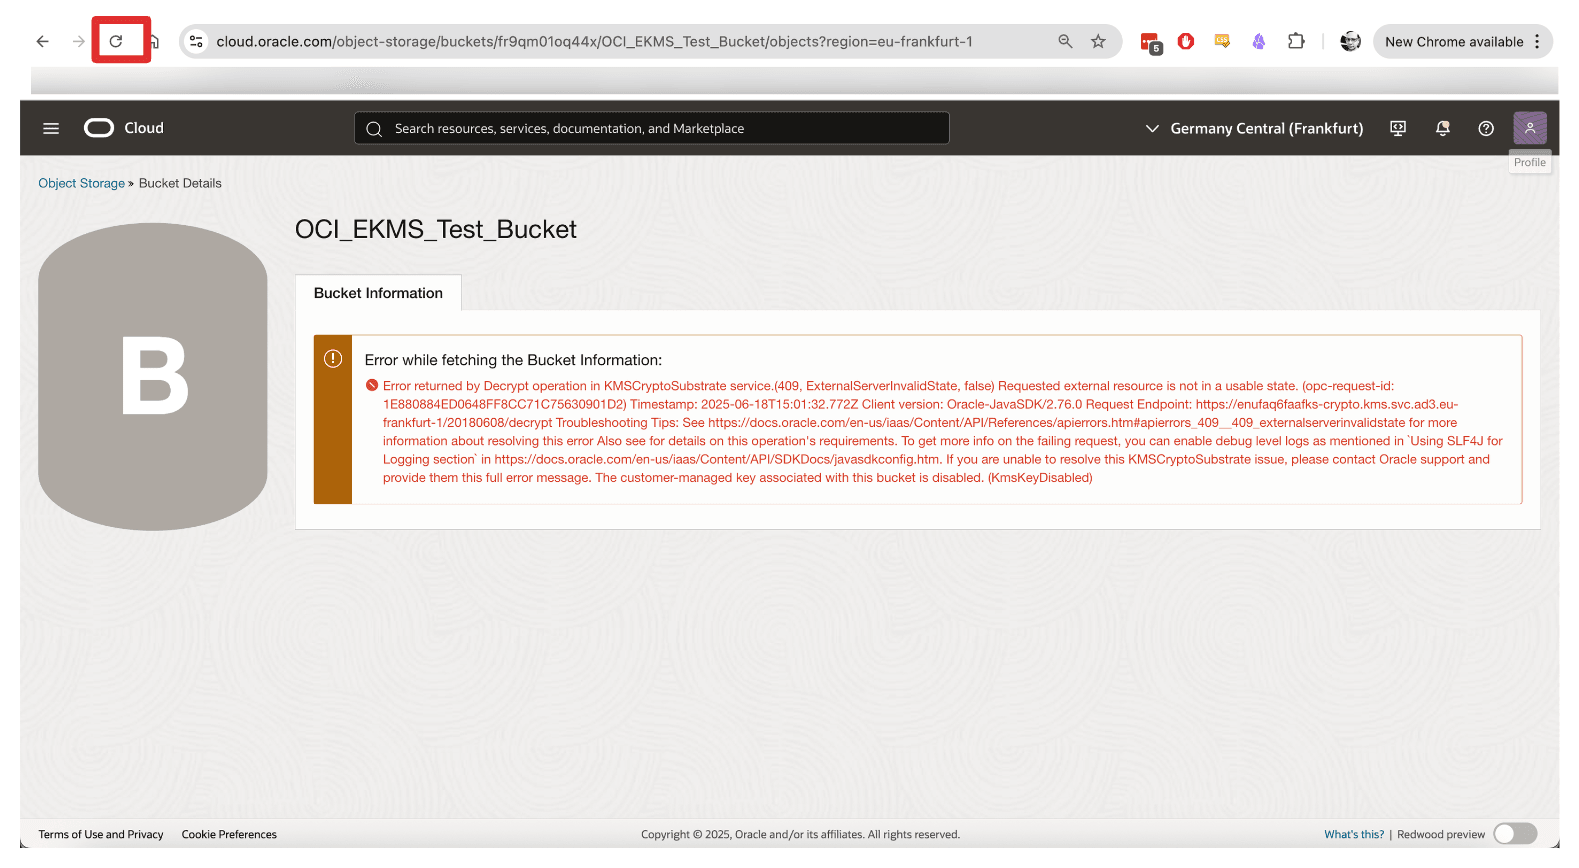
Navigate back to the Bucket Details page, or refresh the browser if you are still on that page.
-
Note that you cannot re-access the OCI Object Storage bucket when unblocked.
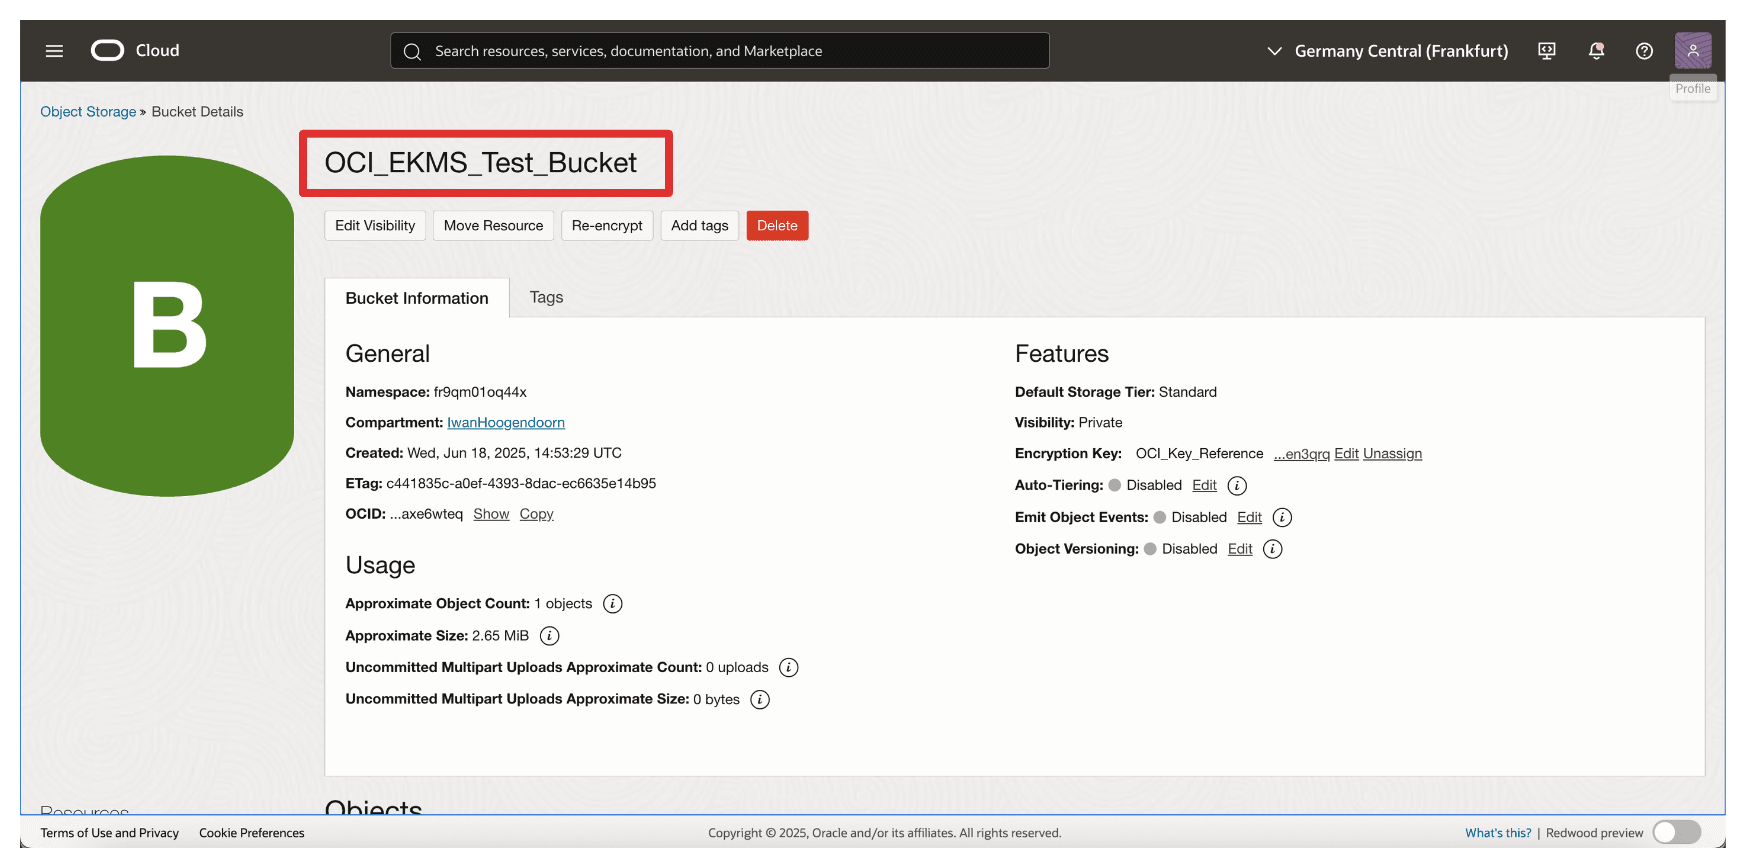
This capability provides a powerful mechanism for emergency response, regulatory compliance, and data sovereignty enforcement, ensuring you maintain complete control over when and how your data is accessible in OCI.
Next Steps
By completing this tutorial, you have successfully set up OCI Hold Your Own Key solution using Thales CipherTrust Manager with OCI API Gateway integration option.
You have:
- Designed and validated the supporting network architecture.
- Deployed and configured the OCI API Gateway with secure DNS and TLS settings.
- Established mutual trust between OCI and Thales CipherTrust Manager using confidential applications and identity providers.
- Integrated Thales CipherTrust Manager-managed external keys with OCI Vault and tested access control through key blocking and unblocking.
Using an OCI API Gateway in this setup provides a secure and scalable integration point that enforces authentication, enhances observability, and abstracts your key manager behind a controlled interface ensuring compliance, control, and flexibility.
This architecture positions your organization to meet strict data sovereignty, compliance, and regulatory requirements by ensuring that encryption keys are never stored or managed within OCI yet still available for secure operations when needed.
You are now equipped with a production ready blueprint for enabling external key management in OCI with full ownership, visibility, and control over your cryptographic assets.
Related Links
Acknowledgments
- Author - Iwan Hoogendoorn (Cloud Networking Black Belt)
More Learning Resources
Explore other labs on docs.oracle.com/learn or access more free learning content on the Oracle Learning YouTube channel. Additionally, visit education.oracle.com/learning-explorer to become an Oracle Learning Explorer.
For product documentation, visit Oracle Help Center.
Set up an OCI Hold Your Own Key using Thales CipherTrust Manager with OCI API Gateway
G38184-03
Copyright ©2025, Oracle and/or its affiliates.