Create Oracle Cloud Infrastructure Kubernetes Engine Cluster using Terraform
Introduction
In this tutorial, we will demonstrate how to create an Oracle Cloud Infrastructure Kubernetes Engine (OKE) cluster using Terraform and manage your Terraform code with Oracle Resource Manager. This approach allows you to implement Infrastructure as Code (IaC) principles, enhancing automation, consistency, and repeatability in your deployments.
Oracle Cloud Infrastructure Kubernetes Engine (OKE)
Kubernetes (K8s) is an open-source platform for automating the deployment, scaling, and management of containerized applications. Originally developed by Google and now maintained by the CNCF, it is the industry standard for running cloud-native applications at scale.
OKE is a fully managed service on Oracle Cloud Infrastructure (OCI) that simplifies the deployment and management of Kubernetes clusters. It automates control plane and worker node management, integrates with OCI’s networking, storage, and security services, and supports both stateless and stateful workloads. OKE nodes are organized into node pools, which can be easily scaled and managed, ensuring high availability and optimal resource utilization for containerized applications. OKE follows the standard Kubernetes model, with two key components (managed control plane and a customer-managed data plane).
-
Control Plane: Fully managed by Oracle, and its components handle the orchestration and management of the cluster:
kube-apiserver: Central API for communication with the cluster.etcd: Stores the cluster’s configuration and state.kube-scheduler: Assigns pods to suitable nodes.kube-controller-manager: Ensures the desired state by managing controllers.cloud-controller-manager(CCM): Integrates with OCI to manage cloud resources like OCI Load Balancer and OCI Block Volumes.
-
Data Plane: Deployed in customer tenancy and runs the actual workloads. It is composed of:
Worker Nodes: Compute instances (provisioned by the customer) that run pods.kubelet: Node agent that manages pod execution.kube-proxy: Handles networking rules and routing traffic to/from pods.
For more information, review Manage OCI Kubernetes Engine with Different Capacity Types and Resolve Common Issues on Preemptible Nodes.
Architecture
The following reference architecture will be used to demonstrate the OKE cluster creation.
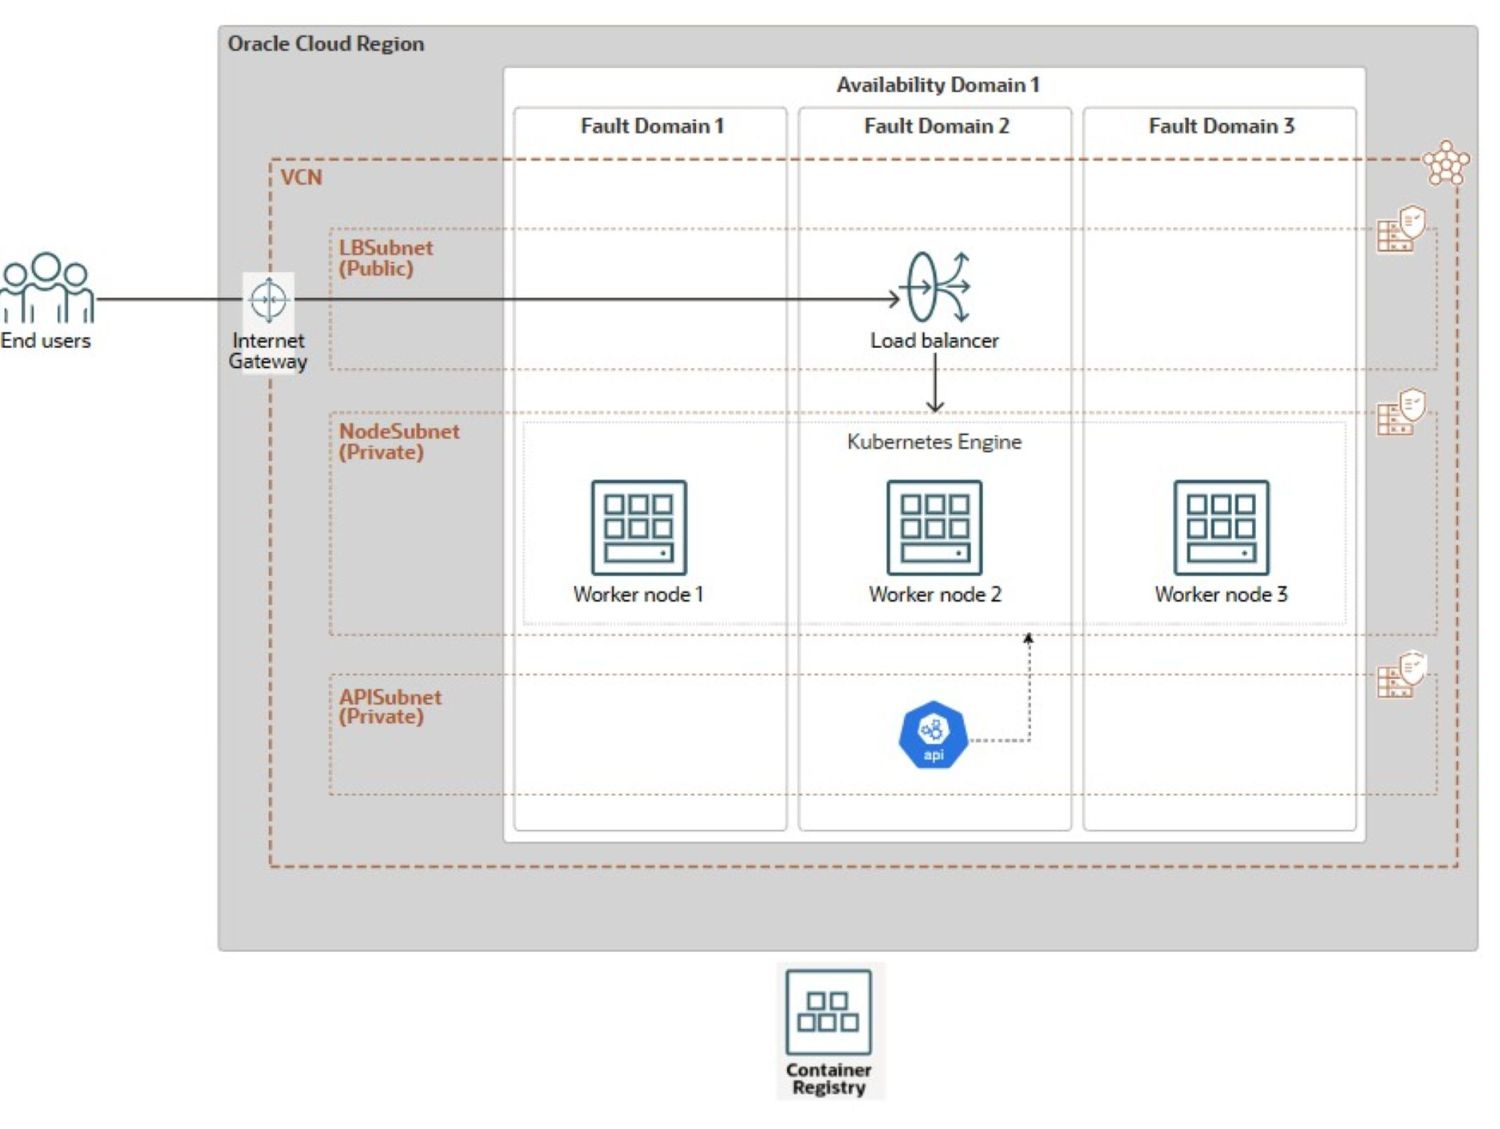
The diagram illustrates a resilient OKE architecture deployed within a single OCI region distributed among multiple Fault Domains (FDs). The setup features a Virtual Cloud Network (VCN) with three distinct subnets: a public subnet (LBSubnet) hosting an internet gateway and an OCI Load Balancer to distribute incoming traffic, and two private subnets, one for OKE worker nodes (NodeSubnet) and another for the API server (APISubnet). The worker nodes are distributed across three FDs within a single availability domain (AD), minimizing failure risk. The cluster seamlessly connects to the OCI Container Registry for container image storage and retrieval.
The OCI Console offers a straightforward Point-&-Click method. To use it, navigate to the Kubernetes clusters UI. Select Quick-Create. Name the cluster. Select a private API endpoint. Configure managed worker nodes with your desired shape, image, and count. The OCI Console’s option sets up an enhanced OKE cluster. It uses OCI_VCN_IP_NATIVE CNI, which is the default. It also provides dedicated private subnets for worker nodes and the API endpoint. Additionally, it creates a public subnet for the load balancer. However, this manual approach is time-consuming and unscalable for large or repeatable deployments
To overcome the limitations of manual deployment, this tutorial provides a simplified, flat Terraform-based solution that automates the entire OKE cluster setup in three steps:
- Networking resource creation.
- OKE cluster provisioning.
- Worker node pool creation.
This tutorial focuses on deploying the core OKE cluster infrastructure. Application-level customizations and workload-specific configurations are outside its scope. To streamline provisioning, we have included Bash scripts that automate the execution of Terraform commands. These scripts are designed for seamless integration into a three-phase Jenkins pipeline, enabling One-Click automated deployment of the entire OKE environment.
You will learn how to automate the creation of networking resources (VCN, gateways, subnets), the OKE cluster, and its node pools using both Terraform CLI and Oracle Resource Manager. We will also demonstrate how to extend this automation using Bash, OCI CLI, and Jenkins, reducing manual effort and ensuring consistent infrastructure delivery.
Objectives
- Create an OKE cluster using Terraform for Infrastructure as Code, and describe the process of managing your deployment through Oracle Resource Manager. Along the way, we will also cover foundational OKE concepts.
Prerequisites
-
OCI tenancy root administrator role for initial setup, not recommended for production.
- Non-admin OCI user with necessary networking and OKE OCI IAM policies. For more information, see Policy Configuration for Cluster Creation and Deployment.
-
Familiarity with Infrastructure as Code principles and Terraform (community version), including:
Terraform Automation for OKE Cluster Creation
There are two automation options to create the VCN (OKE-VCN) and the OKE Cluster: a Flat Module or a Standard Module leveraging child modules. The latter approach is out of the scope of this article, but it offers better organization and scalability for larger, complex deployments, promoting code reusability and maintainability, making it ideal for production environments. We will use the flat and simpler approach, suitable for development use cases, testing scenarios, or a one-time VCN deployment demonstration. For more information, see terraform-oci-oke.
Task 1: Deploy OKE Resources with Terraform (Community Edition)
Before running Terraform commands to plan and deploy your infrastructure using the Terraform CLI, update the provided Terraform configuration with your environment-specific details, either from your local machine or through OCI Cloud Shell.
You can download the full Terraform source code here: oke_terraform_for_beginners.zip. We are using a flat directory structure. When you unzip the package, ensure all your Terraform template source codes (.tf, .tfvars, ssh keys, etc) are located in the root directory.
-
To instruct Terraform to create any of the main resources (
VCN,OKE_Cluser, orNode_Pool), you need to set the appropriate flag (is_vcn_created,is_k8cluster_createdoris_pool_created) totruein yourterraform.tfvars. Then specify the remaining parameters for the networking, OKE cluster, and node pool within their respective code blocks.-
Start by setting
is_vcn_createdtotrueto instruct Terraform to create a new VCN orfalseto use an existing VCN (you will need to provide its OCID). If creating a new VCN, make sure to specify a CIDR block variablevcn_cidr_block. -
Provide the CIDR blocks for the following three subnets.
- K8 API endpoint private subnet (
k8apiendpoint_private_subnet_cidr_block). - Worker node private subnet (
workernodes_private_subnet_cidr_block). - Service load balancer public subnet (
serviceloadbalancers_public_subnet_cidr_block).
- K8 API endpoint private subnet (
-
Set the
is_k8cluster_createdflag to tell Terraform to create a Kubernetes cluster, and specify the target compartment usingcompartment_id. If a worker node pool is needed, set theis_nodepool_createdflag accordingly. -
OKE supports two CNI types: VCN-Native (default), where each pod gets its own IP for better performance and full OCI network integration, and Flannel-Overlay, a simpler overlay network where pods share the node’s VNIC. In this setup, the
cni_typeis set toOCI_VCN_IP_NATIVEto match the default cluster configuration created by the Quick-Create workflow in the OCI Console. -
OKE offers two cluster types: Basic and Enhanced. For greater flexibility, we set
cluster_typetoENHANCED_CLUSTER.- Enhanced clusters provide advanced capabilities like add-on management, improved security, and better lifecycle control
- Basic clusters deliver a straightforward Kubernetes environment with essential features
-
Node cycle configuration
node_cycle_configdefines how worker nodes are created, replaced, or updated within a node pool, especially during updates, upgrades, or autoscaling events. The configuration defines the following attributes:is_node_cycling_enabled (bool):Enables the automatic cycling (replacement) of nodes during an update or upgrade. Set to true to enable safe node rotation.maximum_surge (int): The maximum number of extra nodes (beyond the desired count) that can be added during updates. It allows new nodes to be created before old ones are deleted without downtime.maximum_unavailable (int): The maximum number of nodes that can be unavailable during updates. Used to control disruption during rolling updates.cycle_modes (list)(Optional): It provides an ordered list of actions for node cycling. The available cycle modes are:REPLACE_BOOT_VOLUME: Updates the boot volume without terminating the node.REPLACE_NODES: Cordon, drain, terminate, and recreate nodes with updated config.
-
-
Modify the default values only if necessary. The package includes clear instructions for environment setup, execution steps, and key concepts related to networking and security.
The following is a sample of Terraform configuration in the
terraform.tfvarsfile that you need to customize to run in your environment.########################################################################## # Terraform module: OKE Cluster with Flat Network. # # # # Author: Mahamat H. Guiagoussou and Payal Sharma # # # # Copyright (c) 2025 Oracle # ########################################################################## # Working Compartment compartment_id = "WORKING_COMPARTMENT" #------------------------------------------------------------------------# # Step 2.1: Create Flat Network # #------------------------------------------------------------------------# is_vcn_created = false # Terraform creates VCN if set to 'true' # Display Name Prefix & Host Name Prefix display_name_prefix = "DISPLAY_NAME_PREFIX" # e.g.: "ACME-DEV" host_name_prefix = "HOST_PREFIX" # e.g.: "myvcn" # VCN & Subnets CIDR Blocks vcn_cidr_block = "VCN_CIDR_BLOCK" k8apiendpoint_private_subnet_cidr_block = "ENDPOINT_CIDR_BLOCK" workernodes_private_subnet_cidr_block = "WRKRNODE_CIDR_BLOCK" serviceloadbalancers_public_subnet_cidr_block = "LB_CIDR_BLOCK" #------------------------------------------------------------------------# # Step 2.2: Create the OKE Cluster # #------------------------------------------------------------------------# is_k8cluster_created = false # Terraform creates OKE cluster if 'true' control_plane_kubernetes_version = "K8_VERSION" # e.g.: "v1.32.1" cni_type = "OCI_VCN_IP_NATIVE" # FLANNEL_OVERLAY control_plane_is_public = false # Set the below flag to true for 'OCI_VCN_IP_NATIVE'. This is needed to # provision a dedicated subnet for pods when using the VCN-Native CNI. create_pod_network_subnet = true # NO subnet 'false' image_signing_enabled = false # image not signed cluster_type = "ENHANCED_CLUSTER" # or "BASIC_CLUSTER" #------------------------------------------------------------------------# # Step 2.3: Create a Node Pool for the cluster # #------------------------------------------------------------------------# is_nodepool_created = false # Terraform creates Node_Pool if 'true' worker_nodes_kubernetes_version = "WORKER_NODE_VERSION" # e.g.: "v1.32.1" # Detailed configuration for the Node Pool node_pools = { node_pool_one = { name = "WORKER_NODE_POOL_DISPLAY_NAME" # e.g. "my_worker_node_pool", # https://docs.oracle.com/en-us/iaas/Content/ContEng/Reference/contengimagesshapes.htm shape = "WORKER_NODE_SHAPE_NAME" # e.g.: "VM.Standard.E4.Flex", shape_config = { ocpus = "WORKER_NODE_NB_OF_OCPUS" # e.g.: 1 memory = "WORKER_NODE_MEMOR_SIZE" # e.g.: 16 }, boot_volume_size = "WORKER_BOOT_VOLUME_SIZE" # e.g.: 50 # Oracle maintains a list of supported OKE worker node images here: # https://docs.oracle.com/en-us/iaas/images/oke-worker-node-oracle-linux-8x/ # https://docs.oracle.com/en-us/iaas/Content/ContEng/Reference/contengimagesshapes.htm#images__oke-images image = "WORKER_NODE_OKE_IMAGE" # e.g.: ocid1.image.oc1.iad...." node_labels = { hello = "Demo"}, # Run command "oci iam availability-domain list" to list region's ADs. # No need to set Fault Domains, they are selected automatically availability_domains = ["YOUR_AD_NAME"] # e.g. "GqIF:US-ASHBURN-AD-1", number_of_nodes = "NB_OF_NODES_IN_THE_POOL" # e.g. 1, pv_in_transit_encryption = false, node_cycle_config = { node_cycling_enabled = false maximum_surge = 1 maximum_unavailable = 0 }, ssh_key = "YOUR_SSH_KEY_PATH" # e.g.: "worker_node_ssh_key.pub" } } -
Run the following Terraform commands.
terraform init
terraform validate
terraform plan
terraform apply
After successful execution of
terraform apply, your OKE cluster will be created in your working compartment and region with the following configuration:- An
ENHANCED_CLUSTERwithOCI_VCN_IP_NATIVEcni_typeand the specified OKE version. - Dedicated private subnets for both worker nodes and the API endpoint.
- A public subnet for the load balancer to access the cluster services.
- A managed node pool configured with your desired shape, image, and node(s) count.
- An
-
Go to the OCI Console to confirm your cluster deployment and configuration.
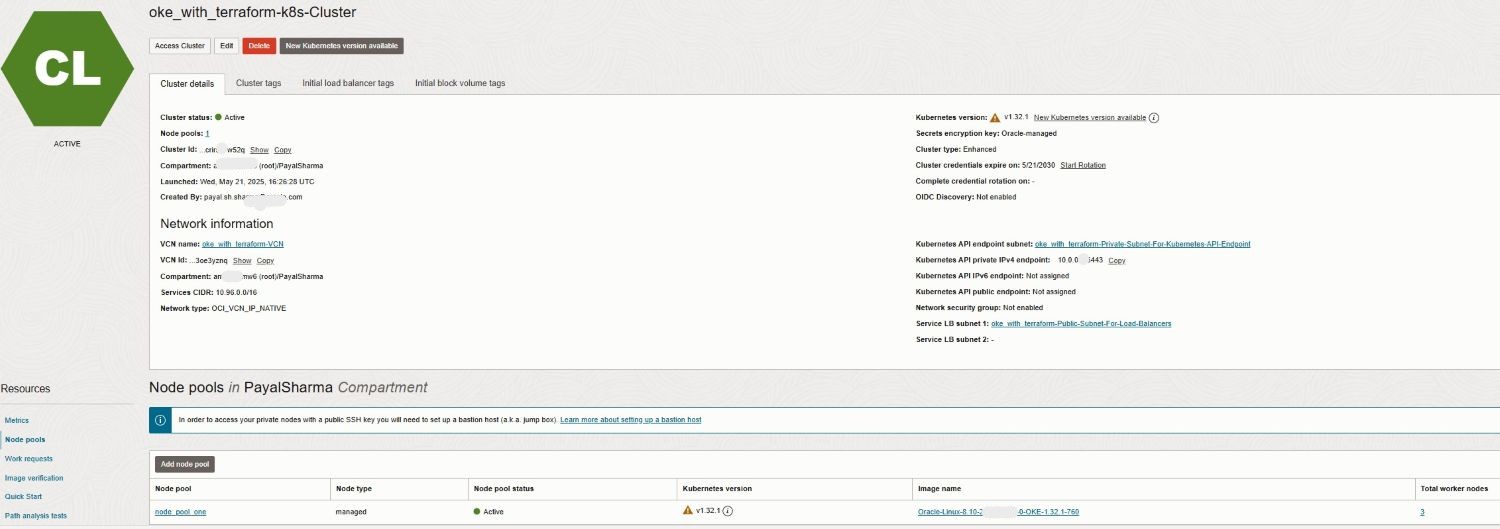
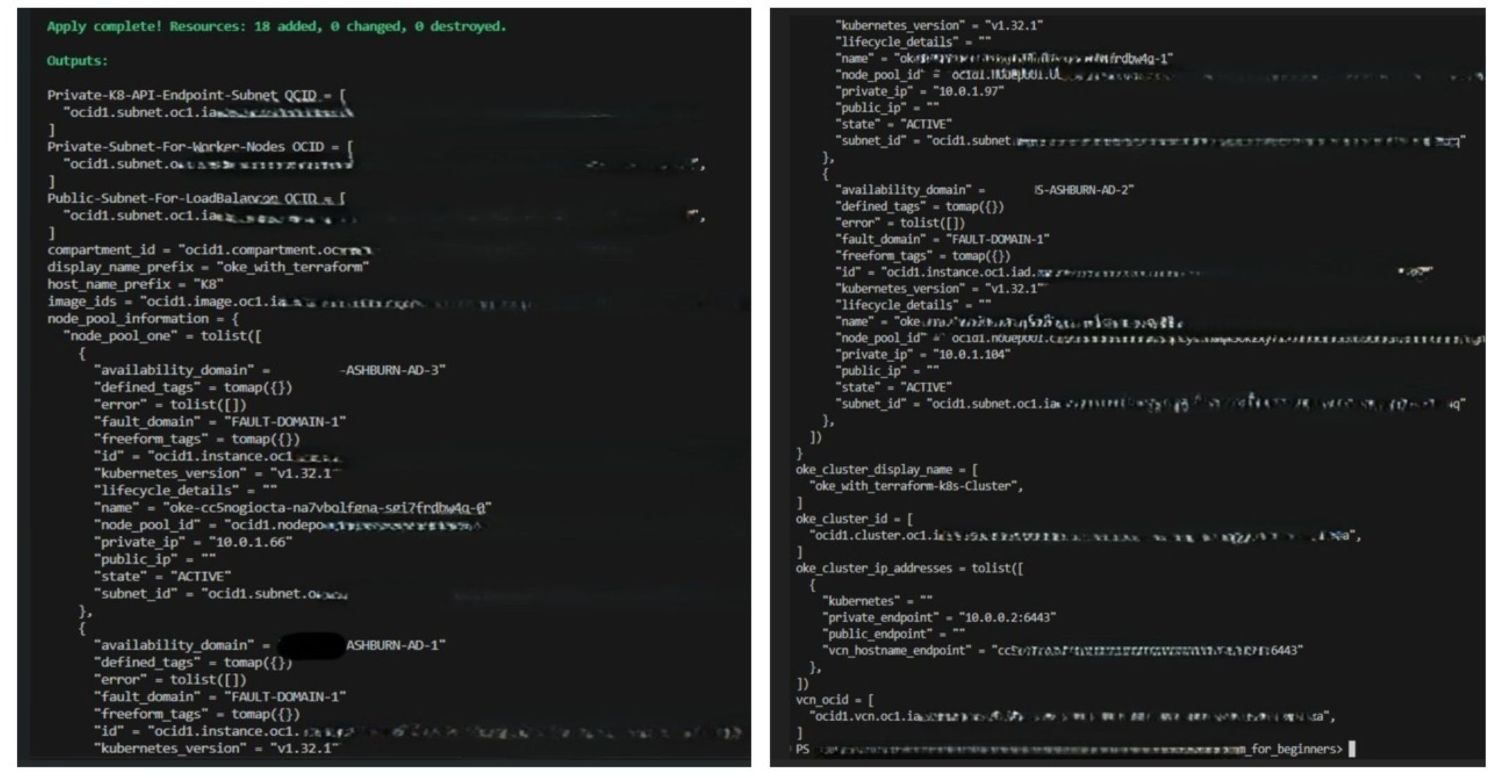
The following images illustrate a successful Terraform execution along with the generated logs.
-
When you are done testing, run
terraform destroyto clean up your environment. This command removes all OKE resources created during deployment and helps prevent unnecessary resource consumption in your tenancy.
Task 2: Automate Terraform CLI Execution with Jenkins CI/CD Pipeline
In this task, we will abstract the previously detailed steps into four primary stages, designed for later orchestration by Jenkins. This aggregated pipeline is implemented through a set of Bash scripts that execute Terraform CLI commands.
Task 2.1: Create Networking Resources
The following script runs a sequence of multiple Terraform commands to create the network resources.
-
Bash Script:
create_network_resources.sh.#!/bin/bash # Change directory to your working directory cd ~/oke_terraform_for_beginners # Run terraform init (at least once) /usr/local/bin/terraform init # Create the OKE Cluster Network resources (VCN, Gateways, RT, K8 API Endpoint Subnet, Worker Node Subnet and LB subnet) /usr/local/bin/terraform apply \ --var is_vcn_created=true \ # Create OKE Cluster Networking Resources --auto-approve
For the remaining scripts, ensure terraform init has already been executed, and that you are running the commands from your working directory. For example, ~/oke_terraform_for_beginners.
Task 2.2: Create OKE Cluster
This script runs the terraform apply command to create the OKE cluster.
-
Bash Script:
create_oke_cluster.sh.#!/bin/bash ..... # Create OKE Cluster (auto-approve - not advised for production) /usr/local/bin/terraform apply \ --var is_vcn_created=true \ # Use the created network --var is_k8cluster_created=false \ # Create a new OKE cluster --auto-approve
Task 2.3. Create OKE Worker Node Pool
The following script runs the terraform apply command to create the worker node pool for the OKE cluster.
-
Bash Script:
create_worker_node_pool.sh#!/bin/bash # Create Worker Node Pool (auto-approve - not advised for production) /usr/local/bin/terraform apply \ --var is_vcn_created=true \ # Use the created network --var is_k8cluster_created=true \ # For the existing OKE cluster --var is_nodepool_created=true \ # Create new Worker Node Pool --auto-approve
Task 2.4: Destroy all Resources
This script runs a destroy command, purging all OKE cluster resources (networking resources, OKE cluster, and worker nodes pool).
-
Bash Script:
destroy_all_cluster_resources.sh.#!/bin/bash # Run terraform destroy (for testing purposes only, not for production) /usr/local/bin/terraform destroy --auto-approve
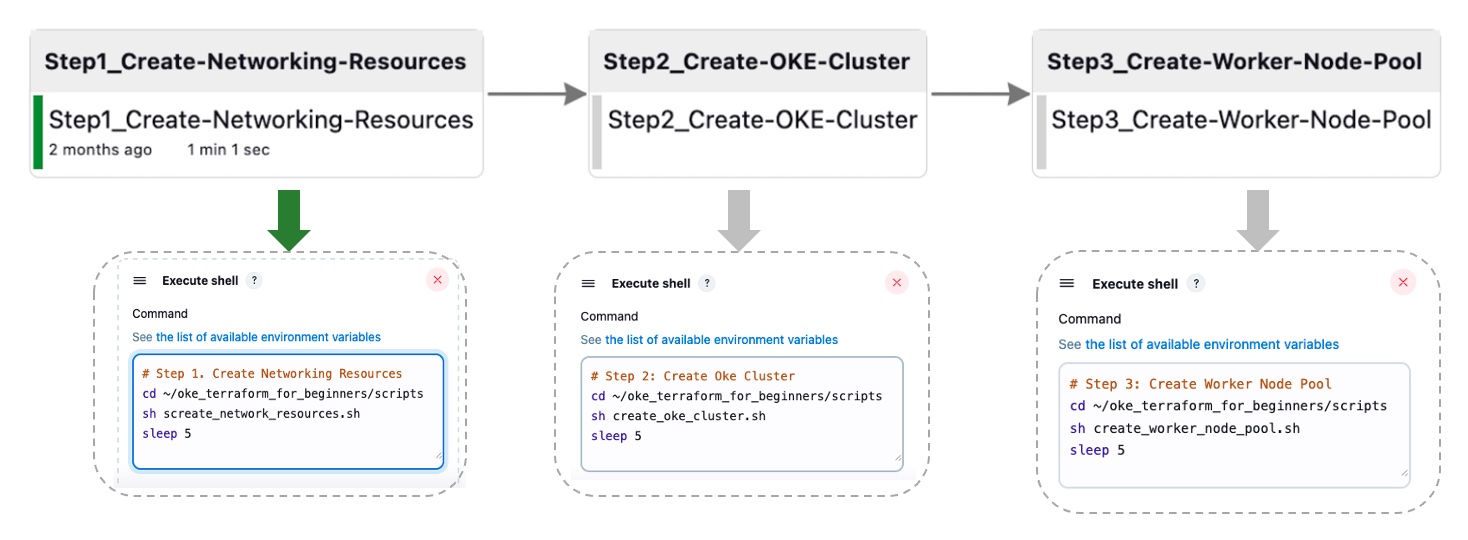
We have automated the Jenkins pipeline’s end-to-end process, consolidating it into four Jenkins build tasks (Task 2.1, 2.2, 2.3). This aggregated pipeline runs via Bash scripts executing Terraform CLI commands. The image below shows the One-Click automation for the first three tasks; the destroy step is not included for simplicity.
Task 3: Orchestrate OKE Deployments with Oracle Resource Manager
Oracle Resource Manager Flow (illustrated):
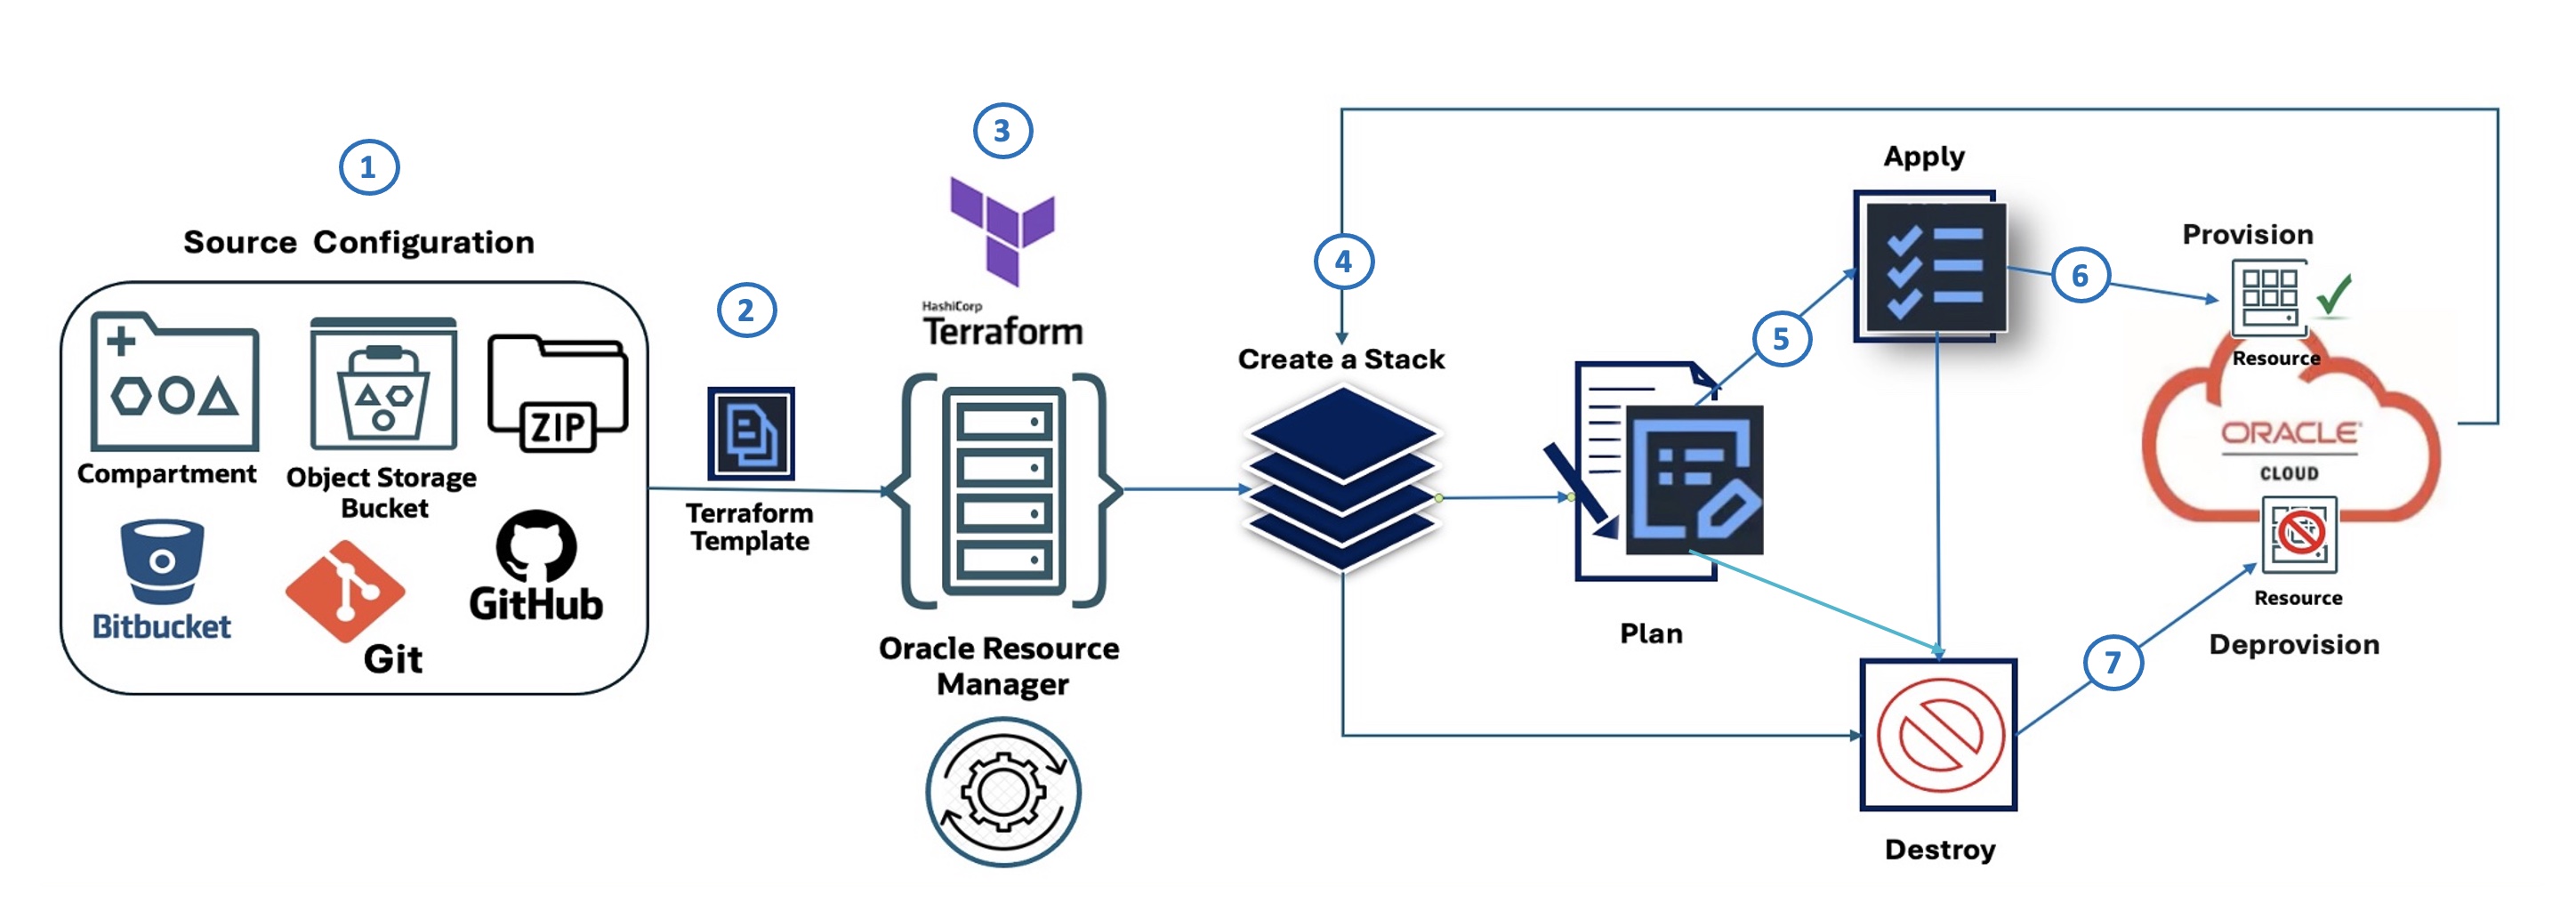
The following diagram describes the seven steps illustrating Oracle Resource Manager Code Manager:
- Source Configuration: Defines where the IaC configuration originates, such as a compartment in OCI, an OCI Object Storage bucket, a Zip file, Bitbucket, or GitHub.
- Terraform Template: The infrastructure configuration is defined using HashiCorp Terraform in a template file.
- Oracle Resource Manager: The OCI Terraform as a Service offering takes the Terraform template as input and manages the infrastructure provisioning process.
- Create a Stack: Oracle Resource Manager uses the template to create a stack, which is a collection of OCI resources.
- Plan: Before making any changes, Oracle Resource Manager generates a plan, which outlines the actions that will be taken to provision or modify the infrastructure.
- Apply: Based on the plan, Oracle Resource Manager applies the configuration, provisioning the specified resources within OCI.
- Destroy: Oracle Resource Manager can also be used to destroy (deprovision) or purge the resources that were previously created by the stack.
Task 3.1: Source Configuration: Defining Your Oracle Resource Manager Stack
To deploy an OKE cluster using Oracle Resource Manager, start by downloading the beginner-friendly module: oke_terraform_for_beginners_orm.zip. We are using a flat directory structure. When you unzip the package, ensure all your Terraform template source codes (.tf) are located in the root directory.
This version of the module is pre-configured for Oracle Resource Manager; terraform.tfvars has been removed, and all variables are set with “generic” placeholder values like “REPLACE_WITH_YOUR_OWN_VARIABLE_VALUE” in variables.tf.
Before creating your stack, update variables.tf with your region, networking CIDRs, and flags to control the creation of the VCN, OKE cluster, and node pool.
The OKE cluster utilizes VCN-Native CNI (OCI_VCN_IP_NATIVE) for pod networking, so ensure the create_pod_network_subnet flag is enabled to define your pod subnet CIDRs.
When configuring your stack in the Oracle Resource Manager UI, you can control the creation of core OKE resources by selecting the following:
- VCN: Select
is_vcn_created. - OKE Cluster: Select
is_k8cluster_created. - OKE Node Pool: Select
is_nodepool_created.
Task 3.2: Create Oracle Resource Manager Stack
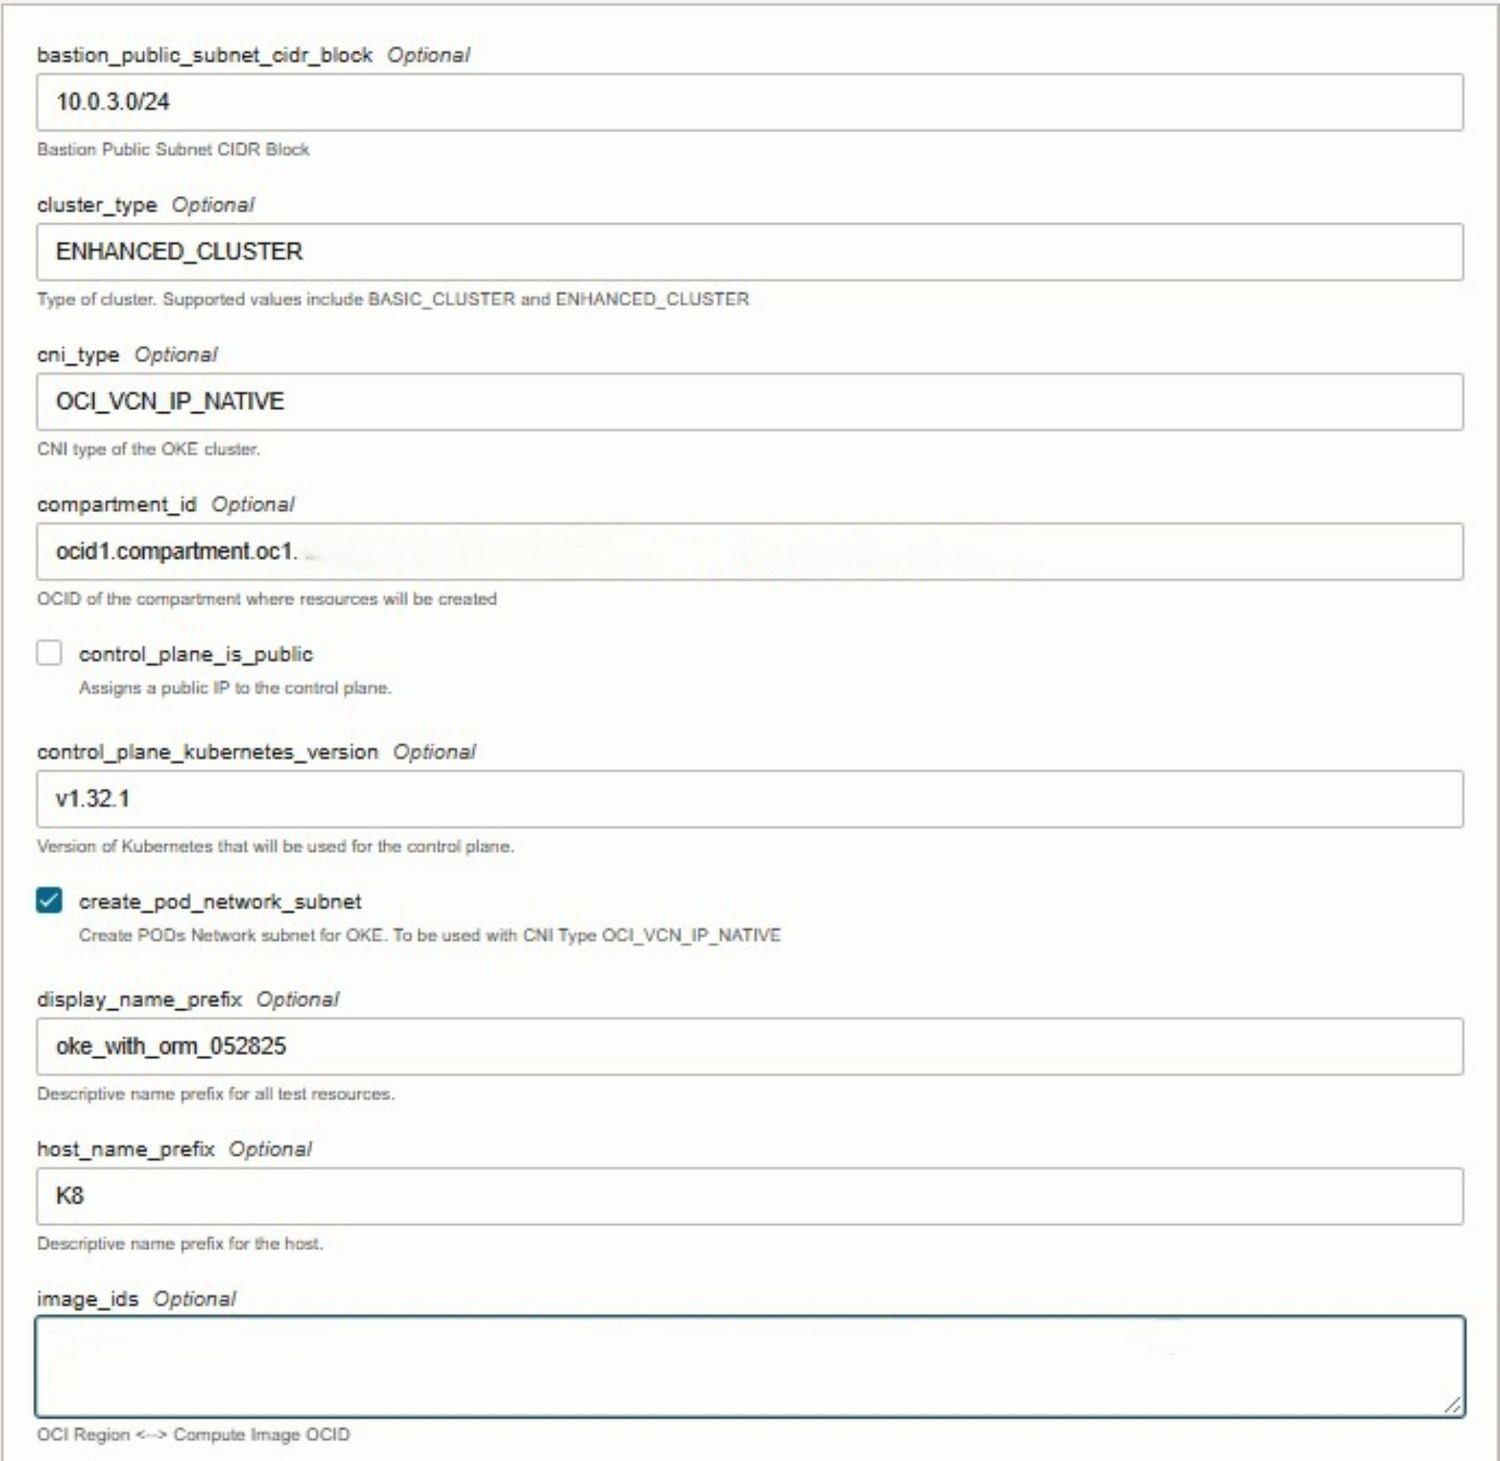
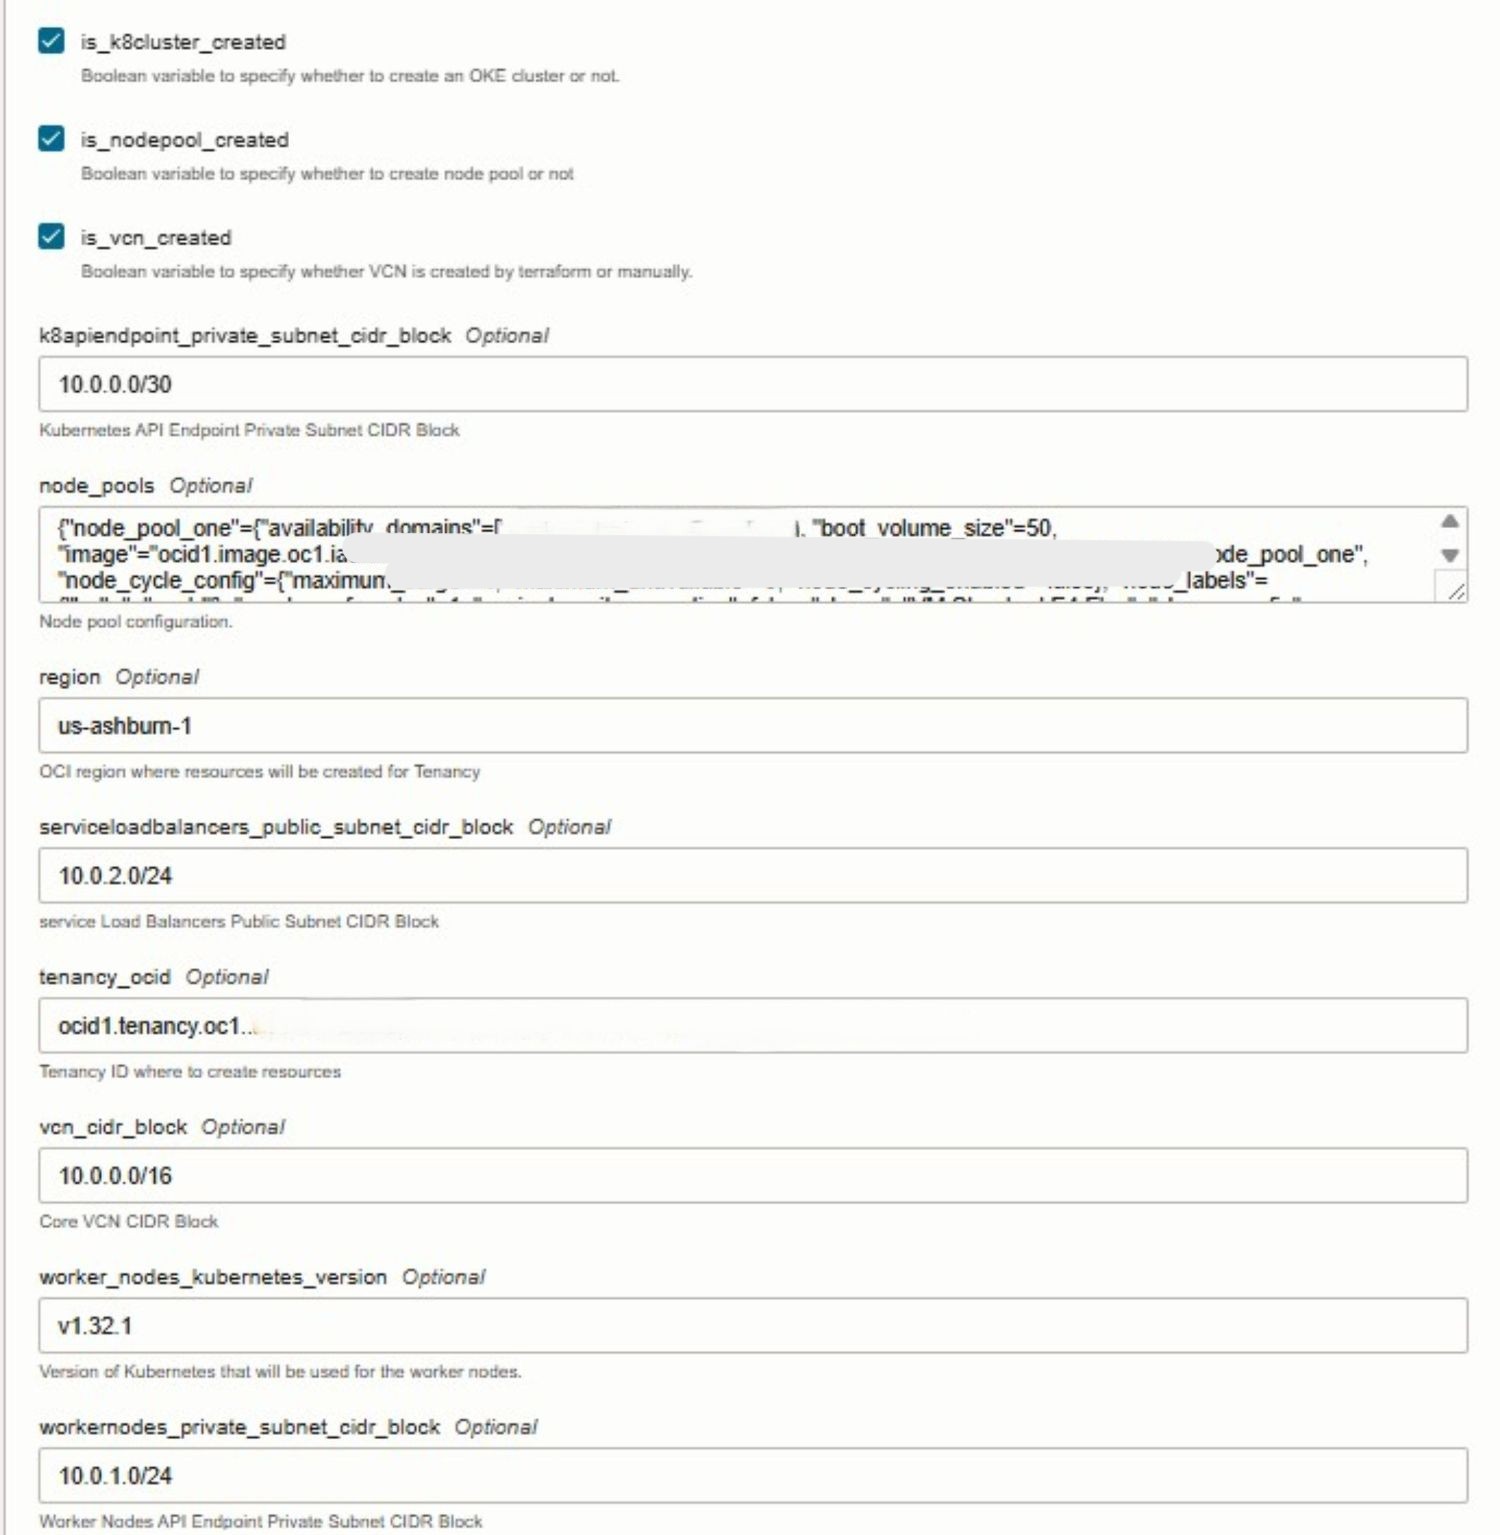
During stack creation, select the provided Terraform template and proceed to configure the necessary variables directly within the console. Oracle Resource Manager automatically detects the input variables defined in the Terraform files and presents them in an easy-to-edit form. At this stage, you will need to supply environment-specific details such as your tenancy OCID, compartment OCID, and other required values.
The following images illustrate the stack creation and variable configuration process within the Oracle Cloud Console.
Task 3.3: Execute Apply Job
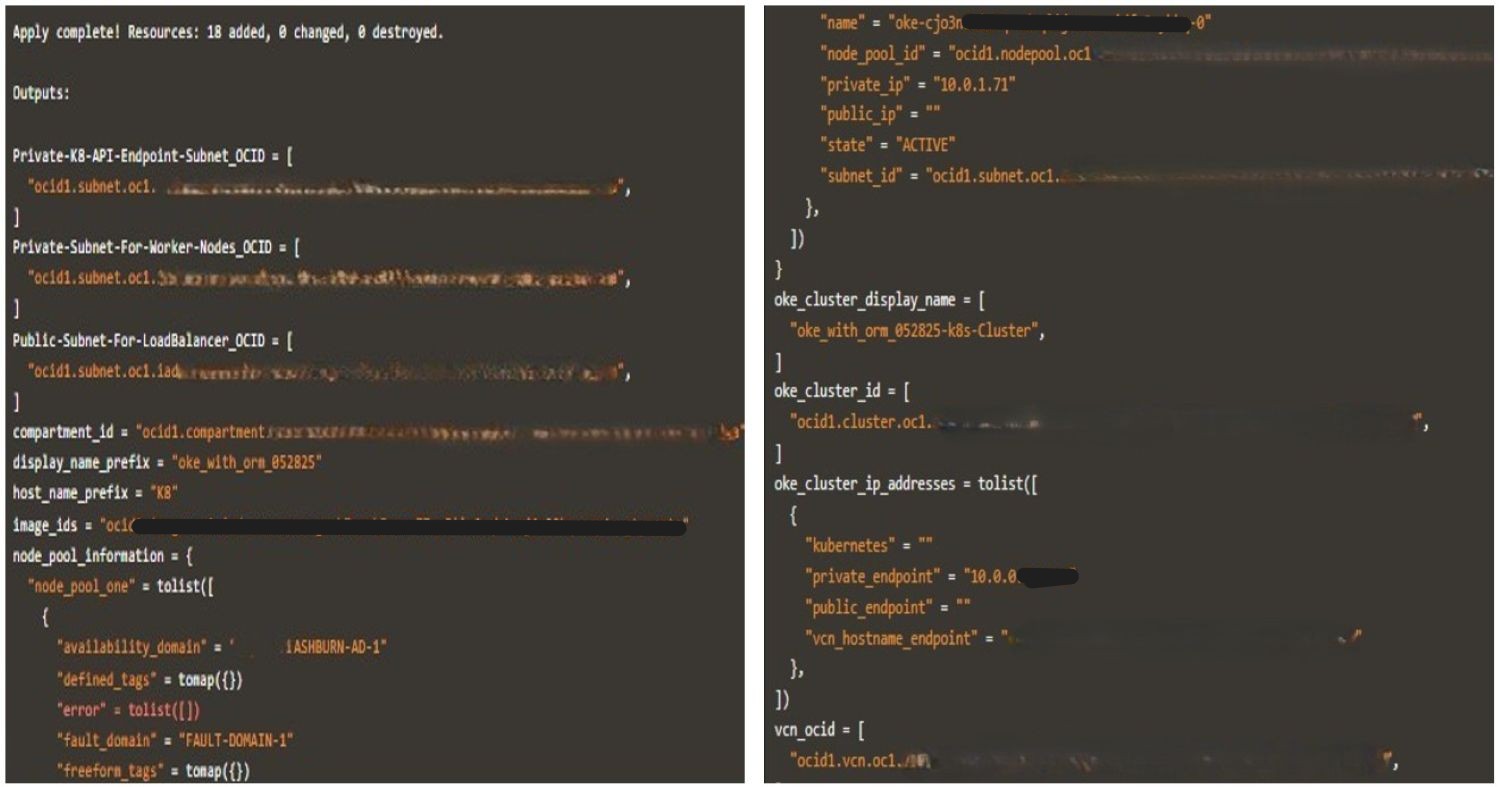
For simplicity, we are skipping the Plan step, as running Apply in Oracle Resource Manager will automatically execute it. By launching the Apply job, Oracle Resource Manager uses the configuration defined in the previous Source Configuration step to provision the specified OKE resources within OCI.
The following images illustrate a successful stack Apply job execution along with the generated logs.

Task 3.4: Execute Destroy Job
Once your activity or testing is complete, you can run the Destroy job in Oracle Resource Manager to clean up the environment. This action instructs Oracle Resource Manager to deprovision (purge) all infrastructure resources that were previously created as part of the stack, including the OKE cluster, node pools, networking components, and any associated services. Running Destroy ensures that unused resources are fully removed, helping you avoid unnecessary costs and maintain a clean OCI tenancy.
Next Steps
Using Terraform to provision an OKE cluster offers a consistent, repeatable, and automated approach to managing Kubernetes infrastructure on Oracle Cloud Infrastructure (OCI). With Infrastructure as Code (IaC), teams can orchestrate cluster creation, enforce best practices, and integrate CI/CD workflows into their deployment processes. Oracle Resource Manager enhances this by simplifying Terraform operations, managing state, and enabling collaboration within OCI. This tutorial serves as a beginner-friendly introduction, and in our upcoming advanced guide, we’ll cover customizable modules, production-grade automation, modular architecture patterns, and complete CI/CD integration. Stay tuned for a more scalable, secure, and enterprise-ready approach to managing Kubernetes at scale.
Related Links
Acknowledgments
- Authors - Mahamat Guiagoussou (Lead Resident Cloud Architect), Payal Sharma (Senior Resident Cloud Architect)
More Learning Resources
Explore other labs on docs.oracle.com/learn or access more free learning content on the Oracle Learning YouTube channel. Additionally, visit education.oracle.com/learning-explorer to become an Oracle Learning Explorer.
For product documentation, visit Oracle Help Center.
Create Oracle Cloud Infrastructure Kubernetes Engine Cluster using Terraform
G34903-01
Copyright ©2025, Oracle and/or its affiliates.