Note:
- This tutorial is available in an Oracle-provided free lab environment.
- It uses example values for Oracle Cloud Infrastructure credentials, tenancy, and compartments. When completing your lab, substitute these values with ones specific to your cloud environment.
Use ReaR to Perform an Oracle Linux Backup
Introduction
Relax-and-Recover (ReaR) was born in 2006 by Gratien D’haese and Schlomo Schapiro as part of a complete rewrite of an earlier Linux Disaster Recovery project mkCDrec. ReaR is an Open Source bare metal disaster recovery solution that Oracle Linux (OL) provides natively. It produces a bootable image that can recreate the system’s original storage layout and restore from the backup.
ReaR is directly available from the Application Streams repository in Oracle Linux 8 or later and is simple to deploy and configure.
This tutorial guides users on installing and configuring ReaR to backup and restore Oracle Linux using NFS storage.
Objectives
In this tutorial, you’ll learn to:
- Install the ReaR package
- Configure ReaR to exclude specific filesystems, mount points, and Logical Volumes that are not needed
- Perform a ReaR backup using NFS storage as a backup repository
- Verify the ReaR client backup on the NFS storage
- Perform a ReaR recovery
Prerequisites
-
Minimum of three Oracle Linux systems
-
An Oracle Linux system as the ReaR client
-
An NFS server as the backup storage location
-
Another system for the recovery
We’ll leverage KVM in this tutorial to create virtual machines for the required systems.
Deploy Oracle Linux
Note: If running in your own tenancy, read the linux-virt-labs GitHub project README.md and complete the prerequisites before deploying the lab environment.
-
Open a terminal on the Luna Desktop.
-
Clone the
linux-virt-labsGitHub project.git clone https://github.com/oracle-devrel/linux-virt-labs.git -
Change into the working directory.
cd linux-virt-labs/ol -
Install the required collections.
ansible-galaxy collection install -r requirements.yml -
Deploy the lab environment.
ansible-playbook create_instance.yml -e localhost_python_interpreter="/usr/bin/python3.6" -e use_kvm=true -e passwordless_ssh=trueThe free lab environment requires the extra variable
local_python_interpreter, which setsansible_python_interpreterfor plays running on localhost. This variable is needed because the environment installs the RPM package for the Oracle Cloud Infrastructure SDK for Python, located under the python3.6 modules.The default deployment shape uses the AMD CPU and Oracle Linux 8. To use an Intel CPU or Oracle Linux 9, add
-e instance_shape="VM.Standard3.Flex"or-e os_version="9"to the deployment command.Important: Wait for the playbook to run successfully and reach the pause task. At this stage of the playbook, the installation of Oracle Linux is complete, and the instances are ready. Take note of the previous play, which prints the public and private IP addresses of the nodes it deploys and any other deployment information needed while running the lab.
Deploy the KVM Virtual Machines
-
Open a terminal and connect via SSH to the ol-node-01 instance.
ssh oracle@<ip_address_of_instance> -
Install the Ansible package and dependencies.
sudo dnf install -y ansible-core python3-lxml -
Create a requirements file for collections.
cat << EOF | tee ~/requirements.yml > /dev/null --- collections: - ansible.posix - community.general - community.crypto - community.libvirt EOF -
Install the collections.
ansible-galaxy install -r requirements.yml -
Create an Ansible configuration file.
cat << EOF | tee ~/ansible.cfg > /dev/null [defaults] nocows = 1 host_key_checking = false interpreter_python = auto_silent inventory = host EOF -
Create an inventory file.
cat << EOF | tee ~/host > /dev/null --- server: hosts: ol-node-01: EOF -
Verify you can connect to each host in the inventory.
ansible all -m pingThe output should list each host with a SUCCESS ping: pong response.
-
Make a template directory.
mkdir ~/templates -
Create a playbook to deploy the virtual machines.
cat << EOF | tee ~/deploy_vms.yml > /dev/null - name: Gather host facts hosts: all tasks: - name: Run facts module ansible.builtin.setup: - name: Configure VMs hosts: server become: true tasks: - name: Deploy VM1 vars: base_image_name: "" base_image_url: "" base_image_sha: "" vm_name: ol9-nfs ansible.builtin.import_tasks: create_vm.yml - name: Deploy VM2 vars: base_image_name: "" base_image_url: "" base_image_sha: "" vm_name: ol9-client ansible.builtin.import_tasks: create_vm.yml EOF -
Create a playbook to create the virtual machines.
cat << EOF | tee ~/create_vm.yml > /dev/null --- - name: Get the list of existing VMs community.libvirt.virt: command: list_vms register: existing_vms changed_when: false vars: ansible_python_interpreter: "/usr/libexec/platform-python" - name: Print list of existing VMs ansible.builtin.debug: var: existing_vms when: debug_enabled - name: Create VM if it doesn't already exist when: ( vm_name not in existing_vms.list_vms ) block: - name: Download base image ansible.builtin.get_url: url: "" dest: "/tmp/" checksum: "sha256:" mode: "0664" - name: Copy base image to libvirt directory ansible.builtin.copy: dest: "/.qcow" src: "/tmp/" force: false remote_src: true owner: qemu group: qemu mode: "0660" register: copy_results - name: Generate a vm ssh keypair community.crypto.openssh_keypair: path: ~/.ssh/id_ed25519 type: ed25519 comment: vm ssh keypair register: vm_ssh_keypair become: true become_user: "" - name: Create vm meta-data ansible.builtin.copy: dest: "~/meta-data" content: | instance-id: iid-local01 local-hostname: mode: "0664" become: true become_user: "" - name: Read the vm ssh private key ansible.builtin.slurp: src: "~/.ssh/id_ed25519.pub" register: vm_ssh_private_key become: true become_user: "" - name: Create vm user-data ansible.builtin.copy: dest: "~/user-data" content: | #cloud-config system_info: default_user: name: opc ssh_authorized_keys: - mode: "0664" become: true become_user: "" - name: Generate iso containing cloud-init configuration ansible.builtin.shell: | genisoimage -output /tmp/.iso -volid cidata -joliet -rock ~/user-data ~/meta-data become: true become_user: "" register: generate_iso changed_when: generate_iso.rc == 0 - name: Copy vm iso image to libvirt directory ansible.builtin.copy: dest: "/.iso" src: "/tmp/.iso" force: false remote_src: true owner: qemu group: qemu mode: "0660" - name: Remove vm iso image from tmp ansible.builtin.file: path: "/tmp/.iso" state: absent - name: Define the vm using xml community.libvirt.virt: command: define xml: "" vars: ansible_python_interpreter: "/usr/libexec/platform-python" - name: Start the vm community.libvirt.virt: name: "" state: running register: vm_start_results until: "vm_start_results is success" retries: 15 delay: 2 vars: ansible_python_interpreter: "/usr/libexec/platform-python" - name: Remove temporary file ansible.builtin.file: path: "/tmp/" state: absent when: cleanup_tmp | bool EOF -
Create the VM template.
cat << EOF | tee ~/templates/vm_template.j2 > /dev/null <domain type="kvm"> <name></name> <memory unit='MiB'></memory> <vcpu placement='static'></vcpu> <os> <type arch="x86_64" machine="q35">hvm</type> <boot dev="hd"/> </os> <features> <acpi/> <apic/> </features> <cpu mode="host-model"/> <clock offset="utc"> <timer name="rtc" tickpolicy="catchup"/> <timer name="pit" tickpolicy="delay"/> <timer name="hpet" present="no"/> </clock> <pm> <suspend-to-mem enabled="no"/> <suspend-to-disk enabled="no"/> </pm> <devices> <emulator>/usr/libexec/qemu-kvm</emulator> <disk type="file" device="disk"> <driver name="qemu" type="qcow2"/> <source file="/.qcow"/> <target dev="vda" bus="virtio"/> </disk> <disk type="file" device="cdrom"> <driver name="qemu" type="raw"/> <source file="/.iso"/> <target dev="sda" bus="sata"/> <readonly/> </disk> <controller type="usb" model="qemu-xhci" ports="15"/> <interface type="network"> <source network=""/> <model type="virtio"/> </interface> <console type="pty"/> <channel type="unix"> <source mode="bind"/> <target type="virtio" name="org.qemu.guest_agent.0"/> </channel> <memballoon model="virtio"/> <rng model="virtio"> <backend model="random">/dev/urandom</backend> </rng> </devices> </domain> EOF -
Create a default varibles file.
cat << EOF | tee ~/default_vars.yml > /dev/null username: oracle debug_enabled: false ol_base_image_name: OL9U4_x86_64-kvm-b234.qcow2 ol_base_image_url: https://yum.oracle.com/templates/OracleLinux/OL9/u4/x86_64/ ol_base_image_sha: 7f1cf4e1fafda55bb4d837d0eeb9592d60e896fa56565081fc4d8519c0a3fd1a libvirt_pool_dir: "/var/lib/libvirt/images" vm_vcpus: 2 vm_ram_mb: 2048 vm_net: default vm_root_pass: cleanup_tmp: no EOF -
Run the deploy_vms playbook.
ansible-playbook deploy_vms.yml -e "@default_vars.yml"
Verify Virtual Machine Creation
-
Get a list of running VMs.
sudo virsh listExample Output:
Id Name State ---------------------------- 1 ol9-nfs running 2 ol9-client running -
Get the IP address of the ol9-nfs VM.
sudo virsh net-dhcp-leases defaultExample Output:
 Expiry Time           MAC address         Protocol   IP address           Hostname     Client ID or DUID
--------------------------------------------------------------------------------------------------------------
 2023-05-28 19:56:44   52:54:00:6d:c7:e0   ipv4       192.168.122.37/24    ol9-client   01:52:54:00:6d:c7:e0
 2023-05-28 19:55:50   52:54:00:78:7c:eb   ipv4       192.168.122.181/24   ol9-nfs      01:52:54:00:78:7c:eb
Another way to get the IP address of a VM is using
sudo virsh domifaddr <vm_name>. -
Upgrade the ol9-nfs VM to the current release.
ssh opc@$(sudo virsh -q domifaddr ol9-nfs | awk '{ print $4 }' | cut -d "/" -f 1) sudo dnf upgrade -y
ssh opc@$(sudo virsh -q domifaddr ol9-nfs | awk '{ print $4 }' | cut -d "/" -f 1) sudo reboot
The embedded command above retrieves the IP address and passes it directly to
ssh, after trimming out the headers (-q) and other data usingawkandcut. Thensshremotely runs the command to upgrade the system and reboot. -
Repeat the upgrade steps for the ol9-client VM.
ssh opc@$(sudo virsh -q domifaddr ol9-client | awk '{ print $4 }' | cut -d "/" -f 1) sudo dnf upgrade -y
ssh opc@$(sudo virsh -q domifaddr ol9-client | awk '{ print $4 }' | cut -d "/" -f 1) sudo reboot
Install and Configure NFS
Using the ol9-nfs VM, install and configure the NFS server.
-
Connect to the ol9-nfs VM.
ssh opc@$(sudo virsh -q domifaddr ol9-nfs | awk '{ print $4 }' | cut -d "/" -f 1) -
Install the NFS Utilities package.
sudo dnf install -y nfs-utils -
Create a directory for the NFS share.
sudo mkdir /storage -
Create the NFS export.
sudo tee -a /etc/exports > /dev/null <<'EOF' /storage *(rw,no_root_squash) EOF -
Add firewall rules to allow NFS traffic.
sudo firewall-cmd --permanent --add-service=nfs sudo firewall-cmd --reload -
Enable and start the NFS server.
sudo systemctl enable --now nfs-server -
Show the NFS export options.
sudo exportfs -sSee the
exports(5)manual page for details on these options. Using theshowmountcommand with the latest versions of Oracle Linux is not recommended, as it defaults to using NFSv4. With NFSv4, theshowmountcommand does not return any data. -
Disconnect from the ol9-nfs VM.
exit
Install, Configure, and Run ReaR
-
Connect to the ol9-client VM.
ssh opc@$(sudo virsh -q domifaddr ol9-client | awk '{ print $4 }' | cut -d "/" -f 1) -
Install the ReaR package.
sudo dnf install -y rear grub2-efi-x64-modules nfs-utilsThis command installs the ReaR package and necessary dependencies. The
grub2-efi-x64-modulesis required on systems that use EFI, such as the OCI or Oracle Linux qcow images. -
Configure ReaR.
This specific ReaR configuration file uses modifications based on this tutorial. When running ReaR outside of this tutorial, users should modify this file using parameters suitable for their environment, including the IP address, NFS mount point, export name, backup directory exclusions, etc.
Important: Replace the
xxin the IP address for both theOUTPUT_URLandBACKUP_URLwith the last digits of the IP address of the tutorial’s ol9-nfs VM.sudo tee -a /etc/rear/local.conf > /dev/null <<'EOF' OUTPUT=ISO OUTPUT_URL=nfs://192.168.122.xx/storage ISO_DEFAULT=manual BACKUP=NETFS BACKUP_URL=nfs://192.168.122.xx/storage BACKUP_PROG_EXCLUDE=("${BACKUP_PROG_EXCLUDE[@]}" '/media' '/var/tmp' '/var/crash') NETFS_KEEP_OLD_BACKUP_COPY=y USE_DHCLIENT=y EOFNote: When adding paths to the
BACKUP_PROG_EXCLUDEvariable, be sure to keep the defaults by adding the${BACKUP_PROG_EXCLUDE[@]}in the list. Omitting the defaults may cause the restored system not to boot.ReaR documents the configuration variables in
/usr/share/rear/conf/default.confwhile documenting example templates in/usr/share/rear/conf/examples/. Do not modify these files directly, and instead overrule those variables needed by defining them in the/etc/rear/sites.confor the/etc/rear/local.conffiles. -
Test the ReaR configuration syntax.
Users should treat the ReaR configuration files as Bash scripts, as the program sources the configuration files during runtime and breaks if any Bash syntax errors exist.
sudo bash -n /etc/rear/local.confIf Bash reports any errors, fix the syntax and test again.
-
Perform the ReaR Backup.
sudo rear -d mkbackupWait for the backup to complete. The resulting output should look similar to the following:
Example Output:
[opc@ol9-client ~]$ sudo rear -d mkbackup Relax-and-Recover 2.6 / 2020-06-17 Running rear mkbackup (PID 2696) Using log file: /var/log/rear/rear-ol9-client.log Running workflow mkbackup on the normal/original system Using backup archive '/var/tmp/rear.10orO0oAXWuOgQf/outputfs/ol9-client/backup.tar.gz' Using autodetected kernel '/boot/vmlinuz-5.15.0-3.60.5.1.el9uek.x86_64' as kernel in the recovery system Creating disk layout Using guessed bootloader 'GRUB' (found in first bytes on /dev/vda) Verifying that the entries in /var/lib/rear/layout/disklayout.conf are correct ... Creating recovery system root filesystem skeleton layout Adding net.ifnames=0 to KERNEL_CMDLINE Adding biosdevname=0 to KERNEL_CMDLINE Handling network interface 'eth0' eth0 is a physical device Handled network interface 'eth0' Cannot include default keyboard mapping (no 'defkeymap.*' found in /lib/kbd/keymaps) Copying logfile /var/log/rear/rear-ol9-client.log into initramfs as '/tmp/rear-ol9-client-partial-2023-05-31T12:19:48+00:00.log' Copying files and directories Copying binaries and libraries Copying all kernel modules in /lib/modules/5.15.0-3.60.5.1.el9uek.x86_64 (MODULES contains 'all_modules') Copying all files in /lib*/firmware/ Skip copying broken symlink '/etc/mtab' target '/proc/10353/mounts' on /proc/ /sys/ /dev/ or /run/ Ignoring irrelevant broken symlink /usr/lib/modules/5.15.0-3.60.5.1.el9uek.x86_64/build Ignoring irrelevant broken symlink /usr/lib/modules/5.15.0-3.60.5.1.el9uek.x86_64/source Testing that the recovery system in /var/tmp/rear.10orO0oAXWuOgQf/rootfs contains a usable system Creating recovery/rescue system initramfs/initrd initrd.cgz with gzip default compression Created initrd.cgz with gzip default compression (88819621 bytes) in 8 seconds Making ISO image Wrote ISO image: /var/lib/rear/output/rear-ol9-client.iso (100M) Copying resulting files to nfs location Saving /var/log/rear/rear-ol9-client.log as rear-ol9-client.log to nfs location Copying result files '/var/lib/rear/output/rear-ol9-client.iso /var/tmp/rear.10orO0oAXWuOgQf/tmp/VERSION /var/tmp/rear.10orO0oAXWuOgQf/tmp/README /var/tmp/rear.10orO0oAXWuOgQf/tmp/rear-ol9-client.log' to /var/tmp/rear.10orO0oAXWuOgQf/outputfs/ ol9-client at nfs location Making backup (using backup method NETFS) Creating tar archive '/var/tmp/rear.10orO0oAXWuOgQf/outputfs/ol9-client/backup.tar.gz' Archived 376 MiB [avg 10132 KiB/sec] OK Archived 376 MiB in 39 seconds [avg 9872 KiB/sec] Exiting rear mkbackup (PID 2696) and its descendant processes ... Running exit tasks You should also rm -Rf --one-file-system /var/tmp/rear.10orO0oAXWuOgQf -
With the backup complete, simulate a failure in the ol9-client VM.
sudo rm -rf /libThis change may cause the VM to fail after rebooting and provide a reference point to check after recovery.
-
Exit the ol9-client VM.
exit -
Verify the backup files exist on the NFS server.
ssh opc@$(sudo virsh -q domifaddr ol9-nfs | awk '{ print $4 }' | cut -d "/" -f 1) "sudo ls -al /storage/ol9-client"Example Output:
total 494168
drwxr-x---. 2 root root       155 Jun  1 12:38 .
drwxr-xr-x. 3 root root        24 Jun  1 12:37 ..
-rw-------. 1 root root   2032510 Jun  1 12:38 backup.log
-rw-------. 1 root root 399333695 Jun  1 12:38 backup.tar.gz
-rw-------. 1 root root       202 Jun  1 12:37 README
-rw-------. 1 root root 104531968 Jun  1 12:37 rear-ol9-client.iso
-rw-------. 1 root root    112013 Jun  1 12:37 rear-ol9-client.log
-rw-------. 1 root root         0 Jun  1 12:38 selinux.autorelabel
-rw-------. 1 root root       274 Jun  1 12:37 VERSION
Recover using ReaR
A successful backup is only good when its recovery works. Without testing the recovery process, users are just guessing, leading to a recipe for disaster.
-
Copy the ReaR recovery ISO to the host system.
ssh opc@$(sudo virsh -q domifaddr ol9-nfs | awk '{ print $4 }' | cut -d "/" -f 1) "sudo cat /storage/ol9-client/rear-ol9-client.iso" > ~/rear-ol9-client.isoReaR defaults to using the hostname in the naming of files in the backup process, thus creating the ISO file with the name
rear-ol9-client.iso, -
Copy the ISO to the default KVM storage location.
sudo cp rear-ol9-client.iso /var/lib/libvirt/images/ -
Stop the client VM.
sudo virsh destroy ol9-clientThis action forces the shutdown of the VM. Verify the VM is “shut off” by running
sudo virsh list --all. -
Backup the client VM configuration.
sudo virsh dumpxml ol9-client > ol9-client.xml cp ol9-client.xml ol9-client.xml.bak -
Edit the client VM XML configuration and update it to allow booting from the recovery ISO file.
Open the VM definition using
vi ~/ol9-client.xmlor your editor of choice. Find the OS section, add the cdrom device, and enable the boot menu.<os> <type arch='x86_64' machine='pc-q35-rhel8.6.0'>hvm</type> <boot dev='cdrom'/> <boot dev='hd'/> <bootmenu enable='yes'/> </os>Edit the devices section and change the cdrom source to the name of the recovery ISO file.
...
    <disk type='file' device='cdrom'>
      <driver name='qemu' type='raw'/>
      <source file='/var/lib/libvirt/images/rear-ol9-client.iso'/>
      <target dev='sda' bus='sata'/>
      <readonly/>
      <address type='drive' controller='0' bus='0' target='0' unit='0'/>
    </disk>
...
Save and close the file.
-
Update the client VM definition.
sudo virsh define ~/ol9-client.xml -
Start the client VM and connect to its console.
sudo virsh start ol9-client; sudo virsh console ol9-clientThe boot menu should start the recovery process and present the Relax-and-Recover menu.
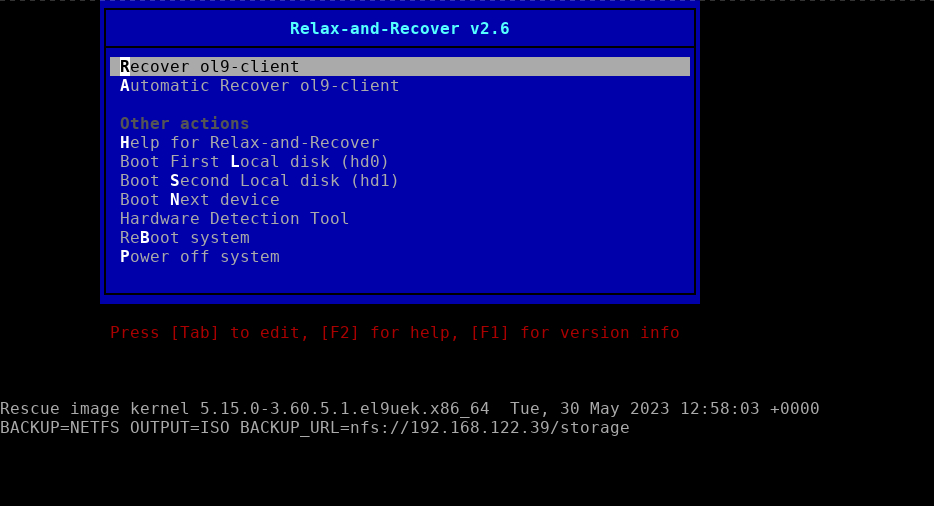
Select
Recover ol9-clientand follow any provided instructions. Log in to the recovery system asrootwithout a password. -
Start the recovery.
rear recoverThis environment requests confirmation of the disk configuration. Answer
yesto the prompt and let the recovery continue. -
Exit from the recovery session.
exitThen type
Ctrl+], where the]is the closing bracket, to release control of the KVM console.
Verify the Recovery
-
Stop the client VM.
sudo virsh destroy ol9-client -
Restore the original client VM definition.
sudo virsh define ~/ol9-client.xml.bakThis command updates the VM definition, not the contents of the associated VM disk.
-
Start the VM
sudo virsh start ol9-client -
Connect to the ol9-client VM and list the contents of the
/libdirectory.ssh opc@$(sudo virsh -q domifaddr ol9-client | awk '{ print $4 }' | cut -d "/" -f 1) ls -lH /libThe
-Hoption follows symlinks, which/libis to/usr/libon Oracle Linux.Note: If the command fails to run, try again, as the VM may not be entirely up and running yet.
Next Steps
That completes this lab and demonstrates how Linux administrators can use ReaR, making it an essential tool for their Linux-based backup solutions. Check out our other content on the Oracle Linux Training Station to learn more about Oracle Linux.
Related Links
- Create VMs with KVM on Oracle Linux
- Backing up Files and Storage Volumes for Disaster Recovery
- Relax-and-Recover upstream documentation
- Oracle Linux Documentation
- Oracle Linux Training Station
More Learning Resources
Explore other labs on docs.oracle.com/learn or access more free learning content on the Oracle Learning YouTube channel. Additionally, visit education.oracle.com/learning-explorer to become an Oracle Learning Explorer.
For product documentation, visit Oracle Help Center.
Use ReaR to Perform an Oracle Linux Backup
F82527-02
September 2024