Build Multi-Platform Container Images Using Podman on Oracle Linux
Introduction
This demo shows the creation of a multi-platform container image using Podman on Oracle Linux.
Objectives
In this tutorial, you’ll learn how to:
- Configure Podman for remote connectivity
- Connect to a remote Podman instance
- Build platform-specific images from a single Containerfile
- Push platform-specific images to the Oracle Cloud Infrastructure Registry (OCIR)
- Create a manifest list that includes both platform-specific images
- Push the manifest list to OCIR
- Inspect the OCIR-hosted manifest list to see the available platforms
- Pull and run the image
Prerequisites
- Access to an Oracle Cloud Infrastructure (OCI) tenancy
- An Oracle Linux x86_64 instance
- An Oracle Cloud Developer aarch_64 instance
- Access to Oracle Cloud Infrastructure Registry
Deploy a Podman Server
-
Create an Oracle Linux compute instance.
You can use the default image and shape, provided the shape uses an x86_64 architecture. Select or create a public subnet and assign an IPv4 address.
This step supports using the Micro shapes available in the Always Free Tier.
-
Once the instance is running, log in to the instance.
ssh -i <SSH_KEY> opc@<IP_ADDRESS_OF_PODMAN_SERVER_INSTANCE>Where:
<SSH_KEY>is the private part of your SSH key used when provisioning the compute instance. Example:~/.ssh/id_rsa<IP_ADDRESS_OF_PODMAN_SERVER_INSTANCE>is the public IP address of the compute instance.
Install and Configure Podman for Remote Access
You can run these commands as the default opc user account on the compute instance or any user with sudo access.
-
Update the system with all the latest security fixes and errata.
sudo dnf -y update -
Install the Podman packages or modules.
Oracle Linux 8:
sudo dnf module install -y container-tools:ol8Oracle Linux 9 and Oracle Linux 10:
sudo dnf install -y container-toolsThe container-tools module or package installs podman and other container tools, including skopeo and buildah. One essential package is container-selinux, which allows running
podmanas a non-root user on a SELinux-enabled system, which Oracle Linux enables by default. -
Enable the Podman socket.
systemd will listen on that socket and fire up an instance of Podman whenever a remote client activates it. When the connection closes, systemd will shut down the Podman instance.
Note: It is possible to configure remote Podman access in rootless mode, but that is beyond the scope of this tutorial.
sudo systemctl enable --now podman.socket -
Verify the path for the socket.
sudo systemctl status podman.socketThe output shows the socket listening and its location is at
/run/podman/podman.sock.That’s it, but stay logged on to the Podman server instance to perform SSH passwordless configuration later in this tutorial.
Deploy an Oracle Cloud Developer Instance
Oracle Ampere A1 Compute is a high-performance platform combining Oracle Cloud Infrastructure (OCI) and Ampere Altra Arm processors. It provides a deterministic performance, proven security, and a broad developer ecosystem that includes popular tools and environments (OS, Kubernetes - OKE, SDKs, and CLIs).
OCI lists the Oracle Cloud Developer Image as a Platform image with all the popular developer tools installed, including Git, Node.js, Java, and GraalVM.
-
Create an Oracle Cloud Developer compute instance.
Select the Oracle Cloud Developer image and an Ampere shape. Select the same public subnet as the Podman server instance and assign an IPv4 address.
-
Decide to use Ingress Rules or SSH port-forwarding.
You can access the demo web application we’ll create in two ways. While you can enable both, you only need to pick one or the other.
(Optional) Create an Ingress Rule
Using an Ingress Rule is a two-step process. This option opens access to the subnet from the internet and continues to grant access to the instance on the specified port even after a reboot. You must first create the rule within OCI and then open the port within firewalld on the Oracle Linux instance.
-
Add an Ingress Rule to your public subnet.
The rule should allow inbound traffic on port
5808/tcpfrom0.0.0.0/0. The rule takes effect immediately after creation. -
Open a new terminal and connect to the Oracle Cloud Developer instance via SSH.
ssh -i <SSH_KEY> opc@<IP_ADDRESS_OF_ORACLE_CLOUD_DEVELOPER_INSTANCE> -
Add access to the demo web application.
sudo firewall-cmd --permanent --add-port=5808/tcp sudo firewall-cmd --reload -
Confirm the changes to the firewall.
sudo firewall-cmd --list-allThe output shows
ports: 5808/tcpavailable.
Use SSH Port-Forwarding
-
Open a terminal and connect via SSH to the Oracle Cloud Developer instance.
The
-Loption enables local forwarding, which opens a local port to connect through an SSH tunnel to the remote demo web application.ssh -L 5808:localhost:5808 -i <SSH_KEY> opc@<IP_ADDRESS_OF_ORACLE_CLOUD_DEVELOPER_INSTANCE>
Create a Container Image for a Web Application and Run It Locally
-
Clone the demo application’s Git repository.
For this tutorial, you will be deploying RasDash, a Node.js based server monitoring web app.
git clone https://github.com/sykeben/RasDash.git -
Change to the source code directory.
cd ~/RasDash -
Create a Containerfile to build and serve the web application.
cat << EOF > Containerfile FROM ghcr.io/oracle/oraclelinux8-nodejs:14 COPY . /app WORKDIR /app RUN npm install && \ npm test CMD ["/usr/bin/node", "app.js", "service"] EOF -
Build and run the image on the local instance.
Build the container image locally using
podmanand tag the image with the application’s version and the platform’s architecture. This information will be helpful later when you push each platform image to the Oracle Cloud Infrastructure Registry (OCIR) and when you create a manifest of the two platform images.sudo podman build --format docker --tag rasdash:0.3.4-arm64 .The final line will be unique to your application build.
-
Run a container using the image.
sudo podman run --rm --init -detach --name rasdash --publish 5808:5808 localhost/rasdash:0.3.4-arm64The digest that Podman returns is unique to each container instance.
-
View the running container.
sudo podman psThe output displays the container as
Upand running. -
View the container logs.
sudo podman logs rasdashThe output shows the
[STATE] Server started. -
View the web application.
Open a browser on your local machine and navigate to
http://localhost:5808. If you created the ingress and firewall rules, you could use the Oracle Cloud Developer instance’s public IP address rather thanlocalhost.Note: The CPU temperature metric will display
-1as virtual instances in OCI cannot access physical hardware data. -
Stop the running container.
sudo podman stop rasdash
Configure Passwordless SSH Between the Instances
Podman communicates using SSH between instances for security purposes. For a more seamless experience, create a public/private key pair on your Cloud Developer instance and copy that to the Podman Remote server so you can SSH from the developer instance without being prompted for a password.
-
Generate a public/private key pair on the Oracle Cloud Developer instance.
ssh-keygen -b 4096 -f ~/.ssh/id_rsa -q -N "" -
Copy the contents of the public key file.
cat ~/.ssh/id_rsa.pubSelect the output from the
catcommand and copy it. -
Switch to the Podman server instance.
-
Open the file in vi.
vi ~/.ssh/authorized_keysPaste the public key contents into the authorized keys file.
Save and close the file.
-
Ensure you apply the correct file system permissions to the SSH directory and files.
chmod 700 ~/.ssh && chmod 600 ~/.ssh/authorized_keys -
Switch to the Cloud Developer instance.
-
Test if you can SSH to the Podman server as the
opcuser without requiring a password.Note: If you have any issues, refer to the following documentation:
ssh opc@<IP_ADDRESS_OF_PODMAN_SERVER_INSTANCE>After you have verified that you can connect without requiring a password, be sure to
exitthe SSH session between the Oracle Cloud Developer instance and the Podman server. -
Switch to the Podman server instance.
-
Replace the root user’s authorized keys file.
cat /home/opc/.ssh/authorized_keys | sudo tee /root/.ssh/authorized_keys -
Switch to the Cloud Developer instance.
-
Test if you can SSH with the
opcuser on the Cloud Developer instance to therootuser on the Podman server.ssh root@<IP_ADDRESS_OF_PODMAN_SERVER_INSTANCE>You can
exitthe session after successfully testing the SSH connection to the Podman server as the root user.
Create a System Connection to the Podman Server
-
Create a Podman system connection between the Oracle Cloud Developer instance and the Podman service running on your Podman server.
sudo podman system connection add --identity ~/.ssh/id_rsa amd64 ssh://root@<IP_ADDRESS_OF_PODMAN_SERVER_INSTANCE>/run/podman/podman.sockIn the command above, ensure you replace
<IP_ADDRESS_OF_PODMAN_SERVER_INSTANCE>with the IP address or hostname of your Podman server. -
Verify that you successfully added the connection.
sudo podman system connection listThe output displays the
amd64connection with theDefaultvalue set totrue. Podman uses this connection if the system has multiple connections configured.
Build an Image on the Remote Podman Server
You should now be able to use podman --remote to send commands from the Oracle Cloud Developer instance to the remote Podman server instance.
-
Test by getting the details of the Podman server.
sudo podman --remote infoThe architecture should report as
arm64. -
Build the remote image.
Podman will copy the entire context to the remote instance automatically.
cd ~/RasDash sudo podman --remote build --format docker --tag rasdash:0.3.4-amd64 . -
Verify that the image exists on the remote Podman server.
NOTE: Podman does not copy the image it creates back to the client machine, so the image will not be listed if you run
sudo podman images. However, it is available on the remote machine.sudo podman --remote imagesExample Output:
REPOSITORY TAG IMAGE ID CREATED SIZE localhost/rasdash 0.3.4-amd64 3a1b9755ebdd 8 seconds ago 439 MB ... -
Verify local image architecture.
The final method of validating that each image has been built for (and on) a specific platform and architecture uses
jqto extract the value of theArchitecturefield in the manifest of each image.sudo podman inspect rasdash:0.3.4-arm64 | jq -r '.[] | .Architecture'The local image reports its architecture as
arm64. -
Check the remote image.
sudo podman --remote inspect rasdash:0.3.4-amd64 | jq -r '.[] | .Architecture'The remote image reports as
amd64.
Create a Container Registry Repository
In the Oracle Cloud Infrastructure Console, navigate to the Container Registry section and create a repository to store your multi-platform application.
For more details, see Creating a Repository in the Oracle Cloud Infrastructure Documentation.
-
Create the private
demo/rasdashrepository.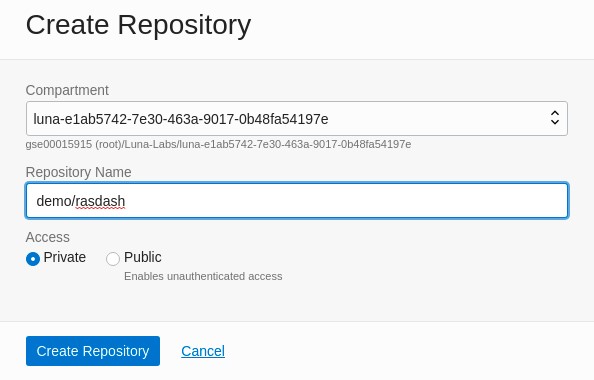
-
Review the details of the new repository.

Gather the Container Registry Repository Credentials
The following table provides example values used in subsequent steps in this tutorial. The iad example is the region key for US East (Ashburn) region. If your region is Germany Central (Frankfurt), the region key is fra. Refer to the Regions and Availability Domains documentation for a complete table listing available region keys.
| Registry Data | Tutorial Placeholder | Notes |
|---|---|---|
| REGISTRY_NAMESPACE | gse00015915 |
Displayed in the repository info panel as “Namespace” |
| REPOSITORY_NAME | demo/rasdash |
Displayed under the compartment name |
| OCIR_INSTANCE | iad.ocir.io |
Use <region>.ocir.io |
See Pushing Images Using the Docker CLI if needed. This procedure describes the login process required to push images to the Container Registry using the CLI.
-
Get your username.
You need a username and an authentication token to log in to the container registry. To obtain the username, in the top-right corner of the Oracle Cloud Infrastructure console, open the Profile menu (User menu icon) and then click My profile to view the details.
Copy and save the username, including the
tenancy-namespacedisplayed in the console.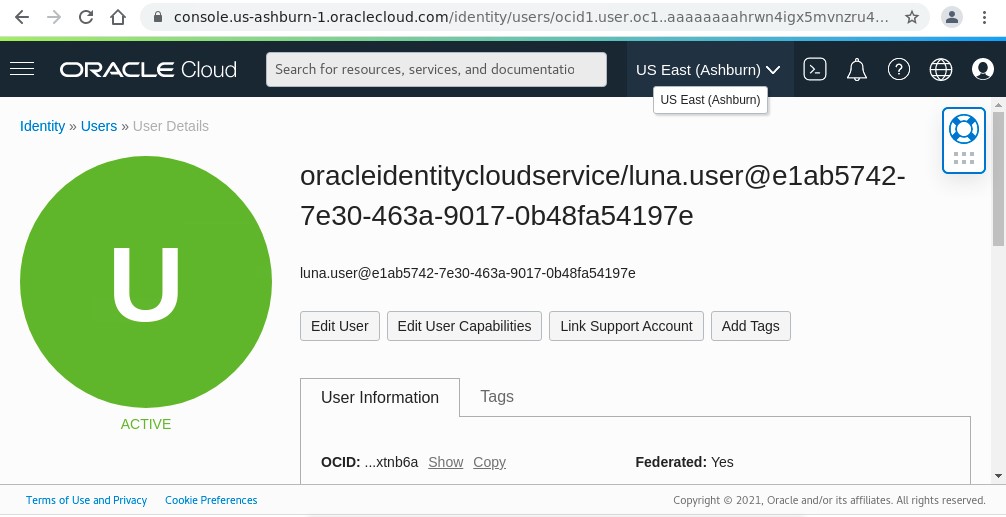
-
Generate an Auth Token.
Scroll down the My profile page in the console and select Auth Tokens under Resources.
Select the Generate Token button and provide a description of
demofor the new token.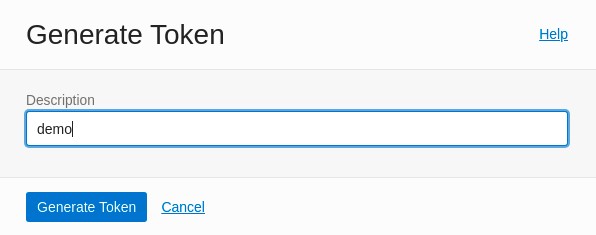
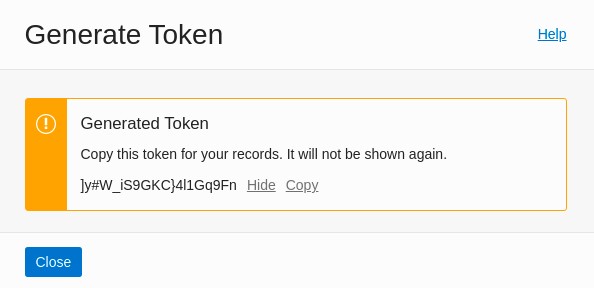
After you generate the token, be sure to copy and save it.
Login to the Container Registry Repository
The following table provides example values used in subsequent steps in this tutorial.
| Username | Tutorial Placeholder |
|---|---|
| REGISTRY_NAMESPACE | gse00015915 |
| USERNAME | luna.user@e1ab5742-7e30-463a-9017-0b48fa54197e |
| TOKEN | ]y#W_iS9GKC}4l1Gq9Fn |
| OCIR_INSTANCE | iad.ocir.io |
-
Create environment variables for use in the
podman logincommand.Create the
USERandTOKENenvironment variables using your username and token. Ensure you include the<REGISTRY_NAMESPACE>as part of the username.export OCIR_INSTANCE="iad.ocir.io" export OCIR_NAMESPACE="gse00015915" export OCI_USERNAME="luna.user@e1ab5742-7e30-463a-9017-0b48fa54197e" export OCIR_USERNAME="$OCIR_NAMESPACE/$OCI_USERNAME" export OCI_USER_TOKEN="]y#W_iS9GKC}4l1Gq9Fn" -
Login to the container registry.
sudo -E podman login -u $OCIR_USERNAME -p $OCIR_USER_TOKEN $OCIR_INSTANCEThe remote instance will automatically inherit the auth credentials from the client instance.
Push the Platform Images
In this example, the final repository URIs with platform-specific tags are:
docker://iad.ocir.io/gse00015915/demo/rasdash:0.3.4-arm64docker://iad.ocir.io/gse00015915/demo/rasdash:0.3.4-amd64
Podman can push local images to remote registries without the image needing to be tagged beforehand.
-
Push the local
rasdash/0.3.4-arm64image.sudo -E podman push rasdash:0.3.4-arm64 docker://$OCIR_INSTANCE/$OCIR_NAMESPACE/demo/rasdash:0.3.4-arm64 -
Push the remote
rasdash:0.3.4-amd64image.sudo -E podman --remote push rasdash:0.3.4-amd64 docker://$OCIR_INSTANCE/$OCIR_NAMESPACE/demo/rasdash:0.3.4-amd64 -
Check the Container Registry console.
Note: Pushing a remote image does not generate local output. Review the Container Registry console for the
rasdash:0.3.4-amd64tag to check if you successfully pushed the image.You should see two images in the Container Registry console.

The
0.3.4-amd64image:
The
0.3.4-arm64image:
Create and Push a Manifest List to the Container Registry
Now that you have two platform images, it’s time to create a manifest list to enable container runtimes to select the appropriate image for their platform, which is a combination of the operating system and architecture.
Because most container images are Linux-based, users typically refer to a multi-platform image as a multi-arch image. However, combining images that can run on Windows, macOS, and Linux into a single manifest is also possible.
-
Create and populate the manifest.
Create a local manifest list on the Cloud Developer Instance with just the app version in the tag.
sudo podman manifest create rasdash:0.3.4As before, the checksum output is unique to the manifest you create and will not match the one above.
-
Inspect the manifest list to reveal what
mediaTypeis being used and its member images.sudo podman manifest inspect rasdash:0.3.4 -
Add the two platform-specific images to the list.
sudo -E podman manifest add rasdash:0.3.4 docker://$OCIR_INSTANCE/$OCIR_NAMESPACE/demo/rasdash:0.3.4-arm64sudo -E podman manifest add rasdash:0.3.4 docker://$OCIR_INSTANCE/$OCIR_NAMESPACE/demo/rasdash:0.3.4-amd64 -
Inspect the manifest list.
sudo podman manifest inspect rasdash:0.3.4The output is more interesting after adding the images.
For maximum compatibility, you added the
--format dockerparameter to each build command, which instructs Podman to create the image using the Docker Image Manifest V2, Schema 2 (v2s2) specification instead of the Open Container Initiative Image Manifest Specification, which Podman will use by default.Because the manifests are using the
v2s2specification, Podman uses the associatedv2s2Manifest List specification instead of the Open Container Initiative Image Index Specification.The default container runtimes used by both cloud-based managed Kubernetes services, including Oracle Engine for Kubernetes (OKE) and on-premise self-hosted Kubernetes distributions, are compatible with both specifications.
-
Push the manifest list to the Container Registry.
Now that you have created the manifest list, you can push it to the same Container Registry repository that stores the platform-specific images.
sudo -E podman manifest push --all rasdash:0.3.4 docker://$OCIR_INSTANCE/$OCIR_NAMESPACE/demo/rasdash:0.3.4This action is a quick operation because you pushed the platform-specific images earlier. The Container Registry just links the manifest list to the existing images.
-
Create and run the image locally.
You can now run an instance of the image locally and remotely using the manifest list tag instead of the platform-specific tag.
sudo -E podman run --rm --detach --init --publish 5808:5808 $OCIR_INSTANCE/$OCIR_NAMESPACE/demo/rasdash:0.3.4 -
Create and run the image remotely.
sudo -E podman --remote run --rm --detach --init --publish 5808:5808 $OCIR_INSTANCE/$OCIR_NAMESPACE/demo/rasdash:0.3.4
Test the Images Using a Browser
Suppose you created the necessary ingress rules and firewalld rules on the instances. In that case, you should be able to open your browser and navigate to http://<PUBLIC_IP_ADDRESS_OF_ORACLE_CLOUD_DEVELOPER_INSTANCE>:5808 and http://<PUBLIC_IP_ADDRESS_OF_PODMAN_SERVER_INSTANCE>:5808 to open the RasDash web application running on each instance.
Otherwise, you can use SSH port-forwarding as before by creating two tunnels from your local machine.
-
Open an SSH tunnel to the Oracle Cloud Developer instance.
ssh -L 5808:localhost:5808 -i <SSH_KEY> opc@<IP_ADDRESS_OF_ORACLE_CLOUD_DEVELOPER_INSTANCE>Open a browser on your local machine and navigate to
http://localhost:5808to view the arm64-based web application on the Cloud Development instance. -
Exit out of the SSH tunnel session.
-
Open an SSH tunnel to the Podman server instance.
ssh -L 5808:localhost:5808 -i <SSH_KEY> opc@<IP_ADDRESS_OF_PODMAN_SERVER_INSTANCE>Refresh the browser on your local machine pointing to
http://localhost:5808to view the amd64-based web application on the Podman Server instance.
Next Steps
After completing this tutorial, you should now know how to create images that you can deploy from both private and public OCIR repositories. You can use these images in various locations,such as Oracle Engine for Kubernetes (OKE) or Oracle Cloud Native Environment. When deploying your images to hosts outside of Oracle Cloud Infrastructure, including Podman Desktop for Mac or Windows, you should ensure the repository is public.
Related Links
More Learning Resources
Explore other labs on docs.oracle.com/learn or access more free learning content on the Oracle Learning YouTube channel. Additionally, visit education.oracle.com/learning-explorer to become an Oracle Learning Explorer.
For product documentation, visit Oracle Help Center.
Build Multi-Platform Container Images Using Podman on Oracle Linux
F45797-08