Secure Legacy Applications using OCI IAM App Gateway
Introduction
Oracle App Gateway is a software appliance that enables you to integrate applications hosted either on a compute instance, in a cloud infrastructure, or in an on-premises server with Oracle Cloud Infrastructure for authentication purposes.
App Gateway acts as a reverse proxy protecting web applications by restricting unauthorized network access to them. App Gateway intercepts any HTTP request to these applications and ensures that the users are authenticated with OCI Identity and Access Management (IAM) before forwarding the request to these applications. App Gateway propagates the authenticated user’s identity to the applications.
If the user isn’t authenticated with OCI IAM, then App Gateway redirects the user to OCI IAM’s Sign In page for credential validation.
Objective
This tutorial demonstrates how to use Oracle App Gateway to secure a legacy application by adding an authentication and authorization layer integrated with OCI IAM. This provides centralized control over access to the legacy environment, ensuring security, governance, and visibility into authorized users.
Prerequisites
Before configuring App Gateway in Oracle Cloud Infrastructure (OCI), make sure you have:
- An OCI account with administrative permissions
- An identity domain created of type Enterprise
- Access to the identity domain configured in OCI IAM
- Permission to create and manage enterprise applications in OCI IAM
- A configured network environment
- A subnet in the virtual cloud network (VCN) to host App Gateway
- Security rules in security lists or a network security group (NSG) to allow traffic on port 443 (HTTPS) and the backend application port
- A server with App Gateway
- A virtual machine (VM) or host running Linux to install the Cloud Gate Agent (NGINX + OCI IAM module)
- A valid or self-signed TLS certificate to enable HTTPS on the App Gateway
- An available legacy application
- Must be running on a backend host (HTTP or HTTPS)
- The application’s address and port must be known and reachable from the VCN
- Users and groups in OCI IAM
- Users provisioned in the identity domain
- Groups or assignments configured to define who can access the legacy application
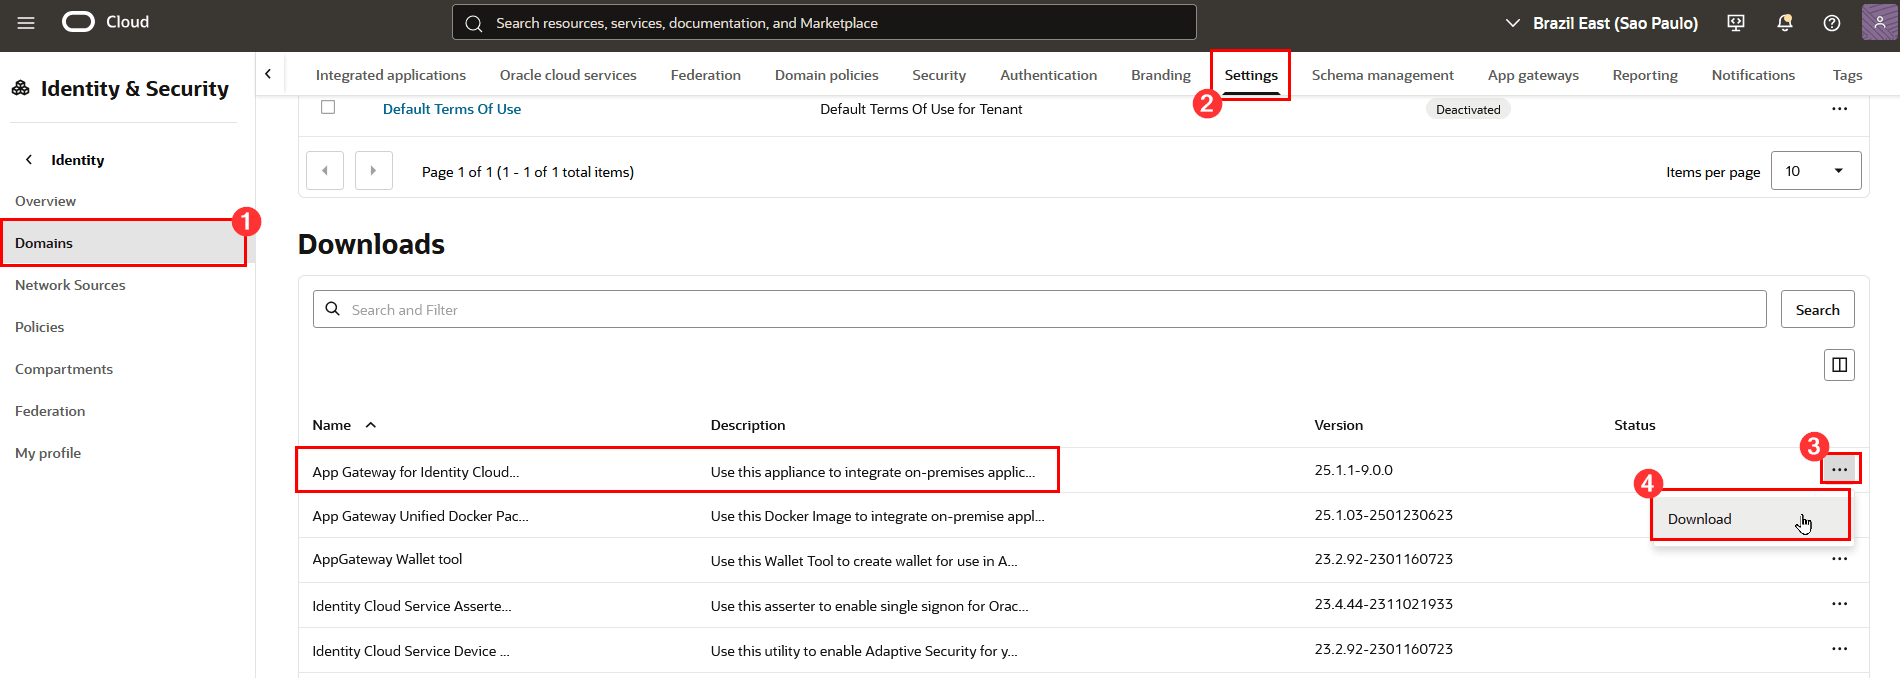
Task 1: Download Oracle App Gateway OVA and convert it to VMDK
-
Click Domains, Settings for your domain, then scroll down to the Downloads section. Click the 3 dots to open the App Gateway for Identity Cloud Service menu and then click Download:
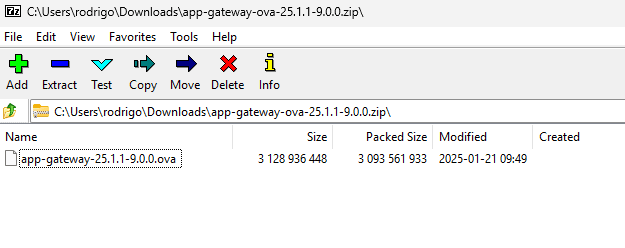
-
After the download completes, extract the .ova file (VirtualBox virtual appliance file) from the .zip file to your computer.
-
To process this file, import the .OVA file into VirtualBox. Importing the .OVA file will create a Virtual Disk Image (.VDI) file.
-
Upload this VDI file to a bucket in OCI.

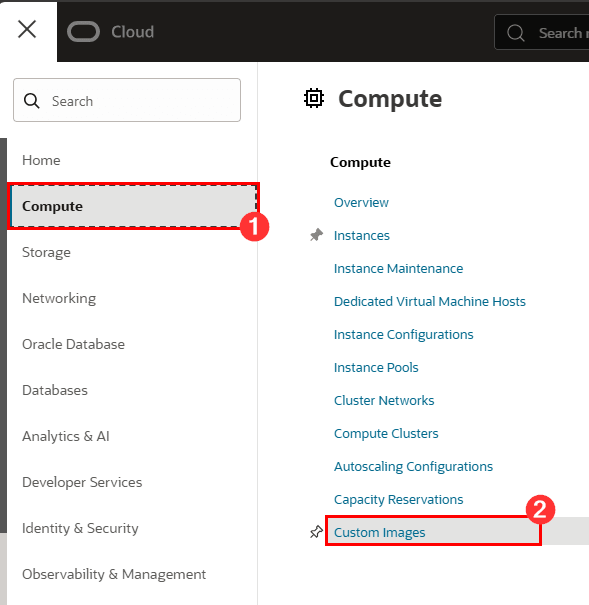
Task 2: Create App Gateway’s custom Image in OCI
-
After the .VDI file is available in the bucket, create a custom image for use on instances in your tenant. Click Compute, Custom Images:
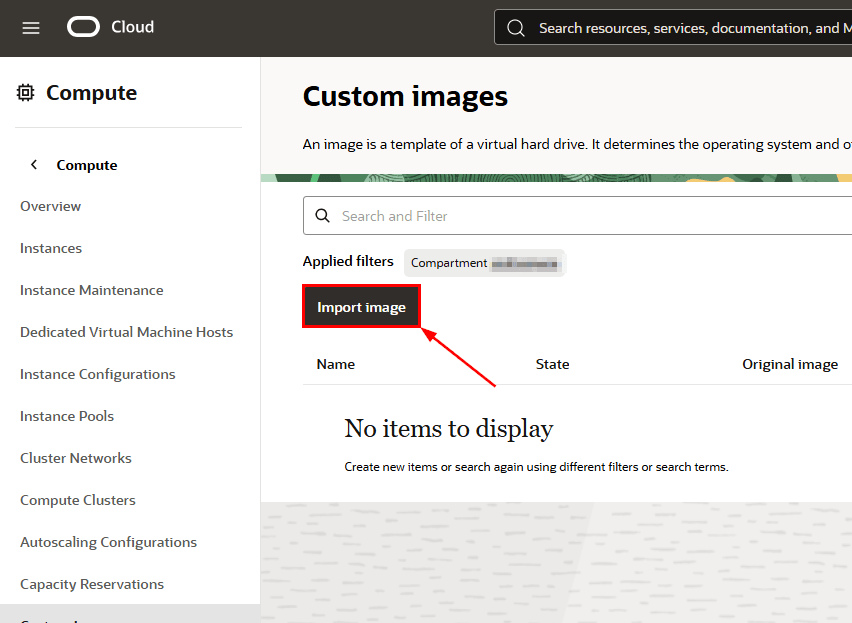
-
Click Import image:
-
Fill in and select the settings to create the custom image:
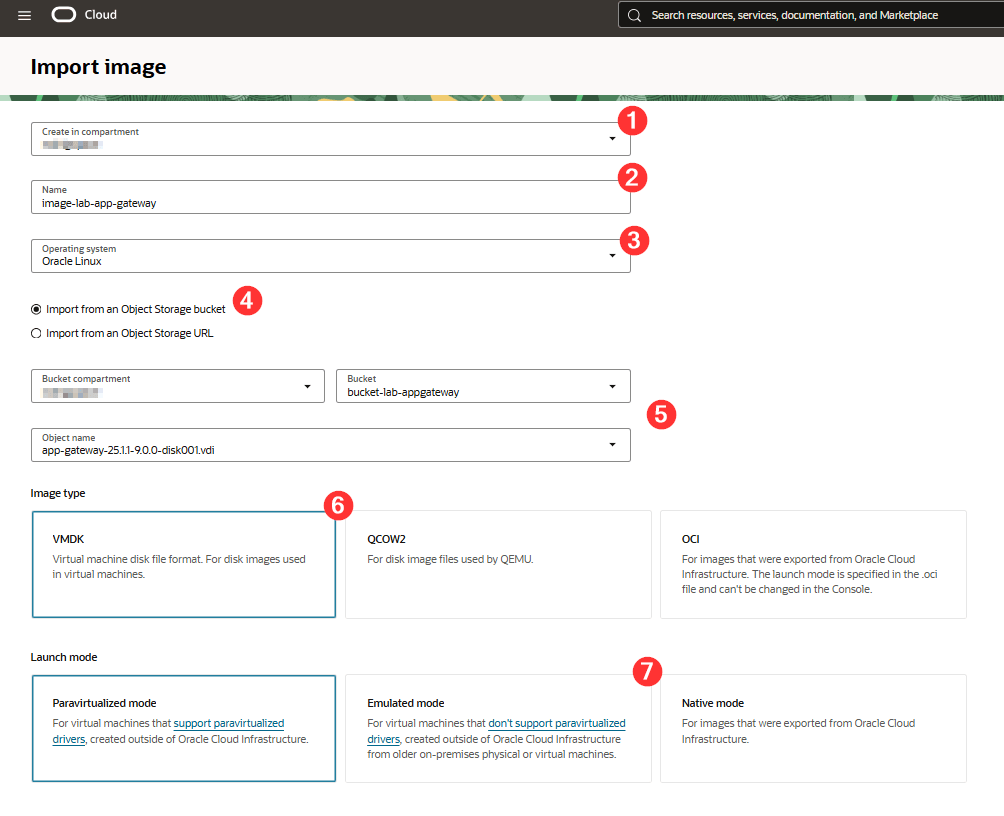
Where:
- Create in compartment: Select the compartment here the custom image will be created
- Name: Name of the custom image to be created
- Operating System: Keep Oracle Linux selected
- Bucket: Select Import from an Object Storage ucket
- Object storage information: Select the object torage and the .vdi image from the previous step
- Image type: Click VMDK
- Launch mode: Click Emulated mode
After filling out this information, click Import image. After the import is complete, you can create an OCI instance with the newly created custom image.
Task 3: Create App Gateway instance
-
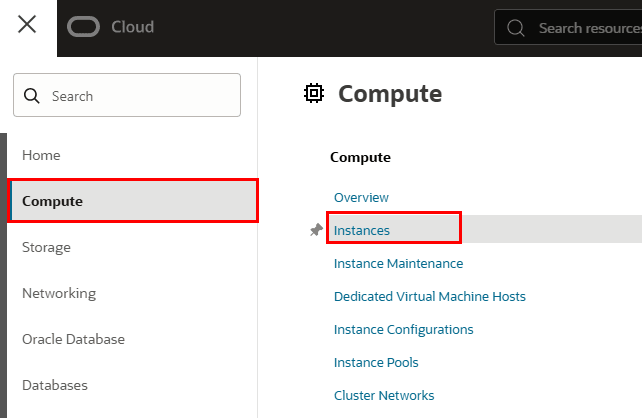
To create the instance, Click Compute, Instances:
-
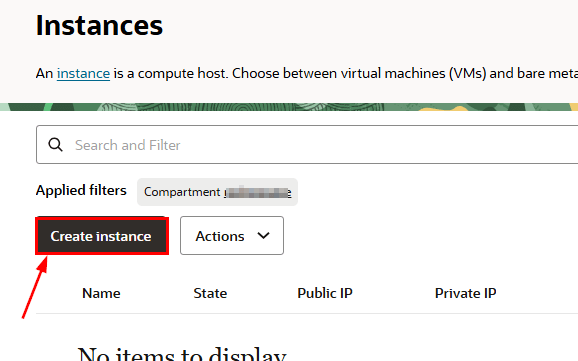
Click Create instance:
-
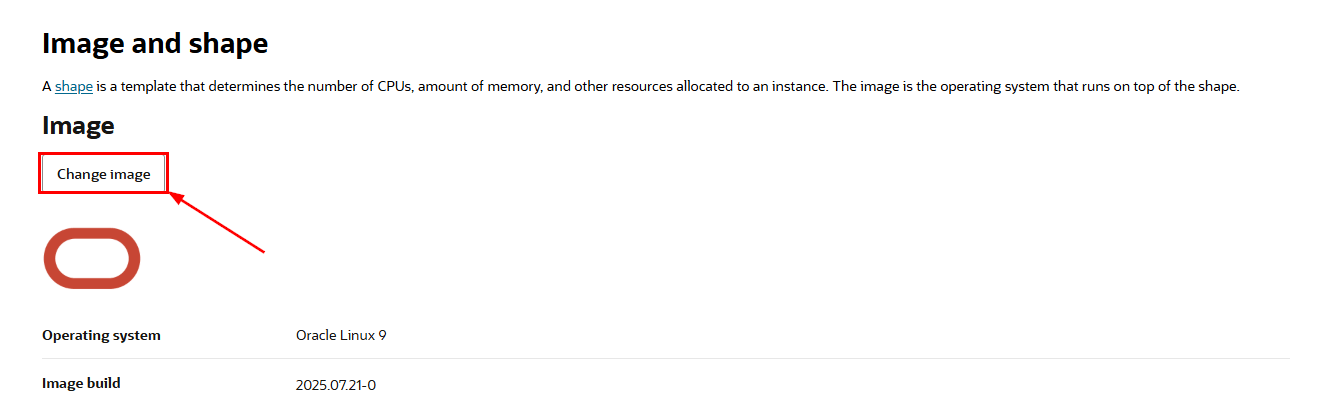
Fill in the information regarding instance creation and click Change image to select the custom image that was created in the previous steps.
-
Select the fields to use the custom image:
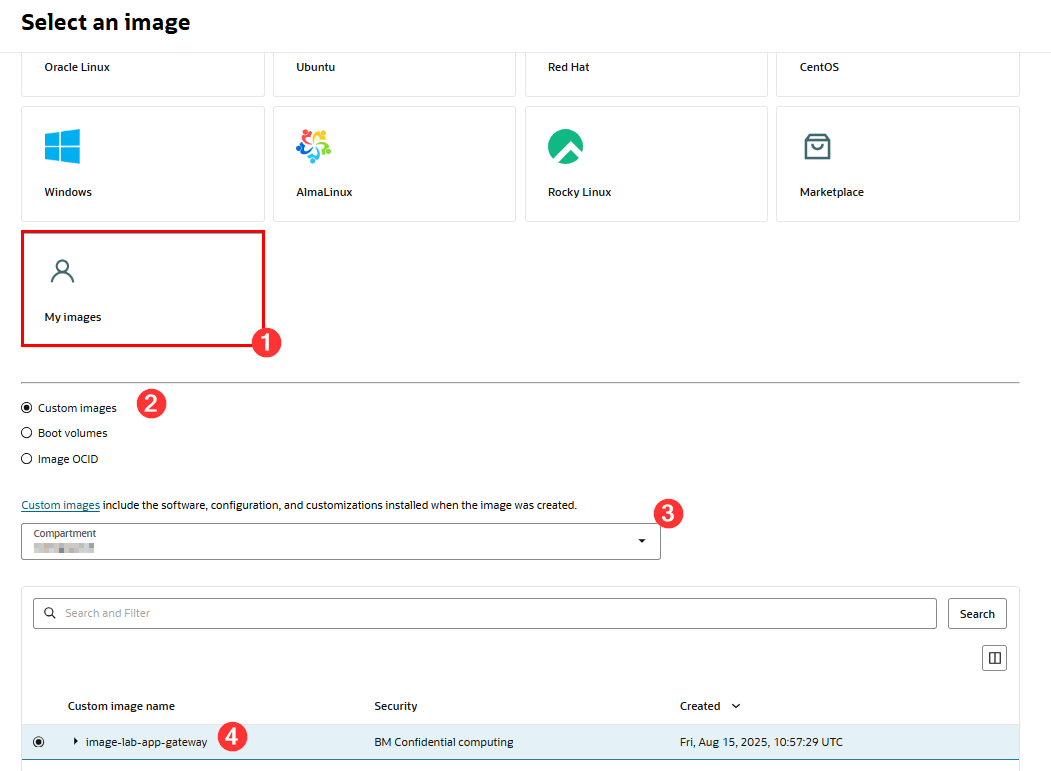
Where:
- My images: Select this item to use your custom image
- Custom images: Leave this item selected
- Compartment: Select the compartment where the custom image was created
- Custom image name: Select your previously created App Gateway image
Task 4: Validate App Gateway Server Settings
To validate your App Gateway server settings after creating it, log in to a terminal by using SSH:
ssh -i <path_private_key> oracle@<IP_servidor_app_gateway>
SSH with the ‘oracle’ user. The password for this user can be found in the official App Gateway product documentation at this link.
Note: The password must be changed the first time you log in.
Task 5: Create a Certificate and Private Key for the App Gateway Server
After you’ve accessed the instance, create a server.crt and a server.key for use by App Gateway, as it will operate over HTTPS. To do this, run the following commands on the server:
-
To create the server.key:
openssl genrsa -out server.key 2048 -
To create server.crt:
openssl req -new -x509 -days 365 -key server.key -out server.crt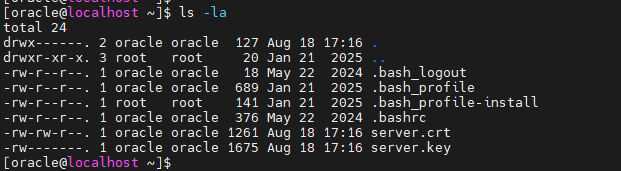
Important: Make a note of the path where the server.crt and server.key files are stored on your App Gateway server. You’ll need this information to complete the App Gateway configuration within the OCI Web Console:
ssl_certificate /home/oracle/server.crt;
ssl_certificate_key /home/oracle/server.key;
ssl_protocols TLSv1 TLSv1.1 TLSv1.2;
ssl_ciphers HIGH:!aNULL:!MD5;
After creating the server.crt and server.key files, we can register App Gateway within the OCI console.
Notes:
- This lab uses self-signed SSL certificates. Therefore, we are certain to encounter a certificate validation failure message in the browser when testing access to the legacy application by using App Gateway.
- If your environment uses valid SSL, visit the Oracle App Gateway documentation for more information.
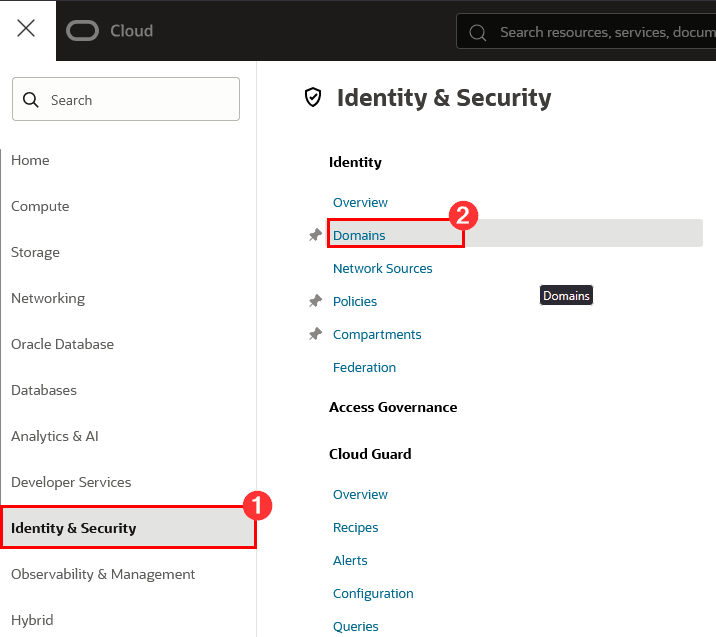
Task 6: Register App Gateway in the OCI Console
-
To register App Gateway, from the OCI Web Console, click Identity & Security, Domains:
-
Click your Domain name:
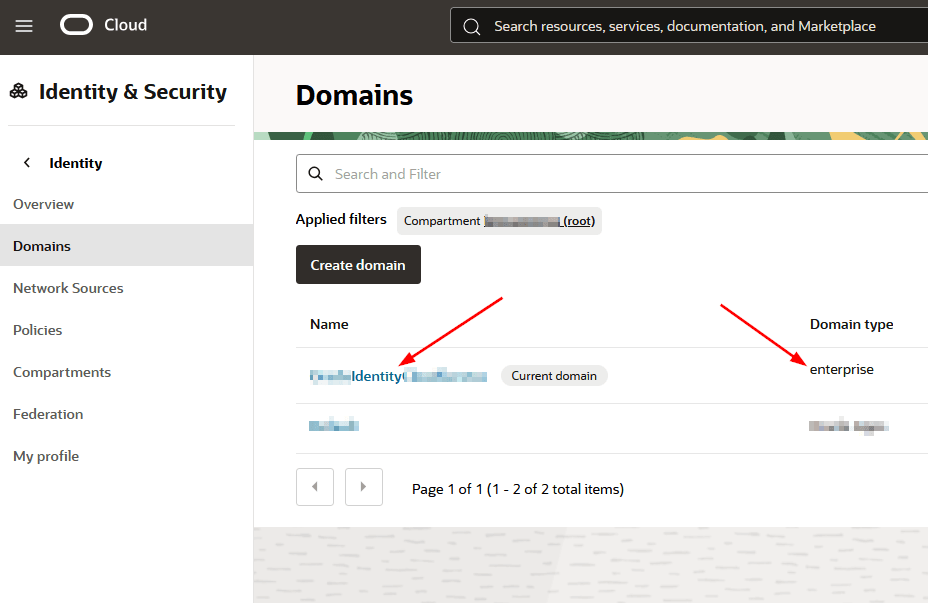
Note: To use App Gateway, your Identity Domain must be created as type Enterprise.
-
Click App Gateways and then click Create app gateway:
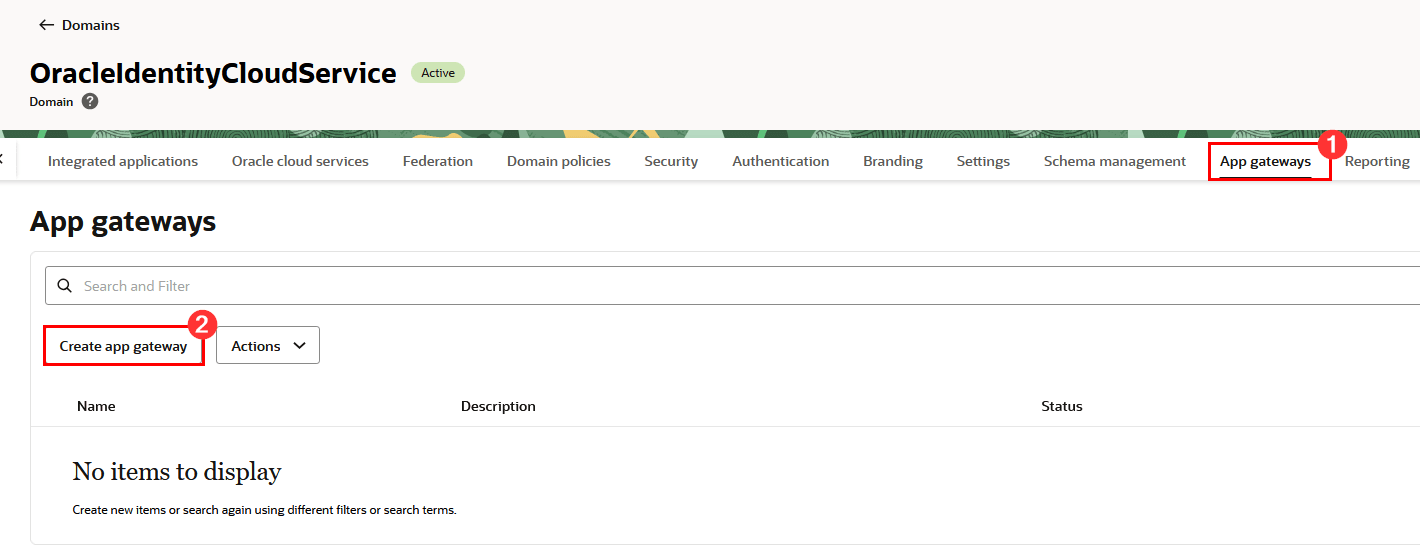
-
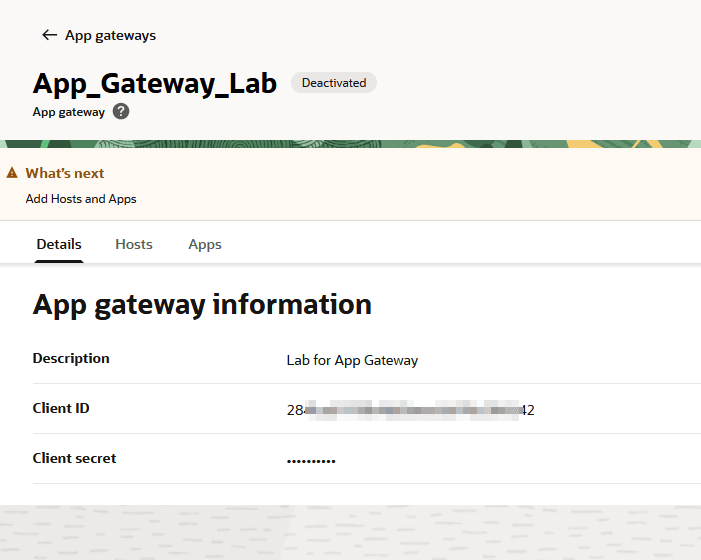
Fill in the required information in the App Gateway creation workflow and click Create app gateway. After creation, your App Gateway details will be displayed on the screen:
-
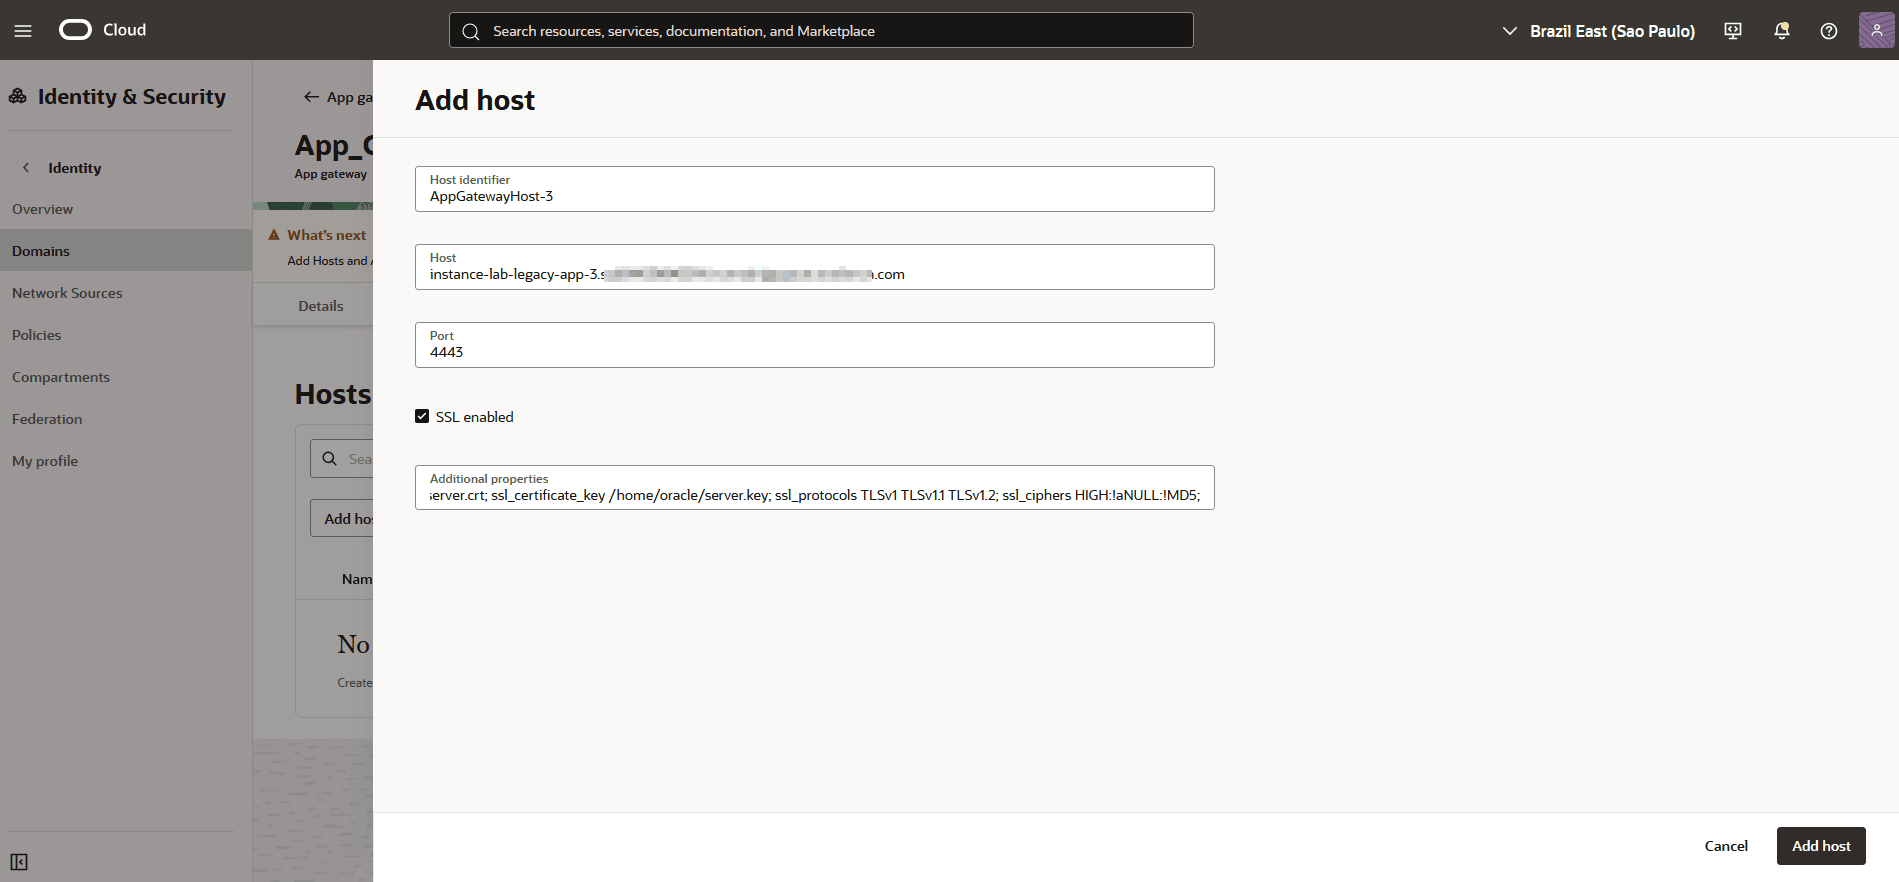
After you’ve created your App Gateway, click Hosts and then Add host:

-
Enter the information regarding the App Gateway server created in the previous steps:
Where:
1: Host Identifier: Enter a name for your App Gateway
2: Host: This is the FQDN of the App Gateway instance created previously. To capture this information, go to your instance, click the Networking tab and capture the Internal FQDN 3: Port: Enter the port on which the App Gateway will run (in this example, we’ll use port 4443)
4: SSL Enabled: In this lab, the App Gateway will use SSL. Therefore, click SSL enabled
5: Additional Properties: Enter the SSL settings as previously created
ssl_certificate /home/oracle/server.crt; ssl_certificate_key /home/oracle/server.key; ssl_protocols TLSv1 TLSv1.1 TLSv1.2; ssl_ciphers HIGH:!aNULL:!MD5; -
Click Add host.
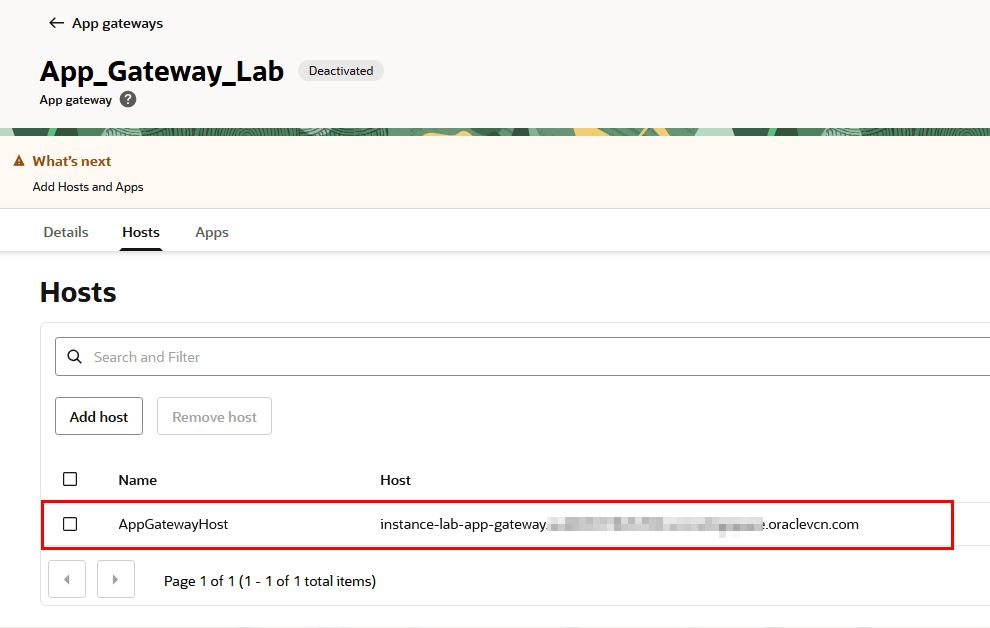
-
After the App Gateway is created, it will appear on the screen after its configuration:
-
Click the Details tab and activate your App Gateway by clicking Actions, Activate app gateway:
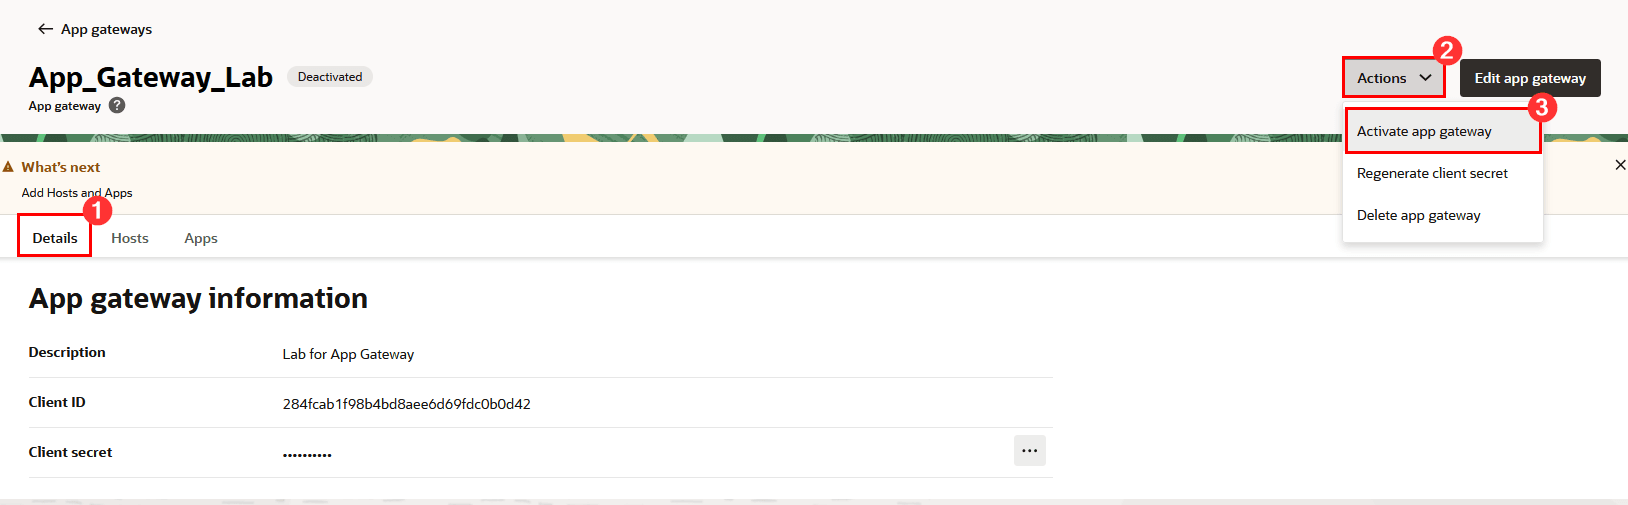
-
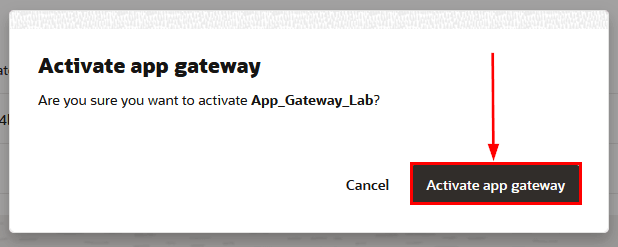
Confirm the activation:
-
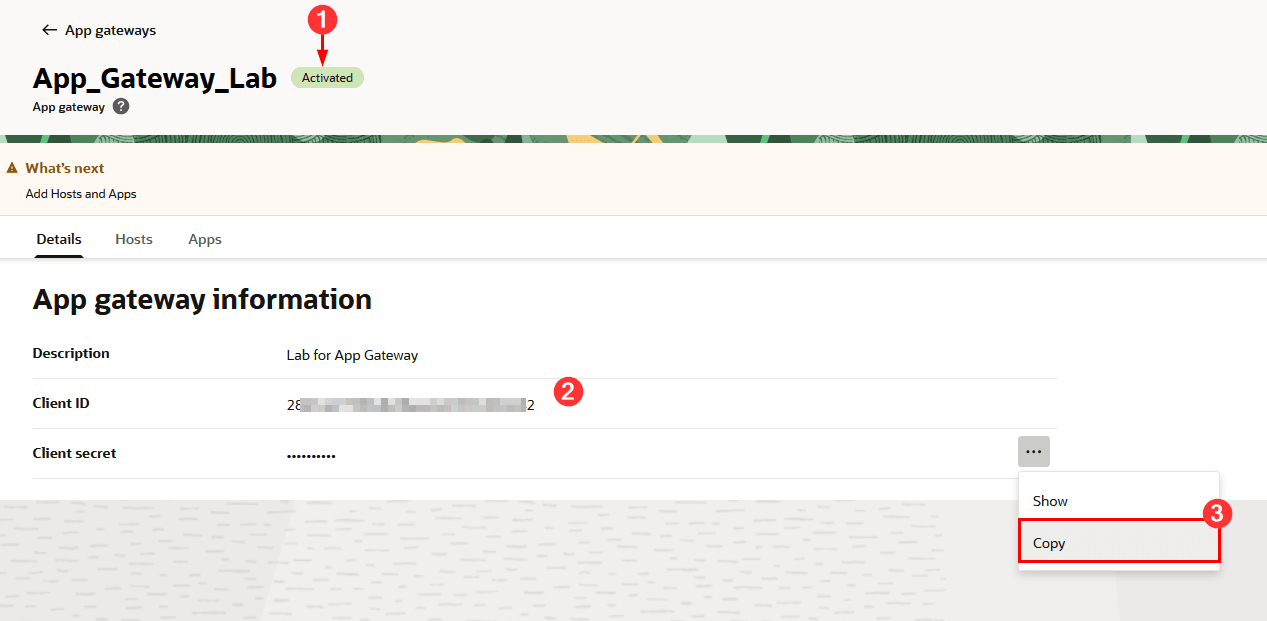
When activating, confirm your activation, and write down the Client ID and Client Secret of your App Gateway (keep it in a safe place) for use in the next steps.
Task 7: Configure the App Gateway Server
After configuring App Gateway in the OCI console, you need to configure the App Gateway server. The next step is to enable the App Gateway server to communicate with the OCI Domain endpoint.
-
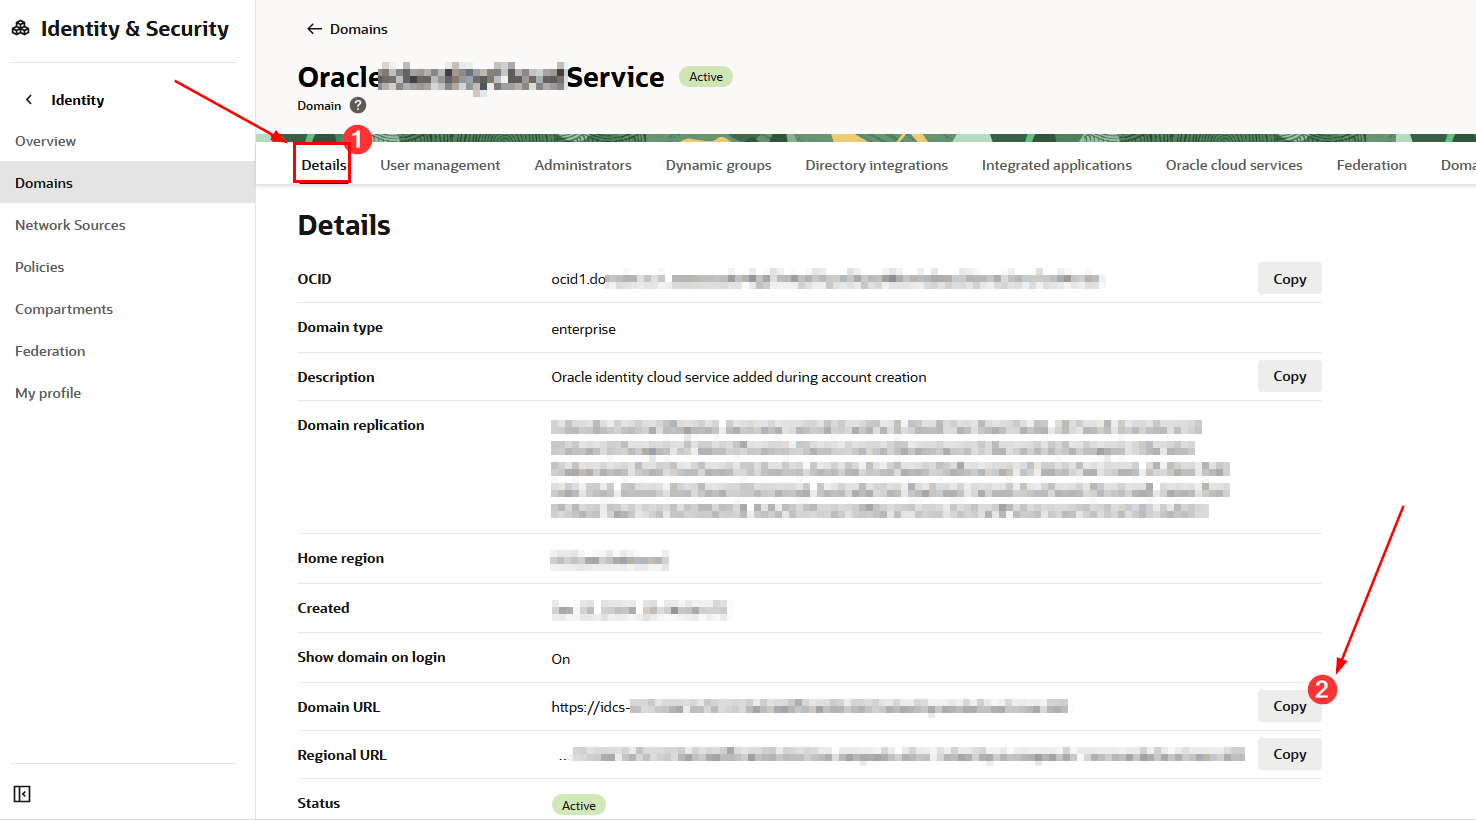
To test connectivity with the Identity Domain endpoint, capture its FQDN. To capture it, in the OCI console, within the Details page of your Identity Domain, click Copy in the Domain URL line:
-
Edit the
cloudgate-envfile to insert the Identity Domain settings into App Gateway by changing theIDCS_INSTANCE_URLsetting. In this setting, you must insert the FQDN of your Domain Endpoint (the same one used to perform the access test via curl above):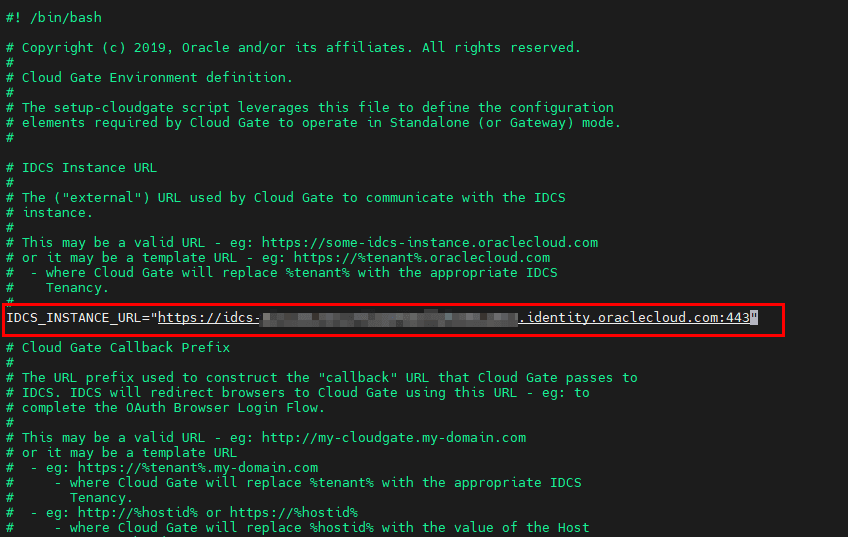
-
The next parameters to configure are:
- CG_APP_TENANT: Enter the Tenant OCID in this field
- CG_APP_NAME: Enter your App Gateway’s Client ID
- CG_APP_SECRET: Enter your App Gateway’s Client Secret
-
As a final step, you need to verify that the App Gateway server’s resolver can identify the IP address of your Identity Domain’s endpoint in OCI. To do this, run the command below:
nslookup <id_domain_endpoint_domain>
Task 8: Configure the App Server
-
After making all the necessary changes to the App Gateway files, you need to run the command to configure your App Gateway. To do this, run the
setup-cloudgatecommand within the/scratch/oracle/cloudgate/ova/bin/setupdirectory: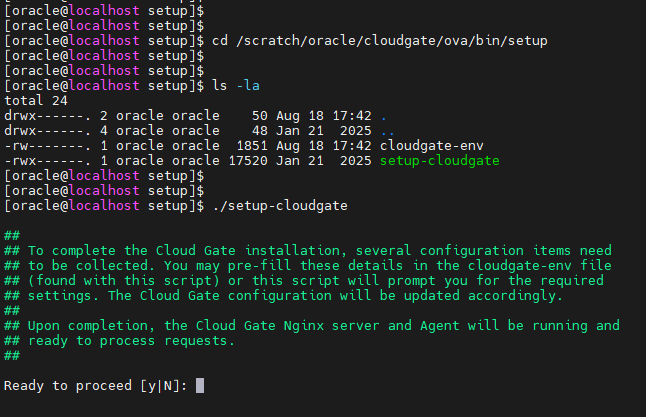
-
Follow the instructions completely. Confirm the information configured in the App Gateway files and enter the password when prompted. After configuration is complete, verify that App Gateway is working with the following command:
/scratch/oracle/cloudgate/home/bin/cg-status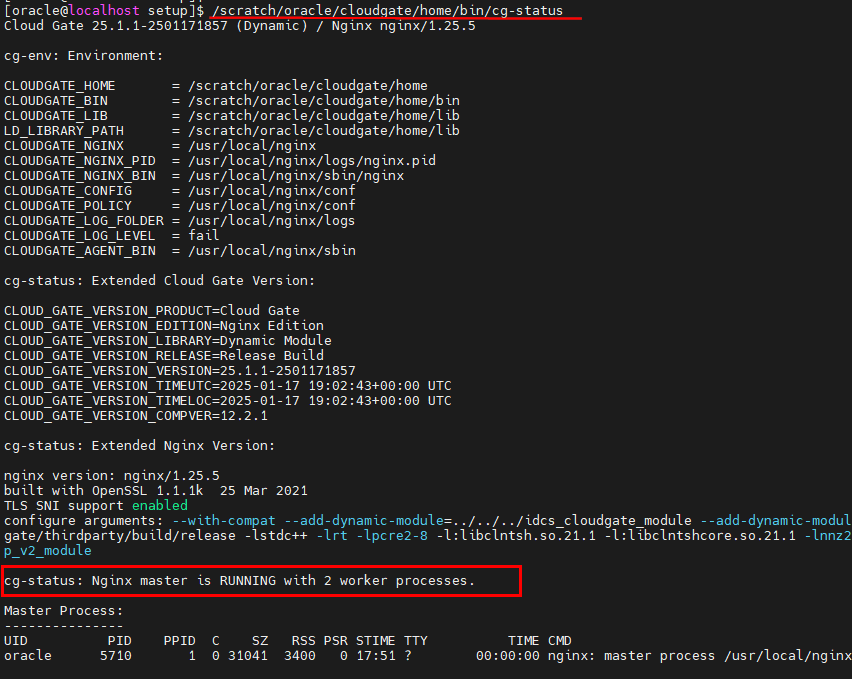
-
After you have validated that the server is up and running, you can then begin configuring the application that will use the App Gateway features.
Task 9: Secure a Legacy Application with Oracle App Gateway
-
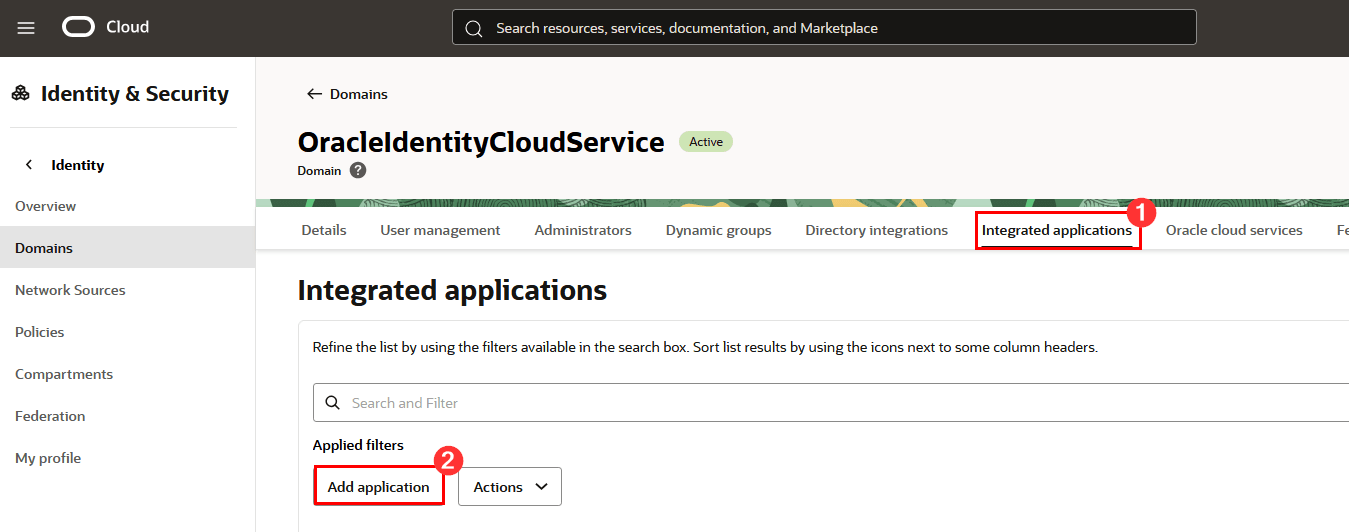
To protect a legacy application using Oracle App Gateway you will need to configure access to the Identity Domain where App Gateway is configured and click Integrated Applications and then click Add application:
-
Select Enterprise Application and click Launch workflow:

-
Fill in all the requested information, including:
- Name: The name of the Enterprise Application that will be created for your application to be protected by App Gateway;
- Description: Enter a description for your legacy application to be protected by App Gateway;
- Application URL: Add the URL your users currently use to access your legacy application. This is the URL of the application that will be protected by App Gateway.
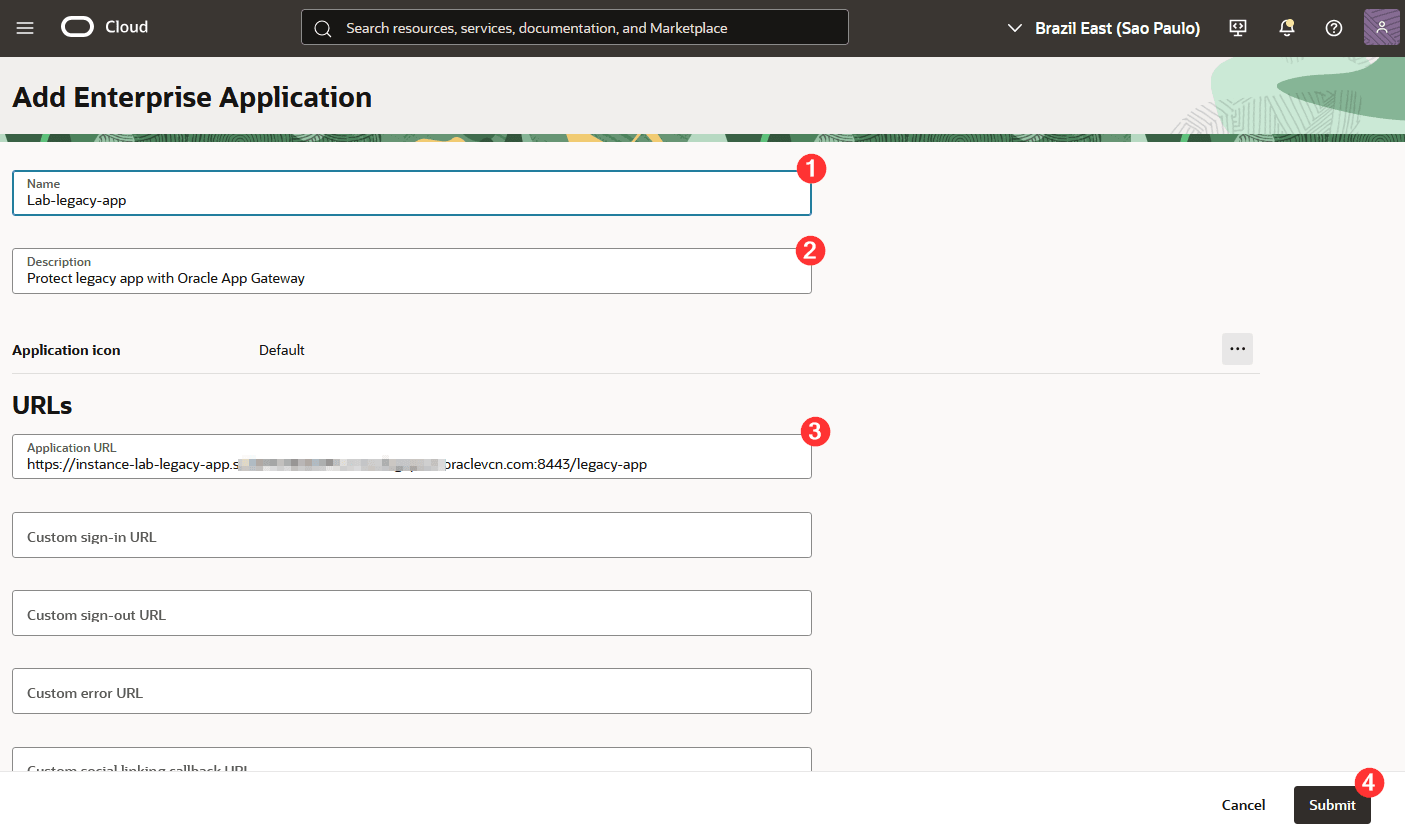
-
Click Submit.
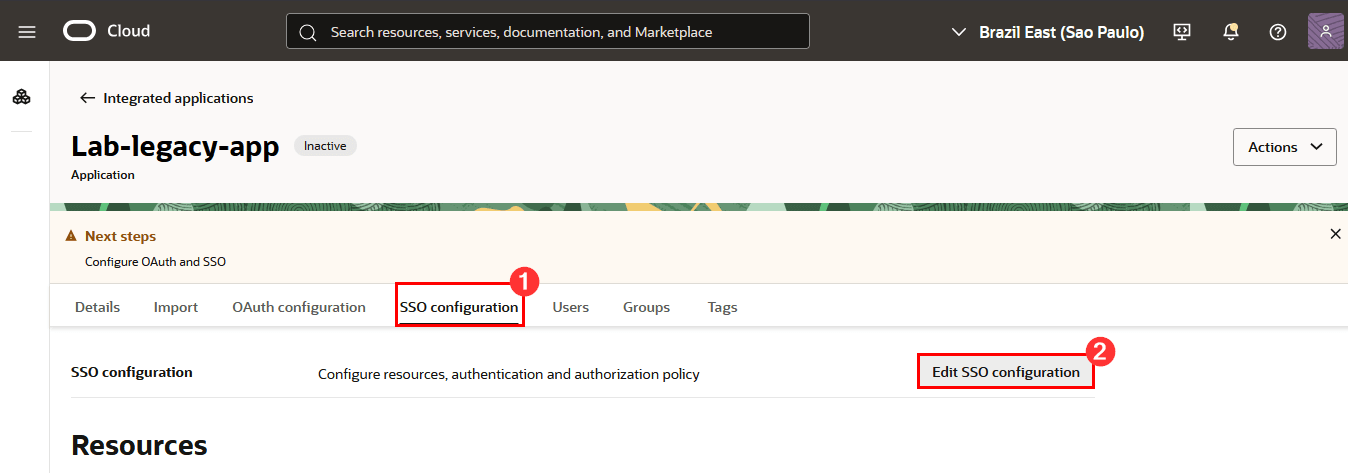
When you’ve finished creating the Enterprise Application, the screen with its details is displayed.
-
Click SSO configuration and then click Edit SSO configuration to continue with the configuration:
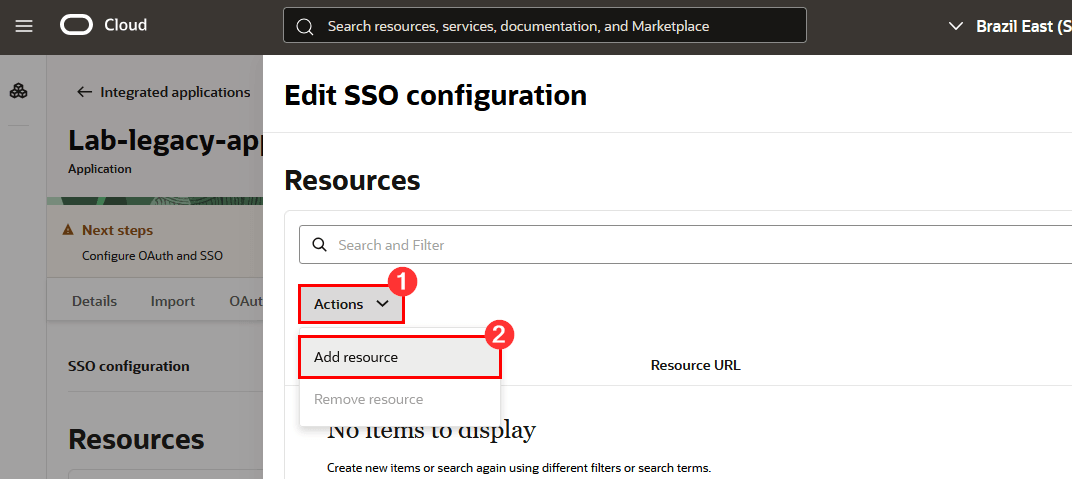
-
Click Actions and then click Add resource:
-
Configure which legacy application resources will be protected by Oracle App Gateway. You can create resources individually, adding them one by one to your legacy application’s URLs, and use regular expressions to represent the collections of URLs your application has.
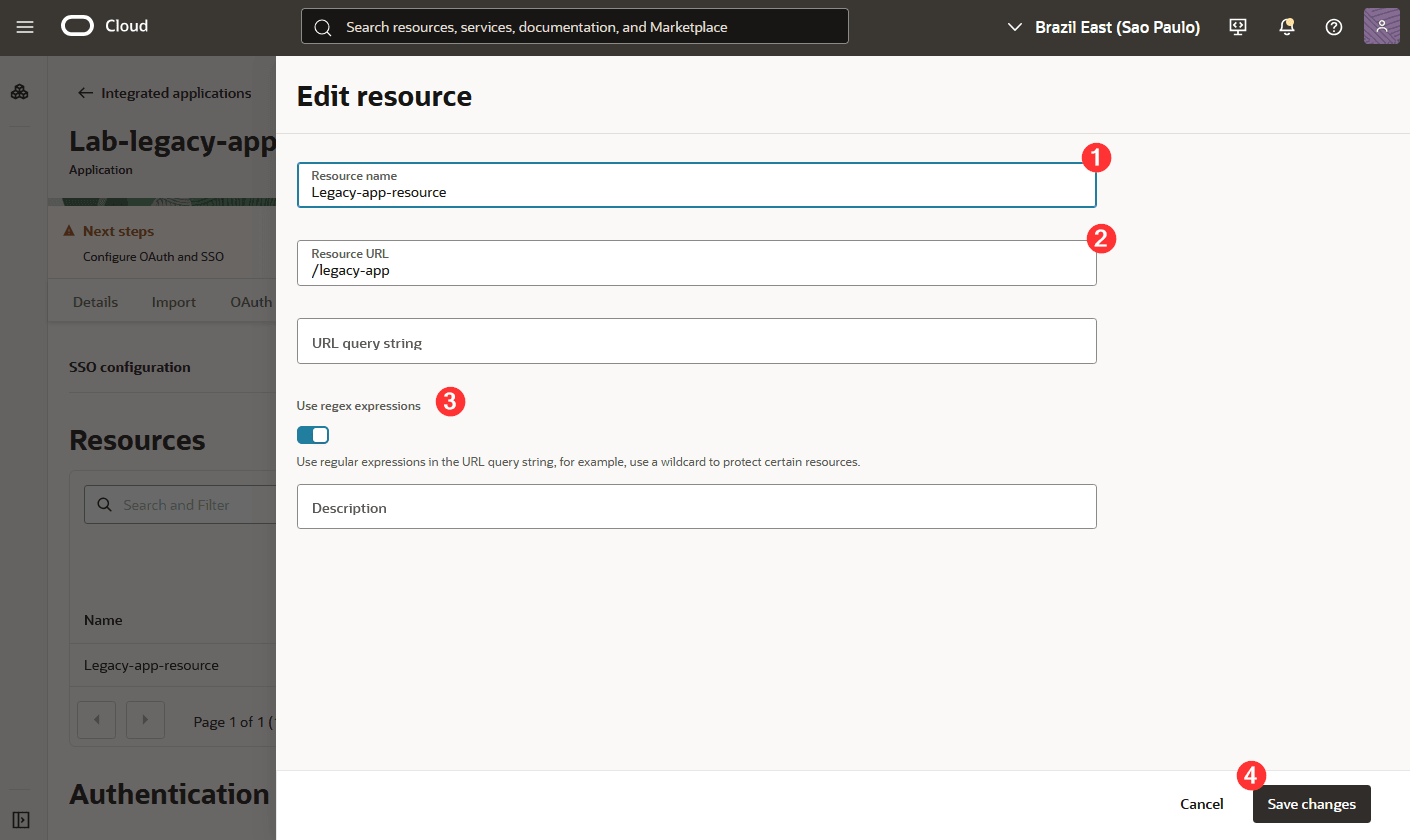
-
Click Add resource.
-
To configure the Resource Manager, click Edit SSO Configuration, scroll down to the SSO Configuration page, select Add managed resources, click Actions, and click Add managed resources:
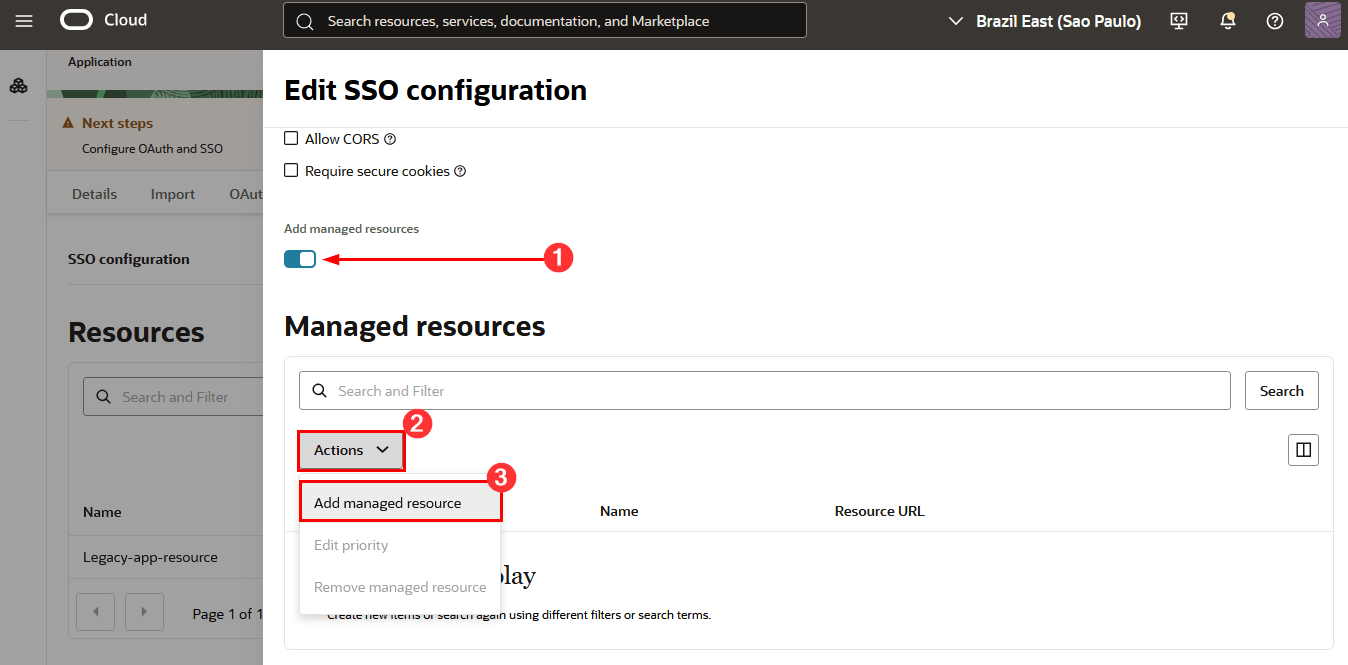
-
On the displayed page do the following:
1: Resource: Select the newly created Resource (in this tutorial, it’s Legacy-app-resource)
2: Authentication method: Select the authentication method for your legacy application (here, for example, we’ll use Form or Access token)
3: Name/Value: Enter the name and value of the HTTP headers you want to send to the legacy application
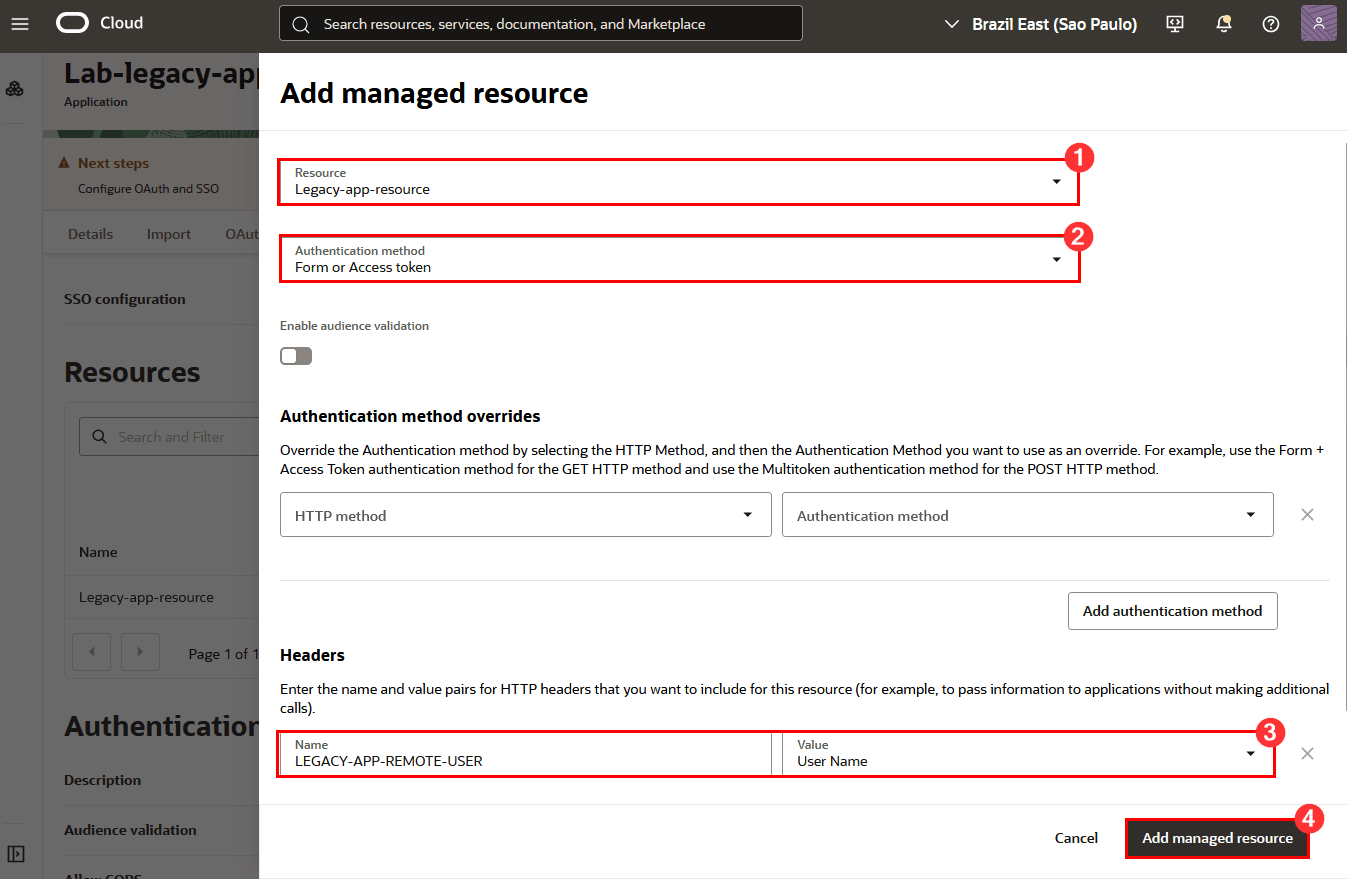
-
Finally, click Add managed resource and then click Save changes. This completes the creation of the Enterprise Application in OCI IAM. This Enterprise Application represents your legacy application that will be protected by Oracle App Gateway.
-
After the Enterprise Application has been created, activate it by clicking the Action menu and then clicking Activate:
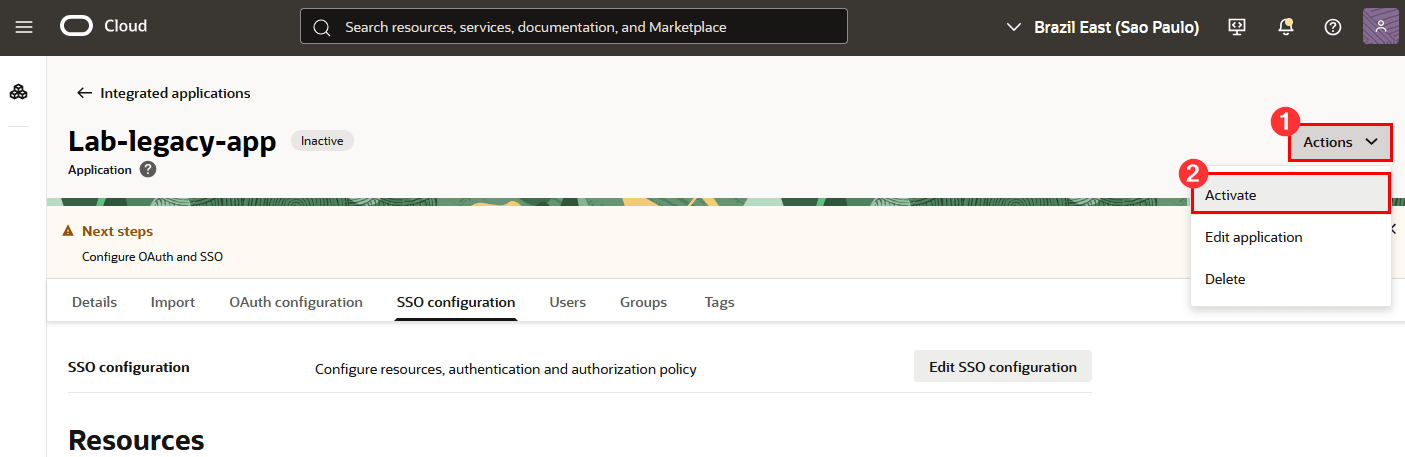
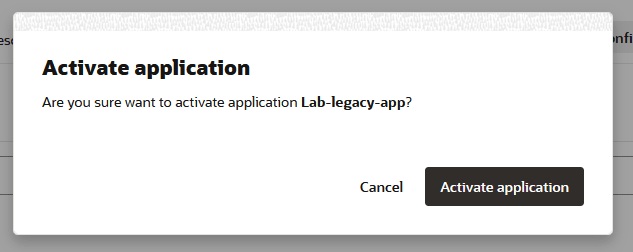
-
Confirm your activation:
Task 10: Associate the Enterprise Application with Oracle App Gateway
-
To associate your Enterprise Application with Oracle App Gateway, you need to configure it within the OCI Console, using the App Gateway that was configured in your Identity Domain in the previous steps.
-
Return to your Identity Domain’s main screen, click App Gateways and then click the name of the App Gateway you configured:
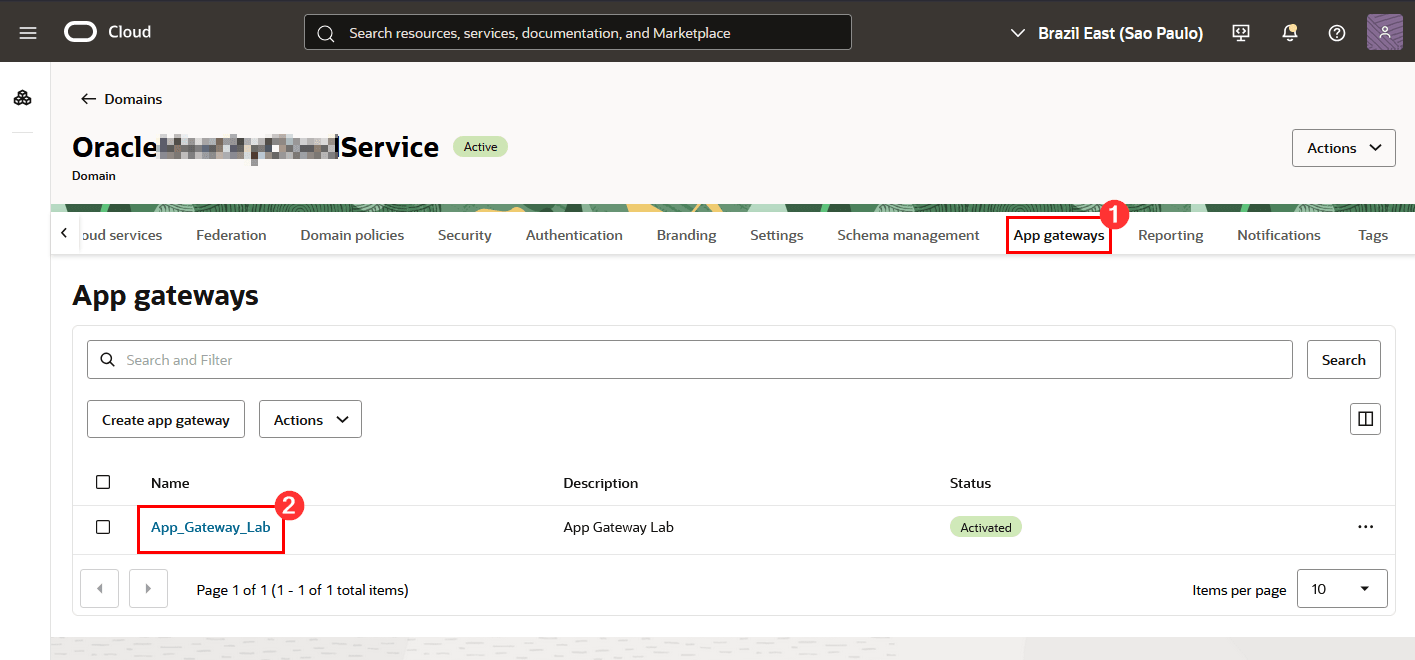
-
Click Apps and then click Add app:

-
On the configuration screen, fill in the required information:
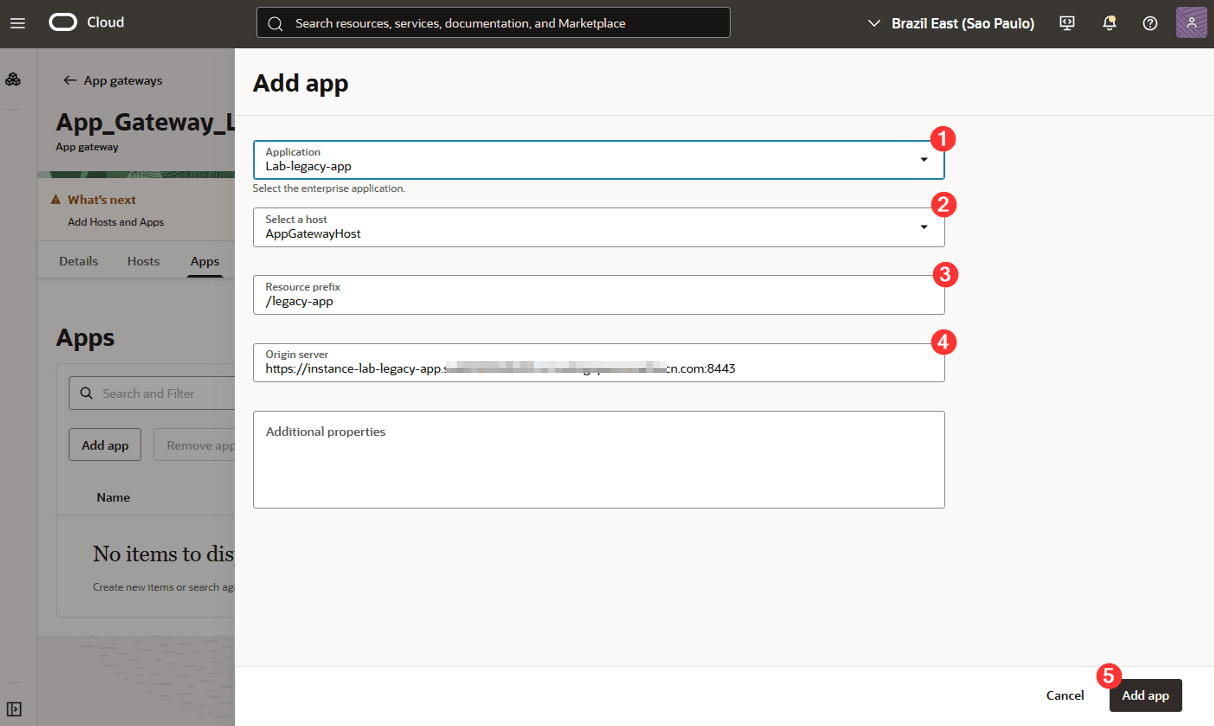
Where:
1: Application: Select the application you created previously
2: Select a host: Select the host you created for the application
3: Resource prefix: Enter the route through which the application should be accessed via App Gateway
4: Origin server: Enter the FQDN of your server where the legacy application is running, followed by the port where the application is running
-
Finally, click Add app.
After all configurations are complete, you can test access to the legacy application by using the Oracle App Gateway.
Task 11: Test Legacy Application Access by Using Oracle App Gateway
-
After you’ve configured App Gateway and the Enterprise Application, you can perform an access test. To do this, open a browser and enter the App Gateway’s public address along with the port where it was configured:

-
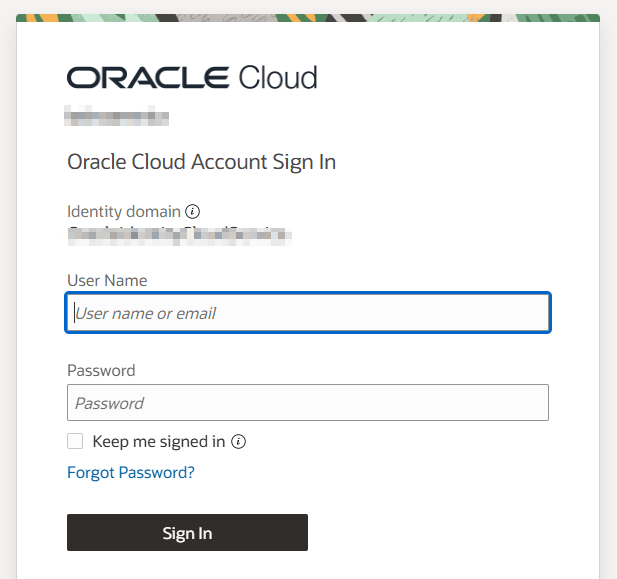
When accessing, App Gateway will redirect the user to OCI IAM so that the OCI login can be done.
-
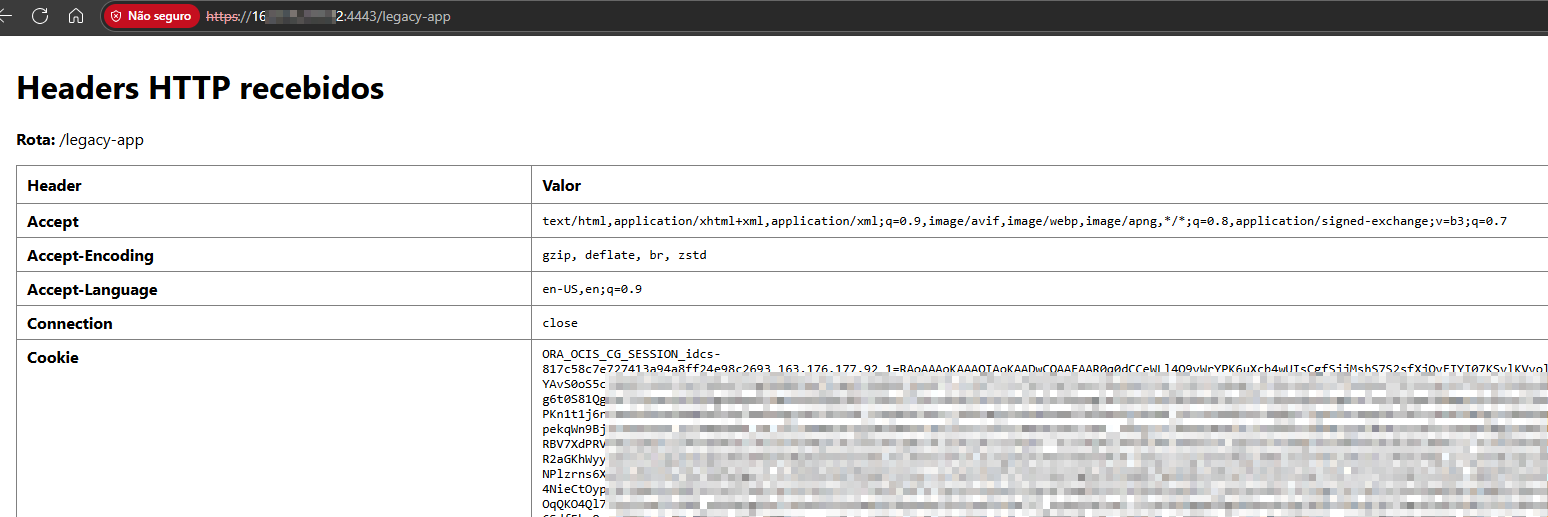
After signing in, a redirect will occur and the application will be accessed via App Gateway:
Acknowledgments
- Author: Rodrigo Pace de Barros (Oracle LAD A-Team Cloud Security Solution Engineer)
More Learning Resources
Explore other labs on docs.oracle.com/learn or access more free learning content on the Oracle Learning YouTube channel. Additionally, visit education.oracle.com/learning-explorer to become an Oracle Learning Explorer.
For product documentation, visit Oracle Help Center.
Secure Legacy Applications by Using OCI IAM App Gateway
G42941-01