Switch from CentOS 8 to Oracle Linux 8
Introduction
The following tutorial provides step-by-step procedures to automatically switch a CentOS 8 instance to Oracle Linux 8 by removing or replacing any CentOS-specific packages with the Oracle Linux equivalent. The README.md in the Oracle centos2ol repository on GitHub states that the script used in this tutorial is a work in progress and not designed to handle all possible configurations.
Please ensure you have a complete backup of the system before starting this process if the script cannot successfully convert the system.
Be sure to review the centos2ol project README.md file for the latest details.
Objectives
In this lab, you’ll:
- Check for non-standard kernels
- Ensure the
dnfconfiguration is working - Disable or remove stale and non-CentOS repositories
- Ensure 5GB free space in
/var/cache - Disable all automatic updates, including
dnf-automatic
Prerequisite
- A system with CentOS 8 installed.
Check the CentOS Version
-
Open a terminal and connect to your instance.
-
Get the version of CentOS.
sudo cat /etc/redhat-releasesudo cat /etc/os-releaseBoth of these commands show the instance is running CentOS 8.
Check for Non-Standard Kernels
-
Get a list of installed kernels using
yum.sudo yum list installed kernelThe listing shows all the kernels installed using
yum. We strongly recommend removing all non-standard kernels; for example, any kernel installed and not provided by the base or updates repo. Includes removing anycentospluskernels. -
Get a list of other installed kernels using
grubby.sudo grubby --info=ALL | grep ^kernel
The list shows all the kernels configured for use. Again, we strongly recommend removing all non-standard kernels.
Remove Non-Standard Kernels with Yum
Because of the GRUB2 BootHole vulnerability, the Oracle Linux Secure Boot shim can only boot kernels signed by Oracle, and we can only replace the default CentOS kernels. While this may not impact a system if SecureBoot is disabled, enabling it later could render it unbootable. For that reason, we strongly recommend removing all non-standard kernels; for example, any installed kernel not provided by either the base or updates repo, including the CentOSPlus kernels.
Note: Skip this section if your system does not have non-standard kernels based on the description above.
-
Remove any non-standard kernels.
sudo yum remove <KERNEL>Where
<KERNEL>is is the complete package name provided byrpm -q kernel.
Remove Non-Standard Kernels with Grubby
grubby is a command-line tool for updating and displaying information about the grub boot loader’s configuration files. This tool allows an administrator to disable kernels installed outside of yum.
Note: Skip this section if your system does not have non-standard kernels based on the description in the previous section.
-
Get the index assigned to each of the installed kernel’s boot entries.
sudo grubby --info=ALL | grep -E "^kernel|^index"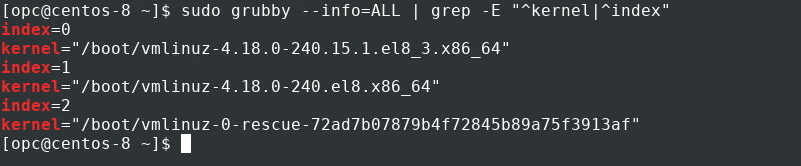
-
Remove any non-standard kernel’s boot entries.
grubby --remove-kernel=<MENU_INDEX>Where
<MENU_INDEX>is the index value returned from the previous command’s output.
Check DNF Configuration
-
Get a list of enabled repositories.
sudo dnf repolist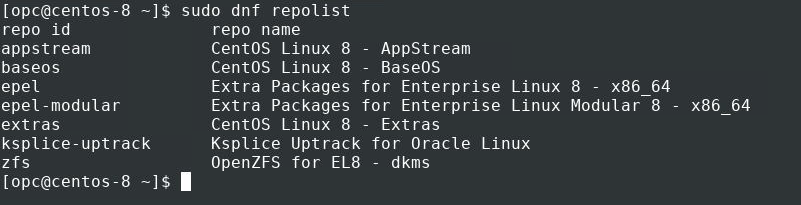
-
Update all installed packages.
sudo dnf -y upgrade
Remove or Disable Non-CentOS Repositories
Disable all non-CentOS repositories. This step helps avoid package conflicts with third-party repositories during the switch. You can re-enable the repos after the switch.
-
Disable non-CentOS repositories.
sudo dnf config-manager --set-disabled <REPOSITORY_NAME>Replace
<REPOSITORY_NAME>with the repository name of any non-CentOS repository enabled on your system.
Check Free Space in /var/cache
-
Get a disk space usage report.
df -h
Check for Automatic Updates in Cron
There are several ways an administrator can enable automatic updates. This section checks for cron jobs that execute dnf directly or using a script. Disable these jobs, if found, to avoid them running during the switching process.
-
List root’s cron jobs.
sudo crontab -l -
List the user’s cron jobs.
sudo crontab -u <username> -lWhere
<username>is the name of your user account on the system. -
List daily, hourly, weekly, and monthly cron jobs.
sudo ls -al /etc/cron*Then, check the individual files using
lessor the editor of choice. -
List contents of
/etc/crontab.sudo less /etc/crontab
Disable DNF Automatic Updates
Another way to automatically apply updates is with dnf-automatic.
-
Check for the
dnf-automaticpackage.sudo dnf list installed dnf-automatic
If the output shows the
dnf-automaticpackage not installed on your system, skip to the next section. -
Check the state of the
dnf-automaticsystemd timer.sudo systemctl is-enabled dnf-automatic.timer sudo systemctl is-active dnf-automatic.timer -
Disable the
dnf-automaticsystemd timer if it is active and running.sudo systemctl stop dnf-automatic.timer sudo systemctl disable dnf-automatic.timer
Download and Run centos2ol Script
-
Download the
centos2ol.shscript from GitHub.The simplest way to get the script is to use curl:
curl -O https://raw.githubusercontent.com/oracle/centos2ol/main/centos2ol.shIf you have Git installed, use the
cloneoption to pull the repository from GitHub.git clone https://github.com/oracle/centos2ol.git -
Run the
centos2ol.shscript.If you used
git clone, change the current working directory to the centos2ol directory.See the usage options for the script by passing the option
-h.sudo bash centos2ol.sh -hNow, run the script and wait for it to complete.
sudo bash centos2ol.shAs part of the process, the default kernel is switched to the latest release of Oracle’s Unbreakable Enterprise Kernel (UEK) to enable extensive performance and scalability improvements to the process scheduler, memory management, file systems, and networking stack. We also replace the existing CentOS kernel with the equivalent Red Hat Compatible Kernel (RHCK), which specific hardware or application may require if it has imposed strict kernel version restrictions.
-
Reboot the system.
sudo reboot
Confirm System Switch to Oracle Linux
-
Using the terminal, again connect to your instance.
-
Check the distribution version and kernel details.
cat /etc/os-release
cat /etc/redhat-release
uname -r
Contribute to the centos2ol GitHub Project
-
Get support.
Open a GitHub issue for non-security-related bug reports, questions, or requests for enhancements.
For More Information
Oracle Linux Documentation
Oracle Linux Training
Oracle Linux Training Station
More Learning Resources
Explore other labs on docs.oracle.com/learn or access more free learning content on the Oracle Learning YouTube channel. Additionally, visit education.oracle.com/learning-explorer to become an Oracle Learning Explorer.
For product documentation, visit Oracle Help Center.
Switch from CentOS 8 to Oracle Linux 8
F41673-08
August 2024