Add an Email Server

You can add an email server to deliver reports by email.

To add an email server:

  1. From the Administration page, under Delivery, select Email, and then click Add Server.
  2. Enter the Server Name and Host of the email server.
  3. Optional: Select a Secure Connection method to use for connections with the email server.
    Use TLS when the server supports the protocol; SSL is accepted in the response.
  4. Optional: Enter the port number, user name, and password.
  5. In the Access Control section, deselect Public.
  6. From the Available Roles list, select one or more roles you want to provide access to the delivery channel, and click Move to add them to the Allowed Roles list.
  7. Click Test Connection.
  8. Click Apply.

Deliver Reports Using Email Delivery Service on Oracle Cloud Infrastructure

You can use the Email Delivery service on Oracle Cloud Infrastructure to deliver reports.

If you don't have access to Oracle Cloud Infrastructure Console, ask your Oracle Cloud Infrastructure administrator to provide you access.

  1. In Oracle Cloud Infrastructure Console, configure Email delivery.
    1. Sign-in to your Oracle Cloud account with permissions to configure Email Delivery.
    2. In Oracle Cloud Infrastructure Console, click Navigation menu in the top left corner.
    3. Click Developer Services. Under Application Integration, click Email Delivery.
    4. Optional: Set up the email domain you plan to use.

      This is the domain you plan to use for the approved sender email address, and can’t be a public mailbox provider domain such as gmail.com or hotmail.com.

    5. Click Approved Senders.
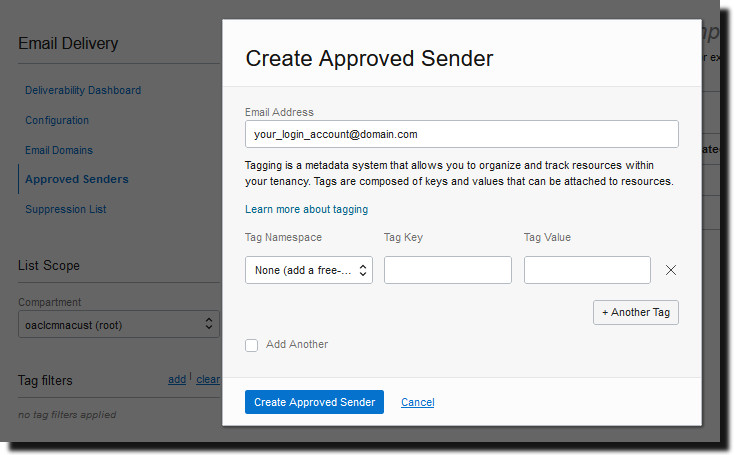
    6. On the Create Approved Senders page, set up an approved sender for the From email address that you want to use to send emails through the mail server.

      Create Approved Sender dialog

      Refer to Oracle Cloud Infrastructure documentation for details. See Managing Approved Senders.

    7. Click Configuration, then make a note of the Public Endpoint, Port (587), and that Transport Layer Security (TLS) is used on the connection.

      Email Configuration page

      Refer to Oracle Cloud Infrastructure documentation for details. See Configure the SMTP connection.

    8. If you've not already done so, click the Identity Interface link to navigate to your Identity pages and then click Generate SMTP Credentials to generate SMTP credentials for yourself or another user with permissions to manage email.

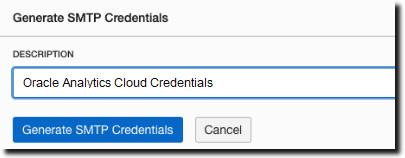
      Enter a Description, such as Oracle Analytics Cloud credentials, and click Generate SMTP Credentials.

      Generate SMTP Credentials

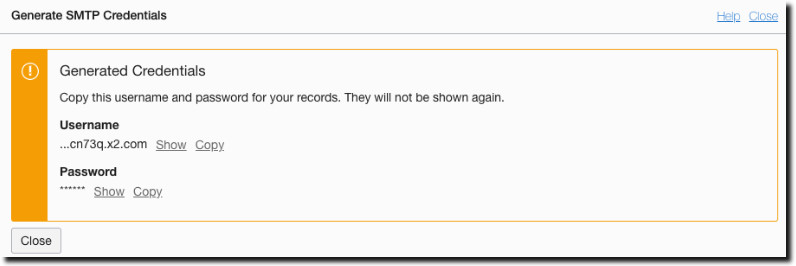
      Copy the Username and Password for your records.

      Username and password for SMTP mail server user

      Refer to Oracle Cloud Infrastructure documentation for details. See Generate SMTP credentials for a user.

  2. In Oracle Analytics Cloud, add a connection to the email server.
    1. From the Administration page, under Delivery, select Email, and then click Add Server.
    2. Enter the name of the email server (Email Delivery service hostname).
    3. Enter the port number and SMTP credentials (user name and password).
    4. Select the secure connection method.
    5. In the Access Control section, deselect Public.
    6. From the Available Roles list, select one or more roles you want to provide access to the delivery channel, and click Move to add them to the Allowed Roles list.
    7. Click Test Connection.
    8. Click Apply.
  3. Set up delivery notification.
    1. From the Administration page, under Delivery, select Delivery Configuration.
    2. Enter values for Email From Address and Delivery Notification Email From Address.
    3. Optional: Enter values for Success Notification Subject, Warning Notification Subject, Failure Notification Subject, and Skipped Notification Subject.
      The completed jobs use the appropriate notification subject depending on the status of the job.
    4. Deselect Use System Proxy Settings.
  4. Configure the bursting jobs to deliver reports using the email server.
    Update bursting queries to specify Email as the delivery channel in DEL_CHANNEL and provide the "From" address in PARAMETER3.
  5. Test report delivery.
    1. Schedule a job to email a report using the email server.
    2. In the Job History Details page, check the status of the job.

Deliver Reports Using OAuth Authorized SMTP Server

You can use an OAuth 2.0 authorized Microsoft Exchange Online SMTP server to deliver pixel-perfect reports.

In the Publisher Email delivery configuration page, you can configure to use any of these OAuth authorized Microsoft Exchange Online SMTP servers to deliver pixel-perfect reports:

  • OAuth authorized Microsoft Exchange Online SMTP server configured using the Console. You can use mail servers configured through the Console to deliver data visualizations, analyses, dashboards, and Publisher reports.

    Note:

    If you change mail settings using Console after you configure the Microsoft Exchange Online SMTP server for Publisher report delivery, your changes aren't automatically available to Publisher.

    In this case, you must remove the Microsoft Exchange Online SMTP server configuration from the Publisher Email delivery configuration page, and add the Microsoft Exchange Online SMTP server again to use the updated Console settings.

  • OAuth authorized Microsoft Exchange Online SMTP server configured to exclusively deliver Publisher reports.
  1. Configure delivery.
    1. From the Administration page, under Delivery, select Delivery Configuration.
    2. Enter value for Email From Address.

      The sender email address must be correct to test connection to the Microsoft Exchange Online SMTP server.

    3. Enter value for Delivery Notification Email From Address.
    4. Optional: Enter values for Success Notification Subject, Warning Notification Subject, Failure Notification Subject, and Skipped Notification Subject.
      The completed jobs use the appropriate notification subject depending on the status of the job.
    5. Deselect Use System Proxy Settings.
    6. Click Apply.
  2. From the Administration page, under Delivery, select Email.
  3. Click Add Server.
  4. Provide the server configuration details for the OAuth authorized SMTP server.
    1. Enter the server name and the host name of the Microsoft Exchange Online SMTP server.
    2. Enter the Port number recommended by the SMTP service provider.
    3. Select STARTTLS from the Secure Connection list.
    4. For Authentication Type, select OAuth2.
    5. Specify values for Username, Client ID, Client Secret, and Tenant ID.
  5. If you want to restrict access to the delivery channel, in the Access Control section, perform these steps:
    1. Deselect Public.
    2. From the Available Roles list, select one or more roles you want to provide access to the delivery channel, and click Move to add them to the Allowed Roles list.
  6. Click Test Connection.
  7. Click Apply.
  8. Make the OAuth authorized Microsoft Exchange Online SMTP server as the default for email delivery.
  9. Optional: Configure the bursting jobs to deliver reports using the SMTP email server.
    Update bursting queries to specify SMTP Email server as the delivery channel in DEL_CHANNEL and provide the "From" address in PARAMETER3.
  10. Test report delivery.
    1. Schedule a job to email a report using the SMTP email server.
    2. In the Job History Details page, check the status of the job.