Oracle® Fusion Middleware

Deploying a Signed iOS Application to the Enterprise using Oracle Business Intelligence Mobile SecurityToolkit

12c Release 1

E92654-02

September 2018

As of August 2018, Oracle Business Intelligence Mobile (Oracle BI Mobile) for iOS supports AppConfig, a community focused on providing tools and best practices for native capabilities in mobile operating systems. AppConfig enables a more consistent, open, and simple way to configure and secure mobile apps to increase mobile adoption in business.

For details on AppConfig, see Oracle BI Mobile Security Toolkit Downloads.

Audience

The intended audience for these instructions is the iOS mobile developer using Apple Xcode 8.x who is familiar with Apple's signing and deployment process and who is also familiar with the details of deploying an application with a selected MDM (Mobile Device Management) vendor.

Note:

The current version of Oracle BI Mobile supports iOS 9.3. Older versions of iOS are no longer supported.

Introduction

The Oracle Business Intelligence Mobile Security Toolkit (Oracle BI Mobile Security Toolkit) provides the ability to generate a signed version of the Oracle BI Mobile application.

The toolkit includes the instructions and necessary content to build this application making use of Apple's Xcode and the iOS SDKs.

How Are Updates to Oracle BI Mobile and the Oracle BI Mobile Security Toolkit Delivered?

The Oracle BI Mobile Security Toolkit is updated on a regular basis in order to synchronize with the Oracle BI Mobile application available on Apple's App Store.

Toolkit updates are delivered in alignment with the releases of the Oracle BI Mobile application. As these updates are provided on an on-going basis, users must periodically update their Oracle BI Mobile applications—either through the App Store or through the Oracle BI Mobile Security Toolkit.

Note:

Whether you update your application through the App Store or through the Oracle BI Mobile Security Toolkit, the ability to provide incremental updates is not supported. For updates accessed through Apple's App Store, your installed application is replaced with the latest version available. For updates through the Oracle BI Mobile Security Toolkit, a completely new package of support files and libraries is provided.

Known Issues for Simulators

Issues have been noted with Apple iOS simulators when updated versions of the Oracle BI Mobile Security Toolkit are executed with only the project libraries replaced and the application rebuilt.

The simulator may not respect the updates to the libraries. In order to use simulators with library updates, perform a complete rebuild of the project or reset the content settings in the simulator.

Note:

In order to avoid these simulator issues, you should replace all project and library files and build a completely new version of the application.

Overview of Creating an Application

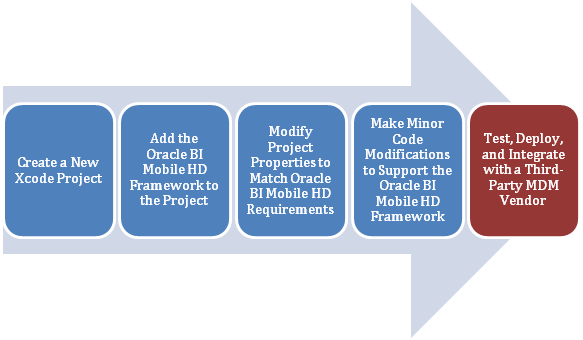
The high-level process of creating an application for deployment in your organization's enterprise application store involves five steps.

The first four steps in this process are documented in detail; the final step requires you to work with your IT department, the team in charge of your enterprise distribution, and your MDM vendor. This final step will vary from organization to organization.

Build the Application with a Storyboard-Based Project

Use these instructions to build an application with a storyboard-based project.

To create the project:

  1. From the Xcode menu, select File, then New, and Project to create a new Xcode project.
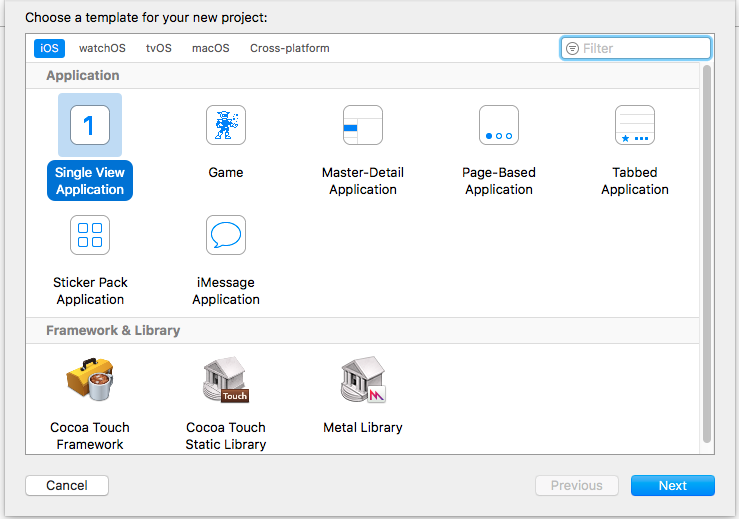
  2. When asked to choose a template, under iOS, select Application. Then select Single View Application and click Next.
  3. Give your project a name and fill out the other fields with your organization's information. For the Company Identifier and the Class Prefix, you may want to consult your IT department to see if there are standards you should follow.
  4. In the Language field, specify a language for the project.
  5. In the Devices field, specify the devices you’re targeting. Make sure to select Universal.

    Note:

    The Oracle BI Mobile application is a universal application that supports iPhone and iPad clients, so it is important that you select Universal. The instructions that follow are based on the assumption that you’re building a universal application.

  6. Select a destination for your new project. Choose a safe location that you will remember.

Add the Oracle BI Mobile Framework to the Project

Use these instructions to add Oracle BI Mobile content to the new project.

To add Oracle BI Mobile content to the new project:

  1. Download the latest Oracle BI Mobile Security Toolkit files to the machine on which you have created your new Xcode project.
    The files can be found on Oracle Technology Network.
  2. Extract the files from the security toolkit zip.
  3. Drag the following files to the project:
    • toolkit.framework

    • Settings.bundle

    Note:

    Ensure that you drop the files on the Project icon, not above the icon.

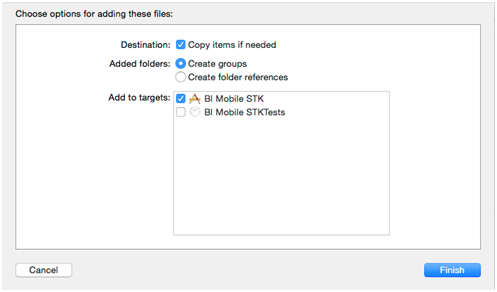
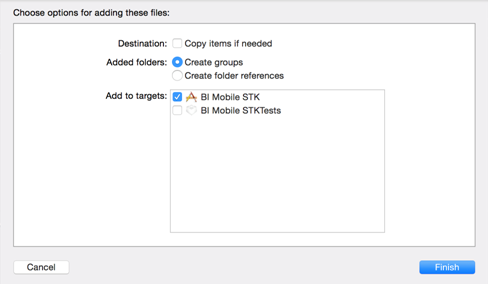
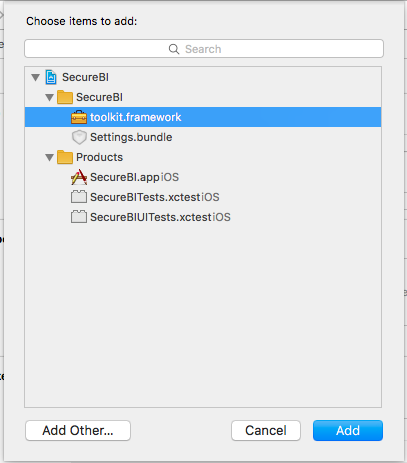
  4. For the Destination option, select Copy items if needed as shown in the image and leave the other options as defaults, then click Finish.
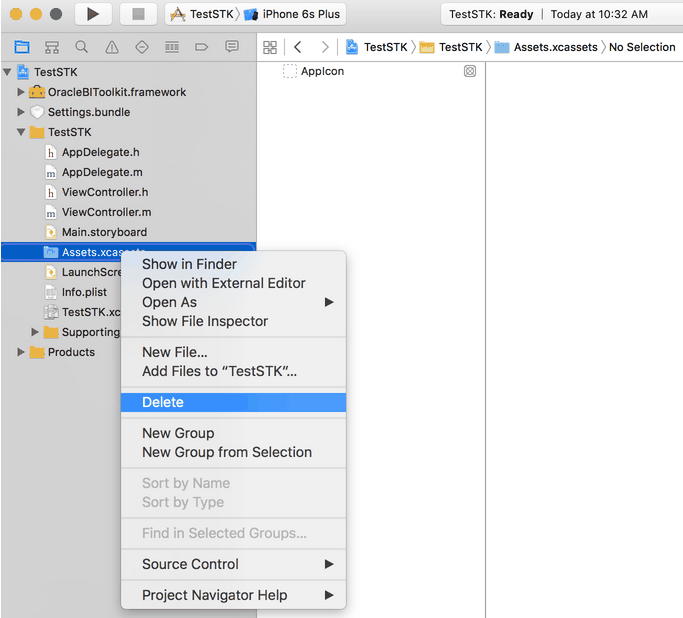
  5. Delete the existing Assets.xcassets folder and replace it with Assets.xcassets provided in the zip file.

    Note:

    When prompted, select the Move to trash option. This option removes references and deletes the entire folder in the project.

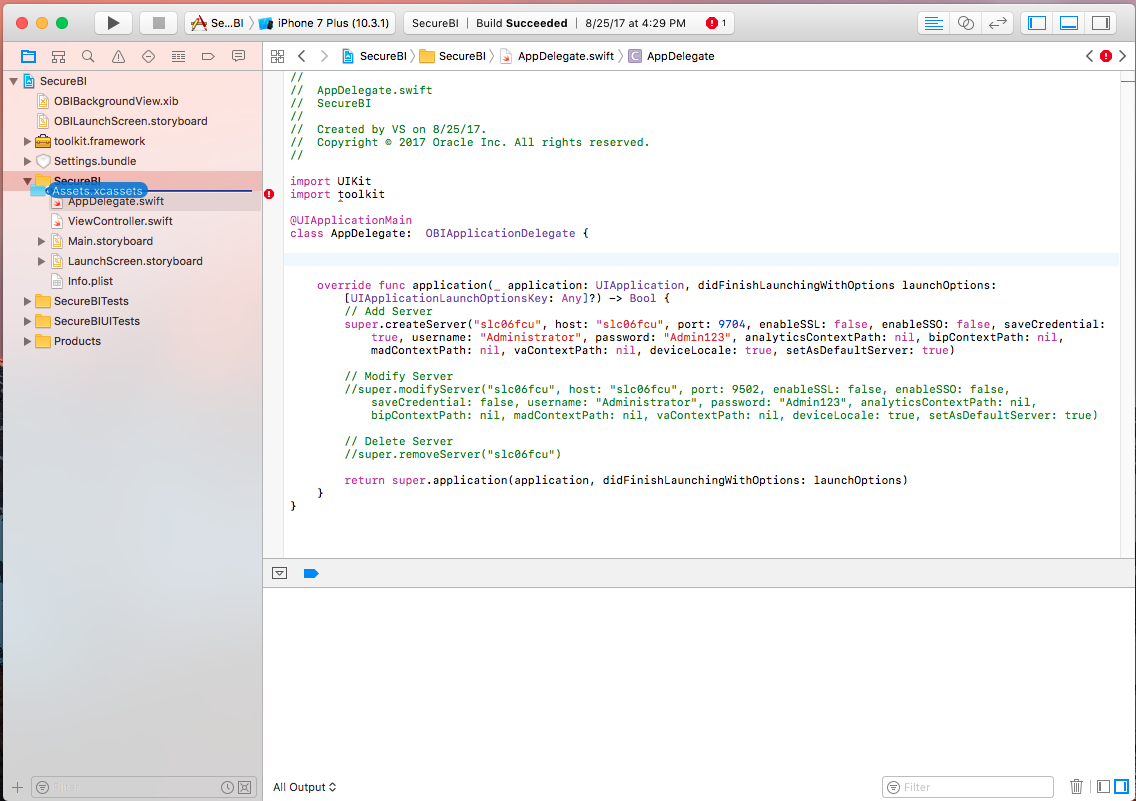
  6. From the files you extracted in Step 2, drag the Assets.xcassets folder to the Project folder.

    Note:

    Ensure that you drop the folder on the Project icon, not elsewhere in the project.

  7. From the files you extracted in Step 2, drag the Launch folder to the Project folder.
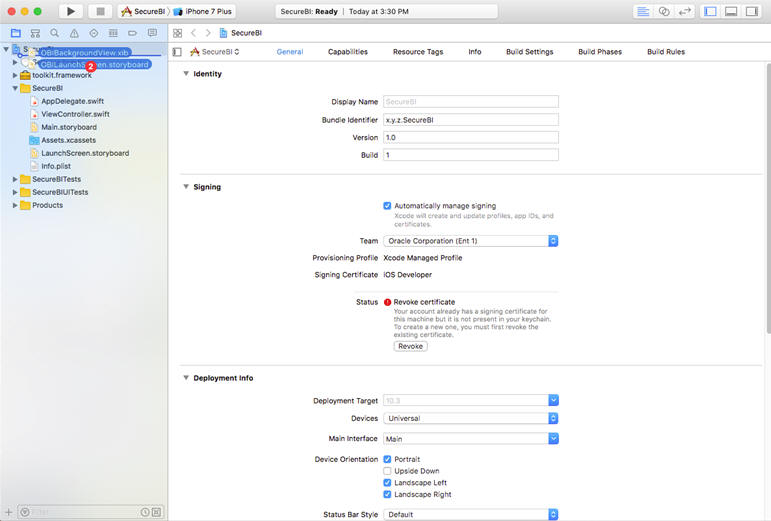
  8. Add the following files as the initial files within the Project folder and then select Create Groups:
    • /Launch/OBIBackground.xib

    • /Launch/OBILaunchScreen.storyboard

    Use the default settings for the other options and click Finish.

Modify the Project Properties

Use these instructions to modify properties of the project.

To modify project properties:

  1. In the General section of the new project, verify that the App Icons and Launch Images section is as shown in the following image:
  2. Verify that the asset catalog and the images that were added in the previous section are correctly selected.
  3. Ensure that you set the Launch Screen File field to OBILaunchScreen.
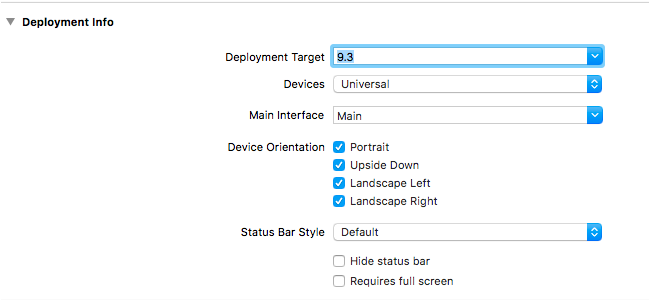
  4. In the General section, select the orientations. For both the iPad and the iPhone, select every orientation:
    • Portrait

    • Upside Down

    • Landscape Left

    • Landscape Right

  5. In the General section of the new project, verify that you set the Deployment Target to a version of iOS that the Oracle BI Mobile application supports.

    Note:

    Don’t select an option lower than 9.3 and ensure that you select the Requires full screen option.

    Find the supported iOS versions by checking the Requirements list for the Oracle BI Mobile application on the Apple App Store.

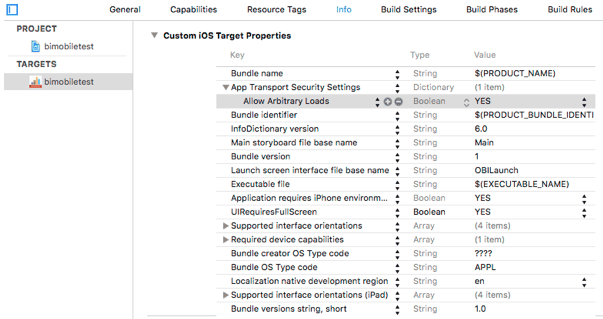
  6. In the Info section of the new project, add a new Dictionary type called App Transport Security Settings, and add the following in the new property:
    • Key: Allow Arbitrary Loads

    • Type: Boolean

    • Value: Yes

    This new dictionary type enables you to connect to non-SSL servers. If you only connect to SSL servers, then you can skip this step. Additionally, if you want to white list specific domains, then you can perform this step as an alternative. Refer to the applicable Apple Tech Note for details on how to create exceptions.

  7. In the Info section of the new project, expand URL Types. Click the plus sign (+) to add a new URL type and add values as follows to complete the fields:
    • Identifier: com.oracle.obimobile

    • URL Schemes: oraclebimobile

    Leave the rest of the options for the new URL type blank or as defaults.

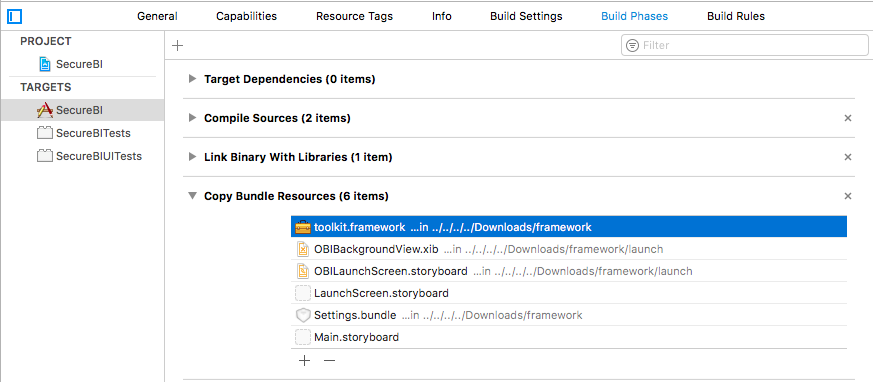
  8. In the Build Phases section of the new project, under Copy Bundle Resources, click the plus sign (+) and select toolkit.framework from the list.
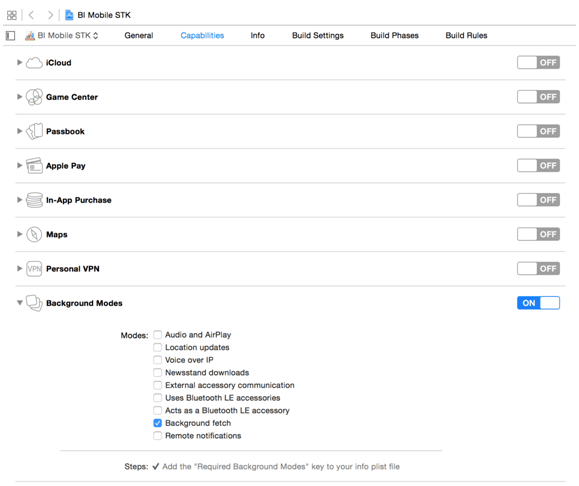
  9. In the Capabilities section of the new project, set Background Modes to ON and select Background fetch .
  10. In the General section of the new project, do the following:
    1. Expand the Embedded Binaries section and click the plus sign (+) to select toolkit.framework from the list.

    2. After you have completed Step a, in the Linked Frameworks and Libraries section, toolkit.framework appears twice. Remove one instance of toolkit.framework so that only one appears.

  11. In the General section of the new project, under Deployment Info, from the Main Interface field, select or enter Frameworks/toolkit.framework/bihd.

Make Minor Code Modifications

Use these instructions to make minor code modifications.

To modify the default application code:

  1. In the project, if you’re using the Swift language, then select the file called <classprefix>AppDelegate.swift and add or modify the following lines of code:
    //
    //  AppDelegate.swift
    //  SecureBI
    //
    //  Created by VS on 8/25/17.
    //  Copyright © 2017 Oracle Inc. All rights reserved.
    //
    
    import UIKit
    import toolkit
    
    @UIApplicationMain
    class AppDelegate:  OBIApplicationDelegate {
       /* CODE COMMENTED OUT */
    }
  2. In the project, if you’re using the Objective-C language, then select the file called <classprefix>AppDelegate.h and add or modify the following lines of code:
    #import <UIKit/UIKit.h>
    #import <CoreData/CoreData.h>
    	#import <OracleBIToolkit/OracleBIToolkit.h>
    @interface <classprefix>AppDelegate : OBIApplicationDelegate
    /* CODE COMMENTED OUT*/
    @end

    Note:

    The <classprefix> represents the name of the Class Prefix used in Build the Application with a Storyboard-Based Project. If you don’t specify a class prefix, then the file is simply called AppDelegate.h and any reference in the code is AppDelegate.

Test and Deploy the Application

The project is now ready to run and test.

To run and test the project:

Note:

Make sure you thoroughly test the application prior to deployment or integration with any MDM tool.

  1. From the Product menu in Xcode, run and test the new project in the simulator or on an iOS device.
  2. Complete the certification process, driven by Apple, to prepare your application for distribution. This process includes the following steps:
    1. Certify the application and provision it within the iOS Developer Enterprise Program.

    2. Sign and build your project in Xcode.

      Note:

      You can deploy your application only after completing the certification process within Apple's iOS Developer Enterprise Program. For details, contact your IT department or the team in charge of your enterprise distribution.

Appendix

This appendix covers the following topics:

Configure a Server When Deploying the Application

You can configure a server when deploying the application.

You likely want to spare your end-users the bother of configuring servers. A benefit of creating a wrapped application that's deployed in an enterprise application store is that you can modify the code and save users from configuring servers themselves.

To modify the code for a storyboard-based project:

  1. In the project, if you’re using the Swift language, then select the file called <classprefix>AppDelegate.swift and add the following method:
    //
    //  AppDelegate.swift
    //  SecureBI
    //
    //  Created by VS on 8/25/17.
    //  Copyright © 2017 Oracle Inc. All rights reserved.
    //
    
    import UIKit
    import toolkit
    
    @UIApplicationMain
    class AppDelegate:  OBIApplicationDelegate {
        override func application(_ application: UIApplication, didFinishLaunchingWithOptions launchOptions: [UIApplicationLaunchOptionsKey: Any]?) -> Bool {
            // Add Server
            super.createServer("slc06fcu", host: "slc06fcu", port: 9704, enableSSL: false, enableSSO: false, saveCredential: true, username: "Administrator", password: "Admin123", analyticsContextPath: nil, bipContextPath: nil, madContextPath: nil, vaContextPath: nil, deviceLocale: true, setAsDefaultServer: true)
            
            // Modify Server
            //super.modifyServer("slc06fcu", host: "slc06fcu", port: 9502, enableSSL: false, enableSSO: false, saveCredential: false, username: "Administrator", password: "Admin123", analyticsContextPath: nil, bipContextPath: nil, madContextPath: nil, vaContextPath: nil, deviceLocale: true, setAsDefaultServer: true)
            
            // Delete Server
            //super.removeServer("slc06fcu")
            
            return super.application(application, didFinishLaunchingWithOptions: launchOptions)
        }
    }
  2. In the project, if you’re using the Objective-C language, then select the file called <classprefix>AppDelegate.m and add the following method:
    - (BOOL)application:(UIApplication *)application
     didFinishLaunchingWithOptions:(NSDictionary *)launchOptions
    {
    // To add a server you can do the following:
    [super createServer:@"<Provide server name>"
    host:@"<Provide host>"
    port:<9704>
    enableSSL:NO
    enableSSO:NO
    saveCredential:YES
    username:@"<Provide username or blank (user will be prompted)>"
    password:@"<Provide password or blank (user will be prompted)>" 
    analyticsContextPath:nil
    bipContextPath:nil
    madContextPath:nil
    vaContextPath:nil
    deviceLocale:YES
    setAsDefaultServer:YES];
    // To modify an existing server do the following:
    [super modifyServer:@"<Provide server name>"
    host:@"<Provide host>"
    port:<9704>
    enableSSL:NO
    enableSSO:NO
    saveCredential:YES
    username:@"<username>"
    password:@"<password>" 
    analyticsContextPath:nil
    bipContextPath:nil
    madContextPath:nil
    vaContextPath:nil
    deviceLocale:YES
    setAsDefaultServer:NO];
    // To delete an existing server do the following:
    [super removeServer:@"<Provide server name>"
    // Override point for customization after application launch.
    return ([super application:application
     didFinishLaunchingWithOptions:launchOptions]);
    }

    Note:

    Replace any boldface strings above in <> with actual values based on your configuration.

Add Supported Languages to the Project

You can test languages on a simulator.

On-device, the application is translated into 29 languages. If, however, you need to test languages on a simulator, use these instructions.

To add supported languages to the project:

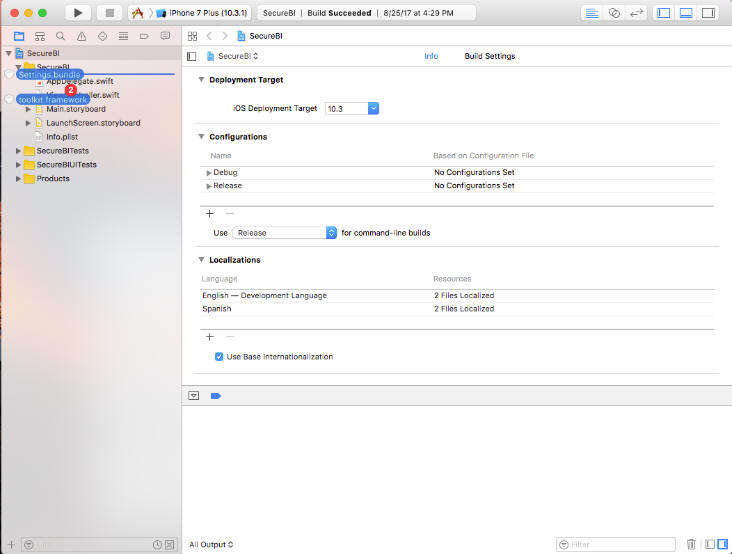
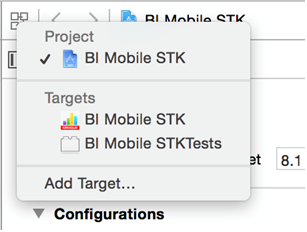
  1. In the project navigator, select the project (not a target) as shown in the following image and then click Info.
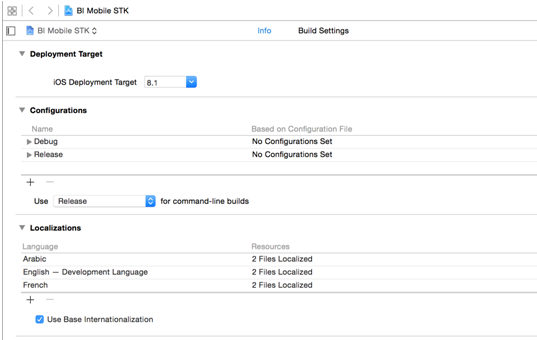
  2. In the Localizations section, in the Language column, click the plus sign (+) as shown in the image. From the drop-down menu, choose the language you want to add.
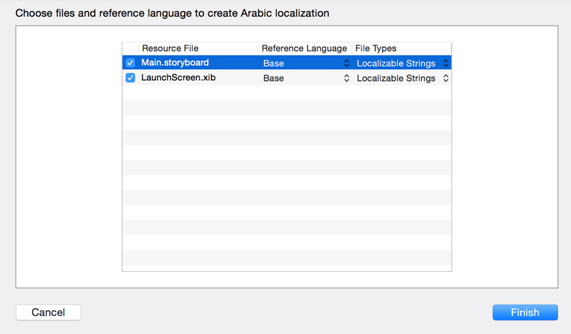
  3. In the Choose Files dialog, select all the resource files for the language, as shown in the following image:
  4. Click Finish.

Supported Languages and Codes

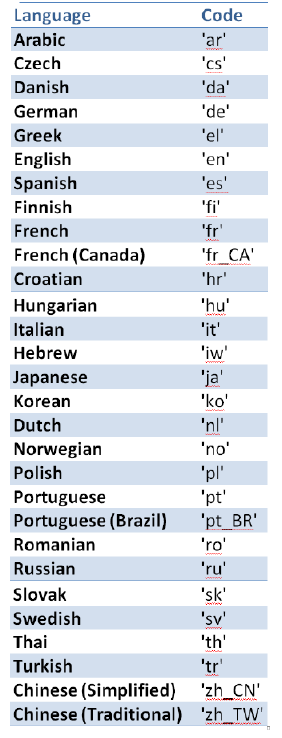
Oracle BI Mobile supports several languages.

The following image displays the languages and their corresponding codes.

Documentation Accessibility

For information about Oracle's commitment to accessibility, visit the Oracle Accessibility Program website at http://www.oracle.com/pls/topic/lookup?ctx=acc&id=docacc.

Access to Oracle Support

Oracle customers that have purchased support have access to electronic support through My Oracle Support. For information, visit http://www.oracle.com/pls/topic/lookup?ctx=acc&id=info or visit http://www.oracle.com/pls/topic/lookup?ctx=acc&id=trs if you are hearing impaired.


Oracle Fusion Middleware Deploying a Signed iOS Application to the Enterprise using Oracle Business Intelligence Mobile SecurityToolkit, 12c Release 1

E92654-02

Copyright © 2015, 2018, Oracle and/or its affiliates. All rights reserved.

Primary Author: Oracle Corporation

This software and related documentation are provided under a license agreement containing restrictions on use and disclosure and are protected by intellectual property laws. Except as expressly permitted in your license agreement or allowed by law, you may not use, copy, reproduce, translate, broadcast, modify, license, transmit, distribute, exhibit, perform, publish, or display any part, in any form, or by any means. Reverse engineering, disassembly, or decompilation of this software, unless required by law for interoperability, is prohibited.

The information contained herein is subject to change without notice and is not warranted to be error-free. If you find any errors, please report them to us in writing.

If this is software or related documentation that is delivered to the U.S. Government or anyone licensing it on behalf of the U.S. Government, then the following notice is applicable:

U.S. GOVERNMENT END USERS: Oracle programs, including any operating system, integrated software, any programs installed on the hardware, and/or documentation, delivered to U.S. Government end users are "commercial computer software" pursuant to the applicable Federal Acquisition Regulation and agency-specific supplemental regulations. As such, use, duplication, disclosure, modification, and adaptation of the programs, including any operating system, integrated software, any programs installed on the hardware, and/or documentation, shall be subject to license terms and license restrictions applicable to the programs. No other rights are granted to the U.S. Government.

This software or hardware is developed for general use in a variety of information management applications. It is not developed or intended for use in any inherently dangerous applications, including applications that may create a risk of personal injury. If you use this software or hardware in dangerous applications, then you shall be responsible to take all appropriate fail-safe, backup, redundancy, and other measures to ensure its safe use. Oracle Corporation and its affiliates disclaim any liability for any damages caused by use of this software or hardware in dangerous applications.

Oracle and Java are registered trademarks of Oracle and/or its affiliates. Other names may be trademarks of their respective owners.

Intel and Intel Xeon are trademarks or registered trademarks of Intel Corporation. All SPARC trademarks are used under license and are trademarks or registered trademarks of SPARC International, Inc. AMD, Opteron, the AMD logo, and the AMD Opteron logo are trademarks or registered trademarks of Advanced Micro Devices. UNIX is a registered trademark of The Open Group.

This software or hardware and documentation may provide access to or information about content, products, and services from third parties. Oracle Corporation and its affiliates are not responsible for and expressly disclaim all warranties of any kind with respect to third-party content, products, and services unless otherwise set forth in an applicable agreement between you and Oracle. Oracle Corporation and its affiliates will not be responsible for any loss, costs, or damages incurred due to your access to or use of third-party content, products, or services, except as set forth in an applicable agreement between you and Oracle.