 ODI12c: Creating and Connecting to ODI Master and Work Repositories
 Before You Begin
This tutorial walks you through the steps that are needed to create and connect to the Oracle Data Integrator (ODI) Master Repository and the ODI Work Repository using Repository Creation Utility (RCU) and ODI Studio.
This tutorial takes approximately 15 minutes to complete.
Background
Repositories are schemas and tables in a database that hold information about ODI Designs, Topologies, and Security. There is a one-to-many relationship between Master and Work repositories. An example of why you might want to have multiple work repositories is for separating development and production designs. The repository schemas and tables can be created either manually using ODI Studio or automatically using Repository Creation Utility (RCU). RCU is the preferred method of maintaining the repositories. The database storing the repository can be Oracle Database 12c or several other supported databases.
What Do You Need?
The following is a list of software requirements:
- A supported operating system
- Oracle Database
- Oracle Data Integrator 12c
The following is a list of OPTIONAL software:
- Oracle WebLogic Server (WLS) 12c (other versions are supported as well)
- Oracle SQL Developer 12c (included with Database 12c install)
If WLS is present, it must be in the same Middleware HOME directories as ODI.
Before starting this tutorial, you should have:
- Started Oracle Database services and components such as the Listener
- A Database user with DBA role privileges such as the
SYSorSYSTEMaccount. - Installed the
HRschema included in the Oracle Database. The Sample Schemas Installation Guide is part of the Oracle Database documentation set, and is also available online at: http://otn.oracle.com. - Already installed, but not configured, ODI.
- Mapped a plan for passwords. Best practices are MixedCase, at least eight characters in length, and contain a number. Examples:
MyPasswd99,Welcome1.
 Creating Repositories with RCU
RCU can be used to create or to drop repositories. Installing ODI adds the RCU bits to the Middleware HOME.
To create repositories with RCU, perform the following steps:
- Navigate to the proper directory and launch RCU. The Welcome page is displayed. Click Next to continue.
- On the Create Repository page, select Create Repository and System Load and Product Load (which is the default). This will require DBA privileges such as the user SYS or SYSTEM would have. Click Next to continue.
- On the Database Connection Details page, enter a Host Name such as
localhostor an IP address, Database Listener Port such as1521, Database Service Name such asorcl.example.com(note this is not the instance name), Database User Name such assys,and the corresponding Password which will not display. The Role will change automatically as you type a Username.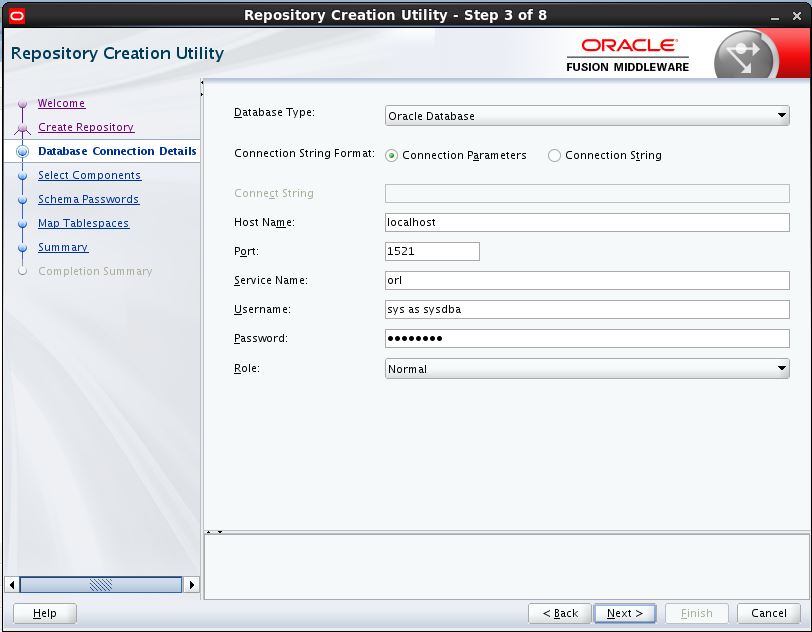
- Click Next to continue. You may see the following warning depending on your database configuration: "The database you are connecting is with non-AL32UTF8 character set. Oracle strongly recommends using AL32UTF8 as the character set".
- If you are using Latin alphabets for languages such as English, click Ignore to continue. A progress bar displays. When the progress bar reaches 100% and all the lines have green checks, click OK to continue.
- On the Select Components page, select Oracle Data Integrator. Selecting that one line item will automatically select several other components. Notice the
DEVprefix on some of the schema names. You can change the default prefix, as will be needed if you ever add additional repositories. - Click Next to continue. A progress bar displays. When the progress bar reaches 100% and all the lines have green checks, click OK to continue.
- On the Schema Passwords page, enter the same password twice. In a training environment, it is acceptable to use the same password for all schemas; but in a production environment, you would likely use different passwords. Click Next to continue.
- On the Custom Variables page, enter the same Password in four places, enter a Work Repository Type of
D, and a Work Repository Name ofWORKREP. Note that the Supervisor password is for ODI Studio, and the Repository password is for the database user. These eventually will be stored in Oracle Wallet. Click Next to continue.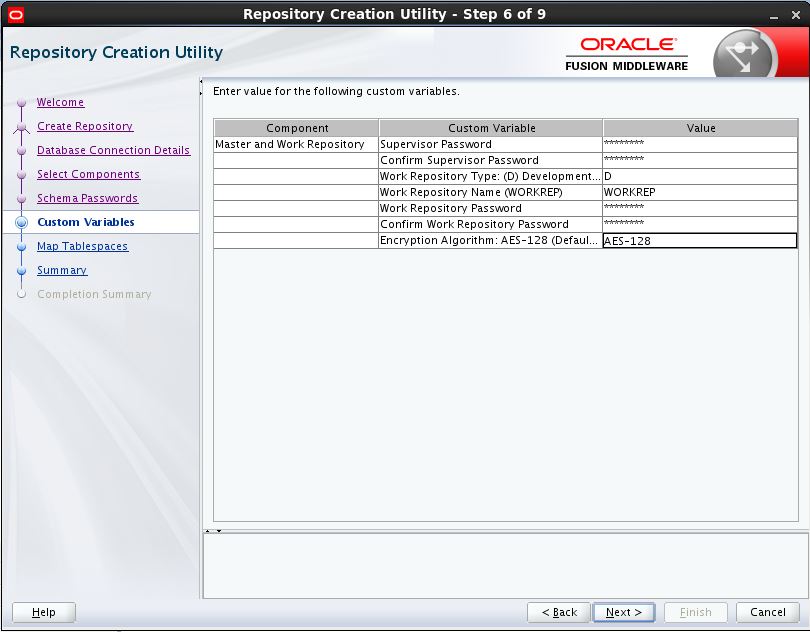
- On the Map Tablespaces page, there is nothing to do, the defaults are fine. Note the prefix of
DEVthroughout. The asterisks are not part of the tablespace names. - Click Next to continue. A Confirmation dialog box will pop up.
- Click OK to continue. A progress bar displays. When the progress bar reaches 100% and all the lines have green checks, click OK to continue.
- On the Summary page, there is nothing to do, just review. Click Create to continue. A progress bar displays. When the progress bar reaches 100% and all the lines have green checks, it will automatically go to the Completion Summary page.
- On the Completion Summary page, you have the option to view the various log files. Click Close to continue.
In summary, you have used RCU to create various schemas on an Oracle database to support ODI. Remember the passwords, you will need them later.
 Connecting to Repositories with ODI Studio
Oracle Data Integrator 12c Studio provides a graphical tool for manipulating the repository's designs, operators, and topologies. You can have several work repositories, such as DEV (development) and PROD (production), or you can do everything in one work repository.
To connect to a particular set of master and work repositories, perform the following steps:
- Navigate to
$ODI_HOME/studio. - Start ODI Studio by running script
odi.sh. A progress bar displays. Midway through the progress bar, and only the very first time, the Confirm Import Preferences dialog box will pop up and ask if you want to import preferences from a previous installation. If there is no previous installation, there is nothing to select. Click No to continue. The progress bar resumes. - In the left panel, click Connect To Repository....
- On the Login panel, click the '+' green plus to add a new login. Strictly speaking, the yellow pencil (edit) and the red X (delete) should be greyed out since there is nothing to edit or delete yet.
- Fill in all of the Connection information. This must match what you created using RCU and is case-sensitive.
Field Prompt: Value: Login Name: DEV_ODI_REPOODI User: SUPERVISORPassword: (not displayed)Master User: DEV_ODI_REPOMaster Password: (not displayed)Driver List: Oracle JDBC Driver (pick from pull-down list) Driver Name: oracle.jdbc.OracleDriverUrl: jdbc:oracle:thin:@ localhost:1521:orcl(pick template from list, then edit<placeholders>) - Click on the magnifying glass glass corresponding to Work Repository field to display a list of valid work repositories. This was created as part of RCU.
- Select workrep and click OK. This populates the Work Repository field.
- Click Test to make sure that everything is correct. If Information popup box replies, "Successful," then click OK.
Only on the very first time, New Wallet Password asks you to define a password and an expiration time. When using a wallet to store the ODI credentials, ODI Studio will ask you for the Wallet password prior to logging in. You will not need to enter the ODI credentials again. Click OK to continue. This stores the wallet information (and other preferences) in the hidden directory in your home directory: ~/.odi/oracledi/ewallet. You can view it with the GUI tool owm (Oracle Wallet Manager). If you ever deinstall ODI, the wallet is not removed automatically.
From now on, the ODI Login page will be prepopulated with the login information. If the connection is successful, you will have information under the three tabs in the left panel. It is possible to store the login information without using Wallet as an alternative.
In summary, you have defined the connection for ODI to use the repository you created with RCU. That information is stored in Oracle Wallet in your home directory.
 Want to Learn More?
In this tutorial, you should have learned how to:
- Create Master and Work repositories using RCU
- Connect to Master and Work repositories using ODI Studio
Resources
The following are conceptual or procedural Help topics relevant to the topic of this tutorial:
- Online documentation, viewlets, samples, and OLN URLs on OTN:
- External Web sites for related information:
- www.oracle.com/goto/odi
- OTN Community Forums
- To learn more about Oracle Data Integrator 12c, refer to additional OBEs in the Oracle Learning Library, or on the ODI Studio Start Page.
Credits
- User Assistance Developer: Minu Nair
- Other Contributors: Julien Testut