Configure Runtime Environment
Mandatory Configurations
The following configurations are mandatory:
Configuring Kafka
- Click the user name at the top right corner of the screen.
- Click System Settings.
- Click Environment.
- Enter the Kafka bootstrap URL. Select the one of the available authentication methods:
- SSL: Select SSL to connect to an SSL enabled Kafka cluster.
-
Truststore: Locate and upload the truststore file. This field is applicable only to connect to an SSL enabled Kafka cluster.
-
Truststore Password: Enter the truststore password.
-
- MTLS: Select MLTS to enable 2-way authentication of both the user and the Kafka broker.
-
Truststore: Locate and upload the truststore file. This field is applicable only to connect to an SSL enabled Kafka cluster.
-
Truststore Password: Enter the truststore password.
-
Keystore: Locate and upload the keystore file. This field is applicable only to connect to an SSL enabled Kafka cluster.
-
Keystore Password: Enter the keystore password.
-
- SASL: Select SASL if Kafka broker requires authentication.
-
User Name: When using OCI Streaming Kafka compatibility APIs, enter the SASL username for Kafka broker, in the following format:
tenancyName/username/stream pool idNote:
Enter the tenancyName and userName, not tenancy OCID and user OCID. Similarly, enter the stream pool ID and not the stream pool name.You can retrieve this information from the OCI console. This field is enabled only if you have checked the SASL option.
-
Password: Enter the SASL password, which is an authentication token that you can generate on the User Details page, of the OCI console.
Note:
Copy the authentication token when you create it, and save it for future use. You can not retrieve it at a later stage.
-
- SSL: Select SSL to connect to an SSL enabled Kafka cluster.
Internal Kafka Topics
The internal Kafka topics and Group ID's used by GGSA are standardized to the following naming conventions:
Kafka Topics
| Topic | Resource | Operations |
|---|---|---|
|
sx_backend_notification_<UUID> |
Topic | CREATE,DELETE,DESCRIBE,DESCRIBE_CONFIGS,READ,WRITE |
|
sx_messages_<UUID> |
Topic | CREATE,DELETE,DESCRIBE,DESCRIBE_CONFIGS,READ,WRITE |
|
sx_<application_name>_<stage_name>_public |
Topic | CREATE,DELETE,DESCRIBE,DESCRIBE_CONFIGS,READ,WRITE |
|
sx_<application_name>_<stage_name>_draft |
Topic | CREATE,DELETE,DESCRIBE,DESCRIBE_CONFIGS,READ,WRITE |
|
sx_<application_name>_public_<offset_number>_<stage_name>_offset |
Topic | CREATE,DELETE,DESCRIBE,DESCRIBE_CONFIGS,READ,WRITE |
Group IDs
| Group ID | Resource | Operations |
|---|---|---|
|
sx_<UUID>_receiver |
Group | DESCRIBE, READ |
|
sx_<UUID> |
Group | DESCRIBE, READ |
|
sx_<application_name>_public_<offset_number>_<stage_name> |
Group | DESCRIBE, READ |
Configuring the Runtime Server
For runtime, you can use a Spark Standalone or Hadoop YARN cluster. Only users with the Administrator permissions can set the system settings in Oracle GoldenGate Analytics.
Configuring for Standalone Spark Runtime
- Click the user name at the top right corner of the screen.
- Click System Settings.
- Click Environment.
- Select the Runtime Server as Spark Standalone, and enter the following details:
-
Spark REST URL: Enter the Spark standalone REST URL. If Spark standalone is HA enabled, then you can enter comma-separated list of active and stand-by nodes.
-
Storage: Select the storage type for pipelines. To submit a GGSA pipeline to Spark, the pipeline has to be copied to a storage location that is accessible by all Spark nodes.
- If the storage type is WebHDFS:
-
Path: Enter the WebHDFS directory (hostname:port/path), where the generated Spark pipeline will be copied to and then submitted from. This location must be accessible by all Spark nodes. The user specified in the authentication section below must have read-write access to this directory.
-
HA Namenodes: If the hostname in the above URL refers to a logical HA cluster, specify the actual namenodes here, in the format:
Hostname1:Port, Hostname2:Port.
-
- If storage type is HDFS:
-
Path: The path could be
<HostOrIPOfNameNode><HDFS Path>. For example,xxx.xxx.xxx.xxx/user/oracle/ggsapipelines. Hadoop user must haveWritepermissions. The folder will automatically be created if it does not exist. -
HA Namenodes: If the hostname in the above URL refers to a logical HA cluster, specify the actual namenodes here, in the format:
Hostname1:Port, Hostname2:Port.This field is applicable only when the storage type is HDFS.
-
- Hadoop Authentication for WebHDFS and HDFS Storage Types:
- Simple authentication credentials:
- Protection Policy: Select a protection policy from the drop-down list.
- Username: Enter the user account to use for submitting Spark pipelines. This user must have read-write access to the Path specified above.
- Kerberos authentication credentials:
- Protection Policy: Select a protection policy from the drop-down list.
- Kerberos Realm: Enter the domain on which Kerberos authenticates a user, host, or service. This value is in the
krb5.conf file. - Kerberos KDC: Enter the server on which the Key Distribution Center is running. This value is in the
krb5.conf file. - Principal: Enter the GGSA service principal that is used to authenticate the GGSA web application against Hadoop cluster, for application deployment. This user should be the owner of the folder used to deploy the GGSA application in HDFS. You have to create this user in the yarn node manager as well.
- Keytab: Enter the keytab pertaining to GGSA service principal.
- Yarn Resource Manager Principal: Enter the yarn principal. When Hadoop cluster is configured with Kerberos, principals for hadoop services like hdfs, https, and yarn are created as well.
- Simple authentication credentials:
- If storage type is NFS:
Path: The path could be
/oracle/spark-deploy.Note:
/oracle should exist and spark-deploy will automatically be created if it does not exist. You will needWritepermissions on the /oracle directory.
- If the storage type is WebHDFS:
-
- Spark standalone master console port: Enter the port on which the Spark standalone console runs. The default port is
8080.Note:
The order of the comma-separated ports should match the order of the comma-separated spark REST URLs mentioned in the Path. - Spark master username: Enter your Spark standalone server username.
- Spark master password: Click Change Password, to change your Spark standalone server password.
Note:
You can change your Spark standalone server username and password in this screen. The username and password fields are left blank, by default. - Click Save.
Configuring for Hadoop Yarn Runtime
- Click the user name at the top right corner of the screen.
- Click System Settings.
- Click Environment.
- Select the Runtime Server as Yarn, and enter the following details:
-
YARN Resource Manager URL: Enter the URL where the YARN Resource Manager is configured.
-
Storage: Select the storage type for pipelines. To submit a GGSA pipeline to Spark, the pipeline has to be copied to a storage location that is accessible by all Spark nodes.
- If the storage type is WebHDFS:
-
Path: Enter the WebHDFS directory (hostname:port/path), where the generated Spark pipeline will be copied to and then submitted from. This location must be accessible by all Spark nodes. The user specified in the authentication section below must have read-write access to this directory.
-
HA Namenodes: Set the HA namenodes. If the hostname in the above URL refers to a logical HA cluster, specify the actual namenodes here, in the format:
Hostname1:Port, Hostname2:Port.
-
- If storage type is HDFS:
-
Path: The path could be
<HostOrIPOfNameNode><HDFS Path>. For example,xxx.xxx.xxx.xxx/user/oracle/ggsapipelines. Hadoop user must haveWritepermissions. The folder will automatically be created if it does not exist. -
HA Namenodes: If the hostname in the above URL refers to a logical HA cluster, specify the actual namenodes here, in the format:
Hostname1:Port, Hostname2:Port.
-
- If storage type is NFS:
Path: The path could be
/oracle/spark-deploy.Note:
/oracle should exist and spark-deploy will automatically be created if it does not exist. You will needWritepermissions on the /oracle directory.
- If the storage type is WebHDFS:
-
- Hadoop Authentication:
- Simple authentication credentials:
- Protection Policy: Select a protection policy from the drop-down list. This value should match the value on the cluster.
- Username: Enter the user account to use for submitting Spark pipelines. This user must have read-write access to the Path specified above.
- Kerberos authentication credentials:
- Protection Policy: Select a protection policy from the drop-down list. This value should match the value on the cluster.
- Kerberos Realm: Enter the domain on which Kerberos authenticates a user, host, or service. This value is in the
krb5.conf file. - Kerberos KDC: Enter the server on which the Key Distribution Center is running. This value is in the
krb5.conf file. - Principal: Enter the GGSA service principal that is used to authenticate the GGSA web application against Hadoop cluster, for application deployment. This user should be the owner of the folder used to deploy the GGSA application in HDFS. You have to create this user in the yarn node manager as well.
- Keytab: Enter the keytab pertaining to GGSA service principal.
- Yarn Resource Manager Principal: Enter the yarn principal. When Hadoop cluster is configured with Kerberos, principals for hadoop services like hdfs, https, and yarn are created as well.
- Simple authentication credentials:
- Yarn master console port: Enter the port on which the Yarn master console runs. The default port is
8088. - Click Save.
Configuring for OCI Big Data Service
Topology
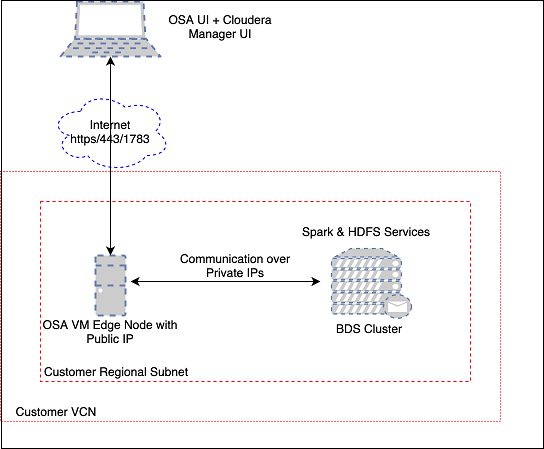
In this example, the marketplace GGSA instance and the BDS cluster are in the same regional subnet. The GGSA instance is accessed using its public IP address. The GoldenGate Stream Analytics instance seconds as a Bastion Host to your BDS cluster. Once you ssh to GGSA instance, you can ssh to all your BDS nodes, by copying your ssh private key to GGSA instance.
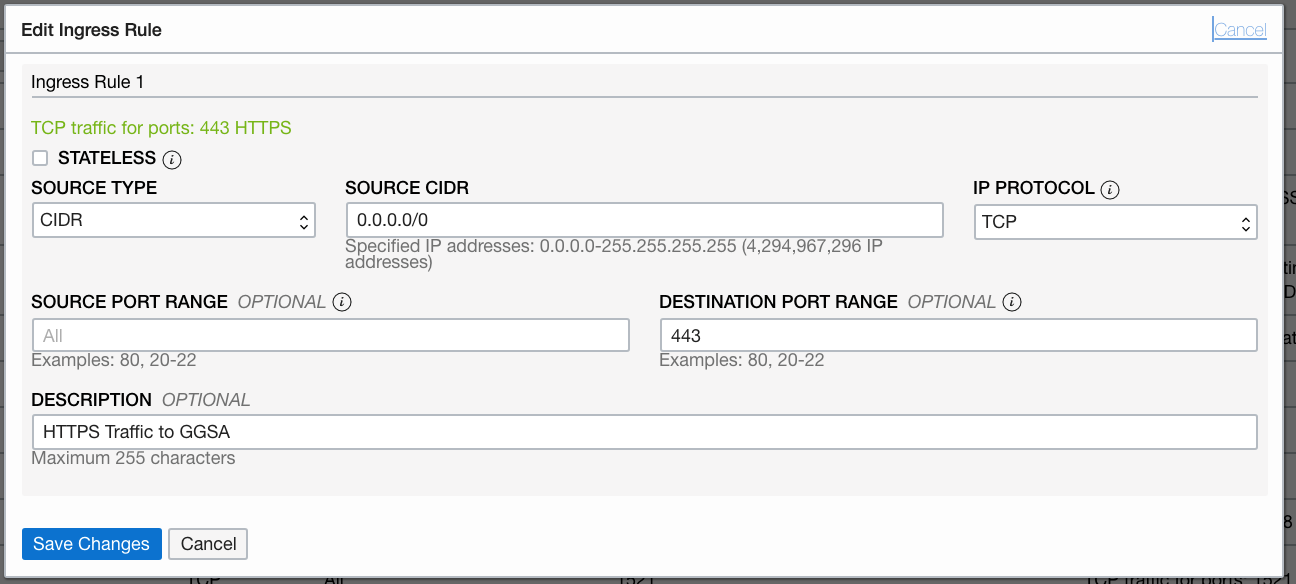
The default security list for the Regional Subnet must allow bidirectional traffic to edge/OSA node so create a stateful rule for destination port 443. Also create a similar Ingress rule for port 7183 to access the BDS Cloudera Manager via the OSA edge node. An example Ingress rule is shown below.
You will also be able to access your Cloudera Manager using the same public IP of GGSA instance by following steps below. Please note this is optional.SSH to GGSA box and run the following port forward commands so you can access the Cloudera Manager via the GGSA instance:
sudo firewall-cmd --add-forward-port=port=7183:proto=tcp:toaddr=<IP address of Utility Node running the Cloudera Manager console>
sudo firewall-cmd --runtime-to-permanent
sudo sysctl net.ipv4.ip_forward=1
sudo iptables -t nat -A PREROUTING -p tcp --dport 7183 -j DNAT --to-destination <IP address of Utility Node running the Cloudera Manager console>:7183
sudo iptables -t nat -A POSTROUTING -j MASQUERADE
You should now be able to access the Cloudera Manager using the URL https://<Public IP of GGSA>:7183.
Prerequisites
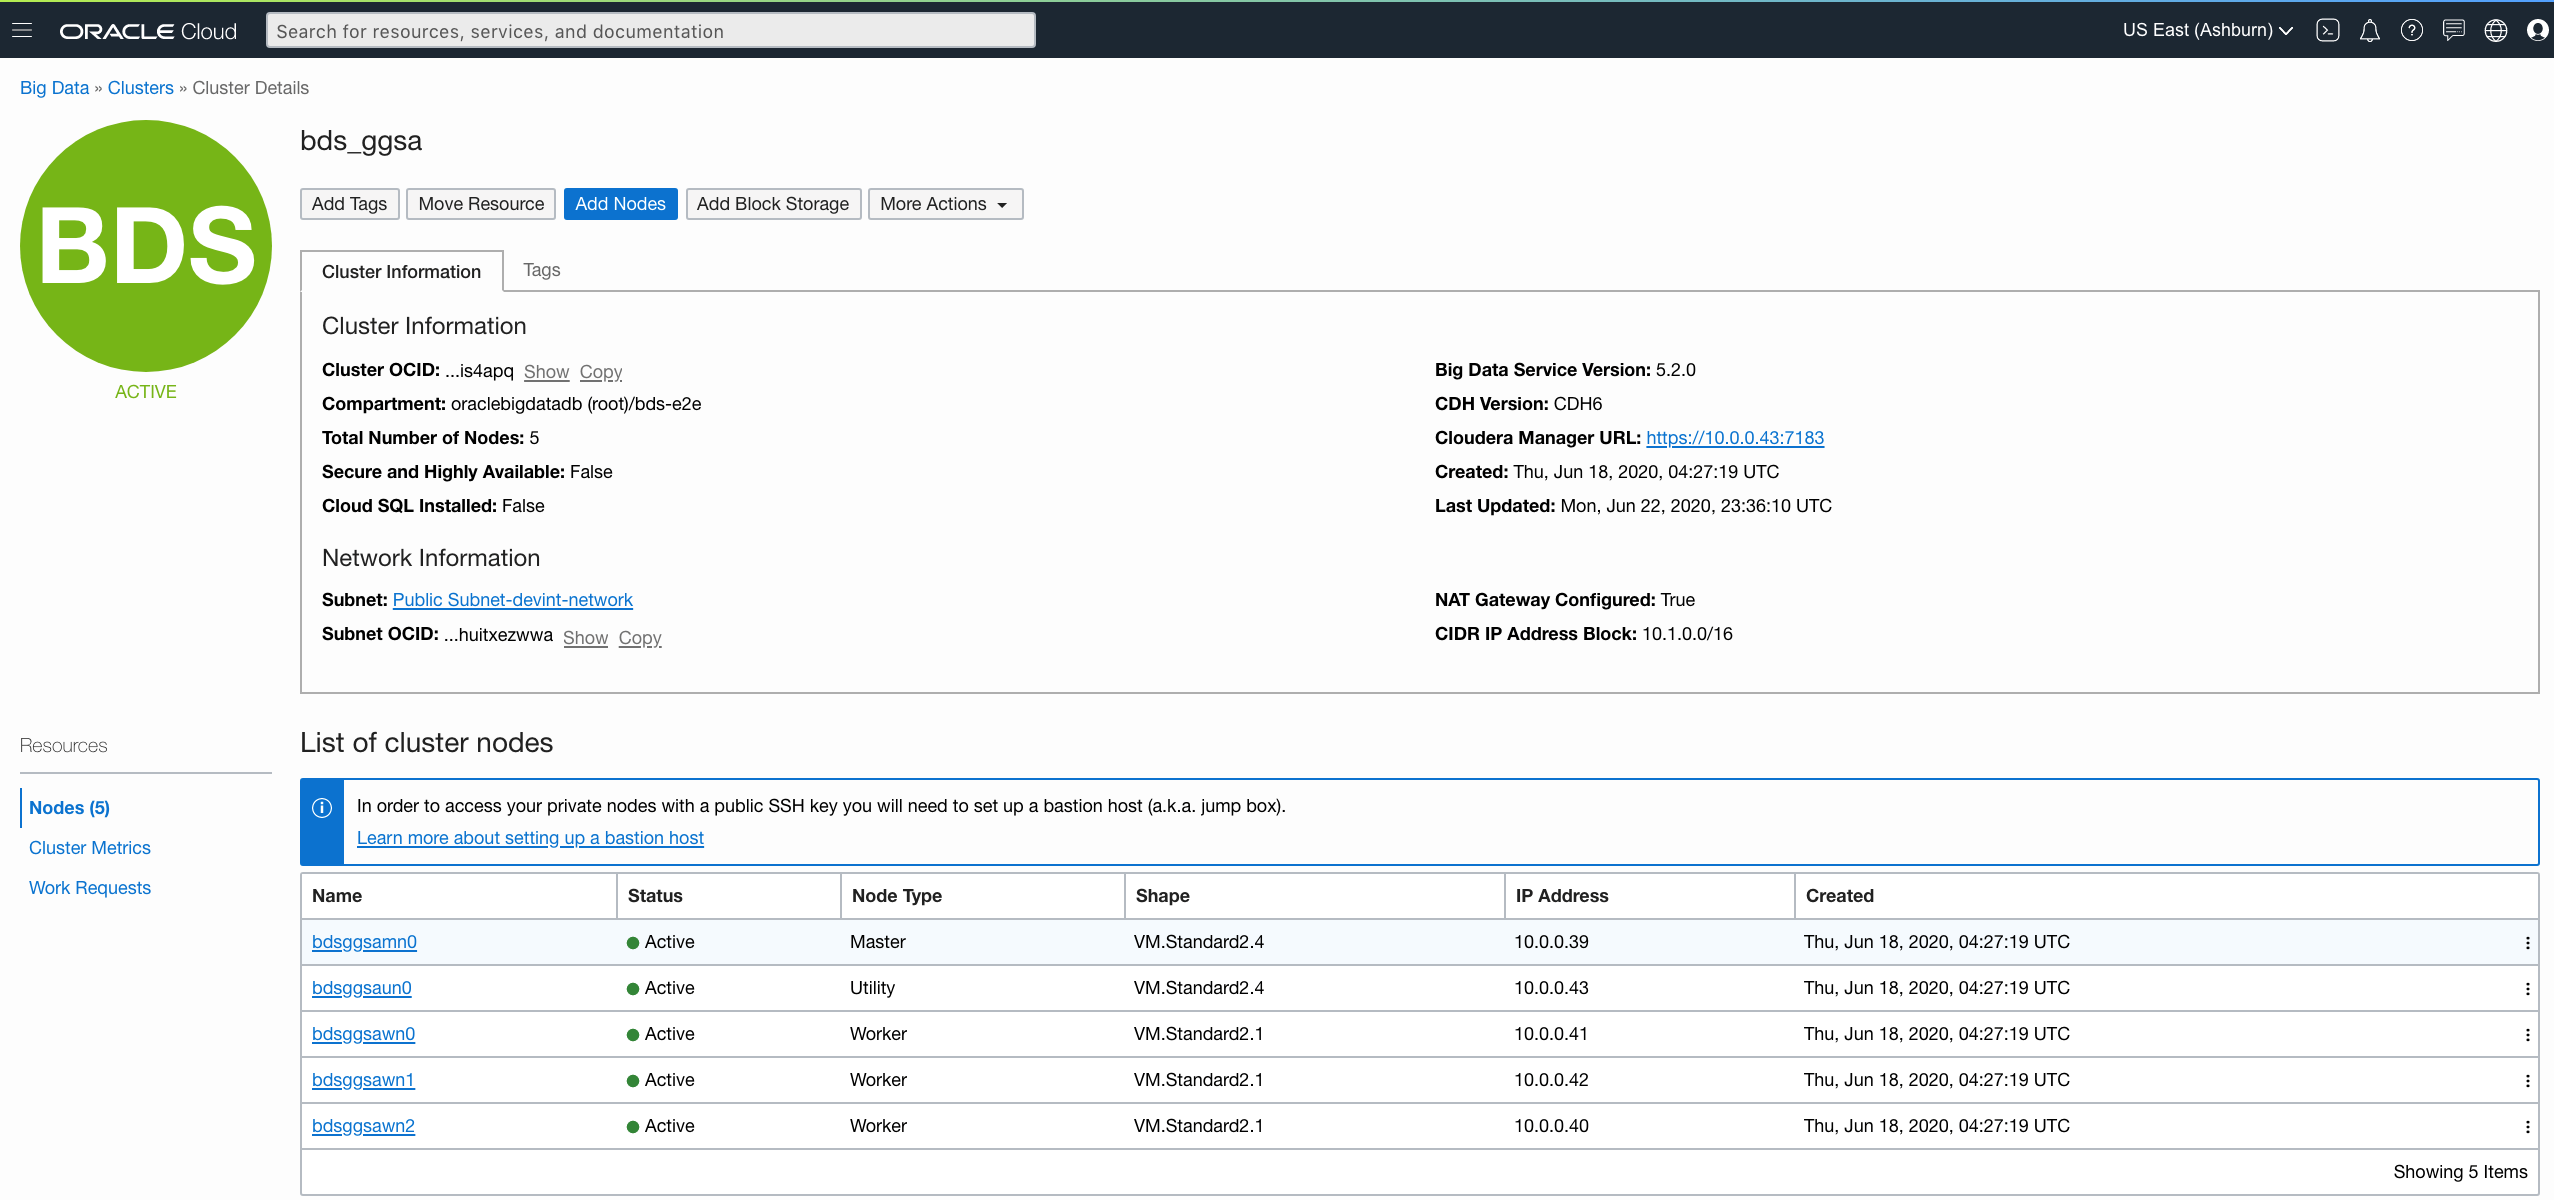
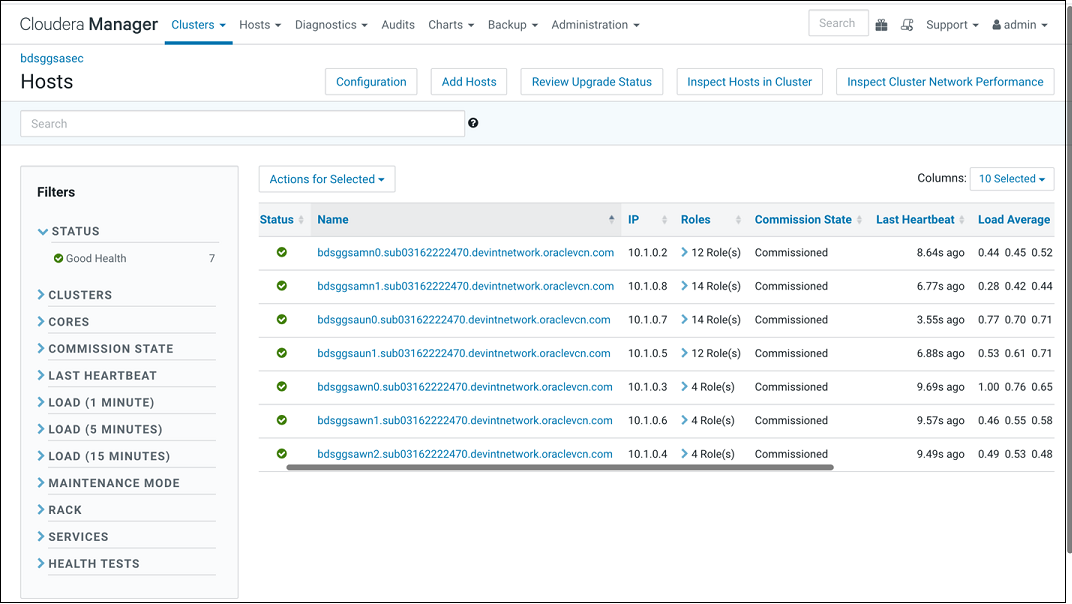
- Retrieve IP addresses of BDS cluster nodes from OCI console as shown in screenshot below. Alternatively, you can get the FQDN for BDS nodes from the Cloudera Manager as shown below.
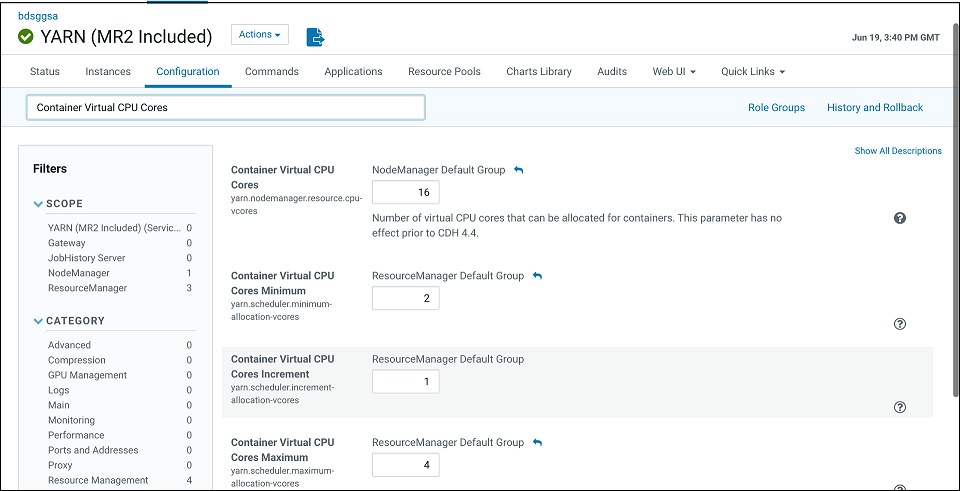
- Reconfigure YARN virtual cores using Cloudera Manager as shown below. This will allow many pipelines to run in the cluster and not be bound by actual physical cores.
-
Container Virtual CPU Cores: This is the total virtual CPU cores available to YARN Node Manager for allocation to Containers. Please note this is not limited by physical cores and you can set this to a high number, say 32 even for VM standard 2.1.
-
Container Virtual CPU Cores Minimum: This is the minimum vcores that will be allocated by YARN scheduler to a Container. Please set this to 2 since CQL engine is a long-running task and will require a dedicated vcore.
Container Virtual CPU Cores Maximum: This is the maximum vcores that will be allocated by YARN scheduler to a Container. Please set this to a number higher than 2 say 4.
Note:
This change will require a restart of the YARN cluster from Cloudera Manager. -
Configuring for Kerberized Big Data Service Runtime
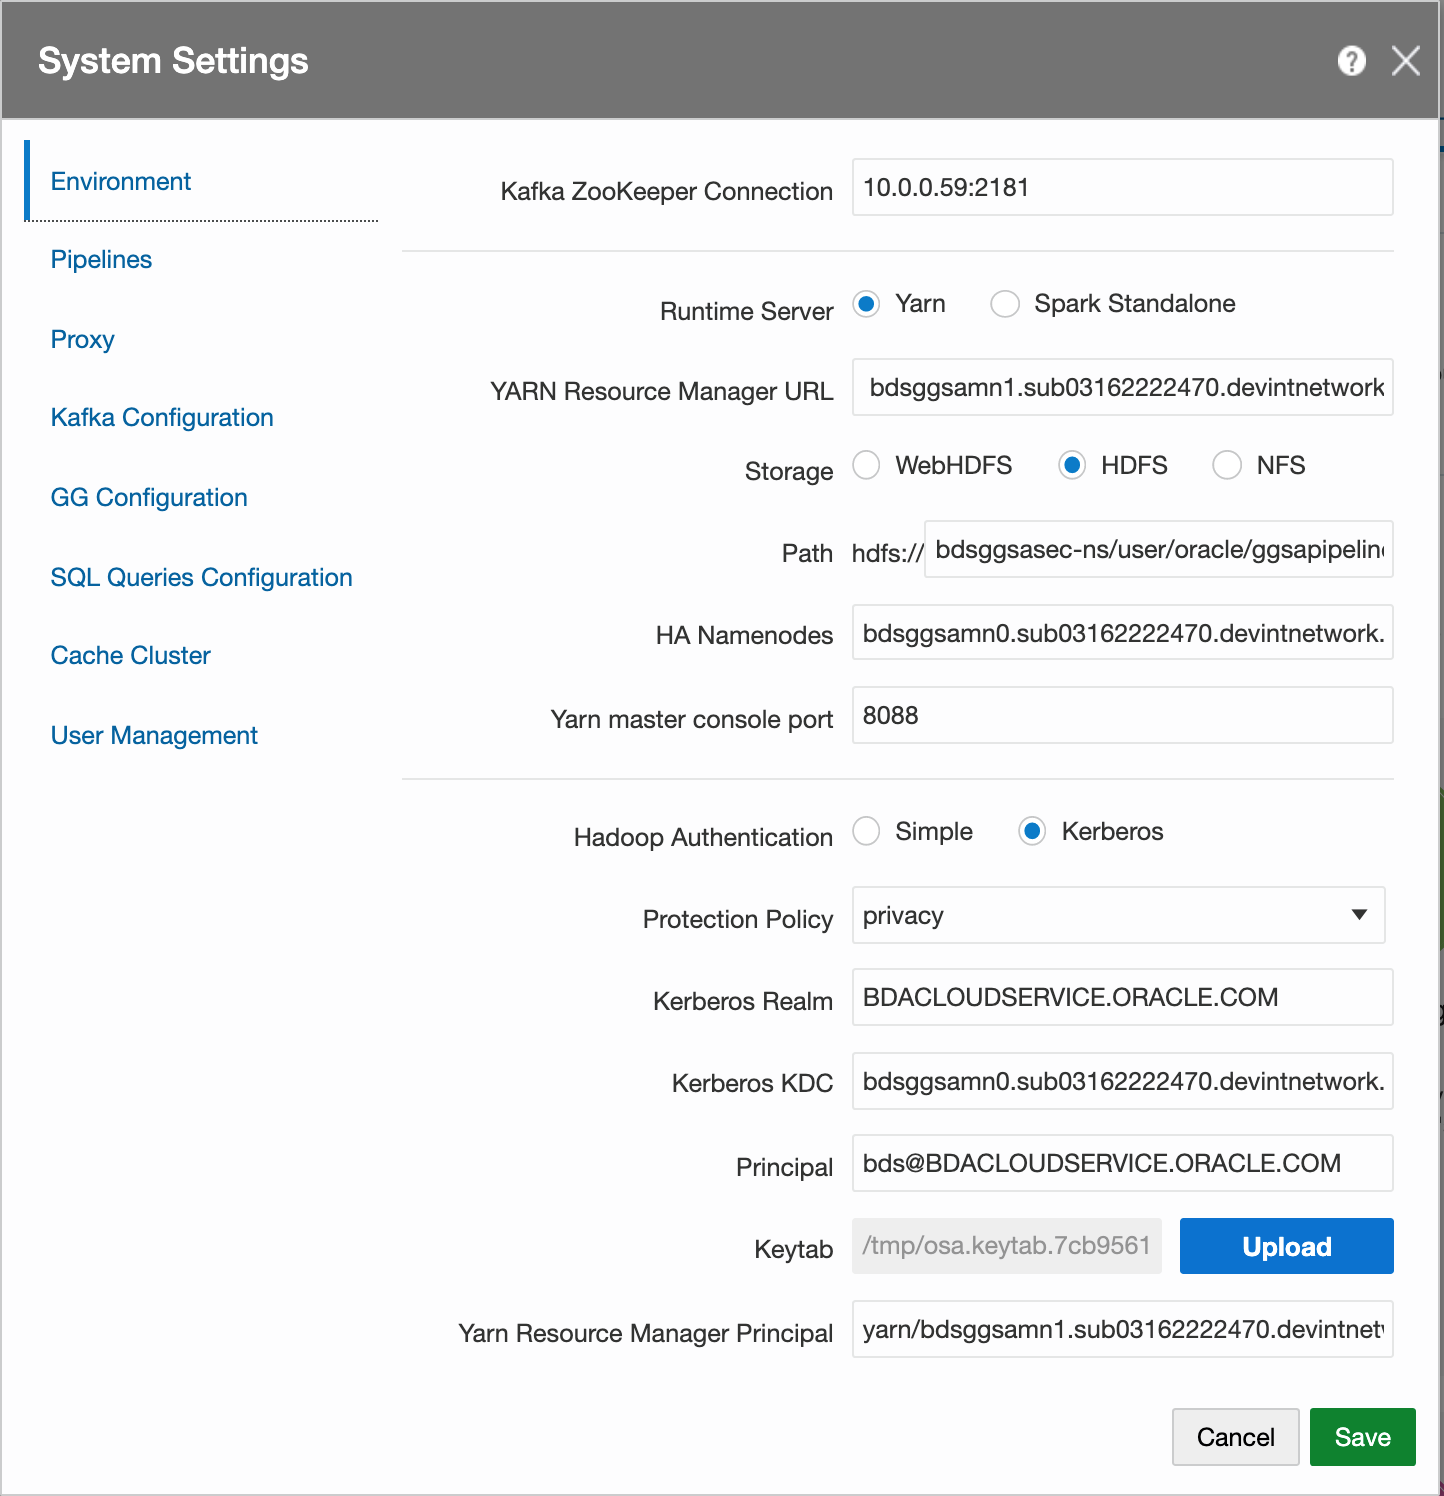
In GGSA System Settings dialog, configure the following:
- Set Kafka Zookeeper Connection to Private IP of the OSA node or list of Brokers that have been configured for GGSA’s internal usage. For example, 10.0.0.59:2181.
- Set Runtime Server to Yarn.
- Set Yarn Resource Manager URL to Private IPs of all master nodes starting with the one running active Yarn Resource Manager. For example,
bdsggsamn1.sub03162222470.devintnetwork.oraclevcn.com,bdsggsamn0.sub03162222470.devintnetwork.oraclevcn.com. - Set storage type to HDFS.
- Set Path to <NameNode Nameservice><HDFS Path>. For example,
bdsggsasec-ns/user/oracle/ggsapipelines. The path will automatically be created if it does not exist but the Hadoop User must have write permissions. NameNode Nameservice can be obtained from HDFS configuration as shown in the screenshot below. Use search string nameservice in the search field.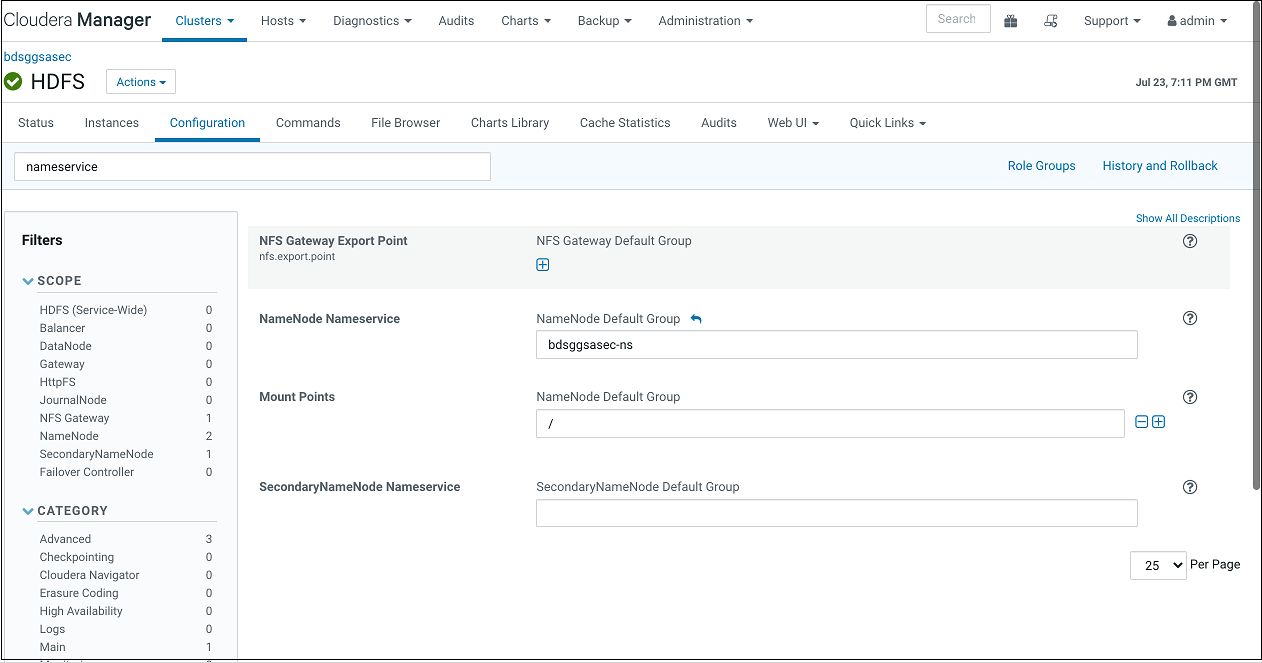
- Set HA Namenode to Private IPs or hostnames of all master nodes (comma separated), starting with the one running active NameNode server. In the next version of GGSA, the ordering will not be needed. For example,
bdsggsamn0.sub03162222470.devintnetwork.oraclevcn.com,bdsggsamn1.sub03162222470.devintnetwork.oraclevcn.com. - Set Yarn Master Console port to 8088 or as configured in BDS.
- Set Hadoop authentication to Kerberos.
- Set protection policy to privacy. Please note this should match the value in HDFS configuration property hadoop.rpc.protection.
- Set Kerberos Realm to BDACLOUDSERVICE.ORACLE.COM.
- Set Kerberos KDC to private IP or hostname of BDS master node 0. For example,
bdsggsamn0.sub03162222470.devintnetwork.oraclevcn.com. - Set principal to bds@BDACLOUDSERVICE.ORACLE.COM. See this documentation to create a Kerberos principal (e.g. bds) and add it to hadoop admin group, starting with step Connect to Cluster's First Master Node and through the step Update HDFS Supergroup.
Note:
You can hop/ssh to the master node using your GGSA node as the Bastion. You will need your ssh private key to be available on GGSA node though. Restart your BDS cluster as instructed in the documentation.
[opc@bdsggsa ~]$ ssh -i id_rsa_private_key opc@bdsggsamn0.sub03162222470.devintnetwork.oraclevcn.com - Make sure the newly created principal is added to Kerberos keytab file on the master node as shown:
bdsmn0 # sudo kadmin.local
kadmin.local: ktadd -k /etc/krb5.keytab bds@BDACLOUDSERVICE.ORACLE.COM
- Fetch the keytab file using sftp and set Keytab field in system settings by uploading the same.
- Set Yarn Resource Manager principal which should be in the format
yarn/<FQDN of BDS MasterNode running Active Resource Manager>@KerberosRealm. For example,yarn/bdsggsamn1.sub03162222470.devintnetwork.oraclevcn.com@BDACLOUDSERVICE.ORACLE.COM.Sample System Settings Screen:
Configuring for Non Kerberized Big Data Service Runtime
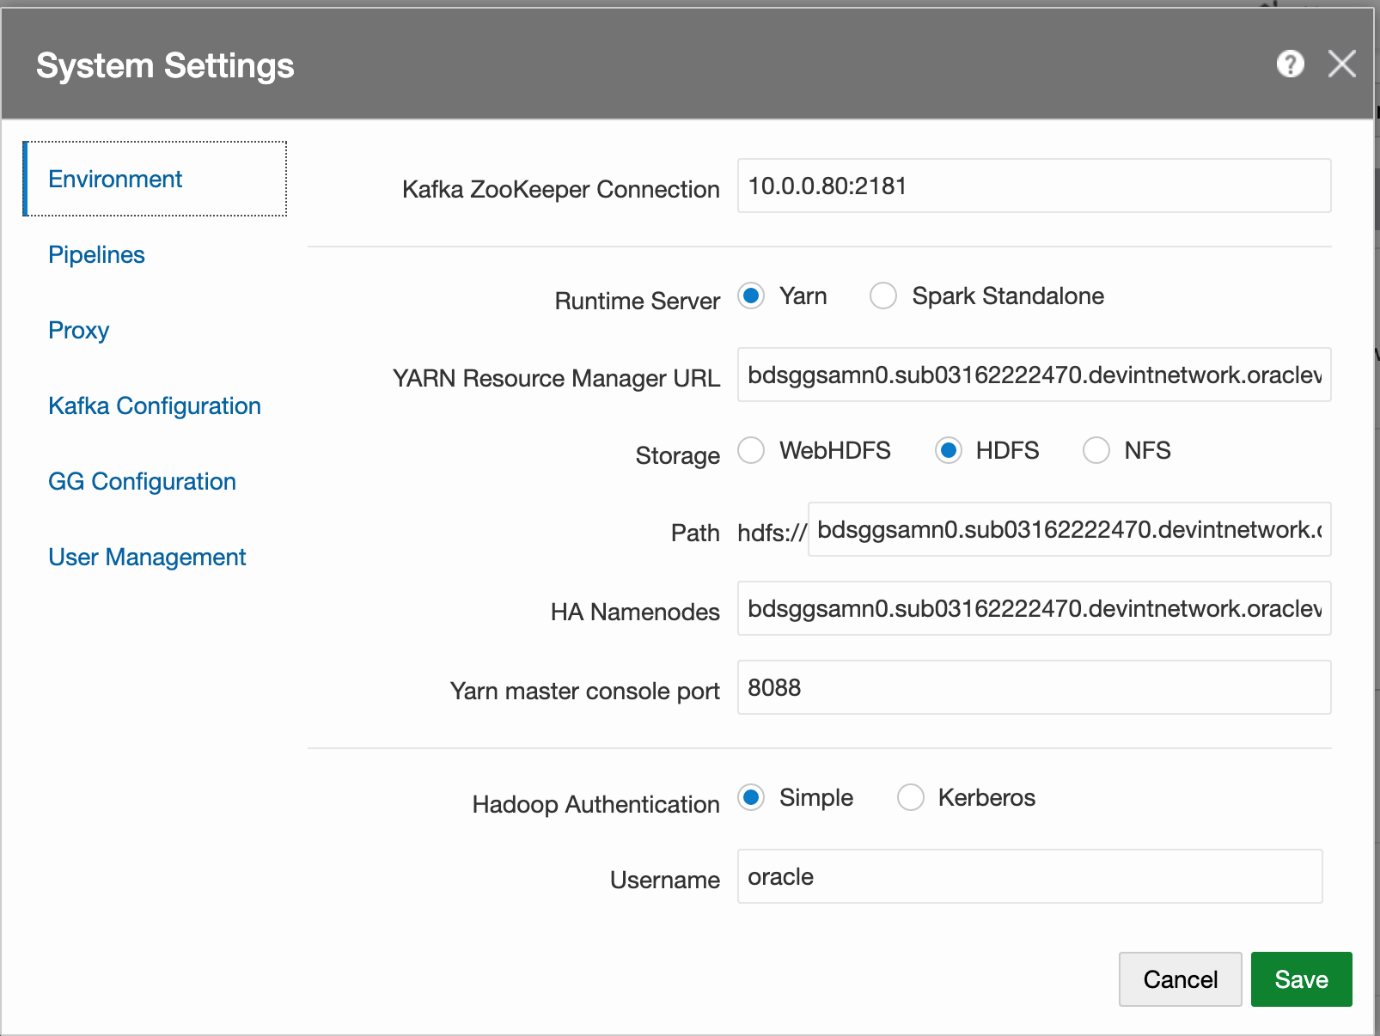
- Set Kafka Zookeeper Connection to Private IP of the OSA node or list of Brokers that have been configured for GGSA’s internal usage. For example, 10.0.0.59:2181
- Set Runtime Server to Yarn.
- Set Yarn Resource Manager URL to Private IP or Hostname of the BDS Master node. For example,
bdsggsamn0.sub03162222470.devintnetwork.oraclevcn.com. - Set storage type to HDFS.
- Set Path to <PrivateIP or Host Of Master><HDFS Path>. For example,
10.x.x.x/user/oracle/ggsapipelinesorbdsggsamn0.sub03162222470.devintnetwork.oraclevcn.com/user/oracle/ggsapipelines. - Set HA Namenode to Private IP or Hostname of the BDS Master node. For example,
bdsggsamn0.sub03162222470.devintnetwork.oraclevcn.com. - Set Yarn Master Console port to 8088 or as configured in BDS
- Set Hadoop authentication to Simple and leave Hadoop protection policy at authentication if available
- Set username to oracle.
- Click Save.
Optional Configurations
The following configurations are optional:
Configuring Pipeline Preferences
- Click the user name in the top right corner of the screen and Select System Settings from the drop-down list.
- Click Pipelines and set the following configurations:
-
Batch Duration: Set the default duration of the batch for each pipeline.
-
Executor Count: Set the default number of executors per pipeline.
-
Cores per Executor: Set the default number of cores. A minimum value of 2 is required.
-
Executor Memory: Set the default allocated memory for each executor instance in megabytes.
-
Cores per Driver: Set the default number of cores. A minimum value of 1 is required.
-
Driver Memory: Set the default allocated memory per driver instance in megabytes.
-
Log Level: Select a log level for unpublished pipelines, from the drop-down list.
Note:
Reset the default log level of draft pipelines to WARNING, and of published pipelines, to ERROR. -
High Availability: Set the default HA value for each pipeline
- Pipeline Topic Retention: Set retention period for intermediate stage topics, in milliseconds. Default is one hour.
- Enable Pipeline Topics: Select this option to enable creation of intermediate kafka topics. It is selected by default.
- Input Topics Offset: Select the Kafka topic offset value from the drop-down list. The default value is latest.
Note:
When you publish the pipeline for the first time, the input stream is read based on the offset value you have selected in this drop-down list. On a subsequent publish, the value you have selected here is not considered, and the input stream is read from where it was last left off. - Reset Offset: Select this option to read the input stream based on the offset value selected in the Input Topics Offset drop-down list.
-
- Click Save.
Configuring Network Proxy
- Click the user name in the top right corner of the screen and Select System Settings from the drop-down list.
- Click Proxy, and set the following configurations:
- HTTP Proxy: Set HTTP proxy server to access any resource, for example a REST target, outside your network.
- Port: Enter the port of the HTTP proxy server. Enter a number between 0 and 65,535.
- Use this proxy server for all protocols: Select the option to use a single proxy server.
- No proxy for: Set a list of hosts that should be reached directly, bypassing the proxy. This is a list of patterns separated by the delimiter
|. The patterns can start or end with a*for wildcards.
- Click Save.
Configuring Kafka Preferences
- Click the user name in the top right corner of the screen and Select System Settings from the drop-down list.
- Click Kafka Configuration, and set the following configurations:
- Partition count per Topic: By default, GGSA creates a Kafka topic with partition count of 3 and a replication factor of 1. Increasing the partition count to higher than 3 will increase throughput when consuming data from topic. For Kafka targets, you can select a column as partitioning key.
- Replication factor per Topic: Increasing the replication factor increases the number of copies of your data thereby making it highly available.
- Click Save.
Configuring GG Preferences
- Click the user name in the top right corner of the screen and Select System Settings from the drop-down list.
- Click GG Configuration, and set the following configurations:
- Begin: By default, GGSA reads the Goldengate trail file from the latest offset (Now), but you can change it to read from the beginning.
- Click Save.
Configuring SQL Preferences
When displaying tables and objects in Database reference or target, GGSA by default only shows the objects that are owned by the user. If you want the system to display all objects the user has access to, regardless of the owner, enter your own SQL query here.
- Click the user name in the top right corner of the screen and Select System Settings from the drop-down list.
- Click SQL Queries Configurations, and set the following configurations:
- Oracle DB Reference and Target:
Enter a SQL query to fetch the table column details, for all the tables to be used for creating references or targets. The SELECT query must contain the following attributes for each column:
table_name, column_name, data_type, data_length, data_precision, data_scale, nullableanddata_default.WHEREstatements can be used to filter the tables listed.Example:
SELECT table_name, column_name, data_type, data_length, data_precision, data_scale, nullable, data_default FROM all_tab_columns WHERE table_name LIKE DEMO ORDER BY table_name. In this example all the tables with names starting with DEMO will be displayed when using references or targets. - Oracle DB Geofence: Enter the query for geofence tables and columns details.
Enter a SQL query to fetch the table column details, for all the tables to be used for creating Geofences. The SELECT query must contain the following attributes for each column:
table_name, column_name, data_type, data_length, data_precision, data_scale. The tables listed in for geofence must have at least one column of theSDO_GEOMETRYtype. Hence the following where clause is mandatory:WHERE table_name IN (SELECT TABLE_NAME FROM all_tab_columns WHERE data_type='SDO_GEOMETRY'.Example:
SELECT table_name, column_name, data_type, data_length, data_precision, data_scale FROM all_tab_columns WHERE table_name IN (SELECT TABLE_NAME FROM all_tab_columns WHERE data_type='SDO_GEOMETRY') AND table_name LIKE GEO ORDER BY table_name desc. In this example, all the tables with names starting with GEO will be listed in the descending order of the table name.
- Oracle DB Reference and Target:
- Click Save.
Changing Spark Work Directory
To change Spark work directory:
- Stop Spark service:
sudo systemctl stop spark-slave.servicesudo systemctl stop spark-master.service
- Create work directory under u02:
- Navigate to
/u02 sudo mkdir spark. Heresparkis the work folder name, you can create folder with the name of your choice.chmod 777 spark, to change permission.
- Navigate to
- Edit
spark-env.sh- Navigate to
SPARK_HOME/conf, and editspark-env.sh - Add
SPARK_WORKER_DIR=/u02/sparkat the end of the filespark-env.shto point to newly created folder under/u02
- Navigate to
- Start Spark service:
sudo systemctl start spark-master.servicesudo systemctl start spark-slave.service
You will see the application and driver data ( files and logs) under
/u02/sparkwhen you publish the pipeline again.
Changing Spark Log Rollover based on Time
To change Spark log rollover based on time:
- Stop Spark service:
sudo systemctl stop spark-slave.servicesudo systemctl stop spark-master.service
- Edit
spark-env.sh- Navigate to
SPARK_HOME/conf, and comment or deleteSPARK_WORKER_OPTSvariable and its value.
- Navigate to
- Edit
spark-defaults.confby adding the below lines:spark.executor.logs.rolling.maxRetainedFiles 7spark.executor.logs.rolling.strategy timespark.executor.logs.rolling.time.interval minutely
Note:
You can changespark.executor.logs.rolling.timetodaily,hourly,minutely. This is to enable log rollover based on time. - Start Spark service:
sudo systemctl start spark-master.servicesudo systemctl start spark-slave.service
You will see the application and driver data ( files and logs) under
/u02/sparkwhen you publish the pipeline again.