 Configure
and Use Production Redeployment
Configure
and Use Production Redeployment Before You Begin
This 20-minute tutorial shows you how to use the Oracle WebLogic Server 12c production redeployment feature to have two versions of the same application deployed simultaneously.
Background
WebLogic Server's production redeployment strategy involves
deploying an updated version of an application alongside an
older version of that same application. WebLogic Server
automatically manages client connections so that only new client
requests are directed to the new version of the application.
Clients already connected to the application (clients that
already have an HTTP Session object) during the
redeployment continue to use the older version of the
application until they complete their work, at which point
WebLogic Server automatically retires the older application. To
assign a version identifier to an application, you can add a
line that gives the version name to the MANIFEST.MF
file, which is part of the enterprise or web application being
deployed. Alternatively, the version name can be specified at
deployment time by using the -appversion argument
of the weblogic.Deployer command-line tool, or the
archiveVersion argument of the WLST commands deploy()
and updateApplication(). This tutorial covers
deploying versioned applications that use the version name in
the MANIFEST.MF file.
What Do You Need?
- Installed Oracle WebLogic Server 12c
- Before starting this tutorial, you should have completed the Oracle by Example tutorials titled Oracle WebLogic Server 12c: Installing WebLogic Server and Creating a Domain and Oracle WebLogic Server 12c: Configuring Managed Servers.
- The versioned.zip
file downloaded and extracted to the folder where WebLogic
Server domain and servers are located. Extract the file
contents to a local drive.
The zip file contains the following two directories: deployversion1, which contains the first version of thesimple.warapplication.deployversion2,which contains the second version of thesimple.warapplication.
META-INF/MANIFEST.MF file, you can extract the
files from simple.war and use a text editor to
view that file. Notice the entry Weblogic-Application-Version:v1
which sets the version name to v1. The MANIFEST.MF
file from the deployversion2/simple.war file has a
different version name, Weblogic-Application-Version:v2. Deploy
the First Version of the Application
Deploy
the First Version of the Application
In this section, you deploy the first version of a Java web application.
- Start the WebLogic Administration Server.
$ cd
$DOMAIN_HOME/ $ ./startWebLogic.shDOMAIN_HOMEis the path where the WebLogic Server domain is created. In this tutorial, the path is$ORACLE_HOME/user_projects/domains/.
When prompted for a username and password, enter the credentials of the domain administrator. - Start the managed server,
dizzy1.$ ./startManagedWebLogic.sh dizzy1 host01.example.com:7001
This runs the script to start the managed server nameddizzy1. Also notice the argument that gives the URL of the domain's administration server:http://host01.example.com:7001
Use the host name and port of the administration server of your domain. - After the servers are up and running, access the WebLogic
Server administration console. Open a web browser and enter
the URL of the domain's administration console. Here,
Note: Use the host name and port of the administration server of your domain.http://host01.example.com:7001/console - On the Welcome screen, log in using the username and password entered to start the servers.
- In the Administration Console Change Center, click Lock
& Edit.
Deploying an application is a change to the domain's configuration, so it must first be locked. - Under Domain Structure, click Deployments.
The Summary of Deployments page appears on the right. This page displays the list of Java EE applications and standalone application modules installed to the current domain.
- Under Deployments, on the Configuration tab,
click Install.
Note that the Archive Version is set to the version name in theMANIFEST.MF file: v1. - Find and enter the Current Location field.
Use the links to browse to the location where the zip file was extracted. Navigate to the directory deployversion1. There you will seesimple.warwith a radio button next to it. Select that radio button. By using the links and the radio button, the console fills in the Path field for you.
Alternatively, you can type in the path and file name in the Path field.
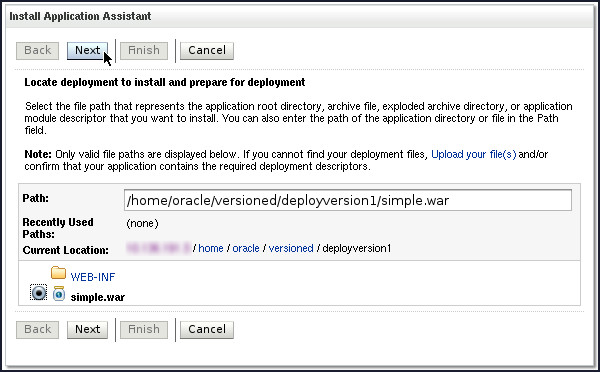
Description of the illustration t1s9.jpg - Click Next.
The Choose installation type and scope page appears. - Select Install this deployment as an application,
and then click Next.
The Select deployments targets page appears.
- Select dizzy1, and then click Next.
The Optional Settings page appears. Notice that the Archive Version is set to the version name in theMANIFEST.MFfile:v1. - Retain all the default values and click Next.
The Review your choices and click Finish page appears.
- Select No, I will review the configuration later,
and then click Finish.
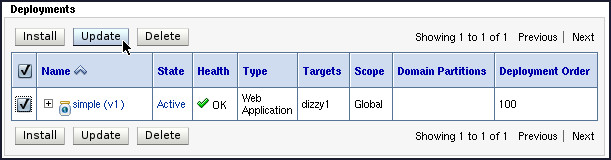
A message about the successful deployment appears. You must, however, activate and commit the pending changes. You can also see the simple (v1) application listed in the Deployments table. The "v1" in parentheses is the version name.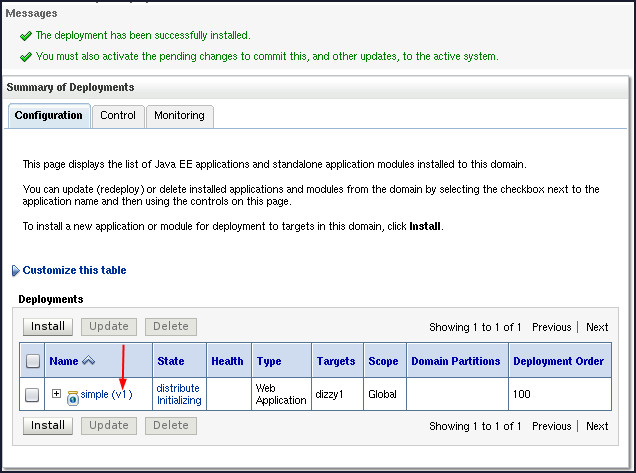
Description of the illustration t1s14.jpg - In the Change Center, click Activate Changes.
A message that the changes have been activated appears. Note that the state of the simple (v1) application listed in the Deployments table changes to Prepared state. - Under Summary of Deployments, click the Control tab.
- In the Deployments table, select the simple application.
- Click the Start drop-down list, and then select Servicing
all requests.
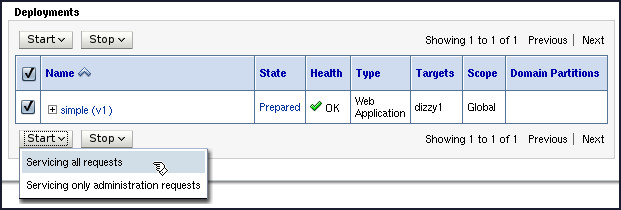
Description of the illustration t1s18.jpg - Click Yes to continue.
A message indicating that a start request have been sent appears. Momentarily you will see the State of the simple application changes to Active. This means that the application is available to those that have access to the server.
 Test
the Application
Test
the Application
- In a web browser, enter the host and port for the managed
server dizzy1, followed by /simple.
In this tutorial, the URL entered is:http://hostname:8003/simple
Enter information in the fields, and then click OK.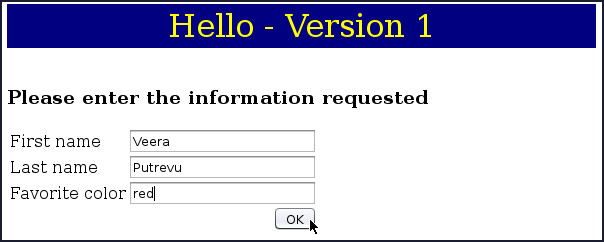
Description of the illustration t2s1.jpg - On the next screen, use the Start over link to return to the previous page.
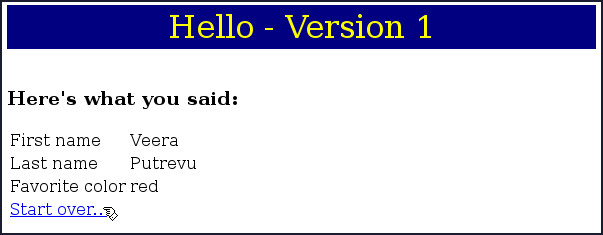
Session.
Important: Do NOT close this browser window. This will represent a client using the old version of the application.
 Update
the Application to the Second Version
Update
the Application to the Second Version
You can update first version of the deployed web application with a second version by using the WebLogic Server Administration Console.
- In the Administration Console Change Center, click Lock & Edit.
- On the Configurations tab, select the simple
application in the Deployments table, and
then click Update.
Description of the illustration t3s1.jpg - On the Update Application Assistant page, click Change Path to update the Source path.
- Find and enter the Current Location field.
Use the links to browse to the location where the zip file was extracted. Navigate to the directory deployversion2. There you will seesimple.warwith a radio button next to it. Select that radio button. By using the links and the radio button, the console fills in the Path field for you.
Alternatively, you can type in the path and file name in the Path field.
The Source path now points to thesimple.warfile found in thedeployversion2directory.
- Click Next.
The Review your choices page appears. You can now see that the Source path points to the new version. Also, notice that the Archive Version is nowv2.
- Select Allow the application to finish its current sessions and then retire, and then click Finish.
- In the Change Center, click Activate Changes.
In the Deployments table, notice that there are now two versions of the simple application. The one called simple (v1) has the state of stop Running. This means that current users will continue using it. After all users have finished using it, and their sessions have timed out, the old version will be retired. The application called simple (v2) is Active. All new users will use it.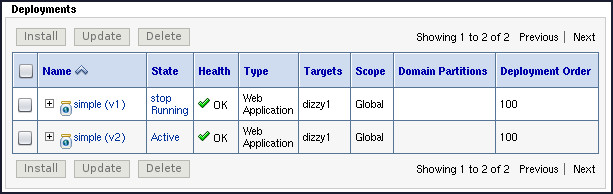
Description of the illustration t3s7.jpg
 Test
the Application Again
Test
the Application Again
After deploying the second version of the web application, verify the deployment to see if the applications are running simultaneously.
- To see whether the old version is still running for old
users, return to the web browser that was left open. Enter
information in the fields and click the OK button .
Make sure that on the second screen it still says Version
1. As long as the HTTP
Sessionis valid, the old user will continue to use Version 1.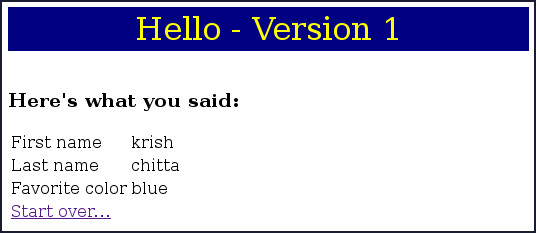
Description of the illustration t4s1.jpg - In another web browser, enter the URL for the simple web
application. In this tutorial, the URL entered is:
http://hostname:7003/simple
Note: You want this browser to use a different HTTPSessionthan the previous browser window. If you are using Firefox for the "old user" browser, you cannot also use Firefox for the "new user," because all windows (or tabs) of Firefox share one session. The best strategy is to use two different browser programs. For example, use Firefox for one browser and Chrome for the other.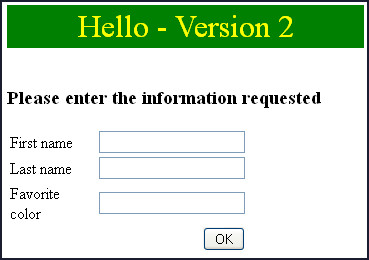
Description of the illustration t4s2.jpg
Notice that as a new user of the application, Version 2
appears in the title bar. All new users will be using Version
2.
 Next
Steps
Next
Steps
The WebLogic Server 12c collection contains a number of additional tutorials, covering a variety of topics. See the WebLogic Server 12c collection here for additional topics and content.