6 Updating the Oracle Unified Directory Software

You can update an Oracle Unified Directory directory service to the latest version without a service interruption. It also describes how to update an individual directory server instance and provides considerations for Oracle Unified Directory Services Manager on Oracle Weblogic Server.

Topics:

6.1 Important Notes Before You Begin

Read the following notes before you start upgrading Oracle Unified Directory.

6.2 Starting Points for an Oracle Unified Directory Update

Oracle supports Oracle Unified Directory 11g (11.1.2.3.0) as a starting point for updating Oracle Unified Directory.

Note:

If your existing version of Oracle Unified Directory is 11g (11.1.2.2.x or earlier), you must first upgrade to Oracle Unified Directory 11g (11.1.2.3.0) before you can upgrade to 12c (12.2.1.3.0)

6.3 Backing Up the Middleware Home

Before you start an upgrade, back up the 11g Middleware home. If any step in the upgrade process fails, restore the environment to its original state using the backup files.

Note:

Oracle recommends that you create a complete backup of your pre-upgrade environment before you begin an upgrade. Upgrades cannot be reversed. In most cases, if an error occurs, you must stop the upgrade and restore the entire environment from backup and begin the upgrade process from the beginning.
To perform a backup, complete the following steps:
  1. Shut down all processes in the Middleware home. For example, shut down the Managed Servers, the Administration Server, and Oracle Unified Directory server instances running in the Middleware home.
  2. Back up the Middleware home (MW_HOME) on all hosts. For example:

    UNIX

    tar -cf mw_home_backup_042013.tar MW_HOME/*

    Windows

    jar cf mw_home_backup_042013.jar MW_HOME\*
  3. If your Oracle Unified Directory instance (OUD_INSTANCE) reside outside the Middleware home, then you must back up the instance directory. For example:

    UNIX:

    tar -cf oud_instance_backup_06052017.tar oud_instance/*

    Windows:

    jar cMf oud_instance_backup_06052017.jar oud_instance\*

6.4 Considerations for Global Index Catalogs

If you update Oracle Unified Directory to the current release, you must then reconfigure the global index catalogs using gicadm. You cannot update 11g Release 1 (11.1.1.5) or 11g Release 2 (11.1.2.0) global index catalogs that were previously configured using the gicadm command.

See Configuring Global Index Catalogs Using gicadm in Administering Oracle Unified Directory.

6.5 Updating a Directory Service Without Service Interruption

Updating a replicated Oracle Unified Directory topology involves updating the software for each server instance individually. The strategy for maintaining service during an update depends on the specifics of your deployment, but usually, you can update an entire topology without any interruption in service.

Because a particular directory server instance must be stopped during the update process, maintaining service during an update requires alternative servers that can handle client requests while a particular server is down.

If your deployment includes one or more proxy server instances that route client requests to the back-end servers, you can safely take down one directory server at a time and update that server instance. The proxy server will reroute client requests to ensure uninterrupted service. Upgrading the proxy server instance requires more than one proxy server instance with the same configuration.

If your deployment does not include a proxy server, you must configure your client applications to send requests to an alternative server while a specific directory server instance is being updated.

The following sections outline the steps to follow for each of these topologies:

6.5.1 Upgrading a Topology That Includes a Proxy Server

Review these topics for the various topologies with the directory servers and replication servers either installed on the same host or different hosts.

Various topologies are possible as explained in the following topics:

6.5.1.1 About Topology with the Replication Servers and Directory Servers on the Same Host

In this topology, the directory servers and replication servers are installed on the same host.

If a single host contains both a replication server and a directory server, and those servers are associated with the same ORACLE_HOME directory, the servers are stopped and updated at the same time.

In the following figure, Group 1 and Group 2 refer to configured replication groups. For more information about replication groups, see About Replication Groups in Administering Oracle Unified Directory.

Figure 6-1 Replicated Topology With Proxy Servers - RS and DS on the Same Host
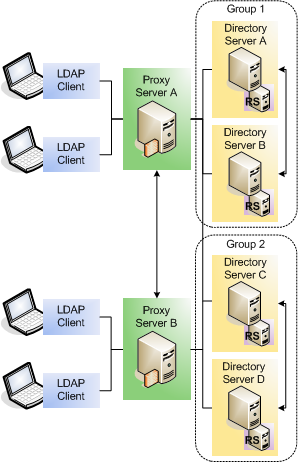
Topology with all servers installed on the same host.
6.5.1.2 Upgrading a Topology with the Replication Servers and Directory Servers on the Same Host

To update a topology with the directory servers and replication servers installed on the same host:

  1. Change the configuration of proxy server A so that client requests are not routed to directory server A.
  2. Stop directory server A. The replication server running on this host is stopped at the same time.
  3. Update directory server A, following the steps in Upgrading an Existing Oracle Unified Directory Server Instance.
  4. Restart directory server A.
  5. Test that your directory service is working properly before upgrading successive servers.
  6. Repeat steps 1-5 for each directory server in that replication group.
  7. Follow steps 1-6 for each replication group in the topology.
  8. Stop proxy server A.
  9. Update proxy server A, following the steps in Upgrading an Existing Oracle Unified Directory Server Instance.
  10. Restart proxy server A.
  11. Repeat steps 8-10 for the remaining proxy servers in the topology.
6.5.1.3 About Topology with Replication Servers and Directory Servers on Different Hosts

In this topology, the directory servers and replication servers are installed on different hosts. In the following figure, Group 1 and Group 2 refer to configured replication groups. For more information about replication groups, see About Replication Groups in Administering Oracle Unified Directory.

Figure 6-2 Replicated Topology With Proxy Servers - RS and DS on Different Hosts
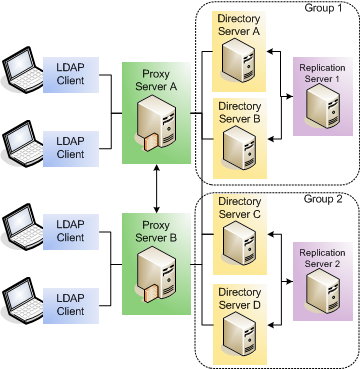
Topology with all servers installed on different hosts.
6.5.1.4 Upgrading a Topology wIth Replication Servers and Directory Servers on Different Hosts

To update a topology with the directory servers and replication servers installed on different hosts:

  1. Change the configuration of proxy server A so that requests are not routed to directory server A.
  2. Stop directory server A.
  3. Update directory server A, following the steps in Upgrading an Existing Oracle Unified Directory Server Instance.
  4. Restart directory server A.
  5. Test that your directory service is working properly before upgrading successive servers.
  6. Repeat steps 1-5 for each directory server in that replication group.
  7. Stop replication server 1.

    The replication mechanism ensures that directory servers A and B now connect to replication server 2.

  8. Update replication server 1, following the steps in Upgrading an Existing Oracle Unified Directory Server Instance.
  9. Restart replication server 1.
  10. Follow steps 1-9 for each replication group in the topology.
  11. Stop proxy server A.
  12. Update proxy server A, following the steps in Upgrading an Existing Oracle Unified Directory Server Instance.
  13. Restart proxy server A.
  14. Repeat steps 11-13 for the remaining proxy servers in the topology.

6.5.2 Upgrading a Topology That Does Not Include a Proxy Server

In a topology that does not include any proxy server instances, you must update your client applications so that they point to an alternative directory server each time you take a directory server down for an update.

The following diagram shows a replicated topology that does not include a proxy server. This topology assumes that the directory servers and replication servers are installed on the same ORACLE_HOME directory.

In this diagram, Group 1 and Group 2 refer to configured replication groups. See About Replication Groups in Administering Oracle Unified Directory.

Figure 6-3 Replicated Oracle Unified Directory Topology Without Proxy Servers
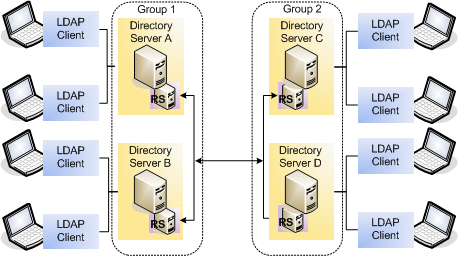
Replicated topology without a proxy server.

To update a topology that does not include a proxy server:

  1. Change your client application configuration so that applications do not access directory server A directly.
  2. Stop directory server A. The replication server on this host is stopped and updated at the same time.
  3. Update directory server A, following the steps in Upgrading an Existing Oracle Unified Directory Server Instance.
  4. Restart directory server A.
  5. Test that your directory service is working properly before upgrading successive servers.
  6. Change your client application configuration so that applications do not access directory server B directly.
  7. Stop directory server B.
  8. Update directory server B, following the steps in Upgrading an Existing Oracle Unified Directory Server Instance.
  9. Follow steps 1-8 for each replication group in the topology.

6.6 Upgrading an Existing Oracle Unified Directory Server Instance

You can upgrade all Oracle Unified Directory server instances that are associated with a specific ORACLE_HOME directory.

Note:

After upgrading to 12c, OUD instances that are created in 11g, will continue to be standalone instances and hence will not be part of the newly created 12c domain.

To upgrade an existing Oracle Unified Directory server instance:

  1. Download the latest Oracle Unified Directory version from the Oracle Software Delivery Cloud.
  2. Stop any Oracle Unified Directory server instances that are associated with the ORACLE_HOME directory that you are upgrading.

    On UNIX and Linux systems:

    $ instance-dir/OUD/bin/stop-ds
    

    On Windows systems:

    instance-dir\OUD\bat\stop-ds.bat
    

    Servers in the topology that are associated with a different ORACLE_HOME will not be updated and do not need to be stopped.

  3. Follow the steps outlined in Installing the OUD/OUDSM Software.

    The OUD base location home and Oracle home directory (ORACLE_HOME) for 12c (12.2.1.3.0) must be placed in a different path as compared to its previous release. The existing Oracle Unified Directory instances are pointing to previous OUD home path. So when OUD instances are upgraded to 12c, instances must point to the new Oracle 12c home.

    For more information about these directories, see Understanding the Oracle Unified Directory Installation Directories.

  4. Run the upgrade-oud-instance script from the Oracle 12c home.

    On UNIX and Linux systems:

    $ Oracle12cHome/oud/bin/upgrade-oud-instances --instancePath=oud-base-location/11gINSTANCE_NAME
    

    On Windows systems:

    Oracle12cHome\oud\bat\upgrade-oud-instances.bat --instancePath=oud-base-location/11gINSTANCE_NAME
    

    Note:

    • You must set the JAVA_HOME environment variable to Java 8 before executing the script.

    • The script updates the install path of each instance to point to the new Oracle 12c Home and also updates the java properties for each instance.

    • The script takes the backup of the modified files (install.path, set-java-home, java.properties) in their respective directories.

    • The list of instances that are successfully updated, are displayed in the console. However, those failed instances are available in the following logs.

      On UNIX and Linux systems:

      Main log: /tmp/preUpgradeActions-<timestamp>.log

      Instance log: instance-dir/OUD/logs/preUpgradeActions-<timestamp>.log

      On Windows systems:

      Main log: <Temp_dir>\preUpgradeActions-<timestamp>.log

      Instance log: instance-dir\OUD\logs\preUpgradeActions-<timestamp>.log

  5. On Windows systems, manually copy the start-ds.bat file (located at 12c-install-dir\bat\start-ds.bat) and replace the start-ds.bat file (located at instance-dir\OUD\bat\start-ds.bat) of the instances that must be upgraded.
  6. Upgrade any Oracle Unified Directory server instances that are associated with the ORACLE_HOME directory:

    On UNIX and Linux systems:

    $ instance-dir/OUD/bin/start-ds --upgrade
    

    On Windows systems:

    instance-dir\OUD\bat\start-ds.bat --upgrade
    

    Caution:

    If the server instance has large static groups or many total members in all static groups, updating the instance to 12c (12.2.1.3.0) can take some time. Therefore, avoid ending the update (such as using Ctrl-C to end the process) before it is finished. Ending the update early can leave the server instance in an undetermined state.

    The output of the start-ds --upgrade command is logged in the INSTANCE_PATH/logs/server.out directory.

  7. Restart the server instances that you stopped in Step 2.

    On UNIX and Linux systems:

    $ instance-dir/OUD/bin/start-ds
     

    On Windows systems:

    instance-dir\OUD\bat\start-ds.bat

    Note:

    You can only use stop-ds and start-ds commands for stopping and starting OUD servers upgraded using this method. See Stopping the Server Using stop-ds and Starting the Server Using start-ds in Administering Oracle Unified Directory.

6.6.1 Enabling Admin REST API for an Upgraded 12.2.1.3.0 OUD Instance

You can enable the Admin REST API for an upgraded 12.2.1.3.0 OUD instance to expose the REST APIs for administering OUD instance.

After you upgrade OUD from 11.1.2.3.0 to 12.2.1.3.0, you need to enable the HTTP Administration Connector port and restart the OUD instance for performing the Admin REST API operations.

Configuring HTTP Administration Connector Port for an Existing OUD Instance

Run the dsconfig command-line utility with set-administration-connector-prop subcommand to update an existing OUD instance to expose the HTTP Administration Connector to support Admin REST APIs.

dsconfig set-administration-connector-prop  \ 
--connector-name HTTP \
--set listen-port:1888 \  
--set enabled:true \           
--hostname localhost\           
--port 1444 \           
--portProtocol LDAP \           
--trustAll \           
--bindDN cn=Directory\ Manager \          
--bindPasswordFile password.file \          
--no-prompt

Note:

After enabling the HTTP Administration Connector port, you must restart the OUD instance to use the OUD Admin REST interface.

6.7 Verifying the Oracle Unified Directory Server Instance Upgrade

After completing all the upgrade steps, verify that the upgrade was successful by checking that the Oracle Unified Directory Server version has been properly updated.

To verify the version of the Oracle Unified Directory Server instance, run the start-ds command.

cd $OUD_INSTANCE_HOME/OUD/bin/start-ds -s | grep 'Oracle Unified Directory'

The following shows an example of the result after running the command:

Oracle Unified Directory 12.2.1.3.0
Build ID: 20170727163142Z
JAVA Version: 1.8.0_251
JAVA Vendor: Oracle Corporation
JVM Version: 25.251-b08
JVM Vendor: Oracle Corporation
JAVA Home: /u01/oracle/products/dir12c/jdk/jre
Class Path: /u02/private/oracle/config/instances/oud1/OUD/classes:/u01/oracle/products/dir12c/oud/winlib/classpath.jar:/u02/private/oracle/config/instances/oud1/OUD/lib/*.jar
JE Version: 7.0.7
Current Directory: /u01/app//imupg_files/oud12cPS3
Installation Directory: /u01/app/fmw/ORACLE_HOME/dir12c/oud
Instance Directory: /u01/app/fmw/ORACLE_HOME/config/instances/oud1/OUD
Operating System: Linux 2.6.39-400.306.1.el6uek.x86_64 amd64
JVM Architecture: 64-bit
System Name: ldaphost1
Available Processors: 4
Max Available Memory: 5569642496
Currently Used Memory: 5569642496
Currently Free Memory: 5518099608

Verify that the upgraded version matches the latest version number for that Oracle Unified Directory Server.

6.8 Enabling TNS Alias Support for EUS-enabled Configurations

Oracle Unified Directory 12c provides support for Transparent Network Substrate (TNS) Aliases for deployments that have Oracle Enterprise User Security (EUS) configured.

When you upgrade OUD instances (directory server or proxy with EUS integration) from 11g to 12c, then you have the option to enable the TNS Aliasing capability. You must manually run the dsconfig command to set up the TNS Aliasing feature by adding the eus-alias-resolution workflow element into the global cn=OracleContext and also the cn=OracleContext,<EUS Realm> workflow chains.

In OUD 11g, the EusContext workflow has the following chain in its configuration:

NG: Network-Group
	WF: cn=oraclecontextworkflow1,<Realm>
		WFE: cn=eus-context-we1,cn=Workflow elements,cn=config (EusContext)
			WFE: cn=oraclecontext1,cn=Workflow elements,cn=config (DBLocalBackend)

While the global OracleContext workflow has the following chain in its configuration:

NG: Network-Group
  WF: cn=OracleContext,cn=Workflows,cn=config (cn=OracleContext,dc=example,dc=com)
    WFE: cn=OIDCompatibility,cn=Workflow elements,cn=config (DBLocalBackend)

After performing an upgrade, you must add the workflow element of type eus-alias-resolution into the preceding chains.

Note:

  • Use OUDSM and list-backends to find the correct names of your workflow and workflow elements to be used in the configuration.

  • Workflow and workflow element names are different for OUD as a Directory server and for OUD as a Directory Proxy Server.

To add the eus-alias-resolution workflow element into the chain using dsconfig command:

  1. Create the eus-alias-resolution workflow element and point to the existing local back end OracleContext1.
    ./dsconfig create-workflow-element \
      --element-name EusAliasResolution0 \
      --type eus-alias-resolution \
      --set enabled:true \
      --set next-workflow-element:OracleContext1 \
      --hostName localhost \
      --port 1445 \
      --bindDN "cn=directory manager" \
      --bindPasswordFile /oracle/kit/.pw \
      --trustAll \
      --noprompt 
    
  2. Point the EusContext workflow element to the eus-alias-resolution workflow element.
    ./dsconfig set-workflow-element-prop \
      --element-name eus-context-we1 \
      --set next-workflow-element:EusAliasResolution0 \
      --hostName localhost \
      --port 1445 \
      --bindDN "cn=directory manager" \
      --bindPasswordFile /oracle/kit/.pw \
      --trustAll \
      -n
    
  3. Test by creating an alias alias1 for an existing registered database db1.
    ./ldapmodify -h localhost -p 1390 -D "cn=Directory Manager" -j /oracle/kit/.pw
    
    dn: cn=alias1,cn=OracleContext,dc=example,dc=com 
    changetype: add
    objectClass: alias
    objectClass: top
    objectClass: orclNetServiceAlias
    aliasedObjectName: cn=db1,cn=OracleContext,dc=example,dc=com
    
  4. Test the TNS Alias resolution:
    $ tnsping db1 
    $ tnsping alias1 
  5. If you want to place the TNS aliases in cn=OracleContext workflow, then you must add the eus-alias-resolution workflow element to that chain as well.
    dsconfig create-workflow-element \
    --element-name EusAliasResolution1 \
    --type eus-alias-resolution \
    --set enabled:true \
    --set next-workflow-element:OIDCompatibility\
    --hostName localhost \
    --port 1445 \
    --bindDN "cn=directory manager" \
    --bindPasswordFile /oracle/kit/.pw \
    --trustAll \
    --noprompt
    
    dsconfig set-workflow-prop \
    --workflow-name OracleContext\
    --set next-workflow-element:EusAliasResolution1 \
    --hostName localhost \
    --port 1445 \
    --bindDN "cn=directory manager" \
    --bindPasswordFile /oracle/kit/.pw \
    --trustAll \
    -n

6.9 Upgrading Oracle Unified Directory Services Manager

Consider these topics if you run Oracle Unified Directory Services Manager on Oracle WebLogic Server to manage Oracle Unified Directory.

Note:

If your Instance Home or Domain Home contains both OUD and OUDSM, you must review both Upgrading an Existing Oracle Unified Directory Server Instance and Upgrading Oracle Unified Directory Services Manager.

6.9.1 OUDSM Version Requirements

The version of Oracle Unified Directory Services Manager (OUDSM) described in this guide is 12c (12.2.1.3.0). When you update the Oracle Unified Directory software to 12c (12.2.1.3.0), OUDSM is also updated to this same release.

Note:

OUDSM update to OUDSM 12c (12.2.1.3.0) is supported from Oracle Unified Directory 11g (11.1.2.2.0) and 11g (11.1.2.3.0).

Several requirements for using OUDSM with Oracle Unified Directory include:

  • You can use OUDSM 12c (12.2.1.3.0) to manage only Oracle Unified Directory 12c (12.2.1.3.0).

  • You cannot use OUDSM 12c (12.2.1.3.0) to manage previous versions of Oracle Unified Directory, Oracle Internet Directory, or Oracle Virtual Directory. Similarly, you cannot use versions of OUDSM shipped with Oracle Internet Directory or Oracle Virtual Directory to manage any versions of Oracle Unified Directory.

Note:

After you update Oracle Unified Directory, you might encounter problems on Oracle WebLogic Server when you try to access the updated version of OUDSM. This problem usually occurs if you used your browser to access an earlier version of OUDSM. During an update operation, the OUDSM URL can change.

Therefore, to access the updated version of OUDSM, first clear your browser's cache and cookies.

6.9.1.1 Updating Multiple Instances of OUDSM

If you have multiple instances of OUDSM in your replication topology, consider the following requirements:

  • If you update one OUDSM instance to 12c (12.2.1.3.0), you must update all OUDSM and replicated instances.

  • If you update OUDSM to 12c (12.2.1.3.0), Oracle Unified Directory must be the same version. An updated OUDSM version is not supported with earlier versions of Oracle Unified Directory.

6.9.2 Upgrading OUDSM from 11g to 12c

Oracle Unified Directory Services Manager stores only the directory instance connection details and administrator configurations. The 12c (12.2.1.3.0) upgrade using the Fusion Middleware Reconfiguration Wizard does not support migration of Oracle Platform Security Services (OPSS) to a file-based store. You will not be able to migrate those stored OUDSM configurations from 11g OUDSM domain instance to 12c. You will have to manually add or copy those configurations in the newly created 12c OUDSM domain instances.

Note:

If you are upgrading OUDSM from 11g to 12c, you must copy the stored configurations from 11g OUDSM domain instance and add them in 12c OUDSM domain instance. This is the Oracle preferred approach to upgrade OUDSM from 11g to 12c.

To upgrade OUDSM:

  1. Install the collocated 12c (12.2.1.3.0) Oracle Unified Directory before upgrading your existing Oracle Unified Directory Services Manager 11g (11.1.2.2.0 or 11.1.2.3.0).
  2. Backup your existing environment.
  3. Create a new domain in 12c using the WebLogic Scripting Tool.
  4. Copy the connection details and administrator configurations files from 11g domain (if any) to the newly created domain in 12c.
    cp -r $11gDOMAIN_HOME/config/fmwconfig/odsm $12cDOMAIN_HOME/config/fmwconfig/

6.9.3 Upgrading OUDSM from 11g to 12c Using the Reconfiguration Wizard

You can upgrade Oracle Unified Directory Services Manager from 11g to 12c using the Fusion Middleware Reconfiguration wizard. The valid starting points for this upgrade are 11g (11.1.2.2.0) and 11g (11.1.2.3.0).

Note:

The installation and configuration of a certified database is a prerequisite if you are upgrading using the reconfiguration wizard.

To upgrade OUDSM:

  1. Install the collocated 12c (12.2.1.3.0) Oracle Unified Directory before upgrading your existing Oracle Unified Directory Services Manager 11g (11.1.2.2.0 or 11.1.2.3.0)
  2. Create the required schemas before upgrade.

    If you are upgrading from Oracle Unified Directory Services Manager 11g, you must create the required 12c schemas before you begin the upgrade. The schema required for Oracle Unified Directory is Oracle Platform Security Services (OPSS). Selecting the Oracle Platform Security Services schema will automatically select the dependent schemas.

    See Creating Database Schemas for the Infrastructure Domain Using the Repository Creation Utility.

  3. Create a backup of the domain directory:
    1. Shutdown the Administration Server for the ODSM 11g Domain:
      To stop the Administration Server, use the stopWebLogic script:
      • (UNIX) EXISTING_DOMAIN_HOME/bin/stopWebLogic.sh
      • (Windows) EXISTING_DOMAIN_HOME\bin\stopWebLogic.cmd
      When prompted, enter your user name, password, and the URL of the Administration Server.
    2. Copy the source domain to a separate location to preserve the contents.

      (Windows) copy C:\domains\myoudsmdomain to C:\domains\myoudsmdomain_backup

      (UNIX) cp -rf myoudsmdomain /domains/myoudsmdomain_backup

    3. Verify that the backed up versions of the domain are complete.
    If domain reconfiguration fails for any reason, you must copy all files and directories from the backup directory into the original domain directory to ensure that the domain is returned entirely to its original state before reconfiguration.
  4. Run the Reconfiguration Wizard by entering the following command:

    On UNIX and Linux systems:

    $ Oracle12cHome/oracle_common/common/bin/reconfig.sh
    

    On Windows systems:

    Oracle12cHome\oracle_common\common\bin\reconfig.cmd
  5. Use the Select Domain screen to specify the location of the domain you want to upgrade or click Browse to navigate and select the domain directory. Click Next.
  6. The Reconfiguration Setup Progress screen shows the progress of the setup process. When complete, click Next.

    During this process:

    • The reconfiguration templates for your installed products, including Fusion Middleware products, are automatically applied. This updates various domain configuration files such as config.xml, config-groups.xml, and security.xml (among others).

    • Schemas, scripts, and other such files that support your Fusion Middleware products are updated.

    • The domain upgrade is validated.

  7. On the Reconfig Summary screen, review the detailed information of the various reconfigured templates. Click Next.
  8. On the Domain Mode and JDK screen, select the JDK to use in the domain or click Browse to navigate to the JDK you want to use. Click Next.

    Note:

    You cannot change the Domain Mode at this stage.

  9. On the Database Configuration Type screen, select RCU Data to connect to the Server Table (_STB) schema.

    Enter the database connection details using the RCU service table (_STB) schema credentials and click Get RCU Configuration.

    The Reconfiguration Wizard uses this connection to automatically configure the data sources required for components in your domain.

    Note:

    For new datasources where the schema was created for 12c by the RCU, the default connection data will be retrieved from the _STB schema. If no connection data for a given schema is found in the _STB schema, then the default connection data is used.

    If the check is successful, click Next. If the check fails, reenter the connection details correctly and try again.

  10. On the JDBC Component Schema screen, verify that the DBMS/Service and the Host name is correct for each component schema and click Next.
  11. On the JDBC Component Schema Test screen, select all the component schemas and click Test Selected Connections to test the connection for each schema. The result of the test is indicated in the Status column.

    When the check is complete, click Next.

  12. The Node Manager screen is only displayed if the domain you are reconfiguring is currently using a per host Node Manager.

    On the Node Manager screen, select the Node Manager configuration to use for the reconfigured domain. The resulting configuration depends on the combination of options you select for Node Manager Type and Node Manager Configuration.

    Table 6-1 Field Descriptions for Node Manager Screen

    Option Description

    Per Domain Default Location

    If you select this option, the Node Manager home is redefined to DOMAIN_NAME/nodemanager and you cannot edit the Node Manager home.

    Per Domain Custom Location

    Select this option if you want the per domain Node Manager configuration files to be created in a specific location for this domain. Specify the directory in the Node Manager Home field, or click Browse to use the navigation tree to select the location. The specified directory must be empty. The nodemanager.properties and nodemanager.domains files are created in this directory.

    Node Manager Home

    If you selected the Per Domain Custom Location option, click Browse to navigate to the directory location that you want to use to store the per domain Node Manager configuration.

    Manual Node Manager Setup

    If you select this option, creation of the Node Manager configuration for the domain is skipped (all remaining fields cannot be modified), and to use Node Manager in the domain, you must manually configure Node Manager as described in Completing the Node Manager Configuration. The reconfigured domain will still use a per host Node Manager configuration.

    You should also select this option if your existing domain is not configured to use Node Manager and you do not want to use Node Manager in the reconfigured domain.

    For more information about Node Manager configuration, see Administering Node Manager for Oracle WebLogic Server.

    Node Manager Configuration

    Select one of the following two options. These fields are not available if you selected Manual Node Manager Setup.

    Create New Configuration

    A per domain Node Manager configuration will be automatically created for the reconfigured domain using default settings in nodemanager.properties. If necessary, you can modify nodemanager.properties after the domain has been successfully reconfigured.

    Migrate Existing Configuration

    The existing per host Node Manager configuration will be migrated to a per domain configuration for the reconfigured domain. This does not include environment-specific settings for ListenAddress, ListenPort, StartScriptName, JavaHome, and LogFile.

    Node Manager Home

    If you selected the Migrate Existing Configuration option, enter or browse to the Node Manager home directory that you want to migrate to the reconfigured domain.

    Apply Oracle Recommended Defaults

    If you selected the Migrate Existing Configuration option, select this check box to use Oracle-recommended defaults in the nodemanager.properties file. Deselect this check box to continue using the settings in the nodemanager.properties file being migrated.

    Oracle-recommended properties with default values are as follows:

    LogLimit=0
    AuthenticationEnabled=true
    LogLevel=INFO
    DomainsFileEnabled=true
    NativeVersionEnabled=true
    LogToStderr=true
    SecureListener=true
    LogCount=1
    StopScriptEnabled=false
    QuitEnabled=false
    LogAppend=true
    StateCheckInterval=500
    CrashRecoveryEnabled=false
    StartScriptEnabled=true
    LogFormatter=weblogic.nodemanager.server.LogFormatter
    ListenBacklog=50

    Node Manager Credentials: Username, Password

    Specify the username and password that you want to use to start Node Manager in the reconfigured domain.

  13. On the Advanced Configuration screen, you can select all categories for which you want to perform advanced configuration. For each category you select, the appropriate configuration screen is displayed to allow you to perform advanced configuration.

    Note:

    The categories that are listed on the Advanced Configuration screen depend on the resources defined in the templates you selected for the domain.

    For this upgrade, select none of the options and click Next.

  14. On the Configuration Summary screen, review the detailed configuration settings of the domain before continuing.

    You can limit the items that are displayed in the right-most panel by selecting a filter option from the View drop-down list.

    To change the configuration, click Back to return to the appropriate screen. To reconfigure the domain, click Reconfig.

    Note:

    The location of the domain does not change when you reconfigure it.

  15. The Reconfiguration Progress screen displays the progress of the reconfiguration process.

    During this process:

    • Domain information is extracted, saved, and updated.

    • Schemas, scripts, and other such files that support your Fusion Middleware products are updated.

    When the progress bar shows 100%, click Next.

  16. The End of Configuration screen indicates whether the reconfiguration process completed successfully or failed. It also displays the location of the domain that was reconfigured and the Administration Server URL (including the listen port). If the reconfiguration is successful, it displays Oracle WebLogic Server Reconfiguration Succeeded.

    If the reconfiguration process did not complete successfully, an error message is displayed indicates the reason. Take appropriate action to resolve the issue. If you cannot resolve the issue, contact My Oracle Support.

    Note the Domain Location and the Admin Server URL for further operations.

6.9.4 Verifying the OUDSM Upgrade

You can verify the ODSM upgrade by accessing the OUDSM interface and checking the version number.

To verify that the ODSM upgrade was successful, perform the following steps:

  1. Open a browser, and access OUDSM using the following URL format:

    http://host:port/oudsm

    where host is the name of the managed server on which OUDSM is running and port is the Managed Server port number of the Administration Server. The default admin port is 7001.

  2. When the login page appears, navigate to the bottom right pane and click About.

    The About Oracle Unified Directory Services Manager page is displayed.

  3. Verify that the version number of the upgraded OUDSM version matches the latest version number.

6.9.5 Considerations for Upgrading Oracle WebLogic Server

Oracle Unified Directory Services Manager 12c (12.2.1.3.0) is compatible with Oracle WebLogic Server 12c (12.2.1.3.0).

To upgrade Oracle WebLogic Server from an earlier version such as 11g, see Introduction in Upgrading Oracle WebLogic Server.

6.9.6 Considerations for Upgrading Oracle Application Development Framework

Oracle Unified Directory Services Manager 12c (12.2.1.3.0) is compatible with Oracle Application Development Framework 12c (12.2.1.3.0).

To upgrade Oracle ADF from version 11g, see Using Your 11g Application Deployments in Oracle Fusion Middleware 12c in Upgrading to the Oracle Fusion Middleware Infrastructure.

6.10 What to Do If the Upgrade Process Fails

If any step in the upgrade process fails, then terminate the upgrade process and restore the environment to its original state using the backup files you created in Backing Up the Middleware Home.