Integrate Oracle Access Management with Oracle Advanced Authentication
Introduction
This tutorial shows you how to integrate Oracle Access Management (OAM) with Oracle Advanced Authentication (OAA) so users accessing a protected application can login to OAM with Single-Sign On (SSO) and be then challenged with a second factor for multi-factor authentication.
It will also show you how to configure user migration. User migration is a process where a user logs into OAM and that user is automatically migrated to OAA with factors registered based on LDAP attributes defined. The factors registered for each user are based on the LDAP attributes defined in the OAA Authentication Plugin. If a user has any of those LDAP atributes set in OAM’s Default User Identity Store, then those factors are automatically registered for the user in OAA. For the purposes of this tutorial the LDAP attributes mail, mobile, and description are used to set the Email, SMS, and Oracle Mobile Authenticator (OMA) Time-based One Time Passcode (TOTP) factors respectively for a user.
Only Email, SMS, and OMA TOTP factors are supported for user migration.
Note: Administrators should be aware of the following:
- The instructions in this tutorial are for releases installed prior to the December 24 OAA release.
- If you have installed December 24 or later, then the configuration is performed for you by the installer. All sections in this tutorial can be ignored until up until Update the WebGate To Use the OAA MFA Scheme for the Protected Application.
Objective
In this tutorial you will perform the following tasks:
- Register OAA as a TAP Partner in OAM
- Configure the OAM Agent in OAA
- Install and configure the OAA Plugin and Modules in OAM
- Update the omatotpsecretkey Property in OAA
- Test the OAM and OAA integration is successful
Oracle Access Management Prerequisites
Before following this tutorial you must have:
- A running Oracle Access Management 12c (12.2.1.4) installation. The installation must have sample users in the Default User Identity Store used by OAM.
- An installation of Oracle HTTP Server and Oracle WebGate
- An application protected by the WebGate
For the purposes of demonstration, this tutorial builds on the environment created in the tutorial series Getting Started with Oracle Access Management 12c. In this environment Oracle Access Management uses Oracle Unified Directory (OUD) as its Default User Identity Store. An application called mybank is deployed to WebLogic Server and protected via an Oracle WebGate. Any references in this tutorial to OAM hostnames, URL’s, PATH’s, and users are based on the ones used in the Getting Started with Oracle Access Management 12c tutorials.
If you are using the above tutorials for your OAM environment, you will need download the sample oaausers.ldif. This file contains users and groups required prior to installing OAA. Edit the oaausers.ldif and update the mail, mobile, description, and <password> fields for each user with valid values. This is so you can test that when a user (e.g: testuser) logs into OAM, the user will be migrated to OAA with their factors set to SMS, Email, and OMA TOTP. Run ldapmodify -f oaausers.ldif against the OUD to load the users and groups.
Note: The description field value must be exactly 16 characters long, in BASE32 format, and in lowercase. For example if you want your key to be M5XR7XZH26KEA2FZ, then the description field must be m5xr7xzh26kea2fz. In OMA and other authenticator applications you would enter M5XR7XZH26KEA2FZ.
Oracle Advanced Authentication Prerequisites
Before following this tutorial you must have:
- A running Oracle Advanced Authentication (OAA) instance. For instructions on how to install OAA, see Administering Oracle Advanced Authentication and Oracle Adaptive Risk Management.
- The OAA instance has been installed and configured to use OAUTH against the same OAM install listed above. You must know the value for the
oauth.applicationidpassed in theinstallOAA.propertiesfile during the OAA installation. - The OAA is configured for use with a messaging provider to allow authentication via SMS and/or EMAIL. See Configuring Oracle UMS Server for Email and SMS and Customizing E-Mail and SMS Messaging Provider.
- The OAA Administration Console URL and Administrator credentials. For example
https://oaa.example.com/oaa-admin, andoaaadmin/<password>. - The Self-Service Portal (SPUI) URL, for example
http://oaa.example.com/oaa/rui. - An Authenticator application is installed on your mobile device. You can download the Mobile Authenticator of your choice for Android, iOS, and Microsoft, from the Google Play Store, Apple App Store, and Microsoft store respectively. You must add an account to the Authenticator application using the key value set in the
descriptionLDAP attribute for that user. They key value must be entered in uppercase. For exampleM5XR7XZH26KEA2FZ.
Register OAA as a TAP Partner in OAM
In this section you register OAA as a Trusted Authentication Protocol (TAP) Partner in OAM.
Objectives
To register OAA as a TAP Partner in OAM.
Register the TAP Partner in OAM
-
On the OAM server, launch a terminal window as
oracleand enter the following command:cd /u01/app/oracle/product/middleware/oracle_common/common/bin ./wlst.shThe output will look similar to the following:
Initializing WebLogic Scripting Tool (WLST) ... Welcome to WebLogic Server Administration Scripting Shell Type help() for help on available commands wls:/offline> -
Connect to the OAM Administration Server as follows:
wls:/offline> connect ('weblogic','<password>')The output will look similar to the following:
Successfully connected to Admin Server "AdminServer" that belongs to domain "oam_domain". Warning: An insecure protocol was used to connect to the server. To ensure on-the-wire security, the SSL port or Admin port should be used instead. wls:/oam_domain/serverConfig/> -
Run the following command to regsiter the OAA TAP partner:
wls:/oam_domain/serverConfig/> registerThirdPartyTAPPartner(partnerName = "<partner_name>", keystoreLocation= "<path_to_keystore>", password="<keystore_password>", tapTokenVersion="v2.0", tapScheme="TAPScheme", tapRedirectUrl="<URL>")where :
<partner_name>is the name you want to give for the partner application.<path_to_keystore>is the location and filename of the keystore to generate.<keystore_password>is the password for the keystore generated.tapRedirectUrlis the HTTP or HTTPS URL that you access OAM with at the front end. For example, if you access OAM via https://oam.example.com, then settapRedirectUrlto any URL that is reachable under https://oam.example.com. Note: The URL must be one that returns a 200 OK response when accessed.
For example:
registerThirdPartyTAPPartner(partnerName = "OAM-MFAPartner", keystoreLocation= "/tmp/OAMOAAKeyStore.jks", password="********", tapTokenVersion="v2.0", tapScheme="TAPScheme", tapRedirectUrl="https://oam.example.com/oam/pages/login.jsp")The output will look similar to the following:
Registration Successful
wls:/oam_domain/serverConfig/>
In the example above a keystore
/tmp/OAMOAAKeyStore.jkswill be generated. This key and password will be used later when registering the OAM as an agent in OAA. -
Run the following command to exit wlst:
wls:/oam_domain/serverConfig/> exit()
Exiting WebLogic Scripting Tool.
Configure the OAM Agent in OAA
In this section you configure an agent for OAM in the OAM Administration Console.
Objectives
To configure an agent for OAM in OAA.
Configure the OAM Agent in OAA
-
Login to the OAA Administration console with you administrator credentials.g:
https://oaa.example.com/oaa-admin -
Under Quick Actions select Create OAM Integration Agent.
-
In Create Integration Agent, Details tab, enter the following:
- Name:
<partner_name>where the value is the same as the TAP Partner Name registered earlier e.g:OAM-MFAPartner - Description:
OAM TAP Partner for OAA - Integration Agent Type:
Oracle Access Management - Client ID: Click
Re-Generate - Client Secret: Click
Re-Generate - Private Key File: Either drag and drop the key file created when registering the TAP Partner e.g
/tmp/OAMOAAKeyStore.jks, or click + to select it from the file system - Private key Password:
<password>The password entered for the keystore when registering the TAP Partner
For example:
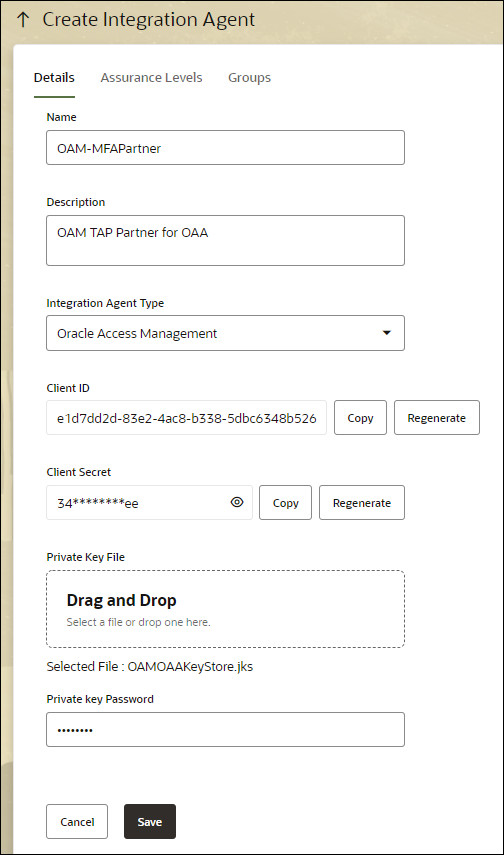
- Name:
-
Copy the Client ID e.g
e1d7dd2d-83e2-4ac8-b338-5dbc6348b526and Client Secret e.g34e360cf-3ccc-4dcd-911e-0b00e367dcee9to a safe place as these are required later when configuring OAM. -
Click Save
-
In the Integration Agents screen click the agent just created e.g: OAM-MFAPartner
-
In Assurance Levels click Create.
-
In Create Assurance Level enter the following and click Create:
- Name:
OAM-MFA-Level - Description:
OAM-MFA-Level for OAM Integration
For example:
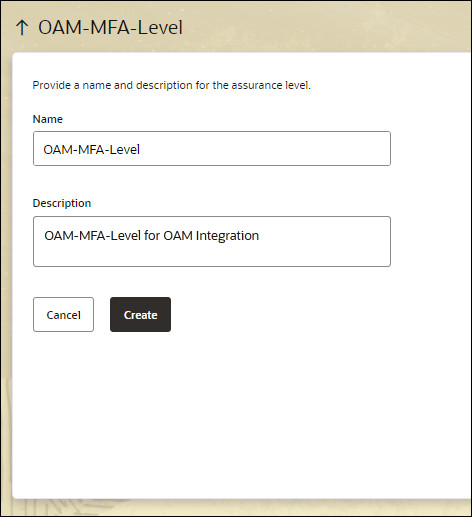
Note: The value entered for Name will be used later in the OAM OAA Plugin configuration for the
ASSURANCE_LEVEL. - Name:
-
In the Assurance Levels tab click OAM-MFA-Level
-
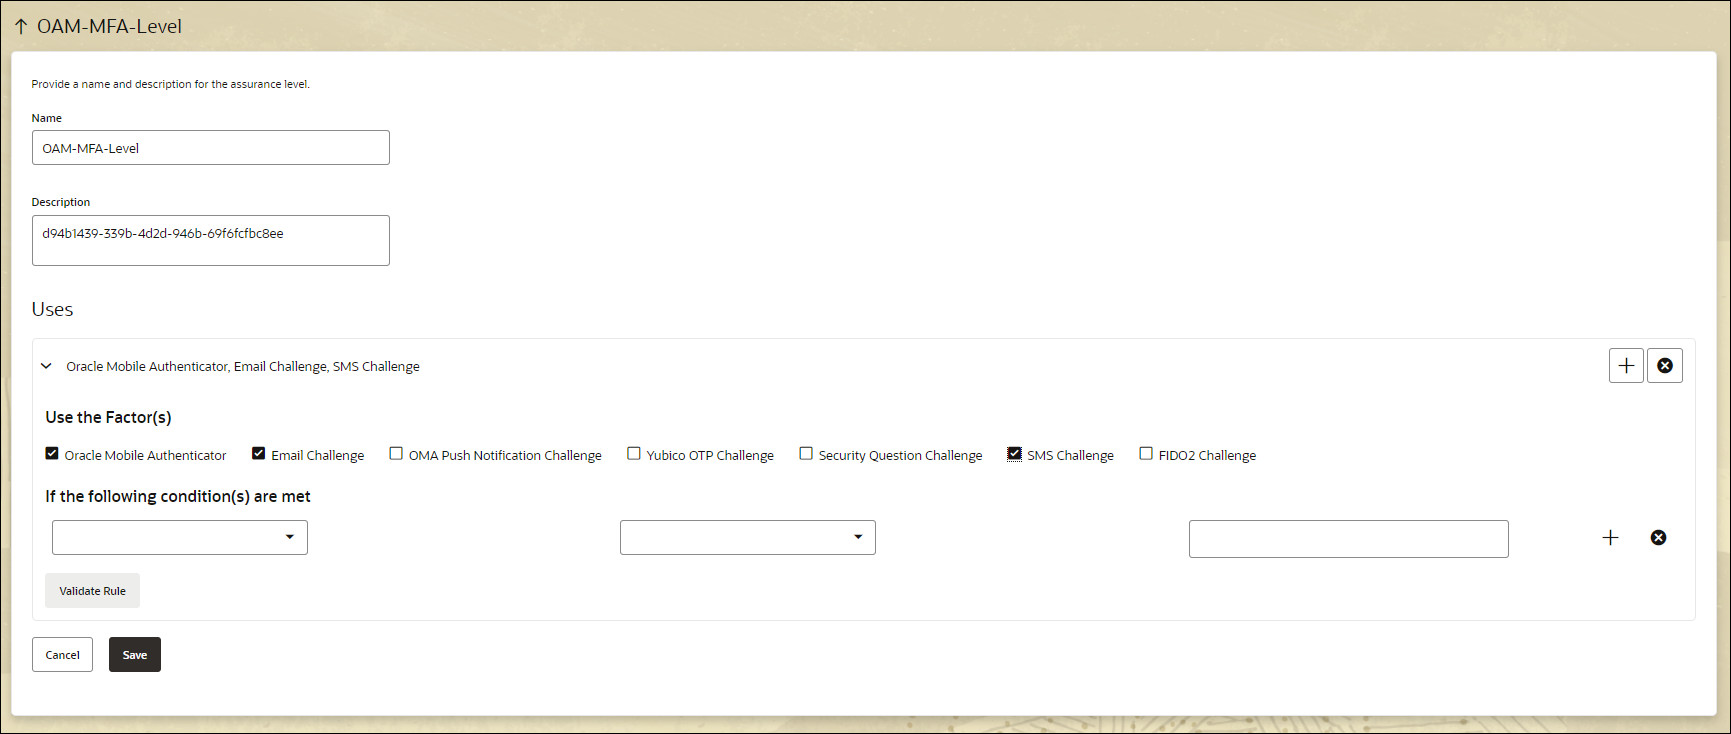
Under Uses select the Factors for to assign to the Assurance Level, for example: Oracle Mobile Authenticator, Email Challenge and SMS Challenge and click Save.
For example:
Install and Configure the OAA Plugin in OAM
In this section you configure the OAA Plugin in OAM.
Objectives
To configure the OAA Plugin in OAM and to create an associated authentication module to enable integration with OAA for second factor authentication.
Install the OAA Plugin for OAM
Note: If using OAM with April 22 Bundle patch (12.2.1.4.220404) or later, you can skip this section and move to Create an Authentication Module for OAA as the plugin is included in OAM by default.
-
On the OAA environment where the
oaamgmtpod is running, copy the OAA PluginOAAAuthnPlugin.jarfrom the pod/u01/oracle/libsdirectory to a directory on the host machine (e.g/scratch/OAA):$ kubectl cp <namespace>/<oaamgmt_pod>:/u01/oracle/libs/OAAAuthnPlugin.jar /scratch/OAA/OAAAuthnPlugin.jarFor example:
$ kubectl cp oaans/oaamgmt-oaa-mgmt-5c68dc9c57-t2h6w:/u01/oracle/libs/OAAAuthnPlugin.jar /scratch/OAA/OAAAuthnPlugin.jar -
Launch a browser and access the OAM Administration console:
http://oam.example.com:7001/oamconsole. Login asweblogic/<password>. -
Copy the
OAAAuthnPlugin.jarover to the machine where the browser is running. -
Navigate to Application Security -> Plug-ins -> Authentication Plug-ins.
-
In the Plug-ins tab select Import Plug-In.
-
In the Import Plug-in window select Choose File to select the Plug-In File (*.jar). Select the location of the
OAAAuthnPlugin.jarand click Import. -
On the same page navigate to the Search field and enter
OAAAuthnPlugin. Highlight the plugin and select Distribute Selected. -
Once the Activation Status of the plugin says Distributed select Activate Selected. The Activation Status should change to Activated.
For example:

-
Close the Plugins-tab.
Create an Authentication Module for OAA
-
In the OAM console navigate to Application Security -> Plug-ins -> Authentication Modules.
-
In the Authentication Modules tab click Create Authentication Module then Create Custom Authentication Module.
-
In the Authentication Module -> General tab enter the following:
- Name:
OAA-MFA-Auth-Module - Description:
OAA MFA Authentication Module
- Name:
-
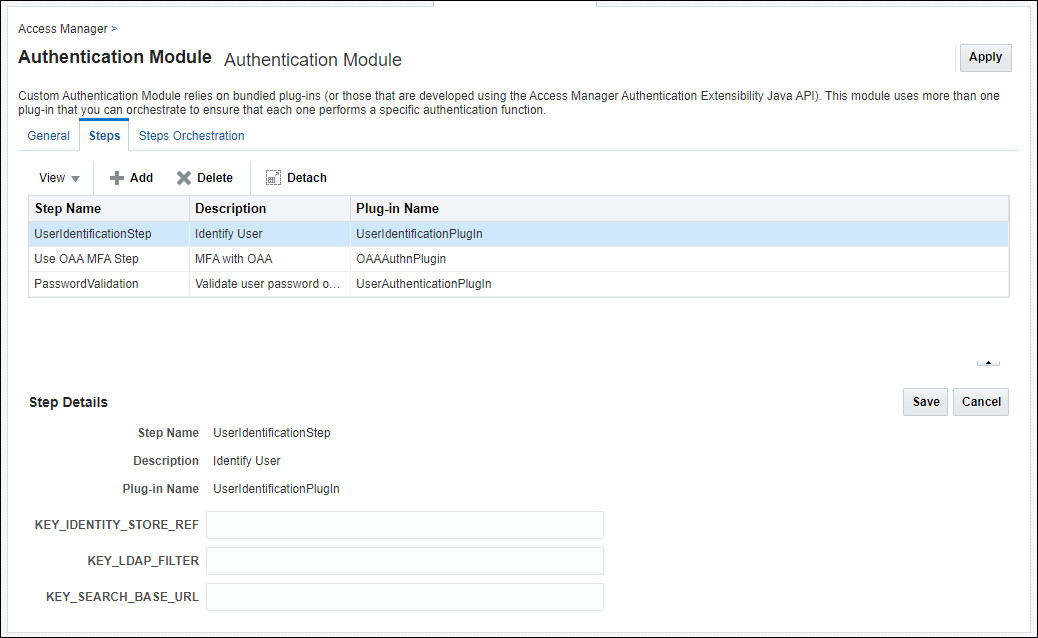
Click the Steps link and in the Steps tab click Add.
-
In the Add new step window enter the following and click OK:
- Step Name:
UserIdentificationStep - Description:
Identify User - Plug-in Name:
UserIdentificationPlugIn
- Step Name:
-
Click Add again, enter the following and click OK:
- Step Name:
User OAA MFA Step - Description:
MFA with OAA - Plug-in Name:
OAAAuthnPlugin
- Step Name:
-
Click Add again, enter the following and click OK:
- Step Name:
PasswordValidation - Description:
Validate user password on OAM - Plug-in Name:
UserAuthenticationPlugin
The module should currently look as follows:
- Step Name:
-
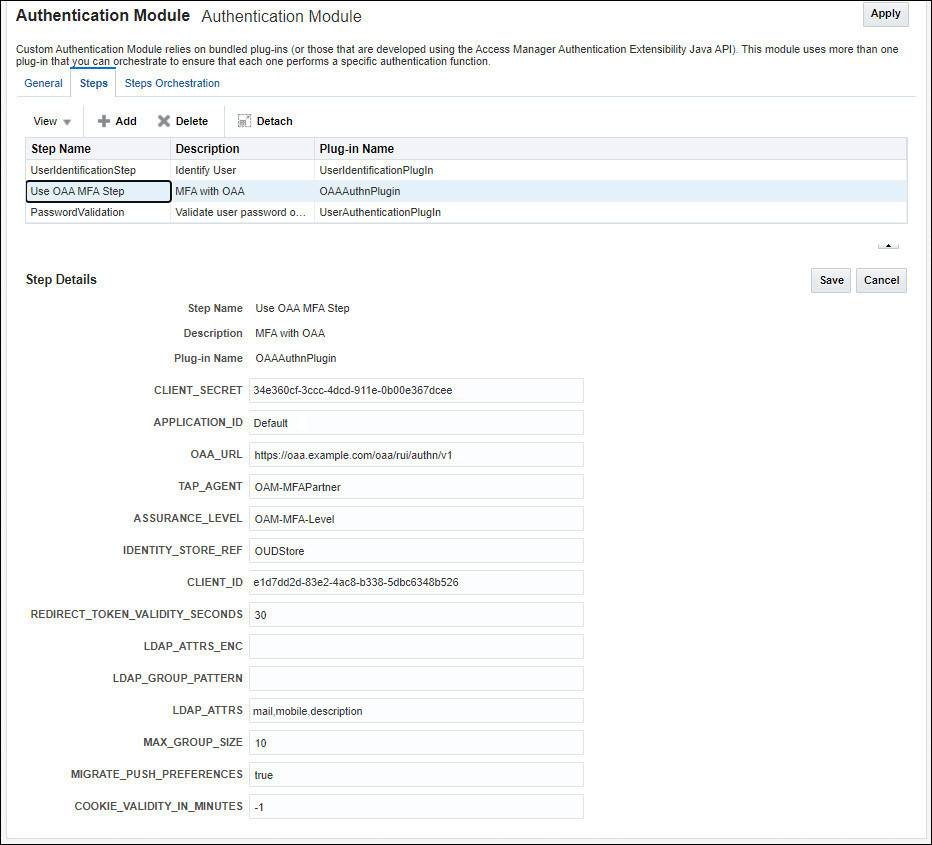
Click
User OAA MFA Stepand populate the following fields:- OAA_URL:
<SPUI_URL/authn/v1>for examplehttps://oaa.example.com/oaa/rui/authn/v1 - TAP_AGENT:
<partner_name>. This value should be the name given when registering the TAP Partner with OAM e.gOAM-MFAPartner - APPLICATION_ID :
<app_id>. This is the name of the OAA group to associate with OAM users that are migrated to OAA e.gDefault. This value should match theoauth.applicationidused when installing OAA otherwise end users will not be able to access the User Preferences UI. - IDENTITY_STORE_REF:
<default_user_identity_store>. This should be set to the value of Default Store set in the OAM console -> Configuration -> User Identity Stores. For exampleOUDStore - ASSURANCE_LEVEL:
<assurance_level>. This value should be set to the Assurance Level created in OAA earlier e.gOAM-MFA-Level - CLIENT_ID:
<client_id>. This is the value of the client ID copied when creating the agent earlier e.g:e1d7dd2d-83e2-4ac8-b338-5dbc6348b526 - CLIENT_SECRET:
<client_secret>. This is the value of the client ID copied when creating the agent earlier e.g:34e360cf-3ccc-4dcd-911e-0b00e367dcee - LDAP_ATTRS:
mail,mobile,description. These are the LDAP attributes set for email address, mobile number, and the OMA TOTP key for users in the LDAP server. This allows that user data to be migrated to OAA. Note: LDAP_ATTRS must be specified in lowercase. This is true even if the LDAP attribute is stored in LDAP as camelCase.
For example:
- OAA_URL:
-
Click Save.
-
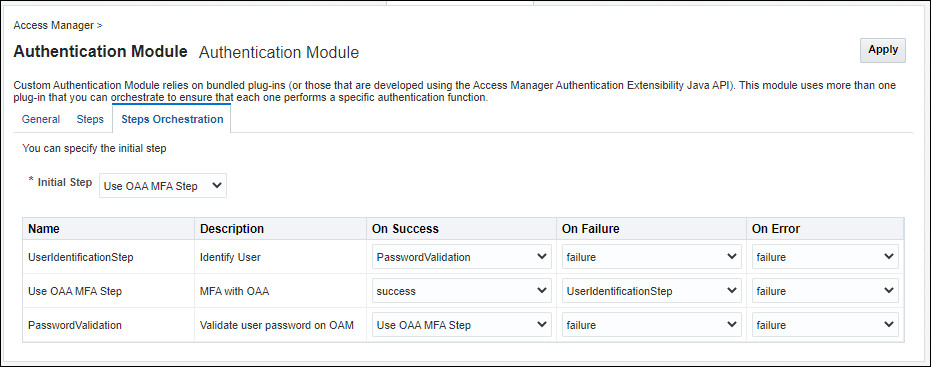
Click Steps Orchestration and from the Initial Step drop down list select User OAA MFA Step.
-
In the table select the values as follows:
Name Description On Success On Failure On Error UserIdentificationStep Identify User Password Validation failure failure Use OAA MFA Step MFA with OAA success UserIdentificationStep failure PasswordValidation Validate user password on OAM Use OAA MFA Step failure failure For example:
-
Click Apply.
Create an OAA Authentication Scheme
-
In Application Security Launchpad -> Access Manager, click on Authentication Schemes.
-
On the Authentication Schemes tab select Create Authentication Scheme
-
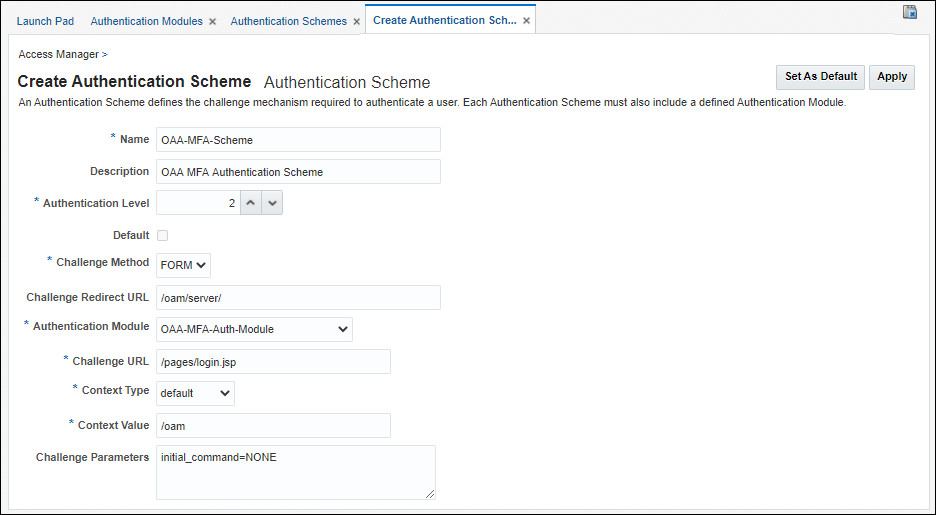
In the “Create Authentication Scheme” tab enter:
- Name:
<scheme_name>e.gOAA-MFA-Scheme - Description:
OAA MFA Authentication Scheme - Authentication Level:
2 - Challenge Method:
Form - Challenge Redirect URL:
/oam/server/ - Authentication Module:
OAA-MFA-Auth-Module - Challenge URL:
/pages/login.jsp - Context Type:
Default - Context Value:
/oam - Challenge Parameters:
initial_command=NONE. This parameter allows Passwordless login. See Passwordless Login.
- Name:
-
Click Apply.
Update the omatotpsecretkey Property in OAA
OAA needs to be updated in order for the description LDAP attribute to be used for OMA TOTP factor migration.
Use the <PolicyUrl>/policy/config/property/v1 REST API to set the properties. For example:
curl --location -g --request PUT '<PolicyURL>/config/property/v1' \
--header 'Authorization: Basic <Base64Encoded(<username>:<password>)>' \
--data '
[
    {
        "name": "bharosa.uio.default.challenge.type.enum.ChallengeOMATOTP.ldapalias.omatotpsecretkey",
        "value": "description"
    }
]'
In this case remove /oaa-policy from the <PolicyUrl>, for example use https://<host>:<port>/policy/config/property/v1 not https://<host>:<port>/oaa-policy/policy/config/property/v1.
For details about finding the <PolicyUrl> and authenticating, see OAA Admin API.
Update the WebGate To Use the OAA MFA Scheme for the Protected Application
Note: In the examples below the webgate webgate_7777 is used and the application URL protected is /mybank. Change accordingly if using something different.
-
In Application Security Launchpad -> Access Manager click on Application Domains.
-
In the Application Domain tab click Search.
-
Click on the WebGate to update e.g:
webgate_7777. -
In the WebGate tab (webgate_7777), click Authentication Policies. Click Create.
-
In Create Authentication Policy enter the following and click Apply:
- Name:
OAA_MFA-Policy - Authentication Scheme:
OAA-MFA-Scheme
- Name:
-
In the WebGate tab (webgate_7777) tab, select the Resources tab, click Search, and then click Create.
-
In the Create Resource tab enter the following and click Apply:
- Type:
HTTP - Description:
OAA Resource - Host Identifier :
webgate_7777 - Resource URL:
/mybank/** - Operations:
ALL - Protection Level:
Protected - Authentication Policy:
OAA_MFA-Policy - Authorization Policy:
Protected Resource Policy
Note: If you have other
/mybankURI’s already protected then update those and change the Authentication Policy toOAA_MFA_Policy - Type:
-
Restart the OAM servers to pick up the new OAA plugin configuration.
Test the OAM and OAA integration
In this section you access the protected application, login to OAM, and test that second factor authentication works.
Objectives
To test the OAA and OAM integration works successfully.
Test the OAM and OAA integration
-
Launch a browser and access the protected application e.g:
http://oam.example.com:7777/mybank. As this application is protected you should be redirected to the OAM login page. Log in as the new usertestuser/<password>.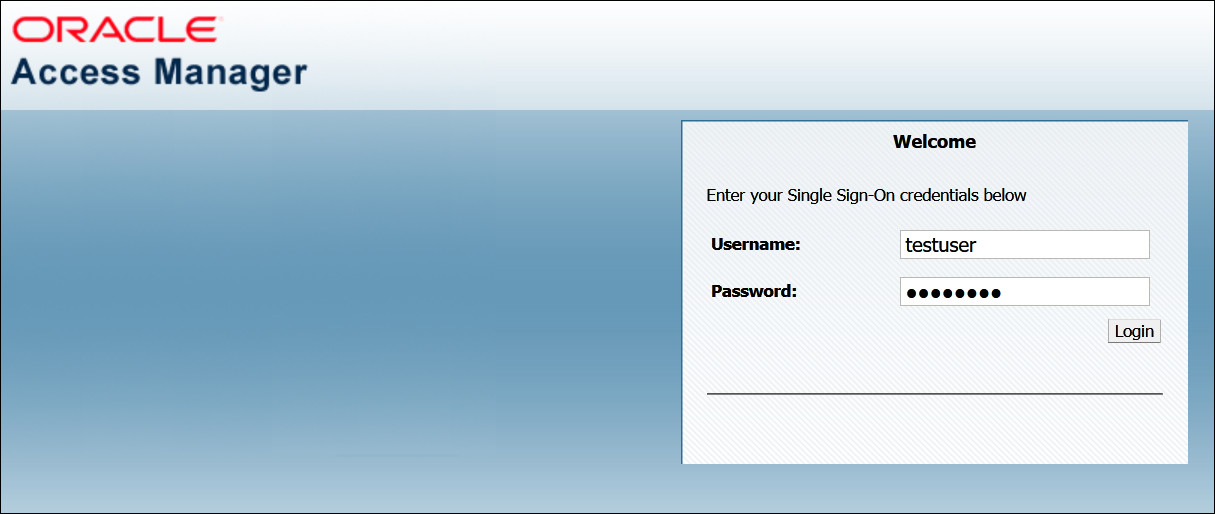
-
If the login is successful you will be redirected to the OAA endpoint, for example
https://oaa.example.com/oaa/authnui. AsLDAP_ATTRSfor the OAA Plugin in OAM are set tomail,mobile,descriptionand those LDAP attributes are populated for thetestuser, then a challenge choice page is presented for the user to select either EMAIL, SMS, or Oracle Mobile Authenticator. Under Email Challenge select Send OTP to te**@**.com.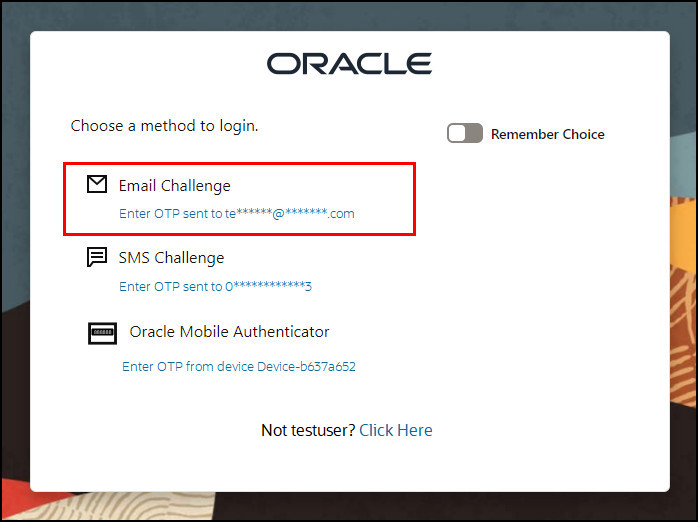
-
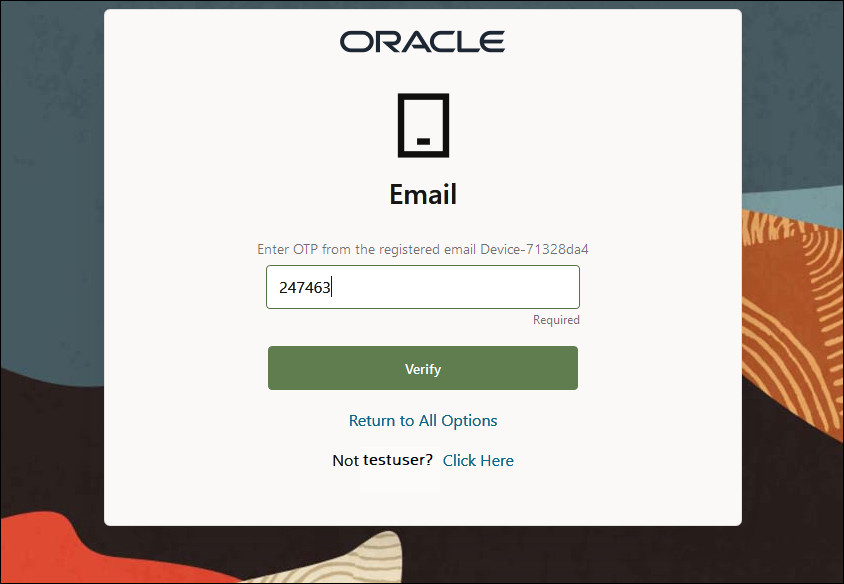
You will be redirected to the Email page where you are asked to Enter OTP from the registered email Device1. In the Enter OTP field enter the one time passcode that is emailed to the users email address and click Verify.
-
If the authentication is successful you should be redirected to the protected application page e.g
/mybank.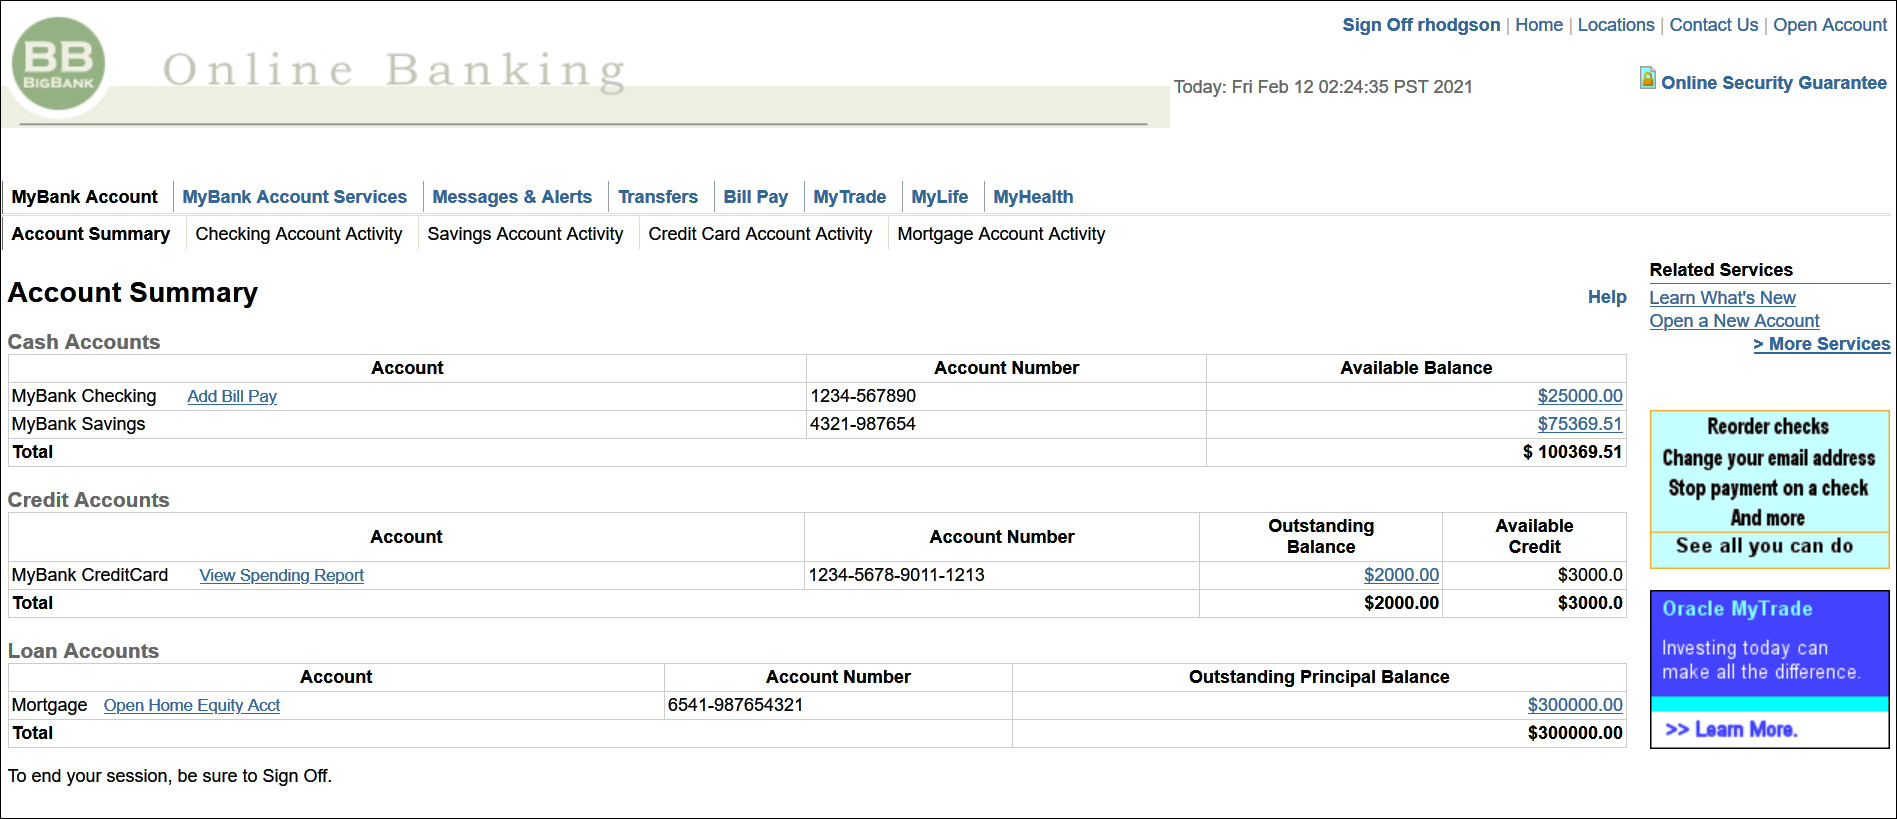
-
Close the existing browser and launch a new browser. Access the protected application once more e.g:
http://oam.example.com:7777/mybank. -
As passwordless login is enabled via the
initial_command=NONEparameter in the Authentication schemeOAA-MFA-Schemethe user is not asked to enter the OAM user and password and is directed to choose their second factor authentication method. Under SMS Challenge choose Send OTP to phone 0****3.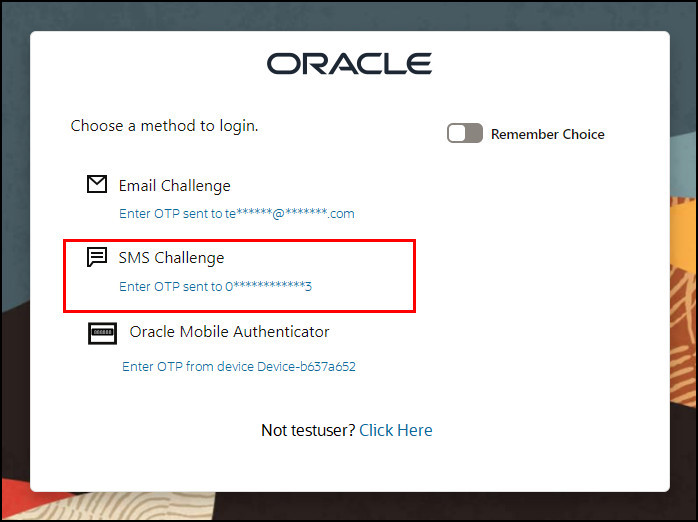
-
You will be redirected to the SMS page where you are asked to Enter OTP from the registered SMS Device. In the Enter OTP field enter the one time passcode that is sent to the users mobile device and click Verify.
-
If the authentication is successful you should be redirected to the protected application page e.g
/mybank. -
Close the existing browser and launch a new browser. Access the protected application once more e.g:
http://oam.example.com:7777/mybank. -
As passwordless login is enabled via the
initial_command=NONEparameter in the Authentication schemeOAA-MFA-Schemethe user is not asked to enter the OAM user and password and is directed to choose their second factor authentication method. Under Oracle Mobile Authenticator choose Enter OTP from Device-**.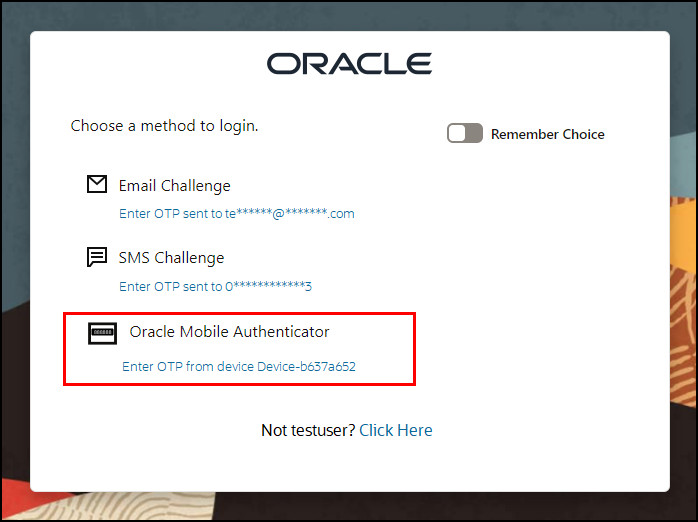
-
You will be redirected to the TOTP page where you are asked to Enter OTP from the registered Device. In the Enter OTP field enter the one time passcode that is showing in the Authenticator application and click Verify.
-
If the authentication is successful you should be redirected to the protected application page e.g
/mybank.
Next Steps
If you want a user to re-authenticate with a second factor when accessing a different URL at a higher OAM authentication level, see Performing Step-up Authentication with Oracle Advanced Authentication.
Learn More
- Oracle Advanced Authentication and Oracle Adaptive Risk Management
- Use Oracle Advanced Authentication REST APIs with Postman
- WebLogic Scripting Tool Command Reference for Identity and Access Management
Feedback
To provide feedback on this tutorial, please contact idm_user_assistance_ww_grp@oracle.com
Acknowledgements
- Author - Russ Hodgson
More Learning Resources
Explore other labs on docs.oracle.com/learn or access more free learning content on the Oracle Learning YouTube channel. Additionally, visit education.oracle.com/learning-explorer to become an Oracle Learning Explorer.
For product documentation, visit Oracle Help Center.
Integrate Oracle Access Management with Oracle Advanced Authentication
F39325-08
January 2025