Performing Step-Up Authentication with Oracle Advanced Authentication
Introduction
This tutorial shows you how to perform step-up authentication with Oracle Advanced Authentication (OAA).
For example, a user accesses an application /mybank that is protected with OAM and OAA (at OAM Authentication level 2). The user logs in with their OAM credentials and is then prompted for a second factor. If successful the application is displayed.
The user, in the same browser, then accesses a second application /credit that is also protected with OAM and OAA (at OAM Authentication level 2). As the user is already authenticated at level 2, the user does not need to authenticate with OAM and the second factor again, and is granted access.
The user, in the same browser, then accesses an application /hr that is protected at a higher level (at OAM Authentication level 3). As this application is protected at a higher level, the user is prompted to authenticate once again using a second factor.
For the purposes of this tutorial, /credit and /hr are index.html files created in the Oracle HTTP Server (OHS) /htdocs/credit and /htdocs/hr directories.
Objectives
In this tutorial you will perform the following tasks:
- Create directories in Oracle HTTP Server for the test applications.
- Configure an Authentication Module in OAM for step-up authentication.
- Update oua.drss.ssoLoginUrl if using Oracle Universal Authenticator.
- Test the step-up authentication is successful.
Prerequisites
For the purposes of demonstration, this tutorial builds on the environment created in Integrate Oracle Access Management with Oracle Advanced Authentication, where /mybank is protected at OAM Authentication level 2.
Task 1: Create Test Directories in OHS
In this section you create directories and index.html files for the test applications. The OHS that should be updated is the one where WebGate is configured to protect the /mybank application.
-
Create a directory for
/creditand/hrin the OHShtdocsdirectory:cd <OHS_DOMAIN_HOME>/config/fmwconfig/components/OHS/instances/ohs1/htdocs mkdir -p credit hr -
Navigate to the
<OHS_DOMAIN_HOME>/config/fmwconfig/components/OHS/instances/ohs1/htdocs/creditdirectory and create anindex.htmlfile that contains the following:<!DOCTYPE html> <html> <head> <title> First Web Page </title> </head> <body> Credit Application! </body> </html> -
Navigate to the
<OHS_DOMAIN_HOME>/config/fmwconfig/components/OHS/instances/ohs1/htdocs/hrdirectory and create anindex.htmlfile that contains the following:<!DOCTYPE html> <html> <head> <title> First Web Page </title> </head> <body> HR Application! </body> </html>
Task 2: Create an Authentication Module for OAA
-
In the OAM console navigate to Application Security -> Launch Pad -> Plug-ins -> Authentication Modules.
-
In the Authentication Modules tab click Create Authentication Module then Create Custom Authentication Module.
-
In the Authentication Module -> General tab enter the following:
- Name:
OAA-MFA-Step-Up-Module - Description:
OAA MFA Step Up Authentication Module
- Name:
-
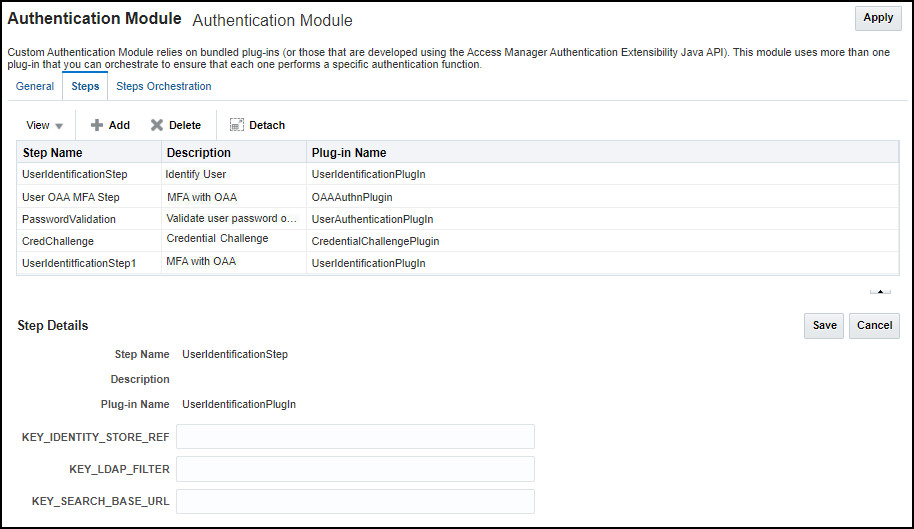
Click the Steps link and in the Steps tab click Add.
-
In the Add new step window enter the following and click OK:
- Step Name:
UserIdentificationStep - Description:
Identify User - Plug-in Name:
UserIdentificationPlugIn
- Step Name:
-
Click Add again, enter the following and click OK:
- Step Name:
User OAA MFA Step - Description:
MFA with OAA - Plug-in Name:
OAAAuthnPlugin
- Step Name:
-
Click Add again, enter the following and click OK:
- Step Name:
PasswordValidation - Description:
Validate user password on OAM - Plug-in Name:
UserAuthenticationPlugin
- Step Name:
-
Click Add again, enter the following and click OK:
- Step Name:
CredChallenge - Description:
Credential Challenge - Plug-in Name:
CredentialChallengePlugin
- Step Name:
-
Click Add again, enter the following and click OK:
- Step Name:
UserIdentificationStep1 - Description:
Identify User - Plug-in Name:
UserIdentificationPlugIn
The module should currently look as follows:
- Step Name:
-
Click
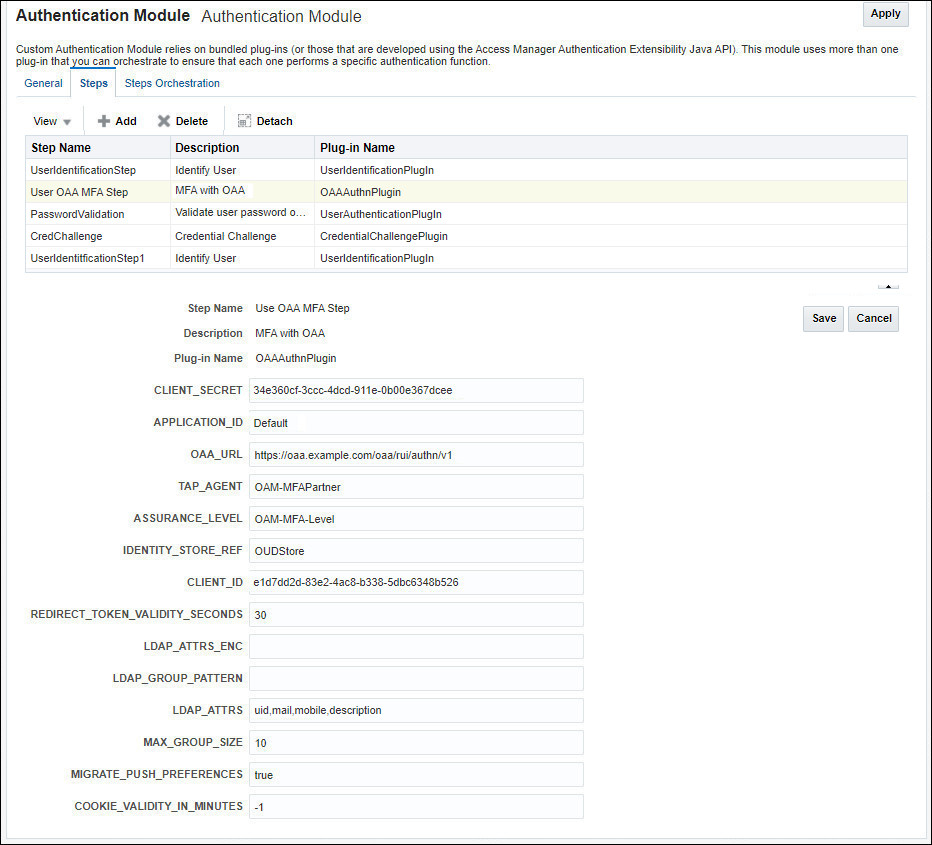
User OAA MFA Step, populate the following fields and click Save:- OAA_URL:
<SPUI_URL/authn/v1>for examplehttps://oaa.example.com/oaa/rui/authn/v1 - TAP_AGENT:
<partner_name>. This value should be the name given when registering the TAP Partner with OAM e.gOAM-MFAPartner - APPLICATION_ID :
<app_id>. This is the name of the OAA group to associate with OAM users that are migrated to OAA e.gDefault. This value should match theoauth.applicationidused when installing OAA otherwise end users will not be able to access the User Preferences UI. - IDENTITY_STORE_REF:
<default_user_identity_store>. This should be set to the value of Default Store set in the OAM console -> Configuration -> User Identity Stores. For exampleOUDStore - ASSURANCE_LEVEL:
<assurance_level>. This value should be set to the Assurance Level created in OAA earlier e.gOAM-MFA-Level - CLIENT_ID:
<client_id>. This is the value of the client ID copied when creating the agent earlier e.g:e1d7dd2d-83e2-4ac8-b338-5dbc6348b526 - CLIENT_SECRET:
<client_secret>. This is the value of the client ID copied when creating the agent earlier e.g:34e360cf-3ccc-4dcd-911e-0b00e367dcee - LDAP_ATTRS:
uid,mail,mobile,description. Note: LDAP_ATTRS must be specified in lowercase.
Note: With the exception of LDAP_ATTRS where you need to also add
uidfor step-up authentication, the values to be entered for the rest of the parameters are the same as were entered in the same section in Integrate Oracle Access Management with Oracle Advanced Authentication.For example:
- OAA_URL:
-
Click
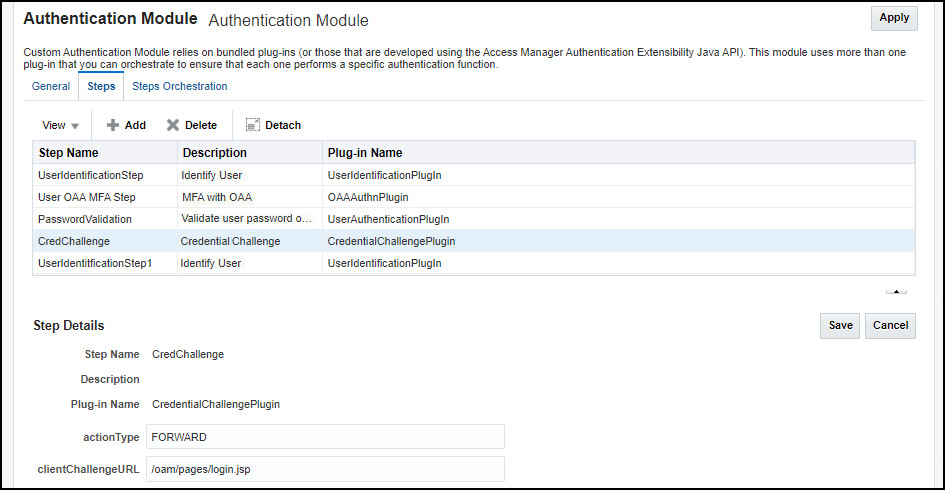
CredChallenge, populate the following fields and click Save:- actionType:
FORWARD - clientChallengeURL:
/oam/pages/login.jsp
For example:
- actionType:
-
Click Steps Orchestration and from the Initial Step drop down list select User OAA MFA Step.
-
In the table select the values as follows and Click Apply:
Name Description On Success On Failure On Error UserIdentificationStep Identify User Use OAA MFA Step CredChallenge failure Use OAA MFA Step MFA with OAA success UserIdentificationStep CredChallenge PasswordValidation Validate user password on OAM Use OAA MFA Step failure failure CredChallenge Credential Challenge UserIdentificationStep1 failure failure UserIdentificationStep1 Identify User PasswordValidation failure failure For example:
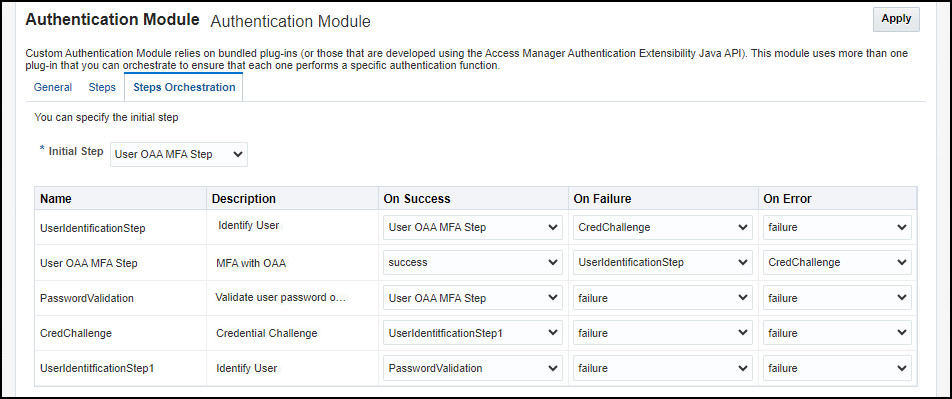
Create a Step-Up Authentication Scheme
-
In Application Security Launchpad -> Access Manager, click on Authentication Schemes.
-
On the Authentication Schemes tab select Create Authentication Scheme.
-
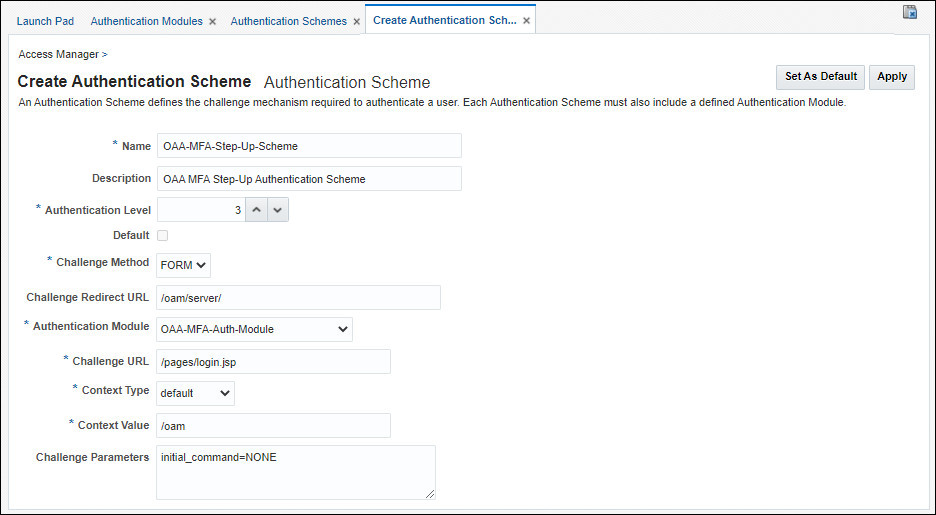
In the Create Authentication Scheme tab enter the following and click Apply:
- Name:
<scheme_name>e.gOAA-MFA-Step-Up-Scheme - Description:
OAA MFA Step-Up Authentication Scheme - Authentication Level:
3 - Challenge Method:
Form - Challenge Redirect URL:
/oam/server/ - Authentication Module:
OAA-MFA-Step-Up-Module - Challenge URL:
/pages/login.jsp - Context Type:
Default - Context Value:
/oam - Challenge Parameters:
initial_command=NONE. This parameter allows Passwordless login. See Passwordless Login.
- Name:
Update the WebGate To Use the OAA MFA Scheme for /credit
Note: In the examples below the webgate webgate_7777 is used and the new application URL /credit/index.html is protected using the OAA MFA Scheme at Authentication level 2. Change accordingly if using something different.
-
In Application Security Launchpad -> Access Manager click on Application Domains.
-
In the Application Domain tab click Search.
-
Click on the WebGate to update e.g:
webgate_7777. -
In the WebGate tab (webgate_7777) tab, select the Resources tab, click Search, and then click Create.
-
In the Create Resource tab enter the following and click Apply:
- Type:
HTTP - Description:
OAA Resource - Host Identifier :
webgate_7777 - Resource URL:
/credit/index.html - Operations:
ALL - Protection Level:
Protected - Authentication Policy:
OAA_MFA-Policy - Authorization Policy:
Protected Resource Policy
- Type:
Update the WebGate to use the OAA MFA Step-Up Scheme for /hr
Note: In the examples below the webgate webgate_7777 is used and the application URL /hr/index.html is protected using the OAA MFA Step-Up Scheme at Authentication level 3. Change accordingly if using something different.
-
In Application Security Launchpad -> Access Manager click on Application Domains.
-
In the Application Domain tab click Search.
-
Click on the WebGate to update e.g:
webgate_7777. -
In the WebGate tab (webgate_7777), click Authentication Policies. Click Create.
-
In Create Authentication Policy enter the following and click Apply:
- Name:
OAA-MFA-Step-Up-Policy - Authentication Scheme:
OAA-MFA-Step-Up-Scheme
- Name:
-
In the WebGate tab (webgate_7777) tab, select the Resources tab, click Search, and then click Create.
-
In the Create Resource tab enter the following and click Apply:
- Type:
HTTP - Description:
OAA Step-Up Resource - Host Identifier :
webgate_7777 - Resource URL:
/hr/index.html - Operations:
ALL - Protection Level:
Protected - Authentication Policy:
OAA-MFA-Step-Up-Policy - Authorization Policy:
Protected Resource Policy
- Type:
-
Restart the OAM servers to pick up the new OAA plugin configuration.
Task 3: Update oua.drss.ssoLoginUrl if Using Oracle Universal Authenticator
The steps in this section should only be followed if you are using Oracle Universal Authenticator (OUA).
-
For step-up authentication with OUA, you must set the
oua.drss.ssoLoginUrlconfiguration property appropriately. To do this use the<DRSS>/oaa-drss/oua/property/v1REST API endpoint. For example:curl --location -g --request PUT '<DRSS>/oaa-drss/oua/property/v1' \ --header 'Content-Type: application/json' \ --header 'Authorization: Basic <Base64Encoded(<username>:<password>)>' \ --data '[ { "name": "oua.drss.ssoLoginUrl", "value": "<OAM_Server_Protocol>://<OAM_Server_Host>:<OAM_Server_Port>/oam/server/obrareq.cgi" } ]'Note: Set
<OAM_Server_Protocol>://<OAM_Server_Host>:<OAM_Server_Port>to the URL of the OAM load balancer, for example https://oam.example.com:443. To find the OAM load balancer URL, access the OAM console and navigate to Configuration > Settings > View > Access Manager . The URL should be<OAM_Server_Protocol>://<OAM_Server_Host>:<OAM_Server_Port>, based on the values listed under Load Balancing in the Access Manager Settings page. The<OAM_Server_Host>must be the fully qualified hostname and not the IP address.For details on the
endpoint and the username and password, see Printing Deployment Details.
Task 4: Test the Step-Up Authentication
In this section you access the protected application /mybank (at OAM Authentication Level 2), login to OAM and test that second factor authentication works. You then access the /credit application also protected at OAM Authentication level 2 to show that you are not asked to authenticated again. You then access /hr application protected at OAM Authentication level 3, to prove step-up authentication works.
-
Launch an incognito browser and access the protected application e.g:
http://oam.example.com:7777/mybank. As this application is protected you should be redirected to the OAM login page. Log in as the user, for exampletestuser/<password>.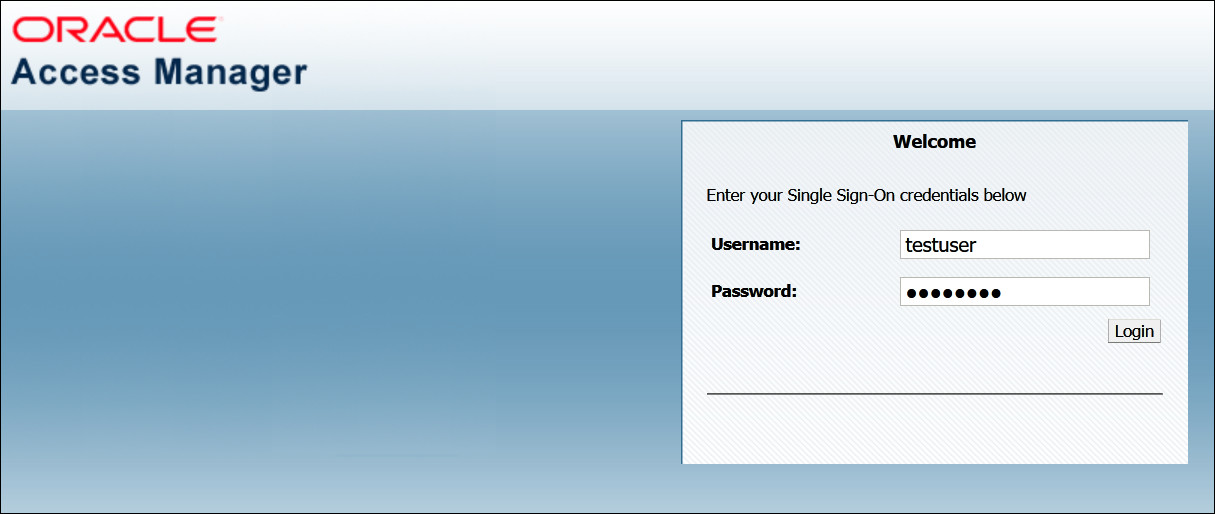
-
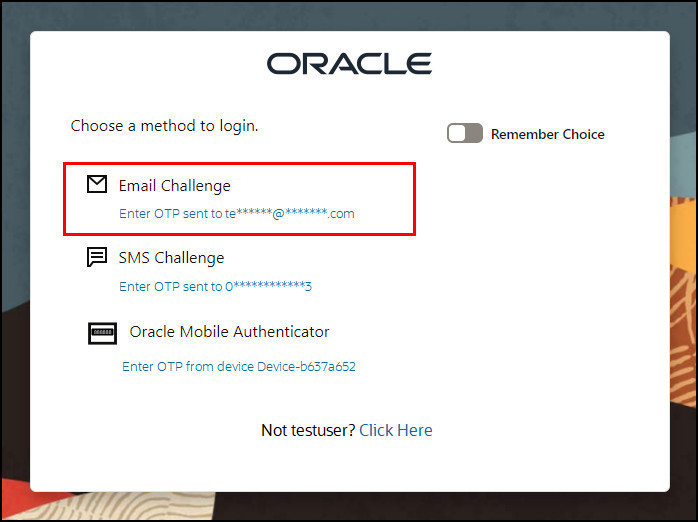
If the login is successful you will be prompted to enter a second factor. In this example you are presented with a challenge choice page for the user to select either EMAIL, SMS, or OMA TOTP. Under Email Challenge select Send OTP to te**@**.com.
-
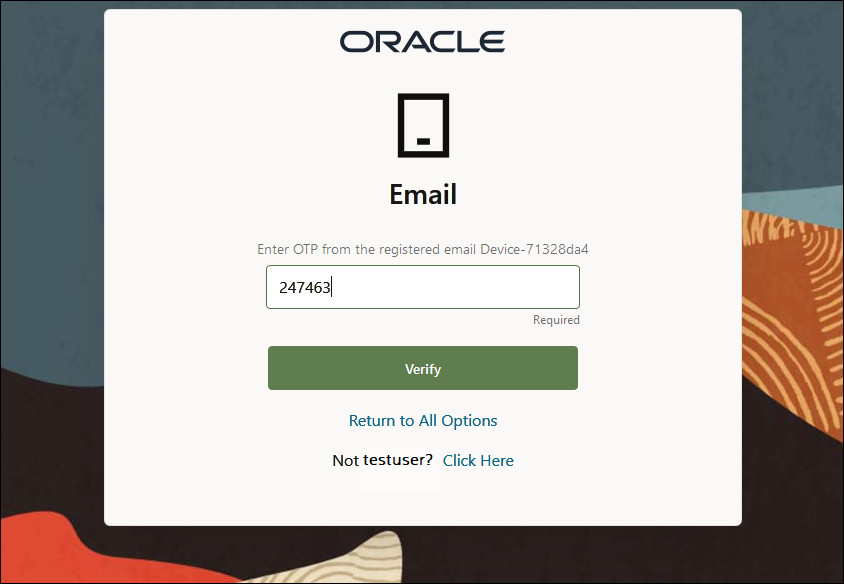
You will be redirected to the Email page where you are asked to Enter OTP from the registered email Device1. In the Enter OTP field enter the one time passcode that is emailed to the users email address and click Verify.
-
If the authentication is successful you should be redirected to the protected application page e.g
/mybank.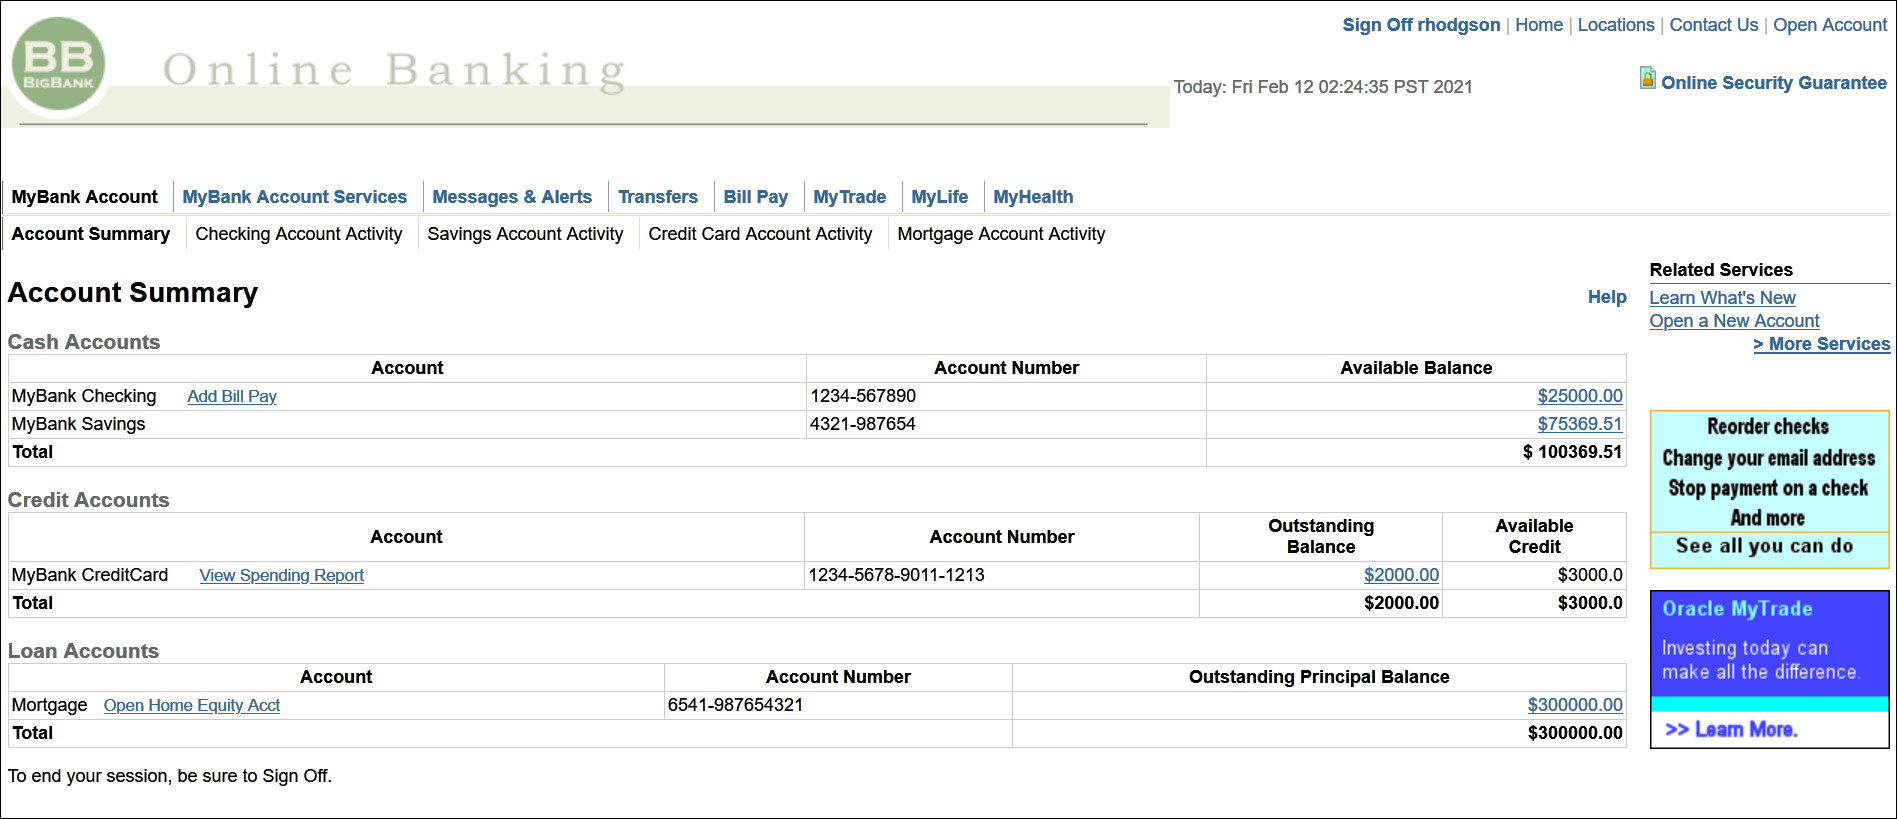
-
In the same browser create a new tab and access the protected credit application, for example
http://oam.example.com:7777/credit/index.html. As this application is protected at the same OAM Authentication level 2, you will be allowed to access it without having to reenter any credentials or second factor.
-
In the same browser create a new tab and access the hr application protected with step-up authentication, for example
http://oam.example.com:7777/hr/index.html. As the URI is protected with step-up authentication you will be prompted to select a factor to authenticate with. In this example you are presented with a challenge choice page for the user to select either EMAIL, SMS, or OMA TOTP. Under Email Challenge select Send OTP to te**@**.com.
-
You will be redirected to the Email page where you are asked to Enter OTP from the registered email Device1. In the Enter OTP field enter the one time passcode that is emailed to the users email address and click Verify.

-
If the authentication is successful you should be redirected to the protected application page, for example
/hr/index.html.
Learn More
Feedback
To provide feedback on this tutorial, please contact idm_user_assistance_ww_grp@oracle.com
Acknowledgements
- Author - Russ Hodgson
More Learning Resources
Explore other labs on docs.oracle.com/learn or access more free learning content on the Oracle Learning YouTube channel. Additionally, visit education.oracle.com/learning-explorer to become an Oracle Learning Explorer.
For product documentation, visit Oracle Help Center.
Performing Step-Up Authentication with Oracle Advanced Authentication
G10026-02
July 2024