2 About Node Manager
This chapter includes the following topics:
Introduction
Node Manager is an Oracle WebLogic Server utility that enables you to start, shut down, and restart Administration Server and Managed Server instances from a remote location.
Server instances in an Oracle WebLogic Server production environment are often distributed across multiple domains, machines, and geographic locations. Although Node Manager is optional, Oracle recommends using it if your Oracle WebLogic Server environment hosts applications with high availability requirements because Node Manager allows you to control the running state of distributed server instances from a centralized location.
Node Manager must run on each computer that hosts Oracle WebLogic Server instances—whether Administration Server or Managed Server—that you want to control with Node Manager. See Running Node Manager as a Startup Service.
For a basic tutorial that demonstrates how to create a default per domain Node Manager instance in a single-machine domain to start and stop Managed Server, see Node Manager Tutorial.
Functionalities of Node Manager
Node Manager controls the Administration and Managed Servers. Using Node Manager, you can start, shut down, restart the servers, and monitor the log data.
The following sections describe the basic functionalities of Node Manager:
Start, Shut Down, and Restart an Administration Server
You can use the WebLogic Scripting Tool (or SSH client for script-based Node Manager only) to connect to a Node Manager process on the machine that hosts the Administration Server and issue the commands to start, shut down, or restart an Administration Server. The relationship between Administration Server and Node Manager varies for different scenarios.
-
An Administration Server can be under Node Manager control - You can start it, monitor it, and restart it using Node Manager.
-
An Administration Server can be a Node Manager client - When you start or stop Managed Servers from the WebLogic Server Administration Console or Fusion Middleware Control (FMWC), you are accessing Node Manager using the Administration Server.
-
An Administration Server supports the process of starting up a Managed Server with Node Manager - When you start a Managed Server with Node Manager or a start script, the Managed Server contacts the Administration Server to obtain the pending configuration updates.
Start, Shut Down, Suspend, and Restart Managed Servers
- WebLogic Server Scripting Tool (WLST)
- WebLogic Server Administration Console
- Fusion Middleware Control (FMWC)
- Scripts
Node Manager can restart a Managed Server after failure even when the Administration Server is unavailable if Managed Server Independence (MSI) mode is enabled for that Managed Server instance. This mode is enabled by default.
Note:
- If using the
packandunpackcommands, Node Manager can start a Managed Server for the first time in the MSI mode. However, if using thenmEnrollcommand, Node Manager cannot start a Managed Server for the first time in MSI mode because the Administration Server for the domain must be available so the Managed Server can obtain its configuration settings. - Node Manager uses the same command arguments that you provide when starting a Managed Server with a script or at the command line. For information about startup arguments, see weblogic.Server Command-Line Reference in Command Reference for Oracle WebLogic Server.
Restart Administration and Managed Servers Automatically
If a server instance that was started using Node Manager fails, Node Manager automatically restarts it.
Note:
Node Manager can restart a server instance that was started using only Node Manager.
The restart feature is configurable. Node Manager's default behavior is to:
- Automatically restart server instances under its control that fail. You can disable this feature.
- Restart failed server instances no more than a specific number of times. You define
the number of restarts by setting the
RestartMaxproperty in the Node Managerstartup.propertiesfile.
If Node Manager fails or is explicitly shut down, then upon restart, it determines the server instances that were under its control when it exited. Node Manager can restart any failed server instances as needed.
Note:
It is advisable to run Node Manager as an operating system service so that it restarts automatically when its host machine restarts.Monitor Servers and View Log Data
Node Manager creates a log file for a Node Manager process and a log file of server output for each server instance it controls. See Log Files.
Node Manager Implementations
Oracle WebLogic Server provides two implementations of Node Manager, Java-based and script-based, with similar functionality. Each implementation has different configuration and security considerations.
This section includes the following topics:
Java-Based Node Manager
Java-based Node Manager runs within a Java Virtual Machine (JVM) process. Oracle recommends that you run it as a Windows service on Windows platforms and as an operating system service on UNIX platforms, allowing it to restart automatically when the system is rebooted. You can configure Java-based Node Manager using the Configuration Wizard or WLST offline.
Oracle provides native Node Manager libraries for Windows, Solaris, Linux on Intel, Linux on Z-Series, and AIX operating systems.
Note:
Node Manager is not supported on OpenVMS, OS/390, AS400, UnixWare, and Tru64 UNIX.This implementation of Node Manager determines its configuration from the nodemanager.properties file. See Reviewing nodemanager.properties.
Java-based Node Manager provides a more fine-grained security model, and the administrator credentials for accessing Node Manager are separate from those of the domain administrator. See Configuring Java-based Node Manager Security.
Script-Based Node Manager
For UNIX and Linux systems, Oracle WebLogic Server provides a script-based implementation of Node Manager. This script is based on UNIX shell scripts.
For information on configuring the script implementation of Node Manager, see Configuring Script-Based Node Manager.
Script-based Node Manager is not recommended for production environments. However, depending on the security requirements for the environment in which you are using Node Manager, the script-based implementation may be acceptable. The advantage of the script-based Node Manager is that it can remotely manage server instances over a network that has been configured to use SSH. No additional server installation is required. The scripts merely have to be copied to the remote machine.
Note:
Oracle recommends that you run script-based Node Manager as an operating system service, which allows it to restart automatically when the system is rebooted.
Determining Which Node Manager Implementation to Use
The implementation of Node Manager you should use depends on the requirements of your Oracle WebLogic Server environment. The following considerations can help you decide which implementation is ideal for your environment:
- If you are installing Oracle WebLogic Server on a Windows system, you must use the Java implementation of Node Manager. The scripted implementation of Node Manager is not supported on Windows.
- Java-based Node Manager can be configured at the time you create the domain. Script-based Node Manager is configured after the domain has been created.
- To use consensus leasing, you may see faster performance when using the Java implementation of Node Manager.
- The script-based Node Manager requires a much simpler security configuration than the Java implementation. RSH and SSH are generally easier to configure than SSL, which is the only way to secure Java-based Node Manager. The script implementation of Node Manager also requires a smaller footprint than the Java implementation.
- The Java implementation of Node Manager can be used in conjunction with
inetdon supported UNIX systems. Theinetddaemon allows Node Manager to be automatically restarted upon receiving a request on the configured port. You can also install the Java implementation of Node Manager as a Windows service.
Accessing Node Manager
Use the WebLogic Server Administration Console, FMWC, or WLST to access the Java-based and the script-based implementations of Node Manager.
In addition, you can access script-based Node Manager from a shell command template provided to you. You can also use JMX to communicate with the Administration Server.
- WebLogic Server Administration Console and FMW Control: Click Environments, select Machines, click Configuration, and then click Node Manager.
- WLST commands and scripts: WLST offline serves as a Node Manager command-line interface that can run in the absence of a running Administration Server. You can use WLST commands to start, stop, and monitor a server instance without connecting to an Administration Server. For more information about using WLST and Node Manager to control server instances, see Using Node Manager to Control Servers.
How Node Manager Works in the Oracle WebLogic Server Environment
nmConnect command provides a Node Manager user name
and password that are used to authenticate the user with Node Manager. The
nmStart command identifies the server instance and creates the
Administration Server process. In the WebLogic Server Administration Console and FMWC, you
can specify the startup arguments that Node Manager uses to start a Managed
Server.
The following sections provide a big picture diagram of Node Manager's role in the Oracle WebLogic Server environment, as well as illustrations and descriptions of the processes Node Manager uses to communicate with server instances:
Diagram of Node Manager and Servers
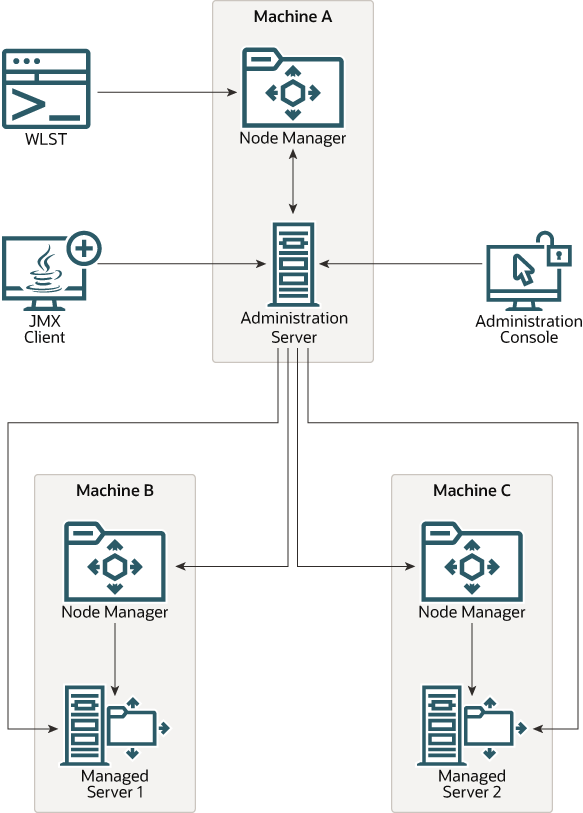
Figure 2-1 illustrates the relationship between Node Manager, its clients, and the server instances it controls.
In this diagram, Machine A hosts the Administration Server, and Machine B and Machine C host Managed Servers. Each machine contains a Node Manager instance. Using Node Manager, you can start, monitor, and restart the Administration Server in Machine A. By using the Administration Server as a Node Manager client, you can start or stop Managed Servers in Machine B and Machine C.
You can use the WebLogic Server Administration Console, FMWC, WLST, or a JMX client to access Node Manager. You can use WLST commands to start, stop, and monitor a server instance when WLST is connected directly to the Node Manager instance or when WLST is connected to the Administration Server. When using the WebLogic Server Administration Console and FMWC, you access Node Manager using the Administration Server. You can also use a JMX client to communicate with the Administration Server.
Figure 2-1 Node Manager in the Oracle WebLogic Server Environment
Description of "Figure 2-1 Node Manager in the Oracle WebLogic Server Environment"
How Node Manager Starts an Administration Server
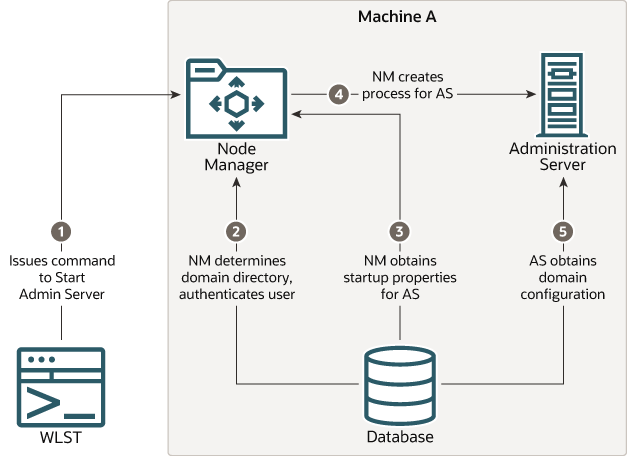
Figure 2-2 illustrates the process of starting an Administration Server with Node Manager.
This section assumes that you have installed the Administration Server and created its domain directory using the Configuration Wizard.
Node Manager is running on Machine A, which hosts the Administration Server. The standalone Node Manager client is remote.
Figure 2-2 Starting an Administration Server
Description of "Figure 2-2 Starting an Administration Server"
- An authorized user issues the WLST offline command
nmConnectto connect to a Node Manager (NM) process on the machine that hosts the Administration Server (AS). ThenmConnectcommand provides a Node Manager user name and password that are used to authenticate the user with Node Manager.Note:
If a Node Manager instance is the script-based implementation, the user can connect using the SSH client.Then, the user issues the
nmStartcommand and provides the credentials for starting the Administration Server. For example:prps = makePropertiesObject(Username=username;Password=password") nmStart("AdminServer",props=prps)Note:
Aboot.propertiesfile is generated if the user has already started the Administration Server and provided credentials.The
nmStartcommand identifies the server instance to start. - Node Manager looks up the domain directory in
nodemanager.domains, and authenticates the user credentials using a local file that contains the encrypted user name and password. - Node Manager obtains the startup properties for the Administration Server.
The
nmStartcommand can optionally pass properties that are used to start the Managed Server. When these properties are passed, they overwrite any previously stored properties that Node Manager may have used. If no properties are passed with thenmStartcommand, then Node Manager uses the values in thestartup.propertiesfile that have been persisted from a previous startup or from using thenmGenBootStartupPropsWLST command. - Node Manager creates the Administration Server process.
- The Administration Server obtains the domain configuration from its
configdirectory.
Note:
After the Administration Server starts, you can update the user credentials and
startup properties by using the WLST nmGenBootStartupProps online command.
Alternatively, when the Administration Server and Node Manager are running, you can update the user credentials and startup properties in the WebLogic Server Administration Console and FMWC. To update, from AdminServer, click Configuration, and then click Server Start. The Administration Server then pushes the updates to the running Node Manager and Node Manager writes the information to the disk.
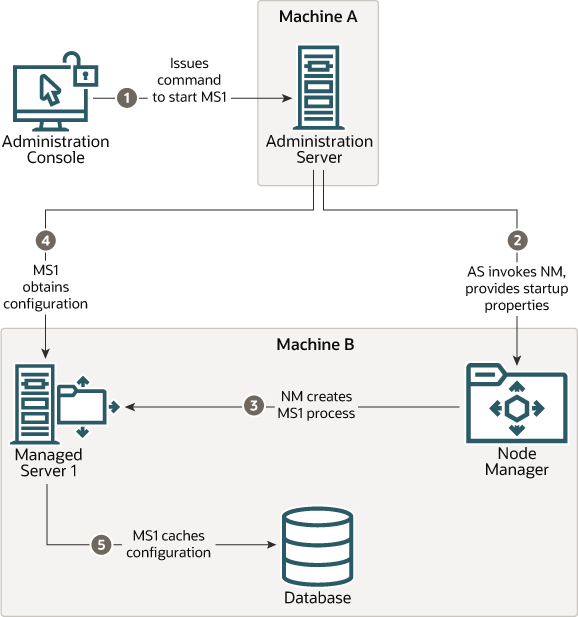
How Node Manager Starts a Managed Server
Figure 2-3 illustrates the process of starting a Managed Server with Node Manager by using the WebLogic Server Administration Console. You can also use FMWC, WLST, or a JMX client to connect to the Administration Server.
Node Manager is running on Machine B, which hosts Managed Server 1. The Administration Server for the domain is running on Machine A.
- From the WebLogic Server Administration Console, the user issues a start command for Managed Server 1 (MS1).
- The Administration Server (AS) issues a start command for Managed Server 1 to Node Manager (NM) on the Machine B, providing the remote start properties configured for Managed Server 1. See Configuring Remote Startup Arguments.
- Node Manager starts the Managed Server 1 in the domain directory.
- Managed Server 1 contacts the Administration Server to check for updates to its configuration information.
- If there are outstanding changes to the domain configuration, Managed Server 1 updates its local cache of configuration data.
How Node Manager Restarts an Administration Server
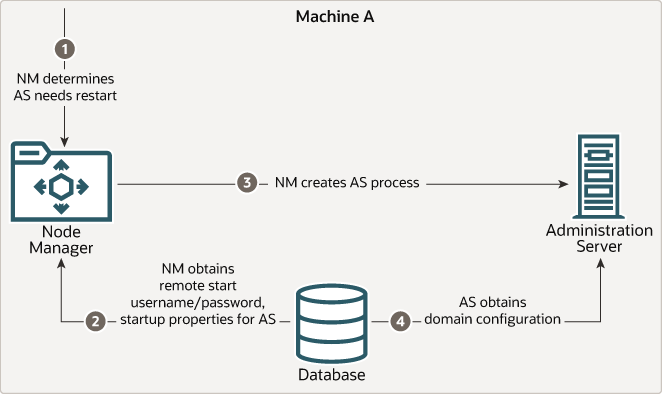
Figure 2-4 illustrates the process of restarting an Administration Server with Node Manager.
Node Manager is running on the machine that hosts the Administration Server. The Administration Server, which was initially started with Node Manager, has exited. The Administration Server's AutoRestart attribute is set to true.
Note:
If a server instance'sAutoRestart attribute is set to false, Node
Manager will not restart it. However, the CrashRecoveryEnabled property
takes precedence over the AutoRestart property in a crash recovery
scenario. For example, if a server instance has AutoRestart=false but
CrashRecoveryEnabled=true, when Node Manager restarts, it tries to
recover the server instance if the server instance failed when Node Manager was not
running.
Figure 2-4 Restarting an Administration Server
Description of "Figure 2-4 Restarting an Administration Server"
- Node Manager (NM) determines from the Administration Server (AS) process exit code that it requires a restart.
- Node Manager obtains the user name and password for starting the Administration
Server from the
boot.propertiesfile, and the server startup properties from theserver_name/data/nodemanager/startup.propertiesfile. - Node Manager starts the Administration Server.
- The Administration Server reads its configuration data and starts up.
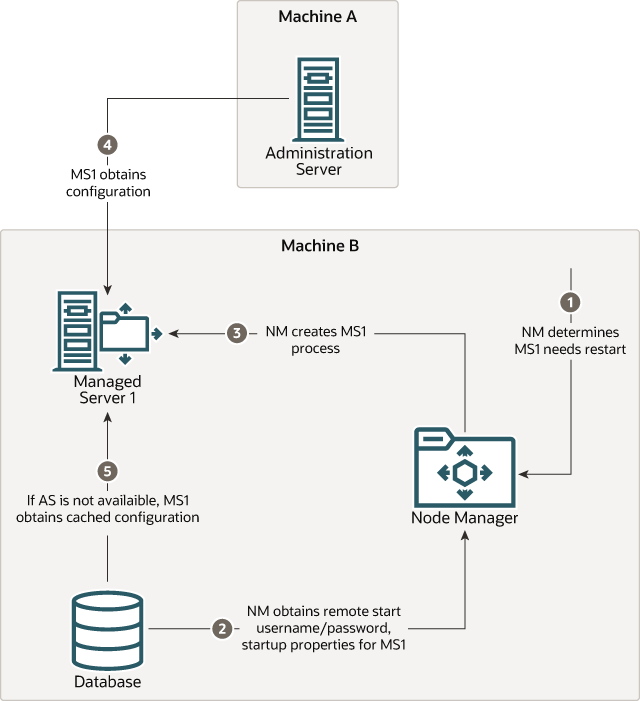
How Node Manager Restarts a Managed Server
Figure 2-5 illustrates the process of restarting a Managed Server with Node Manager.
Node Manager is running on Machine B, which hosts Managed Server 1. Managed Server 1, which was initially started with Node Manager, has exited. Managed Server 1's AutoRestart attribute is set to true.
Note:
If a server instance'sAutoRestart attribute is set to false, Node
Manager will not restart it. However, the CrashRecoveryEnabled property
takes precedence over the AutoRestart property in a crash recovery
scenario. For example, if a server instance has AutoRestart=false but
CrashRecoveryEnabled=true, when Node Manager restarts, Node Manager
tries to recover the server instance if the server instance failed when Node Manager was
not running.
- Node Manager (NM) determines from the Managed Server 1 (MS1) process exit code that it requires restart.
- Node Manager obtains the user name and password for starting Managed Server 1 from
the
boot.propertiesfile, and the server startup properties from thestartup.propertiesfile. These server-specific files are located in theserver_name/data/nodemanager/directory for Managed Server 1. - Node Manager starts Managed Server 1.
Note:
Node Manager waitsRestartDelaySecondsafter a server instance fails, before attempting to restart it. - Managed Server 1 attempts to contact the Administration Server (AS) to check for
updates to its configuration data. If it contacts the Administration Server and
obtains the updated configuration data, Managed Server 1 updates its local cache of
the
configdirectory. - If Managed Server 1 fails to contact the Administration Server, and if the Managed
Server Independence mode (MSI) is enabled, Managed Server 1 uses its locally cached
configuration data.
Note:
The Managed Server Independence (MSI) mode is enabled by default. The MSI mode is also enabled when:- an
admin_urlis not provided, whereadmin_urlspecifies the listen address (host name, IP address, or DNS name) and port number of the domain's Administration Server. - an
admin_urlis provided, but the Administration Server cannot be reached for any reason.
The MSI mode can be temporary as the Managed Server intermittently attempts to reconnect to the Administration Server.
- an
How Node Manager Shuts Down a Server Instance
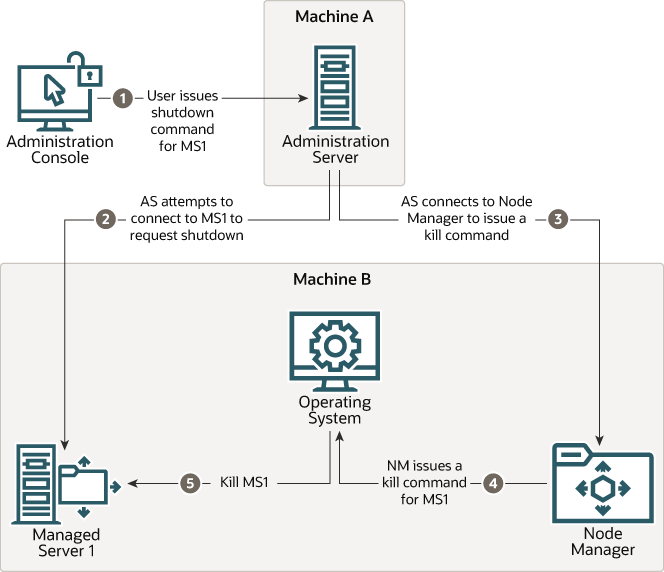
Figure 2-6 illustrates the communications involved in shutting down a Managed Server that is under Node Manager control. Depending on the state and availability of the Managed Server, Node Manager might need to forcefully shut down the Managed Server. Node Manager cannot gracefully shut down a Managed Server.
Node Manager is running on Machine B, which hosts Managed Server 1.
Figure 2-6 Shutting Down a Server Instance Under Node Manager Control
Description of "Figure 2-6 Shutting Down a Server Instance Under Node Manager Control"
-
Through the WebLogic Server Administration Console, an authorized user issues a shutdown command for Managed Server 1 (MS1).
-
The Administration Server (AS) attempts to connect to Managed Server 1 and issues the shutdown command directly to Managed Server 1. If the Administration Server successfully contacts Managed Server 1, Managed Server 1 performs the shutdown sequence described in Shutting Down Instances of Oracle WebLogic Server in Administering Server Startup and Shutdown for Oracle WebLogic Server. For the Managed Server to gracefully shut down itself, it must be connected to the Administration Server.
-
If, in the previous step, the Administration Server fails to contact Managed Server 1, the Administration Server connects to Node Manager (NM) to issue a kill command for Managed Server 1.
-
Node Manager issues a request to the operating system to kill Managed Server 1.
-
The operating system ends the Managed Server 1 process.
Node Manager and System Crash Recovery
To ensure that Node Manager properly restarts server instances after a system crash, set the crash recovery properties and perform the other required tasks for Java-based or script-based Node Manager.
To ensure that Node Manager properly restarts server instances, you must perform the following:
-
For Java-based Node Manager, ensure that
CrashRecoveryEnabledis set totrue.The
CrashRecoveryEnabledconfiguration property allows Node Manager to restart server instances after a system crash. The property is not enabled by default.Note:
If a server instance's
AutoRestartattribute is set to false, Node Manager will not restart it. However, theCrashRecoveryEnabledconfiguration property takes precedence over theAutoRestartserver startup property in a crash recovery scenario. For example, if a server instance hasAutoRestart=falsebutCrashRecoveryEnabled=true, when Node Manager restarts, Node Manager tries to recover the server instance if the server instance failed when Node Manager was not running. -
For script-based Node Manager, place this line in machine start scripts or, if desired, run periodically on a given schedule:
wlscontrol.sh -ddomain_nameCRASHRECOVERY -
You should start the Administration Server using Node Manager.
-
All Managed Servers should be started using the Administration Server. You can accomplish this using WLST, FMWC, or the WebLogic Server Administration Console.
After the system is restarted, Node Manager checks each managed domain specified in
the nodemanager.domains file to determine if there are any server
instances that were not cleanly shutdown. This is determined by the presence of any lock
files which are created by Node Manager when an Oracle WebLogic Server process is
created. This lock file contains the process identifier for Oracle WebLogic Server
startup script. If the lock file exists, but the process ID is not running, Node Manager
will attempt to automatically restart the server instance.
If the process is running, Node Manager performs an additional check to access the management servlet running in the process to verify that the process corresponding to the process ID is an Oracle WebLogic Server instance.
Note:
When Node Manager performs a check to access the management servlet, an alert may appear in the server log regarding improper credentials.Node Manager Configuration and Log Files
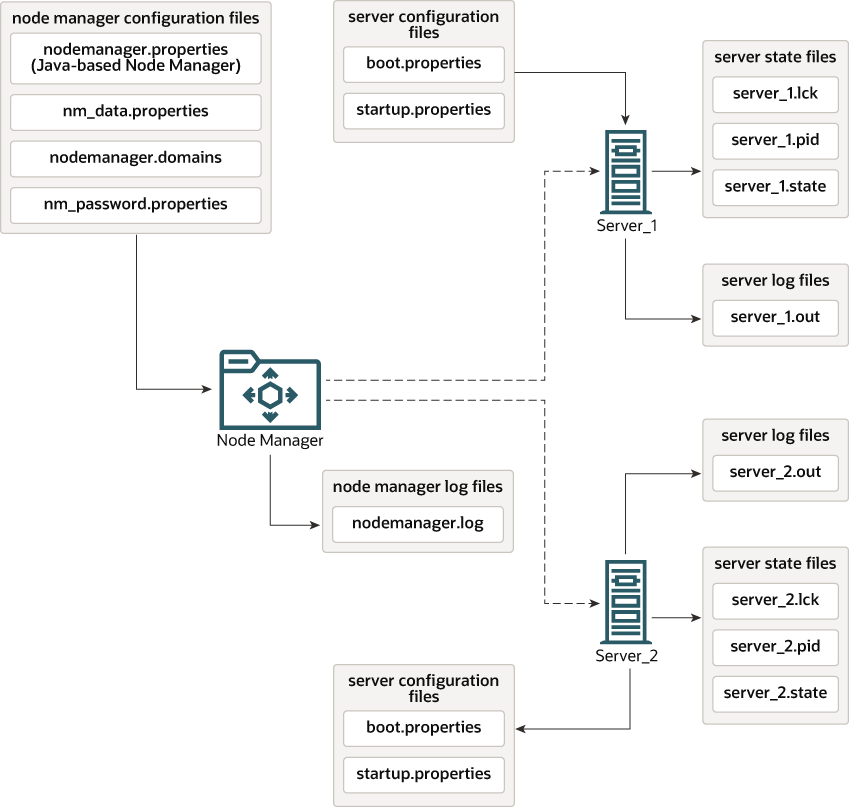
In managing multiple server instances, Node Manager uses multiple configuration files and outputs log files to multiple directories.
These files are shown in Figure 2-7.
Figure 2-7 Node Manager Configuration and Logging Environment
Description of "Figure 2-7 Node Manager Configuration and Logging Environment"
The following sections describe Node Manager configuration and log files:
Configuration Files
Except where noted, configuration files apply to both Java-based and script-based Node Manager.
Node Manager includes the following configuration files:
nodemanager.properties
This is the configuration file used by the Java-based implementation of Node Manager. See Reviewing nodemanager.properties.
By default, this file is located in
NodeManagerHome, typically,
ORACLE_HOME\user_projects\domains\domain_name\nodemanager,
where ORACLE_HOME is the location you specified as
the Oracle Home when you installed Oracle WebLogic Server.
nodemanager.domains
This file contains mappings between the names of domains managed by Node Manager and their corresponding directories. See Configuring nodemanager.domains File.
For the Java-based Node Manager, this file is located in
NodeManagerHome, typically,
ORACLE_HOME\user_projects\domains\domain_name\nodemanager.
For the script-based Node Manager, this file's default
NodeManagerHome location is
WL_HOME/common/nodemanager, where
WL_HOME is the location in which you
installed Oracle WebLogic Server, for example,
ORACLE_HOME/wlserver.
nm_password.properties
This file stores the Node Manager user name and password. See Specifying Node Manager User Name and Password.
This file is located in
DOMAIN_HOME/config/nodemanager, where
DOMAIN_HOME is the location of the WebLogic domain,
typically, ORACLE_HOME\user_projects\domains\domain_name.
boot.properties
Node Manager uses this file to specify user credentials when starting a server instance.
This file is located in DOMAIN_HOME/servers/server_name/data/nodemanager.
startup.properties
Each Managed Server instance has its own startup.properties file
with properties that control how Node Manager starts up and controls the server
instance. Node Manager automatically creates this file by using the properties passed to
Node Manager when the Administration Server was last used to start the server instance.
This allows a Node Manager client or startup scripts to restart a Managed Server by
using the same properties that was last used by the Administration Server.
Note:
For script-based Node Manager,startup.properties file is not
automatically created.
See Setting Server Startup Properties. These properties correspond to the server startup attributes contained in ServerStartMBean and the health monitoring attributes in ServerStartMBean.
This file is located in
DOMAIN_HOME/servers/server_name/data/nodemanager.
server_name.addr
server_name.addr stores the IP address added when a server instance starts or is migrated. This file is generated after the server IP address is successfully brought online during migration. server_name.addr is deleted when the IP address is brought offline. The server IP address is used to validate remove requests to prevent addresses being erroneously removed while shutting down the server instance.
This file is located in DOMAIN_HOME/servers/server_name/data/nodemanager.
server_name.lck
server_name.lck is generated by each server instance and contains an internally used lock ID.
This file is located in DOMAIN_HOME/servers/server_name/data/nodemanager.
server_name.pid
server_name.pid is generated by each server instance and contains the process ID of the server instance. Node Manager checks the process ID generated by the server instance during crash recovery.
This file is located in DOMAIN_HOME/servers/server_name/data/nodemanager.
server_name.state
server_name.state is generated by the server instance and contains the server instance's current state. Node Manager monitors the contents of this file to determine the current state of the server instance.
Note:
Do not delete or alter this file. Without this file Node Manager cannot determine the current state of the server instance.
This file is located in DOMAIN_HOME/servers/server_name/data/nodemanager.
Log Files
Use Node Manager and Oracle WebLogic Server log files to help troubleshoot problems in starting or stopping individual Managed Servers.
Table 2-1 Node Manager Log File Locations
| Log File | Location |
|---|---|
|
Node Manager Log File |
For Java-based Node Manager only,
|
|
Node Manager Server Instance Log Files |
|
|
Oracle WebLogic Server Log Files |
|
This section includes the following topics:
nodemanager.log
nodemanager.log is created for the Java-based Node Manager only; it
is not created for the script-based Node Manager. This log file is generated by Node
Manager and contains data for a given WebLogic domain that is controlled by Node
Manager. The file typically is located in
ORACLE_HOME\user_projects\domains\domain_name\nodemanager.
Log output is appended to the current nodemanager.log file. Log
rotation is disabled by default, but can be enabled by setting LogCount
in nodemanager.properties.
You can view a Node Manager log file by:
- Selecting Machines, clicking Monitoring, and then selecting the Node Manager Log page in the WebLogic Server Administration Console
- Using the WLST
nmLogcommand
Log File Rotation
In versions of Oracle WebLogic Server earlier than 12.1.3.0, when
NativeVersionEnabled is set to false, you can configure the Node
Manager log file rotation properties that are listed in Table 2-2. As of Oracle WebLogic Server 12.1.3.0, Node Manager uses the LogFileMBean properties for log file rotation. However,
NativeVersionEnabled must still be set to
false.
Note:
It is possible to rotate the log files when NativeVersionEnabled is set to true. To do this, add the following property to the startup arguments for your Managed Server:
-Dweblogic.nmservice.RotationEnabled=true
Node Manager checks the log file size every five minutes. The file starts rotating only after Node Manager verifies that the log file has reached or exceeded the maximum threshold value.
For Coherence and other system components that have implemented a plug-in, Node Manager uses the log file rotation properties listed in Table 2-3.
Table 2-2 Node Manager Log File Rotation Properties
| Property | Description | Default |
|---|---|---|
|
|
This property is deprecated in Oracle WebLogic Server 12.1.3.0 and may be removed in a future release. Use the server |
|
|
|
This property is deprecated in Oracle WebLogic Server 12.1.3.0 and may be removed in a future release. Use the server |
|
|
|
This property is deprecated in Oracle WebLogic Server 12.1.3.0 and may be removed in a future release. Use the server |
|
|
|
This property is deprecated in Oracle WebLogic Server 12.1.3.0 and may be removed in a future release. Use the server |
|
|
|
This property is deprecated in Oracle WebLogic Server 12.1.3.0 and may be removed in a future release. Use the server |
|
|
|
This property is deprecated in Oracle WebLogic Server 12.1.3.0 and may be removed in a future release. Use the server |
|
|
|
This property is deprecated in Oracle WebLogic Server 12.1.3.0 and may be removed in a future release. Use the server |
|
Table 2-3 Node Manager Log File Rotation Properties for Coherence and System Components
| Property | Description | Default |
|---|---|---|
|
|
Specifies the maximum size of the file before it is rotated. |
|
|
|
Indicates the interval (in hours) at which the server instance saves old log messages
to another file. Requires that you specify a
|
|
|
|
Allows log rotation to be tested at a different frequency. Note: This property rarely needs to be changed or configured. |
|
|
|
Indicates whether to limit the number of log files that this server instance creates to store old messages. Requires that you specify a |
|
|
|
Specifies the maximum number of rotated files to keep when |
|
|
|
Determines the start time (hour and minute) for a time-based rotation sequence. At
the time that this value specifies, the server instance renames the
current log file. Thereafter, the server instance renames the log
file at an interval that you specify in
|
|
|
|
Specifies the criteria for moving old log messages to a separate file.
|
|
server_name.out
For each server instance that it controls, Node Manager maintains a log file that
contains stdout and stderr messages generated by the
server instance. If the remote start debug property is enabled as a remote start
property for the server instance, or if the Node Manager debug property is enabled, Node
Manager will include additional debug information in the server output log information.
By default, this file is located in
DOMAIN_HOME/servers/server_name/logs, where
server_name is the name of the server instance.
However, if you add -Dweblogic.Stdout= in the Arguments field of the ServerStartMBean, then this value overrides the default location, and Node Manager uses the supplied path as the file for the output. You cannot override the server_name.out default location using the weblogic.startup.Arguments.prepend property in the nodemanager.properties file, as this property applies to multiple server instances.
Node Manager creates the server output log for a server instance in the server instance's logs directory, with the name:
server_name.out
Note:
The rotation of the server output file is configured by the RotateLogOnStartup attribute on the LogFileMBean.
On Windows, the server output file is rotated during shutdown. In addition, if a
server is restarted using Node Manager, the server output file will be rotated
at server shutdown even if the RotateLogOnStartup attribute is
set to false. This is specific to Windows only.
You can view a Node Manager log file for a particular server instance by:
- Selecting Diagnostics, and then Log Files.
- Using the WLST
nmServerLogcommand.
There is no limit to the number of server output logs that Node Manager can create.
Configuring Log File Rotation
Note:
It is possible to configure Log File Rotation properties using WLST, REST, Fusion Middleware Control, or JMX as well. For more information, see Rotating Log Files in Configuring Log Files and Filtering Log Messages for Oracle WebLogic Server.