 Create
Applications and Saved Searches in WebCenter Content: Imaging
Create
Applications and Saved Searches in WebCenter Content: Imaging Before You Begin
This 15-minute tutorial shows how to create an Application and build a Saved Search by using the WebCenter Content: Imaging application.
Background
An Application is a category into which documents are sorted and a Saved Search is a mechanism by which the documents are retrieved. When you create an Application, you specify a name for it, a repository to store documents, metadata, and most importantly security rights to control the user's access to documents. You create a Saved Search by specifying the Source Application and defining the search criteria. Documents are uploaded by choosing an Application. In this tutorial, you create EBS HR Application, Picklist Search, upload the document 'Offer Letter', and using the Picklist Search page, you search and retrieve the document.
What Do You Need?
- WebCenter Content: Imaging application
- To create an Application, you must have at least one of
these rights: Create rights or Administrator rights
Additionally, you must also have View permission to the connection repository that is used.
- To create a search, you must have at least one of these rights: Administrator, Search Definition Management Security Rights of Create, Search Definition Security Rights of Modify and Delete, Grant Access for the Manage Searches Panel
 Create
an Application
Create
an Application
- Login to the WebCenter Content: Imaging application.
- Click Manage Applications and then Create
Application.
The Create Application page appears with a series of tabs: General Properties, Field Definitions, Application Security, Document Security, Storage Policy, Workflow Configuration, and Review Settings. After providing the required information on a tab, click Next to proceed to the subsequent tab.
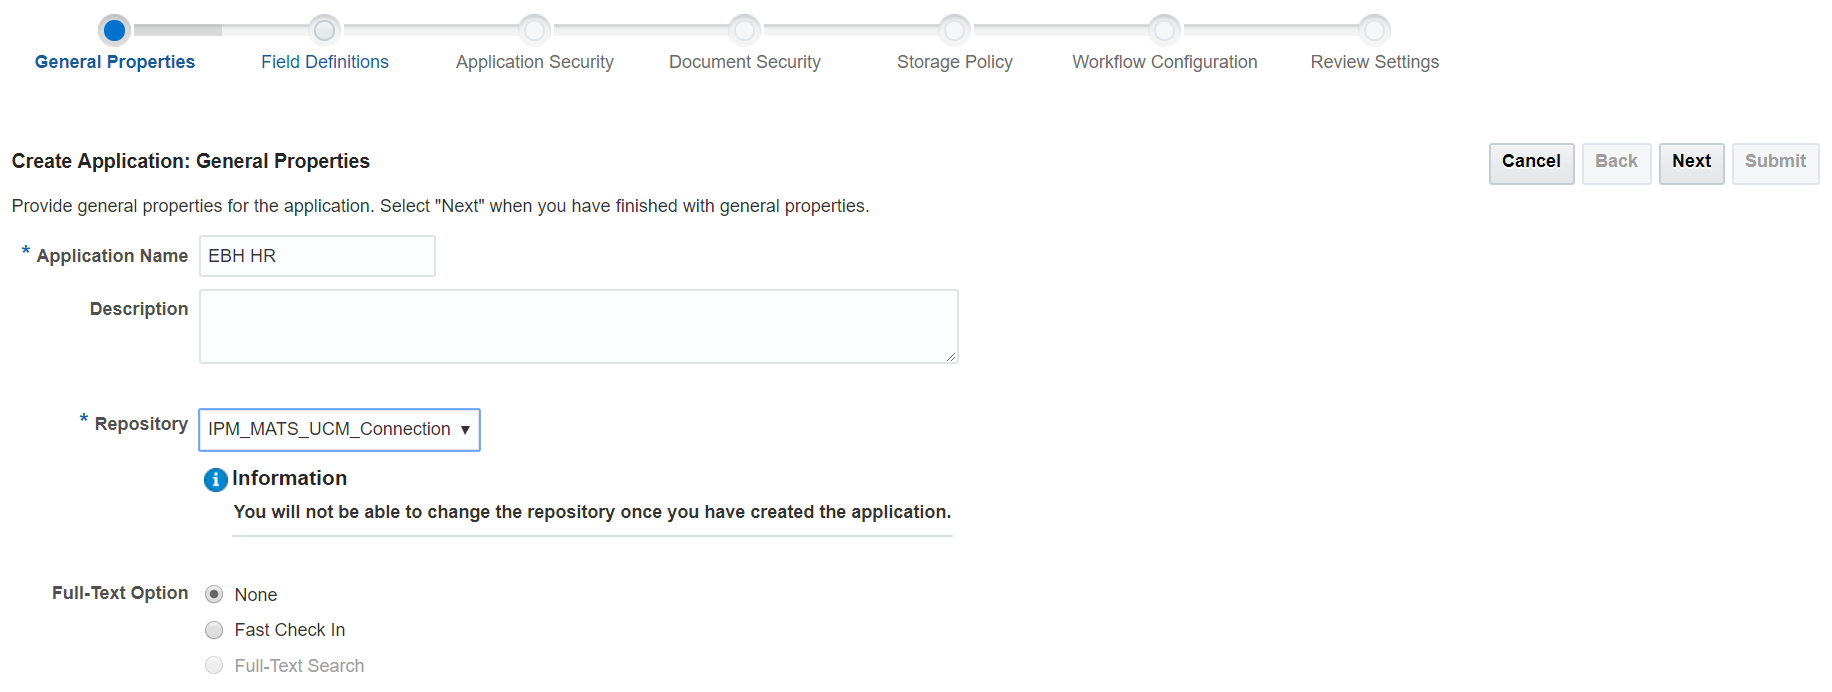
- In the General Properties tab, specify the following details:
- Application Name: Enter the application
name as
EBS HR - Repository: Select the Imaging repository
connection that stores the EBS HR Application and related
documents
Imaging leverages multiple instances of Content Server to store documents. The options available in this field are the Imaging repository connections to which the user has access.
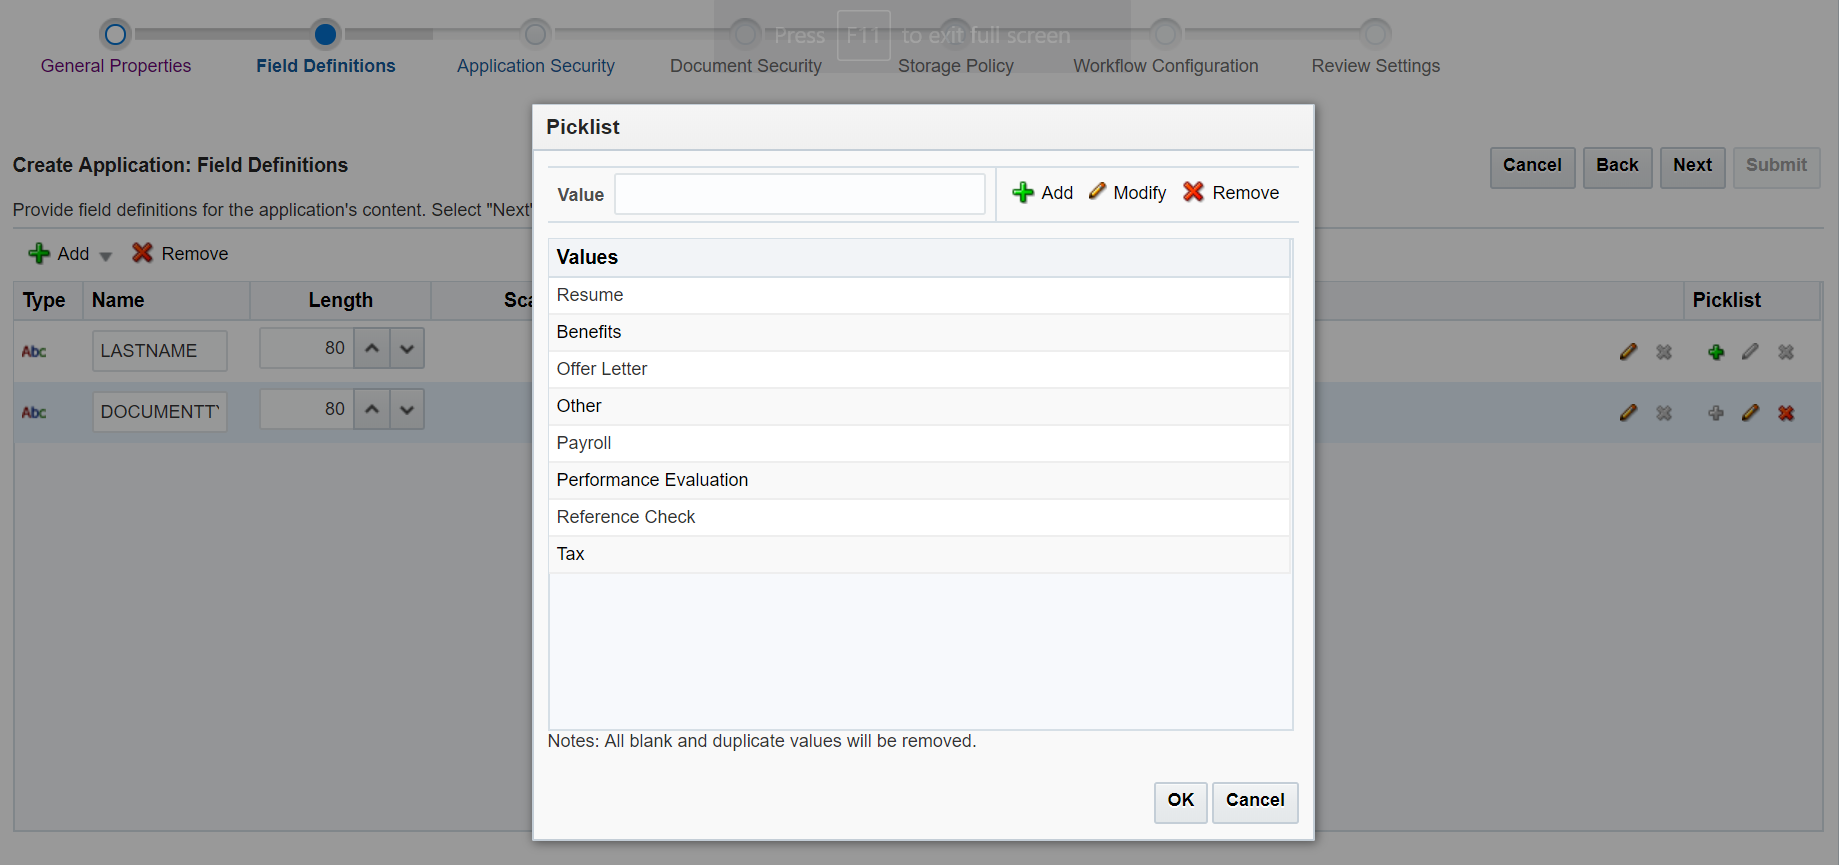
- In the Field Definitions tab, click Add and
select Text.
This tab lets you add the required fields to the Application. You can add as many fields as required.
- Add two fields and enter the following information:
- Name:
LASTNAME,DOCUMENTTYPE - Indexed: Select this check box to enable the repository to create database level indexes to accelerate searching
- Picklist: Add picklist options to the
DOCUMENTTYPE field by clicking
 and in the Picklist window, enter
the following options one after another:
and in the Picklist window, enter
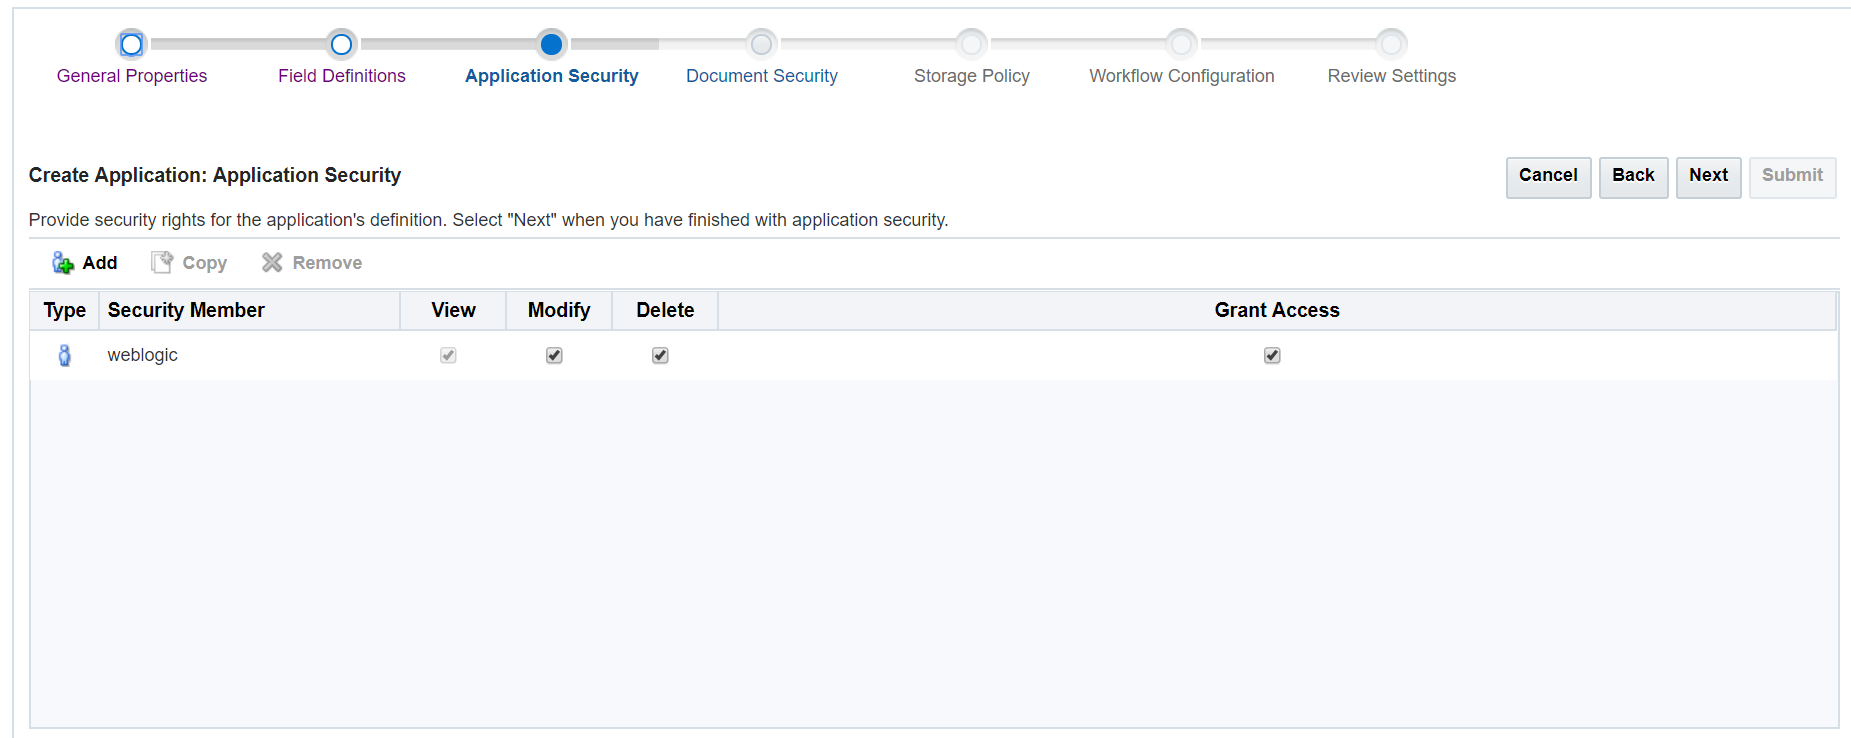
the following options one after another: Resume,Benefits,Offer Letter,Other,Payroll,Performance Evaluation,Reference Check, andTax - In the Application Security tab, click Add to select a user or group.
- Click Search and select the user or user group to which you want to assign Application permissions.
- Select the following check boxes based on the Application permissions you want to assign:
- Modify: The user or group can modify all aspects of the EBS HR Application except for granting the Security Rights to others for the Application
- Delete: The user or group can delete the EBS HR Application
- Grant Access: The user or group can grant security rights to others for the EBS HR Application
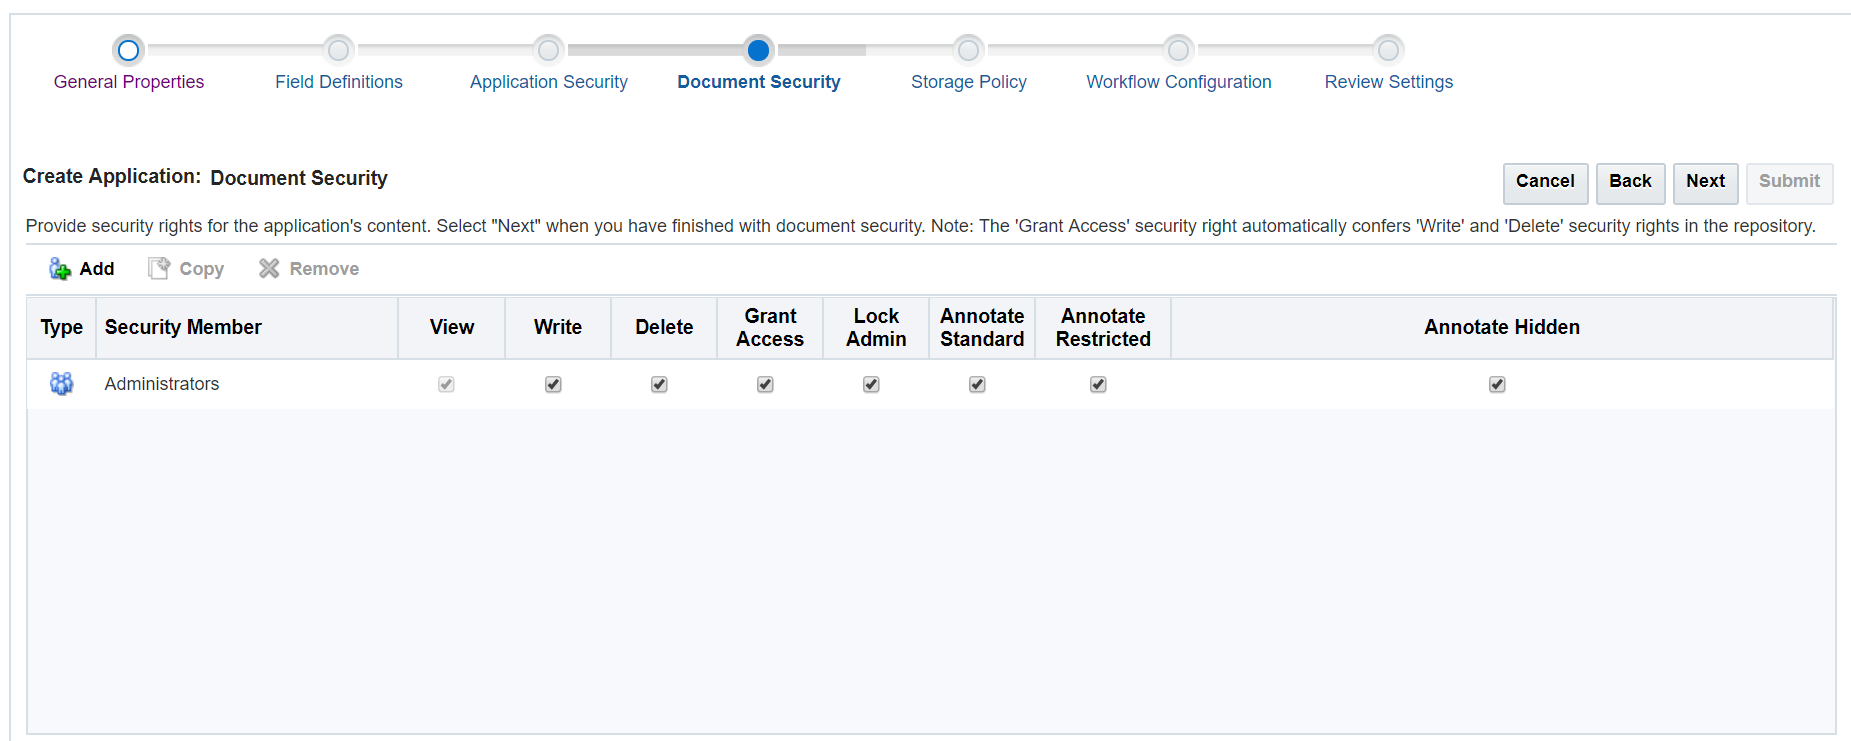
- In the Document Security tab, click Add to select a user group.
- Click Search and select the user group to which you want to assign the document permissions.
- Select the following check boxes based on the security rights you want to assign:
- Write: The user group can upload, update, and copy documents and document metadata within the EBS HR Application
- Delete: The user group can delete a specific document from the EBS HR Application
- Grant Access: The user group can assign document rights to other groups
- Lock Admin: The user group can unlock a locked document within the EBS HR Application
- Annotate Standard: The user group can view, create, modify, and delete security rights to annotations within the EBS HR Application, provided the annotations are not Restricted or Hidden
- Annotate Restricted: The user group can mark annotations within the EBS HR Application as Restricted and also create, modify, or delete annotations marked as Restricted by others
- Annotate Hidden: The user group can mark annotations within the EBS HR Application as Hidden and also create, modify, and delete annotations marked as Hidden by others
- In the Storage Policy tab, select the name of the storage
volume where documents and supporting content such as
annotations are stored.
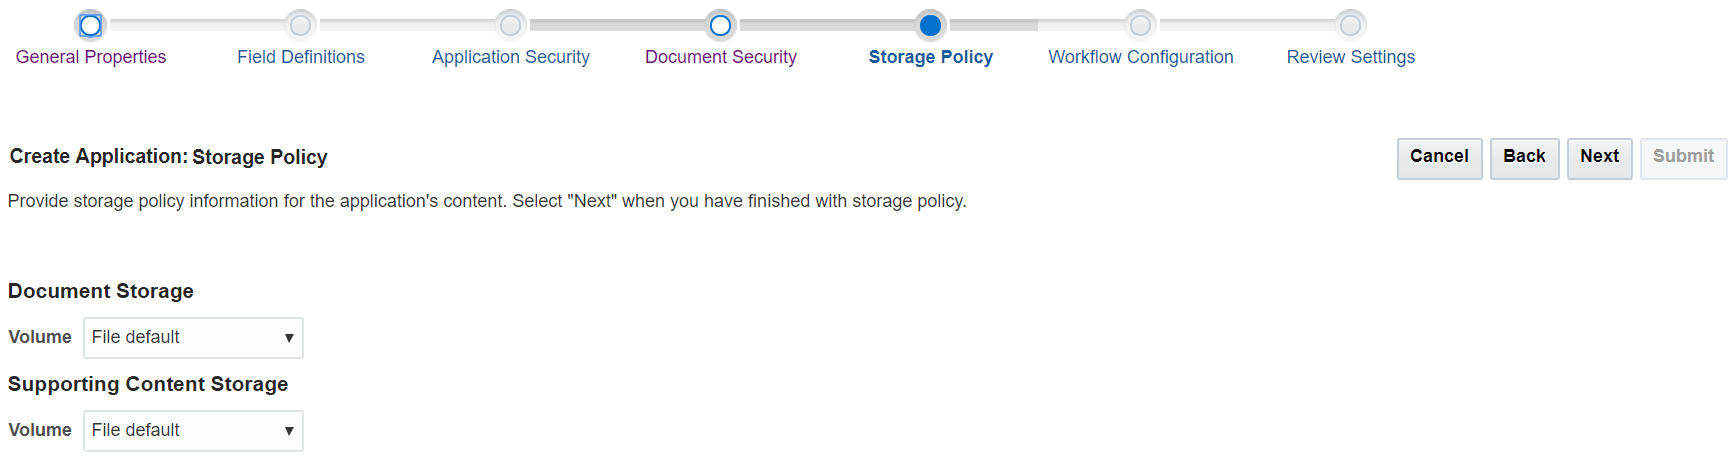
Description of the illustration Create Application: Storage Policy
Once the document is stored in WebCenter Content: Imaging,
optionally you can configure a workflow for the document in the
Workflow Configuration tab. See Application Workflow Configuration
Page in Administering Oracle WebCenter Content: Imaging.
- In the Review Settings tab, verify the entered data and click the Click to submit data button.
Note: Full-text search option is enabled during implementation when you create the Application. See Enabling Full-Text Searching in Administering Oracle WebCenter Content.
Note: The fields added in the Field Definitions tab are the metadata values that appear for the search in the Saved Search page.
Note: If the Write access is not provided, the Upload Document tool is unavailable.
Note: A Delete permission automatically assigns the Write permission.
Note: A Grant Access permission automatically assigns the Delete and Write permissions.
 Create
a Saved Search
Create
a Saved Search
- Click Manage Searches and then Create New Search. The Create Search page appears with a series of tabs: Properties, Results Formatting, Conditions, Parameters, Security, Preview and Test, and Review Settings. After providing the required information on a tab, click Next to proceed to the subsequent tab.
- In the Properties tab, enter
Picklist Searchin the Search Name field.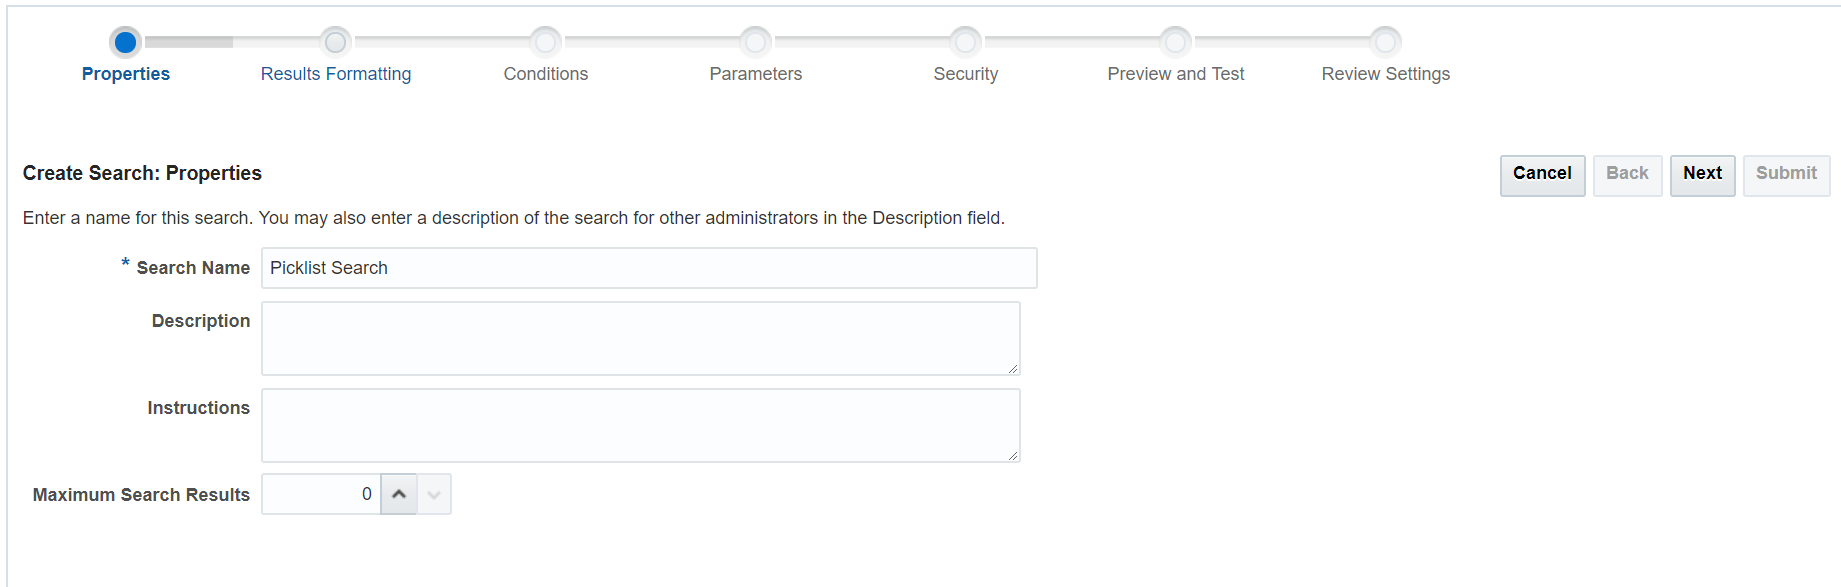
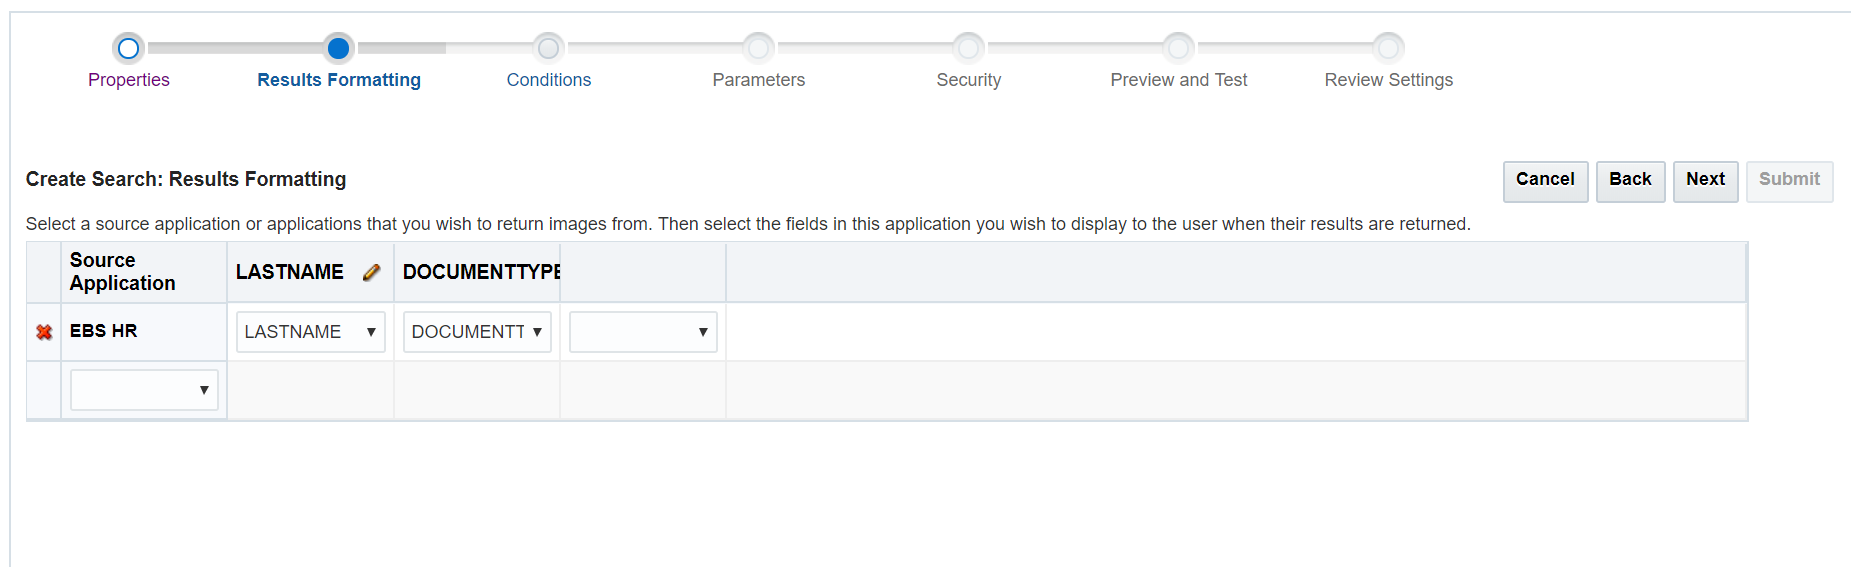
Description of the illustration Create Search: Properties - In the Results Formatting tab, select EBS HR
as the source application and then select the following fields:
LASTNAME and DOCUMENTTYPE.
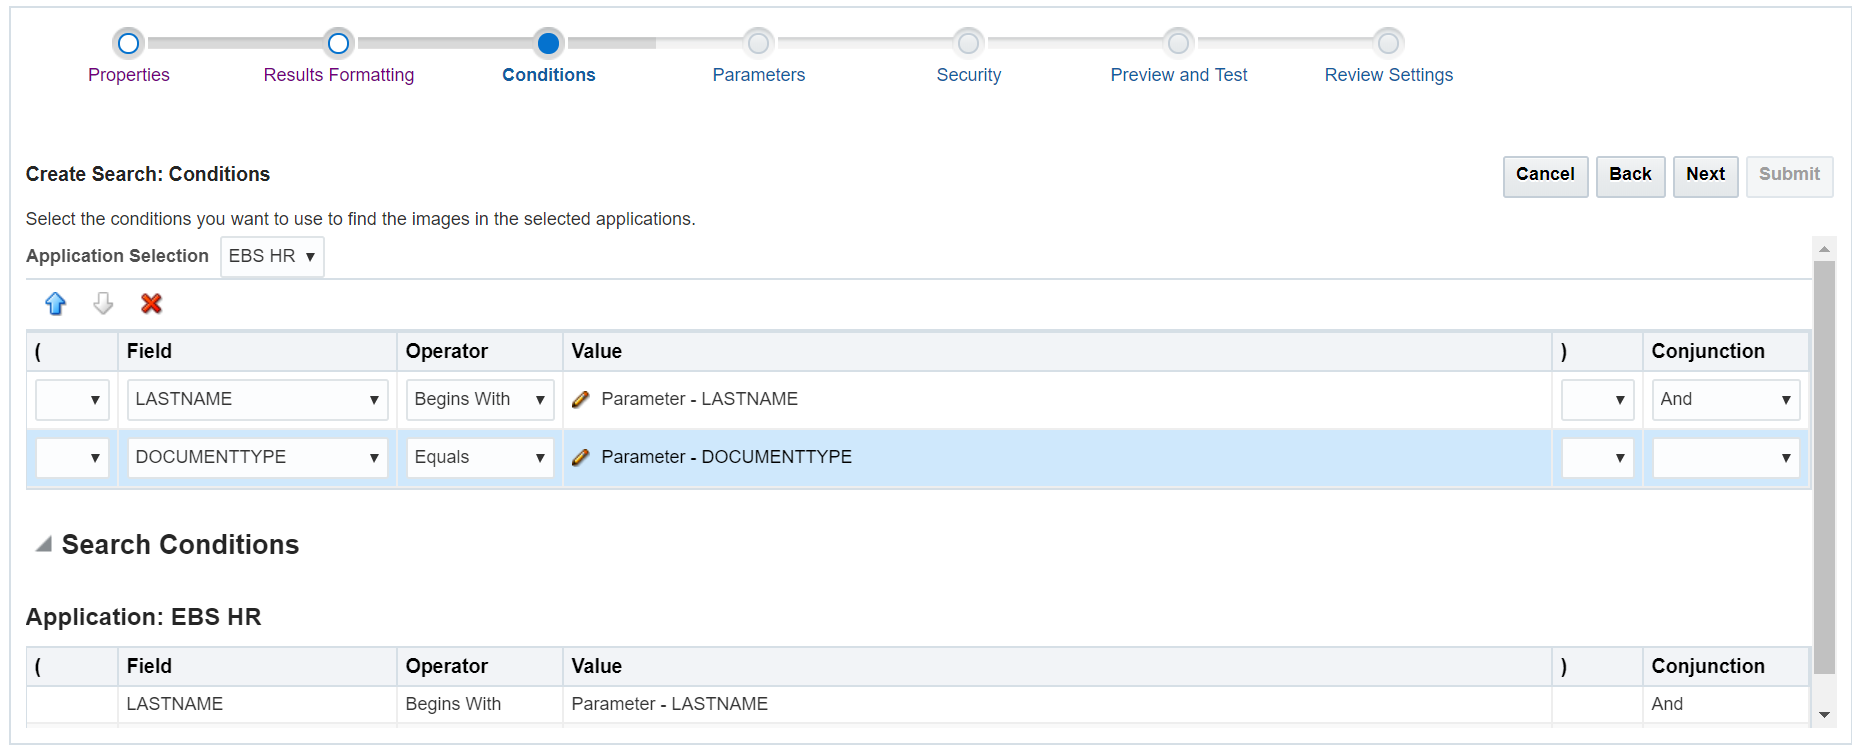
Description of the illustration Create Search: Results Formatting - In the Conditions tab, select the following values:
- Field: LASTNAME
- Operator: Begins With
- Conjunction: And
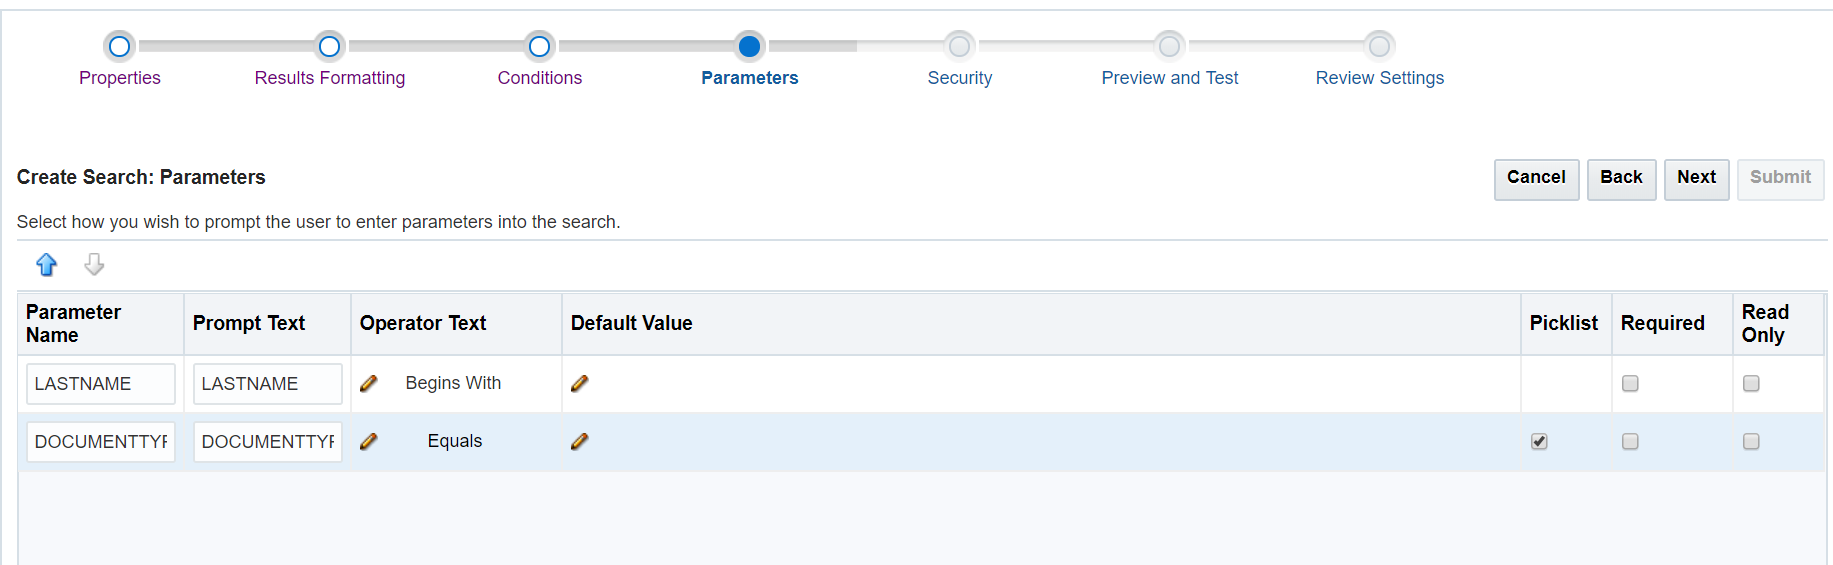
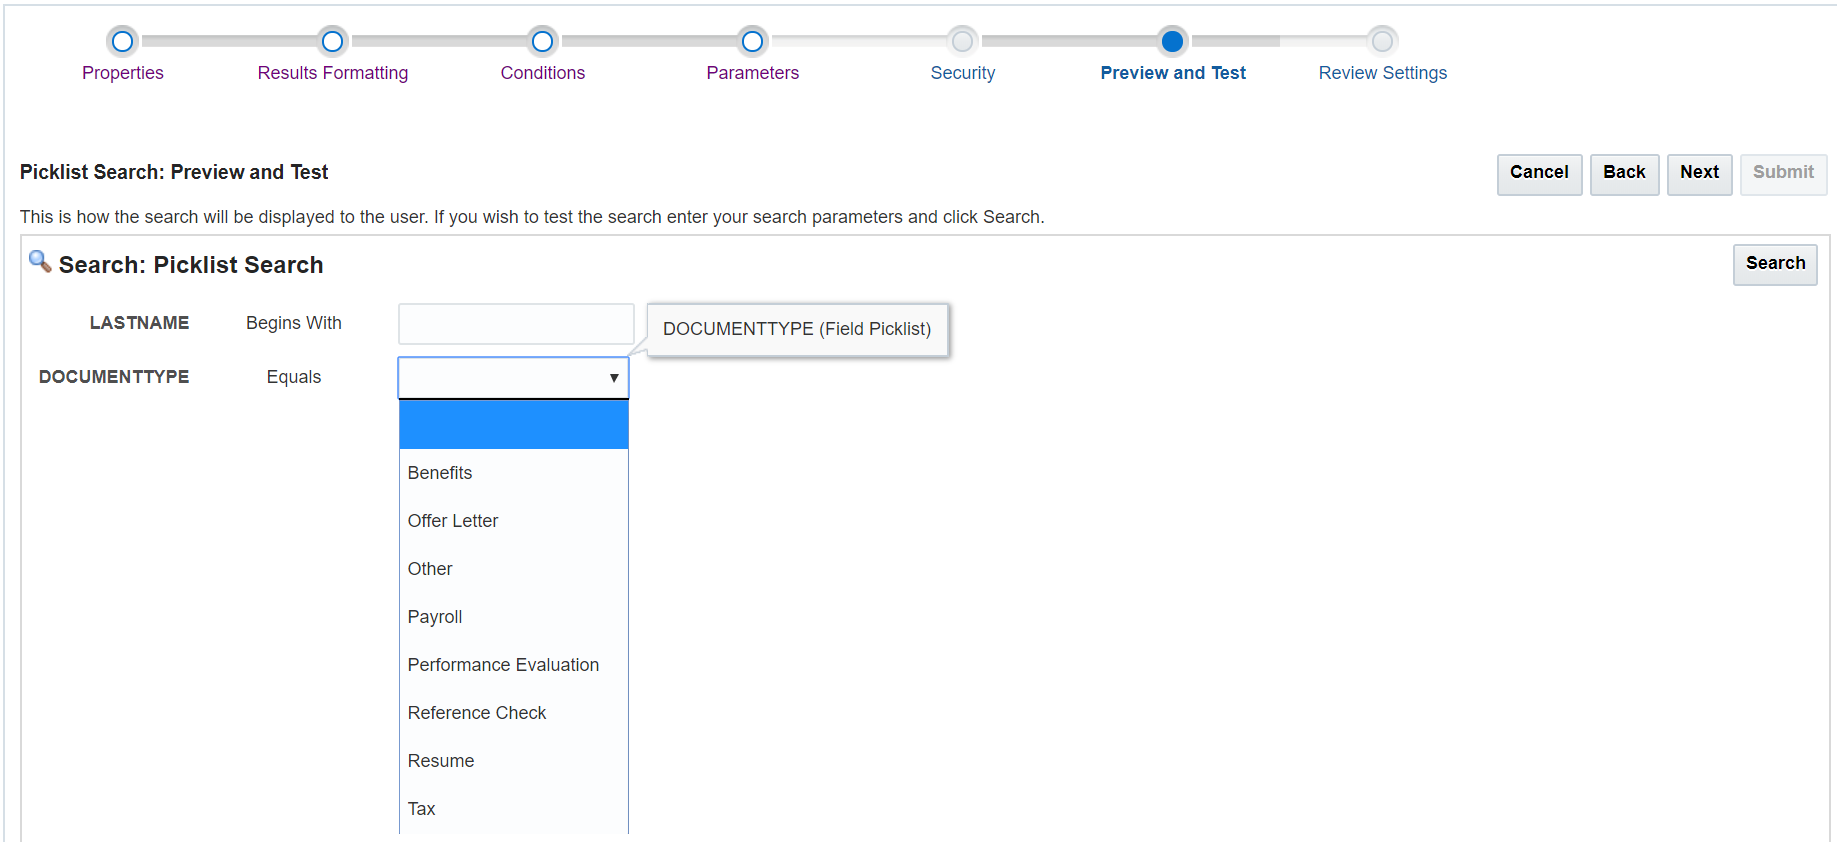
- In the Parameters tab, select the Picklist
check box.
This tab lets you determine how the search parameters should appear to the user. Since the Picklist Search parameters are not mandatory, you need not select the Required check box.
Description of the illustration Create Search: Parameters - In the Search Security tab, click Add to select a user or user group.
- Click Search and select a user or group to which you want to assign the security rights for the Picklist Search.
- Select the following check boxes based on the security rights you want to assign to the user or group:
- Modify: The user or group can modify all aspects of the Picklist Search except for granting security rights to other users
- Delete: The user or group can delete the Picklist Search
- Grant Access: The user or group can grant the security rights to other users for the Picklist Search
- In the Preview and Test tab, review the Picklist Search parameters. When a user accesses the Picklist Search page, the parameters are displayed in the same way as shown in the Preview and Test tab.
- In the Review Settings tab, verify the details and if you don't wish to make any modifications, click the Click to submit data button.

Notice that the Picklist options that you added when creating the EBS HR Application are available as values in the DOCUMENTTYPE drop-down list.
The Picklist Search that you created is available under Manage Searches.
 Upload
a Document
Upload
a Document
- Click Tools and then Upload Document. The Upload Document page appears. Notice that the EBS HR Application is available for selection and also the fields that you specified when creating this Application are available based on the conditions, parameters, and security rights defined while building the Picklist Search.
- Select EBS HR in the Select an Application field.
- Click Choose File and select the 'Offer Letter' document from your local drive.
- Select Offer Letter in the DOCUMENTTYPE field.
- Click Upload.

Note: You can enter the last name of the employee in the LASTNAME field.
 Verify
Search Results
Verify
Search Results
- Click Searches and then Picklist Search.
- Select Offer Letter in the DOCUMENTTYPE field.
- Click Search.
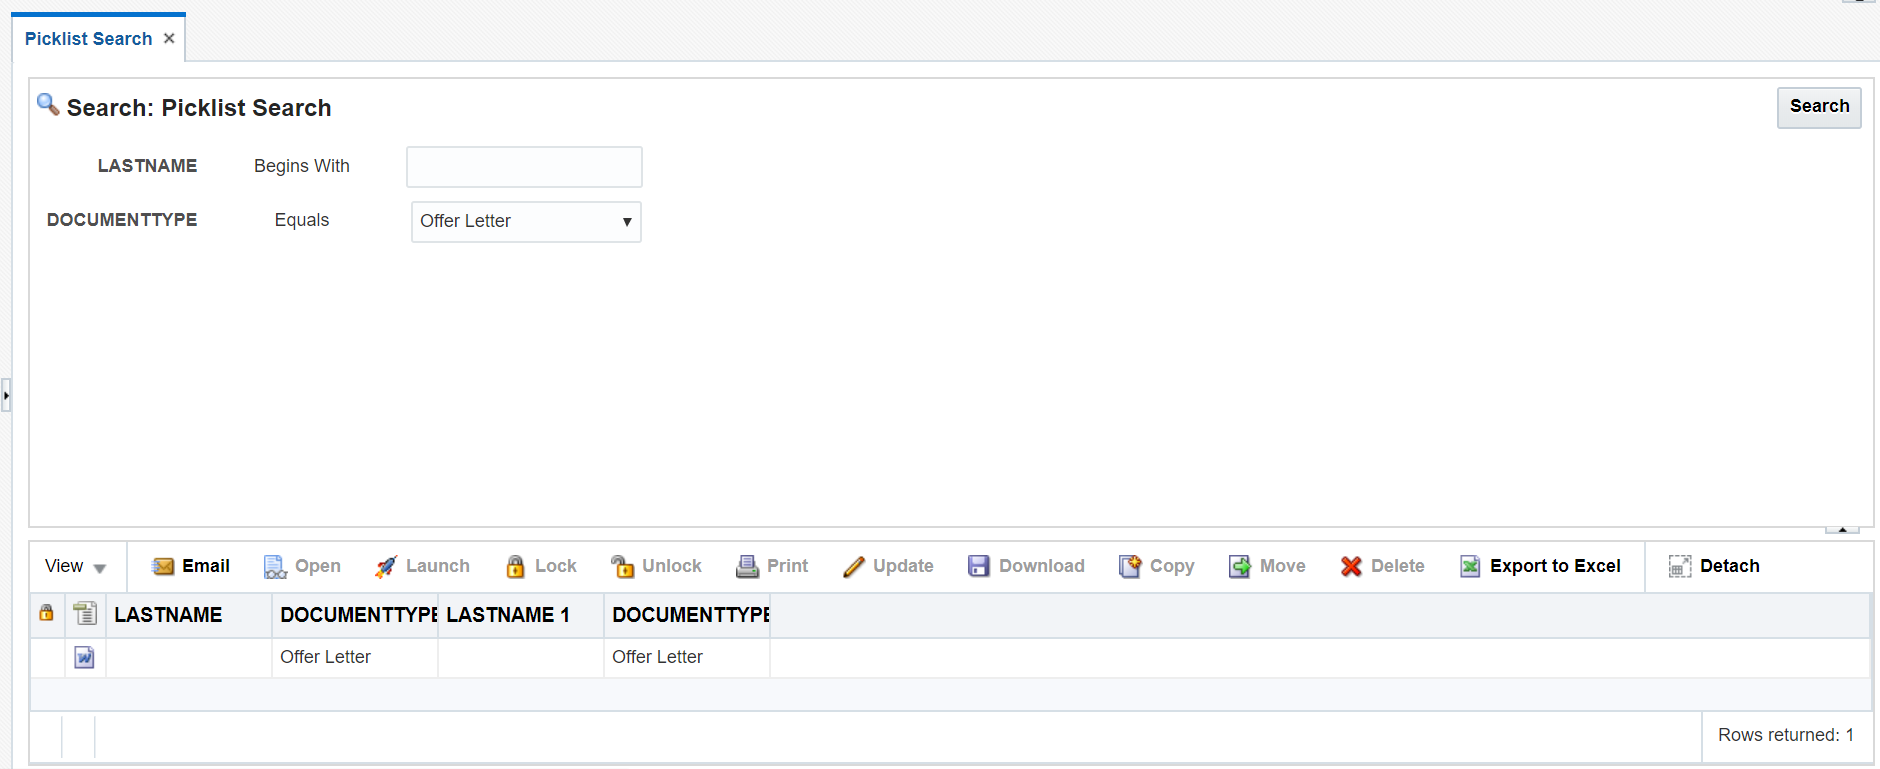
Description of the illustration Picklist Search Page
Notice that the document you uploaded appears in the Search Results section based on the entered search criteria. This indicates that the Picklist Search is functioning as expected.