Network Bonding

A system's physical network interfaces that are connected to a network switch can be grouped together into a single logical interface to provide better throughput or availability. This grouping, or aggregation, of physical network interfaces is known as a network bond.

A bonded network interface can increase data throughput by load balancing or can provide redundancy by activating failover from one component device to another. By default, a bonded interface appears similar to a normal network device to the kernel, but it sends out network packets over the available secondary devices by using a round-robin scheduler. You can configure bonding module parameters in the bonded interface's configuration file to alter the behavior of load-balancing and device failover.

The network bonding driver within the kernel can be used to configure the network bond in different modes to take advantage of different bonding features, depending on the requirements and the available network infrastructure. For example, the balance-rr mode can be used to provide basic round-robin load-balancing and fault tolerance across a set of physical network interfaces; while the active-backup mode provides basic fault tolerance for high availability configurations. Some bonding modes, such as 802.3ad, or dynamic link aggregation, require particular hardware features and configuration on the switch that the physical interfaces connect to. Basic load-balancing modes (balance-rr and balance-xor) work with any switch that supports EtherChannel or trunking. Advanced load-balancing modes (balance-tlb and balance-alb) don't impose requirements on the switching hardware, but do require that the device driver for each component interfaces implement certain specific features such as support for ethtool or the ability to change the hardware address while the device is active.

For more information on the kernel bonding driver, see the upstream documentation at https://www.kernel.org/doc/Documentation/networking/bonding.txt or included at /usr/share/doc/iputils-*/README.bonding.

Note:

For network configurations where systems are directly cabled together for high availability, a switch is required to support certain network interface bonding features such as automatic failover. Otherwise, the mechanism might not work.

Configuring Network Bonding Using the Command Line

Set up a network bond using the nmcli command line tool.
  1. Add a bond interface using the nmcli connection add command.
    sudo nmcli connection add type bond con-name "Bond Connection 1" ifname bond0 bond.options "mode=active-backup"

    Take note to set the bond connection name, the bond interface name, and, importantly, the bond mode option. In this example, the mode is set to active-backup. If you don't set the bond connection name, then the bond interface name is also used as the connection name.

  2. Optional: Configure the IP address for the bond interface using the nmcli connection modify command.

    By default the interface is configured to use DHCP, but if you require static IP addressing, manually configure the address. For example, to configure IPv4 settings for the bond, type:

    sudo nmcli connection modify "Bond Connection 1" \
    ipv4.addresses '192.0.2.2/24' \
    ipv4.gateway '192.0.2.1' \
    ipv4.dns '192.0.2.254' \
    ipv4.method manual
  3. Add the physical network interfaces to the bond as secondary-type interfaces using the nmcli connection add command.

    For example:

    sudo nmcli connection add type ethernet slave-type bond con-name bond0-if1 ifname enp1s0 master bond0
    sudo nmcli connection add type ethernet slave-type bond con-name bond0-if2 ifname enp2s0 master bond0

    Give each secondary a connection name, and select the interface name for each interface that you want to add. You can get a list of available interfaces by running the nmcli device command. Specify the interface name of the bond to which you want to attach the secondary network interfaces.

  4. Start the bond interface.
    sudo nmcli connection up "Bond Connection 1"
  5. Verify that the network interfaces have been added to the bond correctly.

    You can check this by looking at the device list again.

    sudo nmcli device
    ...
    enp1s0   ethernet  connected  bond0-if1
    enp2s0   ethernet  connected  bond0-if2

Configuring Network Bonding Using the Network Connections Editor

Set up a network bond using the nm-connection-editor graphical interface.
  1. Start the editor:
    sudo nm-connection-editor

    The Network Connections window opens.

  2. To add a connection, click the plus (+) button at the bottom of the window.

    Another window opens that prompts you for the type of connection to create.

  3. From the window's drop down list and under the Virtual section, select Bond, then click Create.

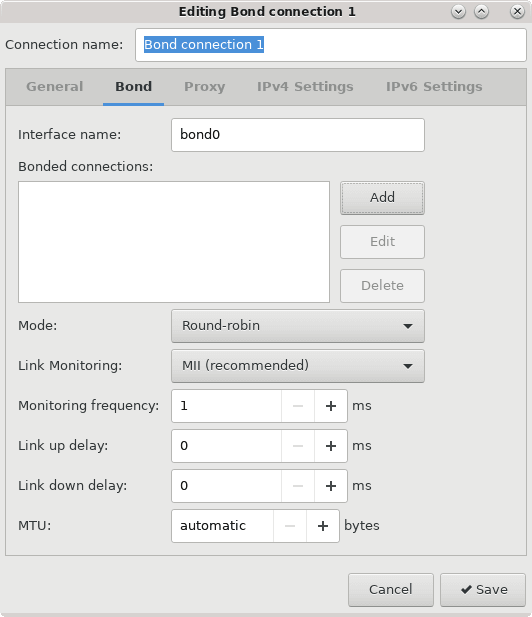
    The Network Bond Editor window opens.

    Network Bond Editor


    The figure shows the Network Connections interface editor open and ready to configure a new bonded network interface.
  4. Optional: Configure a connection name for the bond.
  5. For each physical network interface you want to add to the network bond, complete the following steps:
    1. Click the Add button.
      A new window opens where you can select the type of physical interface to add to the network bond.
    2. Select the type of connection you want to create, then click Create to configure the secondary interface.
      For example, you can select the Ethernet type to add an Ethernet interface to the network bond.
    3. Optional: Configure a name for the secondary interface.
    4. In the Device field, select the physical network interface to add as a secondary to the bond.

      Note:

      If a device is already configured for networking, it's not listed as available to configure within the bond.
    5. Click Save to add the secondary device to the network bond.
  6. In the Mode drop-down list, select the bonding mode that you want to use for the network bond.

    Note:

    Some modes might require more configuration on the network switch.
  7. Configure other bond parameters such as link monitoring as required if you don't want to use the default settings.
    If you don't intend to use DHCP for network bond IP configuration, set the IP addressing by clicking on the IPv4 and IPv6 tabs.
  8. Click Save to save the configuration and create the network bond.

Verifying the Network Bond Status

  1. Run the following command to obtain information about the network bond with device name bond0:
    cat /proc/net/bonding/bond0

    The output shows the bond configuration and status, including which bond secondaries are active. The output also provides information about the status of each secondary interface.

  2. Temporarily disconnect the physical cable that's connected to one of the secondary interfaces.
    No other reliable method is available to test link failure.
  3. Check the status of the bond link as shown in the initial step for this procedure.
    The status of the secondary interface would indicate that the interface is down and a link failure has occurred.