Chapter 9 Updating Client Systems
You can use either the Spacewalk web interface or the spacecmd command on the Spacewalk server to subscribe client systems to software channels and update client systems by using these channels. Alternatively, you can use the spacewalk-channel command on an individual Spacewalk client.
9.1 Subscribing Client Systems to Software Channels by Using the Spacewalk Web Interface

To subscribe systems to software channels:
-
Go to Systems and click the system name.
-
Select Software and then select the Software Channels tab.
-
Change the child or base software channels:
-
To change the child software channels to which a system is subscribed:
-
In the Software Channel Subscriptions section, select or deselect the check boxes next to the child software channels to which you want to want to subscribe or unsubscribe the client.
-
Click Change Subscriptions.
-
-
To change the base software channel to which a system is subscribed:
-
In the Base Software Channel section, select the new base software channel.
-
Click Confirm.
-
On the Confirm Base Software Channel page, click Modify Base Software Change.
NoteChanging the base software channel unsubscribes a system from all other software channels.
-
-
9.2 Subscribing Client Systems to Software Channels by Using the spacecmd Command
To list the base and child software channels to which a system is subscribed, use the system_listbasechannel and system_listchildchannels commands, as shown in the following example:
spacecmd {SSM:0}> system_listbasechannel svr1.mydom.com
ol6-x86_64
spacecmd {SSM:0}> system_listchildchannels svr1.mydom.com
ksplice-ol6-x86_64
ol6_x86_64_addons
ol6_x86_64_spacewalk27_client
ol6_x86_64_uekr3_latest
To list the available child channels of a base channel, use the softwarechannel_listchildchannels command:
spacecmd {SSM:0}> softwarechannel_listchildchannels oraclelinux6-x86_64
ksplice-ol6-x86_64
ol6_x86_64_addons
ol6_x86_64_playground
ol6_x86_64_spacewalk27_client
ol6_x86_64_spacewalk27_server
ol6_x86_64_uekr3_latest
To add or remove child channels, use the system_addchildchannels and system_removechildchannels commands, as shown in this example:
spacecmd {SSM:0}> system_removechildchannels svr1.mydom.com ol6_x86_64_addons
Systems
-------
svr1.mydom.com

Removing Channels
-----------------
ol6_x86_64_addons

Is this ok [y/N]: y

spacecmd {SSM:0}> system_addchildchannels svr2.mydom.com ol6_x86_64_playground
Systems
-------
svr2.mydom.com

Adding Channels
---------------
ol6_x86_64_playground

Is this ok [y/N]: y
To list the available base channels, use the softwarechannel_listbasechannels command:
spacecmd {SSM:0}> softwarechannel_listbasechannels
oraclelinux7u3-x86_64
oraclelinux7u4-x86_64
To change the base channel to which a system is subscribed, use the system_setbasechannel command:
spacecmd {SSM:0}> system_setbasechannel svr5.mydom.com oraclelinux7u4-x86_64
System:           svr5.mydom.com
Old Base Channel: oraclelinux7u3-x86_64
New Base Channel: oraclelinux7u4-x86_64

Is this ok [y/N]: y
Changing the base software channel unsubscribes a system from all other software channels.
You can change the subscribed channels for multiple systems by specifying the following arguments in place of a system name:
channel:
channel_name
Matches systems that are subscribed to the specified software channel.
group:
group_name
Specifies the systems in the named system group, for example, the following:
spacecmd {SSM:0}> system_removechildchannels group:group3 ol6_x86_64_playground
Systems
-------
svr1.mydom.com
svr2.mydom.com

Removing Channels
-----------------
ol6_x86_64_playground

Is this ok [y/N]: y
search:
criterion:value
Matches systems that match a search criterion. See Section 8.3, “Searching for Systems by Using the spacecmd Command”.
ssm: Specifies the systems that are currently
in the system set.
9.3 Listing and Applying Available Security Updates and Errata by Using the Spacewalk Web Interface
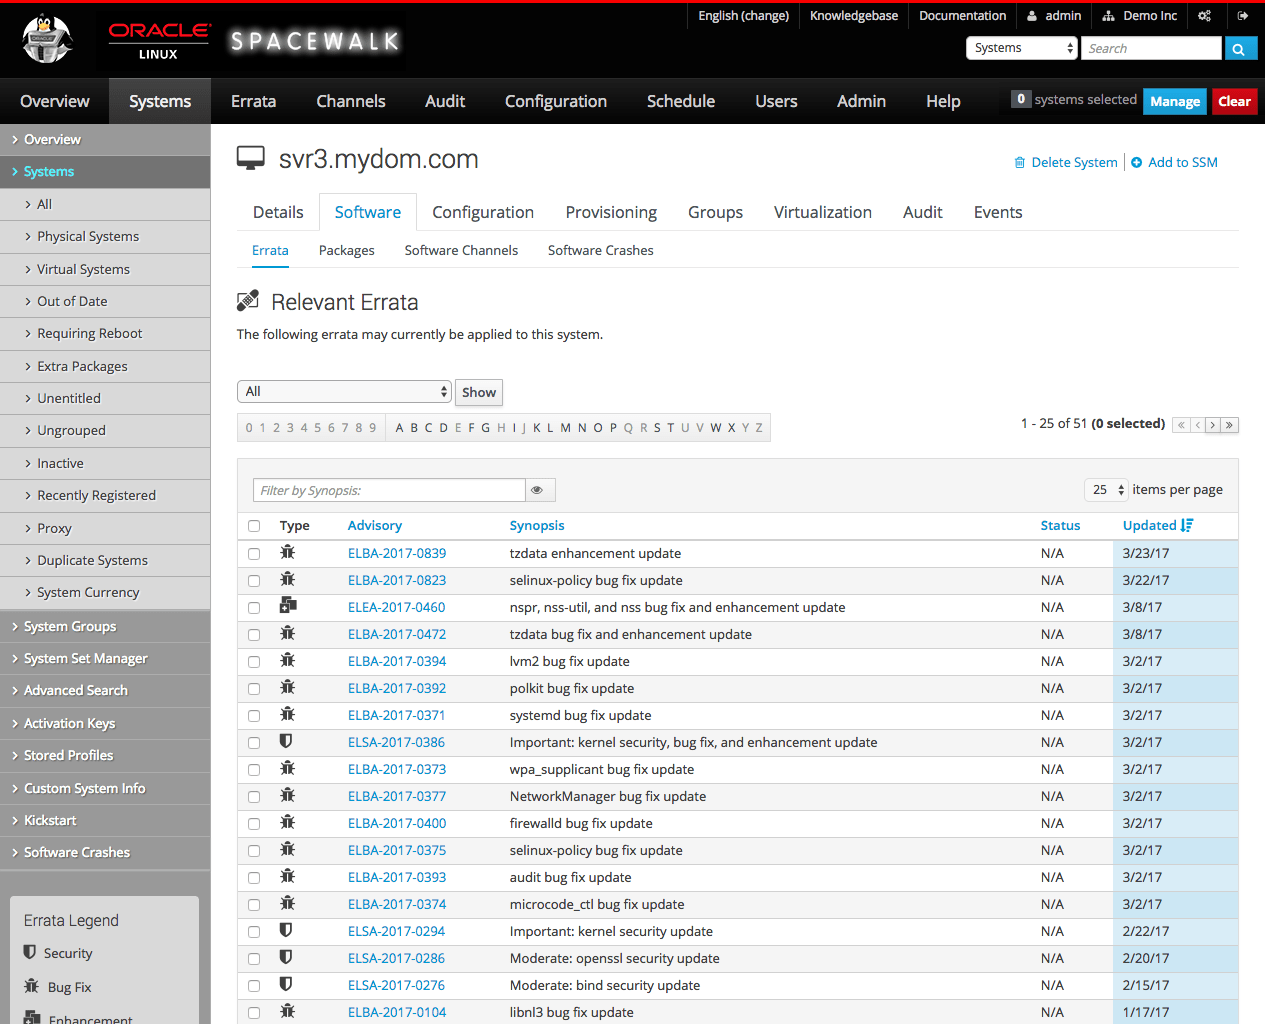
To list the available security updates and other errata for systems or system groups:
-
For systems:
-
Go to Systems and click the system name.
-
Select Software and then select the Errata tab.
Alternatively, click Critical or Non-Critical in the System Status pane to display the Relevant Errata page with security advisory or non-critical errata selected for display.
For system groups:
-
Go to System Groups and click the system group name.
-
On the Details page, click work with group.
Spacewalk loads the group into the System Set Manager.
-
In the System Set Manager, select the Errata tab.
-
-
On the Relevant Errata List page, select All, Non-Critical, Bug Fix Advisory, Product Enhancement Advisory, or Security Advisory from the pull-down list and click Show.
-
You can filter the list on the Synopsis value or sort the list by clicking Advisory, Synopsis, Status, Affected (system groups only), or Updated.
-
To see more details about an erratum listed under Advisory, select its name.
The CVEs section lists the CVEs that are fixed by an erratum. Click on a CVE name for more details.
-
To display the packages that are affected by an erratum, select the Packages tab.
-
To display the systems to which you can apply the erratum, select the Affected Systems tab.
-
-
To apply errata to systems or system groups:
-
Select the check boxes for the errata that you want to apply, or click Select All to select all of the listed errata.
-
Click Apply Errata.
-
On the Relevant Errata Confirm page, change the schedule if required, and click Confirm.
The page updates to include a link to the scheduled action.
If you have not edited the schedule and you have enabled the OSA daemon on the client, the OSA daemon usually installs the errata packages immediately. Otherwise,
rhnsdapplies the errata when it next runs on the client. -
Select Events and then select the Pending or History tab to view scheduled or completed actions. Click the summary name to display the status and details of the errata update on the client.
-
9.4 Listing and Applying Available Security Updates and Errata by Using the spacecmd Command
To list the security, bug fix, and product-enhancement advisory errata that are available for a client system, use the system_listerrata command:
spacecmd {SSM:0}> system_listerrata svr1.mydom.com
Security Errata
---------------
ELSA-2017-1095 Important: bind security update 4/19/17
ELSA-2017-0907 Moderate: util-linux security and bug fix update 4/12/17
ELSA-2017-0906 Moderate: httpd security and bug fix update 4/12/17
ELSA-2017-0933 Important: kernel security, bug fix, and 4/12/17

Bug Fix Errata
--------------
ELBA-2017-0992 lvm2 bug fix update 4/18/17
ELBA-2017-0928 NetworkManager bug fix update 4/13/17
ELBA-2017-0910 libtool bug fix update 4/12/17
ELBA-2017-0915 openssh bug fix update 4/12/17
ELBA-2017-0913 ca-certificates bug fix and enhancement update 4/12/17
ELBA-2017-0921 grubby bug fix update 4/12/17
ELBA-2017-0923 squid bug fix update 4/12/17
ELBA-2017-0905 irqbalance bug fix update 4/12/17
ELBA-2017-0909 systemd bug fix update 4/12/17
ELBA-2017-0904 dmidecode bug fix update 4/12/17
ELBA-2017-0911 initscripts bug fix update 4/12/17
To find out more details about an erratum, use the errata_details command:
spacecmd {SSM:0}> errata_details ELSA-2017-1095
Name: ELSA-2017-1095
Product: Oracle Linux 7
Type: Security Advisory
Issue Date: 4/19/17

Topic
-----


Description
-----------
[32:9.9.4-38.3] - Fix CVE-2017-3136 (ISC change 4575) - Fix
CVE-2017-3137 (ISC change 4578)

CVEs
----
CVE-2017-3136
CVE-2017-3137

Solution
--------
This update is available via the Unbreakable Linux Network (ULN) and
the Oracle Yum Server Server. Details on how to use ULN or http
://yum.oracle.com to apply this update are available at
https://linux.oracle.com/applying_updates.html.

References
----------
https://linux.oracle.com/errata/ELSA-2017-1095.html

Affected Channels
-----------------
ol7-x86_64-u3-patch

Affected Systems
----------------
3

Affected Packages
-----------------
bind-9.9.4-38.el7_3.3:32.x86_64
bind-chroot-9.9.4-38.el7_3.3:32.x86_64
bind-libs-9.9.4-38.el7_3.3:32.i686
bind-libs-9.9.4-38.el7_3.3:32.x86_64
bind-libs-lite-9.9.4-38.el7_3.3:32.i686
bind-libs-lite-9.9.4-38.el7_3.3:32.x86_64
bind-license-9.9.4-38.el7_3.3:32.noarch
bind-pkcs11-9.9.4-38.el7_3.3:32.x86_64
bind-pkcs11-libs-9.9.4-38.el7_3.3:32.i686
bind-pkcs11-libs-9.9.4-38.el7_3.3:32.x86_64
bind-pkcs11-utils-9.9.4-38.el7_3.3:32.x86_64
bind-utils-9.9.4-38.el7_3.3:32.x86_64
To find the errata that fix a CVE, use the errata_findbycve command:
spacecmd {SSM:0}> errata_findbycve CVE-2017-3136
CVE-2017-3136:
ELSA-2017-1095
To list the systems to which you could apply an erratum, use the errata_listaffectedsystems command:
spacecmd {SSM:0}> errata_listaffectedsystems ELSA-2017-1095
ELSA-2017-1095:
svr1.mydom.com
svr2.mydom.com
svr3.mydom.com
To apply an erratum to a system, use the system_applyerrata command:
spacecmd {SSM:0}> system_applyerrata svr1.mydom.com ELSA-2017-1095
Start Time [now]:
Errata Systems
-------------- -------
ELSA-2017-1095 1

Start Time: 20170421T10:01:40

Apply these errata [y/N]: y
INFO: Scheduled 1 system(s) for ELSA-2017-1095
You can apply errata to multiple systems by specifying the following arguments in place of a system name:
channel:
channel_name
Matches systems that are subscribed to the specified software channel.
group:
group_name
Specifies the systems in the named system group.
search:
criterion:value
Matches systems that match a search criterion. See Section 8.3, “Searching for Systems by Using the spacecmd Command”.
ssm: Specifies the systems that are currently
in the system set, for example, the following:
spacecmd {SSM:0}> ssm_add svr2.mydom.com svr3.mydom.com
spacecmd {SSM:2}> system_applyerrata ssm ELSA-2017-1095
Start Time [now]:
Errata Systems
-------------- -------
ELSA-2017-1095 2

Start Time: 20170421T10:02:23

Apply these errata [y/N]: y
INFO: Scheduled 2 system(s) for ELSA-2017-1095
9.5 Managing Packages for Systems by Using the Spacewalk Web Interface

To manage packages for a system:
-
Go to Systems and click the system name.
-
Select Software.
-
On the Packages page, select the tab or link for the package operation that you want to perform:
- Extra Packages
-
The Extra Packages page displays packages that are installed on a system, but which are not present in any of the subscribed channels.
NoteIf you registered an existing system, such as the Spacewalk server itself, as a client, it is possible that some of the installed packages are not present in any subscribed channel.
If the Spacewalk server is a client of itself, Oracle recommends that you synchronize the Spacewalk Server repository and associate it with the server so that the server receives Spacewalk Server software updates.
If one or more packages should not have been installed on a system:
-
Select the packages that you want to remove and click Remove Packages.
-
On the Confirm Package Removal page, change the schedule if required, and click Confirm.
The page updates to include a link to the scheduled action.
If you have not edited the schedule and you have enabled the OSA daemon on the clients, the OSA daemon usually removes the packages immediately.
Select Events and then select the Pending or History tab to view scheduled or completed actions. Click the summary name to display the details and status of the package removals.
-
- Install
-
-
On the Installable Packages page, select the packages that you want to install and click Install Selected Packages.
TipUse the package filter to locate a package.
To see more information about a package, click its name.
The Details page for the package lists any errata that include the package. To find out more information about an erratum, click its name.
The Details page for the erratum lists the CVEs that the erratum fixes. To find out more information about a CVE, click its name.
-
On the Confirm Package Install page, change the schedule if required, and click Confirm.
The page updates to include a link to the scheduled action.
If you have not edited the schedule and you have enabled the OSA daemon on the clients, the OSA daemon usually installs the packages immediately.
Select Events and then select the Pending or History tab to view scheduled or completed actions. Click the summary name to display the details and status of the package installations.
-
- List/Remove
-
-
On the Removable Packages page, select the packages that you want to remove and click Remove Packages.
-
On the Confirm Package Removal page, change the schedule if required, and click Confirm.
The page updates to include a link to the scheduled action.
If you have not edited the schedule and you have enabled the OSA daemon on the clients, the OSA daemon usually removes the packages immediately.
Select Events and then select the Pending or History tab to view scheduled or completed actions. Click the summary name to display the details and status of the package removals.
-
- Profiles
-
On the Profiles page, you can do the following:
-
Create a package profile from the set of packages that are currently installed on the system:
-
Click Create System Profile.
-
On the Create Stored Profile page, enter a name and description for the profile and then click Create Profile.
-
-
Compare the packages installed on this system with a stored package profile for this system or for another system:
-
In the Compare to Stored Profile section, select the profile name from the pull-down list and click Compare.
-
-
Compare the packages installed on this system with those installed on another system:
-
In the Compare to System section, select the system name from the pull-down list and click Compare.
-
-
- Upgrade
-
-
On the Upgradable Packages page, select the packages that you want to upgrade and click Upgrade Packages.
-
On the Confirm Package Upgrade page, change the schedule if required, and click Confirm.
The page updates to include a link to the scheduled action.
If you have not edited the schedule and you have enabled the OSA daemon on the clients, the OSA daemon usually upgrades the packages immediately.
Select Events and then select the Pending or History tab to view scheduled or completed actions. Click the summary name to display the details and status of the package upgrades.
-
- Verify
-
-
On the Verifiable Packages page, select the packages that you want to verify and click Verify Selected Packages.
-
On the Confirm Package Verification page, change the schedule if required, and click Confirm.
The page updates to include a link to the scheduled action.
If you have not edited the schedule and you have enabled the OSA daemon on the clients, the OSA daemon usually verifies the packages immediately.
Select Events and then select the Pending or History tab to view scheduled or completed actions. Click the summary name to display the details and status of the package verifications.
-
9.6 Managing Packages for Systems by Using the spacecmd Command
Create a package profile from the set of packages that are currently installed on a system by using the system_createpackageprofile command, for example:
spacecmd {SSM:0}> system_createpackageprofile svr1.mydom.com -n svr1-profile1 -d "svr1 profile 1"
INFO: Created package profile 'svr1-profile1'
To compare the packages installed on this system with a stored package profile for this system or for another system, use the system_comparepackageprofile command as follows:
spacecmd {SSM:0}> spacecmd {SSM:0}> system_comparepackageprofile svr2.mydom.com svr1-profile1
svr2.mydom.com:
Package  This System  Other System  Difference
-------  -----------  ------------  ----------
zsh      4.3.10-9.el6 None          Only here
To compare the packages installed on this system with those installed on another system, use the system_comparepackageprofile command:
spacecmd {SSM:0}> system_comparepackages svr1.mydom.com svr2.mydom.com
svr2.mydom.com:
Package  This System      Other System  Difference
-------  -----------      ------------  ----------
ypbind   1.20.4-30.el6:3  None          Only here
zsh      None             4.3.10-9.el6  Only there
To display the details of an installable package, use the package_details command:
spacecmd {SSM:0}> package_details zsh
...
Name:    zsh
Version: 4.3.10
Release: 9.el6
Epoch:
Arch:    x86_64

File:    zsh-4.3.10-9.el6.x86_64.rpm
Path:    redhat/1/f5a/zsh/4.3.10-9.el6/x86_64/f5a...59c/zsh-4.3.10-9.el6.x86_64.rpm
Size:    2238632
MD5:     None

Installed Systems: 1

Description
-----------
The zsh shell is a command interpreter usable as an interactive login
shell and as a shell script command processor.  Zsh resembles the ksh
shell (the Korn shell), but includes many enhancements.  Zsh supports
command line editing, built-in spelling correction, programmable
command completion, shell functions (with autoloading), a history
mechanism, and more.

Available From Channels
-----------------------
oraclelinux6-x86_64
...
To install a package on a system, use the system_installpackage command:
spacecmd {SSM:0}> system_installpackage svr1.mydom.com zsh
svr1.mydom.com:
** Generating package cache **
zsh-4.3.10-9.el6.x86_64

Install these packages [y/N]: y
INFO: Scheduled 1 system(s)
spacecmd {SSM:0}> schedule_list
ID      Date                 C    F    P     Action
--      ----                ---  ---  ---    ------
401     20150618T15:22:51     0    0    1    Package Install
...
spacecmd {SSM:0}> schedule_details 401
ID:        401
Action:    Package Install
User:      swadmin
Date:      20150618T15:22:51

Completed:   0
Failed:      0
Pending:     1

Pending Systems
---------------
svr1.mydom.com
To list the package upgrades that are available for a system, use the system_listupgrades command:
spacecmd {SSM:0}> system_listupgrades svr1.mydom.com
bash-4.1.2-29.el6.0.1.x86_64
wget-1.12-5.el6_6.1.x86_64
To upgrade the packages on a system, use the system_upgradepackage command:
spacecmd {SSM:0}> system_upgradepackage svr1.mydom.com *
svr1.mydom.com:
bash-4.1.2-29.el6.0.1.x86_64
wget-1.12-5.el6_6.1.x86_64

Install these packages [y/N]: y
INFO: Scheduled 1 system(s)
To remove a package from a system, use the system_removepackage command:
spacecmd {SSM:0}> system_removepackage svr1.mydom.com busybox*
svr1.mydom.com:
busybox-1.15.1-20.el6:1.x86_64

Remove these packages [y/N]: y
INFO: Action ID: 403
INFO: Scheduled 1 system(s)
9.7 Managing Packages for System Groups by Using the Spacewalk Web Interface
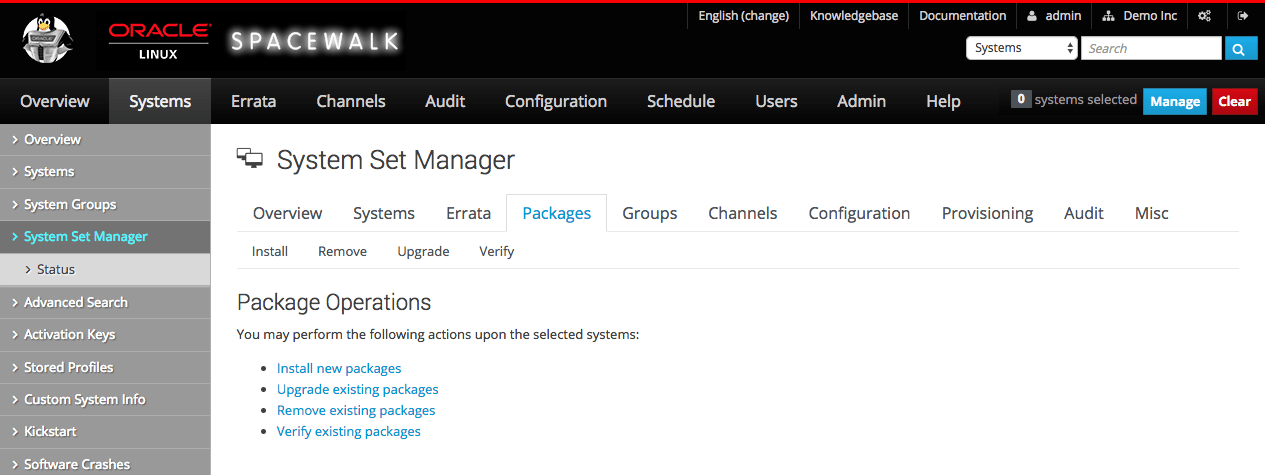
To manage packages for system groups, follow these steps:
-
Go to System Groups and click the system group name.
-
On the Details page, click work with group.
Spacewalk loads the group into the System Set Manager.
-
In the System Set Manager, select the Packages tab.
-
On the Package Operations page, select the tab or link for the package operation that you want to perform:
- Install
-
-
On the Select Channel page, select the channel that contains the packages that you want to install on the systems in the system group.
-
On the Select Packages to Install page, select the packages that you want to install and click Install Selected Packages.
TipUse the package filter to locate a package.
To see more information about a package, click its name.
The Details page for the package lists any errata that include the package. To find out more information about an erratum, click its name.
The Details page for the erratum lists the CVEs that the erratum fixes. To find out more information about a CVE, click its name.
-
On the Confirm Package Install page, change the schedule if required, and click Confirm.
The page updates to include a link to the scheduled action.
If you have not edited the schedule and you have enabled the OSA daemon on the clients, the OSA daemon usually installs the packages immediately.
The Tasks Log page in the System Set Manager shows the status of the package installations.
-
- Remove
-
-
On the Package Removal page, select the packages that you want to remove and click Remove Selected Packages.
-
On the Confirm Package Removal page, change the schedule if required, and click Confirm.
The page updates to include a link to the scheduled action.
If you have not edited the schedule and you have enabled the OSA daemon on the clients, the OSA daemon usually removes the packages immediately.
The Tasks Log page in the System Set Manager shows the status of the package removals.
-
- Upgrade
-
-
On the Select Packages to Upgrade page, select the packages that you want to upgrade and click Upgrade Selected Packages.
-
On the Confirm Package Upgrade page, change the schedule if required, and click Confirm.
The page updates to include a link to the scheduled action.
If you have not edited the schedule and you have enabled the OSA daemon on the clients, the OSA daemon usually upgrades the packages immediately.
The Tasks Log page in the System Set Manager shows the status of the package upgrades.
-
- Verify
-
-
On the Verifiable Packages page, select the packages that you want to verify and click Verify Selected Packages.
-
On the Confirm Package Verification page, change the schedule if required, and click Confirm.
The page updates to include a link to the scheduled action.
If you have not edited the schedule and you have enabled the OSA daemon on the clients, the OSA daemon usually verifies the packages immediately.
The Tasks Log page in the System Set Manager shows the status of the package verifications.
-
9.8 Managing Packages for System Groups by Using the spacecmd Command
Compare the packages that are installed on the systems in a system group with a stored package profile by using the system_comparepackageprofile command, as shown in the following example:
spacecmd {SSM:0}> system_comparepackageprofile group:group1 svr1-profile1
svr3.mydom.com:
Package  This System  Other System  Difference
-------  -----------  ------------  ----------
zsh      None         4.3.10-9.el6  Only there

##############################

svr4.mydom.com:
Package  This System  Other System  Difference
-------  -----------  ------------  ----------
zsh      None         4.3.10-9.el6  Only there
To install a package on the systems in a system group, use the system_installpackage command as follows:
spacecmd {SSM:0}> system_installpackage group:group1 zsh
svr3.mydom.com:
zsh-4.3.10-9.el6.x86_64

##############################

svr4.mydom.com:
zsh-4.3.10-9.el6.x86_64

Install these packages [y/N]: y
INFO: Scheduled 2 system(s)
To list the package upgrades that are available for the systems in a system group, use the system_listupgrades command:
spacecmd {SSM:0}> system_listupgrades group:group1
svr3.mydom.com:
bash-4.1.2-29.el6.0.1.x86_64
wget-1.12-5.el6_6.1.x86_64

##############################

svr4.mydom.com:
wget-1.12-5.el6_6.1.x86_64
To upgrade the packages on the systems in a system group, use the system_upgradepackage command:
spacecmd {SSM:0}> system_upgradepackage group:group1 *
svr3.mydom.com:
bash-4.1.2-29.el6.0.1.x86_64
wget-1.12-5.el6_6.1.x86_64

##############################

svr4.mydom.com:
wget-1.12-5.el6_6.1.x86_64

Install these packages [y/N]: y
INFO: Scheduled 2 system(s)
To remove a package from the systems in a system group, use the system_removepackage command:
spacecmd {SSM:0}> system_removepackage svr1.mydom.com busybox*
svr3.mydom.com:
busybox-1.15.1-20.el6:1.x86_64

##############################

svr4.mydom.com:
busybox-1.15.1-20.el6:1.x86_64

Remove these packages [y/N]: y
INFO: Action ID: 407
INFO: Action ID: 408
INFO: Scheduled 2 system(s)