Using OCI Bastion for Researchers
Bastions (also commonly known as jump boxes, jump hosts, or Gateway VMs) are virtual machines living in a public subnet and used as a go-between to access otherwise unreachable resources. In research setups, they are used to access clusters sitting in a private subnet (the bastion is shown in yellow in the standard architecture diagram below), and are a recommended component in the RDMA HPC Cluster and Lustre DFS setups.
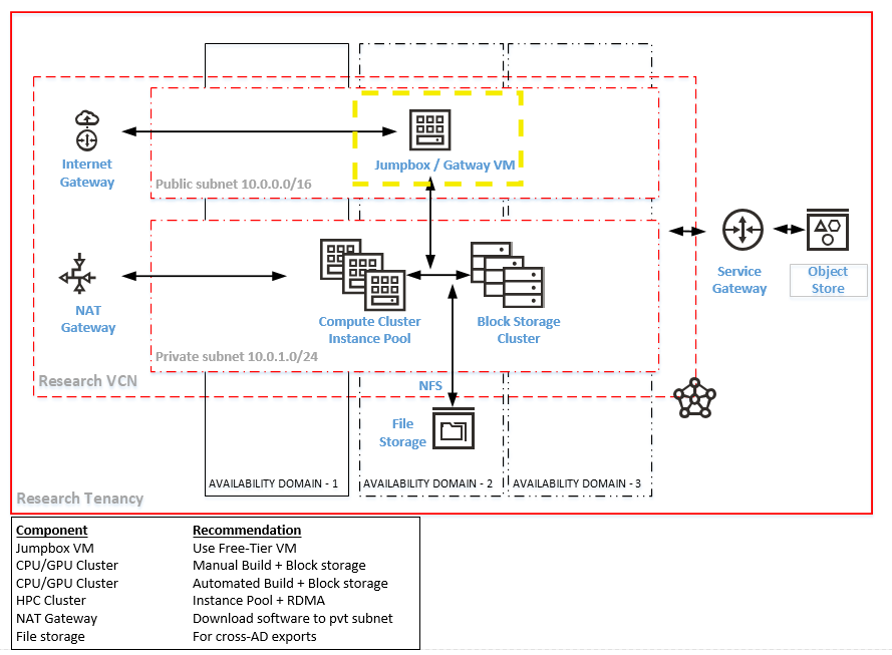
While Bastions are a common component, they do require a public IP/subnet (which comes with its own risks) and are an additional piece in an architecture that researchers must create and manage.
To simplify secure access to private resources, Oracle has released Oracle Cloud Infrastructure (OCI) Bastion. This is a fully managed service that provides restricted and time-limited SSH access to private hosts, and means you no longer need to maintain a dedicated virtual machine.
I’ll now show two ways we can setup the Bastion service to connect directly to instances on a private subnet. The first is directly within the OCI console and the second shows how to add Bastion into an existing Terraform setup.
Option 1. Setting up the Bastion Service using the Console
First things first, you’ll need to have the right permissions: if you’re an administrator in the tenancy or compartment you should be good, otherwise you can have an admin complete the steps to create the Bastion, and then give you 'use bastion-session' permission for day-to-day operations.
You’ll also need an instance to connect to. To support OCI Bastion, the target resource (in this case, the compute instance demo-private-server) must have the Bastion plugin enabled. The screenshot below shows the Instance’s Oracle Cloud Agent screen with this option checked. More details are given in this blog post.
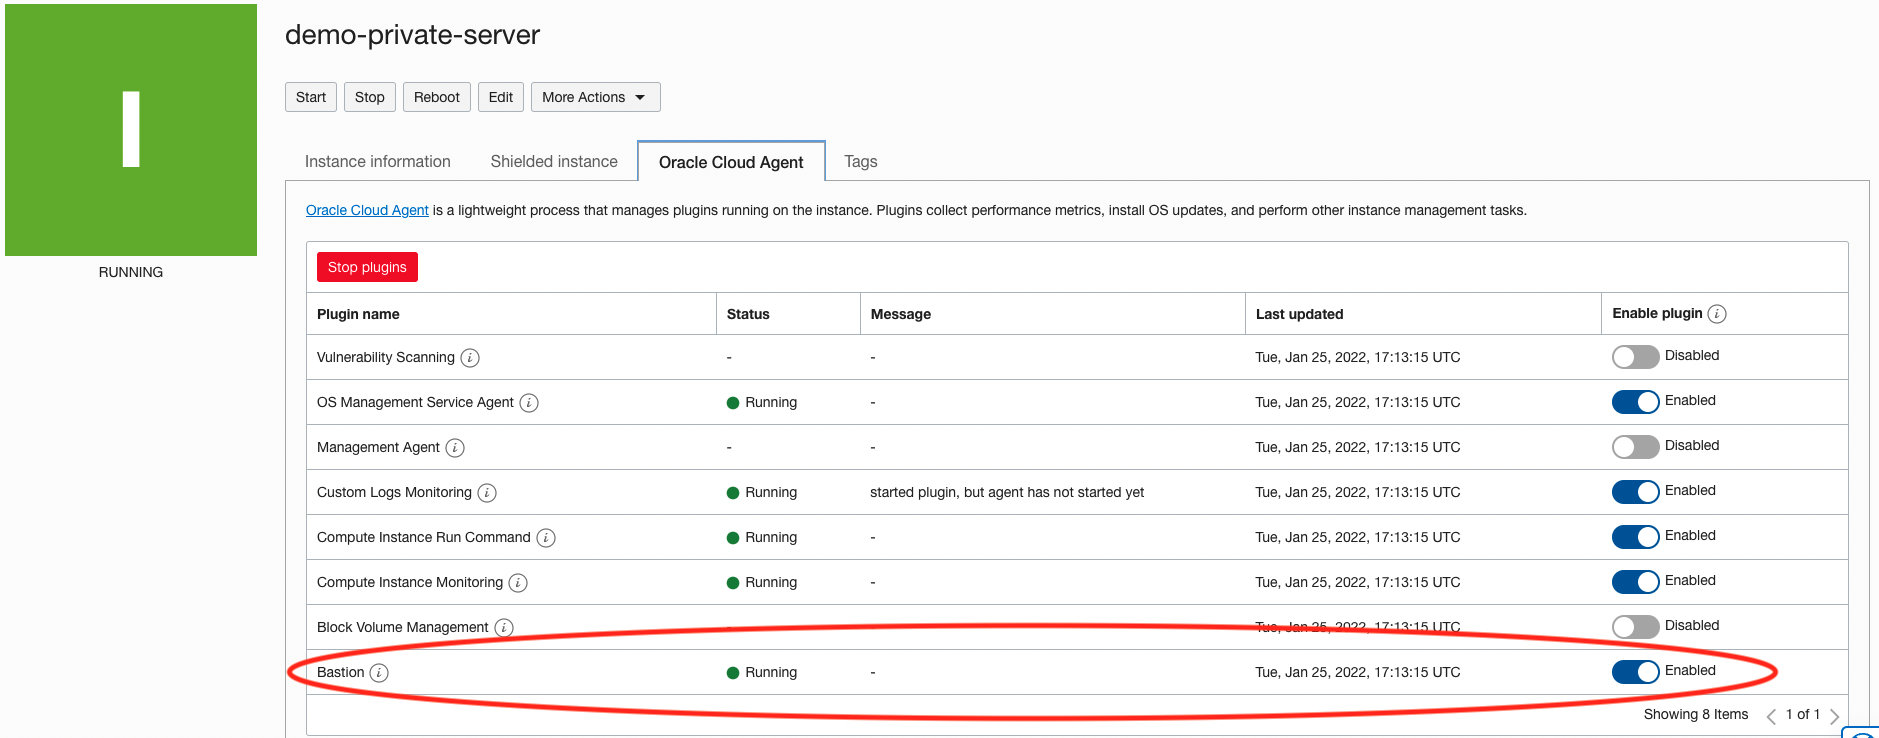 Note, it can take up to 10 minutes for your plugin change to be applied.
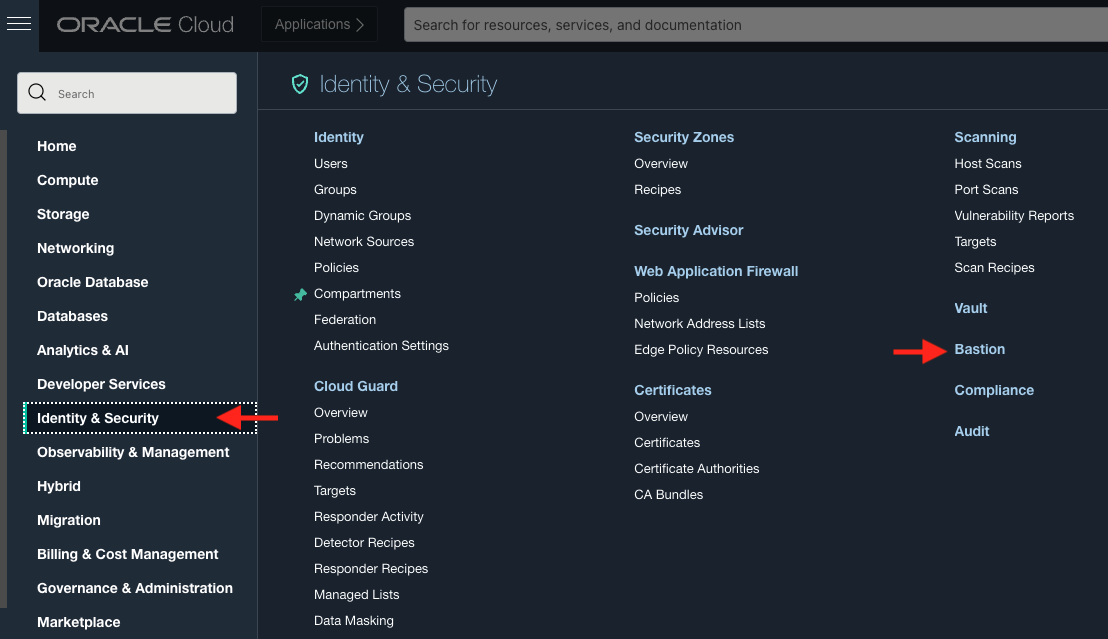
Now, go to the ‘Bastion’ page in the console (under Identity & Security)
Ensure you’re in the right compartment and click Create bastion.
Select your VCN, and the private subnet. In the CIDR block allowlist, add your IP address (or CIDR range for your institution/VPN if you have this and you’re comfortable doing so). For now, keep the default TTL and tags and click Create. It should take about a minute for the Bastion to be created.
We can now create a Bastion session. A session lets authorized users (via SSH keys) connect to a target resource for a predetermined amount of time. Each Bastion can support up to 20 sessions. To do this, you can click Create session from the Bastion.
When specifying a Bastion session, you have the option of two main types of connection:
- Managed SSH session
- SSH port forwarding session
The type you’ll pick depends on your target resource and what you’re trying to do (you can read more here). For our purposes today, a Managed SSH session will work.
When creating the session you can keep the Session name as the default, but the Username must be one that already exists on the machine (with a home directory). We will use opc. For SSH key we can provide a pre-generated public key or create a key pair right from this dialog.
The advanced options let you change the Maximum session Time-to-Live (how long a session can persist) as well as the Target compute instance port the session will connect to (important if not using the standard port 22).
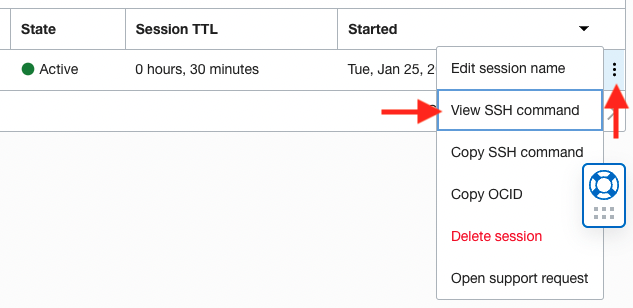
Once the session is created you can find an SSH command to use for connecting. This is found in the additional options under the three dots (see the screenshot below). You will need to modify the command with a path to your SSH private key for it to work.
The command will look something like this:
ssh -v -i <privateKey> -o ProxyCommand="ssh -v -i <privateKey> -W %h:%p -p 22 <bastion_session_ocid>@host.bastion.<region>.oci.oraclecloud.com" -p 22 opc@<compute_instance_private_ip>
Option 2. Setting up the Bastion Service using Terraform
As an alternative to the OCI Console, you can setup a Bastion directly in your Terraform scripts. Terraform is a tool that lets you deploy, configure and manage resources (e.g. infrastructure) through code.
The “Set Up a Simple Infrastructure with OCI Terraform” tutorial is an excellent introduction to OCI setups with Terraform. The example shown here can built on top of this tutorial environment to let you setup and evaluate the Bastion service through Terraform yourself.
As before, the Bastion plugin needs to be enabled on the VM. We can do this by adding an agent_config block inside the resource block for our private compute instance. For example:
# Example private-compute.tf file

resource "oci_core_instance" "<terraform_instance_identifier>" {

    # Required
    availability_domain =  data.oci_identity_availability_domains.ads.availability_domains[0].name
    compartment_id = oci_identity_compartment.tf-compartment.id
    shape = "VM.Standard2.1" # An example shape
    source_details {
        source_id = "<compute_instance_image_ocid>"
        source_type = "image"
    }

    # Optional
    display_name = "<compute_instance_display_name>"

    create_vnic_details {
        assign_public_ip = false
        subnet_id = oci_core_subnet.vcn-private-subnet.id
    }

    metadata = {
        ssh_authorized_keys = file("<path_to_public_key")
    }

    preserve_boot_volume = false

    agent_config {
        plugins_config {
            desired_state = "ENABLED"
            name = "Bastion"
        }
    }
}
Apply the terraform (terraform apply) and the Plugin will be enabled. It may take up to 10 minutes to take effect.
The Bastion service has its own resource, and we can create a new service within our OCI environment (this command may take a few minutes):
# Save this file as bastion.tf

resource "oci_bastion_bastion" "test_bastion" {

    #Required
    bastion_type = "Standard"
    compartment_id = oci_identity_compartment.tf-compartment.id
    target_subnet_id = oci_core_subnet.vcn-private-subnet.id

    #Optional
    client_cidr_block_allow_list = [ "<your CIDR block, see discussion above>" ]

}
After a Bastion is created, Bastion sessions are used for connectivity. Sessions let authorized users connect to a target resource for a pre-determined amount of time. To add this to your setup via Terraform, add the following to bastion.tf:
resource "oci_bastion_session" "test_session" {

    #Required
    bastion_id = oci_bastion_bastion.test_bastion.id
    key_details {
        public_key_content = "<your public key for SSH>"
    }

    target_resource_details {

        #Required
        session_type = "MANAGED_SSH"
        # FYI, the other session_type is "PORT_FORWARDING"

        #Optional
        target_resource_id = <terraform_instance_identifier>
        target_resource_operating_system_user_name = "opc"
        target_resource_port = "22"
    }
}
For more details on the Required and Optional parameters, see the Bastion and Bastion session terraform documentation.
Applying the above terraform will take a few minutes, and you can find your session connection command in the Console (see notes in the ‘Option 1’ write up above).
Notes and Additional Resources
-
OCI documentation for the Bastion service can be found here.
-
It’s a good idea to review the Bastion service FAQs for service limitations and details (maximum number of Bastion and sessions, connection speed limits, etc.).
-
If you’re having issues connecting to the private resource via the supplied SSH command, take a look at the troubleshooting guide. Double check things like the IP/CIDR in the allow list, whether your organization might have a proxy in place, etc.
Using OCI Bastion for Researchers
F56596-01
May 2022
Copyright © 2021, Oracle and/or its affiliates.