Manage Alarms with ServiceNow

This topic explains how to file automatic ServiceNow tickets whenever alarms fire.

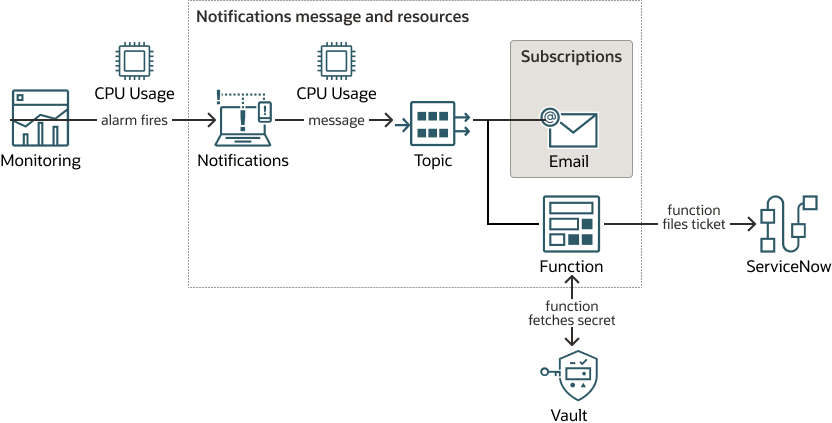
In this scenario, whenever CPU usage exceeds the threshold specified by your alarm, a ServiceNow ticket is created for your on-call engineer.

Do not enter confidential information when assigning descriptions, tags, or friendly names to your cloud resources through the Oracle Cloud Infrastructure Console, API, or CLI.

This scenario involves writing a function to file ServiceNow tickets (and creating a secret to store your ServiceNow credentials), adding that function and optional email as subscriptions to a topic, and creating an alarm that sends messages to that topic when the alarm threshold is exceeded. The message fans out to the topic's subscriptions, which includes a group email address in addition to the function. The function is invoked on receipt of the message.

Everything but the function can be set up in the Console. Alternatively, you can use the Oracle Cloud Infrastructure CLI or API, which lets you execute the individual operations yourself.

The following diagram illustrates the general process flow:


servicenow-notifications-oracle.zip

Store Your ServiceNow Credentials in a Secret

Create a secret that you'll reference later when you create the function.

Create a secret by using the console (you can also create a secret by using the command line interface (CLI) or the application programming interface (API)).

  1. Open the navigation menu, click Identity & Security, and then click Vault.
  2. Under List Scope, in the Compartment list, click the name of the compartment where you want to create a secret.
  3. From the list of vaults in the compartment, do one of the following:
    • Click the name of the vault where you want to create a secret.
    • Create a new vault for the secret, and then click the name of the vault.
  4. Create the username secret:
    1. Click Secrets, and then click Create Secret.
    2. In the Create Secret dialog box, choose a compartment from the Create in Compartment list. Secrets can exist outside the compartment the vault is in.)
    3. Click Name, and then enter a name to identify the secret. Avoid entering any confidential information in this field.
      Example name: servicenow_username_plain_text
    4. Click Description, and then enter a brief description of the secret to help identify it. Avoid entering any confidential information in this field.
      Example description: servicenow_username_plain_text
    5. Choose the master encryption key that you want to use to encrypt the secret contents while they're imported to the vault (the key must belong to the same vault).
    6. For Secret Type Template, choose Plain-Text.
    7. Click Secret Contents, and then enter your ServiceNow username:
      <your-servicenow-username>
    8. Click Create Secret.
    9. Note the secret OCID.

Create the Function

Start with the sample code below to create a function to file ServiceNow tickets and then authorize the function to access your ServiceNow credentials in the secret created using the Oracle Cloud Infrastructure Vault service.

The code sample includes variables SNOW_URL, SNOW_USER_ID_SEC, and SNOW_USER_PWD_SEC that are used in the hypothetical function. You might choose to read these values directly from the function or pass the values as custom configuration parameters instead.

#####################################################
# THIS SAMPLE CODE IS FOR DEMO PURPOSES ONLY
#*************************************************
# ******** DO NOT USE IN PRODUCTION *************
# ************************************************
#####################################################
import io
import sys
import oci
import json
import base64
import requests
from fdk import response
SNOW_URL = '<Provide Service Now URL here>'
SNOW_USER_ID_SEC = '<Provide the OCID of OCI Secret for Service Now User ID>'
SNOW_USER_PWD_SEC = '<Provide the OCID of OCI Secret for Service Now User Password>'
OCI_TO_SNOW_SEV_MAP =
{    'CRITICAL'  : '1',    'WARNING'   : '2',    'ERROR'     : '3',    'INFO'      : '4' }
def handler(ctx, data: io.BytesIO = None):
    try:
        funDataStr = data.read().decode('utf-8')
        funDataJSON =  json.loads(funDataStr)
        alarmData = {}
        alarmData['type'] = funDataJSON['type']
        alarmData['metaDataList'] = funDataJSON['alarmMetaData']
        alarmData['title'] = funDataJSON['title']
        alarmData['body'] = funDataJSON['body']
        alarmData['sev'] = OCI_TO_SNOW_SEV_MAP[funDataJSON['severity'].upper()]
        if alarmData['type'].upper() == 'OK_TO_FIRING':
            snowURL = SNOW_URL
            snowUsrIDSec = SNOW_USER_ID_SEC
            snowUsrPwdSec = SNOW_USER_PWD_SEC
            ociResPrncplSigner = oci.auth.signers.get_resource_principals_signer()
            ociSecSvc = oci.secrets.SecretsClient(config={}, signer=ociResPrncplSigner)
            snowUserID = readSecValueFromSecSvc(ociSecSvc, snowUsrIDSec)
            snowPswd = readSecValueFromSecSvc(ociSecSvc, snowUsrPwdSec)
            snowData = getSNOWData(alarmData)
            sendDataToSnow(snowURL, snowUserID, snowPswd, snowData)
    except Exception as e:
        sys.stderr.write("Exception : " + str(e))
        sys.stderr.write("Exception Class : " + str(e._class_))
    return response.Response(ctx, response_data="", headers={"Content-Type": "application/json"})
def sendDataToSnow(snowURL, uid, pwd, snowData):
    try:
{ 
snowHdrs =
      "Content-Type" : "application/json",
counter = 0
for sd in snowData:
"Accept" : "application/json"         }
        snowResp = requests.post(snowURL, auth=(uid, pwd), headers=snowHdrs, data=json.dumps(sd))
except Exception as e:
    sys.stderr.write("Exception : " + str(e))
    sys.stderr.write("Exception Class : " + str(e._class_))
   def getSNOWData(alarmData):
       snowData = []
       if alarmData['type'].upper() == 'OK_TO_FIRING':
           alrmMD = alarmData['metaDataList'][0]
           for d in alrmMD['dimensions']:
               snowDataElem = {}
               snowDataElem['node'] = d['resourceDisplayName']
               snowDataElem['source'] = 'OCI'
               snowDataElem['severity'] = alarmData['sev']
               snowDataElem['description'] = alarmData['body']
               snowDataElem['type'] = alarmData['title']
               snowData.append(snowDataElem)
       return snowData
   def readSecValueFromSecSvc(ociSecSvc, secID):
       secResp = ociSecSvc.get_secret_bundle(secID)
       secContent = secResp.data.secret_bundle_content.content
       secret_content = base64.b64decode(secContent).decode('utf-8')
       return secret_content

Use a dynamic group to grant your function the ability to read secrets. Your function must have this authorization to access your ServiceNow credentials, which are stored in the secrets you created earlier.

  1. Find and note your function OCID which is in the following format:
    ocid1.fnfunc.oc1.iad.<exampleuniqueID>

    Include your function in the relevant dynamic group by specifying the following rule:

    resource.id = '<function-ocid>'

    Alternatively, you can create a dynamic group that includes all functions:

    ALL{resource.type=’fnfunc’, resource.compartment.id=’<compartment_OCID>’}
  2. Grant the dynamic group access to secrets by adding the following policy.
    allow dynamic-group <dynamic-group-name> to read secret-family in tenancy

    To authorize your function for access to other Oracle Cloud Infrastructure resources, such as compute instances, include the function in a dynamic group and create a policy to grant the dynamic group access to those resources.

Create the Topic

Create the topic you'll use for the subscriptions and alarm.

A topic is a communication channel for sending messages to subscriptions. Each topic name is unique across the tenancy. You can create the topic by using the console, the command line interface (CLI) or the application programming interface (API).

You must deploy the function before you can use it with a topic.

  1. To create the topic by using the console:
    1. Open the navigation menu and click Developer Services. Under Application Integration, click Notifications.
    2. Click Create Topic at the top of the topic list.
    3. In the Create Topic dialog box, configure your topic:
      • Name: Specify a friendly name for the topic. It must be unique across the tenancy; validation is case-sensitive. Avoid entering confidential information.
      • Description: Optionally enter a description for the topic. Avoid entering confidential information.
    4. Click Create.
  2. To create the topic by using the CLI, open a command prompt and enter a command similar to the following:
    oci ons topic create
    --name "My Topic"
    --compartment-id "<compartment-ocid>"
  3. To create the topic by using the API, use operations similar to the following:
    POST /20181201/topics
    Host: notification.us-phoenix-1.oraclecloud.com
    <authorization and other headers>
    {
      "name": "My Topic",
      "compartmentId": "<compartment_OCID>"
    }
    

Create the Subscriptions

Create the subscription for the topic.

A subscription is an endpoint for a topic. Published messages are sent to each subscription for a topic.

You must deploy the function before you can use it with a subscription and you must have FN_INVOCATION permission for the function to be able to add the function as a subscription to a topic.

  1. To create the function subscription by using the console:
    1. Open the navigation menu and click Developer Services. Under Application Integration, click Notifications. Click the name of the topic that you want to add the subscription to.
    2. On the topic detail page, click Create Subscription.
    3. In the Create Subscription dialog box, configure your function subscription. Confirmation is not required for function subscriptions.
      • For Subscription protocol, click Function.
      • For Function Compartment, click the compartment containing your function.
      • for Function Application, click the application containing your function.
      • For Function, click your function.
    4. Click Create.
  2. To create an optional email subscription by using the console:
    1. Open the navigation menu and click Developer Services. Under Application Integration, click Notifications. Click the name of the topic that you want to add the subscription to.
    2. On the topic detail page, click Create Subscription.
    3. In the Create Subscription dialog box, configure your email subscription.
      • For Subscription protocol, click Email.
      • For Email, specify an email address.
    4. Click Create.
      The email subscription is created and a subscription confirmation URL is sent to the specified email address. The subscription remains in Pending status until it has been confirmed. To confirm your new email subscription, open the email and click the confirmation URL.
  3. To create a subscription by using the CLI:
    1. To create a function subscription, open a command prompt and enter a command similar to the following:
      oci ons subscription create
      --compartment-id "<compartment-ocid>"
      --topic-id "<topic-ocid>" 
      --protocol "ORACLE_FUNCTIONS"
      --subscription-endpoint "<function-ocid>"
    2. To create an email subscription, open a command prompt and enter a command similar to the following:
      oci ons subscription create
      --compartment-id "<compartment-ocid>"
      --topic-id "<topic-ocid>" 
      --protocol "EMAIL"
      --subscription-endpoint "team@example.com"
  4. To create a subscription by using the API:
    1. To create a function subscription by using the API, use operations similar to the following:
      POST /20181201/subscriptions
      Host: notification.us-phoenix-1.oraclecloud.com
      <authorization and other headers>
      {
        "topicId": "<topic_OCID>",
        "compartmentId": "<compartment_OCID>",
        "protocol": "ORACLE_FUNCTIONS",
        "endpoint": "<function_OCID>"
      } 
    2. To create an email subscription by using the API, use operations similar to the following:
      POST /20181201/subscriptions
      Host: notification.us-phoenix-1.oraclecloud.com
      <authorization and other headers>
      {
        "topicId": "<topic_OCID>",
        "compartmentId": "<compartment_OCID>",  
        "protocol": "EMAIL",
        "endpoint": "team@example.com"
      
      } 

Create the Alarm

Create the alarm that sends a message to the topic whenever the alarm threshold is exceeded. Notifications then delivers the message to active subscriptions in that topic.

  1. To create the alarm by using the console:
    1. Open the navigation menu and click Observability & Management. Under Monitoring, click Alarm Definitions.
    2. Click Create alarm.
    3. On the Create Alarm page, under Define alarm, set up your threshold:
      Under Metric description:
      • Compartment: Select the compartment that contains a Compute instances of interest.
      • Metric Namespace: oci_computeagent
      • Metric Name: CpuUtilization
      • Interval: 1m
      • Statistic: Count
      Under Trigger rule:
      • Operator: greater than
      • Value: 90
      • Trigger Delay Minutes: 1
    4. To define alarm notifications, add the topic you created previously as a destination.
      Under Destination:
      • Destination Service: Notifications
      • Compartment: (select the compartment that contains your topic)
      • Topic: (select your topic)
    5. Click Save alarm.
  2. To create the alarm by using the CLI, open a command prompt and enter a command similar to the following:
    oci monitoring alarm create
    --display-name "My Alarm"
    --compartment-id "<compartment-ocid>" 
    --metric-compartment-id "<compartment-ocid>" 
    --namespace "oci_computeagent" 
    --query-text "CPUUtilization[1m].count() > 90"
    --severity "CRITICAL"
    --destinations "<topic-ocid>"
    --is-enabled true
  3. To create the alarm by using the API, use operations similar to the following:
    POST /20180401/alarms
    Host: telemetry.us-phoenix-1.oraclecloud.com
    <authorization and other headers>
    {
      "displayName": "My Alarm",
      "compartmentId": "<compartment_OCID>",
      "metricCompartmentId": "<compartment_OCID>",
      "namespace": "oci_computeagent",
      "query": "MemoryUtilization[1m].max() > 90",
      "severity": "CRITICAL",
      "destinations":
        [
          "<topic_OCID>"
        ],
      "isEnabled": true
    }