Learn How to Choose a Compute Shape
The selection process involves choosing a shape, creating an instance of that shape using the template image, then running performance tests.
About the Oracle Cloud Infrastructure Compute Environment
If you're new to Oracle Cloud Infrastructure, you should learn a bit about how to access your compute instance.
The following paragraphs give a brief overview of Oracle Cloud Infrastructure Compute. For more detail, refer to the Oracle Cloud Infrastructure documentation.
Oracle Cloud Infrastructure Compute provides command-line access to an operating system in the Oracle Cloud running on bare metal hardware or in a virtual machine. The operating system images that are available include Oracle Linux, CentOS, Ubuntu, and Windows. You can create your own custom image based on the built-in images, and you can also arrange to have your own images uploaded and used for creating instances.
You must create a virtual cloud network (VCN) before creating a compute instance. After you create the network, you set up a security list which controls access to the network by allowing only the network traffic that you specify. You can modify the existing default security list, or create a new one. After the security list is set, you can log into your instance using SSH.
The built-in images have SSH and SSH ports enabled by default. Similarly for the default security list, which allows ingress traffic on port 22 and egress traffic on all ports. As a result, after provisioning an instance you can immediately use SSH to log into it, scp to copy files to it, and curl or wget to download content from the Internet. However, if you want to set up a web server or other software such as Jupyter Notebook, you need to modify the security list for the virtual cloud network that your instance uses.
In addition to allowing traffic to arrive at the ports on your instance, you must also set the firewall rules on your instance to allow traffic to pass through those ports.
Provision a Non-GPU Template Instance
Create a template image to use when creating test instances. You might need to create up to four instances from this template before finding the right compute shape.
Creating an instance takes only a few minutes, but loading that instance with your software and data can be time consuming. If you create a template image and install the software and data on it, you can more quickly determine the correct shape for your needs.
Create a Custom Image
After you've installed the software and data that you expect to use, create a custom image of the instance. When you have a custom image that has all your software and data installed, setting up subsequent environments is faster and easier.
- Log into Oracle Cloud console and open the navigation menu.
- Under Compute, click Instances.
- Click the name of your template image.
- On the Instance Details page under the Actions button, click Create Custom Image.
- Enter a name such as ML-Custom-Image and click Create Custom Image.
Choose the Best Compute Shape
The best compute shape for your machine learning needs is the one that provides the optimum balance of speed and cost.
Note:
The shapes on offer are periodically updated to meet demand and to reflect changes in hardware prices and availability. As a result, the charts here might not reflect the shapes that are available at the time that you read this document. In that case, you can use the same procedure but keep in mind that you'll need to make adjustments to reflect what is available then.First, choose a target time for your test workload. You might want it to complete in less than 30 seconds, or maybe two hours is fine.
Next, decide which diagram to use. For training neural networks, you almost certainly need a GPU shape. For machine learning training that doesn't involve a neural network, you can usually use non-GPU shapes unless you have an extremely large amount of data, or if you're using NVIDIA's RAPIDS toolkit. For inference tasks, you can almost always use a non-GPU shape.
If you decide that you don't need GPU shapes, then decide if you need Standard shapes or DenseIO shapes. DenseIO shapes are ideal for large data-intensive work loads that require high-performance local storage. They use local Non-Volatile Memory Express (NVMe) Solid-State Drive storage. Because there are few DenseIO shapes to choose from, they are not covered here.
If you're using your own data instead of a benchmark, consider using a representative subset and then extrapolating the results to the complete set. For example, if you need to process a million images, use 10,000 images in the assessment and extrapolate that result to the one million item dataset.
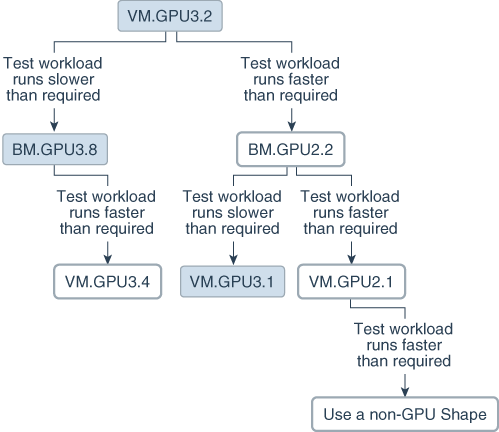
Use the following diagram if you need a GPU shape:

Description of the illustration choose-gpu-shape.png
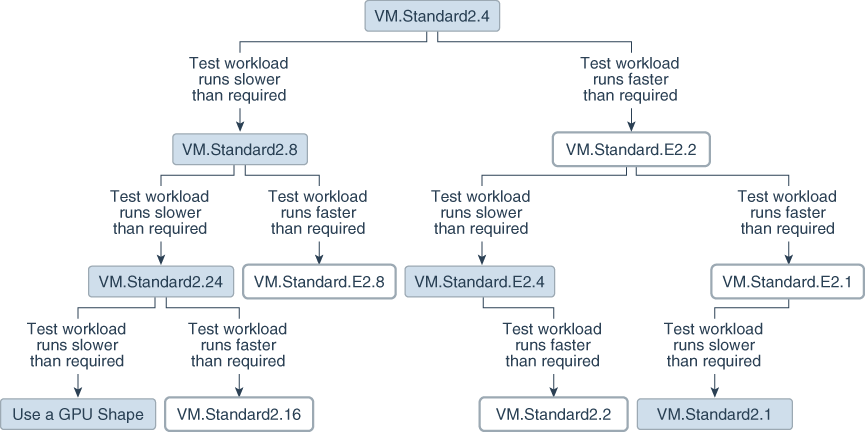
Use the following diagram if you do not need a GPU shape:

Description of the illustration choose-std-shape.png
To choose the best compute shape: