Create and Deploy NFT Smart Contract
In this section you learn how to create and deploy an NFT smart contract that is required to set up the NFT Marketplace.
Use Blockchain App Builder to generate a smart contract to manage minting, owning, and transferring NFTs. The core enabler of this solution is the ability to mint and transfer NFTs using Oracle Blockchain Platform.
First you create an NFT specification file, then deploy the smart contract to an Oracle Blockchain Platform instance. You can then test the smart contract.
Install Blockchain App Builder
After you provision a Oracle Blockchain Platform instance, complete the following steps:
- In the Oracle Blockchain Platform console, open the Developer Tools tab and then select the Blockchain App Builder pane.
- In the Download section, download the command line interface (CLI) tools archive or the Visual Studio (VS) Code extension and then set it up locally.
Customize the Sample NFT Specification File
A sample NFT specification file is included with Blockchain App Builder. You can use it and tailor it to your needs, as shown in the following example:
 assets:
    - name: ArtCollection
      type: token
      symbol: ART      #mandatory
      standard: erc721+
      anatomy:
        type: nonfungible
        unit: whole
      behavior:
        - indivisible      # mandatory
        - singleton        # mandatory
        - mintable:        # mandatory
            max_min_quantity: 20000
        - transferable
        - burnable
        - roles:
            minter_role_name: minter
      properties:
        - name: price
          type: number
        - name: on_sale_flag
          type: boolean
      metadata:
        - name: painting_name
          type: string
        - name: description
          type: string
        - name: image
          type: string
        - name: painter_name
          type: string
 customMethods:
    - executeQuery
    - "createAccountByConsumers(org_id: string, user_id: string, token_type: string)" # Create accounts for consumers while signing up
    - "sell(token_id: string, selling_price: number)" # Post the token for selling in the marketplace
    - "buyWithTokens(from_org_id: string, from_user_id: string, to_org_id: string, to_user_id: string, nonfungible_token_id: string, fungible_token_id: string, amount_paid: number)"  # Buy the NFT after paying the using FT Tokens
    - "buyWithDirectPayment(from_org_id: string, from_user_id: string, to_org_id: string, to_user_id: string, nonfungible_token_id: string, amount_paid: number)"  # Buy the NFT after paying the amount using payment gateway
You can add custom properties and methods to extend this specification for NFT chaincode. NFT chaincodes generated by Blockchain App Builder are based on the ERC-721 standard.
To generate the chaincode (smart contract) by using the Visual Studio Code extension, complete the following steps:
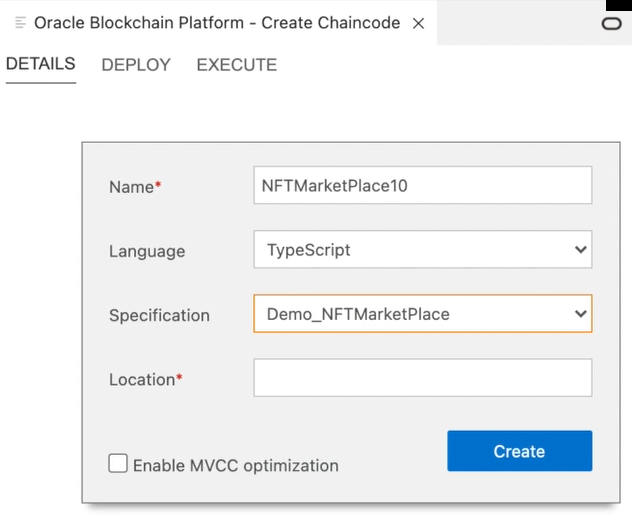
- In the Chaincodes section, click the + icon. The Chaincode Details pane opens.
- Complete the fields required to generate the chaincode project:
- Enter a name for the chaincode project.
- Select
TypeScriptorGoas the language in which to generate the chaincode methods. - Select the input specification file that you created previously.
- Enter the location where you want the project to be generated.
- Click Create.
The following screenshot of the UI shows the Create Chaincode window.

Description of the illustration blockchain_chaincode_details.png
src directory in the project hierarchy.
- The model file contains all of the generated data structures representing the token, accounts, and so on.
- The controller file contains all of the generated NFT lifecycle methods and supporting functions with required validation logic based on the specification.
/**
*
* BDB sql rich queries can be executed in OBP CS/EE.
* This method can be invoked only when connected to remote OBP CS/EE network.
*
*/
@Validator(yup.string())
    public async executeQuery(query: string) {
        const result = await this.query(query);
        return result;
    }
@Validator(yup.string(), yup.string(), yup.string())
          public async createAccountByConsumers(org_id: string, user_id: string, token_type: string) {
          //await this.Ctx.ERC721Auth.checkAuthorization('ERC721ACCOUNT.createAccount', 'TOKEN');
          return await this.Ctx.ERC721Account.createAccount(org_id, user_id, token_type);
    }
@Validator(yup.string(), yup.number())
public async sell (token_id: string, selling_price: number) {
          try {
            const token = await this.Ctx.ERC721Token.get(token_id);
            const t = new ArtCollection(token)
            t.price =  selling_price;
            t.on_sale_flag = true;
            //console.log(token);
            await this.Ctx.ERC721Token.update(t);
            return `Token ID : '${token_id}' has been posted for selling in the marketplace'`;
          } catch(error) {
                throw new Error(error.message);
        }
}
@Validator(yup.string(), yup.string(), yup.string(), yup.string(), yup.string(), yup.string(), yup.number())
public async buyWithTokens(from_org_id: string, from_user_id: string, to_org_id: string, to_user_id: string, nonfungible_token_id: string, fungible_token_id: string, amount_paid: number) {
        try {
            const token = await this.Ctx.ERC721Token.get(nonfungible_token_id);
            const t = new ArtCollection(token);
            const oChainUtil = new OChainUtils(this.Ctx.Stub);
            var msg = `Token ID : '${nonfungible_token_id}' had not been transferred'`;
            if (t.on_sale_flag==true) {
                if(t.price == amount_paid) {
                     // @ts-ignore
                    await oChainUtil.invokeChaincode("LoyaltyToken7", "transferTokens", [fungible_token_id, from_org_id, from_user_id, amount_paid], "marketplace");
                    const from_account_id = await this.Ctx.ERC721Account.generateAccountId(from_org_id, from_user_id);
                    const to_account_id = await this.Ctx.ERC721Account.generateAccountId(to_org_id, to_user_id);
                    await this.Ctx.ERC721Token.transferFrom(from_account_id, to_account_id, t);

                    msg = `Token ID : '${nonfungible_token_id}' has been successfully transferred to UserID : '${to_user_id}'`;
              }
            }
            else {
                msg = `Token ID : '${nonfungible_token_id}' has not been transferred to UserID : '${to_user_id}' as the amount was not fully paid'`;
            }
            return msg;
       } catch(error)
          {
            throw new Error(error.message);
         }
}
@Validator(yup.string(), yup.string(), yup.string(), yup.string(), yup.string(), yup.number())
    public async buyWithDirectPayment(from_org_id: string, from_user_id: string, to_org_id: string, to_user_id: string, nonfungible_token_id: string, amount_paid: number) {
         try {
             const token = await this.Ctx.ERC721Token.get(nonfungible_token_id);
             const t = new ArtCollection(token);
             var msg = `Token ID : '${nonfungible_token_id}' had not been transferred'`;
           if (t.on_sale_flag==true) {
                 if(t.price == amount_paid) {
                 const from_account_id = await this.Ctx.ERC721Account.generateAccountId(from_org_id, from_user_id);
                 const to_account_id = await this.Ctx.ERC721Account.generateAccountId(to_org_id, to_user_id);
                 await this.Ctx.ERC721Token.transferFrom(from_account_id, to_account_id, t);

                 msg = `Token ID : '${nonfungible_token_id}' has been successfully transferred to UserID : '${to_user_id}'`;
                 }
             }
             else {
                 msg = `Token ID : '${nonfungible_token_id}' has not been transferred to UserID : '${to_user_id}' as the amount was not fully paid'`;
             }
             return msg;
         } catch(error) {
             throw new Error(error.message);
         }
      }
}
Deploy the Smart Contract
After you create a chaincode project, you can deploy it locally.
In the Chaincode Details pane, select Deploy to open the deployment wizard. Blockchain App Builder includes a local blockchain network, which runs in the Docker containers, that you can use for testing purposes.
You can also deploy the chaincode to an Oracle Blockchain
Platform instance by selecting the connection profile from the list for the target
environment. You must also complete and save the Init
Parameters, because the generated NFT chaincode requires the
orgId and userId parameters for
initialization. The orgId and userId parameters
are used to specify which users have token administrator privileges.
Test the Smart Contract
When the chaincode is deployed, Oracle Blockchain Platform automatically exposes the REST APIs for token initialization, account and role management, and NFT lifecycle methods (create, transfer, burn).
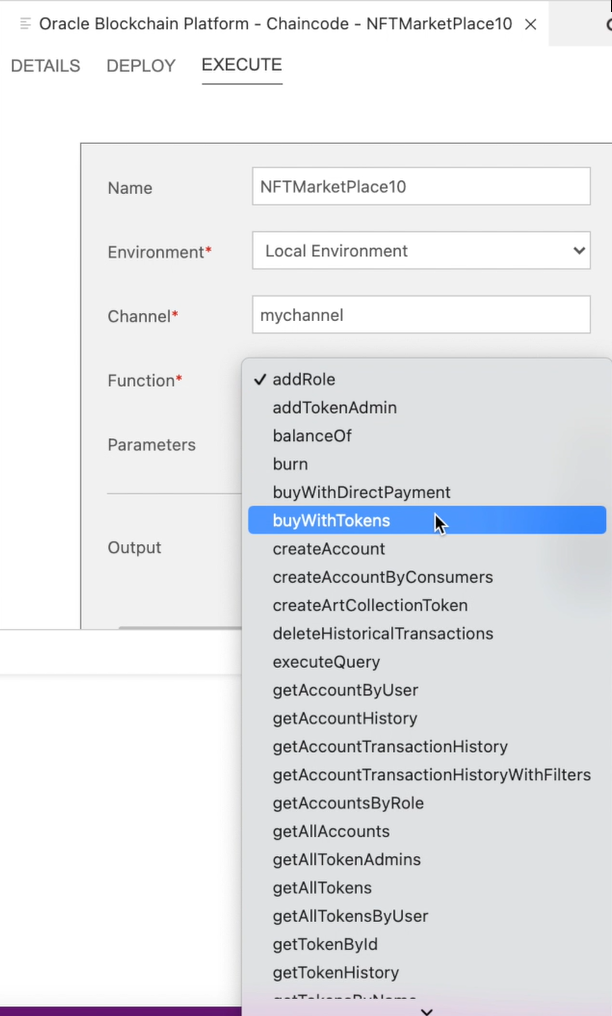
You can test by selecting Execute on the Chaincode Details pane in Blockchain App Builder, or by using a REST API client such as Postman.
The following screenshot of the UI shows the Execute tab of the Create Chaincode window.

Description of the illustration blockchain_chaincode_execute.png
To invoke Oracle Blockchain
Platform smart contract methods using REST API, use the POST method and specify the URL, which consists of two parts concatenated together. The first part is the REST proxy endpoint in Oracle Blockchain
Platform, which you can get from the Nodes tab of the Oracle Blockchain
Platform console.
The second part is the specific URI to invoke the transaction using the Transaction API. See the documentation to send a POST request. The two parts form a complete URL similar to the one here.
https://oabcs1-iad.blockchain.ocp.oraclecloud.com:7443/restproxy/api/v2/channels/{channelName}/transactionsReplace {channelName} with the name of the channel that you specified when deploying your chaincode, such as marketplace. When constructing the API request, complete the following steps:
- Set authorization to use
Basic Authwith theuserid and passwordspecified that's mapped to theREST_Clientrole. You can also useOAuth2tokens. See Use OAuth 2.0 Access Token Based Authentication in the REST API guide for more information. - Set the
Content-Typeheader toapplication/json. - In the body of the request, include the parameters required for transaction invocation, including the chaincode name and the
create<TokenName>Tokenmethod along with the required arguments.
Based on the chaincode generated from the yaml template, the following text shows a sample request body and the associated response.
Request
{
    "chaincode": "{{NFTChaincode}}",
    "args": [
        "createArtCollectionToken",
        "{\"token_id\":\"{{NFTTokenID}}\",\"token_uri\":\"https://ipfs.io/ipfs/QmV68aiT7xw2WX8pmDbeTWpGP2or35NUFan9RagymsLpgV?filename=ArtCollection_NFT1.json\",\"metadata\":{\"painting_name\":\"Oracle - Red Bull Partnership\",\"image\":\"https://ipfs.io/ipfs/QmVap6Gkh3Cp9DiLLWvkvJHpuXpFmYB2GzU1caM57gNcAa?filename=Oracle_RedBull_NFT1.jpeg\",\"painter\":\"Alex\"},\"price\":200,\"on_sale_flag\":false}"
    ],
    "timeout": 0,
    "sync": true
}
Response
{
    "returnCode": "Success",
    "error": "",
    "result": {
        "txid": "c999922f04c3011bf25ca43624e4bb23e8900634f8e23a1648170a90274a9733",
        "payload": {
            "metadata": {
                "painter": "Alex",
                "painting_name": "Oracle - Red Bull Partnership",
                "image": "https://ipfs.io/ipfs/QmVap6Gkh3Cp9DiLLWvkvJHpuXpFmYB2GzU1caM57gNcAa?filename=Oracle_RedBull_NFT1.jpeg"
            },
            "assetType": "otoken",
            "created_by": "oaccount~eadf1b0ae857164f8681d1742b6328089a7d33ebec76d8248cb909da7a84f42a",
            "creation_date": "2022-04-28T12:08:38.000Z",
            "owner": "oaccount~eadf1b0ae857164f8681d1742b6328089a7d33ebec76d8248cb909da7a84f42a",
            "uri": "https://ipfs.io/ipfs/QmV68aiT7xw2WX8pmDbeTWpGP2or35NUFan9RagymsLpgV?filename=ArtCollection_NFT1.json",
            "is_burned": false,
            "token_id": "NFT17",
            "token_name": "artcollection",
            "symbol": "ART",
            "token_standard": "erc721+",
            "token_type": "nonfungible",
            "token_unit": "whole",
            "behaviors": [
                "indivisible",
                "singleton",
                "mintable",
                "transferable",
                "burnable",
                "roles"
            ],
            "roles": {
                "minter_role_name": "minter"
            },
            "mintable": {
                "max_mint_quantity": 20000
            },
            "token_uri": "https://ipfs.io/ipfs/QmV68aiT7xw2WX8pmDbeTWpGP2or35NUFan9RagymsLpgV?filename=ArtCollection_NFT1.json",
            "price": 200,
            "on_sale_flag": false
        },
See the Explore More section for more information on the methods available for managing NFT chaincodes, including the Golang or TypeScript methods and the Platform REST API.
You can call the APIs directly from the Oracle Content Management webhook and the web application built on Visual Builder Cloud Service (VBCS), or remap and wrap them with the API gateway for use by an externally hosted marketplace web application. Note that when you create (mint) an NFT, one of the parameters you must supply is token_uri, which can be an IPFS URI pointing to a JSON file that represents the digital object.
https://ipfs.io/ipfs/QmV68aiT7xw2WX8pmDbeTWpGP2or35NUFan9RagymsLpgV?filename=ArtCollection_NFT1.jsonThe following steps describe an example of generating the token URI using IPFS Desktop:
- Upload an image file on
IPFSand save the URI of the image. - Create and upload the
JSONfile that includes the image URI along with relevant metadata fields. - Share and copy the link to the
JSONfile under the ...More list.
{
    "painting_name": "Oracle - Red Bull Partnership",
    "description": "Cloud Partnership",
    "image": "https://ipfs.io/ipfs/QmVap6Gkh3Cp9DiLLWvkvJHpuXpFmYB2GzU1caM57gNcAa?filename=Oracle_RedBull.jpeg",
    "painter_name": "Alex"
}
Use the URI that points to the JSON file for the token_uri parameter.
You can also include relevant metadata in the attributes that are passed to the create<Token-Name>Token method, which will maintain the metadata in the Oracle Blockchain
Platform ledger for easy retrieval.
For NFTs created using the Oracle Content Management (OCM), use the OCM webhook to call Oracle Functions using an API Gateway and place the REST API invocation in the Oracle Functions as shown in the architecture diagram. You can also invoke Blockchain REST APIs directly from the marketplace web application or by using an API gateway mapping to support user-generated content. Marketplace trading functionality can invoke the custom methods to handle the payment and then trigger a transfer of the NFT ownership, such as the buyWithTokens and buyWithDirectPayment sample methods.