Configure, Deploy, and Test the Web Application

A web application has been configured to point to the Blockchain network and bucket used as an example in this solution playbook. You must update the details to use this application pointing to your Blockchain Network and bucket.

Download the web application from GitHub here: Example web application.

Import the Web Application into Oracle Visual Builder Studio

Oracle Visual Builder Studio is not only used to develop Visual Builder applications, but it allows the development of any kind of modern application thanks to its multitude of integrated development tools, such as a GIT repository, CI/CD pipelines engine, artifact generation, container repository, agile tools, team building tools and more.

  1. Sign in to the Oracle Cloud web console navigation menu, go to OCI Classic Services, and then click Developer.
  2. Click on the Oracle Visual Builder Studio instance icon and then click Access Service Instance.

    Note:

    In case there is no existing instance, create a new instance, wait until it gets created, and access it. Save the URL of this Visual Builder Studio instance, as it will be used in the next steps.
  3. To create a new project, click + Create in the default page (Organization).
  4. Enter a project Name and click Next.
  5. As we will import an existing Visual Builder Application as a Project Template, select the Empty Project option and click Next.
  6. In the last screen of the wizard, leave the default wiki markup language and click Finish. The new project will be created in around 5 minutes.
  7. Once the project gets created, the main page of the project will be shown. Before we import our application, we need to have an environment to configure and temporarily run it. Click Create Environment.
  8. Enter an Environment Name, Description and click Create.
    If there is any Visual Builder instance already in the tenancy, add it to this environment by clicking Add Instance. If you do not have any instance of Visual Builder, provision one and return to this step to add the instance to the environment.
  9. Select your Visual Builder instance and click Add.
  10. Once the environment has been added to the project, create the Workspace, where we will be able to import the precreated web application. Select the Workspaces menu option in the left navigation menu.
  11. A workspace can be created by importing our Visual Builder web application into the project. Click Import.
  12. In the wizard, provide the following details:
    • The zip file of the precreated Visual Builder web application.
    • A name for the workspace.
    • Select the environment we configured previously into the project to be used for testing the application.
    • Create a new empty Git repository and give it a name and a default branch name.
  13. Click Import.

Configure the Web Application to point to your Blockchain instance

In this section, we will configure the provided web application to point to the Blockchain Instance created in the previous section.

Make a note of the following information from the Blockchain network you have created:
  • BC Endpoint
  • Instance name
  • Channel
  • Chaincode
  1. Access the Visual Builder Studio instance and open the project you created by clicking in the name of the project from the default page where you land (Organization) when you access Visual Builder Studio.
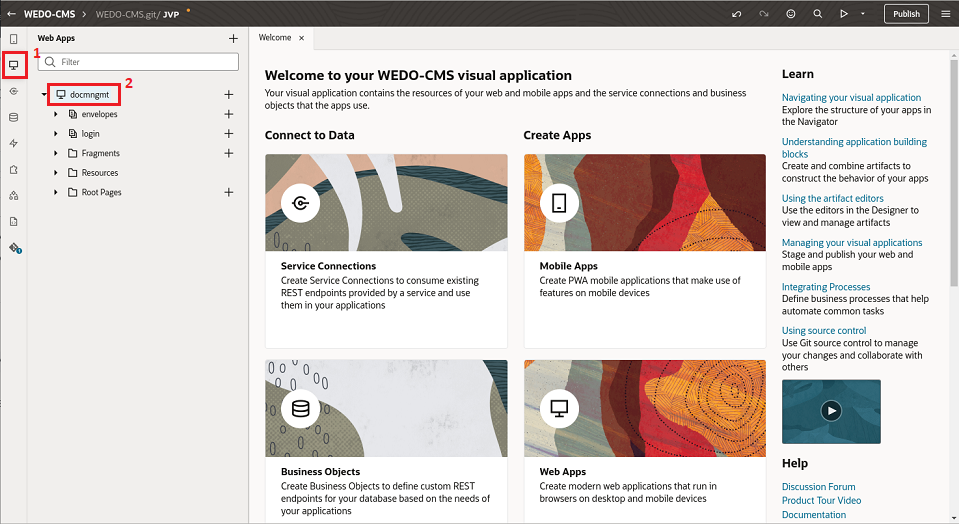
  2. Select the Workspace you created when importing the web application and then select the Web App as shown in the following image and steps.

    1. Select the Web App Section.
    2. Select the Web App.
  3. Go to the Variables tab and change the default value of the variables bcEndpoint, bcInstance, chaincode, and channel by clicking on the f(x) symbol in the top-right corner of the Default Value attribute for each of the variables.

Configure the Web Application to point to your Object Storage Bucket

In this section, we will configure the Object Storage bucket to be used by the Web Application based on the values of the API Key and Bucket, you have created before.

  1. Access the Visual Builder Studio instance and open the project you created by clicking in the name of the project from the default page where you land (Organization) when you access Visual Builder Studio.
  2. Select the Services Connection section, and then select the fileUpload Service Connection.
  3. Go to the Servers tab and on the right side of the server configuration, click on the Pencil icon to change the configuration of the fileUpload service connection.
    The Service Connection configuration used to interact with our bucket needs to be adapted in three places.
  4. In the Edit Server screen, update the following fields:
    • Instance URL: It needs to be changed to point to your bucket based on a couple of properties from your OCI tenancy and the name you gave to the bucket when you created it. The URL must be composed based on the following URL template:
      https://objectstorage.<region-name>.oraclecloud.com/n/<storage-namespace>/b/<bucket-name>
    • Authentication: You must ensure the authentication method is set to Oracle Cloud Infrastructure API Signature 1.0, and the key is set by clicking on the Pencil icon on the right side of the Key Id property.

      Note:

      The Key Id is composed based on the following template:
      <Tenancy-OCID>/<User-OCID>/<Key-Fingerprint>
      
      All these values can be accessed from the Configuration File Preview obtained when the API Key was created during the OCI Bucket Storage configuration. Private Key is the private key we used or generated or downloaded (depending on the selected option) during the API Key creation.
    • Connection Type: Must be set to Dynamic, the service supports CORS.

    Once these three properties have been configured properly accordingly with your Bucket and API Key, the Web Application is completely ready to interact with your Storage Bucket. You can proceed to test your Web Application.

Test your Web Application

Now you can test the application from the Visual Builder environment configured in our project. If everything works fine, we can move forward and export the Web Application to be deployed to a standalone configuration.

This Web Application interacts against the two backends used in the solution: Blockchain to store the folders and document metadata, and the buckets of OCI storage for the document content. So, we are going to test a couple of functionalities ensuring both backends (Blockchain and Bucket) are accessible through the Web Application.
  1. To test the application, click the Preview icon in the top-right corner of the Visual Studio Workspace.
  2. Log in to the application as a folder manager, the user will be able to access the folders for which they are the current owner, or create a new folder, for which they will be the current custodian, being able to add more documents into the folder, or transfer the whole folder to a different user or department.
    Let's try to create a folder and upload a document to it.
  3. Log in as one of the users (cmsleg001, cmsfin001, or cmsrsk001) ensuring the role is set to folder Manager, and click Login.
  4. In the folder Management page, click New folder.
  5. Assign values to the three input fields (folder Type, Description, and Customer ID) and click Create folder.
  6. In the Oracle Blockchain Service console, navigate to the Channels tab, select the wedocms channel, and check the content on the last block saved into the ledger. It should contain the request to execute the transaction we have just executed.
  7. To test if we can upload a document into the newly created folder, select the folder and click Upload Documents.
  8. If there is no document uploaded in this folder, click Upload a New Document.
  9. Select a Document Type, enter a Document Name, select a file or drop a PDF file into the Drag and Drop Area, add Dynamic Properties, and click Upload Document.
We can review in the Oracle Blockchain console if this new transaction has been executed, and also if the document has been uploaded into the OCI Storage Bucket. Log in as a document reviewer, any user who has access to the app will be able to review documents uploaded from any folder.

Export the application to be executed in a standalone machine

The following steps describe how to export the application and download the exportable package to be deployed outside Visual Builder.
A Visual Builder application if it meets some conditions, can be executed outside of the context of Visual Builder. For more information, see the following blogs: Running Visual Builder Apps On Other Servers (and On-Premises) and Running Visual Builder Apps Outside of Visual Builder.
  1. To export the application, push the changes into the Git Repository. Click Git Repo/Branch menu from the upper-left side of the Workspace, and select the Push option.
  2. Enter a commit message and click Commit All and Push.
    The first time this job is executed, it can take several minutes waiting for a Build Executor, but once the Build Executor picks up the job, it should be executed in around 3 minutes and a Git push successful pop-up message should display.
  3. At this point we can publish our application, and this action will trigger a build job to optimize the application to be executed in the best conditions. Click Publish in the top-right corner of the Workspace page.
  4. In the Publish Changes dialog box, select Merge Now or Merge After Review and then click Publish.
  5. Enter your credentials and click Add Credentials and Continue.
  6. In the Build started pop-up window, click Open job.
  7. Click Artifacts to view the generated package.
  8. Click built-assets.zip to download the package, so the exportable package is ready to be deployed outside Visual Builder.

Execute the exported package into an Apache Tomcat Server

The built-assets.zip package can be deployed to be served directly by an Apache Tomcat Server.

  1. Install Apache Tomcat Server, once installed, start it and check it works by trying to access the URL: http://localhost:8080.
  2. Our application can be installed in Tomcat by decompressing the built-assets.zip package, and copying the contents of the zip into a new folder created inside the /webapps folder.
  3. Once the application is deployed inside the webapps folder of our Tomcat installation, we can restart Tomcat, and try to access to the following URL: http://localhost:8080/<folder-name-inside-webapps>/webApps/docmngmt/
    Now we can test the application in our local environment.