Configure IaaS for Private Cloud Appliance

You must configure your network, compute, storage, operating system, and install Oracle Grid Infrastructure and Oracle RAC Database Software before you can create an Oracle RAC Database on Oracle Private Cloud Appliance . The IaaS configuration on Private Cloud Appliance will resemble the following architecture.


rac-pca-architecture.zip

Before creating the infrastructure, review these assumptions and considerations:

  • All nodes (virtual machines) in an Oracle RAC environment must connect to at least one public network to enable users and applications to access the database.
  • In addition to the public network, Oracle RAC requires private network connectivity used exclusively for communication between the nodes and database instances running on those nodes.
  • When using Oracle Private Cloud Appliance , only one private network interconnect can be configured. This network is commonly referred to as the interconnect. The interconnect network is a private network that connects all the servers in the cluster.
  • In addition to accessing the Compute Enclave UI (CEUI), you must also configure the OCI CLI on a Bastion VM to run the commands using OCI instead of relying on CEUI.

The following sections describe how to create compute, network, and storage constructs on a Private Cloud Appliance system.

Configure Network

  1. Create a virtual cloud network (VCN) and define a valid CIDR range. You can use the Compute Enclave UI (CEUI) or the OCI CLI.
  2. Create a public and a private subnet. In addition, define gateways such as a dynamic routing gateway, internet gateway, security rules, DHCP options, and routing tables.
  3. Create a primary DNS zone and DNS Zone Record.
  4. Register the SCAN Name and Virtual IPs in the DNS Zone Records. Configure as follows:
    • Register the SCAN name resolving to three different IP addresses in the DNS Zone using Customer Enclave or using the OCI CLI.
    • Register the Virtual IP name with IP address in the DNS Zone using Customer Enclave or using the OCI CLI for each node in the Oracle RAC cluster.
    [root@vmrac1 ~]#nslookup node1_name-vip.domain_name
    Server: X.X.X.X
    Address: X.X.X.X
    Name: node1-vip.domain_name
    Address: X.X.X.Y4
    [root@vmrac2 ~]#nslookup node2_name-vip.domain_name
    Server: X.X.X.X
    Address: X.X.X.X
    Name: node2-vip.domain_name
    Address: X.X.X.Y5
  5. Create Steering Policy and add Answers as three IP addresses to it, resolving to same SCAN name.
  6. Add Steering policy and attach the DNS Zone to steering policy.
  7. Verify the SCAN name results. For example:
    [root@vmrac1 ~]# nslookup SCAN_name.domain_name
    Server: X.X.X.X
    Address: X.X.X.X
    Name: SCAN_name
    Address: X.X.X.Y1
    Name: SCAN_name
    Address: X.X.X.Y2
    Name: SCAN_name
    Address: X.X.X.Y3

Configure Compute Nodes

These steps describe how to create compute VMs.
  1. Launch two VMs in the same public subnet. Configure the VMs as follows:
    • Two Private Cloud Appliance compute instances with OL7.9 platform images.
    • VM Shape VM.PCAStandard1.x. Where x should be large enough to provide CPUs for the cluster nodes and at least two VNICs. Each cluster node should have at least two OCPUs.
    • Enable Skip Source/Destination Check for the primary (default) VNIC on both nodes. Refer to "Updating a VNIC in "the Oracle Private Cloud Appliance User Guide for more details.
  2. Configure secondary IPs on both compute nodes as follows:
    • For each compute instance, one primary VNIC is already created per cluster node.
    • In the same VCN subnet as the primary VNIC of the compute instance.
    • It's primary IP address is assigned a host name, which is the intended cluster host name.
    • Assign a secondary IP address to this VNIC with the assigned host name cluster-node-name-vip.
  3. Configure private IPs on both nodes in the same private subnet as follows:
    • For each compute instance, create one secondary VNIC per cluster node. Refer to "Configuring the Instance OS for a Secondary VNIC" in the Oracle Private Cloud Appliance User Guide for more details. You may have to download and run the Oracle script secondary_vnic_all_configure.sh, and edit the /etc/sysconfig/network-scripts/ifcfg* files to enable a secondary VNIC.
    • Add the second VNIC in the private subnet on both nodes after the instances are launched. This will assign an IP address from the private subnet CIDR range.
    • Ensure all firewalls are disabled to allow private interconnect traffic to go through without issues.
    • Update entry for private IPs in the /etc/hosts file.
    • Optionally, you can enter an IP address, or let the system assign an IP address from the private subnet CIDR range.
    Cat /etc/hosts
    127.0.0.1 localhost localhost.localdomain localhost4 localhost4.localdomain4
    ::1 localhost localhost.localdomain localhost6 localhost6.localdomain6
    X.X.X.A1 node1 node1.domain_name 
    X.X.X.A2 node2 node2.domain_name
    X.X.X.A3 node1-vip node1-vip.domain_name
    X.X.X.A4 node2-vip node2-vip.domain_name
    X.X.Y.B1 node1-priv node1-priv.domain_name
    X.X.Y.B2 node2-priv node2-priv.domain_name
    
    The /etc/hosts file on both nodes should have entries for public IPs, virtual IPs, and private IPs, as shown in the example above.
  4. Attach a local block volume to each node.
    For each compute instance, create one new block volume per cluster node, then attach it to the compute instance in read/write mode. This volume will be used for the Grid Infrastructure Home and Oracle Database Home.

Configure Storage

Oracle RAC utilizes Oracle Automatic Storage Management (Oracle ASM) for efficient shared storage access. Oracle Automatic Storage Management (Oracle ASM) acts as the underlying, clustered volume manager. It provides the database administrator with a simple storage management interface that is consistent across all server and storage platforms. As a vertically integrated file system and volume manager, purpose-built for Oracle Database files, Oracle Automatic Storage Management (Oracle ASM) provides the performance of raw I/O with the easy management of a file system.
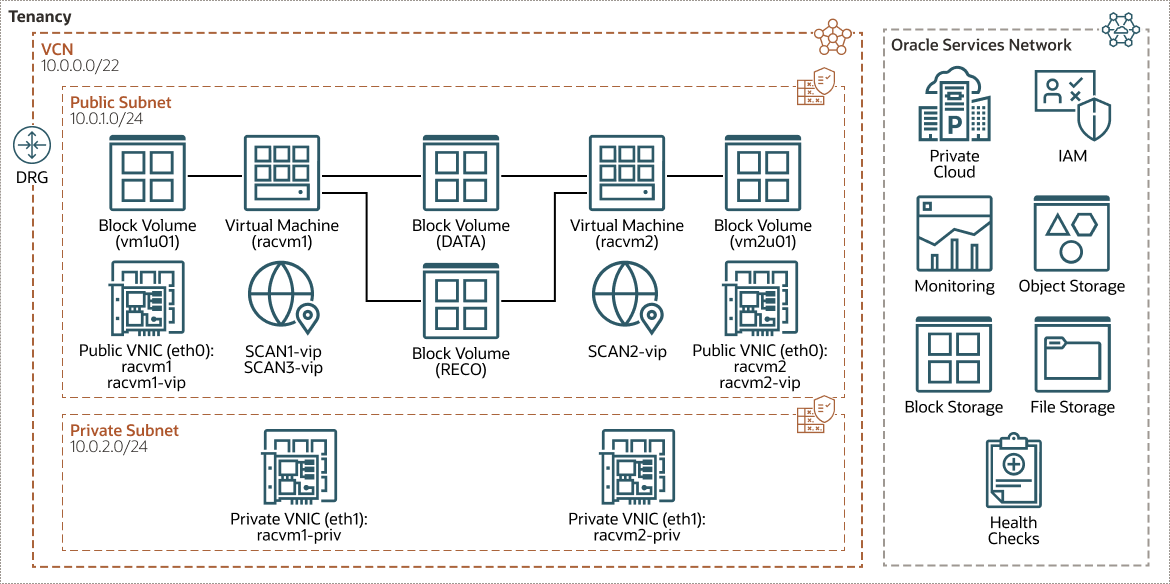
  1. Create Shared Storage Disk Groups. Create at least one block volume, which will be used for Oracle Automatic Storage Management (Oracle ASM) Disk Group. This block volume must be attached in Shared Mode to both the VMs, configure the AFD for Oracle Automatic Storage Management (Oracle ASM) Disks, and create AFD_label using the asmcmd command. These block volumes will be used for the cluster shared disks under ASM.
  2. Ensure the permissions of the disks are configured as follows:
    chown grid:asmadmin /dev/sdc
  3. Set the disk permissions persistent across reboots. Create the following file and update disk permissions:
    /etc/udev/rules.d
  4. Create a local storage mount point, configured as follows:
    • Create two block volumes to be used for local mount point for each node. For each VM, one newly created block volume in read/write mode must be attached.
    • Create a local mount point on each VM as /u01 on each node.
    • Create the filesystem on top of this block volume, and then create a /u01 on each node. Create the filesystem on /u01 on each node.
    • Ensure to add an entry in /etc/fstab, so that it remains persistent across reboots. This mount point will be used for the Oracle Grid Infrastructure Home and Oracle Database Home on each node.

Configure Operating System

Configure users, groups, and environments for Oracle Grid Infrastructure and Oracle RAC.
  1. Create the grid and Oracle users with a primary and secondary group and check the user ids on both nodes.
    [root@vmrac1 ~]#groupadd -g 201 oinstall
    groupadd -g 200 dba
    groupadd -g 202 asmadmin
    groupadd -g 203 asmdba
    [root@vmrac1 ~]#useradd -u 200 -g oinstall -G dba,asmdba oracle
    useradd -u 123 -g oinstall -G dba,asmdba,asmadmin grid
    id oracle
    id grid
    root@vmrac2 ~]#groupadd -g 201 oinstall
    groupadd -g 200 dba
    groupadd -g 202 asmadmin
    groupadd -g 203 asmdba
    [root@vmrac2 ~]#useradd -u 200 -g oinstall -G dba,asmdba oracle
    useradd -u 123 -g oinstall -G dba,asmdba,asmadmin grid
    id oracle
    id grid
  2. Run these commands on both nodes as the root user to create the software installation directories.
    [root@vmrac1 ~]#mkdir -p /u01/app/21.0.0/grid
    chown grid:oinstall /u01/app/21.0.0/grid
    mkdir -p /u01/app/grid
    mkdir -p /u01/app/oracle
    chown -R grid:oinstall /u01 
    chown oracle:oinstall /u01/app/oracle
    chmod -R 775 /u01/
    mkdir /etc/oraInventory
    chown grid:oinstall /etc/oraInventory
    chmod 770 /etc/oraInventory
  3. Configure passwordless SSH configuration for all three users: root, grid, and oracle. If you don't have Role Separation, only one oracle user for both Oracle Grid Infrastructure and Oracle RAC database software is needed.

Setup Oracle Grid Infrastructure and Oracle RAC Database Software

  1. Stage both Oracle Grid Infrastructure and Oracle RAC database software.
  2. Create a staging directory. For example: /u01/app/stage.
  3. Stage the Oracle Grid Infrastructure software in a staging directory (/u01/app/stage), and then unzip the Oracle Grid Infrastructure software in the software installation directory (/u01/app/21.0.0/grid).
  4. Run the Cluster verification utility to verify it meets the install prerequisites. For example: GI_HOME/bin/runcluvfy.sh stage -pre crsinst -n node1,node2 -fixup -verbose.
    /u01/app/21.0.0/grid/bin/runcluvfy.sh stage -pre crsinst -n racvm1,racvm2 -fixup -verbose
    Fix any errors in the cluster verification output before continuing installation. The fixup script generated by the cluvfy command can also be used.