Prepare to Configure SSO Between Azure AD and Oracle Access Manager for Oracle Retail Merchandising Suite
Before attempting this solution, you should be familiar with the its critical concepts, such as the federation flow and capacity and software requirements. You also need to prepare the environment by installing the Retail Merchandising Suite components and provisioning user attributes.
License and Software Requirements
Before installing Oracle Retain Merchandising Suite, ensure the following:
-
You have software licenses for Retail Merchandising Suite version 16.0.2 or later.
-
Your environment meets the capacity and software requirements described here:
Component Requirement Database software Oracle Database Enterprise Edition 12cR1 (12.1.0.2) Database hardware (Oracle Cloud Infrastructure location) Note:
Perform a full capacity-planning exercise to determine if more database capacity or storage is required for your retail enterprise workloads.2-node RAC DB system or Exadata DB system sized appropriately to the retailer’s volumes (minimum 8 VCPU and 60-GB RAM) Middleware software Oracle Fusion Middleware 12.2.1.3.0 Components:- FMW 12.2.1.3.0 Infrastructure (WLS and ADF included)
- Oracle Enterprise Manager Fusion Middleware Control 12.2.1.3.0
- BI Publisher 12.2.1.3.0 for legacy reports
- Oracle Identity Management 11g Release 1 (11.1.1.9)
Java: JDK 1.8+ 64 bit
Single sign-on (SSO):- Oracle Web Tier (12.2.1.3.0)
- Oracle Access Manager 11g Release 2 (11.1.2.3) Oracle Access Manager Agent (WebGate) 11g Release 2 (11.1.2.3)
Minimum middleware hardware (Azure location) Note:
Perform a full capacity-planning exercise to determine if more database capacity or storage is required for your retail enterprise workloads.- Four 2-node Cluster Azure Compute and 300-GB Storage for Retail Merchandising and Retail Integration applications
- Four 2-node Cluster Azure Compute and 300-GB Storage for BI and IDM components
- One VS Azure Compute for SFTP server
Understand the Federation Flow

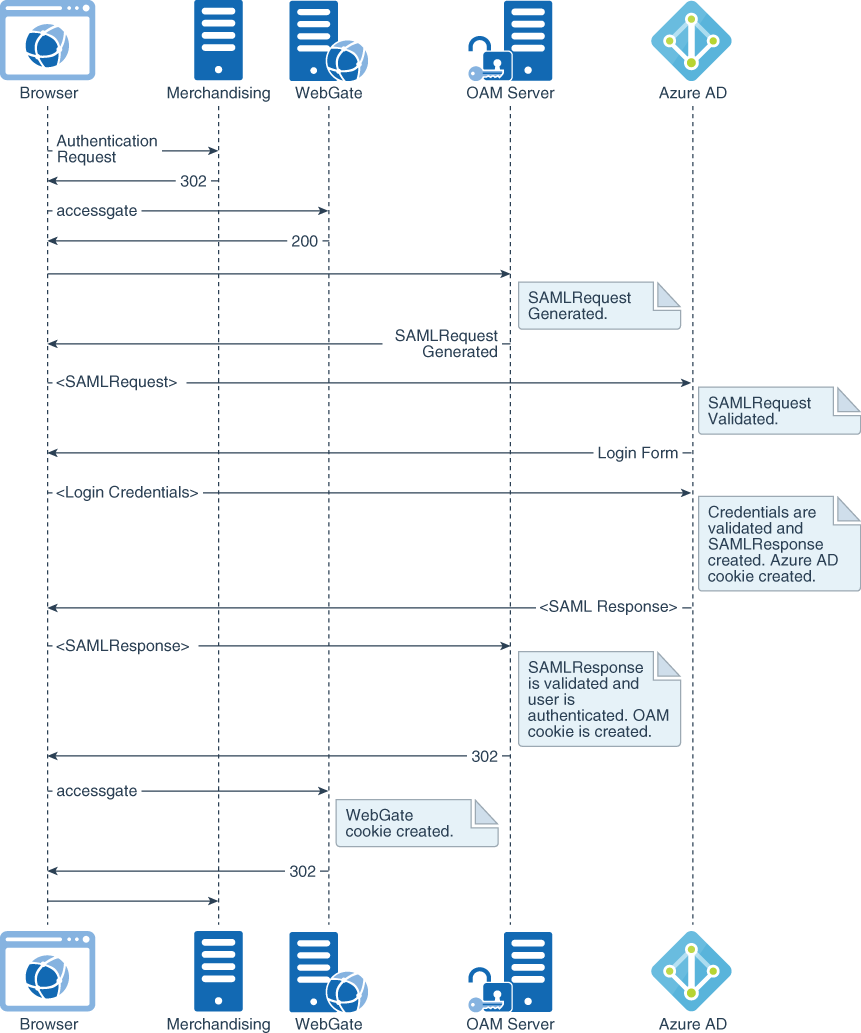
Description of the illustration merch-federation-flow.png
The primary use case is a federation flow that is initiated on access to a Retail Merchandising Suite endpoint. As illustrated in the preceding diagram, the Oracle Access Manager server (OAM Server) detects access to Retail Merchandising, creates an authentication request (SAMLRequest), and redirects the browser to Azure AD for authentication. Azure AD challenges the user for credentials, validates them, creates a SAMLResponse as a response to the received authentication request, and sends it back to Oracle Access Manager. In turn, Oracle Access Manager validates the assertion and asserts the user identification information embedded in the assertion, granting access to the protected resource.
Install Components
The Retail Merchandising Suite consists four components which need to be installed separately before you can integrate Oracle Access Manager and Azure AD for Retail Merchandising.
- Merchandising and Retail Integration database
The Retail Merchandising and Retail Integration applications you will install have been validated against a 12.1.0.2 RAC database on Oracle Cloud Infrastructure.
- Merchandising and Retail Integration applications
The Retail Merchandising System is deployed on a WebLogic cluster in Azure. Requests from the load balancer pass through the Oracle HTTP web server hosted on each clustered node and are proxied to the active-active horizontal WebLogic cluster.
Note:
Before beginning the installation process, ensure that all middleware software has been installed as required by Azure.
Install the Merchandising Database
The Merchandising release contains an installer package that is used to install the database objects for the Merchandising applications.
To install the Merchandising database:
Install the Merchandising Database
Create the required user schemas to install the Retail Integration Bus applications and grant necessary permissions.
Install Merchandising Applications
First, install the Merchandising applications.
To install the Merchandising applications:
- Create a WebLogic domain for each Merchandising and Retail Integration application and configure SSL certificates for secure communication. Configure the Oracle Internet Directory provider in the WebLogic domain, and load required LDIF files for authenticating application requests.
- Configure Oracle Access Manager with the Oracle HTTP server for single sign-on authentication.
- Extract the installer zip file for each Merchandising and Retail Integration application into the respective application staging directory on the shared NFS mounted across cluster nodes.
- Create a wallet in the RETAIL_HOME path for each application with all of the required aliases to be used in the ant.install.properties file.
- Set the environment variables (J2EE_ORACLE_HOME, J2EE_DOMAIN_HOME, JAVA_HOME, and so on).
- Run the
install.shscript to start the application installers in silent mode. - Verify that application SSO URLs are accessible through load balancer IP addresses over secure communication.
Install Retail Integration Applications
The Retail Integration applications are deployed to a WebLogic server in Azure.
To install the Retail Integration applications:
- Extract the Retail Integration applications in a staging directory on the file system.
- Modify the properties files under the conf directory with the appropriate environment information.
- Compile and set up security wallets by using the shell scripts available in the bin directory.
- Deploy the Retail Integration applications (RIB, RSB, JMS, IGS, RSE, and RIHA) on each WebLogic server.
- Configure the Oracle Internet Directory provider in the WebLogic domain, and load the required LDIF files for authenticating application requests.
- Verify that the application SSO URLs are accessible through load balancer IP addresses over secure communication.
Provision Critical User Attributes
Following Azure AD best practices, the user principal name (UPN) is used as the federated user mapping attribute value. The UPN provides a reliable unique value for signing on to the user account and matching in Oracle Access Manager.
| Azure Attribute | LDAP Attribute | Example |
|---|---|---|
| userPrincipalName | test.user1@example.co | |
| samAccountName | uid | test.user1@example.com |
| displayName | cn | Test User1 |
| givenName | givenName | Test |
| sn | sn | User1 |