Installing an Oracle ZFS Storage ZS7-2 Cable Management Arm

Use the following procedure to install the cable management arm (CMA) for an Oracle ZFS Storage ZS7-2 controller. The CMA is an assembly that you can use to route the controller cables in the rack. This procedure is completed from the back of the rack.

Before You Begin

To prepare for installing the optional CMA, follow these guidelines:

  • Route cables in the following priority until the CMA is full:

    1. Cluster cables

    2. SAS active optical cables (AOCs)

    3. SAS copper cables

    4. Host optical cables

    5. Host copper cables (Ethernet, InfiniBand, Fibre Channel)

    6. Power cables

    All excess cabling that cannot be fitted through the CMA should be attached to the side of the rack and properly dressed (Velcro straps, and so on). Allow enough slack (service loop) for serviceability.

  • Up to 16 AOC SAS cables can be routed through the CMA.

  • Oracle ZFS Storage ZS7-2 controllers that support a mix of AOC and copper SAS cables can route up to 12 AOC and 4 copper SAS cables through the CMA.

  • Do not route short SAS daisy chain cables through the CMA. Do not route an excess of cables such that the CMA clamps bow or appear structurally unfit to support the weight.

  • If using two clustered controllers mounted in the middle of the rack with disk shelves located above and below them, you can divide the disk shelf SAS cables between the two CMAs so that they properly route to the upper and lower disk shelves.

  • If uninstalling equipment and the CMA requires removal, be sure to support the CMA as you remove the connectors.
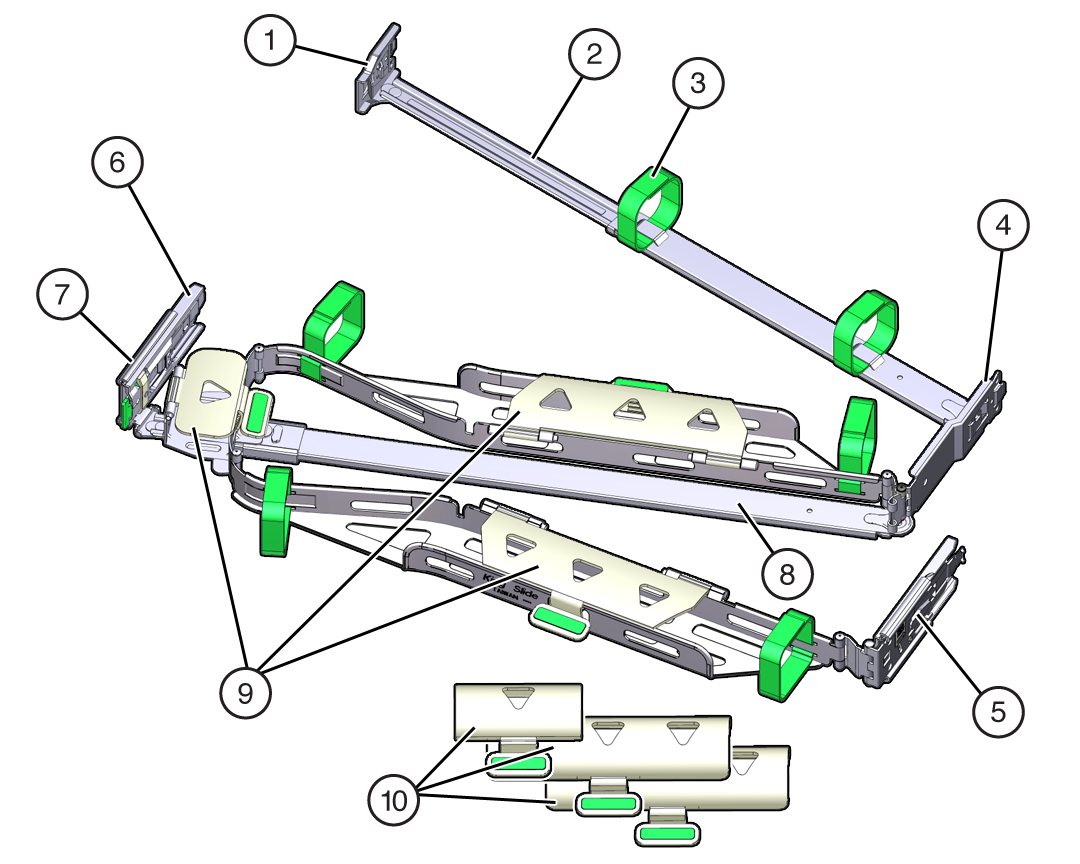
  1. Unpack the CMA and identify its components.

    Figure showing CMA components.
    Callout Description

    1

    Connector A

    2

    Front slide bar

    3

    Velcro straps (6)

    4

    Connector B

    5

    Connector C

    6

    Connector D

    7

    Slide-rail latching bracket (used with connector D)

    8

    Back slide bar

    9

    Controller flat cable covers

    10

    Controller round cable covers

  2. Ensure that you install the round, not flat, cable covers for your controller on the CMA. If flat covers are installed, replace them with round cable covers.
  3. Ensure that the six Velcro straps are threaded into the CMA.

    Note:

    Ensure that the two Velcro straps located on the front slide bar are threaded through the opening in the top of the slide bar, as shown in the illustration in step 1. This prevents the Velcro straps from interfering with the expansion and contraction of the slide bar when the controller is extended out of the rack and returned to the rack.
  4. To make it easier to install the CMA, extend the controller approximately 13 cm (5 inches) out of the front of the rack.
  5. Take the CMA to the back of the equipment rack, and ensure that you have adequate room to work at the back of the controller.

    Note:

    References to left or right in this procedure assume that you are facing the back of the equipment rack.

    Note:

    Throughout this installation procedure, support the CMA and do not allow it to hang under its own weight until it is secured at all four attachment points.
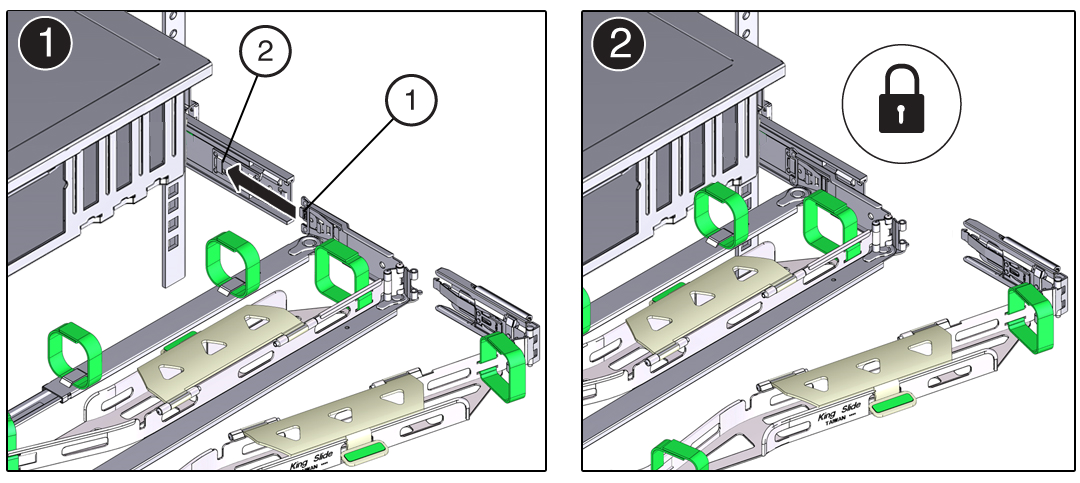
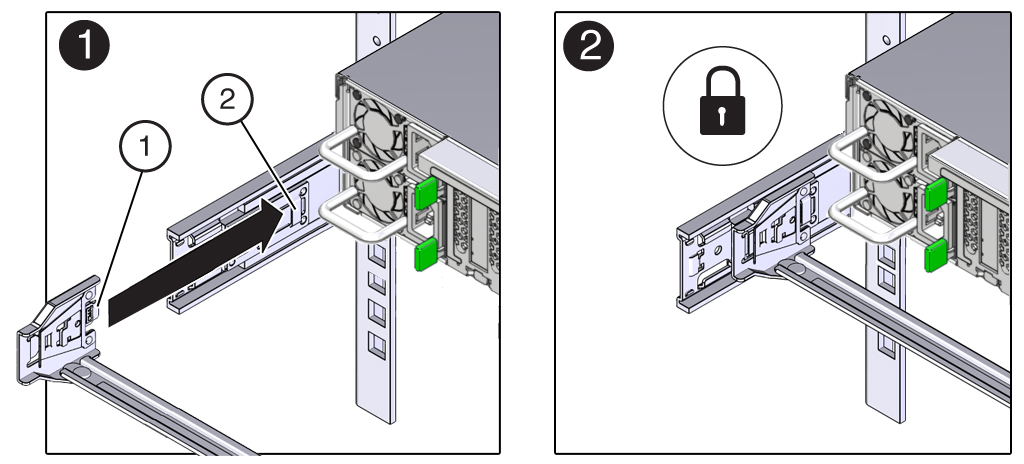
  6. To install CMA connector A into the left slide-rail:
    1. Insert CMA connector A into the front slot on the left slide-rail until it locks into place with an audible click, frames [1] and [2].

      The connector A tab (callout 1) goes into the slide-rail front slot (callout 2).

    2. Gently tug on the left side of the front slide bar to verify that connector A is properly seated.

      Figure showing how to install connector A into the left slide-rail.
      Callout Description

      1

      Connector A tab

      2

      Left slide-rail front slot

  7. To install CMA connector B into the right slide-rail:
    1. Insert CMA connector B into the front slot on the right slide-rail until it locks into place with an audible click, frames [1] and [2].

      The connector B tab (callout 1) goes into the slide-rail front slot (callout 2).

    2. Gently tug on the right side of the front slide bar to verify that connector B is properly seated.

      Figure showing how to install the CMA's connector B into the right slide-rail.
      Callout Description

      1

      Connector B tab

      2

      Right slide-rail front slot

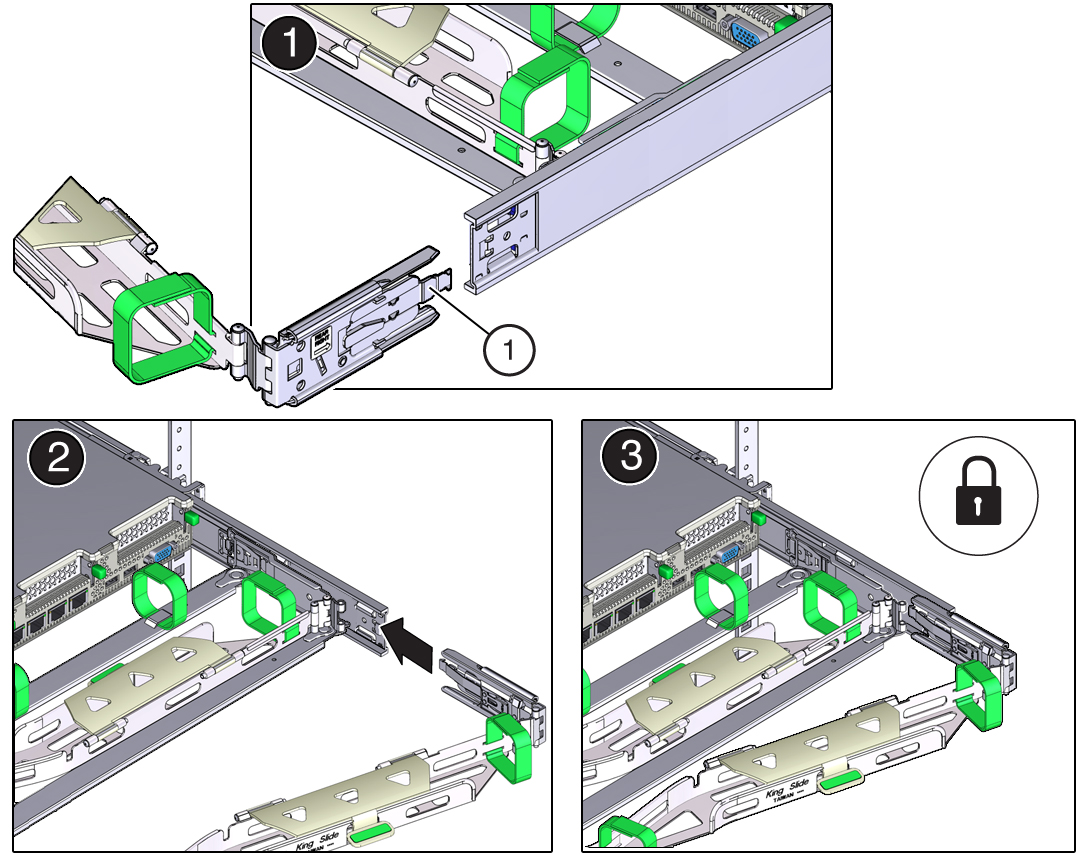
  8. To install CMA connector C into the right slide-rail:
    1. Align connector C with the slide-rail so that the locking spring (callout 1) is positioned inside (controller side) of the right slide-rail, frame [1].

      Figure showing how to install the CMA's connector C into the right slide-rail.
      Callout Description

      1

      Connector C locking spring

    2. Insert connector C into the right slide-rail until it locks into place with an audible click, frames [2] and [3].
    3. Gently tug on the right side of the CMA back slide bar to verify that connector C is properly seated.
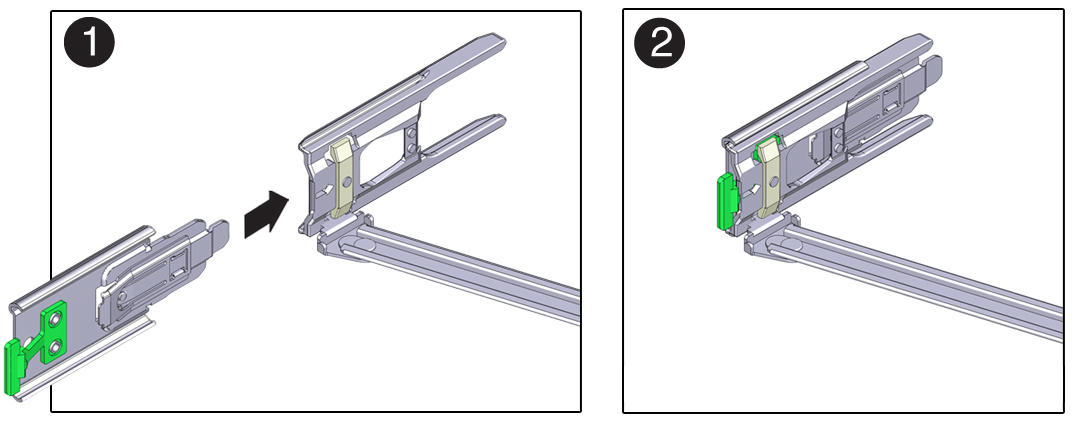
  9. To prepare CMA connector D for installation, remove the tape that secures the slide-rail latching bracket to connector D, and ensure that the latching bracket is properly aligned with connector D, frames [1] and [2].

    Note:

    The CMA is shipped with the slide-rail latching bracket taped to connector D. You must remove the tape before you install this connector.

    Figure showing how to align the CMA slide-rail latching bracket with connector D.
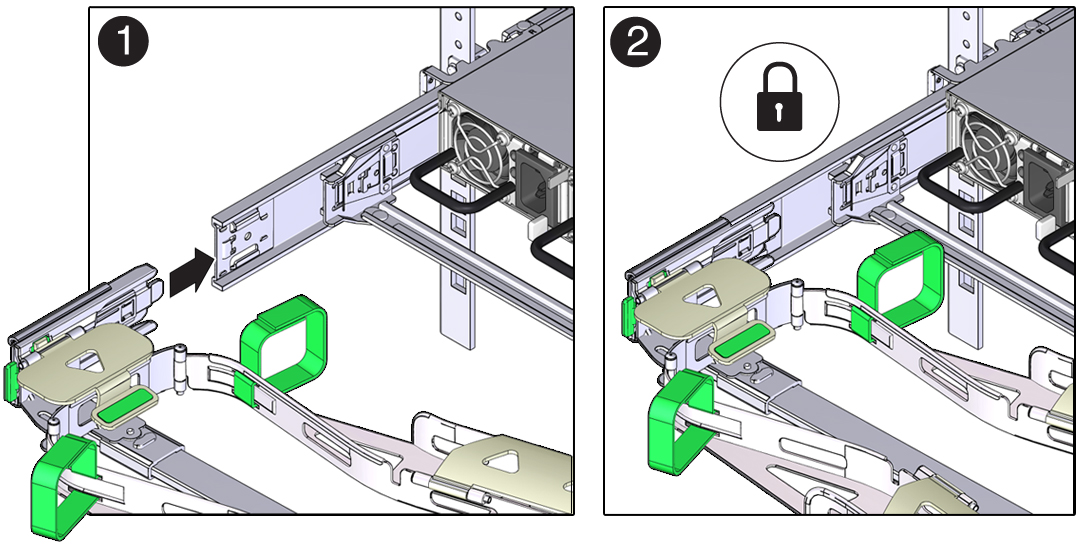
  10. To install CMA connector D into the left slide-rail:
    1. While holding the slide-rail latching bracket in place, insert connector D and its associated slide-rail latching bracket into the left slide-rail until connector D locks into place with an audible click, frames [1] and [2].

      Note:

      When inserting connector D into the slide-rail, the preferred and easier method is to install connector D and the latching bracket as one assembly into the slide-rail.
    2. Gently tug on the left side of the CMA back slide bar to verify that connector D is properly seated.

      Note:

      The slide-rail latching bracket has a green release tab. This tab is used to release and remove the latching bracket so that you can remove connector D.

      Figure showing how to install the CMA's connector D and its associated latching bracket into the left slide-rail.
  11. Gently tug on the four CMA connection points to ensure that the CMA connectors are fully seated before you allow the CMA to hang by its own weight.
  12. Install and route cables to the controller, as required.