2 Upgrading Oracle GoldenGate Veridata
This chapter describes the tasks you perform to upgrade Oracle GoldenGate Veridata.
This chapter includes the following sections:
-
Section 2.1, "Installing Oracle GoldenGate Veridata 12c (12.1.3)"
-
Section 2.2, "Creating Repository Schemas using Repository Creation Utility"
-
Section 2.3, "Using Upgrade Assistant to Upgrade Veridata Schemas"
-
Section 2.4, "Creating the Veridata Domain using the Upgraded Schema"
-
Section 2.5, "Upgrading Veridata Configuration by Using the Upgrade Assistant"
2.1 Installing Oracle GoldenGate Veridata 12c (12.1.3)
Oracle GoldenGate Veridata 12c (12.1.3) runs on Oracle WebLogic Server. Therefore, to upgrade Oracle GoldenGate Veridata 11g (11.2.1), which was using Apache Tomcat Web Server, you must first install Oracle GoldenGate Veridata 12c using the Oracle Fusion Middleware installer. After installing, follow the upgrade process described in this document.
For more information about installation, see Installing and Configuring Oracle GoldenGate Veridata.
2.2 Creating Repository Schemas using Repository Creation Utility
Oracle GoldenGate Veridata Server requires a database to serve as a repository for objects that store the information and environment preferences that users create when using Oracle GoldenGate Veridata Web User Interface. You can use the following databases as a repository:
-
Oracle
-
MySQL
-
Microsoft SQL Server
After installing Oracle GoldenGate Veridata 12c (12.1.3) and configuring your database, create the necessary schema for your repository database by using RCU. Navigate to the ORACLE_HOME/oracle_common/bin directory and start RCU.
RCU creates the schema_version_registry table in the database and it is used by Veridata and Upgrade Assistant. Following sections explain how to create schema for various databases:
Note:
In the RCU pages, when you create the Service Table (STB), specify a unique prefix for the schema for all databases. You need to provide this prefix while running the Upgrade Assistant for upgrading Veridata schema.
To drop the Veridata repository, you should use the same prefix.
2.2.1 Creating Schema for Oracle Database
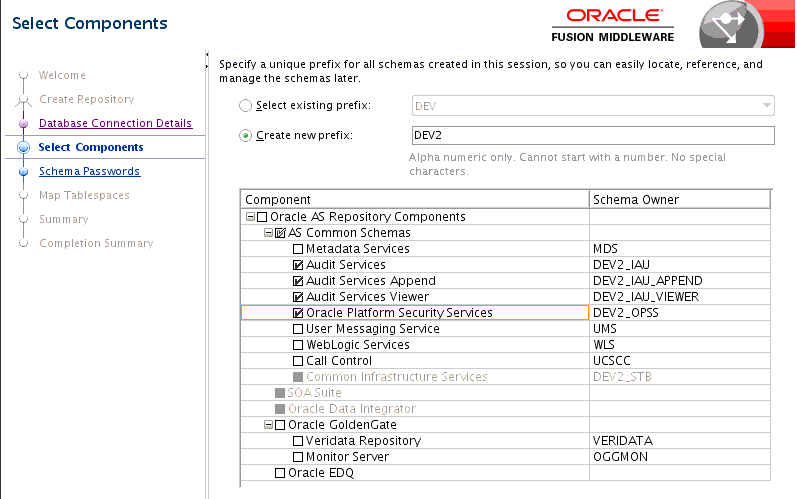
If you are using Oracle database, create the Oracle Platform Security Services (OPSS) schema using RCU. In the Select Components page of RCU, select OPSS as follows:
See Creating Schemas with the Repository Creation Utility for more information.
2.2.2 Creating Schema for Microsoft SQL Server
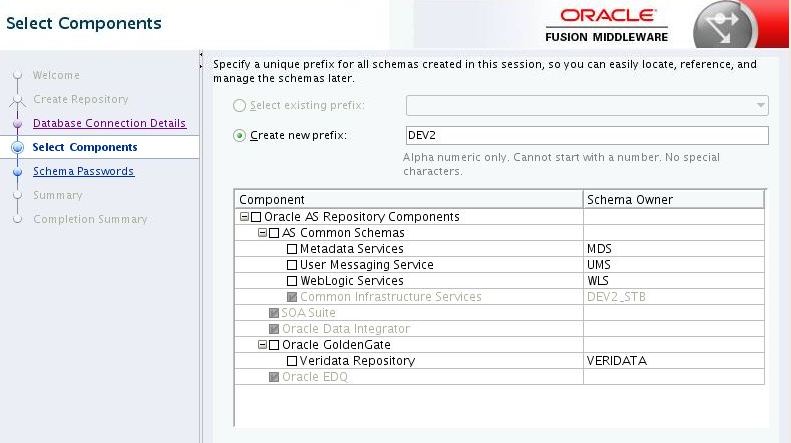
For upgrading to version 12.1.3, MS SQL Server users should run RCU to create the Service Table (STB). Select only Service Table in the Select Components page:
See Creating Schemas with the Repository Creation Utility for more information.
2.2.3 Creating Schema for MySQL
For upgrading to version 12.1.3, MySQL users should run RCU to create the Service Table. Select only STB in the Select Components page of the RCU (See Figure 2-2).
See Creating Schemas with the Repository Creation Utility for more information about using RCU.
Setting the configuration parameters for MySQL
Before running RCU for MySQL, execute the following commands at the MySQL command prompt:
mysql>SET GLOBAL INNODB_FILE_PER_TABLE="ON";
mysql>SET GLOBAL INNODB_FILE_FORMAT="Barracuda";
mysql>SET GLOBAL INNODB_LARGE_PREFIX="ON";
mysql>SET GLOBAL LOG_BIN_TRUST_FUNCTION_CREATORS="ON";
Note:
Before you run the RCU, you must ensure that the database name is compliant with the Oracle Fusion Middleware standards. The database name and the user name must be the same and in capital letters.
Renaming the database user name
The lower_case_table_names system variable in MySQL determines if the MySQL table lookup is case sensitive or not.
If lower_case_table_names is "1", the table lookup is case insensitive.
If lower_case_table_names is "0", the table lookup is case sensitive.
Run the following command at the MySQL prompt to see the value of the lower_case_table_names variable:
mysql > SHOW VARIABLES LIKE "lower_case_table_names";
Depending on the value of lower_case_table_names, follow the steps below to rename the database user name in uppercase.
-
If
lower_case_table_names=1, then rename the MySQL user name as follows:RENAME USER old_user@'host' TO new_user@'host';
where
old_useris the user name of the current Veridata repository.new_useris the user name that is same as the database name and this should be in uppercase.host is the host name of the machine from which you need access to the database. To allow access from all machines, specify '%' for the host name.
Example:
If the database name is
veridataDBand user name isveridataUser, execute the following command:RENAME USER veridataUser@'localhost' to VERIDATADB@'localhost'; or RENAME USER veridataUser@'%' to VERIDATADB@'%';
-
If
lower_case_table_names=0 and if the database name is in uppercase, then rename the MySQL user name to uppercase as same as the database name:RENAME USER old_user@'host' TO new_user@'host';
where
old_useris the user name of the current Veridata repository.new_useris the user name that is same as the database name and this should be in uppercase.host is the host name of the machine from which you need access to the database. To allow access from all machines, specify '%' for the host name.
-
If
lower_case_table_names=0 and if the database name is in lowercase or mixed case, then create a new database and a new user with both the user name and database name in uppercase. See "Creating a new database and user for MySQL database".Example:
If the user name is
veridataUserand old database name isveridataDB, then create a new database with the name asVERIDATAUSERand copy contents ofveridataDBtoVERIDATAUSER. You should also create a new userVERIDATAUSERwith access to the new database.
Creating a new database and user for MySQL database
To create a database:
-
Enter the following commands to create a new database from the old database dump:
bash>mysqldump -u[username] -p[pass] -v [olddatabase] > [file path to create sqldump olddbdump.sql]

bash>mysql -u[username] -p[pass]

mysql>create schema [NEWDATABASE]

mysql>use [NEWDATABASE]

mysql>source [file path for sqldump olddbdump.sql]
-
To grant access to the database:
mysql>grant all on `[NEWDATABASE]`.* to [NEWDATABASE]@'localhost' identified by '[Password]';
mysql>grant grant option on `[NEWDATABASE]`.* to [NEWDATABASE]@'localhost';
mysql>grant all on `[NEWDATABASE]`.* to [NEWDATABASE]@'%' identified by '[Password]';
mysql>grant grant option on `[NEWDATABASE]`.* to [NEWDATABASE]@'%';
mysql>flush privileges;
Example:
Old database: veridata18_9
New database: VERIDATA18_9
New user name: VERIDATA18_9
Note that both user name and database name are the same.
bash> mysqldump -uroot -pwelcome -v veridata18_9 > /home/veridata18_9.sql
bash> mysql -uroot –pwelcome
mysql> create schema VERIDATA18_9;
mysql> use VERIDATA18_9;
mysql> source /home/veridata18_9.sql;
mysql> grant all on `VERIDATA18_9`.* to VERIDATA18_9@'localhost' identified by 'VERIDATA18_9';
mysql> grant grant option on `VERIDATA18_9`.* to VERIDATA18_9@'localhost';
mysql> grant all on `VERIDATA18_9`.* to VERIDATA18_9@'%' identified by 'VERIDATA18_9';
mysql> grant grant option on `VERIDATA18_9`.* to VERIDATA18_9@'%';
mysql> flush privileges;
2.3 Using Upgrade Assistant to Upgrade Veridata Schemas
Use Oracle Fusion Middleware Upgrade Assistant to upgrade Oracle GoldenGate Veridata schema to 12c (12.1.3). For more information about the features of Upgrade Assistant, see Upgrading with the Upgrade Assistant.
To upgrade the Veridata repository schema follow the instructions below:
-
To start Upgrade Assistant, go to the
ORACLE_HOME/oracle_common/upgrade/bindirectory, and enter the following command:On UNIX:
./uaOn Windows:
ua.batThe Welcome screen of the Upgrade Assistant appears. Click Next.
-
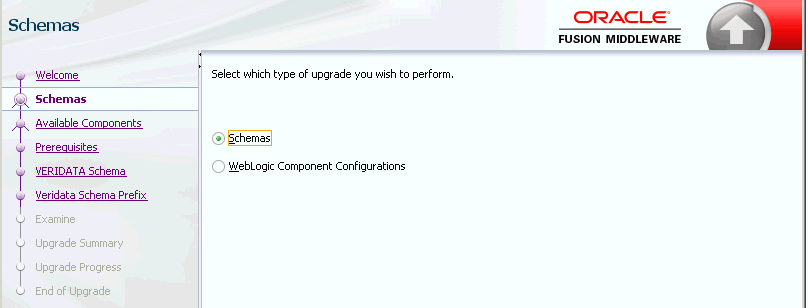
Select Schemas as the upgrade type. Click Next.
-
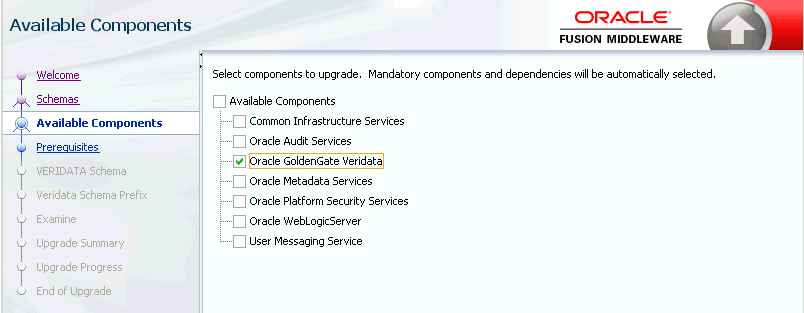
The Upgrade Assistant lists all schemas available for upgrade. Select only Oracle GoldenGate Veridata. Ensure that no other schemas are selected for upgrade.
-
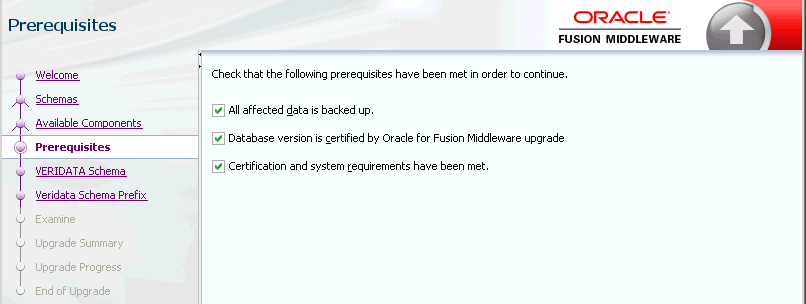
The Prerequisites screen lists items that you must check and verify before you can proceed.
You must check the boxes before you can continue. The Upgrade Assistant will not verify that the prerequisites have been met.
-
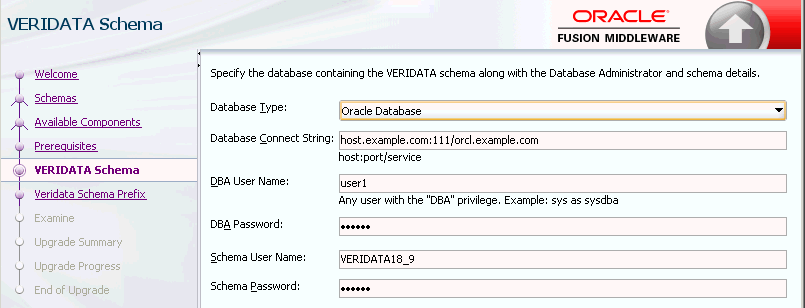
On the VERIDATA Schema page, enter the connection credentials for the database containing the schema you want to upgrade.
-
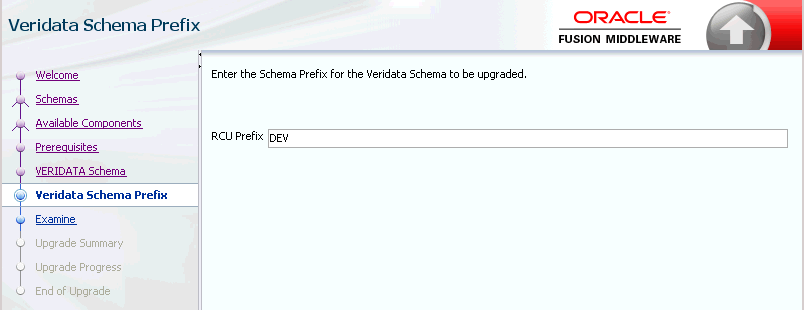
On the Veridata Schema Prefix page, enter the prefix that was entered while creating the schema using RCU. See Section 2.2, "Creating Repository Schemas using Repository Creation Utility".
-
On the Examine screen, the Upgrade Assistant performs a series of validations before upgrading the selected components. Ensure that all validations have succeeded. Click Next.
-
Click Upgrade on the Upgrade Summary screen to begin the upgrade. The Upgrade Progress screens shows information about the progress of the upgrade, and the Upgrade Success screen summarizes the upgrade.
To verify the schema upgrade, follow the procedure as described in Section 3.2, "Verifying the Schema Upgrade".
To troubleshoot issues that might occur during schema upgrade, review the logs as described in Section 3.6, "Troubleshooting your Upgrade".
2.4 Creating the Veridata Domain using the Upgraded Schema
To create a WebLogic Server domain for Veridata, follow the procedure described in "Configure a Domain for Oracle GoldenGate Veridata" in Installing and Configuring Oracle GoldenGate Veridata.
Note:
Provide the upgraded Veridata schema details on the JDBC Component Schema page of the Configuration Wizard as shown in Figure 2-3.
Figure 2-3 Schema Selection in the Configuration Wizard
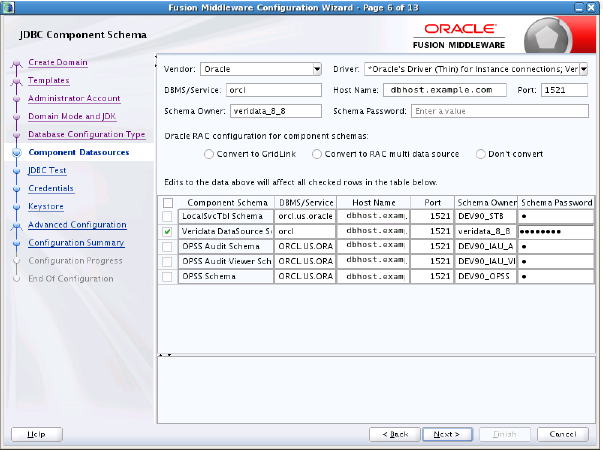
Description of "Figure 2-3 Schema Selection in the Configuration Wizard"
2.5 Upgrading Veridata Configuration by Using the Upgrade Assistant
To upgrade the Veridata repository schema using the Upgrade Assistant follow the instructions below:
-
To start the Upgrade Assistant, go to the
ORACLE_HOME/oracle_common/upgrade/bindirectory, and enter the following command:On UNIX:
./uaOn Windows:
ua.bat -
Select WebLogic Component Configurations on the Upgrade Operation page.
-
Select the Veridata domain to be upgraded. See Section 2.4, "Creating the Veridata Domain using the Upgraded Schema".
-
The Component List page displays a list of components that will be upgraded. Review the list and click Next to start the upgrade process.

-
The Prerequisites screen lists items that you must check and verify before you can proceed.
You must check the boxes before you can continue. The Upgrade Assistant will not verify that the prerequisites have been met.
-
On the Veridata 11g Home Directory page, specify the location of the Veridata 11.2 installation.

-
On the Examine screen, the Upgrade Assistant performs a series of validations before upgrading the selected components. Ensure that all validations have succeeded. Click Next to start the upgrade process.
-
Click Upgrade on the Upgrade Summary screen to begin the upgrade. The Upgrade Progress screens shows information about the progress of the upgrade, and the Upgrade Success screen summarizes the upgrade.
