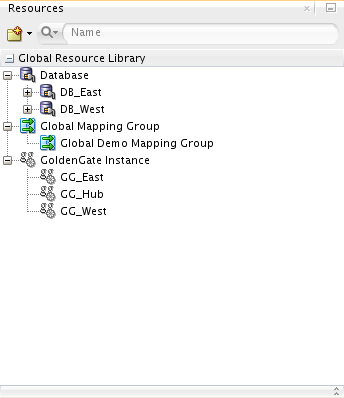
2.6 Using the Resources Navigator
The resources navigator, or the global resource library lists all the available resources such as:
-
Data Servers: All the available data servers. In the current version, only databases are available as data servers.
-
Global Mapping Group: Global mapping groups can be assigned to any replication path of any solution across all projects. Mapping groups created for a solution in the Projects Navigator can be copied to the global mapping groups or created directly from the Resources Navigator.
-
Oracle GoldenGate Instance: The available Oracle GoldenGate instances.
The Resources Navigator looks like:
Figure 2-3 Resources Navigator
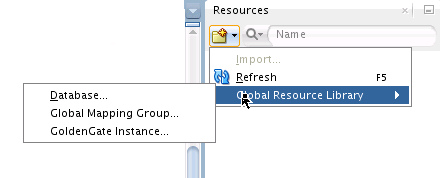
There are three ways to add a new global resource. If any type of resource is not added then you can add it by selecting the New button in the Resources Navigator toolbar, select the New button in the Oracle GoldenGate Studio toolbar, or select New under File menu, and then select the resource type you want to add. If a resource type has already been added, you right-click the resource category and select New Resource Type. You can add a Global Mapping Group by right-clicking a mapping group in the Projects Navigator and selecting Copy to Global Resource Library.
Figure 2-4 Adding New Resources through Resources Navigator
You can change the properties of existing resources by using the Properties context menu. You can also use the keyboard shortcut Ctrl+Tab to navigate to Resources Navigator, use the Tab and arrow keys to select the particular resource, and use Shift + F10 to view the context menu.
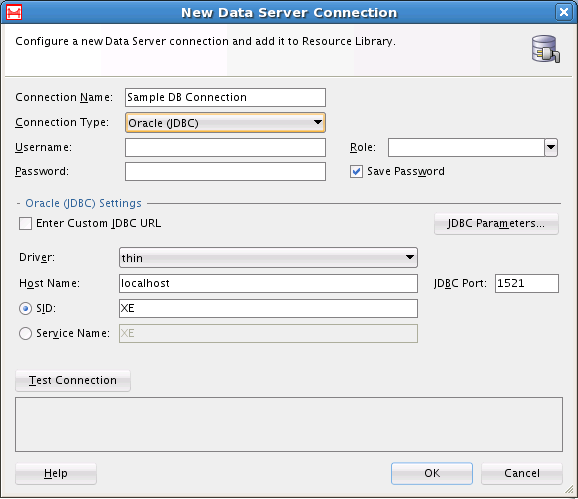
2.6.1 Add a New Data Server Connection
New data server connections are used only for table metadata to facilitate table mapping and are not used to define connections used by capture and apply processes. Capture and apply connections are defined in the Properties Inspector in the Deployment Profile.
A new data server connection wizard looks as follows:
Figure 2-5 New Data Server Connection
-
Select the Database resource type in the Resources Navigator window and right-click to select New Database Connection.
-
In the New Data Server Connection window, add the following:
-
Connection Name: The name of the new connection. The resource is listed in the Resources Navigator with the name mentioned here.
-
Connection Type: Connection types are
Oracle(JDBC),MySQL,SQLServer, andDB2 for z/OS. -
The User name and Password to connect to the database. If you uncheck Save Password check box during connection creation and if you want to expand the Database node after re-connecting to repository, Database node expansion will ask you to enter the password to show all the nodes under database connection.
-
The role as
SYSDBAorSYSOPER. This can be left blank when the user is notSYS. Else, you have to select the role. -
The Oracle JDBC settings.
By default, Oracle GoldenGate Studio provides drivers for Oracle, MySql, SQLServer, and DB2 for z/OS. Data direct drivers are provided for Informix, DB2, and Sybase but you can use any JDBC driver. Database driver can be configured by using Tools menu, then Preferences , Database, and finally JDBC Driver Options. Once a data server connection is created, you can browse objects under the database in the Resources Navigator and the information from the database navigator can be used for the mapping the tasks. Currently Oracle, MySQL, SQLServer, and DB2 for z/OS drivers are certified.
-
-
Click OK to create a new Database resource.
You can also test the connection using Test Connection button before creating the new resource.
2.6.2 Add a New Global Mapping Group
The New Global Mapping Group wizard defines a container for table mappings but does not guide you through the table mapping process. To learn more about defining table mapping see Understanding Mapping Groups
A new Global Mapping Group wizard looks as follows:
Figure 2-6 New Global Mapping Group
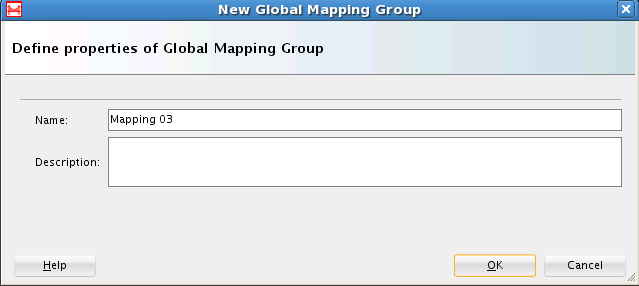
To add a new Global Mapping Group:
- Click the New button on the Resources Navigator window or right click on the database icon and select New Global Mapping Group Connection.
- Enter the name of the new connection.
- Enter a short description to identify the resource.
- Click OK.
2.6.3 Add a New Oracle GoldenGate Instance
The Add a New Oracle GoldenGate Instance dialog defines a connection to an existing GoldenGate installation. That installation must already have the GoldenGate manager and jAgent processes running
A new Oracle GoldenGate Instance dialog looks as follows:
Figure 2-7 New Oracle GoldenGate Instance Connection
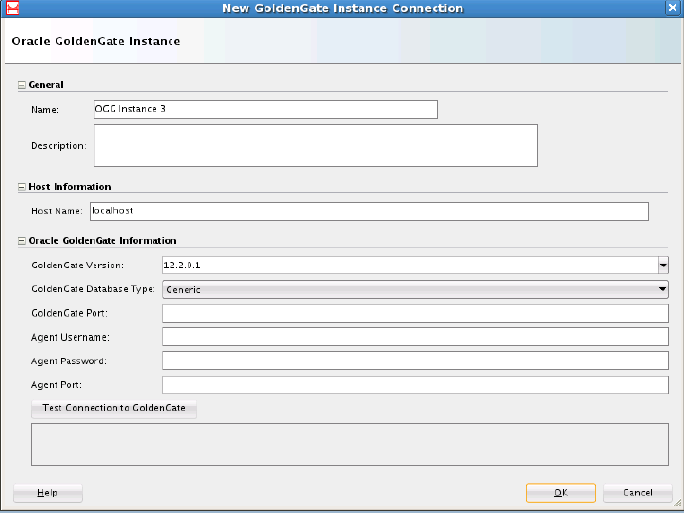
To add a new Oracle GoldenGate Connection: