2 Configuring Oracle GoldenGate Veridata Security
This chapter explains how to set security for Oracle GoldenGate Veridata.
This chapter includes the following sections:
-
Configuring an SSL Connection between Veridata Server and Veridata Agents
-
Securing Access to Oracle GoldenGate Veridata by Defining User Roles
2.1 Oracle GoldenGate Veridata Security Overview
When using Oracle GoldenGate Veridata, you will be selecting, viewing and storing data values from the tables or files of your business applications. Care must be taken to protect access to the following components:
-
The files, programs, and directories in the Oracle GoldenGate Veridata installation directories
-
Data files that contain the results of data comparisons
-
The Oracle GoldenGate Veridata Web User Interface, where data values can be viewed
2.2 Configuring an SSL Connection between Veridata Server and Veridata Agents
Oracle GoldenGate Veridata supports both Secure Sockets Layer (SSL) and plain socket communication between the Veridata Server and multiple Veridata Agents that are connected over a network. This section describes how to configure SSL and secure communication between the Veridata Server and Veridata Agents.
Note:
The Veridata Agent for NonStop platforms do not support SSL communication.In an SSL scenario, the Veridata Server is considered as the SSL Client and the Veridata Agents as the SSL Servers. The Veridata Server and Agents authenticate each other's identity. The data exchanged between the server and agent is also encrypted.
2.2.1 One-Way and Two-Way SSL Connections
SSL can be configured one-way or two-way in Oracle GoldenGate Veridata.
In one-way SSL connection, the SSL Client (Veridata Server) should trust the SSL Server (Veridata Agent). In two-way SSL, mutual trust is required between the SSL Server and the SSL Client. You can either use self-signed certificates or CA signed certificates to enable SSL.
Using self-signed certificates
To establish one-way SSL using self-signed certificates:
-
Create self-signed certificates for all Veridata Agents
-
Upload all Veridata Agent certificates to the
VeridataWebTrustStoreof the Veridata Server. See Section 2.2.6, "Using OPSS Keystore Service to Manage Veridata Keystores".
To establish two-way SSL using self-signed certificates:
-
Create self-signed certificates for all Veridata Agents.
-
Upload all Veridata Agent certificates to the
VeridataWebTrustStoreof the Veridata Server. See Section 2.2.6, "Using OPSS Keystore Service to Manage Veridata Keystores". -
Create self-signed certificate for the identity store of the Veridata WebLogic Server.
-
Upload the WebLogic Server identity certificate to all Veridata Agent truststores.
For more information about creating and importing certificates, see Section 2.2.5, "Creating Keystores and Self-Signed Certificates by using the Keytool Utility".
To establish one-way SSL using CA signed certificates:
-
Use certificates issued by the same Certificate Authority (CA) for all Veridata Agents.
-
Trust the root CA certificate in the Veridata Weblogic Server.
To establish two-way SSL using CA signed certificates:
-
Use certificates issued by the same Certificate Authority (CA) for all Veridata Agents.
-
Trust the root CA certificate in the Veridata Weblogic Server.
-
Use the certificate issued by a CA for identity store of Veridata Weblogic Server.
-
Trust the root CA certificate used in the previous step in the Veridata agent truststore.
2.2.2 Enabling SSL: Main Steps
Oracle GoldenGate Veridata Server and Oracle GoldenGate Veridata Agents are not enabled for SSL by default. If you decide to use SSL, you must enable the properties for the server and the agents. See SSL Settings for Oracle GoldenGate Veridata Agent and SSL Settings for GoldenGate Veridata Server.
You must also create the identity and trust keystores. Create self-signed certificates if you are not using a Certificate Authority (CA) certificate. See Creating Keystores and Self-Signed Certificates by using the Keytool Utility.
To verify and establish an SSL connection between the Veridata Server and an Agent, follow these steps:
-
Configure SSL for the Veridata Web Server. See SSL Settings for GoldenGate Veridata Server.
-
Restart the Veridata Web Server.
-
Shutdown the Veridata Agent. Configure SSL for the Veridata Agent. See SSL Settings for Oracle GoldenGate Veridata Agent.
-
Obtain the agent side keystores. See Using OPSS Keystore Service to Manage Veridata Keystores.
-
Configure the agent-side keystores in the agent configuration properties file.
-
-
Run
configure_agent_ssl.shand supply the password to the keystores configured in the agent configuration file. See Modifying the Veridata Agent Wallet. -
Start the agent.
-
If the trust is established properly between agent keystores and corresponding Veridata Server counterpart present in the OPSS Keystore Service, then SSL communication is established.
2.2.3 SSL Settings for Oracle GoldenGate Veridata Agent
By default, SSL is disabled for the Oracle GoldenGate Veridata Agent. To configure SSL, edit the following properties in the agent.properties file for your Veridata Agent.
Table 2-1 SSL Parameters in agent.properties file
| Parameter | Description | Default Value |
|---|---|---|
|
server.useSsl |
Enables or disables SSL Communication between the Veridata Agent and Veridata Server. Possible values are: true: Enables SSL communication false: Disables SSL communication |
false |
|
server.use2WaySsl |
Specifies whether the SSL communication is one-way or two-way. Options are: true: Uses two-way SSL communication false: Uses one-way SSL communication |
false |
|
server.identitystore.type |
Specifies the type of keystore used for SSL configuration. |
JKS |
|
server.identitystore.path |
Specifies the path for the server identity keystore. |
./certs/serverIdentity.jks(Self Signed) |
|
server.truststore.type |
Specifies the type of truststore used for SSL configuration. |
JKS |
|
server.truststore.path |
Specifies the path for the server truststore. |
./certs/serverTrust.jks(Self Signed) |
|
server.identitystore.keyfactory.alg.name |
Algorithm name of the keyfactory used for SSL server identity store. |
SunX509 |
|
server.truststore.keyfactory.alg.nam |
Algorithm name of the keyfactory used for SSL server trust store. |
SunX509 |
|
server.ssl.algorithm.name |
SSL algorithm name. Note: This value of this parameter must be same for the Veridata Agent and Veridata Server. |
TLS |
2.2.4 SSL Settings for GoldenGate Veridata Server
To enable SSL communication for all Veridata Server-Agent connections, you must set the SSL parameters in the veridata.cfg file located in the DOMAIN_HOME/config/veridata directory of your Veridata installation. Table 2-2 describes the various parameters that you must set in the veridata.cfg file for SSL communication.
You can also establish SSL communication only for certain connections. To do this, edit the connection properties in the Oracle GoldenGate Veridata web user interface. For more information, see the Oracle GoldenGate Veridata Online Help.
Note:
In addition to these settings, configure Veridata Server Identity keystore and Trust keystore using the OPSS Keystore Service in the WebLogic domain. For more details, see Section 2.2.6, "Using OPSS Keystore Service to Manage Veridata Keystores".Table 2-2 SSL Settings in veridata.cfg file
| Parameter | Description | Default Value |
|---|---|---|
|
server.useSsl |
Enables or disables SSL Communication between the Veridata Agent and Veridata Server. Possible values are: true: Enables SSL communication false: Disables SSL communication |
false |
|
server.ssl.client.identitystore.keyfactory.alg.name |
Algorithm name of the keyfactory used for SSL server identity store. |
SunX509 |
|
server.ssl.client.truststore.keyfactory.alg.name |
Algorithm name of the keyfactory used for SSL server trust store. |
SunX509 |
|
server.ssl.algorithm.name |
SSL algorithm name. Note: This value of this parameter must be same for the Veridata Agent and Veridata Server. |
TLS |
2.2.5 Creating Keystores and Self-Signed Certificates by using the Keytool Utility
For mutual authentication and to establish SSL communication, the Veridata Server and the Veridata Agents should mutually trust the add certificates in the respective truststores.
This section explains how to create keystores and self-signed certificates by using the keytool utility that is available as part of the Java Runtime Environment (JRE). For more details about keytool, refer Java documentation at http://docs.oracle.com/javase/7/docs/technotes/tools/#security.
2.2.5.1 Creating an Identity Keystore with a Self-Signed Certificate
The following keytool command creates a keystore containing a self-signed certificate:
keytool -genkey -keystore certs -keyalg rsa -alias vdt_alias -storepass server_ks_pwd -keypass server_pwd
The keytool utility prompts to enter details about the certificate. Provide answers on the command-line when prompted.
2.2.5.2 Building Veridata Server and Veridata Agent Keystores
To build the Veridata Agent keystore, run the following keytool command:
keytool -genkey -alias agent.server.keys -keyalg RSA -keystore agent.server.keystore -storepass ks_password -keypass keypwd
To export the Veridata Agent certificate to a file, run the following keytool command:
keytool -export -alias agent.server.keys -keystore agent.server.keystore -storepass ks_password -file agent.server.cer
To build the Veridata Web Server keystore, run the following keytool command:
keytool -genkey -alias vdt.web.client.keys -keyalg RSA -keystore vdt.web.client.keystore -storepass ks_password -keypass keypwd
To export the Veridata Server certificate to a file, run the following keytool command:
keytool -export -alias vdt.web.client.keys -keystore vdt.web.client.keystore -storepass ks_password -file vdt.web.client.cer
2.2.5.3 Importing Certificates to the Veridata Server and Agent Truststores
To import the Veridata Server certificate to the Agent truststore, run the following keytool command:
keytool -import -v -keystore agent.server.truststore -storepass ks_password -file vdt.web.client.cer
To import the Veridata Agent certificate the Veridata Web Server truststore, run the following keytool command:
keytool -import -v -keystore vdt.web.client.truststore -storepass ks_password -file agent.server.cer
2.2.5.4 Examples
- Example 1 Create a Veridata Agent ID Keystore
-
keytool -genkey -alias vdt.agent.id -keyalg RSA -keystore vdtAgentID.jks -storepass changeit -keypass changeit -validity 365C:\java\Java8\jdk1.8.0_40\bin>keytool -genkey -alias vdt.agent.id -keyalg RSA -keystore vdtAgentID.jks -storepass changeit -keypass c hangeit -validity 365 What is your first and last name? [Unknown]: COMPANY A What is the name of your organizational unit? [Unknown]: NA What is the name of your organization? [Unknown]: COMPANY A What is the name of your City or Locality? [Unknown]: USA What is the name of your State or Province? [Unknown]: USA What is the two-letter country code for this unit? [Unknown]: US Is CN=COMPANY A, OU=NA, O=COMPANY A, L=USA, ST=USA, C=US correct? [no]: yes
keytool -export -alias vdt.agent.id -keystore vdtAgentID.jks -storepass changeit -file vdtAgentID.cerC:\java\Java8\jdk1.8.0_40\bin>keytool -export -alias vdt.agent.id -keystore vdtAgentID.jks -storepass changeit -file vdtAgentID.cer
The certificate is stored in the
vdtAgentID.cerfile. - Example 2 Create a Veridata Server ID Keystore
-
keytool -genkey -alias vdt.server.id -keyalg RSA -keystore vdtServerID.jks -storepass changeit -keypass changeit -validity 365C:\java\Java8\jdk1.8.0_40\bin>keytool -genkey -alias vdt.server.id -keyalg RSA -keystore vdtServerID.jks -storepass changeit -keypass changeit -validity 365 What is your first and last name? [Unknown]: VERIDATA WEBLOGIC SERVER What is the name of your organizational unit? [Unknown]: NA What is the name of your organization? [Unknown]: COMPANY A What is the name of your City or Locality? [Unknown]: USA What is the name of your State or Province? [Unknown]: USA What is the two-letter country code for this unit? [Unknown]: US Is CN=COMPANY A, OU=NA, O=COMPANY A, L=USA, ST=USA, C=US correct? [no]: yes
keytool -export -alias vdt.server.id -keystore vdtServerID.jks -storepass changeit -file vdtServerID.cerC:\java\Java8\jdk1.8.0_40\bin>keytool -export -alias vdt.server.id -keystore vdtServerID.jks -storepass changeit -file vdtServerID.cer
The certificate is stored in the
vdtAgentID.cerfile. - Example 3 Create a Trust Stores for Veridata Agent and Server
-
keytool -import -v -keystore vdtAgentTrust.jks -storepass changeit -file vdtServerID.cer -alias vdt.server.idC:\java\Java8\jdk1.8.0_40\bin>keytool -import -v -keystore vdtAgentTrust.jks -storepass changeit -file vdtServerID.cer -alias vdt.ser ver.id Owner: CN=VERIDATA WEBLOGIC SERVER, OU=NA, O=COMPANY A, L=USA, ST=USA, C=US Issuer: CN=VERIDATA WEBLOGIC SERVER, OU=NA, O=COMPANY A, L=USA, ST=USA, C=US Serial number: 2aded02f Valid from: Thu May 14 12:18:09 IST 2015 until: Fri May 13 12:18:09 IST 2016 Certificate fingerprints: MD5: 4E:7D:89:F7:C8:E8:64:37:E5:0C:D3:03:8F:3E:94:0A SHA1: 1B:00:9D:44:BD:73:6E:71:9D:44:56:4A:29:4E:F5:D7:1C:49:57:F3 SHA256: 25:CB:77:3F:BC:5F:88:4B:09:D2:2D:C1:F8:E6:BA:70:DB:2B:55:53:48:7D:BA:F1:A3:01:18:AB:AA:D1:56:6A Signature algorithm name: SHA256withRSA Version: 3 Extensions: #1: ObjectId: 2.5.29.14 Criticality=false SubjectKeyIdentifier [ KeyIdentifier [ 0000: EF C3 25 BB 83 4E 2D 0D 15 3D EF 50 F7 F2 D0 A6 ..%..N-..=.P.... 0010: 94 5F 87 F2 ._.. ] ] Trust this certificate? [no]: yes Certificate was added to keystore [Storing vdtAgentTrust.jks]keytool -import -v -keystore vdtServerTrust.jks -storepass changeit -file vdtAgentID.cer -alias vdt.agent.idC:\java\Java8\jdk1.8.0_40\bin>keytool -import -v -keystore vdtServerTrust.jks -storepass changeit -file vdtAgentID.cer -alias vdt.age nt.id Owner: CN=COMPANY A, OU=NA, O=COMPANY A, L=USA, ST=USA, C=US Issuer: CN=COMPANY A, OU=NA, O=COMPANY A, L=USA, ST=USA, C=US Serial number: 6b590df2 Valid from: Thu May 14 12:08:00 IST 2015 until: Fri May 13 12:08:00 IST 2016 Certificate fingerprints: MD5: 3E:75:A3:96:40:60:10:96:DD:10:7B:4D:E4:3F:4C:04 SHA1: D1:CC:EB:67:A1:C6:CD:CA:62:27:EA:F8:82:BF:AB:E4:E7:2B:45:6D SHA256: E7:20:CF:D4:48:E2:AE:1E:1C:C7:06:1A:B3:0A:17:1F:8F:02:88:B7:A6:A0:5D:F7:12:BC:26:68:5B:C3:C9:C8 Signature algorithm name: SHA256withRSA Version: 3 Extensions: #1: ObjectId: 2.5.29.14 Criticality=false SubjectKeyIdentifier [ KeyIdentifier [ 0000: C0 D5 02 D9 24 6F 58 F6 63 D7 34 D3 9D C4 9E 33 ....$oX.c.4....3 0010: FC 16 4E 5F ..N_ ] ] Trust this certificate? [no]: yes Certificate was added to keystore [Storing vdtServerTrust.jks]
2.2.6 Using OPSS Keystore Service to Manage Veridata Keystores
The Oracle Platform Security Services (OPSS) keystore services is used as a repository for storing identity and trust keystores for Veridata Server. The Veridata Agent keystores can also be managed using the OPSS keystore service. For more information, see "Managing Keys and Certificates with the Keystore Service" in Securing Applications with Oracle Platform Security Services.
Table 2-3 lists the default values for the OPSS settings.
| Setting | Value |
|---|---|
|
Name of the Application Stripe created by WebLogic Server. |
|
|
Name of the identity keystore under the application stripe VeridataSec. |
|
|
Name of the trust keystore under the application stripe VeridataSec |
|
To configure two-way SSL by using the OPSS keystore service:
-
For each Veridata Agent, create an identity and trust keystore.
-
Update the
VeridataWebIdentityStorewith the identity certificate of the Veridata Web Server. -
Update the
VeridataWebTrustStorewith all Veridata Agent certificates. -
Update each Veridata Agent truststore with the identity certificate of the Veridata Web Server.
-
Export the Agent keystore and truststore as JKS files and note the passwords.
-
Distribute the JKS files to corresponding Agent machines.
-
Run the
configure_agent_ssltool to update the Agent wallet with the keystore passwords. -
For each Agent, configure the agent.properties file to enable SSL.
To configure one-way SSL by using the OPSS keystore service:
-
For each Veridata Agent, create an identity keystore.
-
Update the
VeridataWebIdentityStorewith the identity certificate of the Veridata Web Server. -
Export the Agent keystore and truststore as JKS files and note the passwords.
-
Distribute the JKS files to corresponding Agent machines.
-
Run the
configure_agent_ssltool to update the Agent wallet with the keystore passwords. -
For each Agent, configure the agent.properties file to enable SSL.
2.2.7 Modifying the Veridata Agent Wallet
Before you start the Veridata agent in SSL mode, you must update the Veridata Agent Wallet with the identity and trust keystore passwords. Otherwise, the Veridata Agent fails to start.
To update the wallet, run the configure_agent_ssl script that is available in the agent home:
AGENT_HOME\configure_agent_ssl.sh AgentID
where AgentID is the name of the agent properties file, without the .properties extension. The default value for AgentID is agent.
When prompted, enter the entry or unlock password for the identity and trust keystores for the agent.
2.3 Securing the Oracle GoldenGate Veridata Files
This section describes how to secure your business data and control access to the Oracle GoldenGate Veridata installation directories and user interface.
2.3.1 Controlling Access to the Installation Directories
Standard operating system permissions apply to the programs, files, and directories within the Oracle GoldenGate Veridata Server and Web User Interface, and Oracle GoldenGate Veridata Agent installation directories. You should adjust the permissions for these objects based on your business security rules.
2.3.2 Securing files that Contain Business Data
Oracle GoldenGate Veridata Server creates data files that will contain sensitive application data. By default, these files reside in the DOMAIN_HOME/veridata/reports. All of the sub-directories within that directory contain files that may reflect business data.
The types of files that contain sensitive data are:
-
The comparison report (
rptsub-directory) -
The out-of-sync report (
oosxmlandoossub-directories)
These files inherit the same file permissions as those of the user that runs the Oracle GoldenGate Veridata Server installation program. Do not change the permissions, or Oracle GoldenGate Veridata may be unable to maintain them. These files should be kept just as secure as you would keep your business data. Users of Oracle GoldenGate Veridata Web do not require access to these files because they see the same information through the client interface.
The contents of all report files can be optionally encrypted. For more information, see Section 2.6, "Encrypting Report Files".
2.4 Securing Access to Oracle GoldenGate Veridata by Defining User Roles
You can assign security roles to the users of Oracle GoldenGate Veridata to control their access to the functions that are performed by the software, some of which expose selected data values from the database. Table 2-4 describes the Veridata user roles.
| Veridata | Type | Description |
|---|---|---|
|
|
Type-A |
The administrator role is the highest-level security role in Oracle GoldenGate Veridata. This role can perform all of the functions that configure, execute, and monitor Oracle GoldenGate Veridata. |
|
|
Type-A |
The power user role is the second-highest role in Oracle GoldenGate Veridata. This role can perform all of the functions that configure, execute, and monitor Oracle GoldenGate Veridata from the Oracle GoldenGate Veridata Web User Interface, but this role cannot perform any configuration functions for the Oracle GoldenGate Veridata Server. |
|
|
Type-B |
The report viewer role cannot perform functions that configure Oracle GoldenGate Veridata or execute jobs. This role can only view configuration and job information, and view comparison reports. |
|
|
Type-B |
The detail report viewer role cannot perform any functions that configure Oracle GoldenGate Veridata or execute jobs. This role can only view configuration and job information, and view comparison reports and out-of-sync report information through the Oracle GoldenGate Veridata Web User Interface or at the file level. |
|
|
Additional |
The RepairOperator role can use the Repair feature in Veridata. |
|
|
Additional |
The commandLineUser role provides access to the Veridata command line tools, |
These roles are categorized into various types as follows:
-
Type A and Type B: By default, Type A and Type B users are not given any privileges of the Additional user roles. Assign Additional roles to users of these types.
-
Additional: WebLogic Administrators can assign these Additional roles to Type A users to perform the required Veridata functions.
Security is controlled through the Oracle WebLogic Server Administration Console. From this interface, a user with the administrator role can:
-
Create a user and assign it a security role.
-
Create user groups and assign them security roles. Users can be added to these groups without being given a security role. A user inherits the role of its group.
-
Create a user and assign it a security role, and then add that user to a group. The user inherits the role of its group and keeps its individual role.
To open Oracle WebLogic Server Administration Console
-
Connect to the Oracle WebLogic Server Administration Console from a browser by typing the following address:
http://weblogic_admin_server_hostname:admin_server_port/console
Where:
weblogic_admin_server_hostnameis the name or IP address of the system where the Oracle GoldenGate Veridata server and web components are hosted, andadmin_server_portis the port number assigned to the server (default is 7001). -
Log on to the Administration Console as an Oracle GoldenGate Veridata administrator user. A default administrator user was created during the creation of Oracle GoldenGate Veridata domain.
-
In the left pane of the Administration Console, select Security Realms.
-
On the Summary of Security Realms page select the name of the Veridata security realm.
-
On the Settings for Veridata Security realm page select Users and Groups > Users.
The User table displays the names of all users defined in the Authentication provider. Click New to create a new user or select an existing user to edit settings. Enter the following properties for a new user:-
Name: Specify a name for the user.
-
Provider: Select the Authentication provider for the user.
-
Password: Enter a password for the user.
-
Description: (Optional) Specify a description for this user.
-
-
To assign a role to the user, go to the Settings for user_name page and click Groups.
Select appropriate roles for the user. All roles for a Veridata user are described in Table 2-4, "Veridata User Roles".
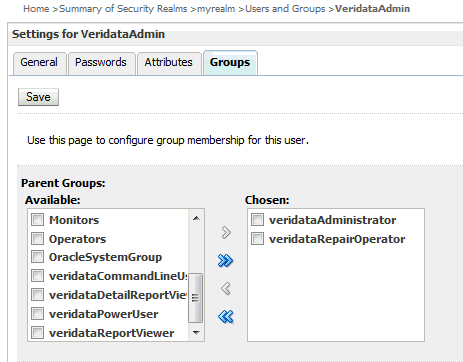
For example, an administrator, VeridataAdmin, can be given privileges as shown in the figure below.
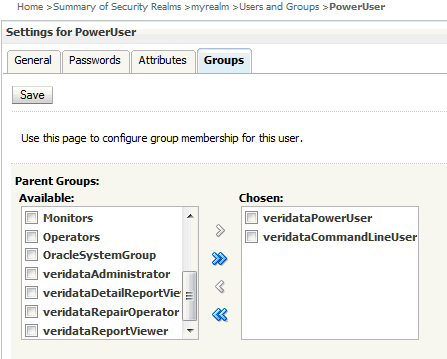
For example, a Veridata power user, PowerUser, can be given privileges as shown in the figure below.
-
Click Save to save the user.
2.5 Changing Database Schema Passwords
You can change Veridata database schema passwords when a schema password expires, an account is locked, or a password change is necessary. This section applies to all database schemas that are prefixed with 'OGG'. For example, OGG_IAU, OGG_IAU_APPEND, or OGG_IAU_VIEWER.
Change a database schema password:
-
Stop your Veridata Server.
DOMAIN_HOME/veridata/veridata/bin/veridataServer.sh stop -
Stop your Oracle WebLogic Server.
DOMAIN_HOME//veridata/bin/stopWebLogic.sh -
Start the Oracle WebLogic Scripting Tool,
wlst.sh. For example:/home/oracle/Oracle/Middleware/Oracle_Home/oracle_common/common/bin/wlst.sh
-
Modify the database schema password as in this example:
modifyBootStrapCredential(jpsConfigFile='/home/oracle/wls_domains/veridata/config/fmwconfig/jps-config.xml',username='OGG_OPSS',password='welcome123')
Where the
username=is your database schema name andpassword=is the new password. -
Exit the scripting tool using
exit(). -
Log into the metadata repository database and change the schema passwords and unlock the schema as in the following example that unlocks the OGG_OPSS schema:
alter user OGG_OPSS identified by welcome123;
alter user OGG_IAU identified by welcome123;
alter user OGG_IAU_APPEND identified by welcome123;
alter user OGG_IAU_VIEWER identified by welcome123;
alter user OGG_STB identified by welcome123;
alter user OGG_VERIDATA identified by welcome123;
alter user OGG_OPSS account unlock;
-
Start the Oracle WebLogic Configuration Wizard, config.sh. For example:
/home/oracle/Oracle/Middleware/Oracle_Home/oracle_common/common/bin/config.sh
-
Select Update an Existing Domain then click Next.
-
Select JDBC Component Schema then enter the new database schema passwords.
-
Click Next until you reach the Configuration Summary screen, and then click Update.
-
Click Next then Finish to save your schema password changes.
-
Start your Oracle WebLogic Server.
DOMAIN_HOME//veridata/bin/startWebLogic.sh -
Start your Veridata Server.
DOMAIN_HOME/veridata/veridata/bin/veridataServer.sh start
2.6 Encrypting Report Files
Oracle GoldenGate Veridata provides you with an option to encrypt the comparison report files (.rpt, .oos, .oosxml). The following sections explain the report encryption in Veridata:
2.6.1 Enabling Report Encryption
The encryption is controlled by the following parameters in the Veridata configuration file, veridata.cfg:
-
server.encryption -
server.encryption.bits
To enable encryption of Veridata report files, set server.encryption to true.
Encryption of Veridata report files use AES encryption, and the default encryption strength is 128 bits. You can increase the encryption strength to 192 or 256 bits by editing the value of server.encryption.bits parameter in veridata.cfg. Note that any encryption strength greater than 128 requires you to use a JRE that has Unlimited Strength Cryptography Extension installed.
For more information about these parameters, see "Parameters for Report File Encryption".
Encrypted Veridata report files have the following extensions in the file names:
-
.xrpt: Encrypted comparison or repair report file -
.xoos: Encrypted binary out-of-sync file -
.xoosxml: Encrypted out-of-sync XML file -
.xNNN: Encrypted out-of-sync XML chunk file (NNNis a decimal number)
2.6.2 Using the reportutil Tool to view Reports
When Veridata report encryption is enabled, all Veridata report files will be encrypted using an encryption key which is initially a large random value. The encryption key can be changed if required.
The encrypted files must be decrypted before you read it. The Veridata Web User Interface automatically decrypts files before displaying them. Alternatively, use the reportutil.sh/.bat utility to display the encrypted contents. This utility is located in the VERIDATA_DOMAIN_HOME\veridata\bin directory. Run the tool as follows:
reportutil [-wlport port ] -wluser weblogic_user { options }
Where wlport is the WebLogic Server port number (the default port is 8830) and wluser represents the WebLogic Server user name.
The valid options are:
-
-version,-v: displays the current version -
-help: displays the help message -
-r: rolls report encryption -
-ffilename[-ddirectory]: decrypts and prints the report file to the specified file if a directory is specified by the-doption. Or else the command prints the decrypted file to the standard output.
Note that the Veridata user running the reportutil tool must be in the appropriate user group to perform the operations:
-
-r,-f: Allowed only if the user is a member ofveridataCommandLineUsergroup -
-r: Allowed if the user is a member ofveridataAdministratorgroup -
-f: Allowed if the user is a member ofveridataAdministratorgroup, or a member ofveridataPowerUsergroup, or a member ofveridataDetailReportViewer. group
For more information about the user roles, see Section 2.4, "Securing Access to Oracle GoldenGate Veridata by Defining User Roles".