2 Affiliate Users
This chapter describes the tasks that can be performed by the Affiliate Users of Argus Affiliate. This chapter contains the following topics:
Note:
To access the LAM user interface, users must first log on to Argus Affiliate using the user name and password that have been provided to them.Logging On
Use the following procedure to log on to Argus Safety Web.
-
Open Microsoft Internet Explorer.
-
Under Address, enter the URL for Argus Safety and press ENTER.
-
When the log-on screen opens, enter your Argus user name, password, and select the required database from the list.
-
Click Login.
Viewing the Worklist
In the Argus User Interface, select Worklist from the Local Affiliate Menu to access the different options available through this screen.
The following table lists and describes the different views:
| View | Description |
|---|---|
| Pending Central Actions | Displays actions on local events that are pending at central |
| Not Routed | Displays local events that have not yet been routed to central |
| Cases Pending Local Labeling | Displays pending action items that have been assigned to the Local Affiliate Users. |
| Action Item from Local/Central | Displays pending action items from Local/Central Users. |
Pending Central Actions
The following tables lists and describes the fields on the Pending Central Actions tab.
| Field | Description |
|---|---|
| Local Event Number | Displays the local event number. The link displayed in this field helps you in viewing event information. |
| Central Case Number | Displays the central case number. |
| Local Affiliate Number | Displays the name of the local affiliate. |
| Actions/Routing Comments | Displays any actions or routing comments for the case. |
| Print List | Prints the list displayed in the screen in a PDF. |
Not Routed
The following table lists and describes the fields in the Not Routed tab.
| Field | Description |
|---|---|
| Local Event Number | Displays the local event number. The link displayed in this field helps you in viewing event information. |
| Primary Suspect Product | Displays the name of the primary suspect product. |
| Primary Event | Displays the name of the primary event. |
| Country of Incidence | Displays the country where the adverse event occurred. |
| Local Affiliate Name | Displays the name of the local affiliate. |
| Print List | Prints the list displayed in the screen in a PDF. |
Cases Pending Local Labeling
The following table describes the fields on Cases Pending Local Labeling tab.
| Field | Description |
|---|---|
| Local Event Number | Displays the local event number. The link displayed in this field helps you in viewing event information. |
| Primary Suspect Product | Displays the name of the primary suspect product. |
| Central Case Number | Displays the case number with Central. |
| Primary Event | Displays the name of the primary event. |
| Country of Incidence | Displays the country where the adverse event occurred. |
| Local Affiliate Name | Displays the name of the local affiliate. |
| Print List | Prints the list displayed in the screen in a PDF. |
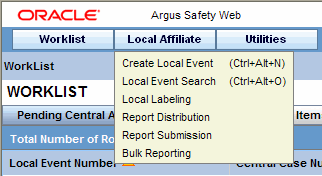
Creating Local Events
The system permits you to create local events.
-
In the Local Affiliate menu, select Create Local Event to open the Local Event Entry form.
-
When the system opens the Local Event Entry Form, enter the appropriate information in the fields.
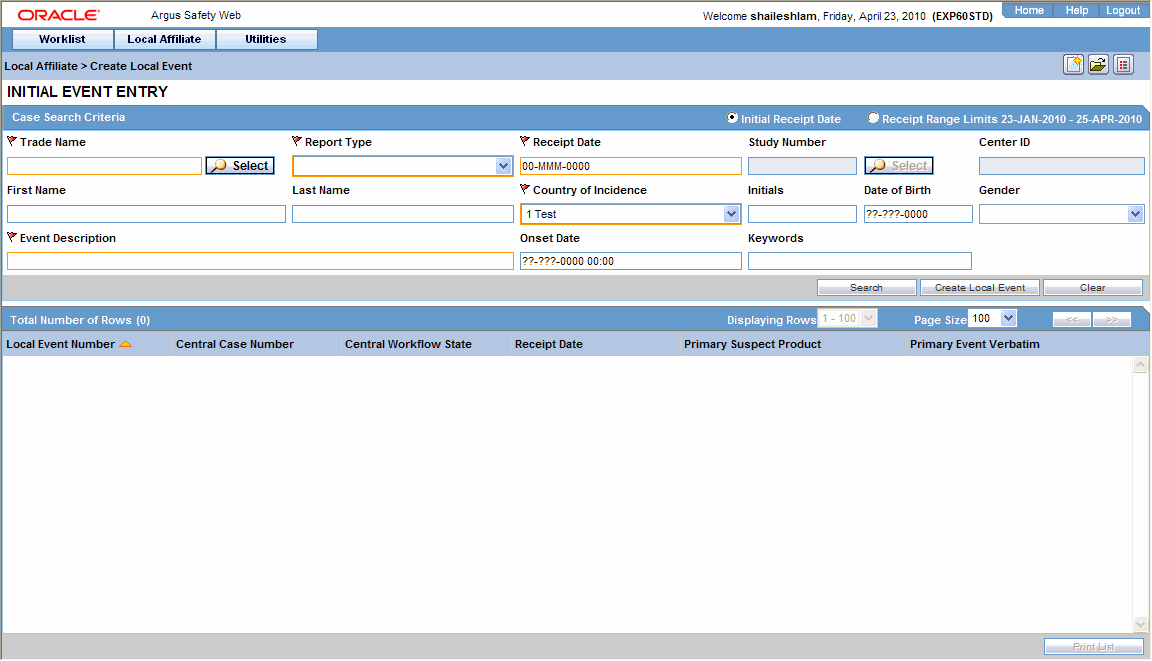
The following table lists and describes the fields on the Local Event Entry form.
Item Description Product Name Enter the name of the product which is associated with the case. If the adverse event(s) is associated with more than one product, each of the additional product can be added from the Case Form. It is advisable to enter the most suspect product here. You can click Select to search for a product from the Trade Name Product Lookup dialog. Several items will be automatically entered on the Case Form based on the product selected here.
-
Click on Select. The Product Browser window appears.
-
Enter the Ingredient key word for the search. The ingredient is displayed in the first column.
-
Select the Ingredient to obtain the Family it is associated with.
-
Select the Product Name to view the associated Trade Names.
-
Select the Trade Name required.
-
Select is now enabled at the bottom of the window. Click Select to add the product details
Report Type From the list, select the item that best describes the type of report. The report type chosen here will determine which fields will be available for entering case information. The report type will also impact the duplicate search. For example, selecting "Sponsored Trial" will make the Study ID and Protocol ID fields available. The Administrator can adjust the information in this list.
Receipt Date Enter the date on which your company became aware of the case. Study Number & Center ID The Study Number and Center Id fields are enabled when the Product details are filled in this section. Enter the ID for the Center.
You can click Select to search for a study from the Study Name Lookup dialog. Several items will be automatically entered on the Case Form based on the product selected here.
Steps to select the Center Id
Click Select to open the Clinical Trial Selection dialog.
Select the Project from the drop-down list and enter the Study details as applicable.
A list of centers associated with the row that you select appear at the bottom of the dialog.
Highlight the required clinical study and study center and click Select.
Reporter First Name Reporter Last Name Enter the reporter's first and last name. Country of Incidence Enter the country where the adverse event occurred. In Argus Safety application, you can either type the complete country name, or enter a two letter country code that will automatically be decoded. In Argus Safety Web, you can select the appropriate country from the list. Note: This may or may not be the reporter's or the patient's country of residence.
Patient Initials Enter the patient's initials. Patient Date of Birth Enter the patient's date of birth. Patient Gender Enter the patient's gender. Event Description Enter a brief verbatim description that describes the event that is most clinically important in the case. Onset Date Enter the date for the onset of adverse event symptoms. Keyword Enter a keyword when searching for duplicates. Keywords are only used for searching for cases. Receipt Range Limits Select this check box to search for cases that have been entered in the range of 60 days before the current date and 60 days after the current date. Tip:
You can click Search to determine if this case has been entered before. A list of cases that match the search criteria appears. Inspect the list and determine if any case matches the event information that is to be entered. -
-
Click Create Local Event to create a new local event. The Local Event- Initial Event Entry screen appears.
-
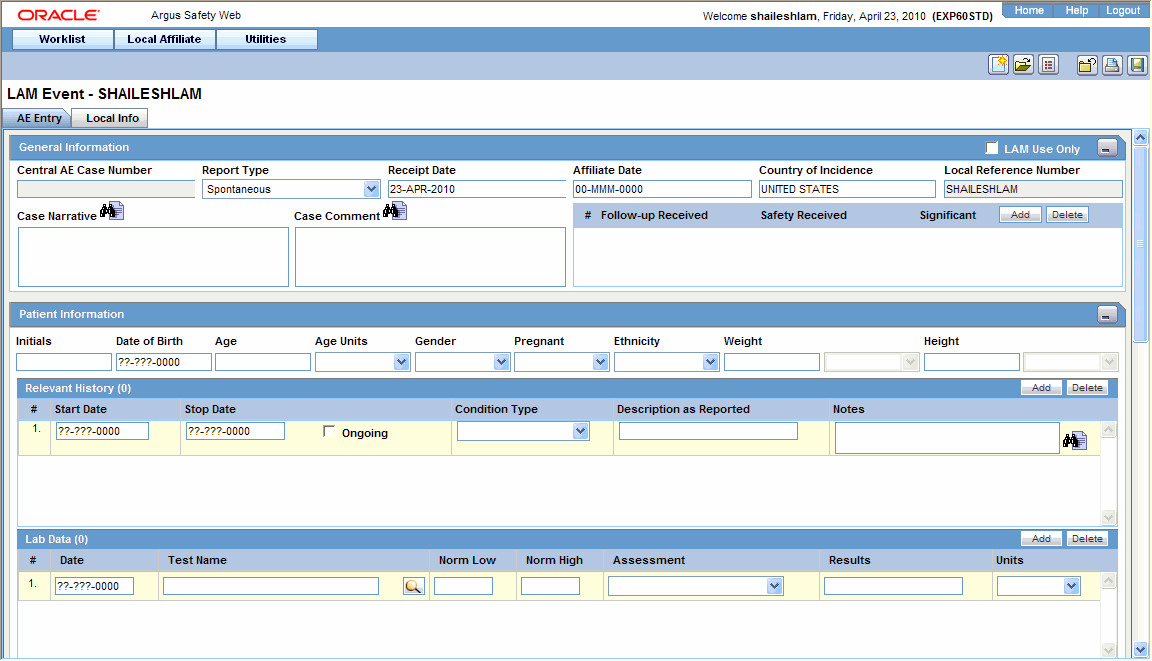
Enter the available event information in the AE Entry and Local Info tabs.
Refer to "Entering Event Information" for further instructions.
Entering Event Information
When entering event information in the AE Entry and Local Info tabs, be aware of the following:
-
Click Add to add another row to the section.
-
Click the Zoom icon to enter text or notes in a separate window. You can also check the spelling of the text in this separate window.
-
Open the AE Entry tab.
-
Enter the available event information in each of the sections of the AE Entry tab as shown in the following tables.
General Section
Item Description LAM Use Only Select this check box if this event is for local usage only and will not be routed to Central. Central AE Case Number The case number that is assigned to this event at Central will be entered here. No text can be entered in this field when initial event information is being entered. Report Type Select the type of report. Receipt Date Enter the Receipt Date. This date will be used at the Central end. Affiliate Date Enter the date received. Country of Incidence Select the country in which this event occurred. Local Reference Number The number by which the event is identified is entered here. This number will be automatically generated if the system has been configured to automatically number local events. Case Narrative Enables the user to enter a narrative description of the case. Case Comment Enables the user to enter relevant comments about the case. Follow up Received Enter the date on which follow up information was received at the local affiliate location. Safety Received Enter the date on which the follow-up information was received by the Central safety office. Significant Select this check box if significant follow-up information has been received. Patient Information Section
Item Description Initials Enter the initials of the patient. Date of Birth Enter the date of birth of the patient. Age/Age Unit Enter the patient's age and the age units used. Gender Enter the patient's sex. Patient ID Enter the patient's identification number. Note: This field is available only if the event is associated with a clinical trial or other study. Study Number Enter the study number. Note: This field is available only if the event is associated with a clinical trial or other study. Other Relevant History Section
Item Description Start Date Enter the start date of the condition. You can enter a partial date if the actual date is not available. You can also choose not to enter a date. Stop Date Enter the stop date of the condition. You can enter a partial date if the actual date is not available. You can also choose not to enter a date. Ongoing Indicates whether the condition is continuing. If it is set to Yes or Unknown, the Stop date is disabled. Condition Type Select a condition type from the list. The Administrator can adjust this list. Description as Reported Enter the verbatim term used by the reporter, or patient, to describe the adverse event or product name. Notes Enter any notes pertinent to relevant history. Reporter Information Section
Item Description Address The address of the institution. City The city where the institution is located. Country The Country where the institution is located. Department The name of the reporter's department Email Address The email address for the reporter. FAX Number The fax number for the reporter. First Name The first name of the reporter. Health Authority Case Number The Health Authority Case Number. Health Care Professional Indicates whether the reporter is a health care professional. Institution The name of the institution where the reporter is currently employed. Intermediary Identifies the intermediary for the case. Last Name The last name of the reporter. Middle Name The middle name of the reporter. Occupation Displays the occupation of the reporter. Postal Code The postal code where the institution is located. Protect Confidentiality Indicates that the reporter's identity is protected in expedited reports. Dosage Regimen Dose Description User this field to describe non-standard dosages that cannot be adequately described using the dose, route, and frequency fields. Note that the initial value for this field defaults to the dose, route, and frequency information and can be amended as appropriate. Report Media Displays the method used to report the case. Reporter Type Identifies the reporter type. Sal. Identifies the title of the reporter. State The state where the institution is located. Suffix Displays the reporter's suffix, if appropriate. Event Information Section
Item Description Onset Date Enter the date/time the event started. You can enter a partial date if the complete date is unavailable. Stop Date Enter the date/time the event stopped. Event Description Enter the verbatim term used by the reporter to describe the adverse event. As you type, the system automatically copies the term in to the Description to be Coded field. Death Click the appropriate box to select the Serious Criteria for the event. Hospitalized Click the appropriate box to select the Serious Criteria for the event. Disability Click the appropriate box to select the Serious Criteria for the event. Other Click the appropriate box to select the Serious Criteria for the event. Other Text Enter text to describe the other type of serious event. Medically Significant Click the appropriate box to select the Serious Criteria for the event. Life Threatening Click the appropriate box to select the Serious Criteria for the event. Intervention Required Click the appropriate box to select the Serious Criteria for the event. Congenital Anomaly Click the appropriate box to select the Serious Criteria for the event. Symptoms Enter the appropriate symptoms for the cases. Outcome Select the outcome of the event from the drop-down list (e.g., recovered, improved, fatal, etc.) The Administrator can adjust the information on this list. If Fatal is selected, Death is check in the list of seriousness criteria. Duration The system automatically calculates this field from the event start and stop dates. If duration is greater than five (5) days, the system only displays days. You can enter or modify the duration manually. Diagnosis/Symptom Click the appropriate radio button to indicate whether the event is a diagnosis. Clicking Yes marks this event as the primary event. In case of multiple diagnosis events, the event on the left is considered as the primary event. Click Relationships to display the Event-Relationships dialog. This enables you to group symptoms and signs with diagnoses. -
Open the Local Info tab.
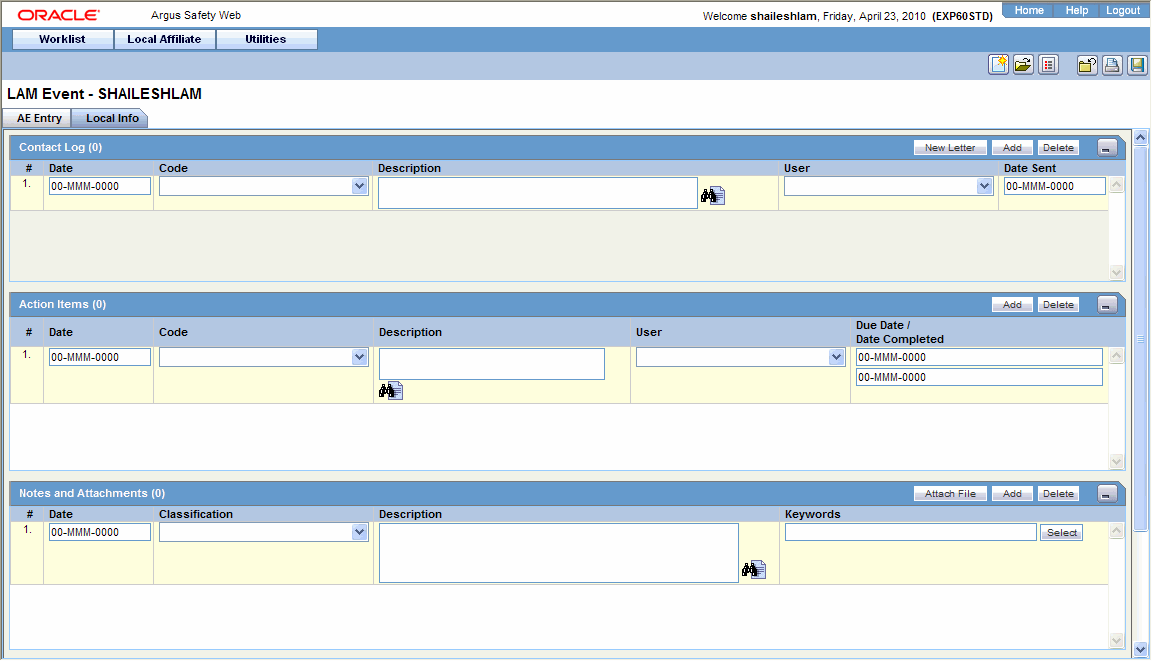
-
Enter the available case information in each of the sections of the Local Info tab as listed in the following tables.
Contact Log Section
Item Description Date Enter the date associated with the letter. Code Enter the contact code associated with the letter. Description Enter the description associated with the letter. User Select the user to whom the letter is to be sent. Date Sent Enter the date on which the letter was sent. Action Items Section
Item Description Date Displays the date associated with the Action Item. Code Displays the code associated with the Action Item. Description Displays a description of the Action Item. User Displays the user to whom the Action Item is assigned. Due Date Displays the date on which the Action Item is due. Date Completed Displays the date on which the Action Item was completed. Notes and Attachments Section
Item Description Attach Documentum Link Displays the Documentum Lookup Dialog. Use this dialog to search for and select Documentum links. Attach File Click Attach File to add an attachment. Browse to the location of the file on your system. Date Enter the date associated with the note or attachment. Classification Select the type to which the attachment belongs. Description Enter the description of the attachment. Item Description Keywords Enter the keywords relevant to the attachment. To select a keyword from a list, click Select. Select Click Select to enter a new keyword or select a keyword from the list. Routing Comments Section
Item Description Date Displays the date on which the event information or follow-up information was routed to Central. Route By Displays the user who was responsible for the routing. Comment Displays the routing comments. -
Add letters as necessary. Select Save in the Local Affiliate menu to save the case.
Note:
For follow-up information associated with an event, enter the follow-up information and then route the event to Central.
Adding a Letter
Use the following procedure to add a letter.
-
In the Contact Log section of the Local Info tab, click Add.
-
Click in the row to select it and click New Letter.
-
Select a letter template from the list and click OK. The letter will open in a separate Internet Explorer window.
-
If you make changes to the letter, save the letter on your system by selecting Save As in the File menu of Internet Explorer.
-
Close the Internet Explorer window.
-
In the Save Letter dialog, click Yes to save the modified letter or No to save the automatically generated letter without the changes you made.
-
If you click No, the letter will be inserted in the new contact log row.
-
If you click Yes, the Attach Letter for LAM dialog appears. Attach the letter that you saved on your system in step 4 by clicking Browse.
-
When a new letter is added, an action item corresponding to that letter is inserted in the Action Items section.
Routing Events to Central
When routing local events, be aware of the following:
-
The system disables the routing button after the event is routed and enables it again when Central accepts the event.
-
You can route a local event for the first time even if there are multiple Argus Affiliate follow-up receipt dates entered.
-
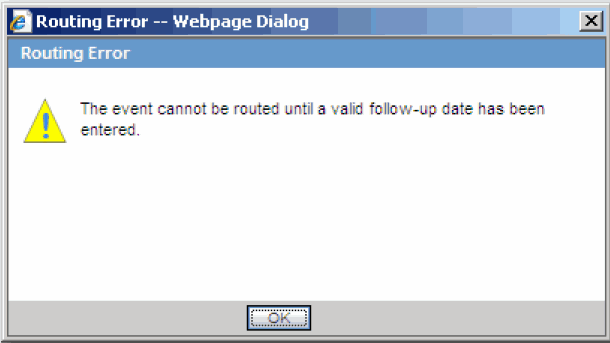
When you route a local event after the first time and all the Argus Affiliate Follow-up Receipt Dates are blank or grayed out (read-only), the system does not permit routing and presents a popup message.
-
After successfully routing a local event, the system makes the following fields read-only:
-
Argus Affiliate Follow-up Receipt Dates
-
Argus Affiliate General Receipt Date
-
Argus Affiliate General Affiliate Date
-
Argus Affiliate Follow-up Safety Date
-
Significant Checkbox
-
-
After successfully routing a local event, the system grays out all the existing follow-up date rows; you cannot delete the grayed out rows.
-
Open the event that is to be routed to Central.
-
The AE Entry tab opens when the event is opened.
-
Open the Local Info tab.
-
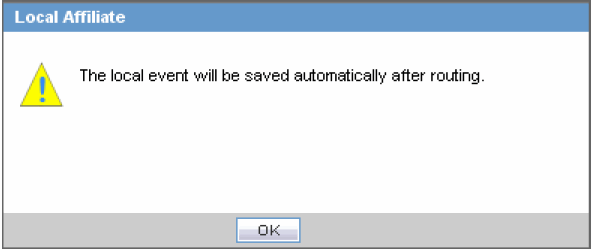
Scroll to the Routing Comments section and click Route to open the Local Affiliate dialog box.
-
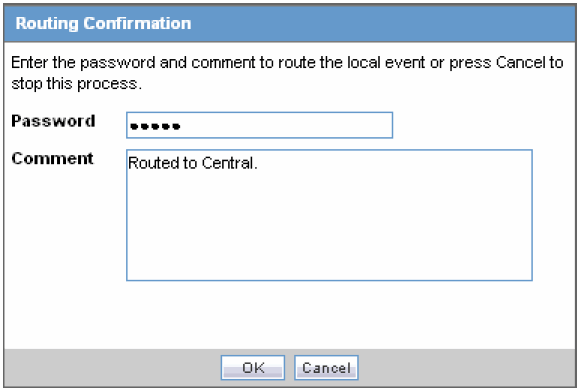
Click OK to open the Routing Confirmation dialog box.
-
Enter your Password and Comment and click OK.
-
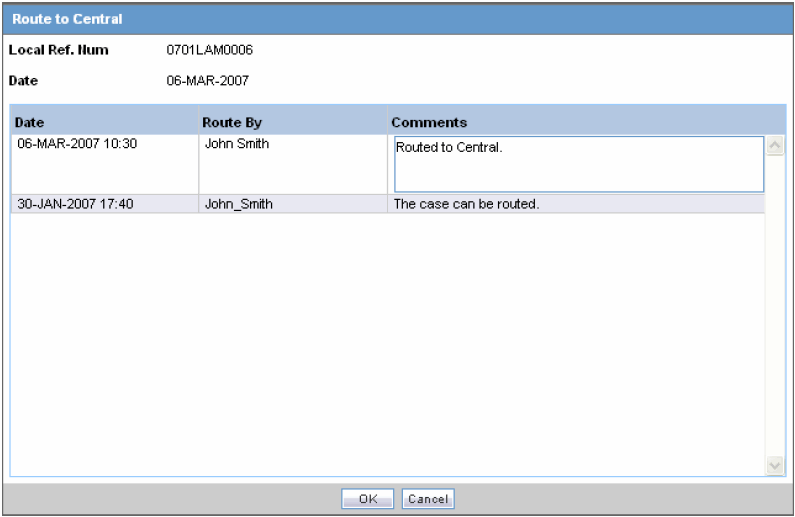
When the Route to Central dialog appears opens, click OK.
Searching for Local Events
Use the following procedure to search for local events.
-
Select Local Event Search from the Local Affiliate menu to open Local Event Search form.
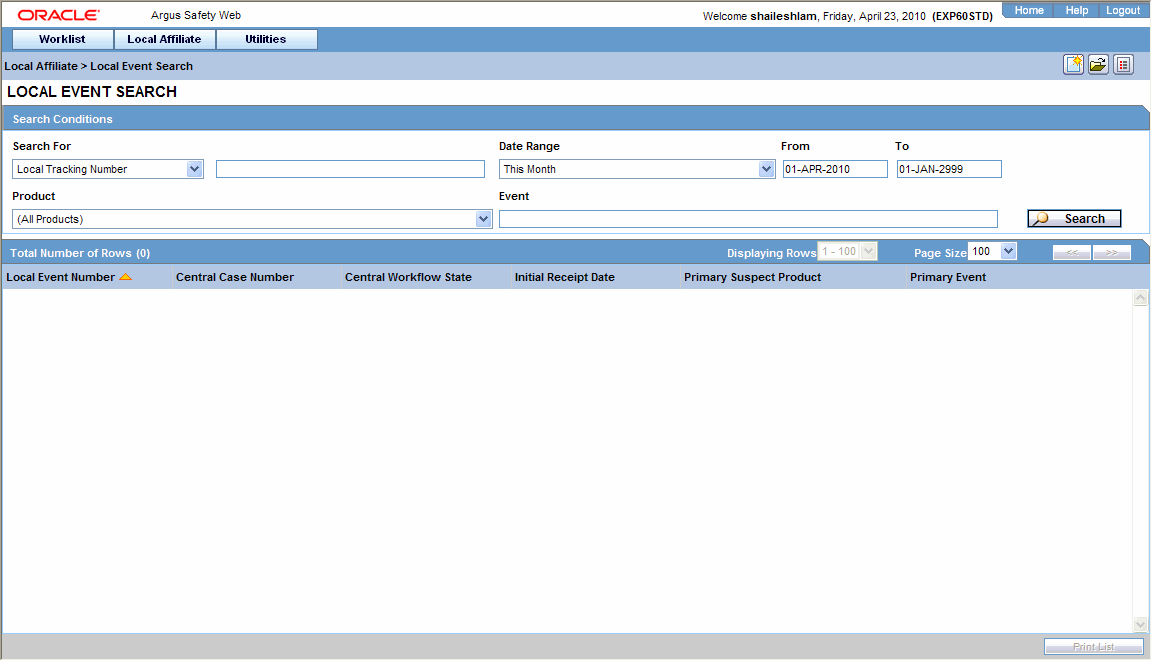
-
Under Search for, select the item by which the search is to be done.
-
Enter the relevant search text in the text box.
For example: To search for local events by local tracking number, select Local Tracking Number in the list and then enter the tracking number which is to be searched.
-
Select the product family to which the event is related under Product Family.
-
Enter the text that describes the event under Event.
-
Select the date range in which the event was entered under Date Range.
Tip:
To specify your own date range, select Custom Date Range. Enter the dates in the Custom Date Range dialog and click OK. -
Click Search to view the list of search results.
Opening Local Events
Use the following procedure to open local events.
-
Select Local Event Search from the Local Affiliate menu to open the Local Event Search form.
-
Enter the search conditions to search for local events.
-
Find the required event in the search results.
-
Click the link associated with the Local Tracking Number of the required event to open it.
Performing Local Labeling
Use the following procedure to perform local labeling.
-
Select Local Labeling from the Local Affiliate menu to open the Local Labeling screen.
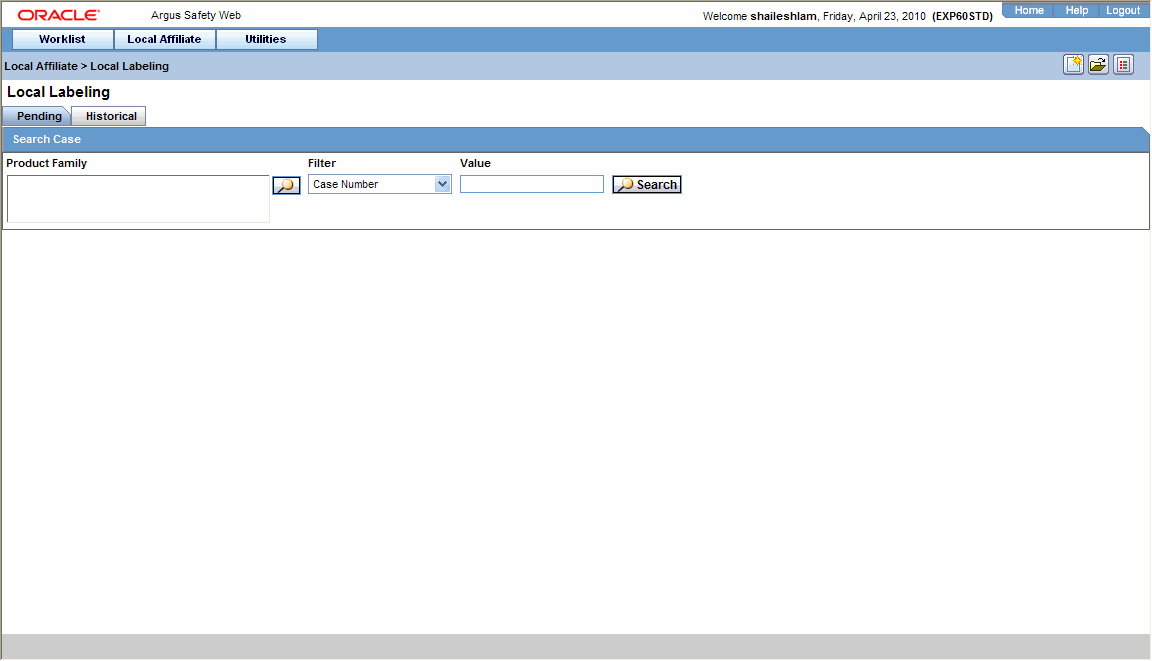
-
Select Pending to view cases that are waiting for labeling.
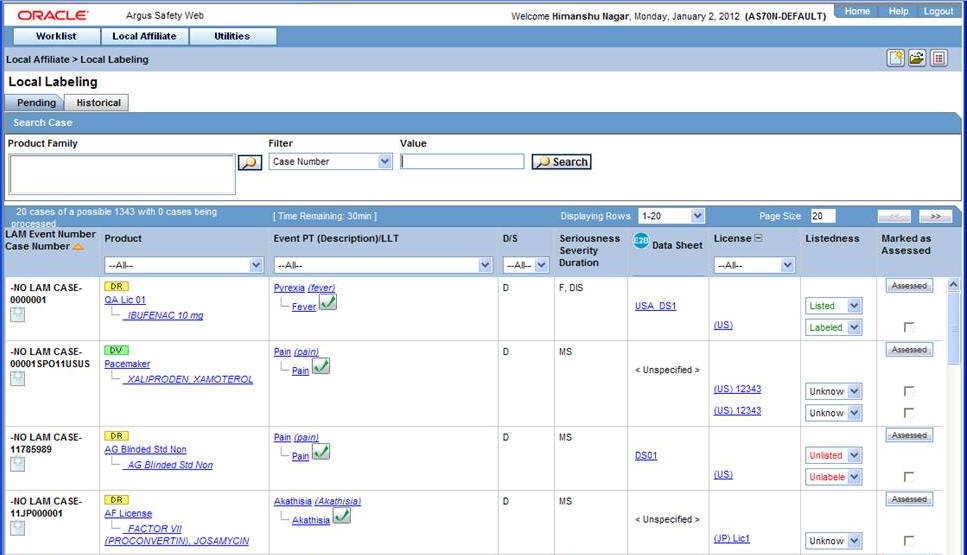
Pending Tab Field Information:
The following table lists and describes the fields on the Pending tab.
Field Description LAM Event Number Displays the LAM event number. The link displayed in this field helps you in viewing event information. Case Number Displays the case number with Central. Product Displays the name of the primary suspect product. Event PT (Description) / LLT Displays the name of the primary event. D/S Displays if the event was diagnosis or symptom. Seriousness Displays all the seriousness criteria for the event. Severity Displays the severity for the event. Duration Displays the duration for the event. Datasheet Displays the datasheet(s) for the agent. License Displays the license(s) for the agent. Listedness Displays the listedness of the drug. Values may include Listed, Labeled, Unlisted, Unknown. Marked as Assessed Allows the user to mark whether local assessment is done against the licenses displayed for the product or not. It provided 3 methods to mark this status at 3 different levels.1) Assessed checkbox at License Level: This checkbox allows users to specify the local assessment status at each license level. It shall be available in both Pending and Historical tabs.2) Assessed checkbox at Database Level: This checkbox allows users to specify the local assessment status at each datasheet level. If user checks or un-checks this checkbox, it shall automatically update all the license level checkboxes under this datasheet accordingly. It shall be available in both Pending and Historical tabs.3) "Assessed" button at Product Level: Clicking on this button shall mark all the licenses and datasheet level checkboxes as checked. It shall only be available on Pending tab. -
Select Historical to view cases that have been assessed.
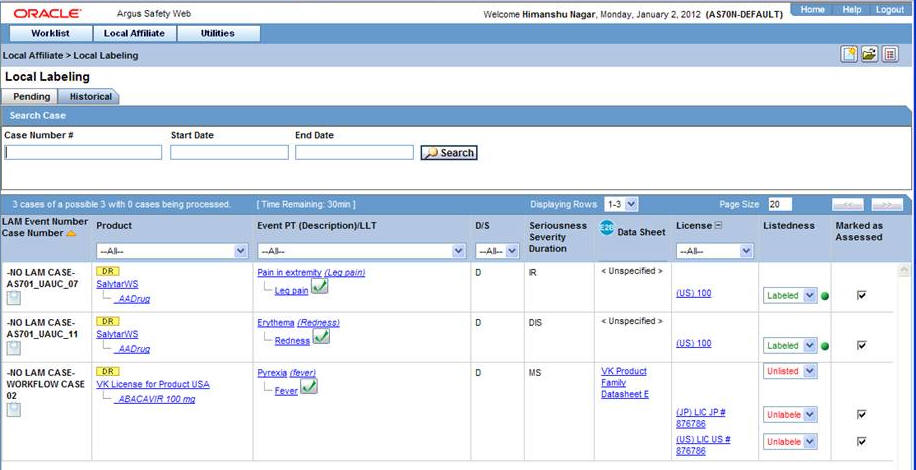
Historical Tab Field Information
The following table lists and describes the fields on the Historical tab.
Field Description LAM Event Number Displays the LAM event number. The link displayed in this field helps you in viewing event information. Case Number Displays the case number with Central. Product Displays the name of the primary suspect product. Event PT (Description) / LLT Displays the name of the primary event. D/S Displays if the event was diagnosis or symptom. Seriousness Displays all the seriousness criteria for the event. Severity Displays the severity for the event. Duration Displays the duration for the event. Datasheet Displays the datasheet(s) for the agent. License Displays the license(s) for the agent. Listedness Displays the listedness of the drug. Values may include Listed, Labeled, Unlisted, Unknown. Marked as Assessed Allows the user to mark whether local assessment is done against the licenses displayed for the product or not. It provided 3 methods to mark this status at 3 different levels.1) Assessed checkbox at License Level: This checkbox allows users to specify the local assessment status at each license level. It shall be available in both Pending and Historical tabs.2) Assessed checkbox at Database Level: This checkbox allows users to specify the local assessment status at each datasheet level. If user checks or un-checks this checkbox, it shall automatically update all the license level checkboxes under this datasheet accordingly. It shall be available in both Pending and Historical tabs.3) "Assessed" button at Product Level: Clicking on this button shall mark all the licenses and datasheet level checkboxes as checked. It shall only be available on Pending tab. -
Enter the Case Number, if it is known.
-
Click Search to view the list of events, grouped by the Local Event Number.
-
Under Local Labeling, select the appropriate labeling for each product associated with the event.
-
Select the Assessed checkbox for the labeled case and click Mark as Assessed to mark the selected case for a Preferred Term. The system enables the Process button.
-
Click Process to save the labeling changes.
-
The selected report is displayed in a PDF.
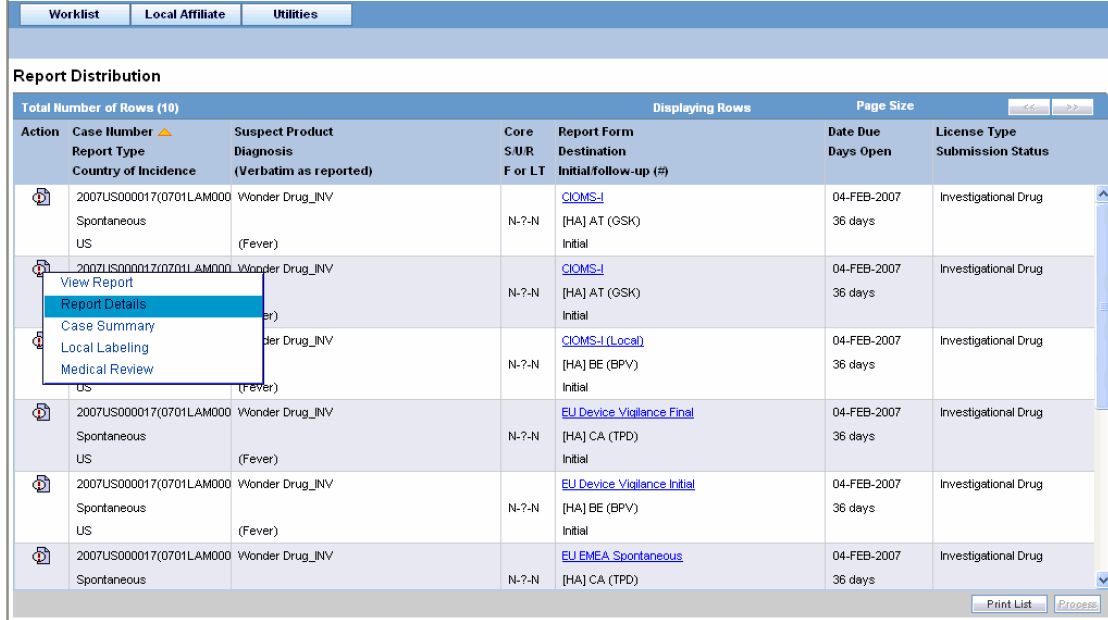
Submitting Reports
Use the following procedure to submit reports.
-
Select Report Distribution from the Local Affiliate menu to open the Report Distribution page.
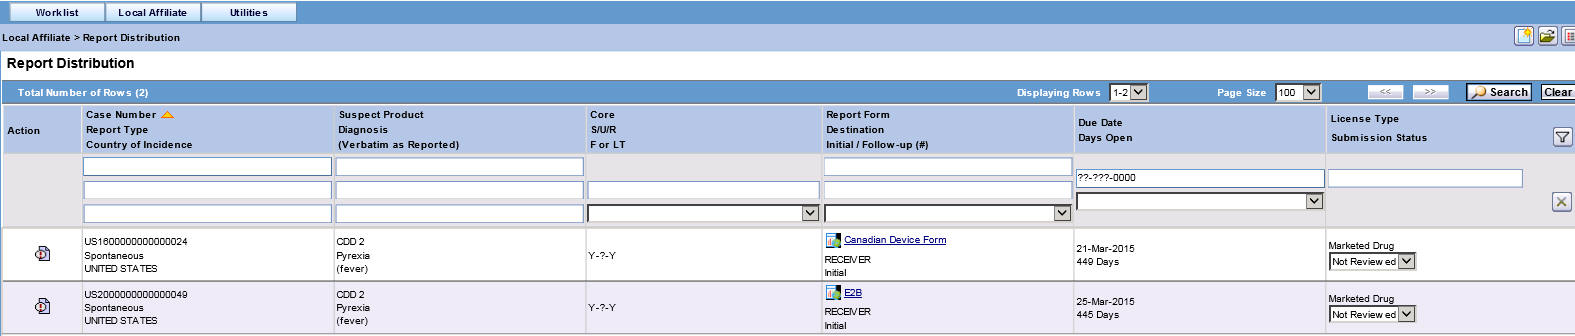
Report Distribution Fields:
The following table lists and describes the fields on the Report Distribution page.
Field Description Action Enables you to view and select the different options available as action items. Case Number Enables you to search for a case based on its case number. Report Type Displays the type of report. Country of Incidence Displays the name of the country where the adverse event occurred. Suspect Product Displays the name of the suspect product. Diagnosis (Verbatim as reported) Displays the diagnosis made for the event. Core Displays the core labeling made for the event. S/U/R Displays whether the case is serious unrelated or related. F or LT Displays if the event is Fatal or Life-Threatening. Report Form Displays the name of the report in a link. Click the link to view the report in a PDF.
Destination Displays the destination name. Initial/Follow-up (#) Displays if the report is an initial report or a follow-up report. Date Due Displays the date when the report is due. Days Open Displays the days since when the report has been open. License Type Displays the license type of the report. Submission Status Displays the submission status for the report. -
Use the standard filters provided for Case Number, Report Type, Country of Incidence, Suspect Product, Diagnosis, and so on to filter to locate the required report.
-
Locate the report to be submitted and click the icon associated with the report in order to view the available options.
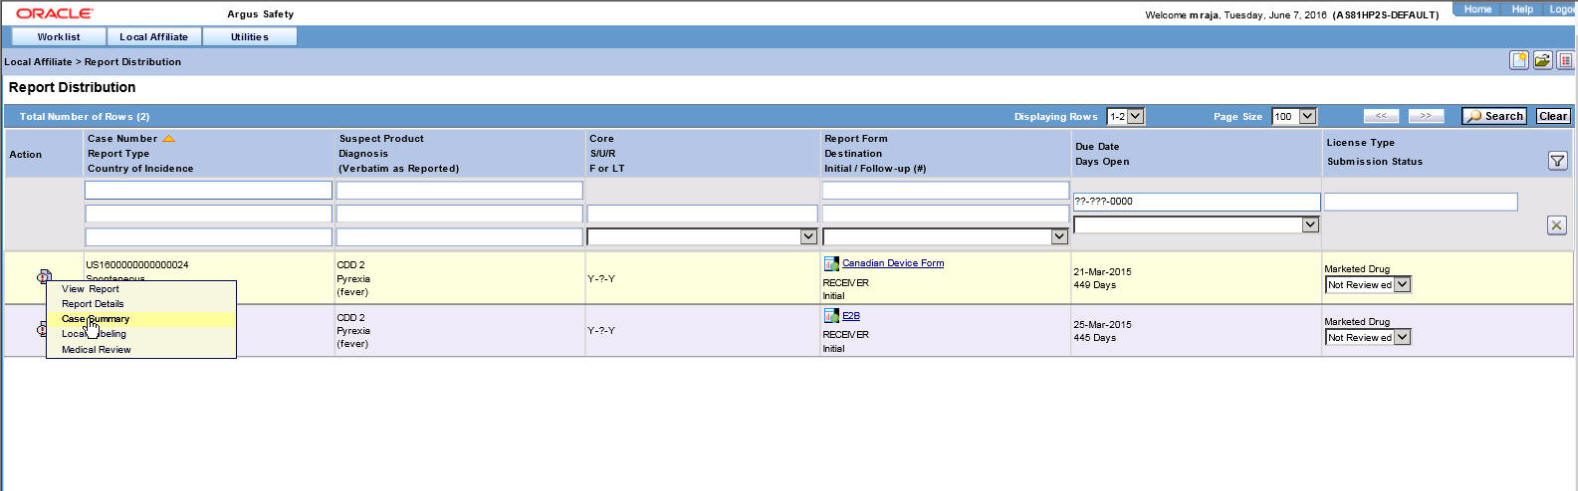
Descriptions of the Action Items
The following table lists and describes the available action items.
Field Description View Report Displays the selected report in a PDF. Report Details Enables you to view the report details associated with the report. Case Summary Enables you to view a summary of the selected case as shown in the table below. Local Labeling Enables you to determine whether labeling has been assessed for the case. Medical Review Displays the Medical Review screen of Argus. The following table describes the meaning of each action item.
Action Item Description 
This report has been scheduled/generated and it is past its due date of submission.

This report has been scheduled and saved.

This report has been scheduled and generated.

This report has been routed and approved by a user.
Case Summary Field Descriptions
The following is an illustration of the Case Summary:
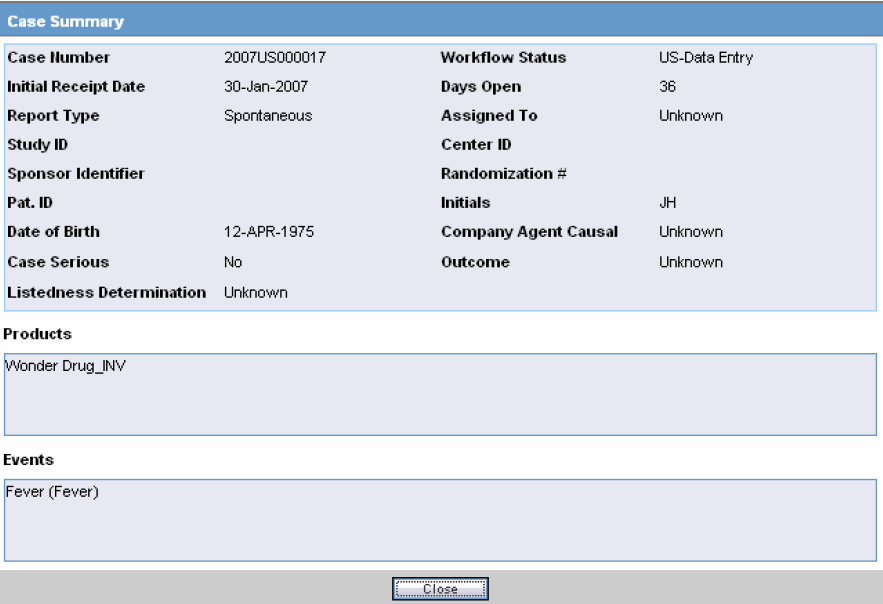
The following table lists and describes the Case Summary fields.
Field Description Case Number Displays the case number Workflow Status Displays the workflow status of the case Initial Receipt Date Displays the Initial Receipt Date of the case Days Open Displays the number of days the case has been opened. This is calculated by the difference between the Initial Receipt Date and the System Date (Current Date)
Report Type Displays the Report Type. Assigned To Displays the individual that the case was assigned to. Study ID Displays the Study ID of the case Center ID Displays the Center ID of the case Sponsor Identifier Displays the Sponsor Identifier of the case Randomization # Displays the Randomization # of the case Pat. ID Displays the Patient ID Initials Displays the Initials of the patient Date of Birth Displays the Date of Birth of the patient Company Agent Causal Displays the whether the case was Company Agent Causal or not. Case Serious Displays whether the case was serious or not. Outcome Displays the outcome of the case. Listedness Determination Displays the Listedness status of the case Products Displays the Suspect Products associated with the case. Events Displays the Events associated with the case. -
In the Submission Status list of the required report, select Submit.
You can submit multiple reports at a time by selecting Submit for the required reports.
-
Click Process to open the Report Submission Information dialog box.
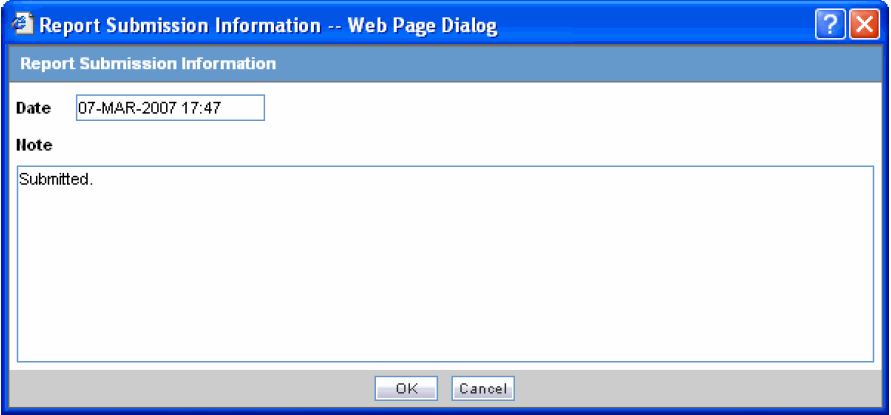
-
Enter any remarks in Note and click OK.
-
The report(s) opens and a list of submitted reports is generated.
Bulk Reporting
Bulk Reporting enables you to print, transmit and/or submit reports in bulk.
Select Affiliate --> Bulk Reporting to view the Bulk Report screen shown in the following illustration.
Bulk Reporting Filter Section
The Bulk Reporting Filter sections enables you to filter reports.
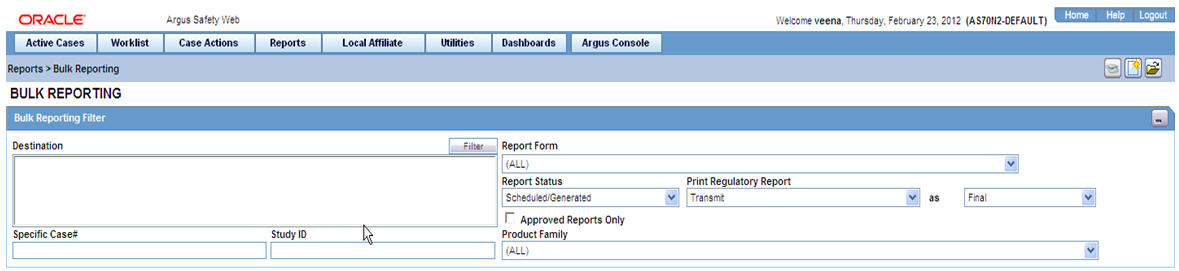
The following table lists and describes the fields in this section:
| Field | Description |
|---|---|
| Destination | Select an Agency to filter reports by that particular agency. Only the agencies that have reports in the Scheduled, Approved and Generated states are displayed. Click Filter to select multiple agencies from the Reporting Destinations dialog. The previous filtering criteria is saved and retained when the user invokes this dialog. By default, all agencies are assumed. |
| Report Form | Select any of the listed report forms to view reports belonging to the selected report form only. |
| Report Status | Choose either Scheduled/Generated, Pending, Failed, or Printed/Transmitted from the drop-down list. |
| Print Regulatory Report | Prints the report as Draft or Final. The Draft option is disabled when the printing option is set to Transmit. Select Medical Summary to view the list of only medical summaries of distinct cases in a PDF. |
| Approved Reports Only | Filters reports for only approved reports. |
| Product Family | Enter a Product family to view all cases where the scheduled reports belong to the searched Product family. |
| Specific Case # | Searches a specific case. To do so, enter the Case Number of the case you wish to search and click the Retrieve button. This stores the agency selections last made. |
Total Number of Rows Section
The system displays the search results in the Total Number of Rows section.
It is worth noting that only those reports that are assigned to any LAM groups are listed in Affiliate > Bulk Reporting.
Reports that are unassigned or assigned to Central user group are not listed in Affiliate >Bulk Reporting.
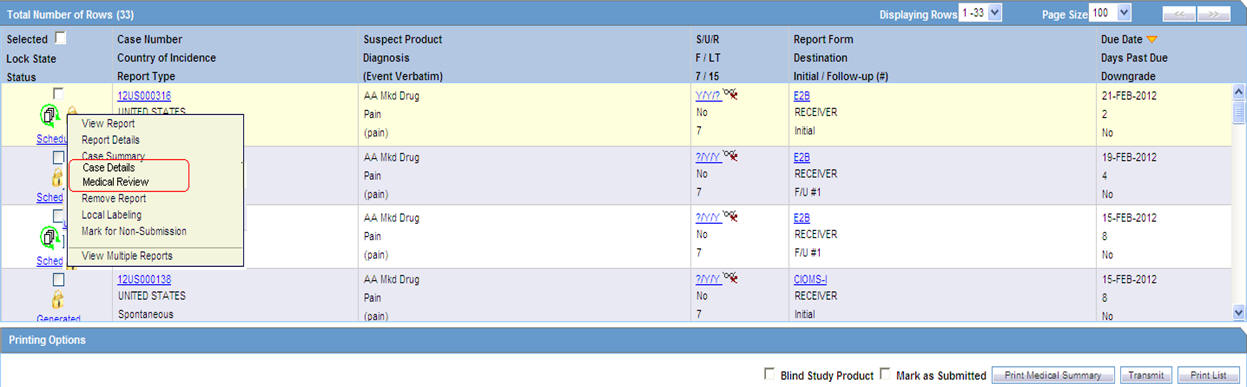
The following table lists and describes the fields and columns in this section.
| Field | Description |
|---|---|
| Selected | Allows the user to select the report. |
| Lock State | Displays the Case status of the case to depict if the case is locked or un-locked. |
| Status | Displays the Report Status e.g. Scheduled or Generated etc.
Click the status to view the report details. |
| Case Number | Displays the Case number.
Click the Case Number link to open the case. |
| Country of Incidence | Displays the view Country of Incidence. |
| Report Type | Displays the Case Report Type |
| Suspect Product | Displays the Trade Name for which the report has been scheduled. If more than one Suspect Company Product exists for the case, an "(+)" is placed at the end of the product name.
For Reports which were scheduled for the Device, the Device name is displayed. |
| Diagnosis | Displays the Primary Event Diagnoses PT |
| (Event Verbatim) | Displays the (Verbatim as reported) of the Primary Event. |
| S/U/R |
|
| F or LT | Fatal / Life Threatening
If any of the events in the case are Fatal or Life Threatening F or LT is displayed. If the case is both F and LT, only F is displayed. If the case is neither F nor LT, only No is displayed. |
| 7/15 | Displays 7 if the report is due within 7 days
Displays 15 if the report is due in more than 7 days |
| Report Form | Displays the Description of the report
Click the Report form link to view the DRAFT Report as a PDF. |
| Destination | Displays the report destination (agency) for which the report is scheduled. |
| Initial / Follow-up (#) | Initial or Follow-up
If Follow-up, the follow-up number is printed |
| Due Date | Displays the due date. |
| Days Past Due | Displays the number of days the report is past due date. |
| Downgrade | Allows the user to view if the report is downgrade.
Displays Yes if the report is a downgrade report else. |
Tip:
The icon (displayed in the lock state) in the Affiliate-> Bulk Reporting screen denotes a SUSAR (Suspected Unexpected Serious Adverse Reaction) case.Printing Options
Several printing options are available to you.
The following table lists and describes the available printing options:
| Field | Description |
|---|---|
| Blind Study Product | Select this check box to print study cases with blinded information. |
| Mark as Submitted | Select this check box to mark reports as Submitted when the transmission/e-mail has been sent.
A dialog is displayed is this check box is not selected. This dialog prompts you to confirm if the report is to marked as submitted or not. Select Yes or No, as required. This selection is remembered for the next time when you print a report. |
| Print Medical Summary | Allows the user to print the Medical Summaries. |
| Allows you to choose the printer for the selected report from the Select Site Printer dialog.
Select the Site and Printer Name where you wish to print the report and click OK. |
|
| Print List | Allows the user to print the current view of the Bulk Reporting. |
Suppress Default Printer option in Select Site Printer dialog
While printing reports from the Reports > Bulk Reporting option, if a Site is not selected or left blank, the Default Printer is selected by default under the Printer Name drop-down list.
If a particular Site is selected, the Default Printer option is not listed. By default, the <Select Printer> option is displayed as the first option.
To print Bulk Reports for a particular site, the user can select one of the printers listed for that site from the Printer Name drop-down list and can perform further actions.
User Options
The following options are available to you.
-
Lock State Header Options
-
Lock State Icon Options
Lock State Header Options
To sort the cases based on the following case status, click the Lock State header row. A pop-up appears listing the following sorting options:
-
Lock State
-
SUSAR
-
Exp/Per
These options enable you to sort cases based on the case categorization.
Tip:
The icon (displayed in the lock state) in the Reports-> Bulk Reporting screen denotes a SUSAR (Suspected Unexpected Serious Adverse Reaction) case.Lock State Icon Options
Click the Lock State icon to view the list of options.
The following table describes these options:
| Field | Description |
|---|---|
| View Report | Displays the Draft report. |
| Report Details | Displays specific information about the report as entered in the Regulatory Reports section. |
| Case Summary | Displays the Case Summary dialog. |
| Case Details | Displays the Case Details screen. The tree structure of the case displays only the 'Reports' node, with its existing features. |
| Medical Review | Displays the Medical Review screen. |
| Remove Report | Deletes the report from the case on being asked for a justification |
| Local Labeling | Allows Local Labeling for the selected case. |
| Mark for Non-Submission | Displays the Submission tab in the Report Details dialog.
Select No for Mark for Non-Submission and enter the reason for the non-submission. |
| Remove Multiple Reports | Deletes multiple reports from the case on being asked a justification. |
| View Multiple Reports | Allows you to view multiple reports. |
Viewing Report Details
Use the following procedure to view report details.
-
Select Local Affiliate => Report Distribution to open the Report Distribution page.
-
Click the icon associated with the report and select Report Details to open the Report Details dialog box.
-
The Report Details dialog opens.
About the Report Details Dialog Box
The Report Details dialog contains the following tabs:
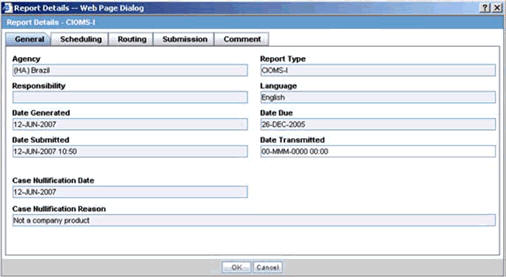
General Tab
The General tab displays the general information about the report. The information on this tab cannot be modified. The following is an illustration of the General tab.
The following tables lists and describes the fields on the General tab.
| Field | Description |
|---|---|
| Agency | Displays the Reporting Destination for which the report is scheduled. |
| Responsibility | Displays the User Group to which the report is assigned. |
| Date Generated | Displays the date when the report was generated. |
| Date Submitted | Displays the date when the report was submitted. |
| Report Type | Displays the Expedited Report Form of the report. |
| Language | Displays the language in which the report has been made. |
| Date Due | Displays the date when the report is due. |
| Date Transmitted | Displays the date when the report was transmitted. |
| Case Nullification Date | Displays the date when the case was nullified. |
| Case Nullification Reason | Displays the reason entered when a case is logically deleted in Argus. |
Scheduling Tab
The Scheduling tab displays a reason for scheduling this report. It also shows the date on which the report was scheduled.
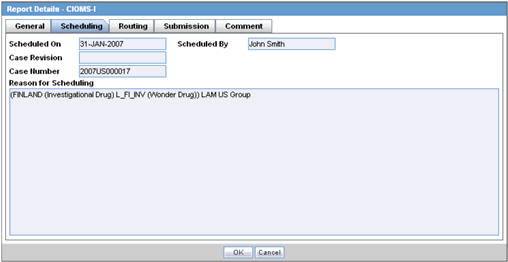
The following tables lists and describes the fields on the Scheduling tab.
| Field | Description |
|---|---|
| Scheduled On | Displays the date when the report was scheduled. |
| Scheduled By | Displays the name of the person who schedule the report. |
| Case Revision | Displays the case revision number. |
| Case Number | Displays the case number. |
| Reason for Scheduling | Displays the reason for scheduling the report. |
Note:
All fields in this tab are auto-populated as per records entered in Argus.Submission Tab
The Submission tab allows you to specify whether submission is required and enter a reason for not submitting the report.
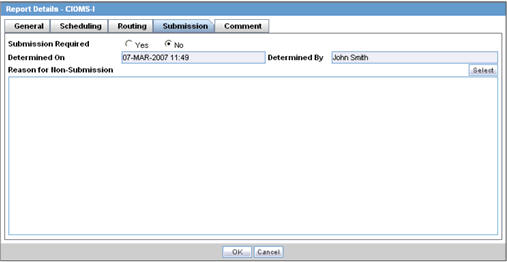
The following table lists and describes the fields on the Submission tab.
| Field | Description |
|---|---|
| Submission Required | Enables you to select if this report is not required to be submitted to the regulatory authority. |
| Determined On | Displays the date when the report was considered not required to be submitted. |
| Determined By | Displays the name of the user who decided the report was not required to be submitted. |
| Reason for Non-Submission | Click Select to select the reason for non-submission. |
Comments Tab
The Comment tab allows you to enter a local comment that prints out on that specific report when generated. Each report has its own respective Local Comment Section.
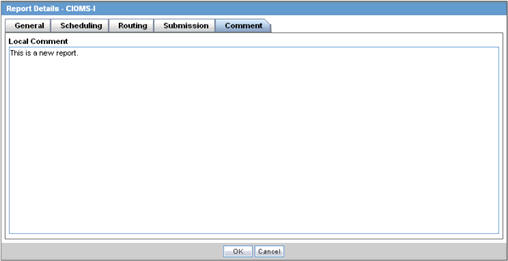
The following table lists and describes the fields on the Comments tab.
| Field | Description |
|---|---|
| Local Comment | Enables you to enter any remarks about the report. |
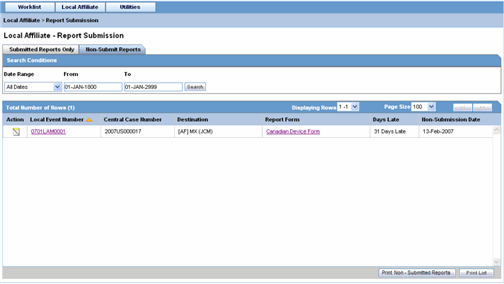
Viewing Report Submission History
You can view a history of the reports that have been sent from the Report Submission page as shown in the following illustration.

To view Report Submission History
-
Select Local Affiliate -->Report Submission to open the Report Submission page.
-
Select whether you want to view Submitted Reports only or Non-Submit Reports.
-
Enter a custom date range or select an appropriate date range under Range.
-
Click Search. A list of submitted or non-submitted reports appears as per the option you selected.
-
To open a report, click the icon associated with the report and select View Report.
-
To view report details, click the icon associated with the report and select Report Details.
The system submits the report.
In the search results for submitted reports, locate the appropriate report.
-
Click the icon associated with the report and select Unsubmit Report to open the Report Unsubmit dialog.
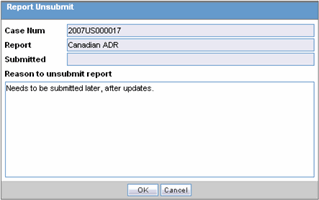
-
This dialog displays the Case Number, Report Name and Submitted status of the selected report.
-
Enter the reason for non-submission of the report in Reason to unsubmit report field and click OK.
Report Submission Tabs
The Report Submission page has the following tabs:
-
Submitted Reports
-
Non-submitted Reports
The following table lists and describes the fields on the Submitted Reports Only tab.
| Field | Description |
|---|---|
| Date Range | Enables you to specify a date range for searching report during a period.
Note: If a Date Range is selected, the From and To fields get populated automatically. |
| From | Enables you to manually enter the start date for the search period. |
| To | Enables you to manually enter the last date for a search period. |
| Action | View Report |
| Report Details | |
| Unsubmit Report | |
| Local Event Number | Displays the Local Event Number of submitted reports. Click this link to view the case details. |
| Central Case Number | Displays the Central Case Number of submitted reports. |
| Destination | Displays the destination of submitted reports. |
| Report Form | Displays the type of report form for the report. Click this link to view the report in a PDF. |
| Days Late | Displays the days by which the report had been delayed in its submission. |
| Submission Date | Displays the date when the report was submitted. |
| Blind Study Product | Enables you to blind the study product on the Submitted Expedited reports. |
| Print Submitted Reports | Allows you to print the submitted reports. |
The following is an illustration of the Non-Submit Reports tab.
The following tables lists and describes the fields on the Non-Submit Reports tab.
| Field | Description |
|---|---|
| Date Range | Enables you to specify a date range for searching report during a period.
Note: If a Date Range is selected, the From and To fields get populated automatically. |
| From | Enables you to manually enter the start date for the search period. |
| To | Enables you to manually enter the last date for a search period. |
| Action | View Report |
| Report Details | Enables you with the option of viewing report details. |
| Local Event Number | Displays the Local Event Number of unsubmitted reports. Click this link to view the case details |
| Central Case Number | Displays the Central Case Number of unsubmitted reports. |
| Central Country of Incidence | Enter the country where the adverse event occurred. Enter the partial two-character code, the country name, or the three-character code. Argus Safety will decode the entry. The Administrator can adjust the information in this list. |
| Destination | Displays the destination of unsubmitted reports. |
| Report Form | Displays the type of report form for the report. Click this link to view the report in a PDF. |
| Days Late | Displays the days by which the report had been delayed in its non-submission. |
| Non-Submit Date | Displays the date when the report was not submitted. |
Changing Your Password
The Change Password utility enables you to change your password as necessary. When you log on to the system for the first time, it is recommended that you change your password.
-
Select Utilities => Change Password from the Utilities menu.
-
When the system opens Change Password dialog box:
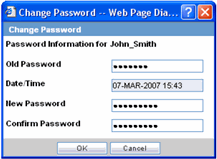
-
Enter your current password in the Old Password field.
-
Enter the new password in the New Password field.
-
Enter the new password a second time in the Confirm Password field.
-
-
Click OK.
The system changes your password.