2 Processing Dossier Reports
Generating Dossier reports requires the use of templates. A template is a pre-defined report format created in Microsoft Word. Before you can begin using templates to create reports, you (or someone with script writing or programming background) must create the template scripts. Information about writing template scripts is in Chapter 3, "Writing Template Scripts".
Using Templates
When using templates, be aware of the following:
-
The application parses template elements sequentially. This prevents elements from being used before they are declared.
-
The order in which the templates appear on the template tab is the order in which they will appear on the generated report. If you need the sections in a different order, use the Up and Down keys to change their position.
You should assign users (authors, reviewers, and owner) to each template section.
About the Templates Tab
The Dossier Template tab enables you to access report templates used to generate periodic reports (CTPR, ICH PSUR, IND, NDA). The following is an illustration of the Templates tab. 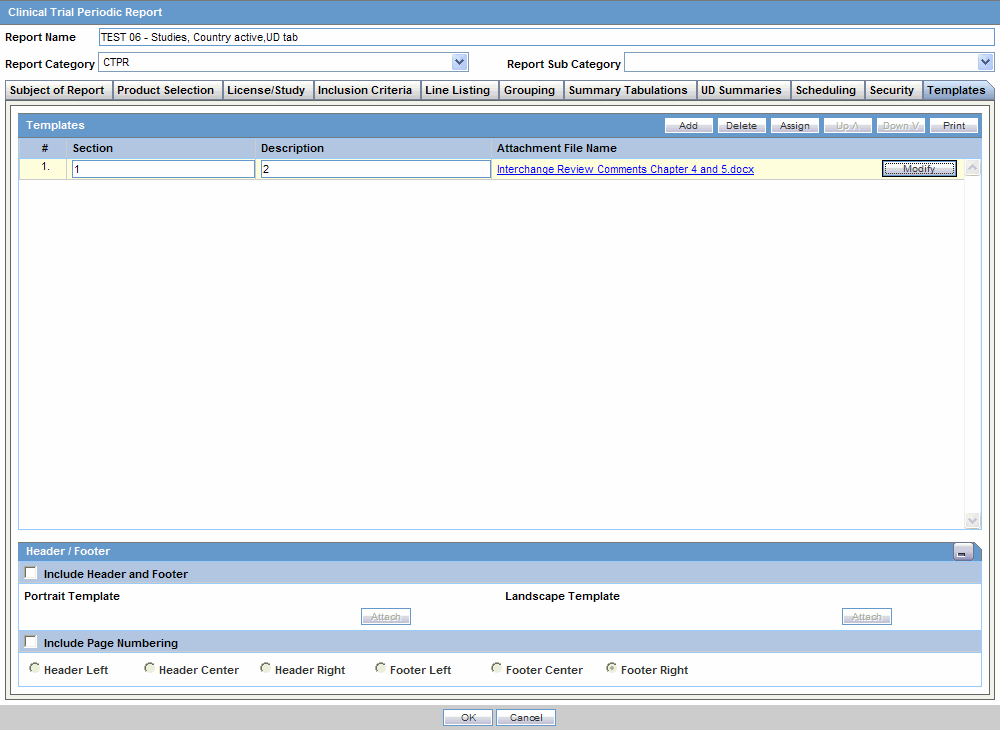
The following table lists and describes the fields and controls on this tab.
| Field/Control | Description |
|---|---|
| Templates | Enables you to add, modify, delete, assign and arrange the sections in your templates. |
| Add | Click Add to add a new section to the report template. |
| Delete | Click Delete to delete a section of a template. |
| Assign | Click Assign to choose who can access a template. |
| Up | Click Up to move the template section up one level. |
| Down | Click Down to move the template section down a level. |
| Click Print to print the report configuration. | |
| # | This column contains the template number. This number changes as you move or change the order of the templates. |
| Section | This column contains the name of the template. |
| Description | This column contains a description of the section. |
| Attachment File Name | This column contains the name of the template file. |
| Modify | Click Modify to change a template document. |
| Attach | Click Attach to attach a new template document. Once the document is attached, this changes to Modify. |
| Header/Footer | This section enables you to attach header/footer information to the template. |
| Include Header/Footer | Click this checkbox if you want to include header/footer information from a specific Word document in your template. |
| Portrait Template | Enables you to use header/footer information from a document in portrait orientation in your template |
| Landscape Template | Enables you to use header/footer information from a document in landscape orientation in your template. |
| Attach | Enables you to attach a Microsoft Word document to a template. |
| Include Page Numbering | Enables you to specify whether or not you want page numbering in the template and the location of the page numbers. |
| Header Left | Click this option to place the page number on the left side of the header. |
| Header Center | Click this option to place the page number in the center of the header. |
| Header Right | Click this option to place the page number on the right of the header. |
| Footer Left | Click this option to place the page number on the left side of the footer. |
| Footer Center | Click this option to place the page number in the center of the footer. |
| Footer Right | Click this option to place the page number on the right of the footer. |
| OK | Click OK update the template page. |
| Cancel | Click Cancel to exit from the template page without saving. |
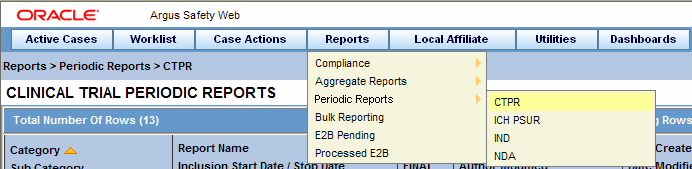
To access the template tab:
-
Select Reports -> Periodic Reports -> <Report Type>.
-
When the system opens the page for the report type you selected:
-
Locate the report and click the row to highlight it.
-
Click Modify.
OR
Click New Report.

-
-
When the application opens the report dialog box, click the Templates tab.
-
The system opens the Templates tab.
Adding a Template
A template can consist of single or multiple sections. Multiple sections enable you to assign different authors and reviewers for each section.
When it uploads the template, the application does the following:
-
Opens a status dialog box to show the executing process.
-
Scans the template for scripting instructions, validates the instructions, and extracts the information to be stored for later use.
To add a template:
-
Select Reports -> Periodic Reports -><Report Type>.
-
When the system opens the page for the report type you selected:
-
Locate the report and click the row to highlight it.
-
Click Modify or New.
-
-
When the application opens the report dialog box, click the Templates tab.
-
When the system opens the Templates tab, click Add.
-
When the application adds a new row in the template section:
-
Enter the section name in the text field in the Section column.
-
Enter a description of the section in the text field in the Description column.
-
Click Attach.
-
-
When the system opens the Attachment dialog box:

-
Type the template file path name OR click Browse to locate and select the template file (DOC or DOCX format) to attach.
-
Click OK.
-
-
Modifying an Existing Template
When you modify a template, the application overwrites the old version of the template with the new version.
-
Select Reports -> Periodic Reports -> <Report Type>.
-
When the system opens the page for the report type you selected:
-
Locate the report and click the row to highlight it.
-
Click Modify.
-
-
When the application opens the report dialog box, click the Templates tab.
-
When the system opens the Templates tab, select the appropriate row you wish to overwrite and click Modify.
-
When the system opens the Attachment message dialog box:
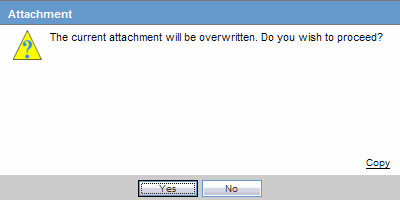
-
Click Yes to continue modifying the template.
OR
Click No to abort the modify operation.
-
-
When the system opens the Attachment dialog box, enter the attachment name in the File Attachment field and click OK.
The system uploads the new template.
Assigning Template Users
Dossier enables you to assign specific template access levels to template users. Template users can be:
Author: The template author can answer any questions and create a draft or final version of a template section. There can be multiple authors for any given section of a template.
Reviewer: The template reviewer does not have access to authoring functions, but can manually edit individual sections of a template after the author has marked the template Ready for Review. Multiple reviewers can be assigned to any section of a template.
Author & Reviewer: The template author & reviewer has access to both authoring and review functions.
Owner: A template can be owned by one or more user groups. Users assigned to these groups can:
-
Access all authoring and reviewing functions
-
Assign user access rights as defined for such roles
-
Build and publish reports
To assign group rights:
-
Select Reports->Periodic Reports-><Report Type>.
-
When the system opens the page for the report type you selected:
-
Locate the report and click the row to highlight it.
-
Click Modify.
-
-
When the application opens the report dialog box, click the Templates tab.
-
When the system opens the Templates tab, click Assign.
-
When the application opens the Dossier Security dialog box, click the Group Assignments tab:
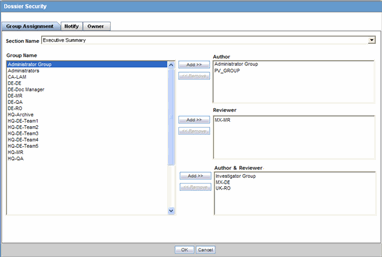
-
Select one or more authors from the Group Name list, and click Add to add the names to the list of authors in the Authors list.
-
Select one or more reviewers from the Group Name list, and click Add to add the names to the list of reviewers in the Reviewers list.
-
Select one or more author/reviewers from the Group Name list, and click Add to add the names to the list of reviewers in the Author & Reviewers list.
-
Click the Notify tab.
-
-
When the system opens the Notify tab:
-
Select one or more groups from the Group Name list, and click Add to add the names to the Notify list OR Click Add All to add all the names in the Group Name list to the Notify list.
-
Click the Owner tab.
-
-
When the system opens the Owner tab, select one or more groups from the Group Name drop-down list and click Add to add the selected group to the Owner list.
-
Click OK to save the assignments information.
Click OK to save your changes, then click the Print icon to view and print a PDF document listing associated assignments. The system only prints saved entries.
See the following sections for information about the individual tabs and for more information about printing the security assignments:
About the Group Assignment Tab
The Group Assignment tab enables you to assign particular roles to users. Any user who is not assigned a user role, cannot modify a template or a report. You can assign any of the following roles:
-
Author
-
Reviewer
-
Author & Reviewer
The following is an illustration of the Group Assignment tab.
Group Assignment Tab Fields
The following table lists and describes the fields on the Group Assignment tab.
| Field/Control | Description |
|---|---|
| Section Name | Enables you to select the template section name for privileges assignment |
| Group Name | Enables you to select one or more user groups to be authors and/or reviewers. |
| Author | Enables you to assign the Author role to one or more groups selected in the Group Name list. |
| Reviewer | Enables you to assign the Reviewer role to one or more groups selected in the Group Name list. |
| Author & Reviewer | Enables you to assign the Author & Reviewer role to one or more groups selected in the Group Name list. |
| Add button | Click Add to add a selected group or groups to the Author, Reviewer, or Author & Reviewer lists. |
| Remove button | Click Remove to move one or more selected groups from the Author, Reviewer, or Author & Reviewer lists and return them to the Group Name list. |
| OK button | Click OK to save the assignment information. |
| Cancel button | Click Cancel to abort the assignment operation. |
Group Assignment Tab Usage Considerations
When using the Group Assignment tab be aware of the following:
-
The default tab is the Group Assignment tab.
-
The Section Name drop down is blank by default.
-
The Section Name contains a list of sections as configured in the periodic report configuration screen.
-
You can add group(s) to each of the three user role lists.
-
Author
-
Reviewer
-
Author & Reviewer
-
-
You cannot assign the same group to more than one user role. In other words, you can assign Group A to either the Author or the Author & Reviewer user role, but you cannot assign it to both.
-
The user can select a group or groups in the Group Name multi-select box (on left) and grant that/those groups privileges by clicking the Add button.
-
The user can select a group or groups in any user role list and click Remove to remove the users.
-
The system returns the names of the removed groups to the Group Name list.
-
-
-
The groups are listed alphabetically in ascending order in all multi-select boxes.
-
When you move to another tab, the system temporarily saves your current choices.
-
You must click OK to save your changes permanently.
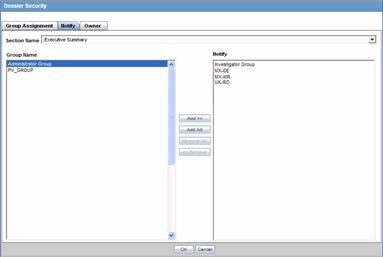
About the Notify Tab
The Notify tab enables you select users to receive e-mail notification of new or modified assignments. The following is an illustration of the Notify tab.
Notify Tab Fields
The following table lists and describes the fields on the Notify tab.
| Field | Description |
|---|---|
| Section Name | Enables you to select the template section name for assignment notification. |
| Group Name | Enables you to select one or more user groups to notify of new assignments or changes to existing assignments. |
| Add button | Enables you to add one or more groups selected in the Group Name list to the Notify list. |
| Add All button | Enables you to add all groups in the Group Name list to the Notify list. |
| Notify | Enables you to notify the users in this list of new assignments or changes to existing assignments. |
| Remove button | Enables you to remove one or more selected users from the Notify list. |
| Remove All button | Enables you to remove all users from the Notify list. |
Notify Tab Usage Considerations
When using the Notify tab, be aware of the following:
-
The Section Name drop-down contains a list of template sections. If you do not select a section, the Add/Remove buttons are disabled.
-
Select one or more groups from the Group Name list to include the users in the group in the notification list.
-
Available groups have been granted access from the Group Assignment tab.
-
When you click Add, the system places the selected group or groups to be notified in the Notify multi-select box (on right).
-
Select one or more groups in the Notify list and click Remove to remove them from the notification list.
-
The application removes the selected groups from the Notify list and returns them to the Group Name list.
-
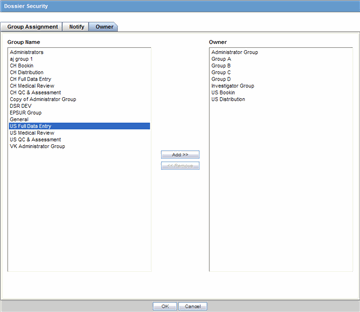
About the Owner Tab
The Owner tab enables you to designate one or more groups to own an entire periodic report. Owner groups can do the following:
-
Access all authoring and reviewing functions
-
Assign user access rights as defined for such roles
-
Build and publish reports
The following is an illustration of the Owner tab.
Owner Tab Fields
The following tables lists and describes the fields on the Owner tab.
| Field | Description |
|---|---|
| Group Name | Contains a list of user groups who can be designated as owners of a report. |
| Add button | Enables you to designate groups selected in the Group Name pane as owners of a template by moving the group name from the Group Name pane to the Owner pane. |
| Remove button | Enables you to remove a selected group from the Owner pane and return it to the Group Name pane. |
| Owner | Contains a list of user groups who are designated as owners of a report. |
Owner Tab Usage Considerations
When using the Owner tab, be aware of the following:
-
All active groups that have been granted access privileges from the Group Assignment tab are included in the Owner drop-down list.
-
You can select one or more groups as the owner of the entire Periodic Report.
-
The owner can perform the generate and build operations.
-
The owner can be both the author and the reviewer and is assigned the access rights defined for such roles.
-
-
You must select at least one group to be the owner of a Periodic Report.
-
If you fail to select a group to be the owner of the Periodic Report, the system presents the following message:
You must assign a Dossier owner group.
-
Click OK.
-
If you remove all the owner groups, the system presents the following message:
You must assign a Dossier owner group.
-
-
AG Service sends e-mail notifications to all Authors, Owners, and Reviewers, if you have selected them for notification when a specific period report is generated or regenerated when the following occur:
-
Report is generated
-
Report is ready to build
-
Build is completed successfully
-
Build is failed in between processing
-
-
The system sends an e-mail notification to the users in the groups listed in the Notify list. The application sends e-mail notifications to users when the following occur:
-
A Periodic Report is generated:
-
The author has checked the Ready for Review checkbox.
-
The application sends an e-mail notification to the appropriate reviewers.
-
If there are multiple reviewers groups specified for a given section, the application sends each reviewer an e-mail notification.
-
-
-
The email notification includes the following:
-
Subject - Dossier Section for <Periodic Report Name> ready for Review
-
Section Name & Description - The name and description of the completed section.
-
Report Name -- The name of the report this section has been completed for.
-
-
E-Mail Layout
Subject:
<Periodic Report> Section for <Periodic Report Name> is ready for Review
Body: (the following four fields are taken directly from the Reports - Periodic Reports dialog)
Trade Name: <Product Name(s)> Destination: <Submission Destination>
Description: <Description>
Due Date: <Due Date of Periodic Report>
The authoring of the <section name> <Section Description> for the <periodic report>"<PSUR Name>" has been completed and is ready for your review. Please log into Argus to review your section utilizing the menu option "Reports > Periodic Reports" and selecting the "View Argus Dossier" option for the correct report.
Printing a Dossier Security List
On the Templates tab, you can click Print to print a list of template assignments. This is called a Dossier Security report but may also be called a template assignment list. When you click Print, the application presents the following message:
To print the current Dossier security settings, the system must save the periodic report configuration.
-
Go to the Template tab.
-
Select the appropriate template from the template list and click Print.
-
Click OK when the system displays the following message:
To print the current Dossier security settings, the system must save the periodic report configuration.
-
The system saves the security settings and prints the Dossier Security report shown in the following illustration.
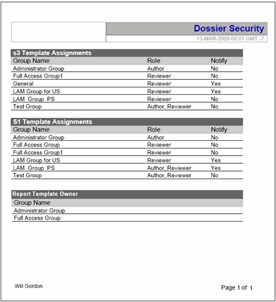
The following table lists and describes the elements in the Dossier Security report.
| Report Section | Description |
|---|---|
| Report Title | The name of the report is always Dossier Security. |
| Save Date and Time | The date and time the template and security assignments were last saved.
The date and time are recorded in GMT (Greenwich Mean Time). The date is actually local time with the GMT offset listed. It is NOT printed in GMT. GMT is only listed to display the offset for GMT. The format is as follows: "Last saved dd-MMM-yyyy HH:mm GMT -n" For example: Last saved 21 JUL 2008 16:11 GMT -8 |
| Template Name | The name of the template.
Each template is listed separately |
| Report Details | This section contains three columns that contain information about the assigned users:
Group Name - The name of the user group sorted alphabetically in ascending order. Role - The role assigned to the group. A group can be assigned multiple roles. Notify - Indicates whether the group should be notified. |
| Report Template Owner | The owner or owners of the periodic report. |
Accessing the Author Tab
Use the following procedure to access the Author tab:
-
Select Reports->Compliance->Periodic to display a list of periodic reports.
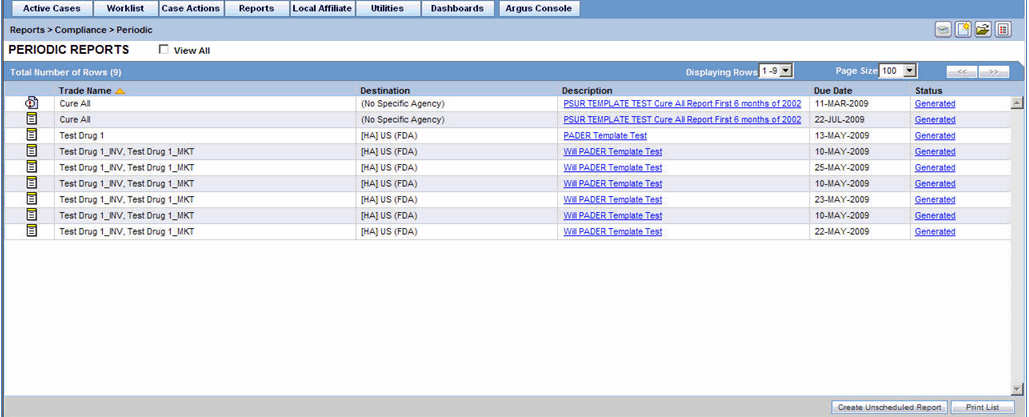
-
When the application opens the list of periodic reports, locate the appropriate report and click its associated report icon.
-
Select View Argus Dossier from the pop-up menu.
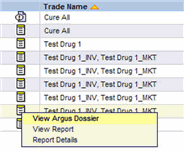
-
The system opens the Author tab for the selected report.
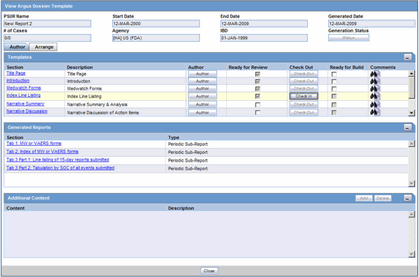
About the Author Tab
All the tasks required to generate a Dossier report can be performed from the Author tab in the View <template name> Template. Generating a Dossier report requires you to do the following:
-
Provide report content
-
Review the report
-
Approve the report
-
Publish the report
The following is an illustration of the Author tab.
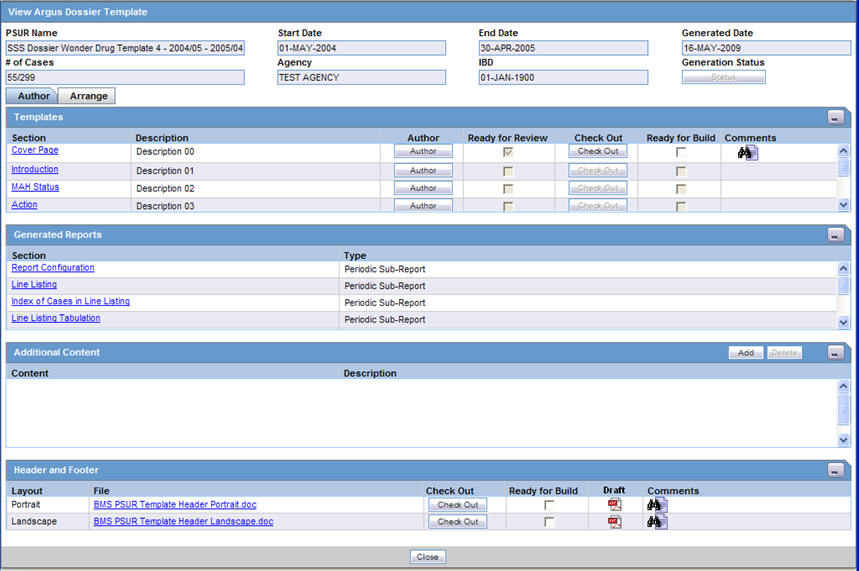
Author Tab Fields
The following table lists and describes the fields and controls on the Author tab.
| Field/Control | Description |
|---|---|
| Periodic Report Name | Displays the periodic report name as configured in the Subject Tab |
| Start Date | Displays the start date of the periodic reporting period from report configuration |
| End Date | Displays the end date of the periodic reporting period from report configuration |
| Generated Date | Displays the date the report was generated. |
| # of Cases | Displays the number of cases that have been included in the PSUR report. |
| Agency | Displays name of the agency |
| IBD | Displays the IBD name of the configured product |
| Templates Section | This section displays a list of all PSUR template section names.
Click the template name to view the unprocessed template doc or docx file in a separate window. |
| Collapse/Expand icons | Click the Collapse icon to collapse the Templates section.
Click the Expand icon to expand the Templates section. |
| Section | Displays the names of the sections included in the template. |
| Description | Display a description of the section contents. |
| Author button | Click Author to perform report-related tasks based on your assigned user role. |
| Ready for Review | Displays if the section of the template is ready to review. |
| Ready for Build | Displays if the section of the template is ready to generate. |
| Check Out Button / Check In Button | Click Check In to check a template section in. This button displays only if a section has been checked out.
Click Check Out to check in a template section. When you click Check Out the system displays the Check Out screen. This button displays only if the authoring task has been successfully completed. |
| Comments | Enables you to enter comments regarding the template.
Click the Zoom icon to view all user comments. |
| Generated Reports | Provides a list of generated reports. |
| Collapse/Expand icons | Click the Collapse icon to collapse the Generated Reports section.
Click the Expand icon to expand the Generated Reports section. |
| Section | Provides a link to the unprocessed template file. |
| Type | Identifies the type of report the system generated |
| Additional Content | Displays any additional content of the user has added content |
| Collapse/Expand icons | Enables you to collapse or expand the Additional Contents section. |
| Add | Enables you to add additional content to the report. |
| Delete | Enables you to delete any uploaded additional content. |
| Content | File name of the attached content |
| Description | This is the additional content Description |
| Header and Footer | Enables the users to view the header and footer files as they appear on the pages that follow. |
| Collapse/Expand icons | Displays any additional content of the user has added content |
| Layout | Indicates whether the document is in portrait or landscape orientation. |
| File | The name of the current file as a link. When you click this link the system opens the current header/footer file. |
| Check Out/Check In | Enables you to check out a file for modification and check it back in.
Check out and check in are for the user of owners and reviewers. |
| Ready for Build | Indicates whether the report is ready to build. |
| Draft | Generates the draft header footer template in PDF format. |
| Comments | Enables the user to enter any relevant comments. |
| Close | Closes the active window. |
Author Tab Usage Considerations
When using the Author tab, consider the following:
-
The system disables the Generation Status button until you initiate the report build process,
-
The screen displays all periodic report configuration elements in sections on the tab.
-
Templates Section
This section lists all sections of the template as configured in previous steps
The Template name is a hyperlink. When you click the template name, the application opens the raw template from the database.
This section displays all the pre configured templates you added when you created the report.
The templates are listed in the order they were in when the report was created.
Click the report section link to view the template file.
The application displays a minimum of six rows. If there are more rows, a scroll bar is available. The scroll bars appears as necessary
-
Generated Reports Section
The application displays the report sections ascending order by Type and then by Section.
Click the report name to view the latest version of a report. The system displays the report (in PDF format) in a separate window.
Click the report section link to view the section report.
The system displays a minimum of six (6) rows. If there are more than six (6) rows, the system displays a scroll bar
Generated report types are: PSUR, CTPR, NDA, and IND. The following table lists the report names for each report type.
Report Type Report Names PSUR Report Configuration Line Listing
Index of Cases in Line Listing
Summary of Cases missing assessments
Line Listing Tabulation
Summary of Unlocked Cases
CIOMS reports
Cumulative Summary FDA - Adverse Event Summary
FDA - Domestic Consumer Report
FDA - MedWatch forms
CDA or CL based on cases in Line Listing (*)
CDA based on all cases (*)
CDA or CL based on date range
CTPR Report Configuration Line Listing
Index of Cases in Line Listing
Summary of Cases missing assessments
Count of Cases per Report Type
Event Count per Study Drug (1)
Event Count per Study Drug (2)
Line Listing Tabulation
Summary of Unlocked Cases
CIOMS reports Cumulative Summary
FDA - Adverse Event Summary
FDA - Domestic Consumer Report
FDA - MedWatch forms
CDA or CL based on cases in Line Listing (*)
CDA based on all cases (*)
CDA or CL based on date range
NDA Report Configuration Tab 1: MW or VAERS forms
Tab 2: Index of MW or VAERS forms
Tab 3 Part 1: Line listing of 15-day reports submitted
Tab 3 Part 2: Tabulation by SOC of all events submitted
Tab 3 Part 3: Cases sent to FDA under a different NDA
Summary of Cases missing assessments Summary of Unlocked Cases
List of Nullified 15-day cases
Custom Case Summary Tabulation
CDA based on cases in Line Listing (*)
CDA based on all cases (*)
Case Count Summary
IND Report Configuration Line Listing of Cases
Line Listing of Death Cases
CDA based on cases in Line Listing (*) CDA based on all cases (*)
-
-
Additional Content Section
You can upload additional information to attach to the report.
-
You can only upload the following file types: .PDF, .DOC, and .DOCX
-
If you try to upload another file type, the system displays the following error message:
Your file has not been uploaded. File type must be .pdf, .doc, or .docx.
-
When you click Add, the system opens an upload pop-up box.
-
You must enter a description of the file you are uploading. If you fail to enter a description and click OK, the system displays the following error message:
You must enter a description for the file you are uploading.
-
The maximum size of the uploaded file is 30 MB.
The names in the Additional Content section are links. Click the link to open the file.
If you select a row and click Delete, the system displays a confirmation dialog box with the following message:
Are you sure you want to delete the highlighted Row.
-
Click Yes to delete the row.
-
Click No to dismiss the dialog box without deleting the row.
The system displays a minimum of four (4) rows in the section. A scroll bar displays if there are more than four (4) rows.
-
General Usage Information
-
Click the collapse and expand icons to collapse/expand each section.
-
The system highlights a selected row.
An Author button is available for each template.
-
The system enables the Author button to all user roles that have access to Dossier.
-
Click the Author button to open the Questions dialog.
-
All users can view all questions; however, only Authors and Owners can change answers.
Only a user assigned an Author role can execute individual templates.
-
The Author operation guides you through all questions (as defined in the template and processed during upload). You are expected to answer the questions.
-
After the user clicks Draft or Final, the system generates a Word document (.DOC/.DOCX format) that contains the processed content and narratives.
-
Once the user clicks Final, the system generates the final version of the template and allows the Author user to check the Ready for Review check box.
The system enables the Ready for Review and Ready for Build checkboxes and the Check In and Check Out buttons when a Template is Final.
When a template is Final, the system enables the Ready for Review check box.
-
Only the template Reviewer and the report Owner can check this check box.
-
Once this box is checked, the system does the following:
Enables the Ready for Build option.
Prevents you from generating a final template.
Disables the Ready for Review check box. Once checked, this check box cannot be unchecked.
The system enables the Ready to Build option when you select Ready for Review.
-
Only the Author or Owner can check the Ready for Build option.
-
You can uncheck this option after it has been checked.
The system enables the Check In and Check Out buttons when you check the Ready for Review option.
-
Click the Check Out button to open the Check Out dialog box.
-
When a document is checked out, the system hides the Check Out button.
-
The system displays the Check In button only if the final template has been checked out.
-
Click the Check In button to open the Check In dialog.
-
The Final template can be checked out by one user at a time.
-
Only the user who checked the document out can check it in.
The system displays the Last Check in Comments in a text box on the screen for each template. Click the Zoom icon to open the check in comments in a popup dialog.
When all template sections and Header and Footer sections are checked, the Owner can build the report. The build process does the following:
-
Merges all template sections into one.
-
Creates a comprehensive .doc or .docx file.
-
Saves the final document in the database and opens it on the screen.
-
Enables all users (if the build was successful) to check-out the document and edit it manually.
-
Enables users to check-in this document after check-out.
The system enables the Build button only if the following are true:
-
The user is the owner of the periodic report.
-
All the templates have been marked as Ready for Build.
If Documentum is configured, AG Services picks up the built file and saves it in Documentum.
-
If Documentum is not configured, the file is marked not submitted.
-
The file is saved in .PDF format.
Role Security Requirements
The following table show which user types have access to various elements in the GUI.
| User Type | ||||
|---|---|---|---|---|
| GUI Element | Owner | Reviewer | Author | Comment |
| Author Button | Yes | Yes | Yes | |
| Final | Yes | No | Yes | |
| Draft | Yes | Yes | Yes | |
| Save | Yes | No | Yes | |
| Ready for Review | Yes | No | Yes | Ready for Review is available when the Final has been generated for the Template. |
| Ready for Build | Yes | Yes | No | Ready for Build is available only when Ready for Review is checked. |
| Section Checkout | Yes | Yes | No | Ready for Build is available only when Ready for Review is checked. |
| Add Other Content | Yes | Yes | Yes | If the user is a Reviewer for any of the section templates, then he/she will have access
If the user is an author for any of the section templates, then he/she will have access. |
| Build | Yes | No | No | Available only when all templates are checked in and Ready for build is checked for all templates. |
| Checkout | Yes | Yes | No | Only available when the Build Process is complete.
If the user is a Reviewer for any of the section templates, he/she will have access |
| View | Yes | Yes | Yes | Only available when the Build Process is complete.
If the user is a Reviewer for any of the section templates, he/she will have access |
| Publish | Yes | No | No | Only available when the Build process is complete and the report is checked in. |
| View | Yes | Yes | Yes | Only available when the Publish is complete.
Only available when the Build Process is complete. If the user is a Reviewer for any of the section templates, he/she will have access. |
Providing Report Content
Dossier enables you to provide report content if you have one of the following user roles:
-
Author
-
Author & Reviewer
-
Owner
When you click Author on the Author tab, the system opens the Author window shown in the following illustration.
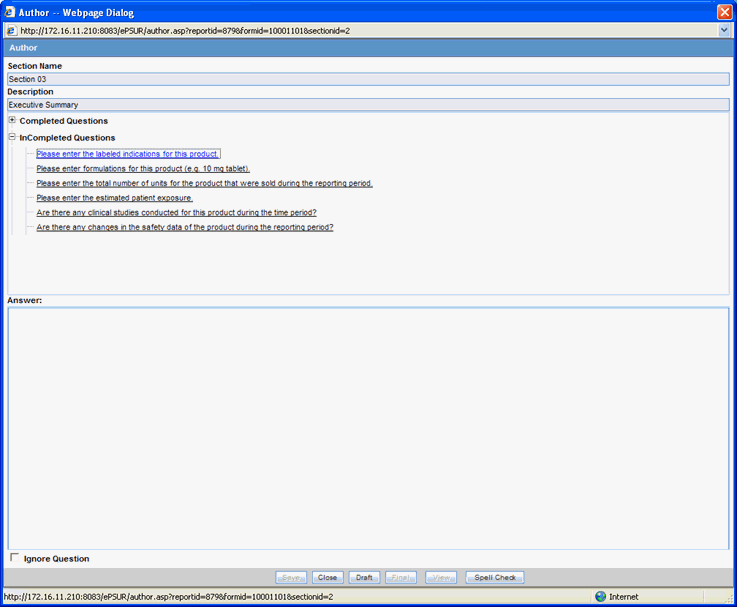
Author Window Fields
The following table lists and describes the fields and controls in the Author window.
| Field/Control | Description |
|---|---|
| Section Name | The name of the section being created for the report. |
| Description | A description of the purpose of the section |
| Completed Questions | Click the expand icon to display a list of completed questions. The system places the questions in this section as you answer them. |
| Incompleted Questions | Click the expand icon to display a list of questions that you must answer before building the report.
Click the question link to display the list of acceptable answers in the Answer section. |
| Answer | Enables you to answer the questions presented in the Incompleted Questions section. |
| Ignore Question | Enables you to skip a questions by click the check box. |
| Save | Saves the answers entered during the session in the database |
| Close | Closes the Authoring window. |
| Draft | Generates and displays a draft version (doc/docx file) with current saved answers. It does not save the file to the database. |
| Final | Generates and displays a doc/docx file and saves the final version of the template in the database. |
| View | Displays the saved doc/docx file. |
| Spell Check | Enables you to run spell check on text entered in a text field. |
Author Window Usage Considerations
When entering content in the Author window, be aware of the following:
The application processes each section and stores it in the database
The Author button is available only to users that have been assigned as authors to the section.
When multiple users are assigned as author to the same section, the application will allow a single section to be "Authored" by a single author at a time.
Clicking Author enables you to navigate through the questions and user prompts from the database.
-
If there are no questions for this template, the system displays No Questions Found in the dialog.
-
Clicking a question enables you to select or enter the answer in the Answer text box. If the question has been answered during an earlier session, the system displays the previous answer.
The Questions Tree has two sections: Completed Questions and Incompleted Questions.
-
Completed Questions - The system displays a list of all answered questions. When you answer a question, the system moves the question from the Incompleted Questions section to this section
-
Incompleted Questions - The system displays a list of all unanswered questions. If you fail to answer a previously answered questions, the system moves the questions beck to the incompleted questions category.
The first part of the screen displays all the questions that have been asked in the template section.
-
The first question is selected by default.
-
You can scroll to view any question in the list.
The second section of the screen enables you to enter any text or select any option value as required.
Click Spell Check to check for spelling errors in a question answered in a text box.
-
The system enables the Spell Check button only when you are required to enter the answer in a text box and when focus is on the text box.
-
If the question requires you to select an answer from a drop-down list, the system disables the Spell Check button.
Click Close to stop the authoring process.
-
If any questions have been answered, the system displays the following messages:
By closing this window will lose any answers that have not been saved. Are you sure you want to continue?
If you click Yes (default), the system closes the message and the Author window without saving answers that have not been saved.
If you click No, the system closes the message box and the Author window remains open.
Click Save to save all answered questions before moving to the next question.
You can continue the authoring process at any time.
The system lists all completed (saved) questions in the Completed Question section.
You can return to a previous question and change its answer.
Select Ignore Question if you wish to skip a question. The unanswered questions remain in raw format in the body of the file itself.
-
This check box is active only when a question is selected and unanswered.
Click Final to generate a final.doc/.docx for a template. A final documents replaces the questions and operands with answers from the database.
-
If one or more of the questions have not been answered, the system displays the following message:
There are unanswered questions. Do you wish to generate the final document?
Click Yes to generate the .doc/.docx file and skip any unanswered questions.
-
If you choose this option, you will have to check out the document and answer the remaining questions manually.
-
If you click No, the Authoring window remains open for further entry.
Any values derived from the unanswered questions will be left blank.
Once the final has been generated, click Final to open the generated .doc/.docx file from the database.
-
Click Draft to generate a .doc/.docx file using the latest data from the database in a read only state. The .doc/.docx will not be saved to the database.
You can move to the next question without answering the current question.
Only one Author can enter report content at a time.
The Author process can be audited.
Entering Report Content
Use the following process to enter report content:
-
Select Reports->Compliance->Periodic to display a list of periodic reports.
-
When the application opens the list of periodic reports, locate the appropriate report and click its associated report icon.
-
Select View Argus Dossier from the pop-up menu.
-
When the system opens the Author tab for the selected report, click Author.
-
When the system opens the Author window, click the expand icon form the Incompleted Questions section to display a list of questions you must answer.
-
Click the question you want to answer to display open the Answer section, then do the following:
-
Select the answer from the drop-down list in the Answer section or enter any text as necessary.
-
Click Save to save the answers to the question.
-
Repeat steps 6a and 6b until you have answered all remaining questions.
-
Click Final to save the completed section of the report in the database.
-
Setting Ready for Review
Once the final has been generated, the report author can indicate whether the template section is ready for review.
-
Select Reports->Compliance->Periodic to display a list of periodic reports.
-
When the application opens the list of periodic reports, locate the appropriate report and click its associated report icon.
-
Select View Argus Dossier from the pop-up menu.
-
When the system opens the Author tab for the selected report, locate the appropriate template and click the associated check box in the Ready for Review column.
-
When the system opens the Ready for review dialog box, click Yes.
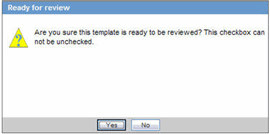
-
The system places a checkmark in the check box and enables the Check Out button.
Editing a Template Manually
Dossier enables you to use Microsoft Word to manually edit a template. Only one person can check out and edit a document at a time.
-
Select Reports->Compliance->Periodic to display a list of periodic reports.
-
When the application opens the list of periodic reports, locate the appropriate report and click its associated report icon.
-
Select View Argus Dossier from the pop-up menu.
-
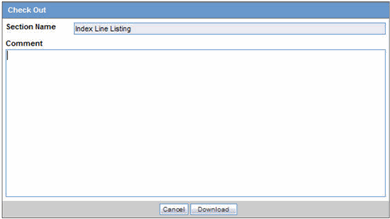
When the system opens the Author tab, locate the appropriate template and click Check Out.
-
When the system opens the Check Out dialog box, type a relevant comment in the Comment field and click Download.
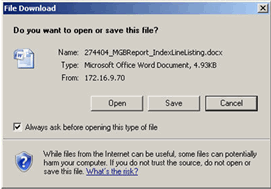
-
When the system opens the File Download dialog box, click Open to download a copy of the template file and open it in Microsoft Word.
-
Edit the document as required and save it.
Note:
You must save the document in one of the standard Microsoft Word file types (.doc or .docx). Otherwise, you will be unable to check the document in.
About the Check Out Dialog Box
The following table lists and describes the fields in the Check Out dialog box.
| Field/Control | Description |
|---|---|
| Section Name | The name of the section you are checking out. |
| Comments | Any relevant comments about the document. The system stores such comments in the Template History. |
| Cancel | Click Cancel to abort the check-out operation. |
| Download | Click Download to download a Microsoft Word (.doc/.docx) version of the template for manual editing. |
Usage Considerations
When using the Check Out dialog box, be aware of the following:
-
You can check out a processed template (.doc/.docx) only after the authoring operation is successfully completed and the author has checked Ready for Review.
-
Any user role (Author/Reviewer/Owner) can check the file out.
-
You cannot check a file in unless it has been checked out.
-
You can enter comments when checking out a document. Comments are record in the comments field.
-
Click Download to save the file in .doc/.docx format to a file location of the your choosing.
-
All check-outs are auditable.
-
The Check In button is disabled except for the person who checked the document out.
-
The Check In dialog pop-up has an Undo Checkout button that enables you to reverse the check-out operation.
-
When you click Undo Checkout, the system dismisses the pop-up dialog box and makes the file available to other users.
-
The system does not save any changes you may have made to the template.
-
Undoing a Check Out Operation
Under some circumstances, you may find it necessary to reverse a check out operation. When you check a document out, the system changes the Check Out button to a Check In button as shown in the following illustration.
Note:
To reverse a check out operation-
Go to the Author tab.
-
Locate and click the appropriate Check In button.
-
When the system opens the Check In dialog box, click Undo Checkout.
-
The system reverses the check out operation without saving changes you may have made to the document.
Checking In an Edited Template
After using Microsoft Word to edit and save a template document, you must check it in using the Check In button on the Author tab.
To check in an edited document:
-
Go to the Author tab.
-
Locate and click the appropriate Check In button.
-
When the system opens the Check In dialog box:
-
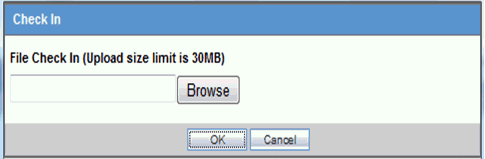
Type the full path name for the template in the File Name field OR Click Browse to locate and select the appropriate document.
-
Type any relevant information in the Comment field.
-
Click OK.
-
-
The system checks the document in.
About the Check In Dialog Box
The following table lists and describes the fields and controls in the Check In dialog box.
| Field/Control | Description |
|---|---|
| Section Name | The name of the template you have checked out for editing. This can be a maximum of 50 characters. |
| File Name | The local path of the file that you have updated. The path name can be a maximum of 200 characters. |
| Browse | Click Browse to display the file selection dialog box and enable you to browse the local directory and locate the file to check in. |
| OK | Click OK to upload the edited file. |
| Cancel | Click Cancel to abort the upload operation. |
| Undo Checkout | Click Undo Checkout to reverse the check-out operation. This button is available only to the user who has the document checked out. |
Usage Considerations
When checking in a document, be aware of the following:
-
Check In is available only if the file is checked-out previously by the person updating the template.
-
The system disables the Check In button for all users except the user who checked the document out.
-
-
You can indicate whether a section is ready for review
-
The Check In dialog pop-up enables you to reverse the checkout.
-
Click OK to initiate the upload process.
-
You can identify a section that is ready for generation by clicking the Ready for Review checkbox on the Author tab.
Retaining Template Versions
The Dossier application provides version control for authored templates. Checking out an authored template initiates the review process and enables you to modify a template as necessary. The Dossier application tracks the template version whether or not has is has a document management system configured for its use. In other words, if a DMS is not configured for Dossier's use, you can check out and modify templates and the system maintains an updated version of the template when you check it in. Once you check in a template, Dossier retains a version of the modified template and makes it available for later viewing by any user who has access to Dossier comments.
The following is an illustration of the Comments window. You can view the checked-in template by clicking the Version Num icon.
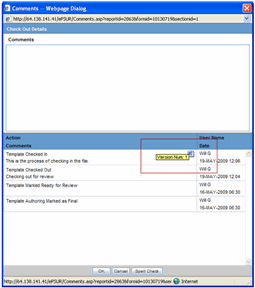
When checking templates in and out, be aware of the following:
-
An icon identifies a document that is checked in.
-
When you place the mouse cursor on the icon, the system provides the following version information:
-
Version Num: x where: x is the incremental version number.
The system version of the document is considered Version 1 and the version number appears on the Word icon.
When you check out the system version (version 1) and check it in again, the system updates the version number to 2.
-
-
When you click the Word icon, the system opens the document in the correct application.
-
If you want to replace a version of the document, you must save the file locally and check out the current template and check in the historical version.
-
-
All checked out files retain the document history.
About the Template History and Comments Log
The Comments and History dialog box provides you with information about the whether the document is checked out and who has checked it out, and how the document has been modified and who has modified it.
The following is an illustration of the Comments and History dialog box.
Fields and Control
The following table lists and describes the fields and controls in the Comments and History dialog box.
| Field/Control | Description |
|---|---|
| Comments (entry) | Enables you to enter comments retained in the Template History. |
| Action | Displays the action, if any. |
| Comments (historical) | Enables the user to review comments in the Template History. |
| Username | Displays the user name of the user that entered the comments |
| Date | Displays the time date stamp in local user time (GMT offset) |
| OK | Dismisses the window and records any comments entered by the user. |
| Cancel | Cancels any action and dismisses the dialog |
| Spell Check | Checks for spelling errors in the comments text box |
Usage Considerations
When using the Comments and History dialog box, be aware of the following:
-
When you click OK, the system records any comments you entered and places them in the Template History.
-
The Template History section retains a history of the following actions that have occurred for each template row:
-
Template Authoring Marked as Final
-
Template Marked Ready for Review
-
Template Checked Out
-
Template Checked In
-
Template Marked Ready for Build
-
-
The template history box is not editable.
-
The format of this history is as follows:
-
Row A-Left "Action: <action from the above listed items>"
If no action occurs, do not print any text.
-
Row B-Left "Comments: <any comments entered>"
If no comments exist for the action, do not print any text.
Comments should display up to 255 characters (which is the limit on the comments box) and should wrap if needed.
-
Row 1-Right "<username>" aligned right
Always print row 1-Right.
-
Row 2-Right Time date stamp "dd-mmm-yyyy HH:mm" aligned right.
Always print row 2-Right.
TimeDate Stamp shows the local time.
-
The Template History displays the history in descending order. (i.e., most recent record on top).
-
Template history records are separated by a line (¼ point).
-
You can enter comments without any action being completed. In this case only the comment will be recorded.
-
Setting Ready for Build
Once the final has been generated, reviewed, and approved the report reviewer and/or report owner can indicate whether the template section is ready for the report build. Ready to Build must be checked for all sections of the report before the system can build the report.
To indicate a template section is ready for the report build:
-
Select Reports->Compliance->Periodic to display a list of periodic reports.
-
When the application opens the list of periodic reports, locate the appropriate report and click its associated report icon.
-
Select View Argus Dossier from the pop-up menu.
-
When the system opens the Author tab for the selected report, locate the appropriate template and click the associated check box in the Ready for Build column.
Building a Dossier Report
Only the assigned owner can build a Dossier report. You can do this from the Arrange tab. Steps involved in building the report include the following:
-
Setting Section Order
-
Creating a Table of Contents
-
Generating the Report
-
Viewing the PDF
About the Arrange Tab
On the Arrange tab, you can change the order in which sections appear in the final report. You can also delete a section as necessary.
To access the Arrange tab:
-
Select Reports->Compliance->Periodic to display a list of periodic reports.
-
When the application opens the list of periodic reports, locate the appropriate report and click its associated report icon.
-
Select View Argus Dossier from the pop-up menu.
-
When the system opens the Author tab, click Arrange to open the Arrange tab.
-
The system opens the Arrange tab.
Arrange Tab Fields and Controls
The following table lists and describes the sections and fields on the Arrange tab.
| Section/Field/Control | Description |
|---|---|
| Templates / Generated Reports / Additional Content | This section lists and describes the template sections in the report. |
| Save button | Enables you to save the current report layout. |
| Remove button | Enables you to remove any section. When you click Remove, the application removes the section and places it in the Removed Content section of the tab. |
| Up button | Enables you to move the selected report section up in the list. |
| Down button | Enables you to move the selected report section up in the list. |
| Section | This column contains the name of each section of the report. Click the link to open the report section. |
| Description / Type | This is either the Description added by the user or the type of file when the item is a generated report |
| TOC After | Indicates where the TOC will be placed in the report. |
| Remove Content | This section displays the content of the report that has been removed. |
| Reinstate button | Allows you to put the removed content back in the report at the bottom of the list. User the Up and Down buttons to put the section in its correct position in the report. |
| Minimize / Maximize icons | Enables you to collapse (minimize) or expand (maximize) the Remove Content section. |
| Section | This column contains the name of each section that has been removed. Click the link to open the removed section. |
| Description / Type | This is either the Description added by the user or the Type of file when the item is a generated report that has been removed |
| Build button | Allows users to initiate the generate process |
| Generation Status | Enables you to see the status of the report build. This button is not available until you initiate the build operation. |
| View PDF button | Enables you to view the compiled report. |
| Publish | Enables you to initiate the publish operation. |
Arrange Tab Usage Considerations
When using the Arrange tab, be aware of the following:
-
Select the row and click Up or Down to arrange the report sections in the desired order for the final report.
-
If you select the first row, the system disables the Up button.
-
If you select the last row, the system disables the Down button.
-
-
If you move reports or attachments, the system does not save them until you click Save.
-
The system displays the following message:
The information was saved successfully
-
If you click Close to leave the screen, the system displays the following message:
You have made changes to the Dossier report order, if you press OK, changes made will be lost.
-
-
You can remove a section to prevent it from being included in the final build.
-
If you remove a section, the system maintains the order.
-
If the Build process is completed, the system disables the Up and Down buttons.
-
-
You must select a row before clicking Remove.
-
If you do not select a row, the system disables the Remove button.
When you click Remove, the system displays the following message:
Are you sure you want to remove the highlighted row?
-
-
When you click Remove, the system moves the selected row to the Remove Content section.
-
Click the Minimize/Maximize buttons to collapse and expand the Remove Content section.
-
Collapsing the section provides more space for the Templates / Generated Reports / Additional Content section.
-
When expanded, the Remove Content section displays a minimum of three rows.
-
-
Click Reinstate to put a removed section back in the report.
-
You must select a row before clicking Reinstate.
-
The system disables the Reinstate button until you select the row.
-
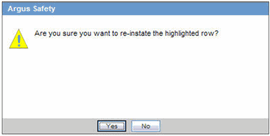
When you click Reinstate, the system displays the following message.
Are you sure you want to reinstate the highlighted row.
-
When you click Reinstate, the system moves the selected row to the bottom of the Templates / Generated Reports / Additional Content section.
-
-
If the Build process has completed, the Remove and Reinstate buttons are disabled
Arranging the Sections of a Report
Use the following procedure to arrange the sections of a report.
To arrange the sections of a report:
-
Select Reports->Compliance->Periodic to display a list of periodic reports.
-
When the application opens the list of periodic reports, locate the appropriate report and click its associated report icon.
-
Select View Argus Dossier from the pop-up menu.
-
When the system opens the Author tab, click Arrange to open the Arrange tab.
-
When the system opens the Arrange tab:
-
Select a row.
-
Click Up to move the row up in the list OR Click Down to move the row down in the list.
-
Click Save.
-
Removing a Section from a Report
Use the following procedure to remove a section of a report:
-
Select Reports->Compliance->Periodic to display a list of periodic reports.
-
When the application opens the list of periodic reports, locate the appropriate report and click its associated report icon.
-
Select View Argus Dossier from the pop-up menu.
-
When the system opens the Author tab, click Arrange to open the Arrange tab.
-
When the system opens the Arrange tab, select a row and click Remove.
-
When the system removes the section and places it in the Remove Content section of the tab, click Save to save the changes to the report.
Reinstating a Section in a Report
Use the following procedure to reinstate a section in a report:
-
Select Reports->Compliance->Periodic to display a list of periodic reports.
-
When the application opens the list of periodic reports, locate the appropriate report and click its associated report icon.
-
Select View Argus Dossier from the pop-up menu.
-
When the system opens the Author tab, click Arrange to open the Arrange tab.
-
When the system opens the Arrange tab, go to the Remove Content section, select the section to put back in the report, and click Reinstate.
-
When the system displays the following message, click Yes to put the section back in the report.
-
When the system places the reinstate section at the bottom of the section list:
Leave the document in its present position OR Select the row and use the Upr and Downs buttons to move the section to its correct position.
Creating a Table of Contents
The table of contents for a Dossier report is created at run time. Therefore, you must specify the location of the table of contents in the document on the Arrange tab. If you do not specify a location, the system automatically prints the table of contents as the first page of the report. Click the appropriate option button in the TOC After column to indicate where to place the TOC. For example, if you want the TOC to appear after the title page, click the TOC After option button associated with the Title Page section.
When specifying the location of the table of contents, be aware of the following:
-
On the Arrange tab, you can specify, at any time, which content section the TOC follows.
-
You can select the TOC After option button for the section the TOC will be placed after during the final build.
-
Pages before the table of contents will not be numbered automatically.
-
Pages before the table of contents will not include the header and footer. However, the header and footer will be included on the TOC pages.
A section must be specified as TOC After; otherwise the TOC begins printing on the first page of the report
If you remove a row specified as TOC After, the system removes the row from the build content. None of the remaining section will have TOC After specified.
If you reinstate the removed section, TOC After will not be specified.
-
-
The system generates the Table of Contents based on the order of the report sections when the final build is started.
-
Each section row is a new chapter.
-
The chapter name comes from the section name.
-
-
The system creates Acrobat bookmarks for each section row of the report using the section name given by the user or the system.
-
The system creates up to 10,000 bookmarks for each MedWatch, CIOMS, or VAERS form. If there are more than 10,000 forms, the system creates a single bookmark for all forms.
-
The system generates and displays the TOC in portrait orientation.
Generating a Dossier Report
The build process merges the report sections and generates a comprehensive period report. Since there is no need to modify a generated report, the system produces all reports in PDF format.
The periodic report owner is the only person who can generate a report and can start the build process only after all sections of the periodic report have been marked Ready for Build.
Once all sections have been marked Ready for Build, the system enables the Build button on the Arrange tab.
To generate a report:
-
Select Reports->Compliance->Periodic to display a list of periodic reports.
-
When the application opens the list of periodic reports, locate the appropriate report and click its associated report icon.
-
Select View Argus Dossier from the pop-up menu.
-
When the system opens the Author tab, verify that all parts of the report are marked Ready for Build and click the Arrange tab.
-
When the system opens the Arrange tab, click Build to generate the report.
-
The system generates the report.
Report Generation Usage Considerations
When building a report, consider the following:
-
Only the owner of the periodic report can initiate the generate process.
-
The owner can initiate the build process only after all sections of the periodic report have been marked Ready for Build.
-
The Build button active if the Ready for Build check box on the Author tab is checked.
-
When you click Build, the system compiles the report in the order on the Arrange tab.
-
The system converts all files to PDF (if not already PDF) and adds any required header, footers, and page numbers to the report.
-
The system displays a message box with the following message:
Your Dossier report has been submitted to final build.
-
The system saves the current arrangement before it starts the Build process.
-
-
The Build process does the following:
Merges all template sections into a single PDF file.
Ignores instructional comments.
-
You cannot modify a periodic report while the Dossier build process is running, and the system disables the Modify and Print buttons until the build process is complete.
-
The system prevents you from moving any section on the Arrange tab while the system is building the report. The Arrange section should be grayed out and you cannot move any sections of the report.
-
Once the final build is completed, the system disables the Build button.
-
If you make any changes on the Arrange tab and click Save after the build is successfully completed, the system displays the following message:
Your dossier is already built. Saving any changes will require that you rebuild the dossier again. Are you sure you want to save these changes.
If you click Yes, the system does the following:
-
Dismisses the message.
-
Removes the existing report.
-
Enables the Build button.
-
Disables the View PDF button.
-
Disables the Publish button.
If you click No, the system retains the existing report.
-
-
Status Button
-
The system activates this button after you start the build process.
-
This button remains active once the build process is completed
-
If you click this button after the build process starts, the system displays the status of the build process in the standard report generation pop.
-
When you click Close on the status window, the system does the following:
-
Closes the status window.
-
Continues to generate the report.
-
-
The status window displays the progress of the build process.
-
-
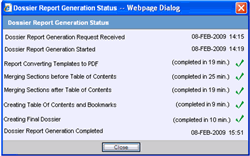
The system displays the following statuses, in order of occurrence:
Dossier Report Generation Request Received
-
Status is followed by a date and time stamp for when this action kicked off the report in local user GMT offset date/time: "dd mmm yyyy HH:mm" (i.e. "02-FEB-2008 15:43")
Dossier Report Generation Started
-
The system displays a grayed out check mark until this process starts (picked up by AG Service)
-
Once AG Service picks up the process, the system displays a date and time stamp showing when this action started in local user GMT offset date/time: "dd mmm yyyy HH:mm" (i.e. "02-FEB-2008 15:43")
Report Converting Templates to PDF
-
The system displays a grayed out checkmark until this process starts.
-
While the process is in progress, the system displays "Processing…"
-
When the process is complete, the system displays the total processing time in minutes and the gray checkmark changes to green.
-
Processing time displays as follows: "(completed in xx min.)"
Merging Sections before Table of Contents
-
The system displays a grayed out checkmark until this process starts.
-
While the process is in progress, the system displays "Processing…"
-
When the process is complete, the system displays the total processing time in minutes and the gray checkmark changes to green.
-
Processing time displays as follows: "(completed in xx min.)"
Merging Sections after Table of Contents
-
The system displays a grayed out checkmark until this process starts.
-
While the process is in progress, the system displays "Processing…"
-
When the process is complete, the system displays the total processing time in minutes and the gray checkmark changes to green.
-
Processing time displays as follows: "(completed in xx min.)"
Creating Table Of Contents and Bookmarks
-
The system displays a grayed out checkmark until this process starts.
-
While the process is in progress, the system displays "Processing…"
-
When the process is complete, the system displays the total processing time in minutes and the gray checkmark changes to green.
-
Processing time displays as follows: "(completed in xx min.)"
Creating Final Dossier
-
The system displays a grayed out checkmark until this process starts.
-
While the process is in progress, the system displays "Processing…"
-
When the process is complete, the system displays the total processing time in minutes and the gray checkmark changes to green.
-
Processing time displays as follows: "(completed in xx min.)"
Dossier Report Generation Completed
-
A grayed out checkmark is displayed until this process is started
-
Once the process is complete, the system displays a date and time stamp showing when this action started in local user GMT offset date/time: "dd mmm yyyy HH:mm" (i.e. "02-FEB-2008 15:43"). Errors in the build process are logged into the Safety Error Log.
-
The system displays a grayed out check mark until this process starts (picked up by AG Service)
-
-
If an error occurs during any of the build process, a status box displays the following error message:
"Failure, please refer to the Argus Safety Error Log for details."
Any final build error(s) are recorded in the Argus Safety error log.
When an error occurs, the system destroys any compiled documents. You must restart the process
View PDF Button
-
Once the final build process is completed, the system enables the View PDF button.
-
Click this button to display the report.
Publish PDF Button
-
Once the final build process is completed, the system enables the Publish button.
-
If you make changes to the report, the system disables this button until a new build process is completed.
If you make any changes in the Arrange window (i.e., move a report section up or down or add or remove a report section) after the build is completed, the following occurs:
-
The system displays the following message:
"The final dossier has been generated. Making changes now will require the report to be rebuilt. Are you sure you want to make changes?" Options OK or Cancel."
-
If you click OK, the system does the following:
-
Disables the View PDF button.
-
Disables the Status button.
-
Disables the Publish button.
-
Enables the Build button.
-
-
If you click Cancel, the system closes the message box and cancels the change action.
When the system opens the Argus Dossier Template window, only the following are enabled. All other buttons, icons, or links are disabled.
Status Button
Author Tab Section Links
-
Template Section Links
-
Generated Report Links
-
Additional Content Links
-
Header/Footer Links
Author Tab Comments Icon
-
The comments are read-only, and you cannot enter new comments for the Templates Comment icon and the Header and Footer Comments icon.
Arrange Tab
-
Arrange Tab Section Links including links to templates, generated reports, and additional content links
-
Removed content links.
-
View PDF Button
Per the regulation "Guidance for Industry, Providing Regulatory Submissions in Electronic Format - General Considerations" (1999), "the initial page of the paper document should be numbered page 1."
-
Set the common profile swith to "Starting from the First Page" so that the first page of the report is page 1, no matter where the table of contents is placed on the Dossier Arrange tab.
-
If page numbering is turned off, no page number prints. However, the first page of the report is considered page 1.
Publishing a Dossier Report
The Publish function is available only after the report has been successfully generated.
To publish a report:
-
Select Reports -> Compliance -> Periodic to display a list of periodic reports.
-
When the application opens the list of periodic reports, locate the appropriate report and click its associated report icon.
-
Select View Argus Dossier from the pop-up menu.
-
When the system opens the Author tab, verify that all parts of the report are marked Ready for Build and click the Arrange tab.
-
When the system opens the Arrange tab, click Publish to publish the report. The report gets pushed to Documentum after Publish is clicked. The system activates the Publish button on the Arrange tab after the report has been generated successfully.
-
The system publishes the report.
-
Click View PDF to view the completed report.
Publish Usage Considerations
When publishing a report, be aware of the following:
-
The Publish function is available after a report has been successfully generated.
-
The system will publish the report only after the report has been built.
-
The system displays the status of the Publish process.
-
Users can have access to information used to create the Dossier Report even after Dossier generates the report. Left-click the Status icon to the left of the submitted report and select View Argus Dossier from the menu.