6 Using Advanced Conditions to Create Point-in-Time Queries on Argus Mart
Argus Insight also supports point-in-time queries for analysis of the historical case data based on specific date/time through Argus Mart.
To enable access to this data in Argus Mart, you need to set specific attributes.
See Table 12-1, "Common Profile Switches", for more information on these attributes.
Benefits of running queries on Argus Mart:
-
Enables you to create the advanced condition queries using the list of fields configured in the common fields table for Argus Mart data source. These advanced condition can be executed to generate case series.
-
Displays the Effective Start Date of the case revision in the resultant case series for all the case series generated on Argus Mart data.
-
Supports different type of queries for fetching the historical data while executing queries on Argus Mart data source.
-
Current Data Queries—Provides a consistent view of the most recent revisions available in Argus Safety regardless of whether the cases are locked or unlocked. These queries and query results are same as the existing queries created on Argus Insight data source that is, case data for cases present in the case series will be refreshed if a case changes in Argus Safety. Any reporting done on such case series/queries will always return the latest data related to cases in the case series.
-
As of Date (Historical Data)—Refers to the data that was current at some point in the past. This query type allows the use of an As of Date that is earlier than the most recent ETL high water mark and later than ETL low water mark. These queries uses the Effective Start Date and End Date of the locked and unlocked revisions.
Note:
-
ETL High Watermark — Date when ETL was executed for the last time.
-
ETL Low Watermark — Date when ETL was executed for the first time.
-
-
At Lock—Provides the case data at one or more user lock actions. A typical use case for an At Lock query displays the data that was provided to local affiliates for review and possible submission. The query returns the revisions at the time of the user lock action. That is, the post-lock revisions are not included. The list of lock dates (and times) is provided by Argus Safety tables that record the user lock action. These queries use the valid Start Date and End Date of the locked revisions.
-
Last Locked Revision as of a Point in Time—Provides a consistent view of the most recent locked revisions that were committed to the database on or before the as-of date. The as-of date can be arbitrary (a date that may not correspond to any actual transaction). When there are post-lock revisions, the query returns any post-lock revision data valid at the given point-in-time. These queries return only a single revision of each case. The as-of date is the same for all cases (a single value for the query). These queries use the valid Start Date and End Date of the locked revisions.
-
Last Locked Revision for a Version in a Period—Provides a consistent view of the most recent locked revision for case versions in a time period. You can choose between Case Creation Date, Case Receipt Date, and Case Lock Date for determining the versions in a period. Regardless of the kind of date used for determining in period, the key point of this type of query is that the revision may have been committed to the database outside the period. However, revisions that belong to later versions of a case not included in the period are not returned. These queries return only a single revision of each case. The as-of date may vary by case (no single as-of date will be sufficient to return the needed revisions across all cases). These queries use the valid Start Date and End Date of the locked revisions.
-
Aggregate Queries—Provides a consistent view of the most recent locked revision for case versions for a specific time period based on the Case Receipt Date. You may also view the most recent unlocked revision with this type of query.
-
-
Enables saving the advanced conditions along with query type and As of Date for future use.
-
Supports all the existing features of advanced conditions with Argus Mart data source and point in time queries. For example, View SQL, Parameterized queries, and etc.
6.1 Creating a New Advanced Condition
-
Navigate to Queries > Advanced Conditions > New (Argus Mart).
The ADVANCED CONDITIONS EDITOR page appears with the data source.
-
Enter the attributes (fields and values) for the advanced condition.
-
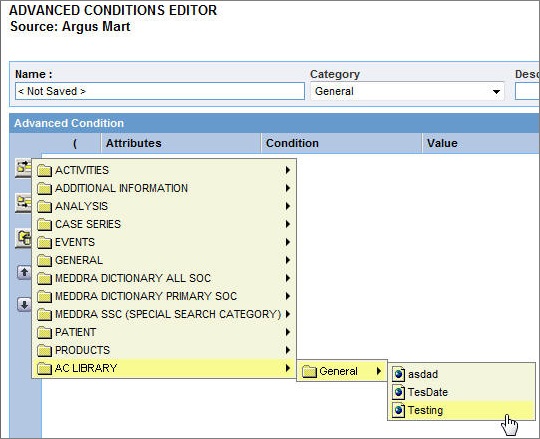
Click the context menu icon (Add Advanced Condition Element Above/Below icon).
In the context menu, the categories (Activities, Additional Info, Analysis, Events, General, Patients, and Products) represent the Argus case form tabs. In these categories, the data mart fields that pertain to case information are organized in this hierarchy:
-
Argus case form tab
-
Sections within the tab
-
Fields within the section
You may browse through the appropriate hierarchy and select the required field as an advanced condition attribute.
The AC Library category lists all the advanced conditions stored in the system. You may browse through the AC Library category and select a stored advanced condition as an attribute for the new advanced condition.
-
-
Browse through a category hierarchy, and select the required attribute.
The selected attribute appears as a row in the editor.
Note:
The user defined fields in Argus Safety which have been converted as a look up are also available as attributes for the advanced condition search. -
In the Value field, enter the value for the selected attribute.
Depending on the type of the selected attribute, the Value field populates a:
-
Drop-down list to select from a set of predefined values
-
Text box to enter text strings or numerals
-
Date field to enter dates
-
Browser to select MedDRA dictionary terms, company products, WHO drugs, clinical study IDs, Drugs in Study (incl. Comparators) and Investigational Drugs.
To use a browser to populate the Value field, click the ellipsis button next to the Value field. From the context menu, select the option corresponding to the browser you want to start. For example, you can start the MedDRA Browser and enter criteria to search for a preferred term based on a specific code or description. You can add a selected term to the Value field.
-
-
Click the Conditions field, and select a condition for the attribute value.
See Table 6-1 for a description of each condition. The availability of the conditions depends on the selected attribute.
Table 6-1 Conditions for Defining an Advanced Condition
Condition Select this option if you want to… equal to
Retrieve cases where the selected attribute's value is equal to what the Value field specifies
not equal to
Retrieve cases where the selected attribute's value is not equal to what the Value field specifies
greater than
Retrieve cases where the selected attribute's value is greater than what the Value field specifies
greater than or equal to
Retrieve cases where the selected attribute's value is greater than or equal to what the Value field specifies
less than
Retrieve cases where the selected attribute's value is less than what the Value field specifies
less than or equal to
Retrieve cases where the selected attribute's value is less than or equal to the Value that the field specifies
missing
Retrieve cases where the selected attribute's value has not been specified
exists
Retrieve cases where the selected attribute has any value
begins with
Retrieve cases where the selected attribute's value begins with what the Value field specifies
contains
Retrieve cases where the selected attribute's value contains what the Value field specifies
does not contain
Retrieve cases where the selected attribute's value does not contain what the Value field specifies
in
Retrieve cases where the selected attribute's value exists in what the Value field specifies
not in
Retrieve cases where the selected attribute's value does not exist in what the Value field specifies
Tip:
To change the structure of the query by changing the order of the attribute rows, select a row and then click the arrow icons to move the row up or down. To delete a row from the editor, select the row and click the Delete icon. -
Specify the operator.
Use the Operator drop-down list to specify the Boolean or Set operator to join the attribute with another attribute.
-
To add more attributes to your advanced condition, click the icons on the left bar to insert another attribute above or below the existing attribute.
-
Specify runtime parameters.
Note:
Argus Insight lets you create advanced conditions which when executed, ask for user-specified values for certain attributes to generate the case series. For example, you may create an advanced condition in which the Case Number or the Product name may be specified only at the time of execution. In this case, the advanced condition would only retrieve those cases where the Case Number/Product Name is as specified at the time of execution.Creating an advanced condition using same field name multiple times requires to change the Parameter name so that while executing the advanced condition different parameters values can be entered.
-
Identify the attribute row to specify runtime parameters.
-
Click the ellipsis button next to the Value field, and then select Parameters from the menu.
-
Click Parameter.
The Parameter dialog box appears.
-
To pass multiple runtime values for a single attribute, select the Multi Select check box.
For example, you might want to pass more than one case number or product name as runtime parameters.
-
Click OK.
If the field is configured to accept single runtime parameter, the field you configured as a runtime parameter is displayed in the Value text box enclosed within % symbol. For example, %Product Type%.
If the field is configured to accept multiple runtime parameters, the field name appears in the Value text box enclosed within %% symbol. For example, %%Product Type%%.
-
To determine the order of execution for the selected advanced conditions, enter parentheses in the ( and ) columns.
-
Examine the advanced condition results.
-
Click Execute.
Tip:
To cancel the query execution at this point and return to the Advanced Conditions Editor, click Cancel Query.-
If any runtime parameter is configured, the Parameters dialog box appears with all the fields available based on the categorization of different fields from the tree view.
-
Specify the parameter values by using the options in the dialog box, and click Execute.
Select at least one parameter for query execution.
The ACTIVE CASE SERIES page appears with the matching cases from the data mart.
Tip:
If you select one runtime parameter and execute the search, you must enter a field.If you select multiple runtime parameters and execute the search, you have the option to ignore the runtime parameters.
-
To ignore the field criteria for query execution, select All.
-
To save the selected values on the Advanced Condition Parameters screen, click Save.
Note:
-
When the Save button is clicked, the values of the current Advance Condition only are saved, and not for the Nested Advance Conditions.
-
The Save button is enabled only when Advance Condition is saved, and not when the Advanced Condition is executed from Query By Example, Filter, or Advance Condition Library page.
You may enter value for one or more parameters.
If no value is selected for any parameter that is if you try to save a parameterized advanced condition without providing any value, then an error message appears as 'You must select values in order to save.'
All the fields where value is been provided are stored for the future use.
-
-
Upon execution of these advanced conditions again, the previously selected values will appear by default on the Advanced Condition Parameters page.
Note:
On the Advanced Condition Editor page, the parameterized advanced conditions appears in their original structure, and the saved parameter values are not available. These values appear only while executing the advanced condition. -
Query criteria for the case series generated using such advanced conditions will only display fields for which values for the parameter were provided.
-
The selective use of parameters can also be used while converting existing filters into advanced conditions.
-
-
If no cases are found that match the querying criteria, a warning message appears.
Click View Query to return to the Advanced Conditions Editor, modify the criteria and execute again.
-
If the cases that match the query criteria are found, the ACTIVE CASE SERIES page appears with the list of such cases.
-
-
Examine the case series. If the case series is too large, you may want to modify the advanced condition by specifying additional attributes or changing values.
Alternatively, if you find the case series to be appropriate, you can save the advanced condition to the system.
The system retrieves the matching cases from the data mart and displays them in the ACTIVE CASE SERIES page.
Note:
If the Argus Insight case series are created by using the Argus Mart advanced condition, then these case series records only case IDs, case revision effective start dates, and query criteria (as a text string).
6.1.1 Saving and Providing Point-in-Time Query Date
-
On the ACTIVE ADVANCED CONDITIONS EDITOR page, from the Category drop-down list, select a category.
-
In the Description field, enter a description of the advanced condition.
For example, you may describe the type of cases the advanced condition retrieves.
-
In the Query Type field:
-
To execute the query based on current data, select Current Data.
The As of Date field is disabled.
-
To execute the query based on historical data, select As of Date.
-
To execute the query based on one or more user lock actions, select At Lock.
-
To view the most recent locked revisions that were committed to the database on or before As of Date, select Last Locked Revision as of a Point in Time.
For steps 3b to 3d, the As of Date field is enabled.
In the As of Date field, enter the date based on which advanced condition will be executed.
Note:
As of Date field contains date-time, populated with ETL high water mark as the default value for all query types.As of Date cannot be greater than ETL high watermark or less than ETL low watermark.
-
To view the most recent locked revision for case versions in a time period, select Last Locked Revision for a Version in a Period.
The Last Locked Revision for a Version In a Period dialog box appears.
i. To execute the query based on the receipt date, select Case Receipt Date (default), and enter dates in the From and To fields. Click Save.
ii. To execute the query based on the lock date, select Case Lock Date, and enter dates in the From and To fields. Click Save.
iii. To execute the query based on the creation date, select Case Creation Date, and enter dates in the From and To fields. Click Save.
-
To view the most recent locked revision for case versions for a specific time period, select Aggregate Queries.
The Aggregate Queries dialog box appears.
i. Enter the date range for the Case Receipt Date in From and To fields, and click Save.
Based on the selected date range, only the last locked revision of a case for the version falling in that period based on initial/follow-up receipt date are displayed. Post lock revisions are also displayed
ii. To view the latest unlocked revision of the cases, select Include Unlocked Cases.
-
-
Click Save.
The Advanced Condition - Save dialog box appears.
-
In the Name field, enter the name of the advanced condition.
-
Click OK to save the advanced condition and refresh the ACTIVE ADVANCED CONDITIONS EDITOR page.
Note that:
-
The Active Query Name field in the upper-right corner of the page now displays the name of the advanced condition you specified while saving the advanced condition.
-
The Save As, View SQL, and Permissions buttons are now enabled.
Note:
The ADVANCED CONDITION LIBRARY page lists all the advanced conditions saved to the system. See "Working with Saved Advanced Conditions" for more information.Tip:
If the field values are modified after saving the advanced condition to the system, click Save to save the changed field values.
-
-
Click View SQL to view the underlying SQL query for the advanced condition.
Note that the creation of advanced conditions custom SQL on Argus Mart requires the use of CASE_MASTER table instead of V_RTP_CASE, and additional EFFECTIVE_START_DATE in the query.
-
Modify the SQL, if necessary.
-
Click Save SQL after editing the query.
Note:
When using the Save SQL functionality, the advanced condition can be executed only from the ADVANCED CONDITIONS LIBRARY page.Tip:
Revert to Original lets you to revert back to the original advanced condition. This button is enabled only when you edit the SQL. -
Click Close.
-
-
To assign group-level permissions on the saved advanced condition, click Permissions.
The Permissions dialog box appears with the names of all the groups (except the Administrator group) that the system administrator has created.
-
To assign permissions to the group members on the advanced condition you have created, use the drop-down list next to a group name. The available options are:
Permission Description R/W/D/P Group members will be able to view, modify, delete, and assign permission on the advanced condition. R/W/D Group members will be able to view, modify, and delete the advanced condition. R/W Group members will be able to view and modify the advanced condition. R Group members will be able to only view the advanced condition. No Access (Default) No group members will be able to access the advanced condition. Note:
The author of the advanced condition always has the highest level of permission (R/W/D/P) on it. For example, suppose you belong to the Data Entry group and you assign the No Access permission level to the Data Entry group on an advanced condition that you create. In this case, you will continue to have the highest level of permission on your advanced condition; other members in your group cannot access your advanced condition. -
Click OK to save the permission settings.
-
Click Execute to generate the case series.
-
The ACTIVE CASE SERIES page appears with the matching cases from the data mart.
-
If any runtime parameters are configured, the Parameters dialog box appears.
Specify the parameter values by using the options in the dialog box, and click Execute.
The ACTIVE CASE SERIES page appears with the matching cases from the data mart.
Note:
The case series generated using Argus Mart data source also displays EFFECTIVE_START_DATE/LOCKED_DATE in the Case Series Editor page.See Chapter 7, "Working with Case Series" for more information.
-
6.1.2 Returning to the Advanced Conditions Editor
Refer to Chapter 5 > "Returning to the Advanced Conditions Editor".
6.1.3 Assigning a Category to an Advanced Condition
Similar to assigning categories to Insight advanced conditions, you may assign categories to advanced conditions created on Argus Mart.
For more details, refer to Chapter 5 > "Assigning a Category to an Advanced Condition".
6.1.4 Using and Ordering Advanced Condition Operators
Each SQL generated on Argus Mart contains EFFECIVE_START_DATE for supporting point-in-time querying.
The following is the syntax of PL/SQL generated on Argus Mart:
SELECT
table1.common_column
FROM
Table1, table2, table3
WHERE
Table1.column2 = table2.column2
AND
Table2.column3 = table3.column3
INTERSECT
SELECT
Table4.common_column
FROM
Table4, table5, table6
WHERE
Table4.column2 = table5.column2
AND
Table5.column3 = table6.column3
For more details, refer to Chapter 5 > "Using and Ordering Advanced Condition Operators".
6.2 Working with the Last Modified or Saved Advanced Condition
The system assigns an active status to a advanced condition when you modify and save it or when you execute it. Unless you save the modifications to another advanced condition or execute another advanced condition, the last advanced condition you modified or executed remains active. This is helpful in situations when you want to access a frequently used advanced condition.
To work with last modified or saved advanced condition:
-
For Argus Insight database, select Active (Insight Mart)
-
For Argus Mart database, select Active (Argus Mart)
To view an active advanced condition:
-
Navigate to Queries > Advanced Condition > Active (Argus Mart).
The ACTIVE ADVANCED CONDITIONS EDITOR page appears with data source and the advanced condition you executed or modified last.
-
If the active advanced condition was saved to the system before executing, the name of the advanced condition appears next to the Active Query Name and in the Name field.
However, if the active advanced condition was not saved to the system before executing, the text
<Not Saved>is displayed next to the Active Query Name label.You can enter the name of the advanced condition in the Name field and click Save.
To rename an already saved advanced condition, in the Name field, enter the new name, and click Save.
From the ACTIVE ADVANCED CONDITION page, you can perform the following tasks:
Task Description Modify the attributes in the Advanced Conditions Editor If required, you can modify the attributes (fields and values) in the Advanced Conditions Editor. See "Creating a New Advanced Condition" for more information. Click Save to save the changed field values. This button is only available for a saved active advanced condition.
Save Active Advanced Condition with another name Click Save As to save the active advanced condition by a different name. The ADVANCED CONDITIONS LIBRARY page lists all the advanced conditions saved to the system. See "Working with Saved Advanced Conditions" for more information.
View the Advanced Condition in SQL Click View SQL to view the underlying SQL query for the advanced condition. Assign Permissions Click Permissions to set the group-level access permissions on the advanced condition. See "Creating a New Advanced Condition" for more information. The Permissions button is only available for saved active advanced conditions.
Change the Description of the Active Advanced Condition You can change the description of the active advanced condition by modifying the text displayed in the Description field. Click Save to store the changed description.
Execute the Active Advanced Condition Click Execute to generate a case series by using the active advanced condition.
Note that modifying the field values in the Advanced Conditions Editor for an active advanced condition or saving the active advanced condition by a different name changes the active advanced condition to reflect the most recent changes. The active advanced condition also changes in case you modify the field values in the Advanced Conditions Editor and execute the advanced condition without saving the modifications.
6.3 Working with Saved Advanced Conditions
Refer to Chapter 5, "Working with Saved Advanced Conditions".
6.3.1 Searching Saved Advanced Conditions
Refer to Chapter 5 > "Searching Saved Advanced Conditions".
6.3.3 Modifying an Advanced Condition
-
Navigate to the ADVANCED CONDITIONS LIBRARY page.
-
Select the advanced condition you want to modify.
-
Click Modify.
-
Make your modifications to the advanced condition.
-
Click Save to save your changes.
Alternatively, click Save As to save the modified advanced condition by another name.
6.3.4 Modifying the SQL of an Advanced Condition
-
Navigate to the ADVANCED CONDITIONS LIBRARY page.
-
Select the advanced condition.
-
Click Modify.
The ACTIVE ADVANCED CONDITIONS EDITOR page appears.
-
Click View SQL.
The Advanced Conditions SQL dialog appears.
-
Modify the SQL.
-
Click Save SQL to save your changes.
-
Click Close to return to the ADVANCED CONDITIONS LIBRARY page.
-
Select the modified advanced condition.
-
From the Query Type drop-down list, select:
-
Current Data—Executes the custom SQL based on the current data and returns the latest revisions of the cases.
-
As of Date—Executes the modified SQL based on the historical date.
-
At Lock—Executes the modified SQL based on one or more user lock actions.
-
Last Locked Revision as of a Point-in-Time—Executes the modified SQL to display the most recent locked revisions that were committed to the database on or before As of Date.
-
Last Locked Revision for a Version in a Period—Executes the modified SQL to display the most recent locked revision for case versions in a time period based on Case Receipt Date, Case Lock Date, or Case Creation Date.
-
Aggregate Queries—Executes the most recent locked revision for case versions for a specific time period.
You cannot edit the date for an Advanced Condition with Custom SQL from the library.
Once executed the query criteria displays the custom SQL as-is, and does not mentions the Query Type.
Note:
The custom SQL should begin with:SELECT DISTINCT CASE_MASTER.CASE_ID,CASE_MASTER.EFFECTIVE_START_DATE FROM CASE_MASTER
-
-
Click Execute.
The search results appear based on your modified SQL.
Note:
You cannot modify an advanced condition once you have added user defined SQL in that, you can modify SQL but cannot add new items in advanced condition.If you want to add new items, you have to revert the SQL to original by clicking Revert to Original.
6.3.7 Executing a Saved Advanced Condition on the Active Case Series
Just as the system assigns the active status to an advanced condition when you save modifications to it or execute it, the last saved or generated case series becomes the active case series.
You may want to run an advanced condition on an active case series.
To narrow down the list of cases in the active case series:
-
Generate the case series to run another Value Set:
-
You may generate the case series by either using QBE, filters, or advanced conditions. This case series becomes the active case series and remains so until you execute another query to generate a different case series.
-
Alternatively, if the case series on which you want to run another Value Set is already saved in the system, navigate to Case Series > Open Case Series > Library.
The CASE SERIES LIBRARY page appears.
Select the case series, and click Make Active.
-
-
Navigate to Queries > Advanced Conditions > Library.
The ADVANCED CONDITIONS LIBRARY page appears.
-
Select the advanced condition to run on the active case series you generated in Step 1.
-
Select the Limit Query to Active Case Series check box.
Note:
The Limit Query to Active Case Series check box is enabled:-
When the selected active case series and advance condition are of same type (Insight Mart/Argus Mart).
-
When Argus Aggregate case series is active.
-
-
Click Execute.
The ACTIVE CASE SERIES page appears with the execution results of the selected advanced condition on the active case series.
Note that the case series you just generated becomes the active case series.