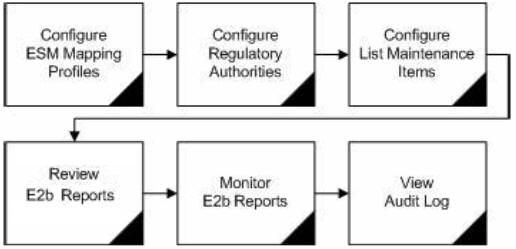
2 Configure Argus Interchange
This section is intended for Argus Interchange Administrators. The flowchart shows the steps to follow when configuring, reviewing, and administering Argus Interchange.
2.1 ESM Mapping Utility
Argus Interchange mapping utility helps to configure the Argus Interchange Service.
2.1.1 Configure Argus Interchange Service
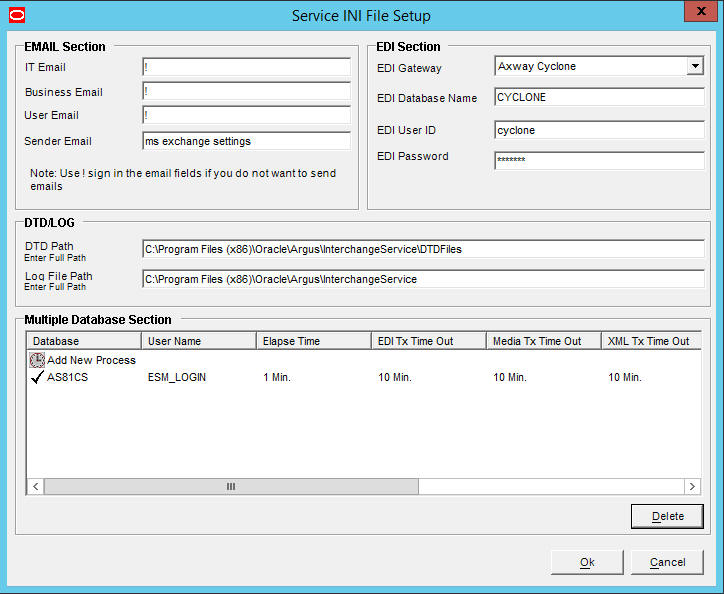
You can configure the Argus Interchange Service by updating the initialization (INI) file from the Argus Interchange Mapping interface.
-
In the Windows 2012R2 server, navigate to Apps and click ESM Mapping tool. This opens the Service INI set up Dialog box.
-
Use the items in the Service INI File Setup Dialog to configure the Argus Interchange Service INI file.
-
Enter the data for each field as required.
2.1.1.1 Service INI File Setup Dialog Box
The following tables lists and describes the fields in the Service INI File Setup Dialog box.
| Item | Description |
|---|---|
| IT E-mail | Enter the e-mail address that Argus Interchange Service should use to send e-mails, if the transmit time out occurs for Physical Media or EDI Gateway. |
| Business E-mail | Enter the e-mail address that Argus Interchange Service should use to send e-mails, if the Receive ACK time-out value is reached. |
| User E-mail | Enter the e-mail address that Argus Interchange Service should use to send e-mails, when the user does not process the E2B Report within the time-out value. The Argus Interchange Service uses SMTP as its mail system. |
| Sender E-mail | Enter the e-mail address that Argus Interchange Service should display, as the 'From' address in the e-mails that it sends. |
| EDI Gateway | Select the name for the EDI Gateway - from either Axway Cyclone or Oracle B2B. |
| EDI Database Name | Enter the database name for the EDI software. |
| EDI User ID | Enter the user name for EDI database. |
| EDI Password | Enter the password for the user name associated with the EDI database. |
| DTD Path | Enter the path for the DTD file. |
| Log File Path | Enter the path where the Argus Interchange Service will write the log files. |
| Multiple Database Section | Displays all the configured databases for ESM Service. |
| Delete Button | Click Delete to remove the entire Database Configuration from ESM Service INI File. |
2.1.2 Add a Database for Argus Interchange Service
You can configure the Argus Interchange Service to support multiple database.
To configure a database:
-
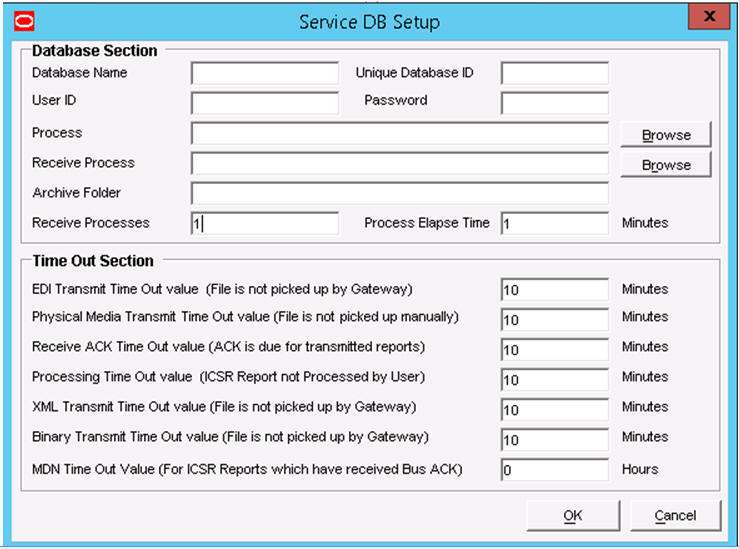
In the Setup INI File Dialog box, double click Add New Process to open the Service DB Setup Dialog.
-
Use the items in the Service DB Setup Dialog to configure the ESM Service INI file.
-
Enter the data in the fields as required.
Note:
ESM Service.ini can be configured for MAX_FILES_IMPORT_PER_RUN at database level under the Database section. This should be set to a number. This determines how many files are read from incoming folder so as to allocate to Receive Process(es). This includes both ICSR reports and Acknowledgments. If it is not defined, an internal limit of 1000 is assumed.
2.1.2.1 Service DB Setup Fields
The following table lists and describes the fields in the Service DB Setup Dialog box.
| Item | Description |
|---|---|
| Database Name | Enter the name of the Adverse Event database. |
| Unique Database ID | Identifies each database uniquely. In the case of multiple databases, the value of this field should be unique. |
| User ID | Enter the user name for the Service. |
| Password | Enter the password associated with the User Name entered in the USER ID field. |
| Process | Enter the full path of the ESMProc.exe file. The system uses this path to locate the ESMProc.exe file. |
| Receive Process | Enter the full path of the E2BReceive.exe file. The system uses this to locate the E2BReceive.exe file. |
| Archive Folder | Enter the full path where the system places the file processed by Argus Interchange. |
| Receive Processes Count | Enables you to specify multiple E2B receive processes
You can specify from 1 to 5 E2B receive processes The default is 1. |
| Process Elapse Time | Enter the time interval for the Argus Interchange Process to run. |
| Enter EDI Transmit Time out Value | The amount of time, in minutes, that must pass before the system sends an e-mail message when an E2B Report has not been transmitted within a specified time period.
Note: The minimum value for the time-out is 10 minutes. |
| Enter Physical Media Transmit Time out Value | Enter amount of time, in minutes, that must pass before the system can send an e-mail message when an E2B Report has not been sent manually by a specified person within a specified time period.
Note: The minimum value for the time-out is 10 minutes. |
| Enter Receive ACK Time Out Value | Enter the amount of time, in minutes, that must pass before the system can send an e-mail message when an ACK message has not been received within a specified time period.
Note: The minimum value for the time-out is 10 minutes. |
| Enter Processing Time Out Value | Enter the amount of time, in minutes, that must pass before the system can send an e-mail message when an Incoming Report has not been processed within a specified time period.
Note: The minimum value for the time-out is 10 minutes. |
| Enter XML Transmit Time Out Value | Enter the amount of time, in minutes, that must pass before the system can send an e-mail message when an XML file is not picked up by the Gateway.
Note: The minimum value for the time-out is 10 minutes. |
| Enter Binary Transmit Time Out Value | Enter the amount of time, in minutes, that must pass before the system can send an e-mail message when a binary file is not picked up by the Gateway.
Note: The minimum value for the time-out is 10 minutes. |
| Enter MDN Time Out Value | Enter the amount of time, in hours, that must pass before the system stops polling the MDN information from the EDI server after receiving the Business ACK for a transmitted report. |
2.2 Argus Console
The Argus Console enables you to configure the Regulatory Authorities to which E2B Reports need to be submitted. In accordance with ICH Guidelines, you can configure additional Code List items with new E2B codes.
This section includes discussions of the following:
-
Configuring Regulatory Authorities
-
Configuring SMTP
-
Configuring Code List Items
2.2.1 Configure Regulatory Authorities
Transmitting E2B reports to an Agency/Trading Partner, requires you to create a regulatory authority entry in the Code List. After creating the regulatory authority, you can transmit regulatory reports to it.
To configure a regulatory authority:
-
On the Argus Console, Click Code Lists -> Argus.
-
When the system opens the Code List Maintenance screen, select Reporting Destination from the list.

Note:
If a report is already scheduled for a Reporting Destination, then clicking on the Delete button displays an error message that this item is already being used, and hence, cannot be deleted.Refer to the Argus Safety Administrator's Guide, Configuring Reporting Destination section for information on using Reporting Destination.