5 Transmit and Monitor Reports
Argus Safety provides utilities that enable you to schedule and transmit E2B reports. Using these utilities, you can also track the status of the transmitted E2B reports.
5.1 Schedule Reports
Argus Safety enables you to schedule your E2B, eMDR and eVAERS reports. In addition, it allows you to generate these reports that comply with the adverse event reporting requirements of different regulatory agencies.
Note:
When you generate an E2B report, some characters entered by the user in the case form may not be display in the same way in the E2B report. Some characters are represented differently in the E2B report such as & for (&), < for (<), > for (>), ' for (') and " for (") as per XML specifications.To schedule an E2B report:
-
Open a case in Argus Safety and click the Regulatory Reports tab.
-
When the system opens the Regulatory Reports tab, click Schedule New Report from the bottom of the screen.
-
When the system opens the New Expedited Report Dialog box, enter the relevant information and click OK.
5.1.1 New Expedited Report Dialog Fields
The Schedule New Expedited Report window has a Report Information drop-down list on the top section.
The following table lists and describes the fields in the New Expedited Report Dialog box.
| Item | Function |
|---|---|
| Product | Select the Company Suspect Product from this drop-down list. |
| License Number | Select the particular license for which the report is to be scheduled. |
| Destination | Select the Regulatory Agency to which the report is to be sent. |
| Report Form | Select the Report Form from this drop down list. |
| Message Type | Select the message type from the drop-down list.
Note: This field is displayed when an E2B or eVAERS report is selected as the Report Form. If the Report Form is selected as eVAERS then the Message type is set to ichicsr and is disabled. |
| Aware Date | Select the Aware date for which the report is required to be scheduled.
Amendment reports can be scheduled by selecting the Aware date which is appended with text (A). |
| Group | If you want to assign the report to a specific group, the group can be selected from this drop down list. |
| Notes | This field is directly mapped to the License but you can modify this field to put in extra notes, as desired. |
| Protect confidentiality of Reporter and Patient | Select this checkbox if you do not wish to disclose the identity of the reporter and the patient in the report. |
| Due Date | You can decide to schedule a report to be due in either 5, 15, or 30 days or any number of days or even on any specific date. |
Note:
Product, License Number, Destination, Report Form (E2B), and Due Date must be entered in the New Expedited Report Dialog to schedule an E2B report.5.1.2 Nullification Reports
The system can automatically schedule, generate, and transmit a Nullification Report under the following circumstances:
-
When a case is deleted and an E2B Report is submitted to a reporting destination based on the Profile switch for sending E2B nullifications.
-
When an E2B report is submitted and marked as unsubmitted from Reports | Compliance | Submitted Reports:
-
The Reason for Unsubmitting the report is sent as the nullification reason for the report.
-
If the user selects the Send Nullification on Unsubmission of E2B Reports check box, the system also sends a nullification to the reporting destination where the E2B Report was previously submitted.
-
If the user does not select the Send Nullification on Unsubmission of E2B Reports check box, the system does not send a nullification to the reporting destination where the E2B Report was previously submitted unless the user deletes the case.
-
If a previous nullification for the E2B Report or an unsubmitted report is sent for a case and the case is deleted at a later date, the system does not send a duplicate nullification for the previous report.
-
When the system generates the Nullification report, the system updates the following E2B items with updated values from the previous report.
Updated E2B Items Update Content M.1.4/ N.1.2 System uses a different unique number from that used in the last report. M.1.7a System enters the message date format. M.1.7b / N.1.5 System enters the message date. M.2 System increments this value every time it transmits the report. A.1.3a System enters the message date format. A.1.3b/C.1.2 System enters the message date. A.1.13/C.1.11.1 System enters 1=Yes on the Nullification report. A.1.13.1/C.1.11.2 System enters the reason for the Nullification report. J.2 System increments this value every time it transmits the report. J.4b System enters the PMDA Acknowledgement Number. J.5 System increments this value every time it submits the report. J.6 System will enter 1. 1 means that it is a completion report. J.7 System will remove the value of this tag, if it was present in the previous report. -
-
When you accept a Nullification report, the system creates an Action Item in the case. The action item tells you that the system will delete the case if you click OK on the acceptance Dialog for all unarchived cases.
-
Action Item is a type-ahead field and its default is blank.
-
The field is populated with values from the action item configured in the code List.
-
You can assign the number of days until the action item is due in the Due In field. The system enables this field after you select an Action Item type.
-
The system calculates the due date as follows: System Date (local client date) + Due In number of days.
-
The system puts the System Date (local client date) in the Date field.
-
-
When creating the action item, you can select a value from the Code List and the Action Item Description. The system uses the following format: Nullification: xxx
where:
xxx is the value entered in the Notes field.
-
By default, the system assigns the action item to the user group in the User Group field.
-
There can be a maximum of 25 user groups in the drop-down list.
-
The system performs a like search when you select a value in the User Group field.
-
If the User Group field is blank, the system does not assign the action item.
-
This is enabled after you select an action item.
-
-
If you do not select an action item, the system does not create an action item for the case.
-
If you accept multiple cases, the system creates action items for all accepted cases.
-
The system skips open, locked, or archived cases or cases you don't have permission to access.
-
If the system archives a case while you are accepting the nullification report, the system displays the Archived Case Dialog to enable you to open the archived case.
-
After you reopen the case, the system displays the Accept Nullification E2B Dialog.
-
If you do not have permission to reopen an archived case, the system displays the following message:
You do not have permission to Re-Open an archived/closed case.
-
Nullification reports are not scheduled for eMDR.
5.1.3 Follow-Up eMDR Reports
If an eMDR report is manually scheduled or automatically scheduled for the same reporting Destination, system either schedules Initial or Follow-up report based on the same logic (product license ID and status of previously scheduled report) that is currently existing for Device reports.
If the case was previously submitted to a Reporting Destination as MedWatch Device report and if the same reporting destination is configured for sending eMDR report:
-
System schedules the next eMDR as a follow-up report and displays the follow-up numbering in the Case Form ' Regulatory Reports ' Seq field by considering the previously reported MedWatch device report.
-
System uses the same report number (F.2 or G.9) that was used in MedWatch Device report in eMDR for the data element ufimporterrepnumber(F2) or mfrreportnumber (G9).
-
Follow-up number that is populated in (F7 uffollowupnumber or G7 gfollowupnumber) shall be incremented from (F7 or G7) of the previously submitted MedWatch Device report by considering the internal common profile switch Allow generation of Report.
Example : If F/p 1 report was submitted as 0000555-2014-00011 to CDRH in MedWatch format and the next follow-up report in eMDR format, then Mfr Report # shall be populated as 0000555-2014-00011 and F/p number as 2.
If the previous report was sent by eMDR and the subsequent report is being sent as MedWatch Device to the same destination, the system shall maintain the report numbering (F2 or G9) same as of previously submitted eMDR.
-
System schedules a follow-up report by populating Follow-up' in the Case Form Regulatory Reports' Seq column.
-
System uses the same report number (F2 or G9) from the previously submitted eMDR report in the F2 or G9 of MedWatch Device report.
-
Follow-up number that is populated in (F7 or G7) is incremented from (F7 uffollowupnumber or G7 gfollowupnumber) of the previously submitted eMDR report by considering the internal common profile switch Allow generation of Report.
-
The MedWatch Device scheduled after the eMDR report does not respect the Common Profile Switch "Data to print on follow up MedWatch Device form "and system displays a warning message during manual scheduling of report as Delta data will not be printed MedWatch Device form for this Device license as it was previously submitted as an eMDR. In case automatic scheduling, this warning message is logged against the report without impacting report scheduling or generation.
Example : If F/p 1 report was submitted as 0000555-2014-00011 to CDRH in eMDR format and the next follow-up report in eMDR report fails due to some reason and company decides to send them in MedWatch device format, then MedWatch report shall print Mfr Report # as 0000555-2014-00011 and F/p number as 2
System includes complete data in follow-up eMDR as the other E2B (R3) reports.
Note:
Common Profile Switch Data to print on follow up MedWatch Device form does not have any impact on eMDR follow-ups.Downgrade report is scheduled automatically if the F/UP version does not satisfy the Regulatory Reporting Rules defined for eMDR for a case that was previously submitted in eMDR.
Follow-up eMDR is scheduled automatically if the Significant F/UP version is marked as Amendment for a case that was previously submitted in eMDR (existing functionality for non E2B (R3) reports).
Nullification reports are not scheduled for eMDR.
5.1.4 Follow-up eVAERS Reports
If an eVAERS report is manually scheduled or automatically scheduled for the same reporting Destination, system either schedules Initial or Follow-up report based on the same logic (product license type and status of previously scheduled report) that is currently existing for E2B reports.
If the case was previously submitted to a Reporting Destination in VAERS PDF format and if the same reporting destination is configured for sending eVAERS report:
-
System schedules the next eVAERS as a follow-up report and displays the follow-up numbering in the Case Form ' Regulatory Reports ' Seq field by considering the previously reported VAERS.
-
If any Follow-up reports are scheduled to the same destination at a later point of time, system schedules a follow-up report by populating'Follow-up<##> in Case Form Regulatory Reports Seq column.
-
System uses Case Number (as printed in the Manufacturer Control Number (that is listed in Box 24) of the previously submitted VAERS report) in data elements C.1.1. and C.1.8.1.
If a reporting destination is configured for eVAERS and VAERS reports and if the previous report was sent in eVAERS format and if the subsequent report is scheduled in VAERS PDF format to the same destination:
-
System schedules an initial report by populating Initial' in the Case Form Regulatory Reports Seq column.
-
If any Follow-up reports are scheduled to the same destination at a later point of time, system schedules a follow-up report by populating Follow-up<##> in Case Form Regulatory Reports Seq column.
-
System does not use (C.1.1) from the previously submitted eVAERS report as the Manufacturer Control Number of VAERS report.
Note:
If user tries to generate eVAERS and VAERS in parallel for a Case, then system has different MCN for eVAERS and VAERS reports for the same case.Downgrade report is scheduled automatically if the Significant F/UP version does not satisfy the Regulatory Reporting Rules defined for eVAERS for a case was submitted in eVAERS.
System auto-schedules Amendment report instead of a follow-up report for a Reporting Destination configured with eVAERS profile, when:
a. eVAERS report was previously submitted to the same Reporting Destination for the same license type
b. if the latest record in the 'Amendment / Follow-up section' of Case Form ' General is an Amendment and the Amendment record was created for previously submitted eVAERS report
System auto-schedules a Nullification report instead of follow-up report for a Reporting Destination configured with eVAERS, under the same conditions ( Case deletion and manually scheduling Nullification from Reports Compliance Submitted Reports Schedule Nullification) as per current functionality on Nullification reports for E2B profiles.
When Nullification report is generated, following data element items have updated values from the previous report.
-
N.1.2 batchmessagenumb
-
N.1.5 batchmessagedate
-
N.2.r.4 messagecreationdate
-
C.1.2 transmissiondater3
-
C.1.11.1 casenullification
-
C.1.11.2 nullificationreason
5.2 Generate Reports
Use the following procedure to generate a scheduled report.
-
E2B, eMDR and eVAERS report scan be manually generated by clicking the draft/final links in the row that corresponds to the scheduled E2B Report in In the Regulatory Reports tab. The report is generated and can be viewed in the ICSR Viewer. If a validation error occurs during E2B report generation, the validation details are stored in the Report Details Dialog.
-
E2B, eMDR and eVAERS reports are generated by AG Services for a locked case which has scheduled E2B report.
Note:
The system allows you to generate E2B reports through AG Service irrespective of the your access rights for blinded information. However, the Blind protected users are not allowed to view E2B reports despite having an Argus Interchange license. If such a user tries to view the E2B report, the system generates the message: Report is generated but system is unable to show the report as user is protected from study information.5.3 Attachments in Reports
Case Form Attachments are sent to Reporting Destination with the E2B (R2) report as described below:
-
If attachment classification in the case is specified in the Reporting Destination, system reads such Attachments and converts .XLS, .TXT, .TIF, .DOC, .RTF, .PNG, .JPG or .BMP them into PDF and combine with the PDF attachments if any in the case.
-
The single merged PDF has each attachment which is merged available as a link (bookmark) by the classification name provided for the attached file.
-
Attachments are sent only if there is a E2B report sent out for that Agency. Attachments are not sent for nullification reports.
Note:
While transmitting attachments using the FDA profile in the E2B (R2) format, the system places the attachment file (PDF file created by merging all relevant attachments) in the configured Attachment folder (Reporting Destination > EDI tab > ICSR Attachment Outgoing folder) only after receiving a positive ACK for the ICSR submitted in the E2B (R2) format as an Initial or Follow-up report.The placement of Attachment files in configured folder after receipt of Positive Ack is done only for E2B (R2) generated using FDA E2B (R2) profile (CFG_PROFILE.AUTHORITY_ID=2.
The system retains the ICSR Attachment in the Outgoing folder if a negative acknowledge is received for an ICSR.
Case Form Attachments are sent to the Reporting Destination with E2B (R3) report as described below:
-
Case Form Attachments are embedded within the ICSR sent in report formats such as E2B (R3), eVAERS and eMDR.
-
Attachments are encoded in the B64 format and sent in the report. The selection of attachments is based on Reporting Destination configuration.
-
Attachments for E2B(R3) are compressed using the compression algorithm configured before embedding them to ICSR. The default algorithm used is DF (Deflate). Attachments are not compressed in eVAERS and eMDR reports.
-
Attachments that were sent out in previous submissions are not sent in Follow-up submission of E2B (R3), eVAERS and eMDR reports (only new and updated attachments are sent in Follow-up reports).
5.4 Transmit Reports
5.4.1 Transmit ICSR Reports
Argus Safety enables you to simultaneously submit multiple adverse event reports to ease the submission process.
After submission of ICSR, the Reporting Destination which receives the ICSR sends MDN and Business Acknowledgment to indicate the status of report acceptance.
The section below describes use of the Bulk Reporting screen to transmit E2B reports and ICSR Transmit Status, ICSR Receive Status and Bulk ICSR transmit screen to track the report submissions and acknowledgement.
5.4.2 Transmit Bulk Reports by Form
Use the following procedure to transmit Bulk Reports by Form:
-
Click Reports ->Bulk Reporting.
-
When the system opens the Bulk Reporting Dialog box, enter the appropriate data in the fields.
-
In the Report Form list, select E2B, eMDR or eVAERS.
-
Under Printing Options, select Transmit.
-
Select the Mark as Submitted check box if it is required to mark the report as submitted after the transmission is successful.
-
When Expedited reports are selected, the Transmission Comment dialog box is displayed.
-
Click OK to transmit the report(s).
or
Click Cancel to close the Dialog box without transmitting the report.
-
If the Marked as Submitted check box was selected in step 5, the system opens the Report Submission Information Dialog box.
Enter the submission notes in the Notes field and click OK.Transmitting Bulk Reports by Form.
Note:
If the Marked as Submitted check box was not selected, the Report Submission Information Dialog does not appear automatically. In this case, once the report has been successfully transmitted, it can be marked as ”submitted” from the Worklist as follows:Go to Worklist ->Bulk ICSR Transmit and verify that the View All radio button is selected.
Scroll in the list to locate the required report. If the report status is Success, click the report icon and select Mark Report as Submitted.
In the Report Submission Information Dialog box, enter the submission notes and click OK.
5.4.3 Monitor ICSR Transmit Status
Use the following procedure to monitor ICSR Transmit Status:
-
Click Utilities -> ICSR -> ICSR Transmit Status
-
When the system opens the ICSR Transmit Status Dialog, enter the appropriate data.
5.4.3.1 ICSR Transmit Status Fields
The following table lists and describes the fields in the ICSR Transmit Status Dialog box.
| Item | Description |
|---|---|
| Column Headers | Clicking the column header sort the data by that column alternately in a ascending and descending order. |
| Agency / Trading Partner | Enables you to filter data by selecting the Agency / Trading Partner from the list. |
| Transmit Date Range From | The search start date. |
| Transmit Date Range To | The search end date |
| Range | A pre-defined date that you select from the list. |
| Message # Range From | The beginning message number for the search. |
| Message # Range To | The ending message number for the search. |
| Type | Enables you to filter data by selecting the pre-defined Type of Message (MSG, ACK) from the list. |
| Enables you to print the current view. | |
| Search | Enables you to perform the search. |
Note:
The EDI Header control number is shown only for EDI files.-
Select the appropriate agency or trading partner from the Agency/Trading Partner list.
-
Select the appropriate option, Transmit Date or Message # to search by transmit date or by message number.
-
Enter the appropriate search criteria beside the selected option and click Search.
-
In the search results, click the appropriate report.
-
The Message Acknowledgement Status Dialog appears.
-
This Dialog provides detailed information about the transmission status of the report. Enter the data for each field as required.
5.4.3.2 Message Acknowledgement Status Dialog Fields
The following table lists and describes the fields in the Message Acknowledgement Status Dialog box.
| Item | Description |
|---|---|
| ICSR Message Number | This is the sender's transmission message number. |
| Acknowledgement Message # | This is the receiver's acknowledgement message number. |
| ICSR Message Sender ID | This is the sender name or identifier. |
| ICSR Message Date | This is the date and time the sender transmitted the message. |
| ICSR Message Receiver ID | This is the receiver name or identification. |
| Acknowledgement Message Date | This is the date and time the message was received. |
| Transmission Acknowledgement Code | This indicates whether the receiver loaded all transmitted reports or part of the transmitted reports into the database. |
| Report Number | This is the report number for adverse event. |
| Authority /Company Number | If the ICSR report originates from a regulatory authority/company, this is regulatory authority's/company's report identification number. |
| Other Number | The system uses this number if the report originates from an entity other than a trading partner or a regulatory authority. |
| Report Status | Report status can be either "Report Loaded" or "Report not loaded." |
| Report Type | This is the report type. It can be one of the following
Initial Follow up Nullification Duplicate |
| Error Message/Comments | This indicates whether an error message or comments are associated with the transmission or receipt of the report. |
5.4.4 Monitor ICSR Receive Status
Use the following procedure to monitor ICSR Receive Status:
-
Select Utilities -> ICSR -> ICSR Receive Status.
-
When the system opens the ICSR Receive Status Dialog box, enter the appropriate data in each field.
5.4.4.1 ICSR Receive Status Dialog Fields
The following table lists and describes the fields in the ICSR Receive Status Dialog box.
| Item | Description |
|---|---|
| Agency / Trading Partner | Enables you to filter data by selecting the Agency / Trading Partner from the list. |
| Receive Date Range From | The search start date. |
| Receive Date Range To | The search end date. |
| Range | Enables you to select a pre-defined date range |
| Message # Range From | The beginning message number for the search. |
| Message # Range To | The ending message number for the search. |
| Type | Enables you to filter data by selecting the pre-defined Type of Message (MSG, ACK) from the list. |
| Control # | The control number. |
| Local Msg # | The local message number. |
| Remote Msg # | The remote message number. |
| Total Reports | The total number of reports. |
| Rejected Reports | The number of rejected reports. |
| File Name | The name of the received file. |
| Received from EDI | The date and time the file was received. |
| Transmission Status | The transmission status for the file. |
| Enables you to print the current view. | |
| Search | Enables you to initiate the search. |
Note:
The EDI Header control number is shown only for EDI files.-
Select the appropriate agency or trading partner from the Agency/Trading Partner list
-
You can search for the receive status by either receive date or message number. Select the appropriate option among Transmit Date and Message #.
-
Enter the appropriate search criteria beside the selected option and click Search.
-
In the search results, double-click the appropriate report.
-
When the system opens the Message Acknowledgement Status Dialog, enter the appropriate data in each field.
5.4.4.2 Message Acknowledgement Status Dialog Fields
The following table lists and describes the fields in the Message Acknowledgement Status Dialog box.
| Item | Description |
|---|---|
| ICSR Message Number | This is the sender's transmission message number. |
| Acknowledgement Message # | This is the receiver's acknowledgement message number. |
| ICSR Message Sender ID | This is the sender name or identifier. |
| ICSR Message Date | This is the date and time the sender transmitted the message. |
| ICSR Message Receiver ID | This is the receiver name or identification. |
| Acknowledgement Message Date | This is the date and time the message was received. |
| Transmission Acknowledgement Code | This indicates whether the receiver loaded all transmitted reports or part of the transmitted reports into the database. |
| Report Number | This is the report number for adverse event. |
| Authority /Company Number | If the ICSR report originates from a regulatory authority/company, this is regulatory authority's/company's report identification number. |
| Other Number | The system uses this number if the report originates from an entity other than a trading partner or a regulatory authority. |
| Report Status | Report status can be either "Report Loaded" or "Report not loaded." |
| Report Type | This is the report type. It can be one of the following
Initial Follow up Nullification Duplicate |
| Error Message/Comments | This indicates whether an error message or comments are associated with the transmission or receipt of the report. |
5.4.4.3 Validation Check of Incoming Message
Prior to updating the transmission status of the reports, the application identifies the type of incoming message and validates the incoming message. The ICSR service processes all the incoming messages located in a folder either in incoming EDI directory or physical media directory. Incoming ICSR Messages are retrieved as SGML from a shared directory. The incoming folder is configurable in Argus Interchange Mapping Utility. ICSR message is parsed to check the validity of the SGML file using the correct version of DTD. The incoming message is saved after checking that message is in compliance with DTD.
The recipient of the ICSR message acknowledges receipt of message and notifies the sender about the validity and usability of the data in the reports. The acknowledgment message is called as ICSR Acknowledgment Message. When a message is acknowledged, workflow status of the ICSR report is updated with one of the following three status:
-
All reports loaded into recipient database
-
ICSR Error, not all reports loaded into database
-
SGML parsing error no data extracted
The acknowledgement contains two sections, one concerning the validity of the message as a whole and the second containing comments on the validity of the individual reports within the message. Create a folder and configure it through the Argus Interchange Mapping Utility, where all the incoming messages can be stored. The Interchange service processes the received message and moves it in the Archive folder.
The message is validated based on the ICH ICSR acknowledgement specifications and the format of the message identified by DTD version. Correctness of receiver and sender identifier present in the message header is also validated to verify that the message is not sent to the wrong recipient.
The content of the message is validated based on the following:
-
Required Data
-
Data Type
-
Data Length
-
Field Value
The system identifies message type (acknowledgement) and the DTD version of the message. If the application is unable to identify the message type or DTD version, then the error is logged in the log table and further processing is stopped. The application sends an email to configured email address indicating the failure to read the message.
Application checks for the presence of the duplicate in the system based on the ’Sender identifier' and ’Acknowledgement Message Tracking #'. Processing of the acknowledgement is stopped, if duplicate message is found in the database and an error is logged into the log table.
The following table describes the error messages and reasons for the occurrence of corresponding errors.
| Process | Error message | Possible Reason of error |
|---|---|---|
| Read the Incoming message from the folder | XML File not in path. | File is removed. |
| Identification of the incoming message type | <<File Name>> not a valid XML File | File format is not as per ICH guidelines. |
| Identification of the incoming message type | Not valid ICH ICSR message Tag ’<ichicsrmessageheader>' not found | File does not contain the valid ICH Message Header. |
| Identification of the incoming message type | Failure to identify the type of incoming message. Either Tag <messagetype> is missing/misspelled or tag does not contain valid value. The valid values are ICHICSR, ICHICSRACK | The incoming file is identified as a message or acknowledgment. The identification value is wrong. |
| Identification of the incoming message type | Record not found in CFG_PROFILE table for DTD version '2.0', DTD release '1.0', Active profile = 'Y' and profile type starts 'ACK%' | Profile does not exist in cfg_profile table. |
| Validation of the incoming message type | M2 Validation failed for incoming message. The following are the elements and values:<<Element, value>> | M2 validation failed on the message header. |
| Identification of the incoming acknowledgement type | Invalid ICH ICSR message Tag ’<messageacknowledgment>' not found. | File does not contain the valid ICH Acknowledgment Header. |
| Processing acknowledgment | Record not found in MESSAGES table for the ICSRMESSAGE number <<MessageNum>> ICSRMESSAGE receiver identifier <<receiver info>> for the received acknowledgment | Record is deleted from the database. |
| Processing acknowledgment | Duplicate acknowledgment received for ICSRMESSAGE number <<message number>> and ICSRMESSAGE RECEIVER IDENTIFIER <<receiver info>> | Acknowledgment already exists for this message number. |
| Processing acknowledgment | <reportacknowledgment> section is missing from the received acknowledgment, MESSAGE number <<message number>> | Acknowledgment does not contain the report acknowledgment body. |
| Processing acknowledgment | Record not found in SAFETYREPORT table for company number <<Company Number>> and msg_id <<message id>> | Record is deleted from SAFETYREPORT table from database. |
Refer to the sample email messages that are sent to the configured email address in case of message validation failure:
-
In case of invalid XML format:
From: ICSR service user
Subject: <<file name>> not valid XML formats file
Content: This mail has been sent by the system to notify that the system has failed to identify the file <<file name>> as a valid XML file.
Error has occurred on Line: <<line no>>, Source Text <<Error Text>>, Error Code <<Parsing Error Code>>, Error Reason <<Error Reason>>
Thanks,
<< ICSR service user >>
-
In case the application fails to identify the incoming message:
From: ICSR service user
Subject: Failure to Identify the Type of Incoming Message.
Content: This mail has been sent by the system to notify that the system has failed to identify the type of the incoming message (Acknowledgement or a Message) present in the file <<Incoming Message File Name>>.
Thanks,
<< ICSR service user >>
-
In case of validation failure of the incoming acknowledgement:
From: ICSR service user
Subject: Validation Failure of the Incoming Acknowledgement.
Content: This mail has been sent by the system to notify that the system has failed to further process the incoming acknowledgement present in the file <<Incoming Message File Name>>.
The following are the reasons for this failure:
#<n>. <<Insert the corresponding relevant error message.>>
Thanks,
<< ICSR service user >>
You can view the acknowledgement information of a report such as acknowledgement message tracking #, acknowledgement report tracking #, date acknowledge initiated, company ICSR message, and error reported by receiver, in the Report Details Dialog.
The status of the each ICSR report is updated based on the information extracted from the ICSR acknowledgment, irrespective of the transmission status (Success or Failure). Refer to the section, Viewing Acknowledgement Information, for viewing the acknowledgement information.
5.4.5 View Status
Argus Safety provides the feature to monitor the transmission status of E2B, eMDR and eVAERS reports.
Use the following procedure to check the status of transmitted E2B, eMDR and eVAERS reports.
-
Select Worklist -> Bulk ICSR Transmit.
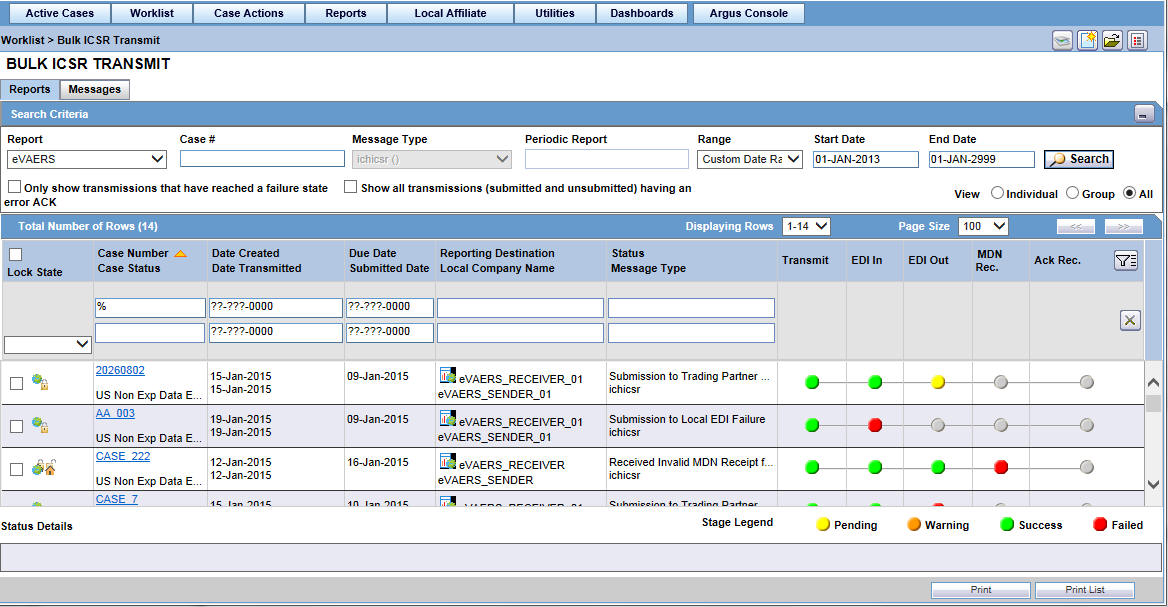
-
Select E2B, eMDR or eVAERS report from the Report drop-down list.
-
Click the Reports tab to view the transmission status of E2B reports.
-
Click the Message tab to view the transmission status of individual E2B messages.
5.4.6 View Acknowledgement Information
In Argus Safety, you can view detailed acknowledgement information for a report sent to a trading partner or a regulatory authority. Use the following procedure to view acknowledgement information.
The status of each report is updated, based on the information extracted from the ICSR acknowledgment, irrespective of the transmission status (Success or Failure).
The acknowledgement information such as acknowledgement message tracking #, acknowledgement report tracking #, date acknowledge initiated, company ICSR message and error reported by receiver is displayed in the Report Details Dialog.
-
On the Regulatory Reports tab of the Case Form, click the E2B, eMDR, or eVAERS report and select View Report Details.
-
When the system opens the Report Details Dialog, click View ACK Information to view the acknowledgement details for that report. If the report is rejected, an error message or a comment appears in the Notes area of the Dialog
When the Acknowledgement Information Dialog opens:
Click Print to print the acknowledgement details
OR
Click OK to close the Dialog box.