6 Reports: Compliance and Aggregate Reports
6.1 Reports
6.1.1 Compliance Reports
Hover over the Compliance option in the Reports tab to go to any of the Compliance Reports.
6.1.1.1 About Expedited Reports
Expedited Reports provide access to the list of previously scheduled or generated but not submitted expedited reports.
Depending on the regulations set forth by the Regulatory Authorities, Expedited reports may need to be submitted for the adverse events pertaining to your company's products.
-
The following expedited report forms do not print a Follow-up number when the user selects DRAFT on the Regulatory Reports tab or when he/she selects the Quick Launch Draft option:
-
US FDA MedWatch Drug/Device
-
US FDA VAERS
-
CIOMS I/CIOMS I (Local)
-
French CERFA
-
Spanish Spontaneous/Clinical
-
-
You can print draft expedited reports from the Batch Print or Create Reports without printing DRAFT on the reports from the Case Open or the Reports | Compliance | Expedited Reports dialog box.
-
You can enter a maximum of 10 characters in the text field.
6.1.1.1.1 Storing Expedited Reports in Documentum
Argus Safety lets you store your Expedited Reports in Documentum.
-
Mark an Expedited Report as submitted from within Argus to insert the report into the Documentum system as a PDF.
-
If the report is to be transmitted via fax or email, Argus Safety Service marks the report as a successful submission in Documentum only after the fax or email transmission has succeeded.
6.1.1.1.2 Understanding Follow-up Reports
Follow-up reports are created when significant follow-up information is entered for the case. This is indicated by entering follow-up information in the General Information section of the General tab and when one of the following happens:
-
Data for a case changes
-
Update information for a case has been entered
-
Depending on the configuration set up by the Administrator, the system analyzes the scheduled reports prior to the data changes to see if they are still required.
-
If the system determines that they are not required, the report status is marked as Downgrade. New reports are automatically scheduled, if required.
-
If the system determines the report is still needed and needs to be updated, one of two functions can take place depending on the configuration done by the Administrator:
-
The system overwrites the report
-
The system schedules a new report in addition to the old report
-
-
If the system has been configured to overwrite the existing report, the report status becomes New Data Available.
-
In the Worklist, the status for this report shows New Data Available for this report. When you re-generate the report, you can select whether or not you would like to re-generate the report with the new data.
-
If the system is configured to create a Follow-up report, the previous report remains in its current state and a new report is scheduled with the status of Scheduled.
-
If a report has been previously submitted, this report is never deleted under any configuration.
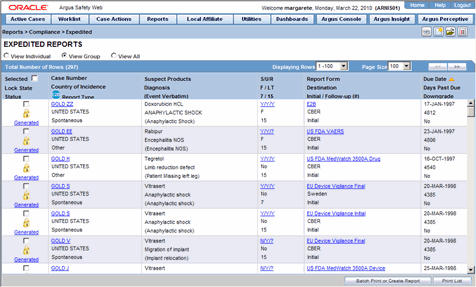
6.1.1.1.3 Viewing a Summary of Expedited Regulatory Reports
| To.. | Do.. |
|---|---|
| View the regulatory reports for a particular case (scheduled, generated and submitted) | Open the Regulatory Reports tab of the Case Form. |
| View all scheduled, generated, and approved reports, as well as other outstanding action items | Select Reports from the Worklist menu. |
| View a list of all scheduled, generated, and approved reports | Select Compliance | Expedited from the Reports menu. |
| View all the submitted reports in the system | Select Compliance |Submitted from the Reports menu. |
6.1.1.1.4 User Options
Several common features are available in the Expedited Reports section.
Click the Lock State header row to sort on the following category of cases. A pop-up window appears, with the following sorting options:
-
Lock State
-
SUSAR
-
Exp/Per
Click the required option to sort cases based on the selected case categorization.
Note:
The icon displayed in the lock state column in the Reports-> Compliance - Expedited and Submitted screens denotes a SUSAR (Suspected Unexpected Serious Adverse Reaction) case.| Icon... | Identifies... |
|---|---|
| A case marked for a Periodic ICSR submission. | |
| A locked case. | |
| An unlocked case | |
| A SUSAR (Suspected Unexpected Serious Adverse Reaction) case. |
Lock Icon Options—Field Descriptions
| Field | Description |
|---|---|
| Report Details | Displays specific information about the report as entered in the Regulatory Reports section.
The information displayed in the fields of the Report Details dialog box is fetched from the data entered in the Regulatory Reports section of Case Form. |
6.1.1.1.5 Scheduling Reports
-
Open the case for which the report has to be scheduled.
-
When the system displays the Case Form for the selected case, select Regulatory Reports -> Schedule New Reports.
-
When the system opens the Schedule New Expedited Report dialog box, enter the appropriate information in the fields in the dialog box.
-
Click OK to schedule the report.
-
Save the case to save the report.
Schedule New Expedited Reports dialog box—Fields and Field Descriptions
| Field | Description |
|---|---|
| Product | Select the relevant company product from the list. All company products associated with the particular case appear in the list.
The items appearing in the drop-down list are listed in the following format: Trade Name, Product Name, Formulation, Concentration and Indication. |
| License # | Select the appropriate license.
The items appearing in this drop-down list are listed in the following format: Country of License, License Type and License Number. |
| Aware Date | This drop-down list is only populated and enabled after a license has been selected. The Aware Dates are displayed in descending order of the Current Aware Date.
If an Aware Date is appended with '(A)' in the drop-down list, it is used to denote the aware date of an Amendment. The resulting expedited report Due Date is based on the selected Aware Date and the duration of the Due Date section. The selected Aware Date has no impact on the Actual Due Date if the user specifies an absolute Due Date. For instance, selecting a date in the Due Date field causes the report to be due on the specified date, regardless of the selected Aware Date. |
| Protect Confidentiality of Patient and Reporter | Check this checkbox if identifying information about the patient and the reporter must not appear on the report.
The system also displays 'MSK' null flavor in the eVAERS report when this checkbox is checked. MSK is populated only when the data element contains some data and is not null. |
-
Open the case for which the report has to be scheduled.
-
Select Regulatory Reports > Auto Schedule or Auto Schedule Device.
-
Reports that qualify as per Reporting Rules defined in Console are populated.
-
If the checkbox, Suppress Auto-scheduling is marked for an Agency in the Reporting Destination codelist, the system does not schedule reports (Initial, Follow-up, Amendment, Nullification) for that Agency during Auto-scheduling (via AG services, Clicking on Auto-scheduling, Auto-scheduling of f/p reports for a manually submitted report). However, reports can be manually scheduled to the Agency that is set for Suppress Auto-scheduling.
Follow-up scheduling for eVAERS
If the case was previously submitted to a Reporting Destination as VAERS report to an Agency and if the reporting destination configured earlier with VAERS is changed to eVAERS report, then:
-
The system schedules the next eVAERS as a Follow-up report to VAERS instead of scheduling (auto or manual) as Initial eVAERS if Case has received follow-up information.
-
If the case has amendment as follow-up data, then:
-
Type of report is displayed as Initial(A1) if the last report submitted to Agency was Initial report (in VAERS)
-
Type of report is populated as F/U# <Number>(A1) if the last report submitted to Agency was a follow-up report (in VAERS)
-
-
The follow-up numbering displayed in the Case Form -> Regulatory Reports Seq field is incremented from the previously submitted VAERS report. If the follow-up of the case is an amendment, the follow-up numbering uses the Amendment number.
If the case with previously submitted VAERS report is deleted and then if the transition happens from VAERS to eVAERS, customers may use the existing practice to indicate the nullification of the previously submitted VAERS report.
6.1.1.1.6 Generating Reports
You can generate a report using either of the following procedures.
-
Verify that the relevant case has been locked and the required report has been scheduled.
-
Open the selected case to display its associated Case Form.
-
Open the report from the Regulatory Reports tab of the Case Form.
-
When the system opens the Regulatory Reports details for the selected case, locate the relevant report and click the Final link to generate the report.
-
The system generates the selected report.
-
Verify that the relevant case has been locked and the required report has been scheduled.
-
Select Case Actions -> Open to view the Case Open form.
-
Click Search to view cases matching the search criteria.
-
When the system displays the search results, click the Lock State icon and select Case Details.
-
When the system opens the Argus Safety Case Details dialog box, open the Scheduled Regulatory Reports folder and select the relevant regulatory report.
-
The system automatically generates the report.
Note:
- You do not need to lock the case to preview a report in draft mode.
-
If you have access rights to view or print blinded information, you are prompted to select whether you would like to view a blinded or unblinded version of the report. If your access rights disallow you from viewing or printing unblinded information, you can view only a blinded version of the expedited report. The following items are not displayed when viewing a blinded version of the expedited report:
-
Clinical Treatment Given (Study Drug field)
-
Study Drug Formulation and Concentration
-
Study Drug Dose, Daily Dose and Route
-
Study Drug Batch/Lot # and Expiration Date
-
If the case is locked you can generate the report from the Worklist | Reports, Reports | Bulk Reporting and Reports | Compliance | Expedited screens.
6.1.1.1.7 Approving Reports
-
Open the case associated with the report that needs to be approved.
-
When the system opens the Case Form, click the Regulatory Reports tab to displays the case details.
-
Click the icon associated with the report you wish to approve and select View Report Details.
-
When the system opens the Report Details dialog box, click the Routing tab.
-
When the system opens the Routing tab, select Approved from the State drop-down list and click Route.
-
When the system opens a dialog box, enter the required information and click OK to approve the report.
Refer to Report Routing to understand how you can route a report to another state.
6.1.1.1.8 Creating Unscheduled Expedited Reports
-
Select Reports -> Expedited -> Compliance.
Field Description Suspect Product Displays the Trade Name for which the report has been scheduled. A (+) displayed at the end of the Product Name denotes that more than one Suspect Company Product exists. For Reports which were scheduled for the Device, the Device name gets displayed.
F / LT Denotes Fatal / Life Threatening If the case is both F and LT, only F is displayed.
If the case is neither F nor LT, No is displayed.
7/15 Displays 7 if the report is due within 7 days Displays 15 if the report is due in more than 7 days
-
Click Batch Print or Create Report and search for the case for which the expedited report has to be scheduled.
-
When the system displays the search results, select the locked cases for which the expedited report is to be scheduled.
-
Click Batch.
-
When the system opens the Batch Print or Create Reports dialog box, enter the appropriate information and click OK.
-
The system generates the unscheduled expedited report.
Batch Print or Create Reports—Fields and Field Descriptions
| Field | Description |
|---|---|
| Format | Enables you to print reports As Draft or As Final.
|
| Destination | Check the Printer checkbox to print the report |
| Scheduling |
|
6.1.1.1.9 Creating Batch Reports
You can use the Batch Reports function to schedule and generate reports for multiple cases. Before using this function, verify that no cases or reports are open.
-
Select Expedited Reports from the Reports - Compliance menu.
-
When the system opens the Expedited Reports dialog box, click Batch Print or Create Report.
Expedited Reports dialog box—Fields and Field Descriptions
| Field | Description |
|---|---|
| Suspect Product | Displays the Trade Name for which the report has been scheduled. A (+) displayed at the end of the Product Name denotes that more than one Suspect Company Product exists.
For Reports which were scheduled for the Device, the Device name gets displayed. |
-
When the system opens the Expedited Reports dialog box, search for the cases for which the expedited report needs to be scheduled.
-
When the system displays the search results, select the appropriate cases and click Batch.
-
When the system opens the Batch Print or Create Reports dialog box, enter the appropriate information in the fields and click OK
The Expedited Batch Printing dialog box supports printing Batch CIOMS, Medwatch, and VAERS on Argus Web locally.
Batch Print or Create Reports dialog box—Fields and Field Descriptions
| Field | Description |
|---|---|
| Format | Enables you to print reports As Draft or As Final.
|
| Protect Confidentiality of Reporter and Patient | Check this checkbox to hide the Reporter and Patient information on the expedited reports. |
| Scheduling | 1. If Run Now is selected, all the selected reports run against all selected cases and a PDF is generated.
The Run Now option is visible only when a MedWatch, MedWatch Drug, CIOMS, or VAERS form is selected on the Batch Expedited Report screen. If you select an unlocked case, the report gets printed in draft form only and is not saved. 2. Select Run at and enter the appropriate date and time when the generation of reports should occur. |
6.1.1.1.10 Expedited Reporting Rules Algorithm
The expedited reporting rules algorithm affects the following:
-
Suppression of Duplicate Reports
-
Blinded/Forced Distribution
-
Letter Placeholder for the IND Cover Letter
Suppression of Duplicate Reports
You can suppress duplicate expedited reports to be scheduled at the reporting destination level, according to the following criteria:
-
The Suppress Duplicate Reports option only applies to drug reports. It does not apply to device reports.
-
This option does not reduce the number of reporting rules the system evaluates. However, it does prevent the system from scheduling and generating expedited reports that match the duplication criteria.
-
When you select Suppress Duplicate Reports, the system uses the following attributes to determine whether the reports are duplicates of other reports:
-
Report Form
-
Reporting Destination
-
Aware Date
-
-
If two or more duplicate reports have different due dates (regardless of license type), the system schedules the report with the earliest due date.
The system enables you to configure the Blinding Study option for products in the case.
-
When you check this checkbox, the system blinds the study products for the report being sent to the reporting destination in a manner similar to the Bulk Reporting dialog box option.
-
If you select either of the Blind Study product options (Reporting Rules or Bulk Reporting), the system blinds the study product information on the report form.
-
The system blinds only active blinded studies. It does not blind the following case reports even if the Blind Study product is selected
-
Open Label Studies
-
Study is eligible for unblinding - If the Study is Unblinding checkbox is not kept as unchecked in study configuration, the user will be able to see the complete case data even if he/she has protection enabled.
-
-
In cases where expedited reports are due, the system permits the user to force-distribute the reports based on user-defined reporting rules, even if case processing is incomplete.
-
When you select the Force Distribution rule, the following occurs:
-
If a case encounters a rule where a report is due is locked, the system schedules the report based on the rule and does the following:
-
Generates the report on the due date.
-
Dynamically replaces the current case comment with the force distribution case comment.
-
Transmits the report based on the preferences defined by the reporting destinations.
-
Displays the status in the Worklist Bulk Transmit/Transmit ICSR dialog boxs.
-
-
The AG Service Force Reporting process for expedited reports completes the process by:
-
Checking the reports required for force distribution
-
Locks the case (if it's not already locked)
-
Generates the reports and makes sure it is ready for transmission
-
-
The notes for the Case Locking/Unlocking are the same as those defined as the common profile value for the Forces Distribution option; System is the user.
Letter Placeholder for the IND Cover Letter
-
You can define a placeholder for the IND_SIMILAR_EVENTS table. The system uses data from this table to populate the Case Number, Protocol Number, Subject ID, and Adverse Event terms for previously submitted cases reporting the same events.
-
If no reports were submitted, the system prints None Submitted instead of the table.
The placeholder only prints this information when it is used in the cover letter for the Regulatory Report. The system uses the license associated with the scheduled report to track other cases where the same product license was previously submitted for the same events in the current case.
6.1.1.2 About Periodic Reports

-
When you select the Case Locked/Archived date, the system limits the cases based on whether the case has been locked or archived within the specified time frame.
-
The locked date is the lock date for the current case.
-
If there is significant FU in the reporting time frame, the system considers the case a follow-up case in the group options of the PSUR/CTPR reports.
-
If you specify the time frame for the case locked/archived date, the system disables the following:
-
Include Follow-up
-
Exclude Follow-up
-
Include Summary of Unlocked Cases
-
Include Unlocked Cases
-
-
For the 15-day report section of the NDA Reports, the system uses the timestamp to determine whether there are further follow-up or downgraded cases in that date range.
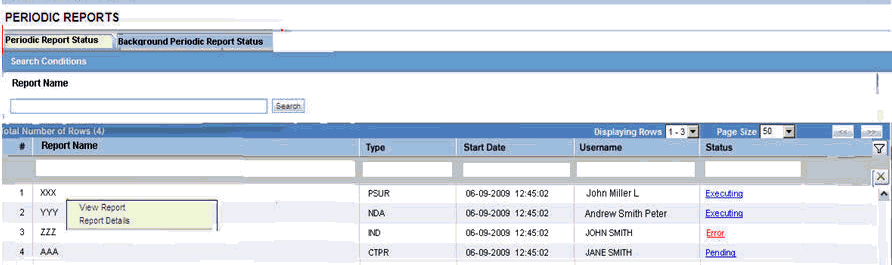
6.1.1.2.1 Periodic Report—Fields and Field Descriptions
| Field | Description |
|---|---|
| Description | Displays the report name. Click this to open the selected report in PDF format. |
| Status | Opens the Report Details dialog box for the selected report. |
| Print List | Allows the user to print the current Periodic Reporting for referencing the current view of the Periodic Reporting. |
6.1.1.2.2 User Options
Common features on the Period Reports page. Click the icon associated with each report to view the following options:
| Option | Description |
|---|---|
| View Report | Opens the Individual Periodic Report selected by the user. |
| Report Details | Displays specific information about the report as entered in the Regulatory Reports section.
The information displayed in the fields of the Report Details dialog box is fetched from the data entered in the Regulatory Reports section of Case Form. |
6.1.1.2.3 About the Report Details dialog box
The General tab displays the general information about the report. The information on this tab cannot be modified.
| Field | Description |
|---|---|
| Agency | Displays the Reporting Destination for which the report is scheduled. |
| Responsibility | Displays the User Group to which the report is assigned. |
| Case Nullification Date | Displays the date when the case was nullified. |
| Case Nullification Reason | Displays the reason entered when a case is logically deleted in Argus. |
6.1.1.2.4 Scheduling Tab
The Scheduling tab displays a reason for scheduling this report. It also shows the date on which the report was scheduled.
All fields in this tab are auto-populated as per records entered in Argus.
6.1.1.2.5 Routing Tab
The Routing tab displays the routing history of the report. To route the report, click Route.
| Field | Description |
|---|---|
| Group | Displays the group of the report. This button is enabled when you click the Route button. |
| User | Displays the state of the report. This button is enabled when you click the Route button. |
| Comments | Displays routing comments entered before routing the report. |
6.1.1.2.6 Submission Tab
The Submission tab enables you to specify whether submission is required and enter a reason for not submitting the report.
| Field | Description |
| Submission Required | Enables you to select if this report is not required to be submitted to the regulatory authority. |
| Reason for Non-Submission | Click Select to select the reason for non-submission. |
6.1.1.2.7 Comment Tab
The Comment tab enables you to enter a local comment that prints out on that specific report when generated. Each report has its own Local Comment section.
To transmit a report
-
Click the icon associated with a report and select the Transmission tab from Report Details.
-
When the system opens the Report Details The Report Details dialog box opens.
-
Click OK or Cancel to approve the transmission or discard any changes, respectively.
-
Click the Transmit button to transmit a report. The Transmit to Recipients dialog box is displayed.
-
Select the recipients of the report, as applicable from the Available Recipients list.
-
Select the method of transmission from Method, as applicable.
-
Enter remarks in Comments.
-
Click Transmit.
-
The selected report is transmitted to the specified recipients.
6.1.1.2.8 Report Generation Status
The Report Generation Status tab is displayed for users who have been configured by the Argus Safety administrator in Argus Console, under Access Management > Groups > Menu > Reports > Periodic Reports and for users who have access to the System Library.
| Field | Description |
|---|---|
| Run At Date | Displays the date and time when the report generation started.
For English users, it is displayed in DD-MMM-YYYY HH:MM:SS (GMT offset) format. For Japanese users, it is displayed in YYYY/MM/DD 00:00 (GMT offset) format |
| Status | Displays the current status of report generation in the form of hyperlinks, with the options listed below:
Executing Error Pending Generated On clicking the Generated status, the Periodic Report is displayed. On selecting any status other than Generated, the Background Periodic Report Execution Status dialog box is displayed, as shown below: 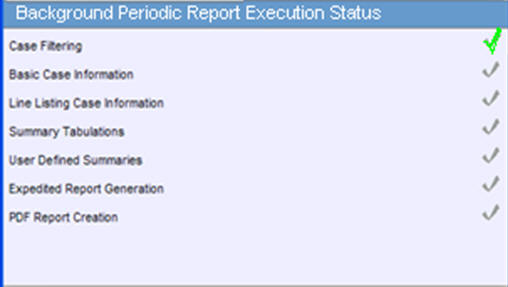
This dialog box displays the different stages of Periodic Report status. A grey tick mark is denotes Pending state, a Green tick mark denotes Completed State, and a Red cross mark denotes an Error. |
| Context Menu > View Report | This option is displayed in the context menu only when PDF/CSV/RTF Report Creation is Generated. On clicking View Report, the selected report is displayed. Applicable only for Periodic reports. |
The Report Status screen displays the report outputs for the logged in user with the last report run as the first report. The reports can be filtered using:
-
Report Name
-
Draft/Final
-
Report Type
-
Scheduled By
-
Scheduled On
-
Run At Date
6.1.1.3 Creating Unscheduled Periodic Reports
-
Click the Create Unscheduled Report button
-
The system opens Periodic Reports dialog box that provides a list of configured reports of the following types:
-
PSUR - Containing ICH PSUR Line Listing Reports
-
IND - Containing US IND Periodic Reports
-
NDA - Containing US NDA Periodic Reports
-
CTPR - Containing CT Periodic Reports
-
-
Click the (+) icon against the desired category to view all the reports within that category.
-
Select the report you wish to create from this list and click Select.
-
When the system opens the Report Batch Printing dialog box, select Run Now or Run at, as appropriate.
Note:
If you select Run Now, specify PDF, RTF, or CSV from the drop-down list for the report output option to generate the PSUR or CTPR report in the selected format.If you select Run at, specify the date/time to schedule the PSUR report to be generated by Argus Safety Service. This enables only Final and disables all other Print As options.
-
In the Email field, enter the email ID of the user to whom the periodic report should be emailed, once completed. By default, this field lists the email address (if configured) of the current user.
-
Select what you want printed on the report: Final, Draft, Internal, or enter Other information.
-
Run Using allows users to select between Argus Native Periodic report and BI Publisher.
-
Report Form Type allows users to select the Report Templates and these options are dependent on the value selected in Run Using. If Run Using is selected as Argus Native, the Report Form Type drop-down list displays PBRER and PSUR. The option selected from this drop-down list is used as Report Form Type for follow-up algorithm.
-
The options displayed in the Report Form Type are configurable through the flexible codelist Report Template.
-
Click OK.
-
The system generates the periodic report.
6.1.1.4 About Submitted Reports
6.1.1.4.1 Submitting Reports
Before you can mark a report as submitted, the report must first be approved.
-
Open the case for which the report has to be approved.
-
Open the Regulatory Reports tab in the Case Form.
-
When the system opens the Regulatory Reports details for the selected case, click the icon associated with the report you wish to approve.
-
Select View Report Details.
Note:
The Case Nullification Date is the date when the case is deleted, the Case Nullification Reason is the comment entered when the case is logically deleted in Argus. -
Select Submitted from the State list in the Routing tab and click Route.
-
When the system opens a dialog box, enter the required details and click OK.
-
The report is approved.
Note:
A user who has Workflow Manager rights can undo the submission of a report, if necessary.Use the following procedure to view submitted reports.
-
Select the Reports -> Compliance -> Submitted Reports.
-
When the system opens the Submitted Reports page, enter the appropriate search criteria and click Search.
-
The system displays the Search Results.
Submitted Reports—Fields and Field Descriptions
| Field | Description |
|---|---|
| Case ID | Enter the specific case number.
Tip: Use wild cards such as 2007% to search for cases starting with 2007. |
| Include these Reports | Select the required report type or case status to be displayed. |
| Product | Select the product as required. The reports scheduled for these products will be displayed. |
6.1.1.4.2 Submitted Reports Search Results—Fields and Field Descriptions
| Field | Description |
|---|---|
| Time Frame (I/F-u) | Displays the whether the report was initial or follow-up. |
| Product | Displays the first suspect product for the case on which the report is based (expedited reports). |
| License Type | Displays the license type of the report. |
| Primary Event | Displays the first event term for the case on which the report is based (expedited reports). |
| Reason for Scheduling | Displays the reason provided for scheduling the report. |
| Report Form | Displays the type of report scheduled (form) and initial/follow-up status (e.g. "Initial Report" or "Follow-up #3"). |
| Submitted Date | Displays the report's submission date. |
| Case Del. Date | Displays the date when the case was deleted. |
| Blind Study Product | Enables you to mark the study product as blinded. When you manually schedule a report, the system enables you to check Blind Product Study on the Schedule New Expedited report dialog box to blind the study products if they are in the case. |
| Print All Submitted Reports | Enables you to print all the submitted reports. |
6.1.1.4.3 Unsubmitting Reports
Cases that are archived while unsubmitting reports can be reopened from the Archived Case dialog box.
-
Enter the password and notes required in the Archived Case dialog box.
-
When the system opens the Report Unsubmit dialog box, enter the reason for unsubmitting the report and click OK.
-
The system unsubmits the report.
Tip:
The icon (displayed in the lock state column) in the Reports-> Compliance - Expedited and Submitted screens denotes a SUSAR case.6.1.2 Aggregate Reports
Argus Safety has a set of powerful and robust aggregate reports that provide information on:
-
Case progress
-
Company productivity
-
Case handling productivity
-
Product profiles
These reports are executed in the background through the AG Services. A new argus service named Batch Aggregate Report Generation is available for this purpose.
The following sections describe how to access an aggregate report and the key fields present in them.
To create a new Aggregate Report
Select Reports -> Aggregate Reports -> <Report Type>.
To view an already executed Aggregate Report
Select Reports > Aggregate Reports > System Report Library.
-
The date and time printed on the following reports are the date and time the query is executed for case qualification. They are not the date/time the query was completed and the report obtained Web Server.
-
Case Listing Report
-
Case Data Analysis Report
-
-
The system converts the following elements that display in the case form as actual text on the Case Listing and CIOMS II Line Listing reports:
-
Duration of Administration
-
Time Between First Dose/Primary Event
-
Time between Last Dose/Primary Event
-
-
Another field has been added to the Regulatory Reports section for the report follow up number. The system prints the report follow-up number on the expedited reports in the following format:
F/U# X
where:
X is the report follow-up number.
-
For an initial report, the system prints initial in the column.
-
If there are no reports for the case in the Case Listing/CIOMS II Line Listing, the column is left blank.
-
This option is available on the CIOMS II Line Listing/Case Listing reports.
-
The system uses the IE offset of the client workstation to print the date and time component for all system-calculated fields on the Case Listing/CIOMS II Line Listing reports.
-
You can filter cases in the following aggregate reports based on the lock/archived date.
-
When you select Case Locked/Archived date, the system limits the cases based on whether the case is locked/archived within the specified time frame.
-
The lock date is considered the locked date.
-
If you select the Case Patient or Reporter Information in the Case Listing or CIOMS II Line Listing reports and the Protect Confidentiality field is checked for the patient or reporter Information, the system does not print the relevant patient or reporter Information selected in the Case Listing or CIOMS II Line Listing report.
-
If you do not have permission to view the reporter or patient information, the corresponding reporter or patient elements selected on the Case Listing or CIOMS II Line Listing report are blank.
6.1.2.1 Using the System Reports Library
The System Reports Library displays the list of the saved aggregate reports. All aggregate reports, that is Case Data Analysis, Case Listing and CIOMS II Line listing reports, appear. This screen displays only the reports either created by the logged in user or the reports that are shared for your user group during report creation.
-
The Aggregate report supports only PDF or CSV formats.
-
The system report library screen, provides the way to filter the reports through:
-
Report Name
-
Description
-
Report Type
-
Output Type
-
Author
-
Last Modified
-
Available for Periodic
-
Shared
-
-
The reports can be executed through the Print option. When you click Print, the applications opens the Report Batch Printing dialog box, where you can run or schedule the report for the desired format (PDF/CSV). You can send an email for the completion status.
-
The open option allows to open and edit the memorized reports.
-
If the user clicks Transmit, the system generates the selected report and starts the transmit process. The system displays the Recipient pop-up.
Note:
A shared report can only be deleted by the Administrator or the user who created it.6.1.2.2 About Case Data Analysis Reports
The Case Data Analysis Report enables you to view quantities of cases over time in a Cross-Tabular Fashion.
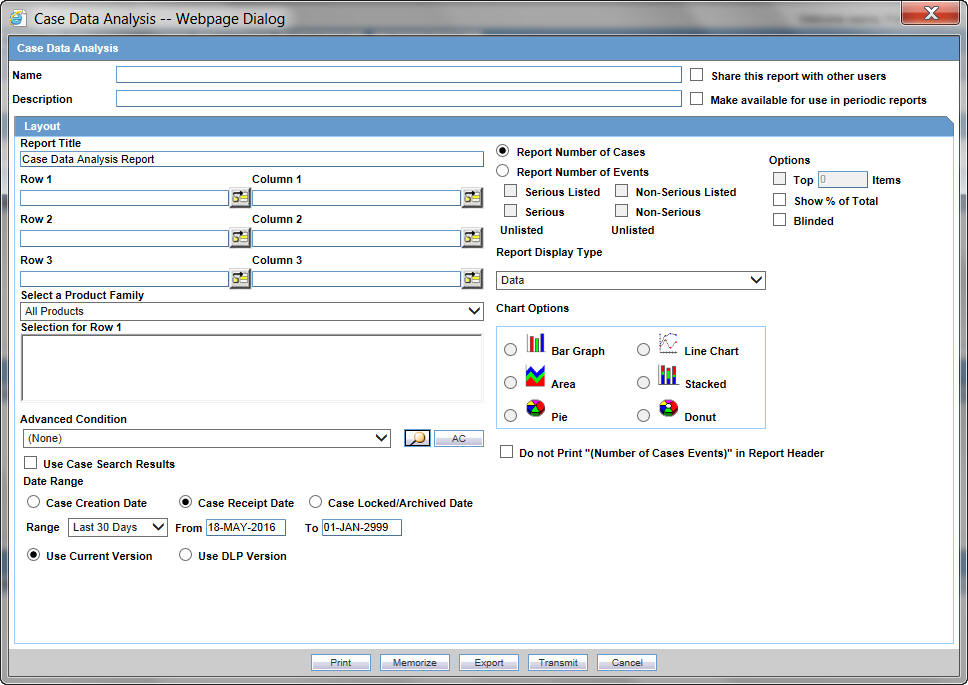
6.1.2.2.1 Creating a Case Data Analysis Report
-
Select Reports -> Aggregate Reports -> Case Data Analysis.
-
In the Case Data Analysis Report view, select the information that must appear in the report.
-
In Row1, select the field the system uses to group cases by row.
-
In Column1, select the data the system uses to group cases by column.
-
In Row2, select the field by which each Row1 item will be categorized.
-
In Column2, select the field by which each Column1 item will be categorized.
-
Select a product family to which the report applies, if appropriate.
-
In Selection for Row1, select the value for row 1 by which the report must be restricted.
-
Specify an advanced condition, as appropriate.
-
Select Report Number of Cases or Report Number of Events, depending on the number of cases or the number of events to be entered in the report.
-
If you select Report Number of Events, you can specify the kind of events (serious listed, non-serious listed, serious non-listed, or non- serious non-listed) that will appear in the report.
-
Select whether only the top few items should be displayed and enter the number of items that should be displayed.
-
Check the Show% of Total checkbox to specify the percentage in each cell in the report.
-
Check the Blinded checkbox to hide blinded information in the report. This field is unchecked and disabled for a restricted user.
-
Check the Use Case Search Results checkbox to limit the Case Data Analysis only to the cases present in the Case Search dialog box.
-
Specify a date range for the cases that will appear in the report.
-
Enter a title for the report.
-
Click the Share this report with other users if there is a need to share the report/report output to other users. Note that the report may contain sensitive data. By default, the report is shared with all users. You can restrict it through Group, where the allowed user groups can be selected. When a report is shared for a user group, only members of that group and the report creator can access the report further.
-
The report can be used in the periodic report using Make available for use in Periodic Reports.
-
The Case Data Analysis report, in addition to the PDF and CSV format, supports the chart format too.
This report output can be selected via Report Display Type field. The following chart types are available:
-
Bar Graph
-
Line Chart
-
Area
-
Pie
-
Donut
-
Stacked
Note:
The chart reports are run in sync and available only the user's browser and not stored in the database.
-
-
The Print button, executes and stores the report output which can be viewed under the system reports library.
-
The memorize button saves the report in the application. It does not execute the report.
6.1.2.3 About CIOMS II Line Listing Reports
The CIOMS II line listing report is a common format desired by Drug Safety professionals for reviewing cases. Create this report from the CIOMS II Line Listing dialog box.
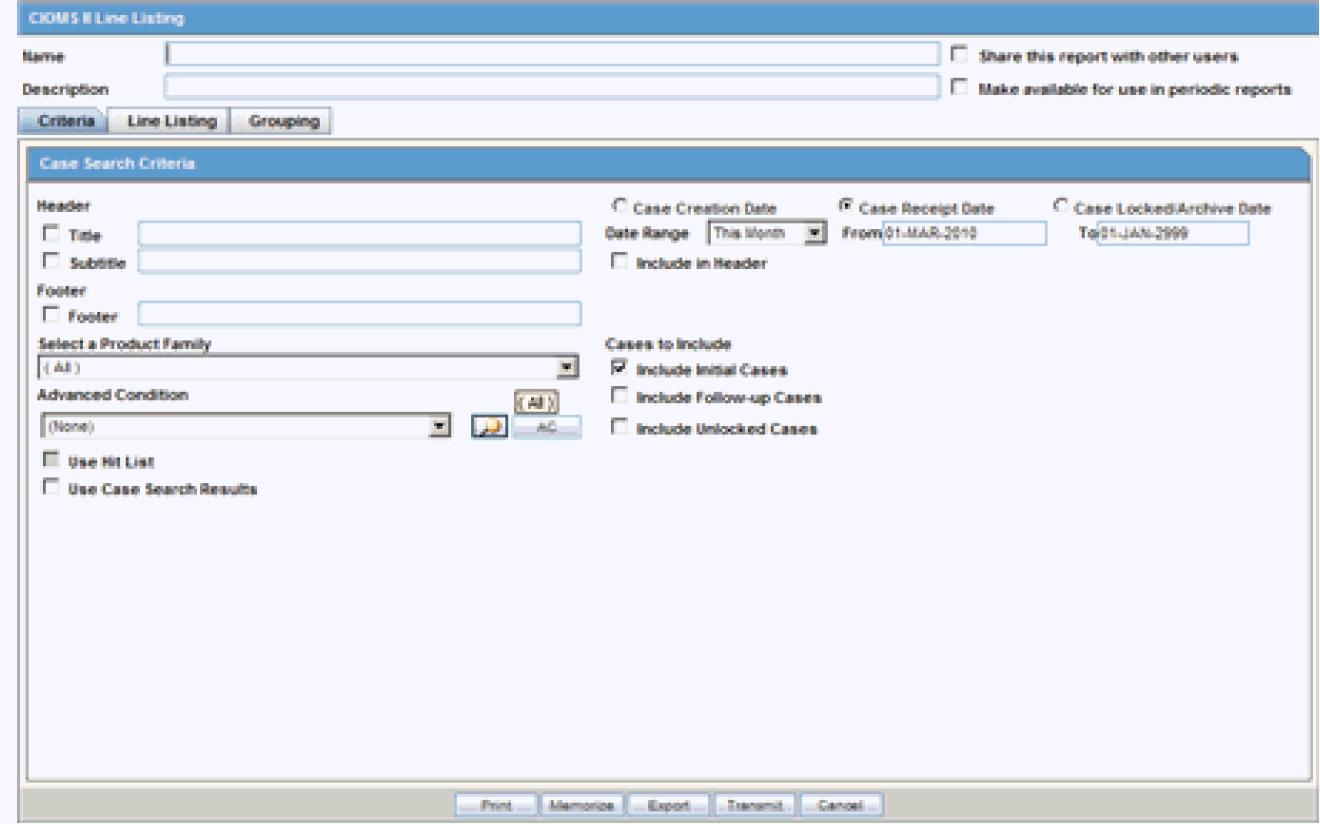
6.1.2.3.1 Creating a CIOMS II Line Listing Report
-
Select Reports ->Aggregate Reports -> CIOMS II Line Listing.
-
On the CIOMS II Line Listing Criteria tab, select information for the header, footer, product family, advanced condition (if any), cases to include, and date.
-
Select either the Case Creation Date or Case Receipt Date radio button and specify a date range to run the report.
Note:
If you perform a search and return a list of cases to the Case Search screen, the Use Case Search Results is visible. Checking this box will disable all selection criteria with the exception of Include Unlocked Cases. For example, the Advanced Condition and Date Range will be disabled. -
In the Line Listing tab, add or remove the appropriate fields.
-
In the Grouping tab, add or remove elements, insert a page break and change the sort order (if desired).
-
Click Memorize to open the Memorized Report dialog box.
-
Click Print to execute and save the report.
-
This report can be shared with other users of Argus and the sharing can be restricted through the User Group selection.
6.1.2.4 About Case Listing Reports
The Case Listing Report enables you to filter cases based on Case Initial Receipt Date and Case Creation Date. You can select multiple entities from the List of available fields using the CTRL+CLICK functionality.
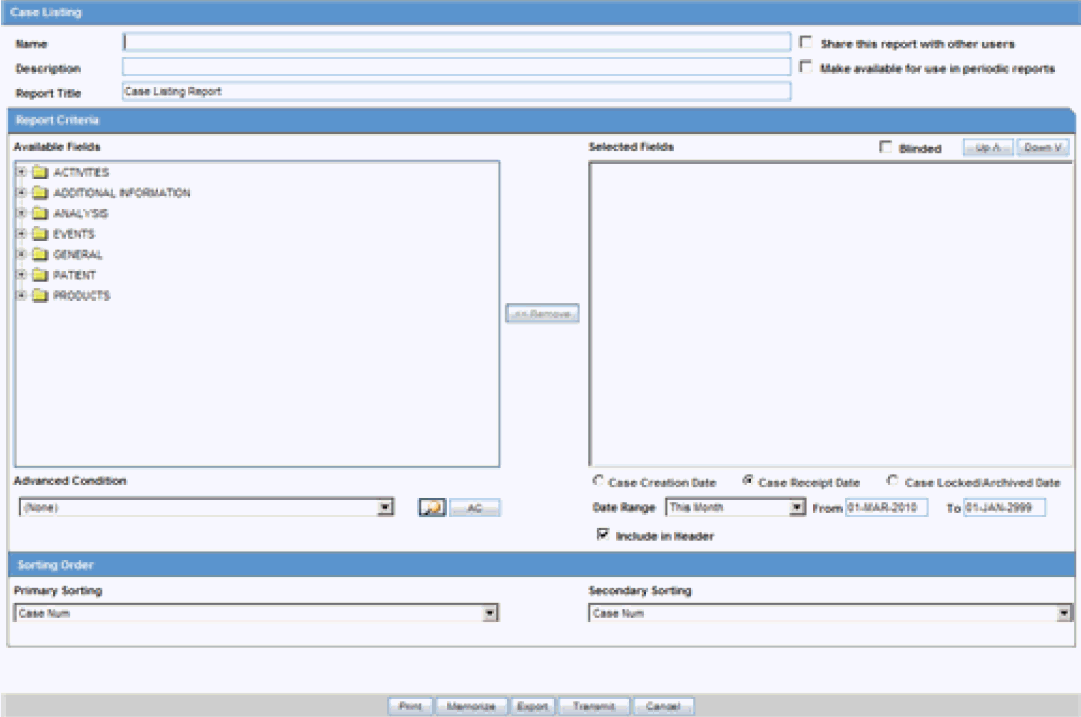
-
Select Reports -> Aggregate Reports -> Case Listing.
-
When the system opens the in the Case Listing Reports view select the information to appear on the report.
-
Select the fields that are to appear in the report from the Available Fields list.
-
Click Add. Repeat this process for each field that must appear in the report.
-
Use Move Up and Move Down to arrange the fields in the Selected Fields list.
-
Check the Blinded checkbox to hide blinded information in the report.
-
Specify an Advanced Condition, if appropriate.
-
Specify a date range for the cases to be displayed in the report.
-
If you check the Include in Header checkbox, the selected date range is displayed on the report.
-
Under Sorting Order, select the fields by which the cases will be sorted. You cannot sort the cases by fields that do not appear on the report.
-
Enter the title of the report.
-
Click Memorize to memorize the criteria specified for a particular report. The Memorized Report dialog box appears.
-
Save, Delete or Cancel the report, as applicable.
-
Click OK in the Case Listing Reports screen to generate the report. The report will be generated in PDF format.