5 Code List Configuration
This chapter allows administrators to configure and maintain code lists in Argus Safety through Argus and the Flexible Data Re-categorization feature.
These are detailed in the following sections:
Configuring Code Lists > Argus
Code List items appear at several locations in the Case Form. It is essential to configure relevant Code List items in order to ensure that case entry in Argus Safety is done according to your company's policies. Before configuring Code List items, the Administrator should consult the company's policies and the terminology used by the company.
To ensure that the Administrator does not have to enter excessive amounts of data during Code List configuration, Argus Safety is shipped with factory data for many of the Code List items.
Tip:
The following Code List Items have been described to familiarize you with the Code List configuration.-
For the complete set of Code Lists refer to the Argus Console->Code List section.
-
The default help text associated with each code list item is displayed at the bottom of the left panel.
| Code List Item | Description |
| Autosignals | This screen helps in capturing Auto Signal information. Users can define the criteria that triggers Autosignal within Argus |
| Batch Reports | This screen helps in capturing Batch Reports information. |
| Letters | The screen helps in configuring the system to create and schedule letters automatically, according to pre-defined business rules. |
| Justification | This screen helps in capturing justification information. |
| Electronic Transmission Recipient | This screen helps in capturing electronic transmission recipient information. |
| Literary Citation | This screen helps in capturing information about Literary Citations. |
| Reporting Destination | This screen helps in capturing Reporting Destination information. |
| Routes of Administration | This screen helps in capturing Routes of Administration information. |
| Study Center | This screen helps in capturing Study Center information. |
Configuring Autosignals
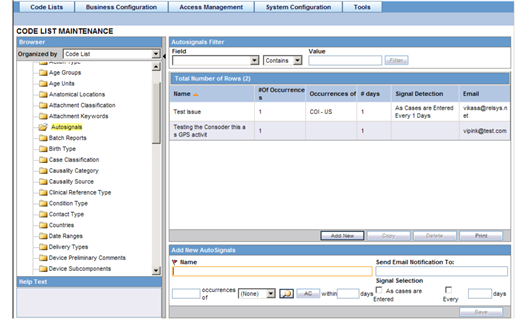
This screen enables you to capture the Auto Signal information.Using this screen, you can define the criteria that triggers Autosignal within Argus.
Example: If an event is reported within x number of days, an email is sent to the defined individual or workgroup. The system checks for patterns each time new data is entered, and sends e-mails to the appropriate individuals or departments on finding a matching pattern.
Select Code Lists -> Argus to view the Code List Maintenance screen.
Tip:
The code list items are displayed in the left-panel. Click on the required Code List folder to be configured. The details of this code list item appear in the right panel.Field Descriptions
The following table describes the fields associated with this section.
| Field/Control Name | Description |
|---|---|
| Name | Enables the user to enter the name of the Autosignal. This is a required field. |
| Number of Occurrences | Enables the user to enter the number of occurrences of the autosignal. |
| Occurrences of | Enables the user to enter the user to select or create an advanced condition for the autosignal through Select icon. |
| Number of days | Displays the number of days for the autosignal. |
| As cases are entered | Enables the user to perform autosignal as cases are entered. |
| Every N Days | Enables the user to enter the number of days, when autosignal should be executed. |
| Enables the user to enter the email address of Argus users to whom the email about autosignal occurrence should be sent. |
Use the following procedure to configure Autosignals.
-
Click on the Autosignals folder in the left panel. The associated autosignal data appears in the Total Number of Rows section in the right panel.
-
Click on the Name (or row), to view the details associated with the selected autosignal. The details appear in the Modify Autosignal section.
You can use the Autosignals Filter to make your search specific to an autosignal. The filtering criterion is essential as it helps you to search for specific items.
-
Select the appropriate Field as the filtering criteria from the drop-down list.
-
Once you have selected the Field, you can specify whether your search should contain or start with specific alphabets.
-
Enter the search criteria in Value.
-
Click Filter to apply the selected criteria.
This displays the search results under Total Number of Rows.
Tip: You can alternatively click Add New to create a new auto signal.:
Click Copy to make an editable copy of an existing autosignal.Click Delete to delete a selected autosignal.
-
Enter the name of the autosignal in the Name field.
-
Enter the number of occurrences of the autosignal in the Number of Occurrences field.
-
Select or create an Advanced Condition, if any from the button in the Occurrences of field.
Tip:
Click here for details on Advanced Conditions -
Enter the number of days for the autosignal under the Number of days field.
-
Select the As cases are Entered checkbox to perform autosignal as cases are entered.
-
Enter the number of days when the autosignal should perform under the Every N Days field.
-
Enter the e-mail address that receives email about autosignal occurrence in the Email field.
-
Click Save to save the changes made to this screen.
Configuring Batch Reports
This screen enables you to configure Batch Reports information.

-
Scheduled reports can be automatically generated and stored in the database by Argus Safety Service. This screen displays a list of all the existing Batch Reports.
-
By default the Batch reports shown are memorized reports. The Argus user can see the list of scheduled reports for memorized reports, using the Memorized Reports option.
-
Select Code Lists -> Argus to view the Code List page.
-
Click on the Batch Reports folder in the left panel.
The associated report data appears in the Total Number of Rows section in the right panel.
Tip:
The code list items are displayed in the left-panel. Click on the required Code List folder to be configured. The details of this code list item appear in the right panel.Field Descriptions
The following table describes the fields associated with this section.
| Field/Control Name | Description |
|---|---|
| Title | This is the unique name for the batch report name. |
| Report | Enables the user to select a report that has to be scheduled.
Report Regeneration Memorized report |
| Product | Enables the user to select a product for which the report is generated. |
| Frequency: Every Days. | Enables the user to enter the number of days after which the report is to be generated. The value has to be -> 0. |
| Next Run Date | Enables the user to enter the next date from which the report has to be scheduled. |
| Advanced Condition | Enables the user to select the Advance Condition that satisfies the criteria which will trigger the Signal. You can either select an existing criteria or create a new one. |
| Report Type | Enables the user to select the type of the report. |
| Group | Enables the user to select the group to which the report must be assigned. |
Use the following procedure to configure Batch Reports
-
Click on the Report Title (or row), to view the details associated with that report. The details appear in the Modify Batch Report section.
You can use the Batch Reports Filter to make your search specific to a batch report. The filtering criterion is essential as it helps you to search for specific items.
-
Select the appropriate Field as the filtering criteria from the drop-down list.
-
Once you have selected the Field, you can specify whether your search should contain or start with specific alphabets.
-
Enter the search criteria in Value
-
Click Filter to apply the selected criteria.
-
This displays the search results under Total Number of Rows.
Tip:
You can alternatively click Add New to create a new report.
-
Use Copy to make an editable copy of an existing report.
-
Use Delete to delete an existing report.
-
-
Enter the Title Name for the batch report.
-
Select the Report Type from the drop-down list.
-
Select the Group to which the report must be assigned.
-
Select the report to be scheduled as Memorized Reports or Reports Regeneration.
-
Select the Frequency of generating the report after the specified number of days have elapsed.
-
Select the Product for which the report is to generated, from the drop-down list box.
-
Select the Report from the drop-down list.
-
Enter the Next Run Date. This is the next date from which the report has to be scheduled.
-
Select the Advanced Condition associated with the report configuration.
-
Click Select icon to launch the Advanced Conditions browser.
-
Click Save to save the changes made to this section.
Configuring Letters
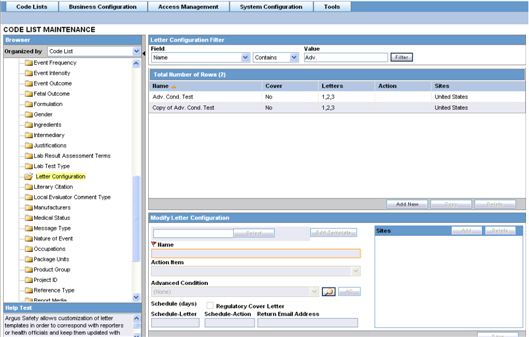
Argus Safety enables the customizing of letter templates in order to correspond with reporters or health officials and keep them updated with case activity. Access to the Letter Configuration dialog can be granted to any user or user-group, as found appropriate by the Administrator.
-
To automatically generate a letter, the system reads a template that specifies the information that must appear in the letter.
-
The template is a file in Rich Text Format (".rtf" format) that contains the letter text and some field identifiers (also called placeholders). The system substitutes information specific to the current case for the placeholders in the template. Thus, a letter containing case-specific information is automatically generated.
-
The administrator can set up the system to create and schedule letters automatically, according to pre-defined business rules. This section discusses the creation, modification, and deletion of letter templates.
Select Code Lists-> Argus to view the Code List page.
Tip:
The code list items are displayed in the left-panel. Click on the required Code List folder to be configured.The details of this code list item appear in the right panel.
Configuring letter (RTF) templates
RTF Document can be created using the required placeholders such as:
[patient_last_name], [product_name]:[n], [rec_vacc_date]:[n]:[m], [event_prior_hist:primary_event], [reg_report_timeframe]
Most of the placeholders have one parameter or two and these are almost always linked to sort order.
Here are some examples of how these placeholders extract data:
For single value columns:
[age],[case_id],[comments],[case_status],[country_of_inc]
For multiple value columns:
[event_death:primary_event] picks data from case_primary_event table
[event_death]:[n] picks data from case_event/lam_event table based on Sort order
[case_notes]:[n], [concentration]:[n],[drug_code]:[n]
For multiple parameter columns:
[ingredient]:[n]:[m] - It lists nth case product and lists its mth ingredient
Field Descriptions
The following table describes the fields associated with this section.
| Field/Control Name | Description |
|---|---|
| Name | Enables the user to specify the name of the letter as it will appear in the Letters menu. |
| Name (J) | Enables the user to specify the Japanese name of the letter as it will appear in the Letters menu. |
| Edit Template | Enables the user to open the letter in MS-Word (template) for editing. |
| Regulatory Cover Letter | Enables the user to indicate whether this letter template should appear in the Regulatory Rules dialog Cover letter drop-down list box.
The available options are: No, Yes – RTF Format, and Yes – PDF Format. |
| Schedule - Letter | Enables the user to enter the number of days (from the receipt date) when the letter will be due. |
| Schedule - Action | The Action field enables the Administrator to specify the number of days (from the current date) after which the Action Item for following up on this letter will be due. |
| Sites | Argus Console provides the ability to configure letters to user sites. Enables users to select single or multiple sites for that letter. The system will only allow users to see letters that are configured to their site. |
| Action Items | The action items list is a drop-down list of action item codes from the Action Type List Maintenance. |
| Return Email Address | Enables the user to enter a default email address where the mails will be sent. This address is displayed by default in the Activities tab of the Case Form. |
| Advanced Condition | Enables the user to configure Advanced Conditions. If the case matches with the Advanced Condition, the configured letter is scheduled for the case. |
Use the following procedure to configure letters.
-
Click on the Letter Configuration folder in the left panel. The associated data appears in the Total Number of Rows section in the right panel.
-
Click on the Name (or row), to view the details associated with that letter. The details appear in the Modify Letter Configuration section.
-
You may use the Letter Configuration Filter to make your search specific to a letter. The filtering criterion is essential as it helps you to search for specific items.
-
Select the appropriate Field as the filtering criteria from the drop-down list.
-
Once you have selected the Field, you can specify whether your search should contain or start with specific alphabets.
-
Enter the search criteria in Value.
-
Click Filter to apply the selected criteria.
-
This displays the search results under Total Number of Rows.
Tip:
You can alternatively click Add New to create a new letter.-
Use Copy to make an editable copy of an existing letter.
-
Use Delete to delete an existing letter.
-
-
Click Select to specify the path of the letter template to be used.
Tip:
Click Edit Template to save the existent template on to your local drive of the system.You can edit this template and repeat the step listed above, to ensure that the updated template is used for letters.
-
Enter the name of the letter, as it will appear, in the Letters Menu section in Enter a new item.
-
Click Add or Delete to configure letter to the user Sites.
-
Select the Action Item from the drop-down list box. The action items list is a drop-down list of action item codes, from the Action Type List Maintenance.
-
Configure the Advanced Condition for the case.
-
Enter the Schedule (days)-Letter. This is the number of days from the receipt date when the letter is due.
-
Enter the Schedule (days)-Action. This is the number of days from the current date, after which the Action Item for the follow up on this letter will be due.
-
Enable the Regulatory Cover Letter option to indicate whether this letter template should appear in the Regulatory Rules dialog.
-
Enter the default e-mail address in Return Email Address.
-
Click Save to save the changes made for this section.
Configuring Justifications
This screen enables you to capture justification information.
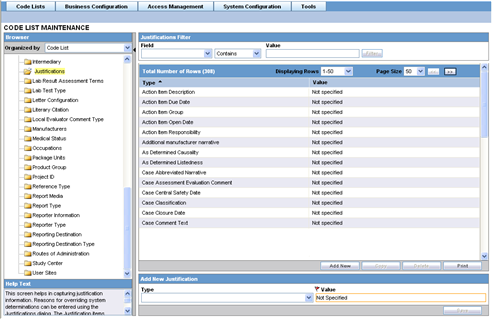
Argus Safety users can enter the reasons for overriding system determinations using the Justifications dialog. The Justification items appear on the Action Justification dialog on the screen.
Select Code Lists-> Argus to view the Code List page.
Tip:
The code list items are displayed in the left-panel. Click on the required Code List folder to be configured.The details of this code list item appear in the right panel.
Field Descriptions
The following table describes the fields associated with this section.
| Field/Control Name | Description |
|---|---|
| Type | Enables the user to configure the type. |
| Justification | Enables the user to enter the justification. |
Use the following procedure to configure justification.
-
Click on the Justifications folder in the left panel. The associated report data appears in the Total Number of Rows section in the right panel.
-
Click on the Type (or row), to view the details associated with that justification. The details appear in the Modify Justification section.
-
You may use the Justifications Filter to make your search specific to a justification. The filtering criterion is essential as it helps you to search for specific items.
-
Select the appropriate Field as the filtering criteria from the drop-down list.
-
Once you have selected the Field, you can specify whether your search should contain or start with specific alphabets.
-
Enter the justification reason in Justification.
-
Click Filter to apply the selected criteria. This displays the search results under Total Number of Rows.
Tip:
You can alternatively click Add New to create a new justification.-
Use Copy to make an editable copy of an existing justification.
-
Use Delete to delete an existing justification.
-
-
Select the Type from the drop-down list.
-
Enter the Value for the justification.
-
Click Save to save the changes made for this section.
Configuring Electronic Transmission
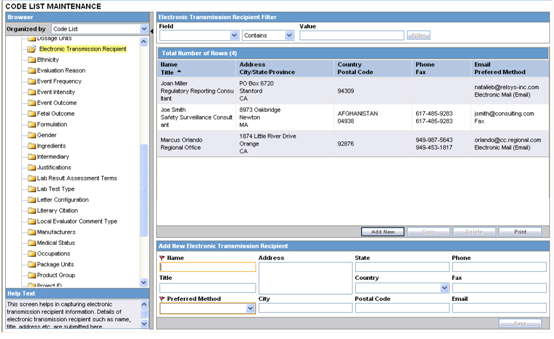
This screen enables you to configure electronic transmission recipient information.
-
Details of electronic transmission recipient such as name, title, address etc. are submitted here.
-
Select Code Lists-> Argus to view the Code List page.
Tip:
The code list items are displayed in the left-panel. Click on the required Code List folder to be configured. The details of this code list item appear in the right panel.Field Descriptions
The following table lists and describes the fields associated with this section.
| Field/Control Name | Description |
|---|---|
| Name | Enables the user to enter the name of Electronic Transmission Recipient. |
| Title | Enables the user to enter the title of Electronic Transmission Recipient. |
| Address | Enables the user to enter the address of Electronic Transmission Recipient. |
| City | Enables the user to enter the city of Electronic Transmission Recipient. |
| State/Province | Enables the user to enter the state/province of Electronic Transmission Recipient. |
| Country | Enables the user to select the country of the user. |
| Postal Code | Enables the user to enter the postal code of Electronic Transmission Recipient. |
| Phone | Enables the user to enter the phone number of Electronic Transmission Recipient. |
| Fax | Enables the user to enter the fax of Electronic Transmission Recipient. |
| Enables the user to enter the email of Electronic Transmission Recipient. | |
| Preferred Method | Enables the user to select the preferred method of transmission from the drop-down list. This can be by fax or by email. |
Use the following procedure to configure the electronic transmission recipient.
-
Click on the Electronic Transmission Recipient folder in the left panel. The associated data appears in the Total Number of Rows section in the right panel.
-
Click on the Name Title (or row), to view the details associated with that electronic transmission. The details appear in the Modify Electronic Transmission Recipient section.
-
You may use the Electronic Transmission RecipientFilter to make your search specific to an electronic transmission recipient. The filtering criterion is essential as it helps you to search for specific items
-
Select the appropriate Field as the filtering criteria from the drop-down list.
-
Once you have selected the Field, you can specify whether your search should contain or start with specific alphabets.
-
Enter the search criteria in Value.
-
Click Filter to apply the selected criteria. This displays the search results under Total Number of Rows.
Tip:
You can alternatively click Add New to create a new electronic transmission recipient.-
Use Copy to make an editable copy of an existing electronic transmission recipient.
-
Use Delete to delete an existing electronic transmission recipient.
-
-
Enter the Name of the electronic transmission recipient.
-
Enter the Title of the electronic transmission recipient.
-
Enter the Address of the electronic transmission recipient.
-
Enter the City of the electronic transmission recipient.
-
Enter the State/Province of the electronic transmission recipient.
-
Select the Country of the electronic transmission recipient, from the drop-down list.
-
Enter the Postal Code of the electronic transmission recipient.
-
Enter the Phone of the electronic transmission recipient.
-
Enter the Fax of the electronic transmission recipient.
-
Enter the Email of the electronic transmission recipient.
-
Select the Preferred Method of communication (by fax or email) for the electronic transmission recipient.
-
Click Save to save the changes made to this section.
Configuring Event Groups
This screen enables you to configure Event Groups information.
-
The list of terms which are used across labeledness determines are defined in a central location for users. These users can update these event groups (list of terms) when the product configuration updates are required or when MedDRA versions are upgraded when MSSO releases the new MedDRA updates.
-
The values entered here and marked as Display appear in the Console > Business Configuration > Products and Licenses > Product Family > Datasheet > Add Event Groups section.
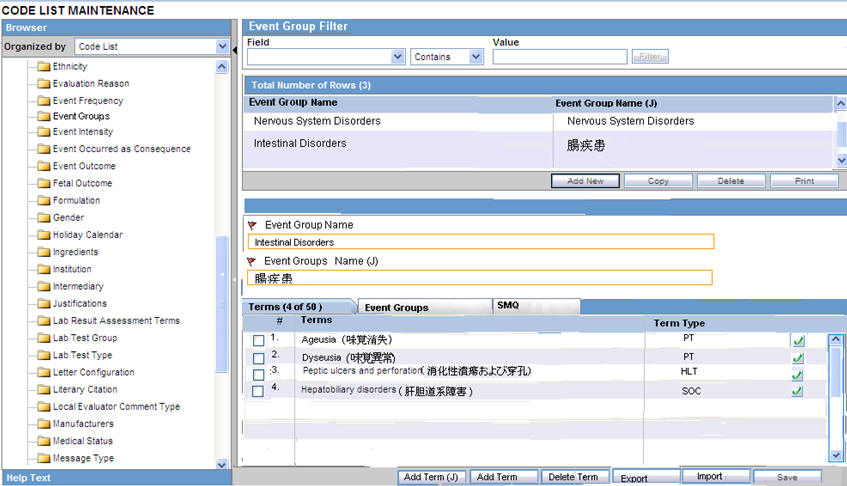
Terms tab
The following table describes the fields associated with Event Groups > Terms tab.
| Field Name | Description |
|---|---|
| Event Group Name | Allows the user to enter a new Event Group name. |
| Event Group Name (J) | Allows the user to enter a new Event Group name in Japanese. This screen and its print form will be visible to only the Japanese users. |
| Display | Allows the user to display the Event Group in Business Configuration > Products and Licenses > Product Family > Datasheet. |
| Terms | The Terms tab contains terms selected from the MedDRA browser. These terms are displayed in the following format for English users: MedDRA Term in English These terms are displayed in the following format for Japanese users: MedDRA Term in English (MedDRA Term in Japanese) The count of the total number of MedDRA terms present for the case is displayed on the header of the Terms tab. |
| Term Type | Displays the type of the MedDRA term. This field can contain the MedDRA term type values such as PT, HLT, HLGT or SOC. |
Use the following procedure to configure Terms:
-
Click Event Groups on the left pane of the Code List.
You can use the Event Group Filter on the right pane, to make your search specific to an event group. The filtering criterion is essential as it helps you to search for specific items.
-
Select the appropriate Field as the filtering criteria from the drop-down list.
-
Once you have selected the Field, you can specify whether your search should contain or start with specific alphabets.
-
Enter the search criteria in Value.
-
Click Filter to apply the selected criteria.
-
This displays the search results under Total Number of Rows.
Tip:
You can alternatively click Add New to create a new event group.
-
Use Copy to make an editable copy of an existing event group.
-
Use Delete to delete an existing event group.
-
-
Enter the name of the event group under Event Group Name.
-
If it is also required for a Japanese user, enter the Japanese name of the event group under Event Group Name (J).
-
Check the Display checkbox to display the Event Group in Business Configuration > Products and Licenses > Product Family > Datasheet.
-
Click Export (or Import) to export (or import, respectively) a file in a valid file format from (or into) your local system. Valid file formats require that the file be in .xls, .xlsx, or .csv formats.
Important: The format of the data in the csv, xls or xlsx file must be as follows:
It must have only a single column of data. An import file can have ~ 16 K Terms.
The first/header row must have text as "PT" or "HLT" or "HLGT" or "SOC" in upper or lower case.
All the rows below the header row must contain corresponding terms (text) such as PT text or HLT text or HLGT text or SOC text.
-
Click Save to save the changes made to this tab.
Event Groups tab
Click the Event Groups tab to configure event groups.
The following screen is displayed:
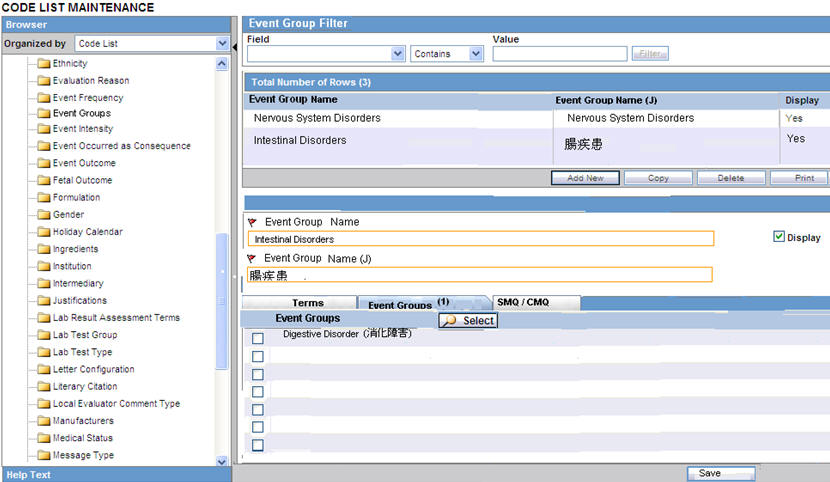
The following table describes the fields associated with Event Groups > Event Groups tab.
| Field Name | Description |
|---|---|
| Event Groups | The Event Group, selected from the Select button > Available Event Groups dialog, is displayed as follows:
Event Group Name in English |
| Select button | Click this button to select the relevant event groups from the Available Event Groups dialog.
This dialog displays the event groups in a tree-format, with the child event groups being paired under the parent event groups. |
SMQ tab
Click the SMQ tab to configure SMQ terms.
The following screen is displayed:
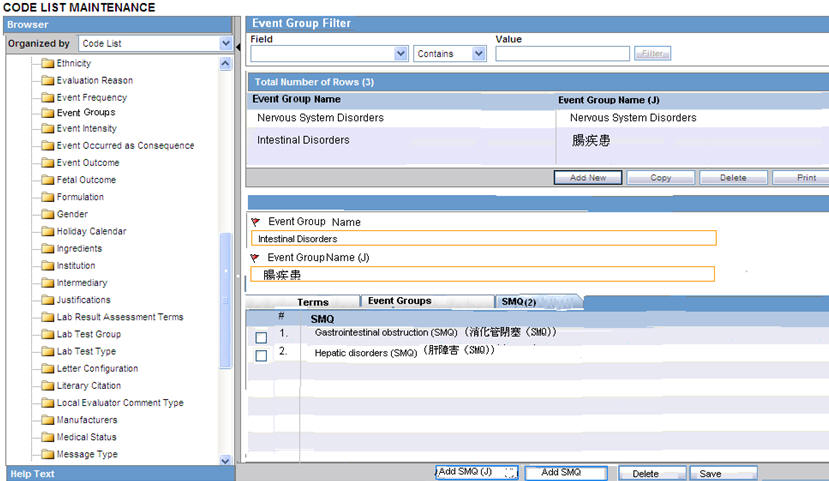
The following table describes the fields associated with Event Groups > SMQ tab.
| Field Name | Description |
|---|---|
| SMQ | The SMQ term is selected from the Add button > MedDRA Browser dialog. |
On clicking the Add button, the MedDRA Browser is displayed, as shown below:
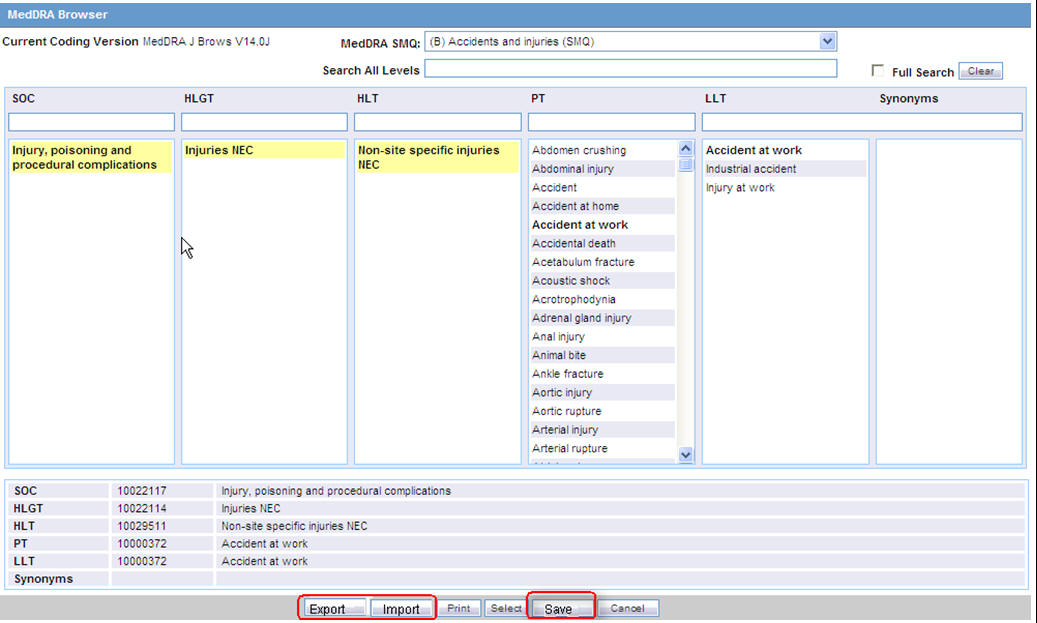
Export:
The Export button is enabled in two scenarios - when MedDRA is opened from:i) Argus Console > Business Configuration > Products and Licenses > Product Family > Datasheetor, from:ii) Argus Console > Code Lists > Argus > Event GroupMedDRA terms are selected at any level of the MedDRA hierarchy.On clicking this button, a dialog is displayed, that allows you to select the file type - .csv / .xls / .xlsx file.On specifying the file type, the selected PT terms are then exported in the Export file. in the <PT terms> format.
Import:
This button is enabled in two scenarios - when MedDRA is opened from:i) Argus Console > Business Configuration > Products and Licenses > Product Family > Datasheetor, from:ii) Argus Console > Code Lists > Argus > Event GroupMedDRA terms are selected at any level of the MedDRA hierarchy.On clicking this button, a dialog is displayed, that allows you to browse and upload a .csv / .xls / .xlsx file from the desired location on your local machine.The format of the data in the selected file should be as follows:It should have only one column of dataThe first header/row must display 'PT' or 'HLT' or 'HLGT' or 'SOC'.All the rows under the header row should contain corresponding terms such as PT text, or HLT text, or HLGT text, or SOC text.The MedDRA terms in the file should be matched against the MedDRA terms table at the level specified in the header row. Duplicate terms within the import file should be ignored.If the user enters a search criteria at any levels of the MedDRA hierarchy and continues to search for terms, the results obtained from the Import will be lost. The user may need to import terms again, using the Import button.
Save:
The Save button is enabled only on selection of the PT term(s).
Configuring Literary Citations
This screen enables you to configure information about Literary Citations.
-
The information configured in this form is displayed in the Literature Info section of the Case Form.
-
Select Code Lists -> Argus to view the Code List Maintenance screen.
Tip:
The code list items are displayed in the left-panel. Click on the required Code List folder to be configured. The details of this code list item appear in the right panel.Field Descriptions
The following table lists and describes the fields associated with this section.
| Field/Control Name | Description |
|---|---|
| Journal | Configures the name of the journal where the citation appears. This is a required field. |
| Author | Configures the name of the author. |
| Title | Configures the title of the citation. |
| Volume | Configures the volume number of the journal where the citation appears. |
| Year | Configures the publication year of the journal where the citation appears. |
| Digital Object Identifier | Configures the digital object identifier. |
| Pages | Configures the number of pages in the journal where the citation appears. |
| Country of Publication | Captures the country of publication of the literature. |
| Study/Trial Classification | Captures the Study / Trial classification for the literature. |
Use the following procedure to configure literary citations.
-
Click on the Literary Citations folder in the left panel. The associated data appears in the Total Number of Rows section in the right panel.
-
Click Journal/Author (or row) to view the details associated with the literary citation. The details appear in the Modify Literature section.
-
You may use the Literary Citation Filter to make your search specific to a citation. The filtering criterion is essential as it helps you to search for specific items.
-
Select the appropriate Field as the filtering criteria from the drop-down list.
-
Once you have selected the Field, you can specify whether your search should contain or start with specific alphabets.
-
Enter the search criteria in Value.
-
Click Filter to apply the selected criteria. This displays the search results under Total Number of Rows.
Tip:
You can alternatively click Add New to create a new citation.-
Click Copy to make an editable copy of an existing citation.
-
Click Delete to delete a selected citation.
-
Click Print to print the selected information as a PDF.
-
-
Enter the name of the journal in the Journal field.
-
Enter the name of the author of the citation in the Author field.
-
Enter the title of the citation in the Title field.
-
Enter the Volume Number in the Volume field.
-
Enter the year in the Year field.
-
Enter the digital object identifier in the Digital Object Identifier field.
-
Enter the number of pages in the Pages field.
-
Click Save to save the changes made.
Configuring Message Type
This screen enables you to configure information about message type.
-
The message type specified in this section enables you to specify auto-submission of reports.
-
Select Code Lists -> Argus to view the Code List Maintenance screen.
Tip:
The code list items are displayed in the left-panel. Click on the required Code List folder to be configured. The details of this code list item appear in the right panel.Field Descriptions
The following table lists and describes the fields associated with this section.
| Field/Control Name | Description |
|---|---|
| Message Type | Displays the message type for a report. |
| Expedited/Periodic | Displays if the message type is expedited or periodic.
Note: By default, ICHICSR is considered as Expedited, while the other message types are considered as Periodic. |
| Description | Displays a description about the message type. |
| Auto Submit | Displays if the report has been auto submitted. |
| Display | Displays if the report needs to be displayed or hidden. |
Use the following procedure to configure message type.
-
Click on the Message Type folder in the left panel. The associated data appears in the Total Number of Rows section in the right panel.
-
Click Message Type (or row) to view the details associated with the message type. The details appear in the Modify Message Type section.
-
You may use the Message Type Filter to make your search specific to a message type. The filtering criterion is essential as it helps you to search for specific items.
-
Select the appropriate Field as the filtering criteria from the drop-down list.
-
Once you have selected the Field, you can specify whether your search should contain or start with specific alphabets.
-
Enter the search criteria in Value.
-
Click Filter to apply the selected criteria. This displays the search results under Total Number of Rows.
Tip:
You can alternatively click Add New to create a new message type.-
Click Copy to make an editable copy of an existing message type.
-
Click Delete to delete a selected message type.
-
Click Print to print the selected information as a PDF.
-
-
Enter the type of message in the Message Type field.
-
Enter the description for the message type in the Description field.
-
Select the English ICSR or Japan ICSR radio button, as applicable.
-
Click the Expedited checkbox if the message type is for an expedited report.
-
Click the Mark as Auto Submit checkbox if you wish to mark for auto submission.
-
Click the Display checkbox if you wish to display the message type.
-
Click Save to save the changes made.
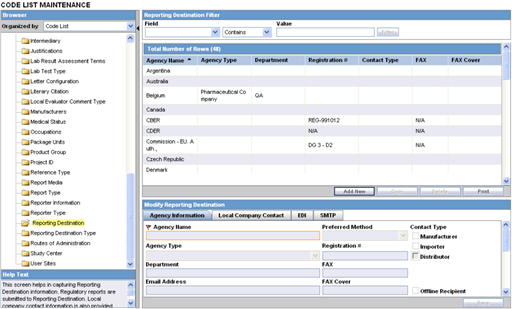
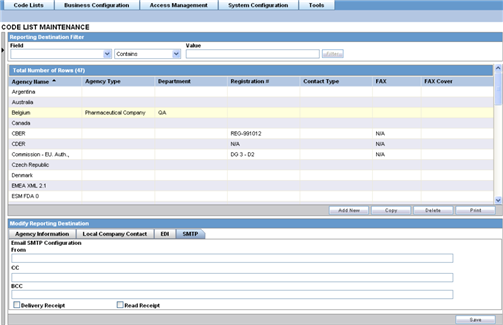
Configuring Reporting Destination
Regulatory reports are submitted to the Reporting Destination. Local company contact information is also provided on this screen.
Use the following procedure to configure reporting destination:
Select Code Lists -> Argus to view the Code List Maintenance screen.
Click Reporting Destination on the left pane of the Code List screen.
Agency Information
The Agency Information tab is displayed by default, on selecting Reporting Destination.
The fields under the Agency Information tab are described in the following table:
| Field/Control Name | Description |
|---|---|
| Address 1 | Enables the user to enter the address of the regulatory contact in line 1. |
| Address 2 | Enables the user to enter the address of the regulatory contact in line 2. |
| Agency Name | Displays the name of the agency. This is a required field. |
| Agency Type | Enables the user to select the agency type. |
| Allow WHO Drug reporting | Enables the user to schedule a report for WHO Drug Reporting. |
| Allowed Attachment File Type | Enables the user to configure the file types that are allowed to be attached to Case Form. |
| Attachments | Enables the user to select the format of attachments.
PDF reports generated by Argus Safety Service to be transmitted via email have a file naming convention as follows:
|
| City | Enables the user to enter the city of the regulatory contact. |
| Contact Type |
|
| Country | Enables the user to enter the country of the regulatory contact. |
| Country Code | Enables the user to enter the country code of the regulatory contact. |
| Department | Enables the user to enter the name of the department. |
| Email Address | Enables the user to enter the email address of the agency. |
| Email Text Body |
|
| Ext | Enables the user to enter the extension number of the regulatory contact. |
| FAX | Enables the user to enter the FAX Number. |
| FAX Cover | Enables the user to enter the FAX Cover. |
| First Name | Enables the user to enter the first name of the regulatory contact. |
| Last | Enables the user to enter the last name of the regulatory contact. |
| Middle | Enables the user to enter the middle name of the regulatory contact. |
| Offline Recipient | Enables the user to configure the regulatory agency as an offline agency. |
| Phone | Enables the user to enter the phone number of the regulatory contact. |
| Postal Code | Enables the user to enter the postal code of the regulatory contact. |
| Preferred Method | Enables the user to select the preferred method of agency information. |
| Registration # | Enables the user to enter the registration number. |
| Report for Investigational Licenses | Enables the user to select if the reports are to be investigational always or only for clinical case or no marketed license. |
| Report for Marketed Licenses | Enables the user to select whether reports are to be marketed always or only for the Spontaneous cases or no Investigational. |
| Report per Email | Enables the user to enter the number of reports to be received in each email. |
| State/Province | Enables the user to enter the state/province of the regulatory contact. |
| Title | Enables the user to enter the title of the regulatory contact. |
| FAX | Enables the user to enter the fax number of the regulatory contact. |
Use the following procedure to configure agency information.
-
Select the Agency Name (or row) of the reporting destination displayed under Total Number of Rows that needs to be modified. The Modify section displays the information about the selected code list.
-
You may use the Reporting Destination Filter to make your search specific to an agency. The filtering criterion is essential as it helps you to search for specific items.
-
Select the appropriate Field as the filtering criteria from the drop-down list.
-
Once you have selected the Field, you can specify whether your search should contain or start with specific alphabets.
-
Enter the search criteria in Value
-
Click Filter to apply the selected criteria. This displays the search results under Total Number of Rows.
Tip:
Tip: You can alternatively click Add New to create a new agency information.-
Click Copy to make an editable copy of an existing agency information.
-
Click Delete to delete the selected agency information.
-
Click Print to print the selected information as a PDF.
-
-
Enter the name of the agency in the Agency Name field.
-
Select the type of agency in the Agency Type field.
-
Enter the department in the Department field.
-
Enter the email address in the Email field. Multiple e-mail addresses must be separated by a comma (,), and not by a semi-colon (;). If you separate the email addresses by a semi-colon, the transmission service will fail.
-
Select the preferred method from the Preferred Method drop-down list. The options available are Fax or Email.
-
Enter the registration number in the Registration # field.
-
Enter the Fax Number in the FAX field.
-
Enter the Fax Cover in the FAX Cover field.
-
Select the preferred contact type by clicking the checkboxes available under Contact Type.
The options available are Manufacturer, Importer and Distributor.
-
Select the Offline Recipient checkbox to configure the regulatory agency as an offline agency.
-
Select the Title of the regulatory contact. The options available are Mr., Miss and Mrs.
-
Enter the first name of the regulatory contact under the First Name field.
-
Enter the middle name of the regulatory contact under the Middle field.
-
Enter the last name of the regulatory contact under the Last field.
-
Enter the postal contact address of the regulatory contact under the Address 1 field.
-
Enter the phone number of the regulatory contact under the Phone field.
-
Enter the extension number of the regulatory contact under the Ext field.
-
Enter the country code to be dialed in calling up the regulatory contact under the Country Code field.
-
Enter the fax number of the regulatory contact under the FAX field.
-
Enter the fax extension number of the regulatory contact under the Ext field.
-
Enter the country code required in faxing up the regulatory contact under the Country Code field.
-
Enter the name of the city where the regulatory contact lives in the City field.
-
Enter the name of the state/province where the regulatory contact lives in the State/Province field.
-
Enter the name of the country where the regulatory contact lives in the Country field.
-
Enter the postal code of the place where the regulatory contact lives in the Postal Code field.
-
Enter the number of reports that need to be sent in every email to the regulatory contact in the Report per Email field.
-
Select the format of the attachments being sent with the emails through the Attachments drop-down list.
The formats available to be sent as attachments are PDF or RTF formats.
-
Click Text or RTF to save and view a letter attachment in text or RTF format.
This enables the user to select the email body in Text or RTF format.
-
Select how the report is to be marketed from the Report to be marketed drop-down list.
-
The options in this list are Always or Spontaneous or No Investigational.
-
Select the Allow WHO Drug Reporting checkbox to schedule the report for WHO Drug Reporting.
-
Select the type of reports as Investigational always or Only for clinical case or No marketed license from the Report for Investigational drop-down list.
-
Click Save to save the changes made.
Local Company Contact
This section lists the Field Descriptions and configuration steps for the Local Company Contact tab.
The fields the following table lists and describes the fields on the Local Company Contact tab.
| Field/Control Name | Description |
|---|---|
| Company Name | Displays the name of the company. This is a required field |
| Sender Type | Enables the user to select the sender type |
| Department | Enables the user to enter the name of the department |
| Email Address | Enables the user to enter the email address of the agency |
| Lab Code | Enables the user to enter the lab code |
| Event Term on Expedited Reports | Enables the user to select the event term on expedited reports. |
| Title | Enables the user to enter the title of the local company contact |
| First Name | Enables the user to enter the first name of the contact |
| Middle | Enables the user to enter the middle name of the contact |
| Last | Enables the user to enter the last name of the contact |
| Address | Enables the user to enter the address of the contact |
| Phone | Enables the user to enter the phone number of the contact |
| Ext | Enables the user to enter the extension number of the contact |
| Country Code | Enables the user to enter the country code of the contact |
| FAX | Enables the user to enter the fax number of the contact |
| Ext | Enables the user to enter the fax extension number of the contact |
| Country Code | Enables the user to enter the fax country code of the contact |
| City | Enables the user to enter the city of the contact |
| State/Province | Enables the user to enter the state/province of the contact |
| Country | Enables the user to enter the country of the contact |
| Postal Code | Enables the user to enter the postal code of the contact |
Use the following procedure to configure the local company contact.
-
Select the Agency Name (or row) of the reporting destination displayed under Total Number of Rows that needs to be modified. The Modify section is populated with information about the selected code list.
-
You can use the Reporting Destination Filter to make your search specific to a company. The filtering criterion is essential as it helps you to search for specific items.
-
Select the appropriate Field as the filtering criteria from the drop-down list.
-
Once you have selected the Field, you can specify whether your search should contain or start with specific alphabets.
-
Enter the search criteria in Value
-
Click Filter to apply the selected criteria. This displays the search results under Total Number of Rows.
Tip:
You can alternatively click Add New to create a new company contact.-
Click Copy to make an editable copy of an existing company contact.
-
Click Delete to delete a selected company contact.
-
Click Print to print the selected information as a PDF.
-
-
Enter the name of the company in the Company Name field.
-
Select the type of sender in the Sender Type drop-down list.
-
Enter the name of the department under the Department field.
-
Enter the email address of the agency under the Email Address field.
-
Enter the lab code of the agency under the Lab Code field.
-
Select the type of event term on preferred reports from the Event Term on Preferred Reports drop-down list. The options available under this list are Preferred and Lower Level.
-
Select the Title of the regulatory contact. The options available are Mr., Miss and Mrs.
-
Enter the first name of the regulatory contact under the First Name field.
-
Enter the middle name of the regulatory contact under the Middle field.
-
Enter the last name of the regulatory contact under the Last field.
-
Enter the postal contact address of the regulatory contact under the Address field.
-
Enter the phone number of the regulatory contact under the Phone field.
-
Enter the extension number of the regulatory contact under the Ext field.
-
Enter the country code to be dialed in calling up the regulatory contact under the Country Code field.
-
Enter the fax number of the regulatory contact under the FAX field.
-
Enter the fax extension number of the regulatory contact under the Ext field.
-
Enter the country code required in faxing up the regulatory contact under the Country Code field.
-
Enter the name of the city where the regulatory contact lives in the City field.
-
Enter the name of the state/province where the regulatory contact lives in the State/Province field.
-
Enter the name of the country where the regulatory contact lives in the Country field.
-
Enter the postal code of the place where the regulatory contact lives in the Postal Code field.
-
Click Save to save the changes made.
Configuring EDI
This section lists the field descriptions and configuration steps for the EDI tab.
Use the following procedure to configure reporting destination:
-
Select Code Lists -> Argus to view the Code List Maintenance screen.
-
Select Reporting Destination on the left pane of the Code List screen. The screen appears as shown below.
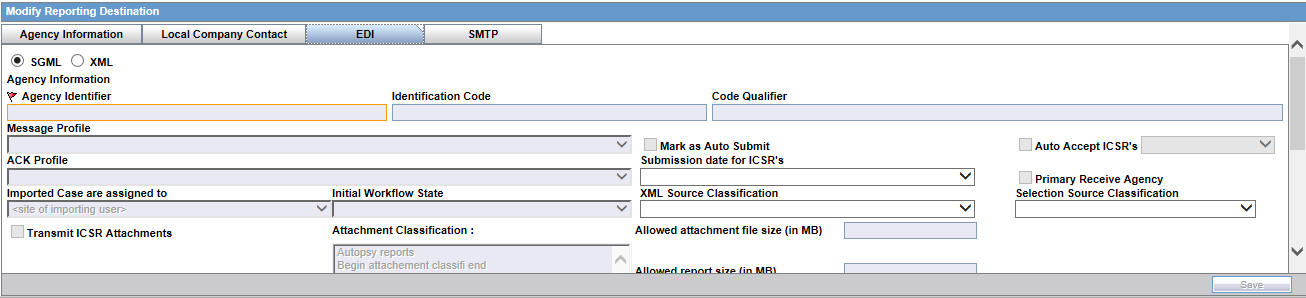
The following table lists and describes the fields on the EDI tab.
| Field/Control Name | Description |
|---|---|
| SGML/XML | Enables the user to select whether to send the report in SGML or XML format. When SGML is disabled and XML is selected, it is populated with default values and is displayed in the read-only mode for the PMDA E2B R3 profile. |
| Agency Identifier | Enables the user to enter the routing ID configured in Cyclone for the sender community. |
| Identification Code | Enables the user to enter the agency Duns code, a unique identification code that identifies the trading partner.
This field is disabled for the E2B (R3), eVAERS, and eMDR profile. Populated with default values and is displayed in the read-only mode for the PMDA E2B R3 profile. |
| Code Qualifier | Enables the user to enter the code qualifier here. The code qualifier is used to interpret the identification code.
This field is disabled for the E2B (R3), eVAERS, and eMDR profile. Populated with default values and is displayed in the read-only mode for the PMDA E2B R3 profile. |
| Message Profile | Enables the user to select a message profile. The available options now include the ICH-ICSR V3.0 MESSAGE TEMPLATE - PMDA template. |
| Mark as Auto Submit | Enables the user to mark the report for auto submission. |
| Auto Accept ICSR's | Click this checkbox to auto accept ICSR's. This checkbox is visible only when case numbering is set to Automatic. |
| Submission date for ICSR's | Enables the user to select the submission date for ICSRs. It is blanked out and disabled if user selects the eVAERS or eMDR profile in the EDI Tab. |
| ACK Profile | Enables the user to select the acknowledgement profile. This field is disabled for the eMDR and eVAERS profile. The PMDA E2B R2 Ack profile is also available now. |
| Primary Receive Agency | Enables the user to select the primary receiving agency. |
| Imported Cases are assigned to | Enables the user to select the country, where the imported cases need to be assigned.
Note: This list comprises the configured Argus sites. The default value is the site of the importing user. |
| Initial Workflow State | Enables the user to configure the initial workflow state of the case.
Note: This list comprises Argus workflow states, with the default value being blank. If you select blank as the workflow state, it is treated as a new case being booked-in. |
| XML Source Classification | The system enables the user to configure the XML Source Classification and the PDF Source Classifications used for classifications defined while the Source E2B File / PDF for Initial Intake or E2B Differences report is classified.
When a case is accepted as an initial or follow-up case, the system attaches the source XML and the Initial Selection PDF to the case on the Additional Info tab. |
| Selection Source Classification | Enables the user to select the source classification from the drop-down. |
| Transmit E2B Attachments | Click this checkbox to transmit E2B attachments. If this checkbox is checked in the Reporting Destination Code List, case form attachments are sent to the specified reporting destination. |
| Attachment Classification | Enables the user to select the attachment classification. |
| Identification Code | Enables the user to enter the company Duns code, a unique identification code that identifies the trading partner. This field is disabled for the E2B (R3), eVAERS, and eMDR profile. |
| Company Identifier | Enables the user to enter the company identifier |
| Code Qualifier | Enables the user to enter the code qualifier here. The code qualifier is used to interpret the identification code. This field is disabled for the E2B (R3), eVAERS, and eMDR profile. |
| File Name | Enables the user to enter the file name |
| SGML Declaration File | Enables the user to enter the SGML Declaration File. This field is disabled for the E2B (R3), eVAERS, and eMDR profile. |
| Maximum # of reports to include in the msg | Enables the user to enter the maximum number of reports that will be transmitted in one message. This field is disabled for the E2B (R3), eVAERS, and eMDR profile and set to 1. Populated with default values and is displayed in the read-only mode for the PMDA E2B R3 profile. |
| Method | Enables the user to select a method here. This field contains E2B ESTRI Gateway and E2b Media values. |
| EDI Header Required | Enables the user to generate the EDI Header. This field is disabled for the E2B (R3), eVAERS, and eMDR profile. Populated with default values and is displayed in the read-only mode for the PMDA E2B R3 profile. |
| XML Version | Enables the user to enter the XML Version. This field is disabled for the E2B (R3) and eMDR profile and set to 1.0. Populated with default values and is displayed in the read-only mode for the PMDA E2B R3 profile. |
| "URL for Message Schema" | Enables the user to enter the path where the message schema resides on the internet or enter full path if it is located on the disk. This field is disabled for the E2B (R3), eVAERS, and eMDR profile. Populated with default values and is displayed in the read-only mode for the PMDA E2B R3 profile. |
| Encoding | Enables the user to select the character set encoding used in XML. This field is disabled for the E2B (R3), eVAERS, and eMDR profile and set to UTF-8. Populated with default values and is displayed in the read-only mode for the PMDA E2B R3 profile. |
| Allowed Attachment File Size (in MB) | Enables the user to specify allowed attachment file size (in MB). |
| Allowed Report Size (in MB) | Enables the user to specify allowed Report size (in MB). |
| "URL of ACK Schema" | Enables the user to enter the path where the ACK schema resides on the internet or enter the full path if it is located on the disk. This field is disabled for the E2B (R3), eVAERS, and eMDR profile. |
| Incoming Folder | Enter the path to the folder where incoming files are stored. |
| Outgoing Folder | Enter the path to the folder where outgoing files are stored. |
| E2B Attachment Outgoing Folder | the path to the folder where outgoing E2B attachments are processed. |
| Suppress Auto-scheduling | If the checkbox for Suppress Auto-scheduling is marked for an Agency in the Reporting Destination codelist, the system does not schedule reports (Initial, Follow-up, Amendment, Nullification) for that specific Agency during Auto-scheduling (via AG services, Clicking on Auto-scheduling, Auto-scheduling of f/p reports for a manually submitted report). However, reports can be manually scheduled to the Agency that is set for Suppress Auto-scheduling. |
Note:
For Argus J users, an additional field called Message Profile 2is displayed for the configuration of the PMDA - J profile. This field is required for the PMDA agency to specify the PMDA J profile.Use the following procedure to configure EDI:
-
Select the Agency Name (or row) of the reporting destination displayed under Total Number of Rows that needs to be modified. The Modify section is populated with information about the selected code list.
-
You may use the Reporting Destination Filter to make your search specific to an EDI. The filtering criterion is essential as it helps you to search for specific items.
-
Select the appropriate Field as the filtering criteria from the drop-down list.
-
Once you have selected the Field, you can specify whether your search should contain or start with specific alphabets.
-
Enter the search criteria in Value
-
Click Filter to apply the selected criteria. This displays the search results under Total Number of Rows.
Tip:
You can alternatively click Add New to create a new EDI.-
Click Copy to make an editable copy of an existing EDI.
-
Click Delete to delete a selected EDI.
-
Click Print to print the selected information as a PDF.
-
-
Select the format in which the report is to be sent by selecting the SGML and XML radio buttons.
-
Click the Mark as Auto Submit checkbox if you wish to mark the report for auto-submission.
-
Select the country where the imported cases need to be assigned.
-
Select the initial workflow state of the case.
-
Enter the routing ID configured in Cyclone for the sender community under the Agency Identifier field.
-
Enter the Agency Duns code under the Identification Code field.
-
Enter the Code Qualifier under the Code Qualifier field.
-
Select the message profile from the Message Profile drop-down list.
-
Select the acknowledgement profile from the ACK Profile drop-down list.
-
Enter the Agency Duns Code in the Identification Code field.
-
Enter the Company Identifier in the Company Identifier field.
-
Enter the Code Qualifier in the Code Qualifier field.
-
Enter the name of the file in the File Name field.
-
When a case is accepted as an initial or follow-up case, the system attaches the source XML and the Initial Selection PDF to the case on the Additional Info tab.
-
Select the SGML file in the SGML Declaration File drop-down list.
-
Enter the maximum number of reports that need to be included in the message under the Maximum # of reports to include in the msg field.
-
Select the method from the Method drop-down list. This list contains options like E2B - Gateway, Physical Media and XML Transmission.
-
Click the EDI Header checkbox to generate an EDI Header.
-
Enter the version of XML in which it is coded in the XML Version field.
-
Enter the path where the message DTD resides on the internet or enter full path if it is located on the disk under the "URL of Message DTD" field.
-
Select the character set encoding used in XML in the Encoding drop-down list.
-
Enter the path where the ACK DTD resides on the internet or enter the full path if it is located on the disk in the "URL of ACK DTD".
-
Click Auto Accept ICSR's to auto accept ICSR's.
-
Click Transmit E2B Attachments to transmit E2B attachments.
-
Click Save to save the changes made.
Use the following procedure to configure reporting destination.
-
Select Code Lists -> Argus to view the Code List Maintenance screen.
Tip:
The code list items are displayed in the left-panel. Click on the required Code List folder to be configured. The details of this code list item appear in the right panel. -
Select Reporting Destination. The screen appears as shown below.
Configuring the Base Directory Path
A new database only (not shown in the UI) global level common profile switch BASE_DIR_PATH_FOR_GATEWAY_FOLDERS is available for providing the base path for all incoming, outgoing and E2B attachments folders.
Users can configure the base directory path of a machine or network shared path through this swtich. This path is suffixed with values provided in new configurations and all incoming, outgoing and E2B attachment folders are created under base directory only. This profile switch is mandatory for the Oracle cloud customers whereas it is optional for the on-premise customers. With this optional set up, on-premise customers can retain their existing folder structure when upgrading from older version of Argus Safety. Cloud customers would need to reconfigure their gateway folders based on the new architecture. When the BASE_DIR_PATH_FOR_GATEWAY_FOLDERS is set, make sure to create the base directory path along with the enterprise name.
For example,
If BASE_DIR_PATH_FOR_GATEWAY_FOLDERS is set to C:\BASE_DIR for the enterprise ENT_DEFAULT, then the folder C:\BASE_DIR\ENT_DEFAULT is created. IF the Incoming Folder is set to AGECNCY\Incoming, Outgoing Folder to AGECNCY\Outgoing and ISCR Outgoing Attachment Folder to AGECNCY\OutAttachment, the actual incoming folder path would be C:\BASE_DIR\ENT_DEFAULT\AGECNCY\Incoming. The same standard applies for the outgoing and attachment folder too.
If the BASE_DIR_PATH_FOR_GATEWAY_FOLDERS is not set, the Incoming, Outgoing and Attachment folders could have the complete directory path.
SMTP
This section lists the Field Descriptions and configuration steps for the SMTP tab.
The following tables lists and describes the fields on the SMTP tab.
| Field/Control Name | Description |
|---|---|
| From | Enables the user to enter the email address of the sender. |
| CC | Enables the user to enter the email addresses to send email as CC. |
| BCC | Enables the user to enter the email addresses to send email as BCC. |
| Delivery Receipt | Enables the user to check this box to receive a delivery receipt. |
| Read Receipt | Enables the user to check this box to receive a read receipt. |
Use the following procedure to configure SMTP.
-
Select the Agency Name (or row) of the reporting destination displayed under Total Number of Rows that needs to be modified. The Modify section is populated with information about the selected code list.
-
You may use the Reporting Destination Filter to make your search specific to an SMTP. The filtering criterion is essential as it helps you to search for specific items.
-
Select the appropriate Field as the filtering criteria from the drop-down list.
-
Once you have selected the Field, you can specify whether your search should contain or start with specific alphabets.
-
Enter the search criteria in Value
-
Click Filter to apply the selected criteria. This displays the search results under Total Number of Rows.
Tip:
You can alternatively click Add New to create a new SMTP.-
Click Copy to make an editable copy of an existing SMTP.
-
Click Delete to delete a selected SMTP.
-
Click Print to print the selected information as a PDF.
-
-
Enter the email address of the sender under the From field.
-
Enter the email addresses to send email as CC under the To field. Multiple e-mail addresses must be separated by a comma (,), and not by a semi-colon (;). If you separate the email addresses by a semi-colon, the transmission service will fail.
-
Enter the email addresses to send email as BCC under the BCC field. Multiple e-mail addresses must be separated by a comma (,), and not by a semi-colon (;). If you separate the email addresses by a semi-colon, the transmission service will fail.
-
Click the Delivery Receipt checkbox to receive a delivery receipt.
-
Click the Read Receipt checkbox to receive a read receipt.
-
Click Save to save the changes made.
-
Click Save to save the changes made.
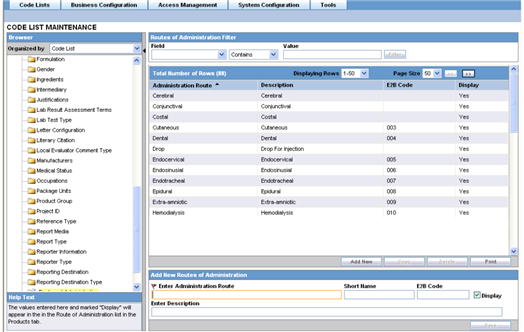
Configuring Routes of Administration
This screen enables you to configure the Route of Administration information. This describes the route of drug administered to the patient. This data is reflected in Expedited and Periodic regulatory reports.
-
The values entered here and marked under Display appear in the in the Route of Administration list on the Products tab.
-
Select Code Lists -> Argus to view the Code List Maintenance screen.
Tip:
The code list items are displayed in the left-panel. Click on the required Code List folder to be configured. The details of this code list item appear in the right panel.Click on the Routes of Administration folder in the left panel. The associated data appears in the Total Number of Rows section in the right panel.
Field Descriptions
The following table describes the fields associated with this section.
| Field/Control Name | Description |
|---|---|
| Administration Route | Displays information about the route of administration. It displays information about how the drug was administered. This is a required field. |
| Short Name | Displays the short name of the administrator route. |
| Description | Displays a description of the administrator route. |
| E2B Code | Displays the E2B Code of the administrator route. |
| Display | Enables the user to display the record in the Administrator Route in the Products screen. |
Use the following procedure to configure routes of administration.
-
Click the Administration Route (or row) to view the details associated with the administration route. The details appear in the Modify Administration Route section.
-
You may use the Routes of Administration Filter to make your search specific to a route. The filtering criterion is essential as it helps you to search for specific items.
-
Select the appropriate Field as the filtering criteria from the drop-down list.
-
Once you have selected the Field, you can specify whether your search should contain or start with specific alphabets.
-
Enter the search criteria in Value.
-
Click Filter to apply the selected criteria. This displays the search results under Total Number of Rows.
Tip:
You can alternatively click Add New to create a new route.-
Click Copy to make an editable copy of an existing route.
-
Click Delete to delete a selected route.
-
Click Print to print the selected information as a PDF.
-
-
Enter information about the administration route in the Enter Administration Route field.
-
Enter a short name about the administration route in the Short Name field.
-
Enter the E2B Code of the administration route in the E2B field.
-
Select the Display checkbox to display the record in the Add field in the Products screen.
-
Enter the description about the administration route in the Enter Description field.
-
Click Save to save the changes made.
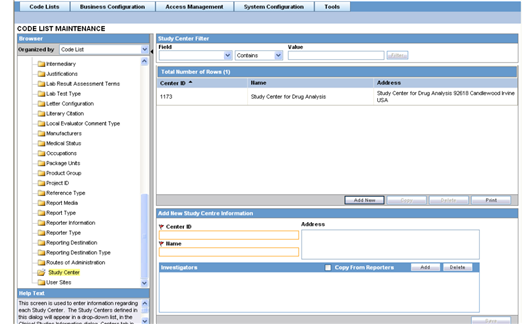
Configuring Study Center
This screen enables you to configure the Study Center information. This screen is used to enter information regarding each Study Center. The Study Centers defined in this dialog appear on a drop-down list in the Clinical Studies Information dialog under the Centers tab in List Maintenance. You can create a Study Center with the same Center ID but with a different name and address. When you select the studies in the Study Look and Center Lookup in the Console, the system concatenates the Center Name (Center ID) in the look-up dialog.
-
Investigators for each Center can also be added via this dialog.
-
Select Code Lists -> Argus to view the Code List Maintenance screen.
-
Click on the Study Center folder in the left panel. The associated data appears in the Total Number of Rows section in the right panel.
Tip:
The code list items are displayed in the left-panel. Click on the required Code List folder to be configured. The details of this code list item appear in the right panel.Field Descriptions
The following table lists and describes the fields associated with this section.
| Field/Control Name | Description |
|---|---|
| Center ID | Enables the user to enter the Center ID. |
| Name | Enables the user to enter the name of the center. |
| Address | Enables the user to enter the address of the center. |
| Copy from Reporters | Enables the user to copy the information from Reporters. |
| # | Displays the row count of the number of investigators. |
| Investigator | Enables the user to enter the name of the investigator. |
| Phone | Enables the user to enter the phone number of the investigator. |
| Fax | Enables the user to enter the fax number of the investigator. |
| Notes | Enables the user to enter comments or remarks. |
Use the following procedure to configure study center.
-
Click the Center ID (or row) to view the details associated with the administration route. The details appear in the Modify Study Center section.
-
You may use the Study Center Filter to make your search specific to a center. The filtering criterion is essential as it helps you to search for specific items.
-
Select the appropriate Field as the filtering criteria from the drop-down list.
-
Once you have selected the Field, you can specify whether your search should contain or start with specific alphabets.
-
Enter the search criteria in Value.
-
Click Filter to apply the selected criteria. This displays the search results under Total Number of Rows.
Tip:
You can alternatively click Add New to create a new center.-
Click Copy to make an editable copy of an existing center.
-
Click Delete to delete a selected center.
-
Click Print to print the selected information as a PDF.
-
-
Enter the ID of the center in the Center ID field.
-
Enter the name of the center in the Name field.
-
Enter the address of the center in the Address field.
-
Select the Copy from Reporters checkbox to copy the information from Reporters.
-
Enter the name of the investigator in the Investigators field.
Tip:
Tip: Click Add to add a new investigator. Click Delete to delete a selected investigator record. -
Enter the phone number of the investigator in the Phone field.
-
Enter the fax number of the investigator in the Fax field.
-
Enter comments, if any, under the Notes field.
-
Click Save.
Configuring Holiday Calendar
This screen enables you to configure the Holiday Calendar information. The Code List allows the user to define holidays at country level.
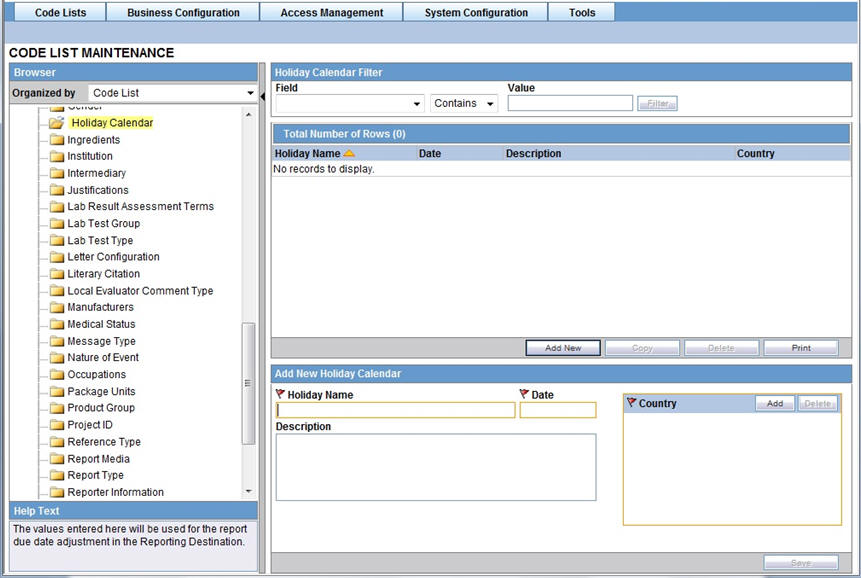
The Country of Reporting Destination will be matched with the Country in the Holiday Calendar to identify the holidays to be adjusted for the Reporting Destination.
Go to Code Lists > Argus to view the Code Lists page and click the Holiday Calendar folder in the left panel.
The associated report appears in the Total Number of Rows section in the right panel.
Tip:
The code list items are displayed in the left-panel. Click on the required Code List folder to be configured. The details of this code list item appear in the right panel.Field Descriptions
The following table describes the fields associated with this section.
| Field/Control Name | Description |
|---|---|
| Holiday Name | This field displays the unique name for the holiday name. |
| Date | This field displays the date on which the holiday has been scheduled. |
| Description | This field displays a description of the holiday. |
| Country | This field displays the name of the country (or countries) with which the holiday is associated. |
Use the following procedure to configure study center.
-
Click the Holiday Name (or row) to view the details associated with that Holiday Calendar. The details appear in the Modify Holiday Calendar section.
-
You may use the Holiday Calendar Filter to make your search specific to a Holiday Calendar record. The filtering criterion is essential as it helps you to search for specific items.
-
Select the appropriate Field as the filtering criteria from the drop-down list.
-
Once you have selected the Field, you can specify whether your search should contain or start with specific alphabets.
-
Enter the search criteria in Value.
-
Click Filter to apply the selected criteria. This displays the search results under Total Number of Rows.
Tip:
You can alternatively click Add New to create a new Holiday Calendar record.-
Click Copy to make an editable copy of an existing Holiday Calendar record.
-
Click Delete to delete an existing Holiday Calendar record.
-
-
Enter the Holiday Name for the Holiday Calendar.
-
Enter the Date for the record.
-
Enter the Country (or countries) with which the holiday must be associated.
-
Enter the Description for the Holiday Calendar record.
-
Click Save.
Other Code List Items
The following table lists and describes additional code list items that you should be aware of.
| Code List Item | Description |
|---|---|
| Accidental Exposure | Enables you to capture Accidental Exposure information. Accidental Exposure is in the Dosage regimen section of the Products tab as a drop-down list. |
| Action Taken | Enables you to capture Action Taken information. Action Taken information is required to capture information about steps taken when an adverse drug event occurs. The values that you enter in this field are read-only, and appear in the Dosage Regimen section on the Action Taken drop-down in Case Form > Products tab. |
| Action Type | Enables you to capture Action Type information that describes the action type required for the case. Values entered in this field are read-only, and appear in the Code/Description list of the Activities tab.
Go to Code List Maintenance > Code List > Argus and click Action Type in the browser tree. |
| Age Group | Enables you to capture Age Group information. An Age Group is the range of lower and upper age limits. Patients are categorized in different age groups. This data appears in Expedited and Periodic regulatory reports. The values that you enter in this field appear on the Patient Information Screen, and in the Age Group drop-down list. |
| Age Unit | Enables you to capture Age Unit information. An Age Unit displays time in periods such as Year, Month, Day, Hours, and so on. This data appears in the Expedited and Periodic regulatory reports. It also appears in the Age Unit drop-down, Gestation Period unit, and Device Age unit fields on the Patient Information screen, as per the settings made to the Age unit, Gestation Period unit, and Device Age unit flags in the Age unit codelist. |
| Always Serious Term List | Enables you to select the report types you would like the always serious to run against. You can select specific Product Families to have the always serious terms run against. |
| Anatomical Location | Enables you to capture information about the location where vaccinations are given. This data appears in the expedited and periodic regulatory reports. The values that you enter in these fields appear on the Anatomical Location drop-down list on the Vaccine screen. |
| Attachment Classifications | Enables you to capture the attachment classification that is used to describe attachment types. The values that you enter in these fields appear in the Attachment Classification section on the Additional Information screen. Attachment Classification that are marked as 'E2B Additional Doc' can be configured to be sent as attachments while transmitting E2B (R2) and E2B (R3) reports. |
| Attachment Keywords | Enables you to capture information about the attachment keywords that are used to define an attachment type. The values appear in the Attachment Keywords section on the Additional Information screen. |
| Birth Type | Enables you to capture birth type information when capturing pregnancy information. This data appears in multiple regulatory reports and in the Birth Type drop-down list on the Pregnancy information screen. |
| Case Classifications | Enables you to capture Case Classification to help categorize cases. This information does not impact any report or screen, but is used during case searches to narrow the results set. |
| Causality Category | Enables you to capture information about the causality type. This data appears in expedited and periodic regulatory reports and on the Event Causality drop-down list in the Event Assessment section on the Event screen. |
| Causality Method | Enables you to capture Causality Method information. It appears on the Case Form Event Assessment tab.The E2B report uses this information to determine the drug assessment method. |
| Causality Source | Enables you to capture Causality Source information. It appears on the Case Form Event Assessment tab.The E2B report uses this information to determine the drug assessment source. |
| Clinical Reference Type | Enables you to capture information about the clinical reference type. The Clinical Reference Type appears as a drop-down list in Study Configuration. |
| Condition Type | Enables you to capture information about the condition of the patient such as historical condition, current condition, historical drug, illness at the time of vaccinetion etc,. This data appears in expedited and periodic regulatory reports and in the Condition Type drop-down list on the Other Relevant History screen. |
| Contact Type | Enables you to capture information about the type of contact (such as Follow-up, Investigator). The values appear in the Contact Type drop-down list in the Contact Log section of the Activity Tab. |
| Countries | Enables you to capture information about the country where the adverse event occurred. If you enter A2, A3, or the numeric country code, the system automatically populates the Country field with the name of the country.
You can also check a checkbox called 'Group 2 Country' (unchecked by default) to enable administrators to add a Group 2 Country. This is required when the Due Date for expedited reports differ from country to country, as per their regulations. For Group 1 countries, the Due Date is based on the Aware Date received globally for the case. For Group 2 countries, the Due Date is based on the aware date when the affiliate or a company representative of that country received information about the case. Obtain the country name and country codes from the ISO 3166 country code specification. You may receive the following error messages:
|
| Date Ranges | Enables you to capture date range information as follows:
|
| Delivery Types | Enables you to capture information about the type of delivery that occurred during pregnancy. This data appears in expedited and periodic regulatory reports and on the Delivery Types drop-down list on the Pregnancy Information screen. |
| Device Preliminary Comments | Enables you to capture comments about medical devices. Device Preliminary Comments appear on the Product screen when the user selects the Device option. |
| Device Subcomponents | Enables you to capture information about subcomponents that are part of a medical device. This information appears on the Product screen when the user selects the Device option. |
| Device Type | Enables you to capture information about patient device types. This data appears in expedited and periodic regulatory reports. |
| Dosage Frequency | Enables you to capture information about how often medication is given (such as daily, bid, weekly, etc.) This information appears on the frequency drop-down list on the Products screen.
|
| Dosage Unit | Enables you to capture dosage units information. This information is required when capturing the quantity of drug on sale and also appears in expedited and periodic reports.
A new Strength Unit column has been introduced. Check the Strength Unit checkbox to capture strength unit information about the Dosage unit. For more information on the Factory data for Dosage Units codelist, see the Argus_Safety_8.1.2_CaseForm_Console_Updates_Summary.xls. |
| Ethnicity | Enables you to capture Race information of the patients. This information appears in periodic regulatory reports and eVAERS reports. |
| Evaluation Reason | Enables you to capture information about why the product is being evaluated. This information appears in the Evaluation Reason list on the Case Form > Products tab. |
| Event Frequency | Enables you to capture information about the frequency of the event. It includes categories such as intermittent, continuous, and single episode. The values entered in this field appear in the Event Frequency drop-down list on the Event Information screen. |
| Event Intensity | Enables you to capture information about the intensity of the adverse event and includes categories such as mild, moderate, and severe. The values that you enter on this screen appear on the Event Intensity drop-down list on the Event Information screen. |
| Event Outcome | Enables you to capture event outcome information such as Fatal, Abortion due to AE/Infection, and Recovered. This data appears in expedited and periodic regulatory reports and on the Event Outcome drop-down list on the Event Information screen. |
| Fetal Outcome | Enables you to capture information about fetal outcome and includes information such as abnormal development or pre-natal complications. This data appears in expedited and periodic regulatory reports. The values entered here appear on the Fetal Outcomes drop-down list on the Pregnancy Information screen. |
| Formulation | Enables you to capture information about the formulations (cream, drop, capsule, etc.) available for a product. The values that you enter here, appear on the Formulation drop-down list on the Product screen. |
| Gender | Enables you to capture gender information. This information appears in expedited and periodic regulatory reports. |
| Ingredients | Enables you to capture information about the ingredients in the product. This includes the ingredient, the concentration, and the units of ingredients used to make the product. This information appears in expedited and periodic regulatory reports. |
| Intermediary | Enables you to capture information about intermediaries such as sales representative, licensee, regulatory authority or local affiliate. The values that you enter here, appear on the Intermediary drop-down list on the Reporters screen. |
| Interval Units | This codelist is used to maintain the interval units that are used as units for Age, Duration, etc. |
| Justifications | Enables you to capture justification information. You can enter reasons for overriding system determinations in the Justifications dialog box. The values that you enter here, appear in the Action Justification dialog. |
| Lab Assessment Terms | Enables you to capture the lab result assessment terms that define the terms that describe the patient's results on various lab tests (such as elevated, depressed, etc). This data is reflected in expedited and periodic regulatory reports. The values that you enter here, appear on the Lab Result Assessment Terms drop-down list on the Laboratory Data screen. |
| Lab Test Type | Enables you to capture the lab test type. This defines test type and whether it has normal, high, or low values. It can be coded as defined in the MedDRA dictionary. The values that you enter here, appear on the Lab Test drop-down on the Patient screen. |
| Lab Test Units | This codelist is used to maintain the units of measures used in Lab test. |
| Languages | This codelist is used to maintain the ISO codes of the languages in which text data entry can be made. |
| Literary Citations | Enables you to enter information about literary citations. |
| Local Evaluation Comment Type | Enables you to capture the category of a local comment such as French, German, English, etc. The values that you enter here, appear in the Analysis, Local Comment type. |
| Location | This codelist is used to maintain the Anatomical locations in which Vaccines are administered. |
| Manufacturer | Enables you to capture information about the product manufacturer.
Manufacturer is required while capturing, adding, or modifying information on manufacturer sites. This data appears in expedited and periodic regulatory reports and on the Manufacturer drop-down list on the Product Configuration screen. |
| Medical Status | Enables you to capture medical information about patient status. This data appears in both the expedited and periodic regulatory reports. The values that you enter here appear on the Medical Status drop-down list. |
| Message Type | Enables you to enter information about each E2B message type. The system uses the defined message types when it creates an E2B file. |
| Nature of Event | Enables you to capture information about the type of adverse event that occurred. |
| Occupations | Enables you to capture information about patient and reporter occupations such as physician, regulatory agent, and journalist. This data appears in both expedited and periodic regulatory reports. The values that you enter here, are marked as ICH Occupation, and appear in the Reporter's Occupation drop-down list on the General Screen. |
| Package Units | Enables you to capture information about product packaging. The package units define the number of units in a package. |
| Product Group | Enables you to capture information about a specific Product Group. Users can use the Product group field to categorize Product Families based on therapeutic area. The values that you enter here appear in the drop-down list associated with the Project Group field of the Product Family. |
| Project ID | Enables you to capture project ID information used to group similar studies under a single project. The values that you enter in this field appear on the Project ID field drop-down on the Study Configuration. |
| Purchased With | This code list is used to maintain the Funds from which Vaccine was purchased. |
| Reference Types | Enables you to capture reference type information and defines a list a reference types such as Parent-Child Link, Patient ID, etc. The values that you enter here, appear in the Type drop-down in the References section on the Additional Information tab. |
| Relation | This codelist is used to maintain the Reporter relation to the Patient. |
| Report Media | Enables you to capture Report Media information. The values that you enter appear on a drop-down field in the Reporter Information section. |
| Report Types | Enables you to capture information about report types. The report type describes the type of report and the abbreviation associated with the specific type. This data appears in expedited and periodic regulatory reports. The values that you enter here, appear on the Report Type drop-down list on the General Screen.
The Considered cases for report type drop-down list determines whether a case is considered marketed or investigational for a given reporting destination. When creating a new case report type, the selected value is Marketed by default. |
| Reporter Information | Enables you to capture reporter information such as First Name, Last Name, Occupation, and so on. |
| Reporter Type | Enables you to capture information about the person reporting the adverse event and includes categories such as lawyer, nurse, doctor, etc. The values that you enter here, appear on the Reporter Type drop-down list on the Product screen. |
| Reporting Destination Type | Enables you to capture information about the reporting destination. The values that you enter here, appear on the Reporting Destination configuration. |
| Routes of Administration | Enables you to capture information about how a drug is administered to a patient such as auricular, cutaneous, dental, and so on. |
| Study Center | Enables you to capture information about the study centers. Values entered here appear on a drop-down in the Clinical Studies Information dialog and on the Centers tab in List Maintenances. You can also add investigators for each center.
You can create a study center with the same center ID but with a different name and address. |
| Vaccinated At | This code list is used to maintain the Vaccination Facility Type information. |
Formulation Factory Data
The following table provides information about the Formulation Factory Data:
| Formulation ID | Formulation | Formulation Name | Formulation Symbol |
|---|---|---|---|
| 38 | Aerosol (Spray and Inhalation) | Aerosols | AER |
| 13 | Alternative Form | ||
| 23 | Cachet (including wafer) | Cachet | CTS |
| 2 | Capsule | Capsules | CAP |
| 24 | Chewable Tablet | Chewing Tablet | CTB |
| 25 | Drop | Drops | DRO |
| 32 | Dusting Powder | Dusting Powders | DPO |
| 39 | Ear Drops | Ear Drops | EDR |
| 8 | Effervescent Tablet | ||
| 47 | Enema | Enemas | ENM |
| 21 | Enteric Table | Enteric-coated dosage forms | ENT |
| 49 | External Use | ||
| 12 | Extra Formulation | External Preparations of Uncertain Dosage Form | EXT |
| 40 | Eye Drops | Eye Drops | EED |
| 41 | Eye Ointment | Eye Ointments | EOI |
| 20 | Grain | Granules | GRA |
| 18 | Granule | Fine Granules | FGR |
| 46 | Implantation | Inserting Preparations | IMP |
| 43 | Inhalation Gas | Gas Inhalant | INS |
| 6 | Infusion | Infusing Preparations | INF |
| 9 | Inhaler | Inhalants | INH |
| 5 | Injection | Injections | INJ |
| 48 | Jelly | Jellies | JEL |
| 11 | Liquid | External Liquids | LIQ |
| 33 | Lotion (except lotion for eye) | Lotions | LOT |
| 28 | Lozenge (troche and candy too) | Lozenges | LOZ |
| 45 | Mouthwash | Throat Washings | MWH |
| 17 | N/A | ||
| 42 | Nasal Drops/Spray | Nose Drops | NDF |
| 34 | Ointment/Cream | Ointments/Creams | OIT |
| 31 | Oral Drug Unspecified Form | Oral Preparations of Uncertain Dosage Form | POR |
| 4 | Patch | ||
| 26 | Pill (except tablets) | Pills | PIL |
| 19 | Powder (except DPO) | Powders | POW |
| 35 | Shampoo | Shampoos | SHP |
| 22 | Slow Release Capsules | Slow-release Capsules | SRC |
| 30 | Slow Release Granule | Slow-release Granules | SRG |
| 29 | Slow Release Tablet | Slow-release Tablets | SRT |
| 27 | Solution (except Syrup) | Solutions for Oral Use | SOL |
| 44 | Spin Cap | Spin Cap | SPC |
| 36 | Spray (except Inhalation) | Sprays | SPR |
| 3 | Suppository | Rectal Suppositories | SUP |
| 7 | Syrup | Syrups | SYR |
| 1 | Tablet | Tablets | TAB |
| 37 | Tape (including Poultice) | Tapes | TAP |
| 16 | Unknown | Uncertain | XXX |
Configuring Code Lists > Flexible Data Re-Categorization
The Flexible data re-categorization feature allows Argus Safety and its associated applications such as Argus Mart and Argus Insight to handle the code list values in a much more flexible manner, as compared to the previously existing Argus Safety Code List database design.
Working with Flexible Data Re-Categorization
The Flexible Data Re-Categorization feature allows applications and customers to store and maintain all types of code list values in a single flat database table structure which shall be easier to maintain. This code list data storage design can be leveraged to easily add new and custom code lists or values by applications as well as customers without adding new database tables and columns. This database structure was added in previous release of Argus Safety.
Argus Console provides a user interface that displays values for different code list languages for the flexible data re-categorization code list feature. This user interface helps add and remove custom languages for an existing code list, present in the flexible data re-categorization code list tables and also the flexibility of adding new code list items through this User Interface (UI).
However, this UI does not allow users to perform any modification for the languages which are maintained via the Console Code List feature. Any changes done to the values through this user interface are audit logged.
The Flexible Data Re-Categorization feature allows administrators to manage and display the existing and new code list items.
Flexible Code Lists
To access Flexible Data Re-Categorization:
-
Go to Argus Console > Code Lists > Argus > Flexible Data Re-Categorization.
The following screen is displayed:
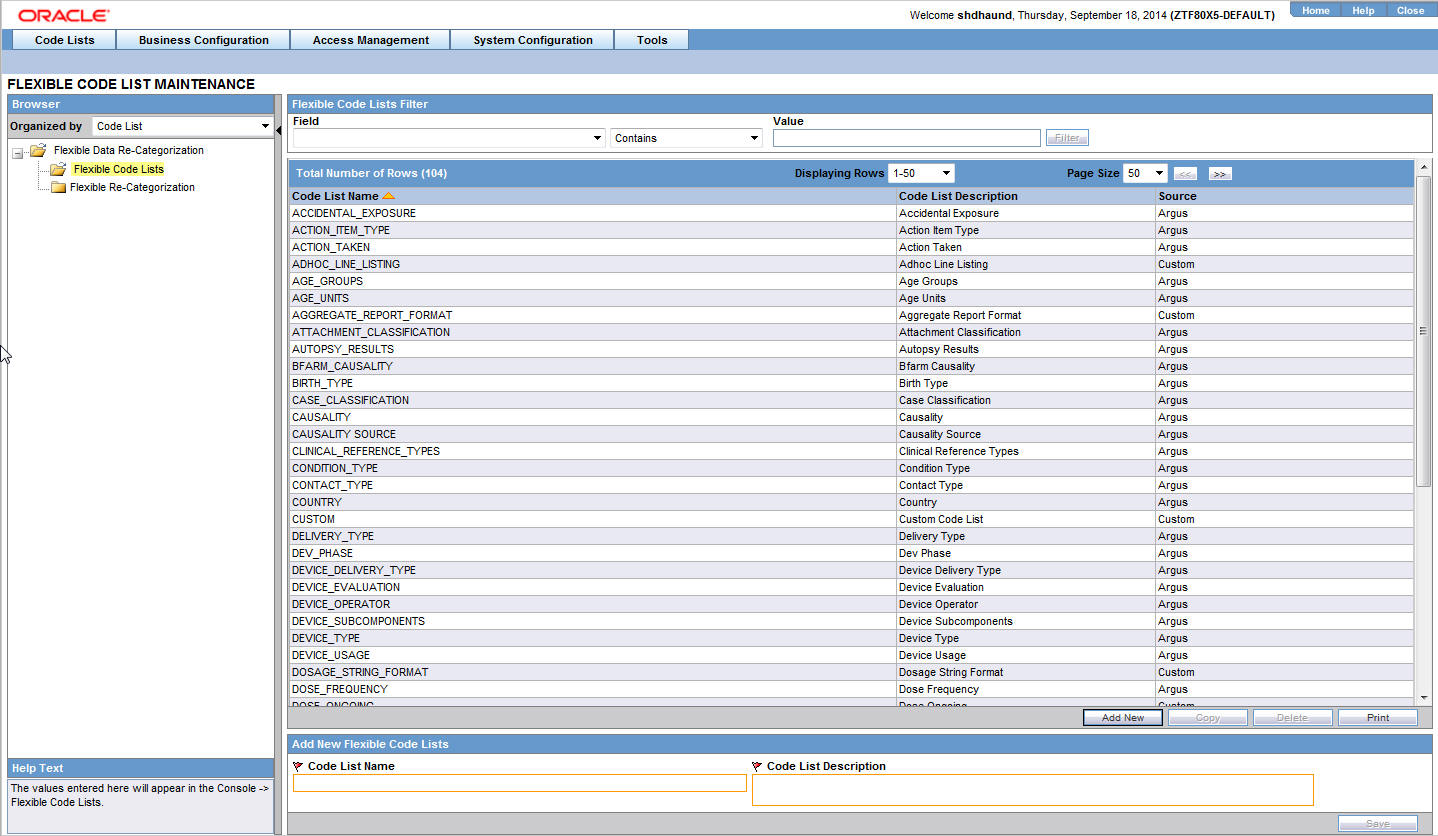
The following table describes the fields associated with this section:
Field Name Description Code List Name This is the unique name of code list which can be used in the application and reporting for fetching the values of a code lists. This is mostly derived from the source Argus Safety code list names. However, it can be different in some scenarios as per the customer need. Code List Description This is the description of code list which can be used to define the purpose of this code list. Source Argus: All the code lists which are part of Argus Safety factory configuration and can be edited using standard Argus console code list UI show the source as 'Argus'. Custom: Any code lists added as part of factory data which cannot be modified from Argus console standard code list UI are considered as custom.
Any code list added by customers has source as 'Custom'.
-
This page is used to add the new code list items in Argus Safety and view the existing Argus code lists.
Click Add New to add a new flexible code list item.
To make any changes, users can select a code list, modify values in the given text boxes, and save those changes for modification.
Click Delete to delete an existing flexible list item.
Click Copy to copy an existing flexible list item.
-
Click Save to save the new or existing flexible code list item information.
Flexible Re-Categorization
To access Flexible Re-Categorization:
-
Go to Argus Console > Code Lists > Argus > Flexible Re-Categorization.
The following screen is displayed:
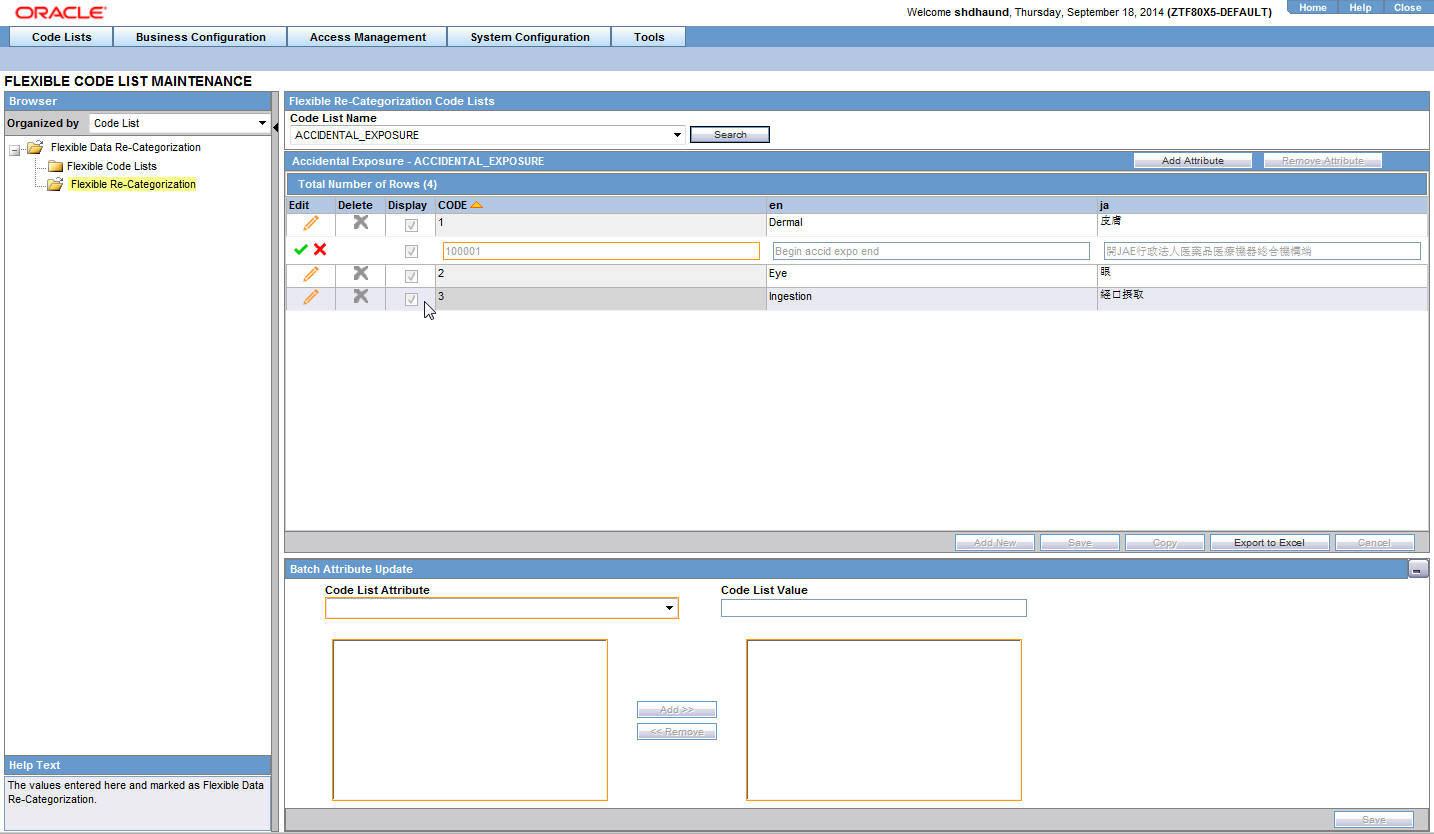
The following table describes the fields associated with this section.
Field Name Description Code List Name This is a drop-down list that displays all the available flexible code lists for selection. Attribute Name This is the language Decode context for selected code list which can have language code and other properties of code lists. The following are possible values for this field for the factory data rows which will be populated based on the current code list factory data. Customer can add more language/type values for the new code list items that they create from flexible re-categorization screen, based on their usage:
i. en: English display value for a code list item
ii. jp: Japanese display value for a code list item
iii. E2B: E2B code value for this code list item
iv. RPT: Display value for Reports
v. ISOA2: A2 country code for the country code list items
vi. ISOA3: A3 country code for the country code list items
vii. EN_ABBRV: This is used for defining abbreviation values.
viii. SM: This decode context is used by Argus Mart while populating data into the SM tables.
ix. UCUM_CODE: UCUM code value for this code list item. This is used in E2B (R3) and eVAERS reports.
x. E2B_R3: E2B (R3) value for this code list item. This is used in E2B (R3) and eVAERS reports.
xi. VAERS_CODE: VAERS Code value for this code list item. This is used in eVAERS and VAERS report mapping.
xii. NCI_CODE: NCI code value for this code list item. This is used in eVAERS reports.
Code List Display Value This the re-categorized display value for the code. This display value shall be based on a code list, code, and language combination. Add Attribute Enables you to add a language attribute. Remove Attribute Enables you to remove a language attribute. Attribute Name This is the language Decode context for selected code list which can have language code and other properties of code lists. Code This is the first column in the gird for all flexible code lists. This column displays the internal id for the existing 'Code' list value. For custom code list, the application always populates the code columns with system generated unique sequence value for the selected code list. It is possible for customers to provide a custom 'Code' value for any of the new rows. This value is always unique for a code list. <All Language Attributes> All the language attributes are displayed as a new column in the grid with Primary attribute being the first one after the Code column. Right-click > Make Primary Allows you to make the selected language attribute as the primary attribute. The primary attribute column is moved as the first attribute in the grid after the 'Code' column. This configuration is available every time the user opens the same flexible code list. Right-click > Make Preferred Allows you to mark the selected cell values corresponding to selected language attribute as Preferred in the database. Preferred values are displayed with an asterisk (*) in the grid for easy identification. At any given time, only one value can be marked as preferred within matching values for a language attribute. Export to Excel Enables you to export all the values of selected code list into an excel file. Batch Attribute Update A collapsible interface, this option displays the list of all attributes available for the selected code list in Flexible re-categorization screen. It also provides a text box called Code List Value, where users can enter the required display value of the code list for the selected attribute. -
This page is used to view existing code list and to add or remove attributes in those code lists.
Click Add New to add a new entry into the custom code lists.
Click Copy to copy a pre-existing flexible code list entry to a new entry.
-
Click Edit. The grid cells of corresponding row become editable for all the attributes added in that code list by the user.
On clicking Edit, a green tick mark is displayed, along with a red colored, cross icon.
Click the green tick mark to temporarily save the grid values (until saved into database by clicking Save button). The selected row comes out of Edit mode.
Click the red colored cross icon to discard any changes made to the selected row. The selected row comes out of Edit mode.
On changing the value of a preferred cell, its preferred status is removed upon saving the grid values.
-
Click Delete to allow the users to delete an entry from the flexible code lists. The Delete icon is enabled for only custom code lists, for which protected flag is set to 0 in CODE_LIST_CODE_ATTRIBUTES table. Click this icon to delete all the attribute values corresponding to the selected row from the database.
-
The Display checkbox is checked by default (except for hidden entries), for a new row added into the flexible code list.
-
Click Save to save all the changes made on flexible code list screen.
The following Code Lists are used/provided for BIP Aggregate Reports:
-
REPORT_TEMPLATE: This code list is used for managing various BIP report templates available in the system (OOB + Custom) and assign an Argus periodic configuration (ICH PSUR or CTPR) using which user want to execute this report template. Whenever a new report template is added in BIP, this code list should be modified for providing report template name, its path and corresponding Argus configuration.
-
ADHOC_LINE_LISTING: All the LISTNAME added in adhoc_line_listing code list are available in the UD Summaries tab of periodic reports configuration for attaching the memorized reports to a particular line listing section of periodic report. User can renames these using flexible re-categorization user interface. System provides four adhoc line listings by default which can be increased using this code list if you have more adhoc line listing sections in your report. Once configured, use Argus UI for attaching the UD summaries with line listings of your custom report.
-
SOC_DISPLAY_ORDER: Use this code list to reorder the printing of SOC in various tabulations.
-
AGGREGATE_REPORT_FORMAT: Use this code list to define the report formats which you want to use with BIP reports execution. Make sure to use only those formats which are supported by BI Publisher.
-
DOSAGE_STRING_FORMAT: This code list can used to restrict/add the dosage string formats which should be available while BIP report execution. More dosage string formats can be added with the help of custom code. The following dosage string formats are provided out of box which print values for dosage string as mentioned in the EN attribute.
Code EN Do Dose DoFo Dose, Formulation DoFoFr Dose, Formulation, Frequency DoFoFrRt Dose, Formulation, Frequency, Route DoFoRt Dose, Formulation, Route DoFr Dose, Frequency DoRt Dose, Route -
UNIQUE_PATIENT_ID_FORMAT: This code list is used to restrict/add the dosage string formats which should be available while BIP report execution. More dosage string formats can be added with the help of custom code. The following dosage string formats are provided out of box which print values for dosage string as mentioned in the EN attribute.
Code EN CePt Center, Patient InPt Investigator, Patient Pt Patient StCeInPt Study, Center, Investigator, Patient StCePt Study, Center, Patient StCnCeInPt Study, Country Name, Center, Investigator, Patient StCnCePt Study, Country Name, Center, Patient StCoCeInPt Study, Country ISO Code, Center, Investigator, Patient StCoCePt Study, Country ISO Code, Center, Patient StInPt Study, Investigator, Patient -
LABELING_ALGORITHM: Use this code list to define new labeling algorithm with the help of custom code. Please see labeling algorithms for more information on out of the box algorithms.
-
EVENTSERIOUSNESS: This code list is provided as part of factory data and is used for printing the actual value of seriousness defined against a serious event.
-
ORGAN_IMPAIRED_HLT: This code list is added for defining the high level terms which needs to be scanned through to find out if event reported falls under organ impairment section or not. This can be used in custom reports.
-
BIP_DFLT_VALUES: This code list used for configuring the default values for some of the important fields which are used in various grouping and tabulations. For example, how to handle/print an event without and SOC. Value configured in this code list corresponding to SOC will be used in PBRER/DSUR tabulation for events with undefined SOC.
The following Code Lists are used in reports, such as E2B(R3), eVAERS, VAERS, and eMDR reports:
| Code List | Description |
|---|---|
| AGE_UNIT | This code list enables you to capture Age Unit information. An Age Unit displays time in periods such as Year, Month, Day, Hours, and so on with E2B and UCUM code information. |
| CAUSALITY_SOURCE | This code list lets you capture the source from which the causality information was derived. |
| CAUSALITY_CATEGORY | This code list lets you capture the category of the causality information with the EU_CODE attribute. |
| CAUSALITY_METHOD | This code list lets you capture the method by which the causality information was derived. |
| * CODE_SYSTEM | For the current release, this codelist is not used in the application (Case Form, Reports). |
| COUNTRY | This code list maintains the list of Countries with the ISO A2, ISO A3, and EEA attributes. |
| DEVICE_AGE_UNIT | This code list enables you to capture Device Age Unit information. Device Age Unit displays time in periods such as Year, Month, Day, and Hours with eMDR code information. |
| DOSE_UNITS | This code list is used to maintain the units of measures used in Dose with E2B and UCUM code information. |
| ETHNIC_GROUP | This code list is used to maintain information about Ethnicity data of Patient or Parent such as Hispanic or Latino, Not Hispanic or Latino with NCI Codes information. |
| ETHNICITY | This code list is used to maintain Race information along with NCI Codes information. |
| EVALUATION_REASON | This code list is used to maintain the List of reasons for not evaluating devices with NCI Codes information. |
| FORMULATION | This code list enables you to capture information about the formulations (cream, drop, capsule, and so on) available for a product with NCI Codes information. |
| GENDER | This code list is used to maintain the Gender with E2B and NCI Codes information. |
| INTERVAL_UNITS | This code list is used to maintain the interval units that are used as units for Age, Duration, and so on. |
| LAB_TEST_UNITS | This code list is used to maintain the units of measures used in Lab test. |
| LANGUAGES | This code list is used to maintain the ISO codes of the languages in which text data entry can be made. |
| LOCATION | This code list is used to maintain the Anatomical locations in which Vaccines are administered. |
| LOCATION_EVENT_OCCURRED | This code list is used to maintain the locations where the events occurred. This data is used in the eMDR and the MedWatch Device report. |
| MEDIA_TYPE | This code list maintains the file types that can be sent as attachments in E2B(R3) reports with the ICH, FDA, EMA, and PMDA attributes to indicate if attachment types are allowed for these agencies. |
| MILITARY_STATUS | This code list is used to maintain the details of the Military status of the Patient such as Active Duty, Reserve, National Guard, TRICARE Beneficiary, and Other with NCI Codes information. |
| NULL_FLAVOR | This code list stores the different null flavors such as UNK, NA NASK, and ASKU.
Null flavor sets are attributes in the Null Flavor codelist which are used to create sets with various combinations of Null Flavors. The Null flavor set can be assigned to Case Form fields in Field Properties Configuration and users can select the Null flavors associated with a Null Flavor set as a part of Case Form data. |
| PRODUCT_IDENTIFIER_TYPE | This code list identifies the type of Product name being used such as Medicinal Product Identifier (MPID), Pharmaceutical Product Identifier (PhPID). |
| PRODUCT_NAME_PARTS | This code list specifies the name of a product as a separated component such as container name, form name, device name, invented name, scientific name, trademark name, intended use name, scientific name and so on. |
| PURCHASED_WITH | This code list is used to maintain the Funds from which Vaccine was purchased. |
| RELATION | This code list is used to maintain the Reporter relation to Patient. |
| REPORTER_INFORMATION | This code list is used to maintain the Reporter information such as First Name, Last Name, and so on. |
| REPORTER_OCCUPATION | This code list is used to maintain the Occupation with NCI Codes and Device Operator information. |
| ROUTE | This code list enables you to capture information about how a drug is administered to a patient such as auricular, cutaneous, dental and so on with E2B and NCI Codes information. |
| SPANISH_STATES | This code list lets you capture the states of Spain with the STATE_CODE attribute. |
| SPECIALIZED_PROD_CATEGORY | This code list is used to maintain details of the Product category details as per FDA specifications such as Convenience Kit of Co-Package, Prefilled Drug Delivery Device/System, Drug/Biologic Combination, and so on with NCI Codes information. |
| US_STATES | This code list lets you capture the states of USA with the STATE_CODE attribute. |
| VACCINATED_AT | This code list is used to maintain the Vaccination Facility Type information. |