5 Use Advanced Conditions
You can create complex or non-standard queries in the Advanced Conditions screen where you can define field-level search criteria. To create advanced conditions, detailed knowledge of the database schema is not required.
Note:
Only users with execute rights for an advanced condition, can view the advanced condition in the drop-down list in the Case Open dialog box.When using Advanced Conditions:
-
By default, the Advanced Conditions drop-down list enables you to view only the New, None, and already selected Advanced Conditions.
-
Access rights and permissions can be assigned to the individual advanced conditions. You can execute and modify access rights to one or more groups on a per-advanced condition basis.
Create, View or Modify Advanced Conditions
-
From the Advanced Conditions drop-down list, select New.
OR
Click the Advanced Conditions icon.
-
To create a new advanced condition query set, in the Confirmation dialog box, click Yes.
-
To create a new advanced condition by associating logical operators (like AND, OR) with items from the Case Form, in the Confirmation dialog box, click No.
The Use the Advanced Condition Set Dialog Box appears.
Use the Advanced Condition Set Dialog Box
You can search entities under the Properties tree-list that are from either the case data or from the code list.
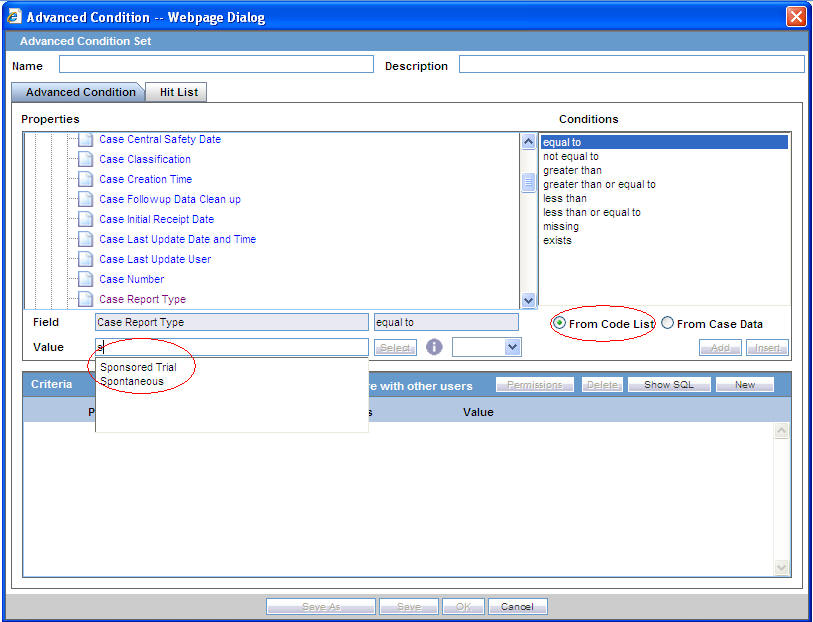
The dialog box has two buttons that provide this functionality:
-
From Code List—Displays a list of all values configured in the Code List in the Value drop-down list. The values in the Code List are configured by the administrator in Argus Console. To configure these values, refer to the Administrator's Guide.
-
From Case Data—Displays only the values actually in the cases in the Value drop-down list.
-
These radio buttons appear only if the selected entity belongs to a code list.
To search the entity based on the code list or case data, select the relevant entity and one of the radio buttons.
-
In the following sections, select the product from the company product browser instead of the drop-down values. To do so, in the Read Only text field, click Select.
-
Suspect Product Name
-
Product Name 2/Study Cases
-
Company Product
-
Study Drug
-
Primary Suspect Drug
-
-
To enable you to search on the selected product, the Product Name is transferred to the user interface.
-
From the Properties tree list, select a property type.
Use Information from Properties for Advanced Conditions
The items available in the folders in the Properties list represent Case Form fields that you can use to perform search in the advanced conditions.
-
To enable a field-to-field comparison, you can auto-populate an Advanced Condition by right-clicking a field in the Properties section.
-
To enable the Select button, select a property for which terms can be encoded.
To select (possibly) multiple terms for the property, use the MedDRA Browser. See Using the MedDRA Browser for further details.
-
The enable SMQ icon, from the Properties tree-list, select SMQ-related properties.
To view details about the selected SMQ, click this icon.
Tip:
To view or modify the SQL statement associated with an advanced condition, click Show SQL. -
In the Conditions list, select a condition that must apply to the item selected above.
-
In the Value field, enter the value that applies to the property or select an a value from the list.
-
To link this created condition with another condition, from the list adjoining Value, select a logical operator.
-
To add the newly created condition to the advanced condition, click Add.
Tip:
You can use the AND and OR logical operators to link an existing condition to a new condition.-
If you are using the AND operator to link two conditions, both conditions must be TRUE for the advanced condition to be TRUE. In all other cases, the advanced condition evaluates to FALSE.
-
If you are using the OR operator to link two conditions, the advanced condition is TRUE if either or both conditions are TRUE. The advanced condition evaluates to FALSE if both conditions are FALSE.
-
-
To add more conditions to the advanced condition, repeat above steps.
-
When all the conditions are entered, click Save.
-
Enter a name for the advanced condition, and click OK.
-
Use the Advanced Conditions from the Case Selection Dialog Box
Users can view a list of Cases that satisfies an Advanced conditions from the Case Open screen.
-
Select Case Actions > Open.
-
You can do the following:
-
Use a set of previously saved criteria
-
Select the appropriate set of criteria from the Advanced Condition list.
-
Select the set of criteria from the Advanced list, and click the adjoining Advanced Condition icon.
-
Add a new condition to a set of criteria.
-
Create a new advanced condition by associating logical operators (like AND, OR) with items from the Case Form.
-
Share Advanced Conditions
You can share the advanced conditions with other users. This feature can be made available by the administrator by logging into Argus Console.
To enable other users to use the advanced condition, click the Share with other users.
-
If an Advanced Condition is not shared with other users, the Advanced Condition does not appear in the Advanced Condition list for any user except the Administrator and the user who created it.
-
If the Advanced Condition is shared, all users in the system can view the advanced condition, but cannot modify it.
-
You cannot stop sharing an Advanced Condition, if the Advanced Condition is in use in the system.
Tip:
To enter a customized Date Range:-
Select Custom Date Range from the list.
-
Enter a date range in the custom date range dialog box.
-
Click OK.
Create an Advanced Condition Query Set
-
From the Advanced Conditions drop-down list, select New.
Or, click the Advanced Conditions icon.
-
To create a set of advanced conditions by linking the previously defined advanced conditions, click Yes.
You can link the advanced conditions by using the set operators like UNION, MINUS, and INTERSECT
-
To add an advanced condition to the query set, click Add.
A new row opens in the advanced condition selection area.
From the list, select an advanced condition.
Tip:
To modify, open, or delete advanced conditions, in the Advanced Conditions dialog box, select an advanced condition, and click Open. -
From the Set Operator list, select an operator.
This set operator will link this advanced condition to the next advanced condition.
-
To add the next advanced condition to the query set, click Add.
-
To enter multiple advanced conditions in the query set, repeat above mentioned steps.
Note:
If the required advanced condition is not already present in the list, it can be created by selecting (New) from the list.If an existing advanced condition requires modification, select it and click Edit.
The advanced condition can be edited only if you have created it.
-
When each advanced conditions for the query set is entered, click Save.
-
Enter a name for the advanced condition, and click OK.
Note:
To view or modify the SQL statement associated with an advanced condition, click Show SQL.
Rename Query Sets
You can save and retrieve sets of search criteria (advanced conditions), and add, edit, or delete them.
You can select and rename a query set on the Advanced Condition screen based on the permissions to modify the advanced condition. When you open an advanced condition or query set, the query name is displayed in the Name field.
-
To enable the Save button, in the Name field, enter an advanced condition name.
-
To record changes to the advanced condition name, click Save.
The query set is saved with the new name and description, and the Query Set drop-down list is refreshed.
-
To update the changes to the query set name, click Save.
-
When you click New, all the values in the Name, Description, and Query Set fields are cleared.
Import and Export Cases in the Advanced Conditions
-
You can import an XLS, XLSX or TXT file with one column containing case numbers.
-
When you upload a text file, each line in the file is considered a complete case number.
-
If a case is missing (cannot be found) or has been deleted, a message appears.
-
If the same case has been entered multiple times; only one entry is retained for the same and rest are ignored after the import process is complete.
-
For Hit List, the import process, imports 1000 cases/60 seconds.
-
When the Hit List is created, click Store Hit List.
The advanced condition is saved and the hit list is stored later use.
-
For further processing of all other data and options available on the Case Open screen, click Hit List.
-
You can export the hit list data in CSV format.
Re-use an Existing Advanced Condition
-
Go to Case Actions > Open, and open the Case Open page.
-
To open the Advanced Conditions Lookup dialog box, click the Lookup icon next to the Advanced Condition drop-down list.
-
Under Filter, select an option.
-
Contains—Filters the advanced conditions that contain the entered criteria.
-
Starts With—Filters all the advanced conditions that start with the entered criteria.
-
-
Enter the search criteria for the advanced conditions in the text box, and click Filter.
-
Select an advanced condition from the list, and execute any of the following actions:
-
To list the selected advanced condition in the Advanced Conditions drop-down list, click OK.
-
To display the details for the selected advanced condition in the Advanced Conditions dialog box, click AC.
-
To close the Advanced Condition Lookup dialog box without saving changes, click Cancel.
-
Select a previously selected advanced condition from the drop-down list to apply the search criteria for that condition.
-
To view the results of an existing Advanced Condition:
-
From the Advanced Conditions drop-down list, select an Advanced Condition.
-
Click Search.
A list of matching cases appears in the Total Number of Rows section.
TIP: The search results are also dependent on the values entered for Date Range and the Initial/Follow-up selection. Therefore, if the Advanced Condition returns a case, but it is not part of the Date Range, the case won't be displayed when you click Search.
Search for a Case
To search for cases that match the query set criteria for the advanced condition, in the Advanced Conditions > Hit List tab, click Find Now.
A search based on the selected query set is performed, and a list of cases that satisfy the advanced condition query set appear.
The following table show the operations you can perform in the Hit List tab.
| To... | Do the following |
|---|---|
| Manually add an existing case to the hit list | Click Add and enter the Case ID in the text box. |
| Remove a case from the hit list | Click Delete. |
| Save the hit list result for future use | Click Store Hit List. |
| Retrieve results of the saved hit list | Click Retrieve Hit List. |
| Save the hit list as a text file | Click Export. |
| View SQL for Query | Click Show SQL. |
| Run a Query | Click Find. |
Use the Advanced Conditions Library
From the Utilities drop-down menu, select Advanced Conditions Library.
From this screen, you can:
-
Create a new advanced condition
-
Reassign an advanced condition
-
Set advanced condition permission levels
-
Modify an existing advanced condition
-
Delete an advanced condition
-
Print a list of advanced conditions
To search for an existing query sets or advanced conditions, enter the search criteria, and click Search.